CHAPTER 5
ALCHEMY IN THE STUDIO
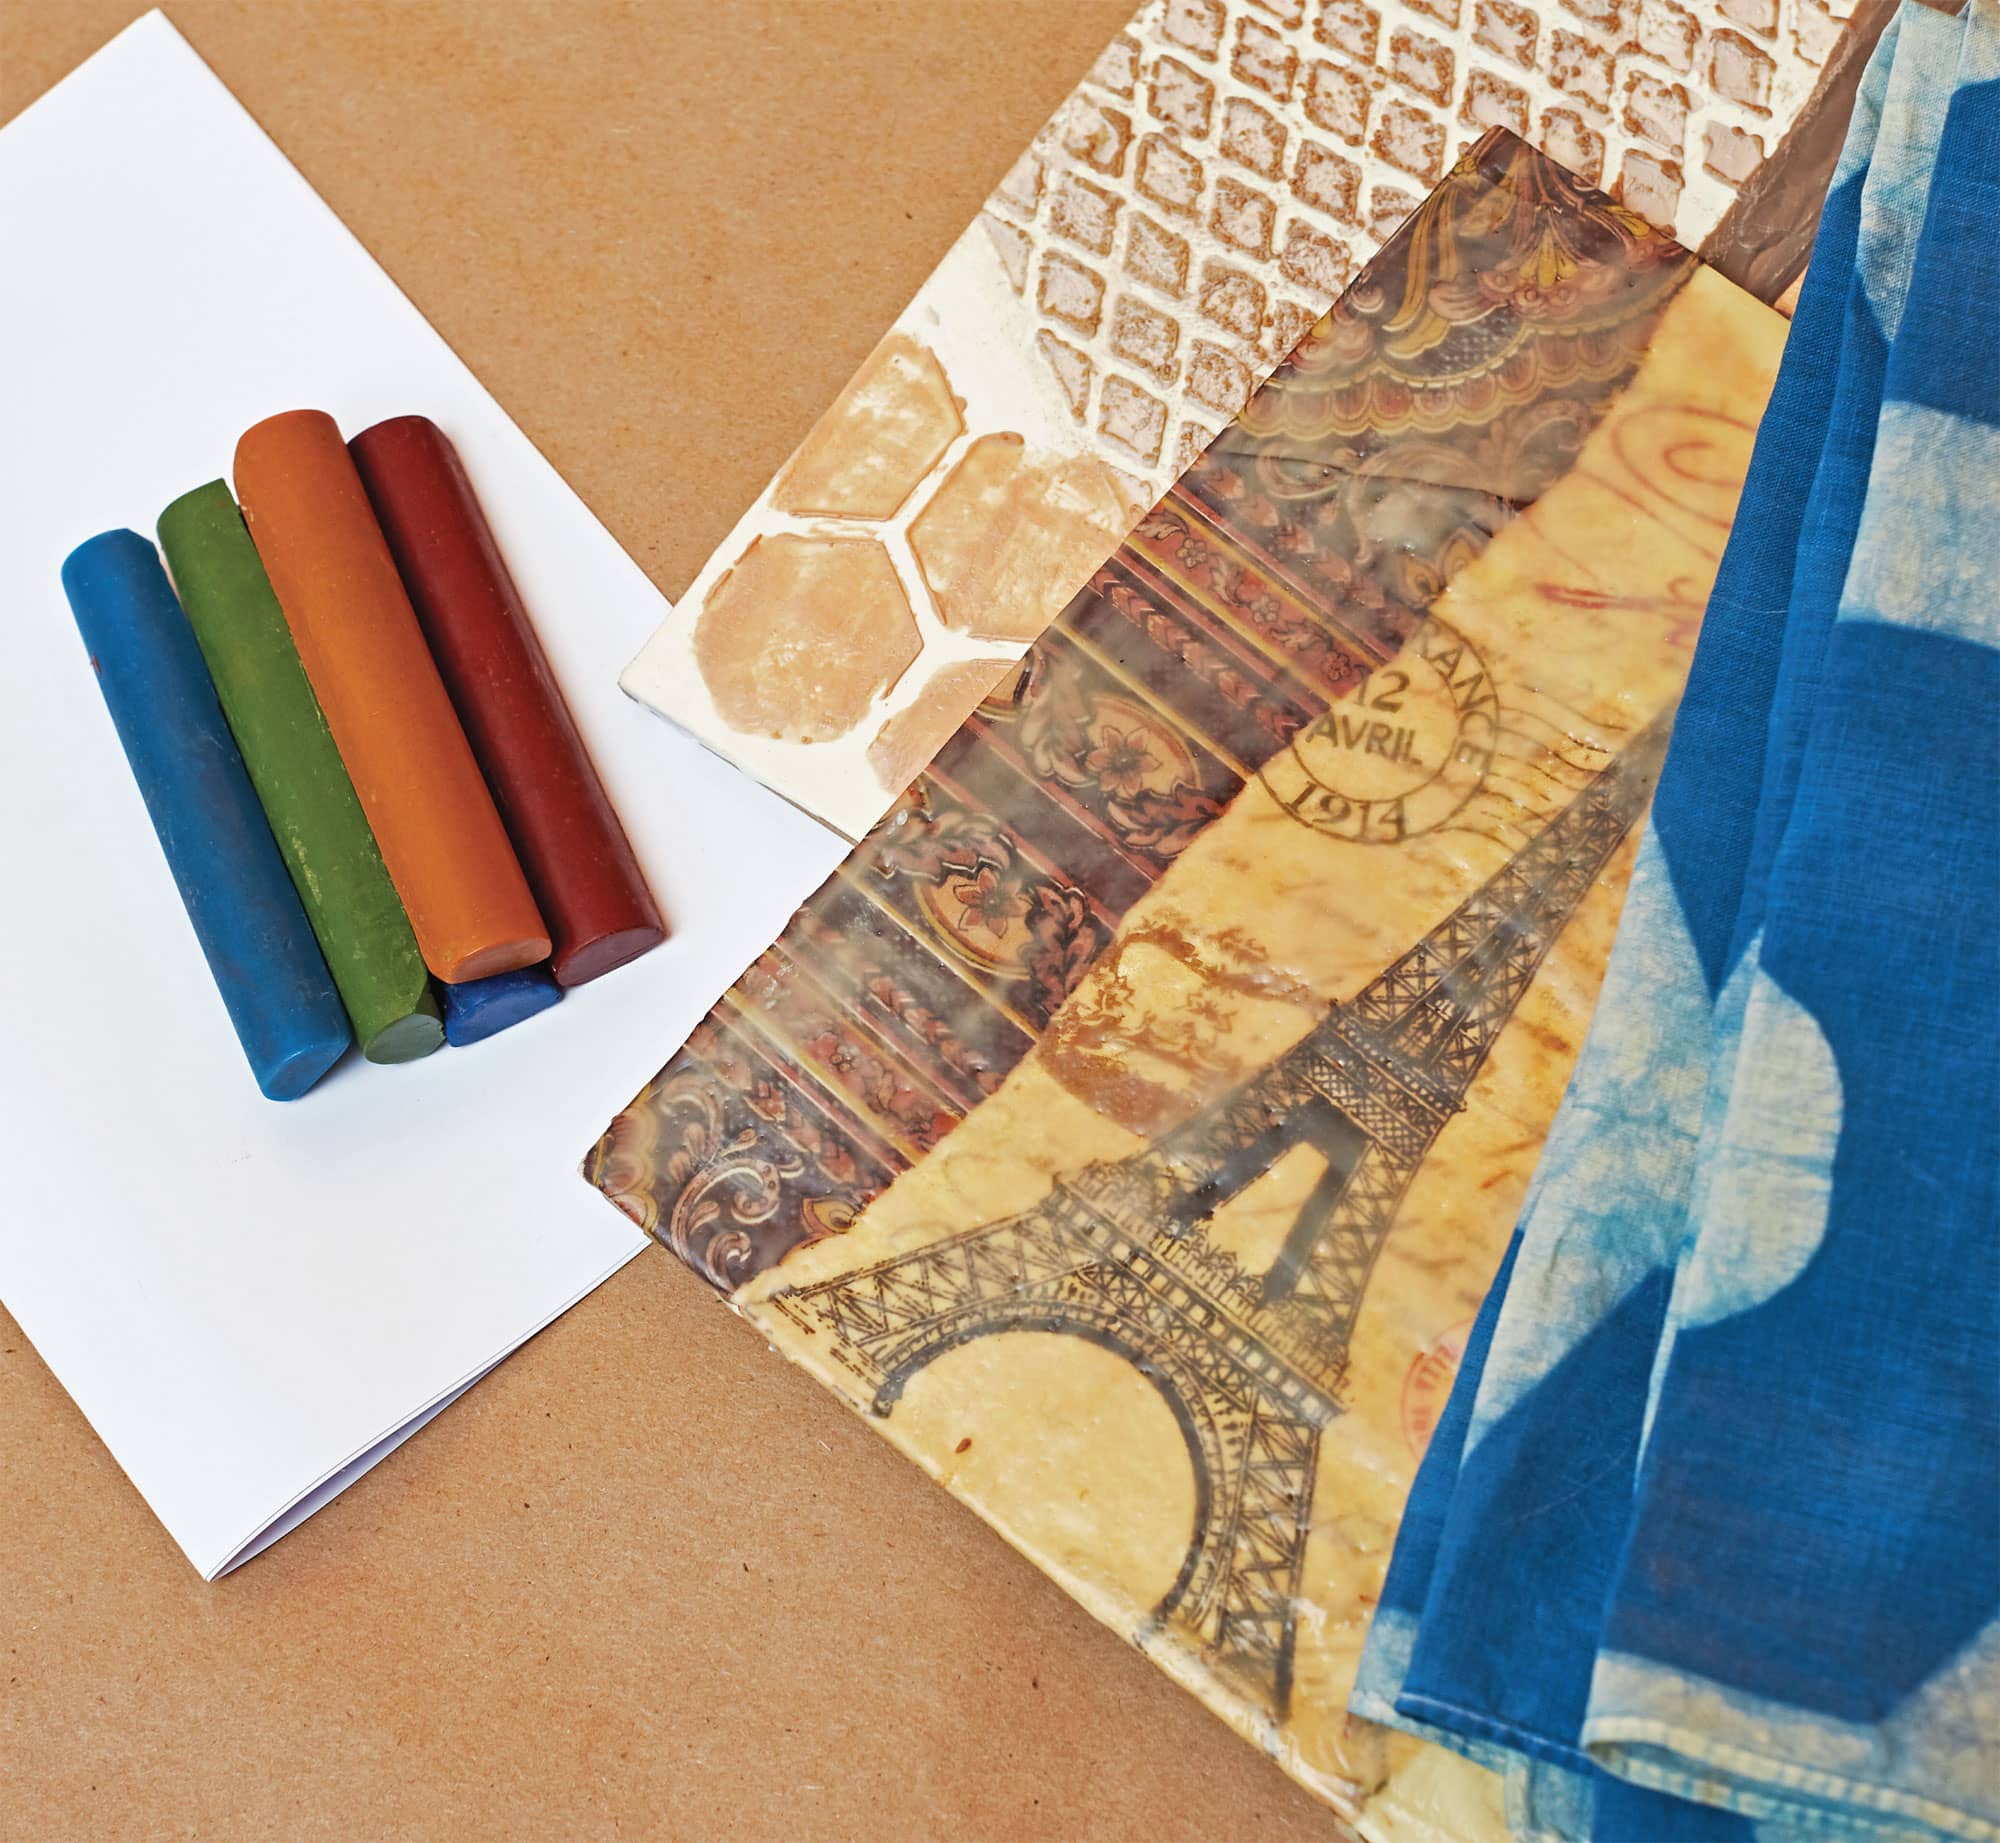
Beeswax can be a lot of fun to use in a variety of different art projects for all ages. The projects included in this section range from making your own crayons; to encaustic painting—creating works of art using hot wax and pigments; to batik, the ancient art of using wax and dye to create designs on fabric. For the encaustic and batik projects, use the instructions provided here as a springboard to inspire your own works of art.
EASY
BEESWAX CRAYONS 

1. Melt the beeswax in a double boiler or electric skillet. Add the jojoba oil and bentonite clay. Mix with a small wooden stir stick until thoroughly combined.
2. Add a small amount of pigment and stir, gradually increasing the amount until desired shade is reached. The amount shown in the recipe is just a rough guideline for color. Don’t judge the color based on how the wax looks in its molten state. There is a difference between actual color of a crayon and how much color the crayon deposits on the paper. Allow a small dollop of wax to harden and try drawing on a sheet of paper to test color strength.
3. Pour the wax into molds that have been sprayed with mold release. Allow to cool completely. Test a crayon for color intensity and ease of application. If the crayon recipe needs to be adjusted, they can easily be remelted and tweaked as needed. If they are too hard, add more oil. If they are too soft, add more beeswax.
ENCAUSTIC
Since writing my last book, Beeswax Alchemy, I have had many opportunities to play with encaustic. In the process, I have learned that it is an incredibly malleable medium that is, at the same time, both extremely versatile and in some ways, frustrating. I have found that simply having a vague sketch of an idea is better than having the entire piece planned in detail. The result rarely looks as I expect it to, but it usually does turn out better than I had hoped. The wax teaches patience and acceptance. It also helps to know that if the plan doesn’t work out, a heat gun and a scraper can take the artwork back to square one.
Although I have included a project for encaustic in this book, my goal is not to have users replicate my project step by step. Instead, my intention is to illustrate how the different techniques come together to create the artist’s vision. The techniques I illustrate are just a handful of useful ways to manipulate wax. Almost anything goes.

TOOLS FOR ENCAUSTIC
Encaustic work requires a few basic tools. Here is what you will need to get started.
FUSING TOOLS
Each layer of wax needs to be fused to the layer beneath it. The best tools for fusing are a heat gun or a propane torch, but irons created for this purpose can be used as well. My personal choice is a heat gun, but I have a torch that comes in handy for small areas that require a bit more precision.
HOT PALETTE
Encaustic medium and encaustic paints need to be melted before they can be applied. The easiest way to do this is to place them on a heated palette. There are specially designed heated palettes for encaustic work that are completely flat and give the user complete control of the temperature. These palettes are definitely nice, but a cheaper option is to use an electric griddle. I chose one that had a light surface, so I could mix some on-the-spot color directly on the griddle surface.
BRUSHES
The brushes for applying encaustic medium can be any shape or size, but they need to be natural. My personal favorites are Japanese Hake brushes. They are relatively inexpensive and seem to hold wax really well. They also come in a variety of widths.
ENCAUSTIC SURFACES
Generally, encaustic art pieces need to be created on rigid surfaces. If there is any flexibility in the substrate, the layers of wax are at risk of cracking and chipping off. Ideal encaustic surfaces also need to be absorbent. If the wax does not soak into the surface, the artwork has nothing to adhere to.
There are boards specially designed for encaustic work that come already primed and ready for wax. Encaustic panels are often cradled boards, which means there is a wood surface attached to a wood frame (3/4-inch [2 cm] and 2-inch [5 cm] deep frames are common). The frame allows the panels to be hung directly on the wall without the need for framing and gives the artwork a more modern feel. These are nice, but not really required.
I like to use inexpensive wood panels from the craft store, especially for playing. They are nice and smooth and rigid. Perfect!
PREPARING THE SURFACE
Before starting my encaustic projects, I usually prepare the surface by laying down at least 3 to 4 layers of encaustic medium, either clear or tinted white. There are specially made encaustic primers out there, but they are usually just paint made without latex. An inexpensive option is classic tempera paint. Applying a couple layers of tempera paint before applying wax creates a nice white background.
ENCAUSTIC MEDIUM
Encaustic medium is refined beeswax combined with damar resin. The best beeswax to use for this is what I refer to as white beeswax. The beeswax has been specially filtered to remove all the yellow color. Damar resin is a resin that comes from the Canarium strictum tree, which grows in India and East Asia. Damar resin is added to the beeswax to raise the melting temperature of the medium, which protects the artwork from damage. The resin also adds luster, luminescence, and translucency to the artwork once it is fully cured.
Although encaustic medium and encaustic paint can be purchased in a ready-to-use form, being a DIY kind of gal, I prefer to make my own. It takes a while for the beeswax and resin to melt, so I like to make a big batch a day or so before I actually plan to paint.
There is artistry in the making of the medium. The desired finished effect will determine the exact ratios of beeswax to resin. If too much resin is used, the medium will become brittle and could flake off. If too little resin is used, the piece will remain a bit soft, leaving it prone to dust accumulation. I like the proportion of 9 parts beeswax to 2 parts damar resin. Others prefer a ratio of 10:1. Some use no damar resin at all.
MODERATE
ENCAUSTIC MEDIUM MASTER BATCH 
1. Melt the resin in the electric skillet. Once the resin is melted, add the beeswax and stir. Keep stirring occasionally until all the wax is melted and all the resin is incorporated. This will take a while, so be patient. There will be some impurities in the resin that will not melt. Ignore them for now.
2. Pour the wax and resin mixture into the loaf pan and allow the wax mixture to solidify. Once it is hard enough to remove from the loaf pan, but still slightly warm to the touch, invert it on a protected surface. All the impurities that were in the resin will have fallen to the bottom and are now visible. With the large knife, either cut off the bottom part with all the impurities or just scrape the bottom with the knife until all the impurities are gone and set aside. I like to keep the wax scrapings and add them to the next batch of encaustic medium that I make. That way, nothing goes to waste.
3. With the knife still in hand, I cut the clean portion into smaller cubes that are easier to handle if used as is or are the perfect size to toss into a tin and mix with pigment.
ENCAUSTIC PAINT
There are many options for adding color to encaustic works and creating an encaustic paint is just one way. The best method varies depending on what color is needed and how much saturation of color is desired. The color can come from powdered pigments or from oil paints, if those are already on hand. To use oil paint, simply squeeze out a line of paint onto a sheet of paper towel and allow the towel to absorb some of the oil before mixing it with the encaustic medium. My preference is to use French mineral pigments, which have some transparency and are available in a nice range of colors that aren’t too primary, but any kind of powdered artists’ pigment will work.
If I am making saturated, super-strength colors, I like to work with them in 4 ounce (120 ml) flat-bottomed tins, either blending them with encaustic medium directly on the electric griddle or adding the concentrated color to a clean mini loaf pan and diluting it as desired.
Because I make my own medium and I have already cut it into useable pieces, I just toss a couple chunks into a mini loaf pan and put the pan on the hot griddle. Then, I add a touch of pigment and stir with my brush until it is fully mixed. To test the color density, I keep a piece of watercolor paper on hand. It is easier to add more pigment, rather than increasing the size of the color batch by adding additional encaustic medium. The loaf pans are ideal for this use, as the high sides support the brushes while the pan heats on the griddle.
Also, pay close attention to the temperature of the griddle and the wax. The ideal temperature for encaustic work is 200°F (93°C). If the temperature rises above 220°F (104°C), the wax can start to smoke and degrade.
ENCAUSTIC TECHNIQUES
There are probably as many encaustic techniques as there are encaustic artists. Every artist develops a repertoire of tools and techniques that work with his or her individual style. My goal here is to highlight a few techniques that are easy to do and can result in an interesting art piece, even for complete novices.
TECHNIQUE 1: SMOOTH OR TEXTURED
Generally, there are two surfaces in encaustic: smooth and textured. For a smooth surface, start by warming the board with the heat gun. Use a paintbrush to apply a single coat of encaustic medium or encaustic color. Fuse the wax with a heat gun by warming the wax enough to make it shiny, but not so much that the wax begins to move it around. Apply another coat of wax and again fuse the surface. The surface should begin to look smooth, and if there is color, the color should look uniform. It may take 3 to 5 coats to achieve a really smooth surface.
To texture the surface, there are a lot of options. An easy one that yields interesting results is the dry-brush technique. This technique can be done on a warm surface or a cold surface, with different results. On a warm surface, the results will be more subtle, while a cold surface will yield a more pronounced effect. Apply color with a coarse brush, either by dabbing or using brush strokes. Lightly fuse with a heat gun and continue adding layers of dry brush paint, fusing lightly between coats, until the desired effect has been achieved. This technique often works better using a variety of colors to add depth to the texture.
TECHNIQUE 2: SCRAPING
Scraping is a technique that involves the removal of one or several layers of wax to reveal the layers below. To do this, apply multiple layers of wax in various colors, fusing after each layer. The layers can be a bit uneven, and that uneven texture will reveal an interesting end result. Once the board has cooled completely, use a single-edge razor blade or other scraping tool to begin revealing the layer below. Don’t try to remove too much with each scrape. Vary the direction of the blade and the stroke. Continue scraping until the desired effect has been achieved.
TECHNIQUE 3: INCISING
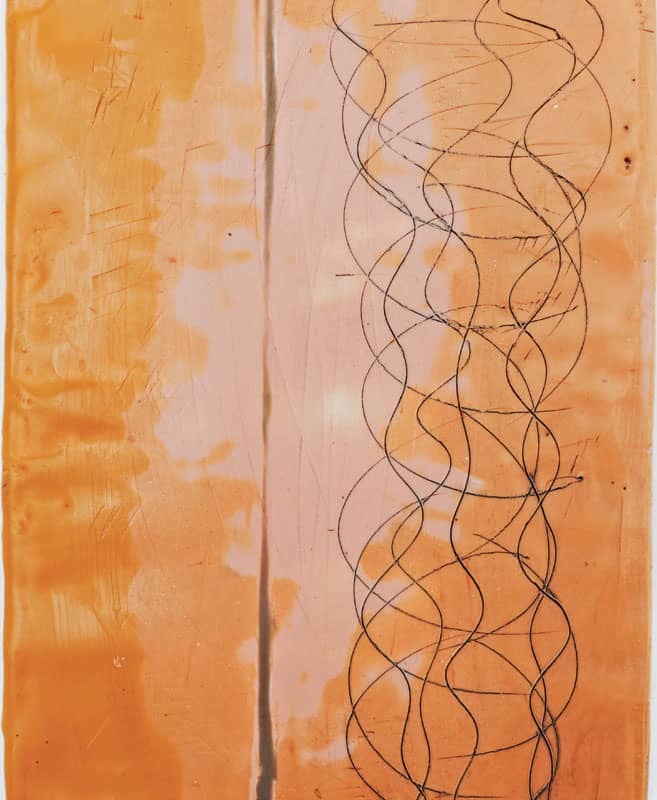
Incising is a really easy way to add interest to an encaustic piece. Incising involves scratching, cutting, or melting the wax with tools. I have a set of clay tools with a variety of shapes that I use for incising. Coarse sandpaper or a wire brush can also be used to scratch lines into the surface. Once the marks have been made, there are a couple ways to highlight the lines.
Small, thin lines scratched into the surface can be highlighted by rubbing some darker oil paint sticks into the lines. Use vinyl gloves to keep your hands clean and rub the color into the scratches. To remove the excess color from outside the incised lines, apply a little vegetable oil to a sheet of paper towel and rub away the color. Once it has been cleaned as much as desired, fuse with a heat gun to seal it into the surface.
Pottery carving tools can also be used to create thick lines in the artwork. The lines are gouged into the wax and then filled with a contrasting color wax. The waxed lines can then be scraped back with a single-edge razor blade, until the inscribed line is even with the surrounding surface.
TECHNIQUE 4: STENCILING AND MASKING
Stencils and tape are two ways to contain an encaustic wax application. Stencils can be used to add shape and texture to a piece. Simply place the stencil on the artwork, burnishing it to help keep it in place and to make sure the entire stencil is in contact with the art piece. Carefully apply a layer of wax. Remove the stencil before the wax hardens completely to keep the pattern from lifting off with the stencil. Stencils can also be used with nonwax colors, such as PanPastels, to apply a pattern without adding more layers of wax. With all stencil work, use a heat gun to fuse into place. Smaller stencil patterns can also be used as a starting point for creating additional texture with the dry-brush technique.
Tape can be used similarly, as a way to confine wax to a specific area or to mask an area that needs to stay free of wax. When using tape, it is important to make sure the tape adheres well to the surface of the work, especially along the edges. If there is texture, it will be difficult to get a good seal. Remove the tape after the wax has been fused, but before it cools off completely.
TECHNIQUE 5: ADDING COLOR
Sometimes, it is desirable to add color to the piece without adding more wax. One way to accomplish this is to use PanPastels. They are soft pastel colors compressed into a shallow cakelike pan. They can be applied using a soft brush, but I prefer a foam sponge or applicator for encaustic work. I add the color into the desired area and rub it in with my finger, burnishing the color in place. Fuse the area with a heat gun or torch to seal the color in place. Additional color can be layered on top to great effect. If something doesn’t look right, it can be wiped away with a touch of rubbing alcohol and a paper towel. Nothing is permanent until it is fused into the wax layer.
TECHNIQUE 6: PAPER
Paper of all sorts can be used to create many different effects. Thin paper such as tissue paper and napkins have the advantage of making the background virtually disappear. Only the pattern remains visible. This technique can be used to add art mediums that aren’t compatible with wax, such as chalk or ink on tissue paper. The patterned paper is then applied to the artwork. Napkins, which are usually 2 or 3 ply, can be reduced down to the single printed layer and added to artwork. Some napkins have elements that can be added in their entirety. Others have useful patterns that can be layered to great effect.
To add tissue paper to an art piece, arrange it directly on a warm encaustic surface and burnish it in place with the back of a spoon. Then, apply a layer of encaustic medium over the paper and fuse with a heat gun or torch.
Lightweight paper can also be used for embellishment. The white spaces may not disappear completely, but the paper does get more transparent once it has absorbed the encaustic medium. These papers behave well and are fun to layer.
To use lightweight paper in an art piece, it is probably best to first dip the paper in encaustic medium and then place the paper on a warmed encaustic surface. Burnish slightly or heat with the heat gun to stick the paper to the art piece. Apply a layer of encaustic medium to seal it in place and fuse.
Working with medium-weight and heavyweight papers is also possible, but it can be more of a headache. Heavier papers seem to have a mind all their own. Some will stick perfectly, while others refuse to lie flat. Great effects can be achieved using them, but this is definitely an advanced technique that requires patience. The technique is basically the same as with lightweight paper, except that heavier paper will require more coaxing to keep it flat and completely embedded.
TECHNIQUE 7: FOUND OBJECTS
All sorts of found objects can be incorporated into an encaustic collage. Leaves and sand work well and make interesting compositions. Larger items such as sticks and branches can be used, but it can be challenging to get them to adhere to the surface of the work. Large heavy items are best attached to the art board with wire or nails to ensure they stay put. Advanced planning is key with these types of items.
To incorporate small found objects, first apply a base of warm wax and then press the object into the warm wax. Add additional wax around or on top of the object and fuse into place. Keep adding wax and fusing until the object is secured to the artwork. For really small items such as sand, it may not be necessary to add an additional layer of wax.
MODERATE
ENCAUSTIC ARTWORK 
With this encaustic project, my goal is to illustrate that a variety of techniques can be employed to accomplish a personal vision for an art piece. This piece is the result of a whole bunch of U-turns and dead ends that I managed to turn around into something that works for me.

1. When I first started this piece, I was paralyzed by a clean white board. To get beyond that, I first added some tissue paper from some old sewing patterns and some other paper that I had been saving for encaustic work. Now, I had a piece that was no longer pristine, but not something that was working. So, I placed a wide strip of painter’s tape across the bottom half of the board. Above the line, I stippled some colored wax and built up the texture a bit using the dry-brush technique. I liked where that was going, so I selected another color and repeated the process below the tape. But this time, I created a finer texture in the wax.
2. I was happy with the new direction of my piece, so I added some interest to the texture by varying the color in the wax layers. The different colors helped to give the texture dimension. I gave the texture a final fusing and removed the tape. Now, I had a wide swath of white to contend with.
3. The wax on either side of the taped-off area was thicker than the area I was about to work on, so I decided to use some tissue paper to add pattern and color. Doing this was easier than trying to work precisely in a relatively narrow depressed area. I drew circles using oil pastels onto some thin white tissue paper. Once I had the colors and shapes the way I wanted, I cut them into a strip that was narrower than the white area on my art piece. I warmed the wax and placed my colored circles onto the white area with the colored side facing the wax. I used my finger to burnish the paper into place and then added a couple layers of clear encaustic medium. The paper virtually disappeared, and the circles showed through. There was no risk of smudging because the pastels were sandwiched between the paper and the wax. This technique works well for incorporating art materials that could not be used directly on the wax.
4. Next, I decided to add a square of corrugated cardboard. Ideally, I should have masked off an area for the square before I started texturing, but at the time, I didn’t know that. So, I used my clay tools to carve out an area for the cardboard. I scraped away the texture until it was the same level as the circle layer.
5. To attach the cardboard, I quickly applied a layer of encaustic medium to the board and the back of the cardboard and held the cardboard in place until it had cooled sufficiently. I then added encaustic medium to the sides to secure it.
6. The corrugated cardboard looks interesting when waxed. The color deepens to a pleasant shade of brown and the corrugations become slightly visible. I added a thin piece of paper with some faint writing on it to the surface of the cardboard and topped it with another couple layers of wax. Finally, I gave the whole piece a final fusing, polished up the smooth areas with a soft cotton cloth, and I was done.
BATIK
Batik is an ancient art form that is at least 2,000 years old. It is essentially a resist technique, which means that color on cloth is protected from additional dye by applying a wax covering.
Each color builds on the sum of the previous colors. It is an art form that can take years to perfect, requiring a vision for the end product and the patience to see the piece through all the necessary steps.
I like that batik can be as intricate or simplistic as time and skill will allow. Traditional batik often uses specialized tools, which can be difficult to find locally and require skill to operate. So, for my batik project, I decided to borrow from the Japanese Shibori dyeing technique. Shibori is the Japanese manual resist dyeing technique, which produces patterns on fabric. The fabric is manually folded, twisted, stitched, or compressed, making some areas impenetrable to dye to create interesting patterns.
THE WAX BLEND
The wax used in this technique is generally a blend of beeswax and paraffin. Depending on the ratios of the two, different effects can be achieved. The more paraffin that is used, the more the wax will crackle and allow some dye to seep through. Personally, I love this effect, so my wax blend will do a bit of that. Adjust the proportion of the wax blend as desired: more paraffin, more crackle; more beeswax, less crackle.
Also, learn from my mistake. Purchase new paraffin wax, rather than using the wax from recycled used candles. Although they may seem to be all paraffin, candles may contain oils and other fillers. The oils will not wash out easily and may leave a permanent grease stain on the fabric. In addition, the oils may make the wax more pliable, which is counter to why the paraffin is used in this technique in the first place.
THE DYE
For batik, I like to use specially designed cold-water dyes that do not require heat in the dyeing process. The grocery store dyes should work as long as they are prepared according to the directions and then allowed to cool. If the dye bath is too warm, it will melt the wax. Wetting the fabric with cold water first will allow the fabric to absorb the dye more evenly. Leave it in the dye bath until the desired tint has been achieved.
TEST THE DYEING TIME
I recommend using fabric scraps to test the dyeing time. Have several that can be pulled out at regular intervals, given a quick rinse, and tossed in the dryer to see how that color looks when dry. Consider setting a timer for more precise results. Once the dry sample is the desired color, remove the batik from the dye bath and rinse with cold water until the water is relatively clear. This is especially important with batik because any “free” dye remaining in the fabric may tint the areas where there is wax.
EASY
BASIC BATIK WAX RECIPE 
Athough any proportion of beeswax to paraffin can be used, my preferred wax blend follows. I usually make a good-size batch, mold it in small bread tins, and then simply melt the amount needed for a particular project. This recipe yields one pound (455 g) of batik wax, which is plenty for the following project, but actual coverage is dependent on how much of the fabric will be waxed.
1. Melt the waxes in a double boiler or electric skillet.
2. Stir to ensure it is well mixed.
3. Pour into mini bread pan molds until ready to use.
EASY
SHIBORI-INSPIRED BATIK FABRIC 
I have chosen to use a relatively simple folding technique to create a pattern on the fabric. I used a basic white cotton bandana, but any lightweight cotton fabric will work. I will be using a 60 percent beeswax, 40 percent paraffin wax blend for this project. How much is needed will depend on the size of the electric skillet and how deep the wax needs to be. I kept the wax level at about 1/2 inch (1 cm).
1. First, make sure the bandana is ready to absorb the beeswax and dye by soaking it for an hour in a solution of water with some detergent and washing soda added. The idea is to remove all traces of residues, such as sizing, that might be on the fabric. Do not use any kind of softener in the wash or dry cycle. Rinse well and dry.
2. Next, prepare the wax. Add enough of the batik wax to the electric skillet to ensure it is 1/2 inch (1 cm) deep when melted. Slowly warm the wax until it is liquid. Set the skillet to a consistent temperature to make sure that the wax remains liquid, but not too hot, between 155°F and 175°F (68°C and 79°C).
3. Set up the dye bath following the dye manufacturer’s instructions. I like to use my large stainless steel pots, which can be easily cleaned afterward.
4. Now, fold the fabric. I used a series of folds that form a hex pattern. The idea is to put folds into the fabric and then dip the folded fabric into the wax, creating the resist. Any pattern will work.
To re-create my pattern, follow the diagram (opposite page) for the folding technique. It looks more complicated than it is. The more precisely the folds line up, the clearer and more defined the wax resist lines will be.
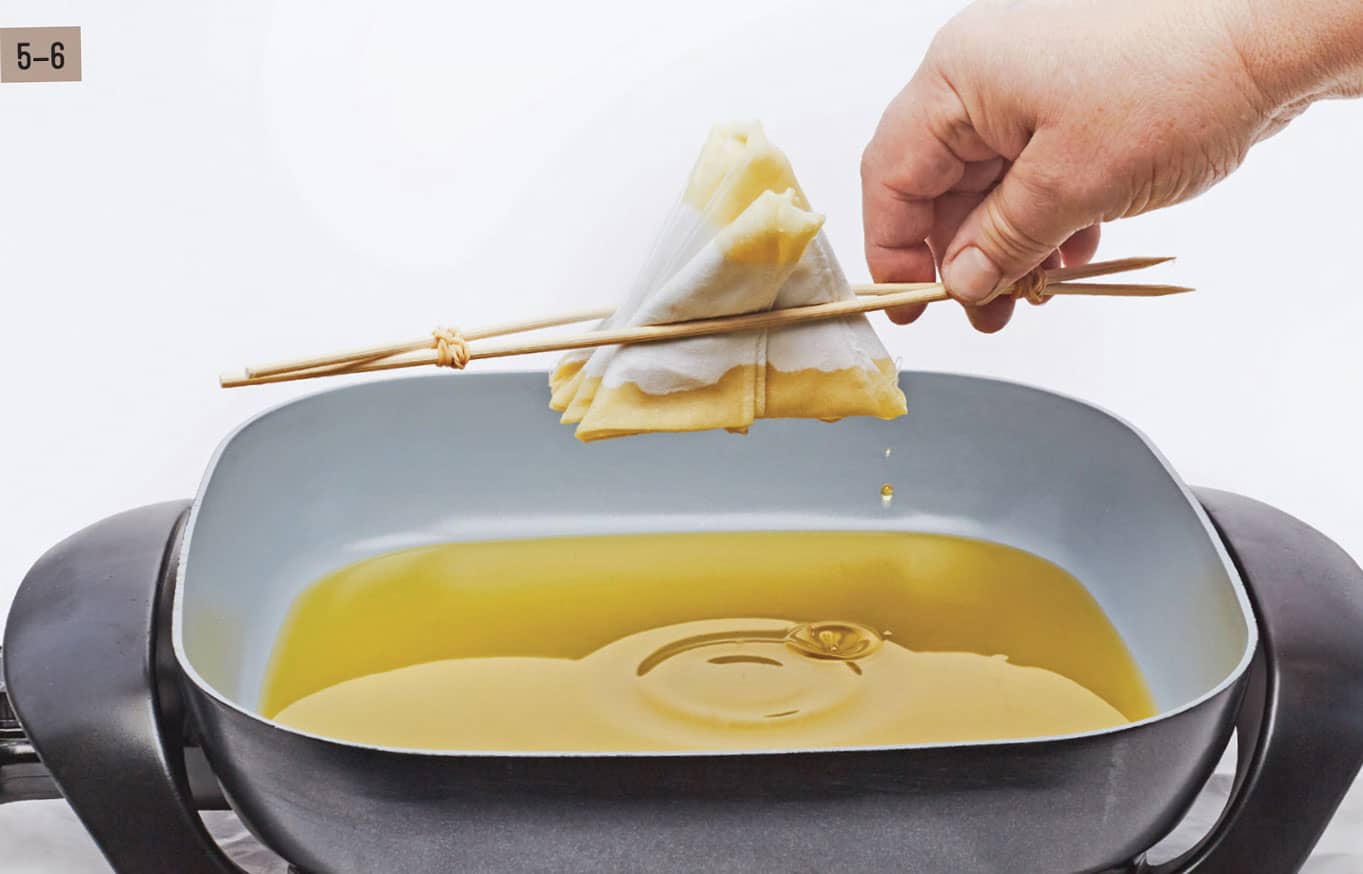
5. Once the bandana has been folded, use the bamboo skewers, one on either side of the folded fabric triangle, and join them with rubber bands on either side. The skewers hold the folded fabric and keep the folded edges aligned. Now, the fabric is ready for the wax.
6. To create the pattern I made, first dip the long side into the wax, holding the fabric in the wax for a couple seconds. Check to make sure wax has reached all the areas uniformly. Turn the triangle around and dip the point on the opposite side.
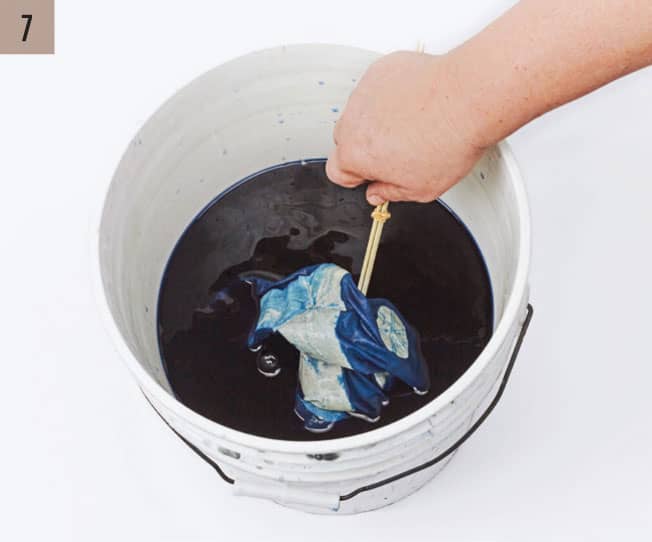
7. Once the wax has cooled slightly, undo the bamboo skewers and unfold the fabric. Wet the fabric in cold water, either under the tap or in the sink, scrunching the bandana to crinkle the wax. Wetting the fabric first will allow the dye to color the fabric more uniformly. Transfer the fabric to the dye bath. Leave in the dye bath until the desired color is achieved (see “Test the Dyeing Time”). Rinse the fabric until the water runs clear. This will take several rinses. Once there is no more dye coming out of the fabric, fix the dye according to the manufacturer’s directions and allow the fabric to dry.
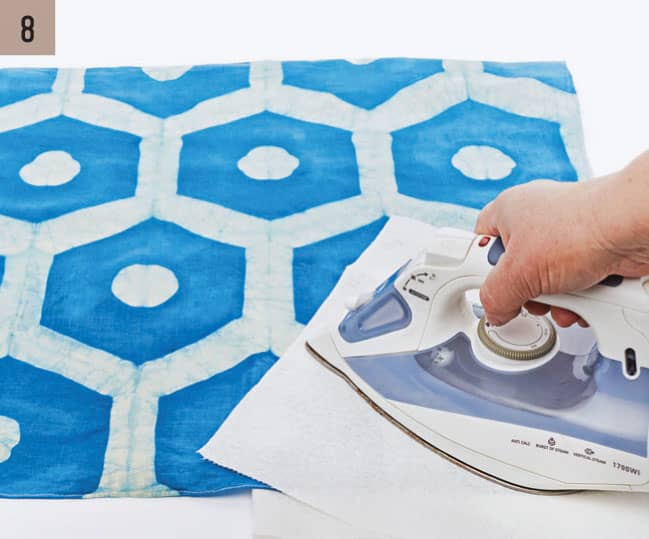
8. Remove the wax using one of two methods. The first option is to boil the fabric in hot water. The wax will melt and float to the top. Once the water is cool, the wax can be skimmed from the surface of the water and the fabric lifted out and dried.
The second method is to use a hot iron and melt the wax into paper towels. First, cover the work surface with multiple layers of newspaper to protect it and then pile on several layers of paper towels. Finally, place the batik piece over the paper towels and cover the fabric with another couple layers of paper towels. As you iron, keep replacing the paper towels until all the wax is removed.
