We are in the midst of a cocktail renaissance. It started in the ’80s with concoctions like the Sex in the City drink of choice, the cosmopolitan, but as this renaissance develops, cocktails are becoming more sophisticated and taking a distinctly savory turn. Today’s bartenders are reaching for unexpected ingredients and employing culinary techniques such as infusions and purées to expand and sometimes challenge the palate. Herbs and spices are moving from the kitchen to the bar as more and more bartenders develop cocktails with a “from scratch” approach. Innovative ingredients and modern techniques create new categories of beverages, because there comes a point in life when sweet, pink drinks just don’t keep you coming back to the bar.
The trend toward savory cocktails had its start with the Bloody Mary (see page 76) and the beef-based Bullshot (see page 83). These brunch-time favorites pack an umami punch. However, savory is much more than the opposite of sweet. It’s not a good idea to just throw a cucumber and a fistful of herbs into the blender and hope for the best; you need to balance the flavor elements. Follow a culinary path as you begin building your cocktail. This book will introduce you to some unexpected directions you may never have considered before.
As an example, a Salad Bowl G&T (see page 69) combines muddled herbs and vegetables with the botanicals already present in gin. All on its own this would make a rather one-note drink, but the balance comes from garden-fresh tomatoes and their sweetly acidic bite. Even a savory cocktail needs the right hint of sweet. Cocktail bitters, too, go a long way in seasoning a drink or providing the final flourish.
In addition to earthy herbs and vegetables, bartenders are incorporating such ingredients as “shrubs” for a tangy flavor. These old-fashioned “drinking vinegars” are being rediscovered for the complex sweet and sour effect they can have when mixed into drinks. A beet and juniper shrub in this book (see page 18) makes a bold impact with scallions and a touch of salt in the crimson-hued Beetle Juice (see page 60).
Savory touches needn’t be that dramatic. Subtle influences can nudge many classic cocktails toward the savory end of the scale. Tartufo (see page 78), with its touch of truffle-infused honey, maintains the thinnest veil of something dark and earthy. The pinch of smoked salt in Breeder’s Cup (see page 57) rounds out its flavors, adding a decidedly savory boost of umami. Perhaps the most subtle way to build a savory drink involves combining some of the more naturally savory spirits, such as medicinal aquavit and malty genever, with interesting liqueurs—artichoke Cynar, cumin-laced kümmel, and allspice dram, for example. These and other centuries-old formulas have made a comeback as bartenders look to old ingredients to provide a modern sensibility. New interpretations, such as Dead Glamour (see page 94) and Vichy Cycle (see page 40), are challenging to the palate and typically very alcohol-forward, but when sipped slowly there can be no denying their savory complexity.
You don’t need a lot of glassware to make a great drink. But it’s nice to have the basics, because proper presentation adds to the enjoyment of a well-made cocktail.
Coupe (or Saucer) This bowl-shaped Champagne glass is better suited for cocktails than for bubbly, so many bartenders have adopted this classic shape. It should hold between 3 and 6 ounces.
Cocktail Glass This 3- to 6-ounce slope-sided glass is considered the quintessential martini glass. It’s ideal for most stirred or shaken cocktails.
Collins Glass There’s a fine line between a Collins glass and a highball glass. Typically, a Collins glass is slightly taller and narrower, holding 10 to 14 ounces. It’s a good size for drinks served over ice and drinks “topped” with something fizzy. An even taller 16-ounce version is known as a chimney glass.
Highball Glass You’ll find this versatile glass in both 8- to 10-ounce and 12- to 14-ounce sizes. I consider it interchangeable with a Collins glass.
Old-Fashioned Glass Short and stocky with a heavy bottom suited to muddling, this glass can vary in size from 4 to 12 ounces (or more). The larger ones are often called double old-fashioned glasses. You’ll also see this style called a rocks glass, a tumbler, or a whiskey glass.
Punch Cup Small and rounded, a punch cup often has a handle—though that’s not my preference. These hold about 6 to 8 ounces and are (of course) used for punch in conjunction with a punchbowl. But their size and rounded shape make them nice for sipping spirits “neat” as well.
Shot Glass Sturdy in form and simple in shape, this little glass holds 1-1/2 ounces when filled to the top. Large “double” shot glasses can be 2 to 4 ounces and are useful for “shooters.”
Wine Glass It’s not just for wine. It’s also a good all-purpose glass that can simplify your glassware choices when entertaining. Wine glasses work well for highballs, large fruity drinks, and spritzers, with or without ice.
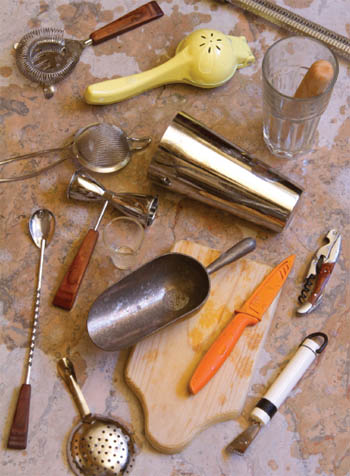
As with most things, making a proper cocktail requires the proper equipment, but this need not be fancy. In fact, some of the bright and shiny accessories on the market aren’t well suited to the job. Look for durability, quality, and ease of cleaning. Avoid plastic in most cases. Old-school is fun, but it can have its drawbacks. Consider each tool individually. My tools are hardly a matched set. I’ve chosen each for the job I intend it to perform. Still, some are vintage, some shiny and fun. I never said a good bar tool wasn’t those things; it’s just not those things primarily.
Call me a neatnik. The first item I’d place on the essentials list is a good (clean) bar towel—actually two bar towels, one a terrycloth workhorse for wiping down your work area and the second a finely woven, lint-free cotton cloth to keep glassware sparkling.
These are what I consider the other essentials:
Barspoon For stirring, mixing, and scooping ingredients in 1/2-teaspoon additions. Look for a stainless-steel version with a long, thin handle. The handle is often twisted to assist in mixing when it’s rotated back and forth between the palms of your hands, or your fingertips if you’re very dexterous.
Boston Shaker This is the classic shaker preferred by most bartenders. It comes in two parts: a pint-size glass and a stainless-steel, slope-sided cup that fits snuggly over the mixing glass to create a sealed shaking chamber.
Bottle Opener/Corkscrew For opening wine and beer bottles, I like the all-in-one variety known as the “waiters corkscrew,” comprising a corkscrew coil, a bottle opener, and a blade for removing foil, wax, or plastic seals.
Citrus Extractor You can get fancy here; there are mountable bar-top versions that handle everything from the tiniest kumquat to the hugest pomelo. But I like the efficiency of the smaller, handheld metal press version. It comes in chrome, enameled steel, or lightweight but sturdy cast aluminum.
Cutting Board with Paring Knife and/or Small, Serrated Knife Essential and self-explanatory.
Grater The small Microplane version grates nutmeg, chocolate, and citrus zest more finely than the citrus stripper/zester—a welcome addition for finishing drinks with finesse.
Ice Scoop Trust me, make enough cocktails and you’ll get frostbitten fingers without one of these. It should be sized to nearly fill a pint glass in a single scoop.
Jigger Look for a dual-cup stainless-steel version. One side is a 1-ounce “pony shot,” and the other side holds a 1-1/2-ounce “standard shot,” or “jigger.” You may also want to have a glass jigger with calibrated measurements for very accurate small additions of liquid.
Mixing Glass If you have a Boston shaker, a mixing glass isn’t actually essential. But a nice mixing glass (shiny, crystal, or otherwise fancy) is fun to have. So go ahead and get one.
Muddler The wooden version is classic, but there are many styles that get the job done. Just make sure the handle is long enough and the blunt end is small enough to work well in the tallest of tall (skinny) cocktails.
Strainers: Hawthorne, Julep, and Fine-Mesh Sieve The Hawthorne strainer is the most common style for cocktails and mixed drinks. It should have a stainless-steel head with a spring coil that assists in making a snug fit and keeping ice and other ingredients in the mixing glass. A julep strainer is a large, perforated round spoon. It can be a bit more awkward to use, but with practice you’ll find it a good choice for drinks that are stirred in a mixing glass. My rule of thumb is this: when straining a cocktail from the metal cup of a Boston shaker, I choose the Hawthorne; when straining from a smaller mixing glass or the pint glass of a Boston shaker, I choose the julep. The fine-mesh sieve is used in conjunction with either the Hawthorne or julep for double-straining drinks that have been muddled or have fine particles (including ice shards) that aren’t part of the final presentation.
Ice is essential to a well-made cocktail. I like medium-size square cubes for stirring, shaking, and serving most drinks “on the rocks.” A single extra-large ice cube is best for some very strong drinks that are sipped slowly, because it keeps the drink chilled without diluting it too much. Cracked ice is best for blender drinks and some specialty cocktails.
The basic rule is simple: drinks made with spirits only, such as martinis and manhattans, should be stirred. This introduces less air into the mixture, creating a silky, viscous texture. A well-stirred cocktail starts in a mixing glass or the metal half of a Boston shaker that’s half-filled with medium ice cubes (about 5 or 6 of them). Use a long-handled barspoon to gently stir the ingredients until a light frosting appears on the glass and the drink is properly diluted, about 20 seconds.
Shaking is a more aggressive form of mixing, mostly reserved for drinks with juice or other heavy ingredients, such as eggs and cream. It lightens the mixture by adding tiny air bubbles and thin shards of broken ice that will melt into the cocktail. To shake, add a pint-size glassful of ice cubes to the shaker, filling it about ⅔ full. Cover the shaker with its cap, or in the case of a Boston shaker with its pint glass. Grasp with both hands, using one hand to hold the cap or glass securely; shake vigorously until the shaker surface becomes frosty, about 20 to 30 seconds. Remove the cap and quickly strain the drink into a glass.
Use a measuring device that has increments you are comfortable using. I always doubt bartenders who just “eye” the ingredients as they build a drink. I have to wonder how consistent their results are from drink to drink.
Here are conversions for typical bar measurements:
Drop = 1 drop from an eye dropper (not a shaker top)
Dash = 1/4 barspoon = ⅛ teaspoon = ⅔ ml
Barspoon = 1/2 teaspoon = 2-1/2 ml
1 pony shot = 1 fl oz = 30 ml
1 shot (jigger) = 1-1/2 fl oz = 45 ml
1 teaspoon = 8 dashes = 5 ml
1 tablespoon = 3 teaspoons = 1/2 fl oz = 15 ml
1 cup = 1/2 pint = 8 fl oz = 8 pony shots = 5-1/3 shots = 250 ml
1 pint = 2 cups = 16 fl oz = 16 pony shots = 10-2/3 shots = 500 ml
1 quart = 4 cups = 32 fl oz = 32 pony shots = 21-1/3 shots = 1,000 ml
I don’t care how savory a cocktail is, most well-made drinks require a sweet element for real balance. Handmade syrups are a great way to explore the possibilities. Sometimes a basic simple syrup of water and sugar is just the right choice. The variations I’ve given here can bring something unexpected to your creation. Experiment. Taste each syrup after you make it and add sweetener if you feel it’s too strong, but keep in mind that the syrup is just one layer in a cocktail; don’t dilute its power too much.
1 cup sugar
1 cup water
Stir together the sugar and water in a medium saucepan over medium-high heat. Bring to a boil, stirring occasionally until the sugar is dissolved. Reduce the heat to low and continue cooking until a syrupy consistency is reached, about 4 minutes. Remove from the heat and let stand for 30 minutes. The syrup may be refrigerated and stored in an airtight container for up to 1 month.
This recipe and its variations makes about 1-1/4 cups each
GINGER Once the simple syrup mixture boils, add 2 tablespoons freshly grated ginger; continue cooking as above. Strain through a wire-mesh sieve double-lined with damp cheesecloth, discarding the solids. Store refrigerated in an airtight container for up to 1 month.
HERBAL LEMON Once the simple syrup mixture boils, add 2 thin lemon slices and 1 to 2 tablespoons fresh herbs of any type or combination (such as mint, rosemary, basil, or lemon verbena), to taste. Continue cooking as above. Strain through a wire-mesh sieve double-lined with damp cheesecloth, discarding the solids. Store refrigerated in an airtight container for up to 1 month.
LEMONGRASS KAFFIR Once the simple syrup mixture boils, add 2 tablespoons minced fresh lemongrass (white and light parts only) and 6 bruised kaffir leaves (or substitute the zest of 1 lime for the kaffir leaves). Continue cooking as above. Strain through a wire-mesh sieve lined with a double layer of damp cheesecloth, discarding the solids. Store refrigerated in an airtight container for up to 1 month.
RHUBARB ROSEMARY Once the simple syrup mixture boils, add 2 or 3 rhubarb stalks, sliced. Continue cooking as above. Remove from the heat and add 1 fresh rosemary sprig; let stand 30 minutes. Strain through a wire-mesh sieve lined with a double layer of damp cheesecloth, discarding the solids. Store refrigerated in an airtight container for up to 1 month.
SPICED Once the simple syrup mixture boils, add 1 ounce lightly cracked whole spice, bark, beans, or seeds (about 1/4 cup) in any combination (such as allspice, cloves, peppercorns, or coffee), to taste. Continue cooking as above. Strain through a wire-mesh sieve lined with a double layer of damp cheesecloth, discarding the solids. Store refrigerated in an airtight container for up to 1 month.
2 ounces thinly sliced fresh ginger (about 1/2 cup)
2 tsp whole black peppercorns
1/2 cup warm water
1/2 cup agave nectar, plus more if needed
Place the ginger slices and peppercorns in a small, nonreactive container and lightly crush them with a bar muddler. Add the warm water and agave nectar; stir to combine and then set aside for about 2 hours to let the flavors come together. Taste the syrup and add more agave nectar if you feel it’s too strong.
When your syrup has the taste you want, pour it through a wire-mesh sieve lined with a double layer of damp cheesecloth; discard the solids. Cover and chill. The syrup may be stored in the refrigerator for up to a month, but be warned: ginger loses its potency quickly. Taste before using.
Makes about 1 cup
2 tbsp whole cloves
1/2 cup warm water
1/2 cup honey
Place the cloves in a small, nonreactive container and lightly crush them with a wooden muddler. Add the warm water and honey; stir to combine, then cover and set aside at room temperature for 2 or 3 days. Taste the syrup; add more honey if you feel it’s too strong.
When your syrup has the taste you want, pour it through a wire-mesh sieve lined with a double layer of damp cheesecloth; discard the solids. Store refrigerated in an airtight container for up to 1 month.
Makes about 1 cup
1 habanero chile, thinly sliced
1/2 cup warm water
1/2 cup agave nectar, plus more to taste
Place the habanero with all its seeds in a small, nonreactive container. Add the warm water and agave nectar; stir to combine and then set aside for about 1 hour to let the flavors come together. Taste the syrup and add more agave nectar if you feel it’s too hot.
When the syrup has the desired heat level, strain it through a wire-mesh sieve double-lined with damp cheesecloth. Store refrigerated in an airtight container for up to 1 month.
Makes about 1 cup
2 cups sugar
3/4 cup freshly squeezed citrus juice (such as lemon, lime, orange, or yuzu*)
1/4 cup water
1 tbsp grated citrus zest (such as lemon, lime, orange, or yuzu*)
* For information about yuzu, see “Golden Ale” on page 36.
Stir the ingredients together in a medium saucepan over medium-high heat. Bring to a boil, stirring occasionally until the sugar is dissolved. Lower the heat to low and continue cooking until a syrupy consistency is achieved, about 4 minutes. Remove from the heat and let stand for 30 minutes. Strain through a wire-mesh sieve double-lined with damp cheesecloth. Store refrigerated in an airtight container for up to 1 month.
Makes about 1-1/2 cups
6 lemons
1-1/2 cups sugar
3/4 cup water
Use a vegetable peeler to remove the skin from the lemons, leaving behind the white pith. In a large bowl, cover the lemon peels with the sugar and toss to combine. Using a muddler or wooden spoon, press the peels to express their oils. Let sit for about an hour, then scrape the mixture into a saucepan. Add the water and bring to a simmer over medium-low heat, stirring occasionally. Once the sugar has dissolved, remove from the heat and let cool. Strain through a wire-mesh sieve double-lined with damp cheesecloth. Store refrigerated in an airtight container for up to 1 month.
Makes about 1-1/2 cups
If you’ve ever had even a half-hearted interest in cocktails, you probably have a bottle of bitters lying around. I’d bet it’s that yellow-capped bottle wrapped in an oversize paper label and known as Angostura bitters. But there’s more to the world of bitters, and this is a great time to explore what they are and what they can do for your cocktails. More varieties of commercially produced bitters are available than ever before. But just what the heck are they?
Cocktail bitters can best be described as something you add in dashes and drops to “season” a drink, integrating ingredients and accentuating flavors—the way salt and pepper enhances food. Bitters are an essential ingredient in classic cocktails and are playing an increasingly important role in modern mixology. They are typically made by infusing botanicals such as herbs, spices, seeds, peels, barks, and roots into some sort of very high-proof alcohol. The flavor combinations can be endless, opening the door to creativity in a huge way.
Bitters weren’t always just the creative finishing touch on a well-made cocktail. Originally they were potable elixirs designed as cures for all that ails you. Once bitters became accepted as a form of “medicine,” all that was needed was a palatable way to deliver them. Enter the cocktail.
There are a number of bitters used in this book that you may not be able to find at your local liquor store, but they are easily purchased online at retailers such as Amazon. But if you want a truly personal cocktail, go ahead and experiment with making your own.
1 lemon
1 orange
1/4 cup dried currants, cranberries, or cherries
3 whole cardamom pods, lightly cracked
1 (2-inch) piece cinnamon stick
1 tsp coriander seeds
1 whole star anise
8 to 10 drops gentian extract (available online)
2 cups 100-proof rye
1 tbsp simple syrup (see page 14)
Use a vegetable peeler to remove the lemon and orange zest in thin strips, leaving the white pith behind. Place the zest, dried fruit, cardamom, cinnamon, coriander, star anise, gentian extract, and rye in a quart jar that has a tight-fitting lid. Cover and store in a dark place at room temperature for 2 weeks, shaking or rolling the jar every other day. Then strain the liquid through a fine-mesh sieve double-lined with cheesecloth into a 2 or 3-cup pitcher. Stir in the simple syrup. Funnel your bitters into small bottles that have squeeze-dropper caps. Will keep in a cool, dark place indefinitely.
Makes about 2 cups
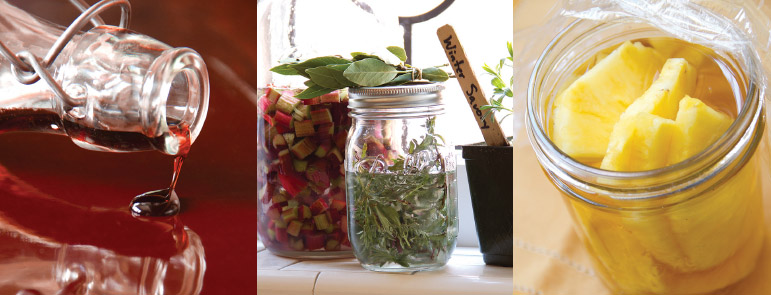
Shrubs are old-fashioned drinking vinegars that are becoming noticed again as flavorful ingredients in both sweet and savory cocktails. Shrubs are also excellent simply mixed with seltzer or club soda and served over ice.
1/4 pineapple, peeled, cored, and cut into 1/2-inch slices (sized to fit your container)
3/4 cup / 6 fl oz apple cider vinegar, or more as needed
1/2 cup sugar
1 large fresh rosemary sprig
Place the pineapple slices in a wide-mouth jar that has a lid. Add enough cider vinegar to cover the fruit completely. Cover the jar and let the vinegar infuse for 4 days, gently shaking or rolling the jar each day. Strain the liquid through a fine-mesh sieve double lined with damp cheesecloth into a small, nonreactive saucepan. Add the sugar and bring to a boil. Lower the heat, add the rosemary, and simmer for 10 minutes. Remove from the heat and strain once more. Allow to cool completely before bottling. Store refrigerated in an airtight container for up to 1 month.
Makes a generous 1/2 cup
20 baby beets
3/4 cup / 6 fl oz apple cider vinegar
3/4 cup / 6 fl oz water
1/2 cup sugar
1/2 tsp kosher salt
1 tbsp whole black peppercorns
1 tbsp whole juniper berries
Trim and peel the beets to a uniform size, about as big as a large olive; set aside. In a small, nonreactive saucepan, combine the vinegar, water, sugar, salt, peppercorns, and juniper berries; stir until the sugar is dissolved. Add the beets and set over high heat to bring to a boil. Reduce the heat to low and simmer, swirling the pan occasionally and turning the beets, until the beets are tender, about 25 minutes.
Use a slotted spoon to transfer the beets to a small container that has a cover. Raise the heat under the saucepan to medium and reduce the liquid to 1 cup. Remove from the heat, let come to room temperature, and strain into the same container as the beets, discarding the peppercorns and juniper berries. Refrigerate the shrub and beets together, covered, for up to 3 weeks.
Makes 20 pickled beets plus 1 cup shrub
Making your own infusions is an easy, enjoyable expression of the art of the cocktail. You can steep any spirit you like, but regardless of the base spirit and flavor infusions you choose, the general idea remains the same: the key to success is to experiment and taste as you go.
Most infusions need 3 to 5 days in a dark place to attain the right flavor profile. Some flavors (such as seeds and nuts) will take longer, while chile pepper infusions only need a few hours to get fiery hot. No equipment is needed other than a clean, sealable container, though steeping them in a dark place such as a cupboard is best. Most ingredients should be sliced, chopped, or lightly crushed to assist in the flavor transfer. All infusions should be well strained before use.
I used 2 cups of vodka for the following examples, but feel free to halve or double (or quadruple) my guidelines. Infusions keep at room temperature for up to 1 month or can be frozen for up to 2 months, unless otherwise indicated.
CITRUS INFUSION Infuse 2 cups base spirit with 1 cup citrus peels for at least 48 hours, swirling the container occasionally.
HERBAL INFUSION Infuse 2 cups base spirit with 1 cup loosely packed herbs for 3 to 4 weeks, swirling the container occasionally.
HOT CHILE PEPPER INFUSION Infuse 2 cups base spirit with 1/2 cup sliced chiles (such as serrano, jalapeño, or Thai bird) for 1 to 4 hours (or to taste), swirling the container occasionally.
BLACK PEPPERCORN INFUSION Infuse 2 cups base spirit with 1/4 cup whole black peppercorns for 24 to 48 hours, swirling the container occasionally.
COFFEE INFUSION Infuse 2 cups base spirit with 1/4 cup roasted and lightly cracked dark espresso bean for 24 to 48 hours, swirling the container occasionally.
GINGER INFUSION Infuse 2 cups base spirit with 1/4 cup thinly sliced fresh ginger for 24 to 48 hours, swirling the container occasionally.
MILD-FLAVORED VEGETABLE INFUSION Infuse 2 cups base spirit with 1 cup chopped vegetables such as celery and cucumber and 1 dried bay leaf for 2 to 3 weeks, swirling the container occasionally.
STRONG-FLAVORED VEGETABLE INFUSION Infuse 2 cups base spirit with 1 cup chopped vegetables such as beets and squash (raw or roasted, as you prefer) for 5 to 7 days, swirling the container occasionally.
SEED OR NUT INFUSION Most seeds or nuts should be roasted before infusion, then lightly cracked. Infuse 2 cups base spirit with 1 cup seeds or nuts (such as hazelnuts) for 2 to 3 weeks, swirling the container occasionally.
WHOLE SPICE INFUSION Most whole spices—such as allspice, anise, cinnamon, clove, or cumin—should be roasted before infusion, then lightly cracked. Infuse 2 cups base spirit with 1/4 cup spices for 24 to 48 hours, swirling the container occasionally.