Chapter 7
Using Compost
Compost Poem
Roses are redder
Violets are bluer
When they’re fed
With composted manure.
Eventually, all the effort spent collecting compost materials, combining ingredients to create the proper C:N ratio, and managing the pile or bin pays off by yielding rich compost—often called gardener’s gold. It’s a wonderfully versatile material that can be used throughout the yard and garden. This chapter features useful tips for determining when compost is actually finished decomposing and is ready to use, plus a wealth of ways to use it in the garden.
1. Is it Compost Yet?
It’s easy to recognize when a compost pile has transformed into finished compost, which is the point when most of the organic materials in the pile have broken down into small bits, leaving crumbly, dark humus. In addition to its uniform dark brown color, finished compost has a pleasant smell—earthy and sweet. It also is spongy and moist. If the pile has been hot, the temperature will have cooled and further turning won’t cause it to heat up again. Other than the occasional corncob chunk, shattered peach pit, or eggshell, individual materials are no longer identifiable.
One of the simplest ways to determine if a batch of compost has finished decomposing is to give it the sniff test: Put a handful of moist compost into a glass jar, seal the lid, and put the jar in a warm, sunny place. After 3 days, open the jar and sniff. Good-quality finished compost should have an odor similar to that of freshly turned soil. If the compost is stinky, it hasn’t finished decomposing yet.
For most garden uses, compost should be in the finished stage when it’s applied. Only finished compost should be used for seed-starting mixes and seedbeds, because unfinished compost can slow the germination and growth of many plants. Corn and squash seem to thrive on unfinished compost, however, so it’s a fine choice to use it on them for fall nourishing or mulching.

The Germination Test

Curing and Storing Compost
If compost fails the tests above, it simply needs a little more time to complete the decomposition process and become stabilized. Keep it just barely moist in the bin or pile. Be sure to protect it from excess rainwater, which can wash away nutrients and can slow down the decomposition process by making the materials too wet. If the bin or pile area is needed for starting a new batch of compost, store nearly finished compost in a smaller breathable bag (see “Compost in a Bag,” Chapter 5), in a perforated compost can (see “Compost in a Can,” Chapter 5), or in a 5-gallon bucket.
When the compost is almost finished, try adding some well-rotted wood chips, part of a rotting log (but not a dead stump, as the tree may have been killed by disease fungi), or decomposing leaves and twigs from a forest floor or hedgerow. This “inoculates” the heap and increases the content and diversity of beneficial organisms already present. This technique is especially useful if the compost became very hot or very wet at any point. Check again every few weeks to see if the compost is finished.
Finished compost can be stored until needed in any of the above-mentioned containers. Be sure to check it every so often and add a little water if needed to keep it just barely moist.
To Screen or Not to Screen
2. Using Compost in the Garden
Finished compost can be applied freely at any time of year without fear of “burning” plants or polluting water. It can be spread on the soil surface as a mulch or mixed into the top layer of the soil. While compost works wonders in rich garden soil, it is especially valuable for improving poor or problem soil.
The best way to apply compost and the amount to apply depend on the soil conditions of the site. Adding good compost—meaning compost that is rich in beneficial bacteria and fungi—benefits soil in a variety of ways. It will:
- Improve the soil’s water-holding ability, which means less watering and less work
- Improve the soil’s structure, allowing roots to grow deeper, get more nutrients, and find more water—also meaning less work for the gardener
- Improve plants’ resistance to pests and disease
- Improve the soil’s natural ability to suppress disease
Compost for Tilled or Turned Beds
When garden beds are tilled or turned periodically, the soil can appear to be crusty, compacted, or healthy, and each state of health requires different care. Read on to learn how to tell the condition of a particular garden area and how to use compost to meet its needs. Note: This advice is designed for temperate climates; tropical or maritime climates may require larger amounts of compost or other approaches, because the soil is warm and soil life is active year-round.
Crusted soil. If the soil surface develops a concretelike layer sometime during the year, then the soil has a salt problem. Hard barrier crusts form when dissolved salts (hundreds of kinds of salts can occur in soil) get left behind at the soil surface as water evaporates. It’s important to deal with this problem, because very few plants, other than weeds, can grow in soil that has a hard crust. A crust also means that water runs off the soil surface rather than percolating down into it. Adding organic matter and microorganisms—both found in good compost—will permanently lower high salt levels. The organic matter grabs the salts and its microorganisms incorporate them, so that the concrete layer is gone for good. (Tilling can temporarily break up a soil crust, but it can’t eliminate it to the degree that compost can.)
To improve crusted soil, start by adding a 1- to 2-inch layer of compost over the area in spring, and till or fork it into the top few inches of soil. If there is still a hard soil surface come fall, add another 2-inch layer and till or fork it in. If the salt levels were really high, repeat the process the following spring. Just keep adding and mixing in good compost, and the crust should disappear.
Fixing Soil in Subdivisions
Compacted soil. Soils low in organic matter, which have been repeatedly walked or driven upon or tilled or plowed to the same depth for years, often have hard, compacted layers that roots and water cannot penetrate. The presence of weeds such as dandelion, cheatgrass, thistles, chickweed, and johnsongrass is nature’s way of pointing out soil compaction. So are the presence of an abundance of insect pests and diseases and the poor color and growth of plants.
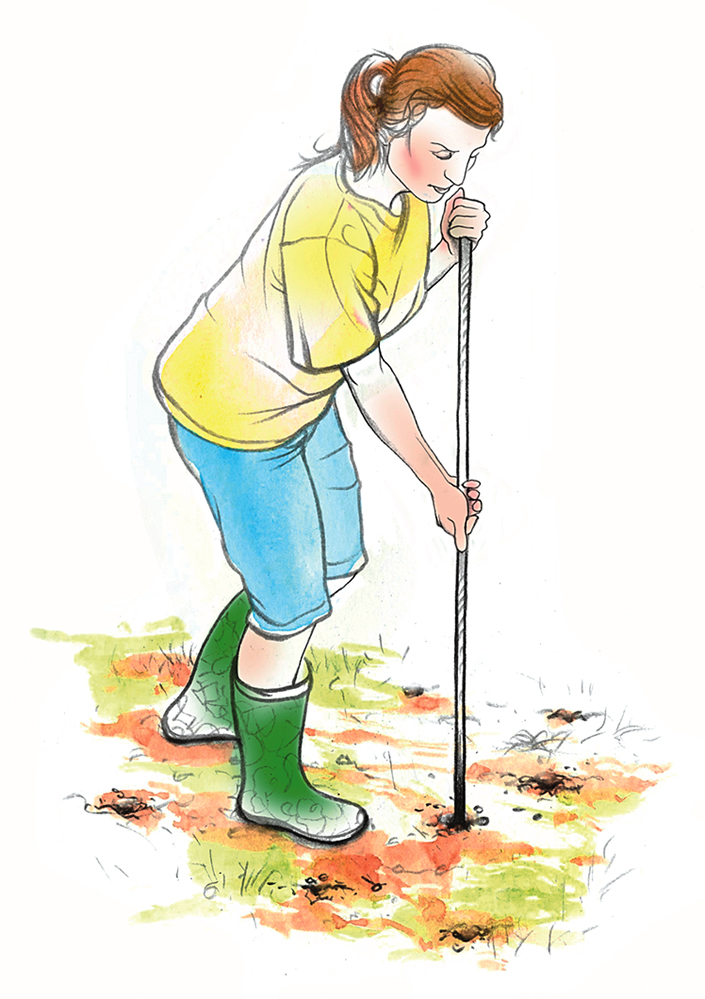
To identify areas with soil compaction, take a smooth metal rod, about a quarter-inch in diameter and at least 4 feet long, and push it straight down into the soil. When the rod becomes difficult to push farther, it has hit a compaction layer. If the soil is rocky, probe in a few different places to make sure the rod has actually hit a compaction layer rather than a rock. The compaction layer can begin at soil level, at 6 inches down, at 12 inches down, or deeper. Plants can only push their roots to the depth of that compaction layer, so if the rod hits compaction at 6 inches, that layer effectively limits a plant’s roots to 6 inches. Unfortunately, only 6 inches of growing space is typical in most lawns and in many gardens and farm fields, and that shallow depth does not allow plants to take in the water and nutrients they need to grow healthy root systems.
To break up a compaction layer and open the soil up for root growth, add 1 inch of good compost in spring and till or dig it in a little deeper than the compaction layer to help break up the crust. Repeat the rod test every few months during the growing season, and if a compaction layer is found, keep adding 1-inch doses of compost and working it into the soil, taking care not to disturb any perennials or other permanent plant roots. Once the rod slides easily into the soil at least 1 foot deep (preferably more) for a full growing season, consider the soil healthy and rich in organic matter and microorganisms!
Healthy soil. When no crust or compaction layers are present, soil is generally healthy. Healthy soil needs only a very thin layer (as little as a fifth of an inch a year) of compost spread on its surface in spring, and the compost doesn’t even need to be tilled in to maintain the health of the soil. If weather conditions are dry, spread a layer of straw or wood chips on top of the compost layer to protect the microorganisms from dehydrating. Growing a cover crop of plants all the time, rather than leaving soil bare, also helps to keep the soil healthy. Low-growing or mowed “living mulches” (such as ryegrass, alfalfa, and clover) help to protect the soil and reduce weed problems at the same time.
Compost and Contaminated Soils
Using Compost in Permanent Garden Areas
To care for soil in permanent plantings, cover the exposed surface with compost. In areas between plants where root damage won’t be likely, use a garden fork to poke holes as deeply as possible all over to help work the compost down into the soil. Cover permanent garden beds with a layer of compost, then top that with a layer of organic mulch, such as wood chips or bark nuggets, to protect it and keep it moist. Take care to keep compost and mulch from touching plant stems. If the soil is in very poor shape and there are numerous perennial weeds, it may be worth moving plants to a holding area, getting rid of the weeds, and rehabilitating the soil as needed before replanting the area.
Trees and shrubs. Apply compost surrounding tree or shrub plantings, extending the treatment out as far as the branch tips; most tree roots extend horizontally about twice as far as their branches reach. Do not mound compost up against a trunk, and make sure to leave the flare at the base of the trunk free of any covering or obstruction. Contrary to what many landscapers practice, mulch piled up around the trunk reduces the amount of oxygen available to the roots and can damage the tree. Also avoid mixing compost into the planting holes for new trees and shrubs. Improving the soil only in the planting hole discourages the roots from growing out into the surrounding soil in search of nutrients. As a result, the tree may be subject to windthrow, a condition in which a tree can be toppled by high winds, because the roots haven’t formed a broad, anchoring base. When planting potentially large trees and shrubs, prepare and amend the soil in a large area to encourage roots to spread far and wide.
Lawns. Lawns are basically large permanent garden areas that can be even more prone to compaction because of foot traffic. In areas with hard-packed soil, apply frequent, thin applications of compost, but take care not to smother the grass. If the soil isn’t healthy, aerate the lawn each time, preferably with a core aerator, before spreading compost, and water well afterwards. Lawns are also a perfect place to use compost “tea” (see “Liquid Compost” at the end of this chapter).
Lawns into gardens. The easiest way to convert a lawn into a garden does not require a shovel or a sod cutter and is easy on the back muscles. Sheet composting, similar to lasagna gardening, is a simple technique that involves layering cardboard, finished compost, and other organic material right over the turf to kill the grass and form a bed of rich soil over the course of a few months. A considerable amount of organic debris is needed for the bed construction, so stockpile plenty of autumn leaves, compost, and garden waste before beginning.
- Use a flexible garden hose to mark the perimeter of the new bed. Mow the grass and weeds within the outline as short as possible (leave the clippings in place).
- Cover the ground with overlapping pieces of cardboard to smother the underlying vegetation and prevent light from reaching any weed seeds. Soak the cardboard with water.
- Spread a 2-inch layer of finished compost over the cardboard and add up to 18 more inches of mixed organic material (such as grass clippings, leaves, straw, seaweed, garden debris, and a little extra compost), adding moisture as needed.
- Top off intended vegetable beds with 2 to 3 inches of straw or compost. Top off intended ornamental beds with 4 inches of wood or bark chips.
- Water the area occasionally and let the microorganisms and earthworms convert the organic material, cardboard, and sod into rich, crumbly garden soil in a matter of months.
- To plant immediately instead, pull aside the surface material to create planting holes and put a shovelful of compost into each before seeds or transplants. By the time the plants’ roots grow out of these compost pockets, the sheet composting area will be starting to decompose and ready to yield its nutrients to the growing plants.
3. Special Uses for Compost
One reason that compost always seems to be in short supply is that it can be used in so many different ways in the garden.
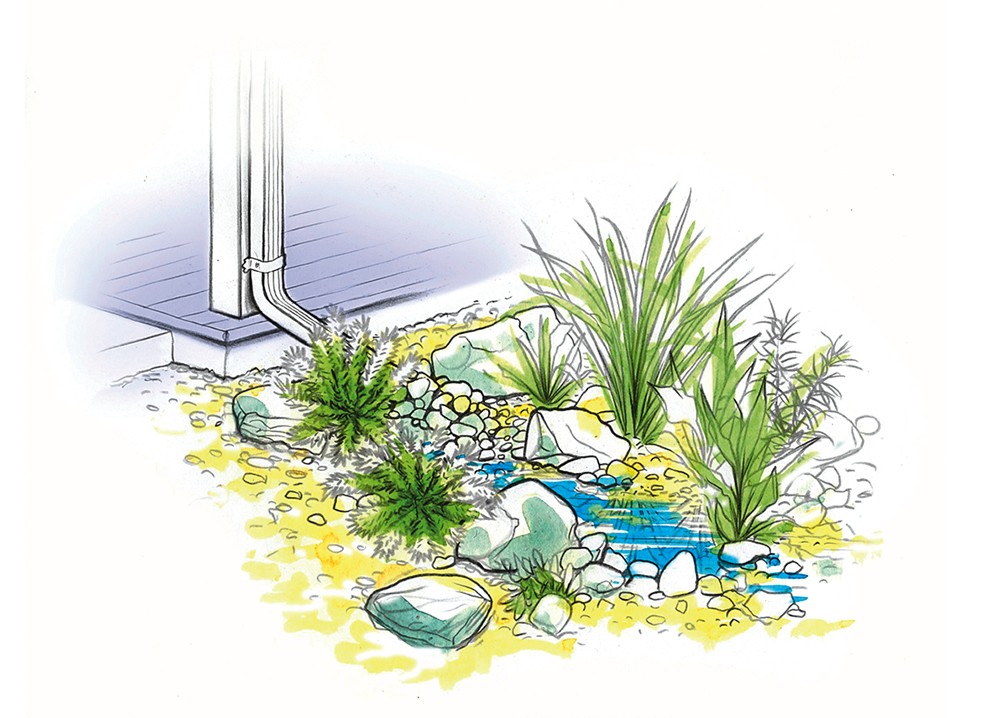
Rain Gardens
Savvy gardeners and environmentalists increasingly suggest that keeping as much precipitation as possible on-site is beneficial to soil, plants, groundwater, water quality, and the wildlife that depends on rivers and lakes downstream. For gardeners and homeowners, this means encouraging water to soak down into the soil rather than speeding its progress to the nearest storm drain or stream. While building the health of soil helps it to soak up rain and melting snow more readily, depending on the site and climate, it may also be necessary to sculpt the soil into a pond shape to help hold the water until it can soak in. Rain gardens are one good way to do this.
A rain garden can be a simple shallow depression where runoff is allowed to collect and seep into the soil. If the soil is healthy and aerated, water will collect in the depression or low spot and slowly permeate the ground. When compost is added to the soil, it further increases the soil’s ability to retain water and thus increases the amount of water that percolates down into it. The difference between a puddle—in which soil compaction prevents water from absorbing normally and benefitting plants—and a rain garden is the porosity and health of the soil underlying it. Where the soil is not healthy, it can be replaced using a compost mix—20 percent compost, 60 percent sand, and 20 percent topsoil, for example—to maximize soil health and water absorption before plants are added.
Rain garden areas can be planted with grasses, perennials, and shrubs that tolerate sites that alternate between wet (sometimes floodlike) and dry conditions. Native grasses and plants adapted to the edges of ponds or rivers are especially good choices for rain gardens. Appropriate plants differ from region to region. For suggestions, ask a local agricultural extension office, a nearby botanical garden or arboretum, or local water-quality agencies.
Rain garden sizes should differ depending on climate, precipitation patterns, soil type, and amount (if any) of paved ground or roof area involved. In general, about 1 square foot of rain garden will handle runoff from about 5 square feet of paved or roof area. The local cooperative extension office should be able to help determine the optimum garden size. For the simplest rain garden setup, consider buying downspout extenders and channeling water away from house foundations and into lawn areas or yard depressions. If the plan calls for a more ambitious, true rain garden, start small with a 10-by-10-foot area, making sure that the soil is healthy and amended with finished compost. Once that area is draining and functioning well, expand the space or add other rain gardens as needed and space allows.
Container Gardening
Finished compost is the perfect ingredient to use in seed-starting mix or potting soil. Don’t be concerned about having sterile compost. Use these recipes for starting seeds and filling containers.
Seed-Starting Mix
2 parts finished compost, with chunks bigger than 1/4 inch screened out
1 part perlite or vermiculite
Combine ingredients gently, then sprinkle the mix with enough water until it is just moist. Store the mix in a breathable container in a cool, shady spot in the garden or cellar. Do not store it in a garage or shed if it will be exposed to high or freezing temperatures, because extreme heat or cold may kill its beneficial microorganisms.
Potting Soil Mix
1 part finished compost, with large chunks screened out (no need to screen as finely as for seed starting mix)
1 part clean garden soil (or commercial organic potting soil)
1 part sand (or perlite, if weight is a concern)
Combine ingredients gently, then sprinkle the mix with enough water until it is just moist. Store it in a breathable container at moderate temperatures. Don’t keep it in a garage or shed where it might be exposed to high or freezing temperatures; extreme heat or cold may kill its beneficial microorganisms.
Self-Watering, Compost-Making Food Gardens
Liquid Compost
Also called compost tea, liquid compost is the goodness of compost infused in water. Compost tea is a great way to make limited amounts of compost go further, adding nutrients to a large area of soil that needs help, to gardens during the growing season, and even to container gardens.
To make liquid compost, wrap a handful of compost in a square of cheesecloth to make a sort of tea bag and immerse it in a gallon bucket of water, stirring vigorously for about 1 minute. This simple and quick process extracts most of the soluble organic matter and beneficial microorganisms. If chunky material escaped the cloth, strain the liquid into a watering can and apply the liquid compost to soil immediately (toss the leftover solids back into the compost pile). Be careful not to let this mix sit unaerated for very long, as the beneficial microorganisms will drown without oxygen, and much of the benefit of the compost will be lost. Even worse, microorganisms that thrive without oxygen can quickly multiply, which isn’t beneficial. Commercial compost tea makers use aeration systems to keep plenty of oxygen available to the microorganisms, but few gardeners are set up to do this, so stick to the quick infuse-and-use method.
When applying liquid compost, sprinkle it on the soil under and around plants, but keep it off the plants themselves as much as possible. When applying to lawns, rinse the grass with plain water immediately afterward to wash the liquid compost off the grass and down into the soil.