Converting Trees Into Lumber
Processing Your Timber Into Hand-Hewn Beams And Top-Grade Lumber
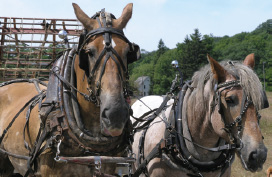
Horsepower is often the best way to log rugged timberland.
Making your own lumber is practical and economical. You not only save the cost of buying wood but of having it delivered. You can cut your lumber to the sizes you need rather than shaping your projects to the sizes available. And you can use your timber resources to the fullest, harvesting trees when they are mature, converting the best stock into valuable building or woodworking material, and burning imperfect or low-quality wood in your fireplace.
Most important of all is the quality of the wood you get. Air-dried lumber of the type demanded over the years by furnituremakers, boatbuilders, and other craftsmen is rare and expensive—lumbermills today dry their wood in kilns rather than wait for years while it seasons in the open. The lumber you cut and stack yourself can match the finest available and in some cases may be your only means of obtaining superior wood or specially cut stock at a reasonable cost. You may even be able to market surplus homemade lumber to local craftsmen.
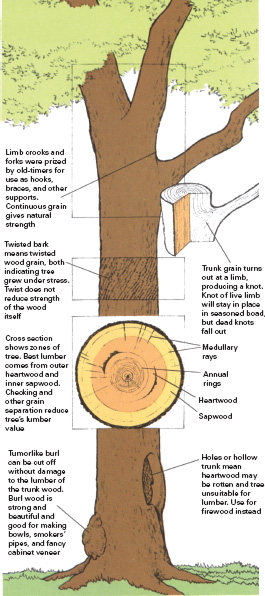
For best lumber and greatest yield per log, select trees with smooth, straight trunks at least 1 ft. in diameter. Trees that have branches at the top only are best, since limbs cause knots in finished boards. Avoid hollow trees or trunks with splits; both probably signal extensive interior decay.
The Lumbermen's Tools
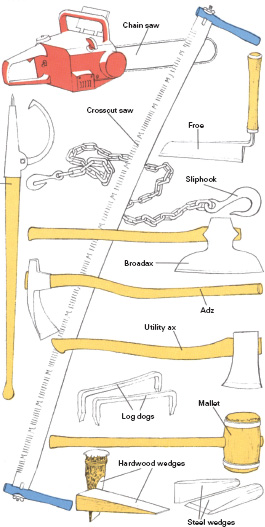
Many home-lumbering tools are available from hardware stores. Some, however, such as froes, broadaxes, and adzes, are manufactured by only a few firms and are difficult to find. Wooden mallets can be homemade; log dogs can be fashioned from steel reinforcing rod (rebar) sharpened at both ends.
Logs and Logging Techniques
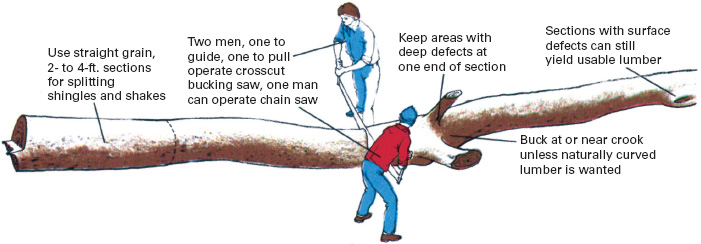
Once a tree has been felled and trimmed of limbs (see Wood as a Fuel, p.84), it is generally hauled elsewhere for conversion into boards. Trunks that are too long or heavy to move must be bucked into sections. Make your cuts near crooks or defects to preserve good board wood. Log lengths may range from 2 to 16 feet, depending on intended use and your ability to haul them.
A good deal of lumbering is still done with horses, especially in hilly areas inaccessible to motor vehicles or where there is a risk of environmental damage. Horses are ideal when only a few trees are being culled or where forest growth is dense. In flat country a four-wheel-drive vehicle with tire chains can be more efficient. Buy a good tree identification handbook (see Sources and resources, p.24), and use it to identify your trees so that you will know what you are cutting. Pay particular attention to bark characteristics, since logging is often done in winter, when there are no leaves. (Logs can be moved more easily on snow, and winter-cut logs season better.)
Tips on bucking
Plan bucking cuts to avoid wasting wood. Group defects together to minimize scrap; allow only enough extra length for trimming logs to final board dimensions.
Hauling logs
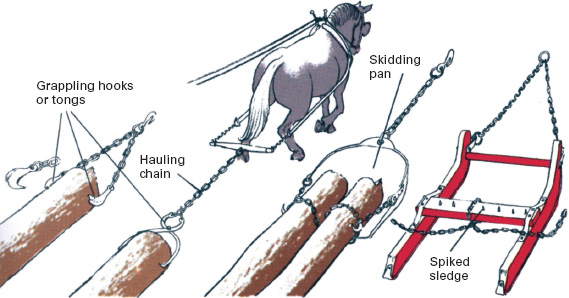
Horses and oxen are versatile haulers, good in deep woods or over rough terrain. Shovellike skidding pan or heavy sledge with spikes holds log end and eases the job. Tongs or hooks on hauling chain grip the log. Keep the animal moving forward slowly and steadily, and avoid following routes that take you along the side slopes of hills. Never haul logs down an icy or steep grade; instead, unhook the log at the top of the slope and let it roll or slide down.
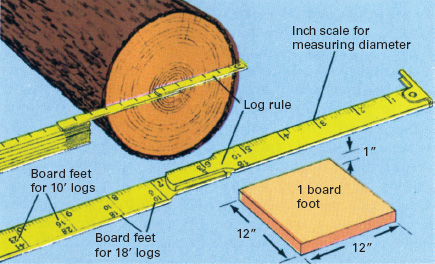
Use a log rule to estimate board feet. Varying scales exist, each yielding slightly different results; the Doyle rule shown above is typical. To use a log rule, determine length of log, measure diameter at small end, then read board feet directly from tables on rule corresponding to those measurements.
Using a vehicle
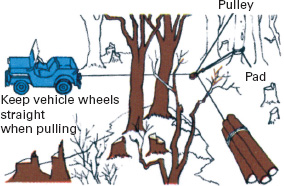
Four-wheel-drive vehicle that has tire chains and power winch is efficient but less maneuverable than a draft animal. Keep the vehicle away from deep mud, heavy snow, and thick woods. Use a pulley chained to a tree to maneuver logs around sharp turns. Pad the chain to prevent damage to tree trunk.
Common woods for lumber
Beech is hard, strong, heavy, and shock resistant. It is good for furniture, floors, and woodenware and can be steam bent. Beeches grow in all states east of the Mississippi River.
Black cherry, or wild cherry, is medium weight, strong, stiff, and hard.
Straight-grained cherry is excellent for making furniture or cabinets. It grows in the eastern United States.
Black walnut is medium weight, has beautiful grain, is easy to work, and is strong and stable. Reserve this wood for special paneling and furniture. It grows throughout the United States.
Douglas fir is light, easy to work, and very strong. A leading structural wood (building timber, plywood), it is also used for Christmas trees. It grows on the Paci?c Coast and in the Rockies.
Eastern red cedar is light, brittle, easy to work, and decay resistant. It grows in the eastern two-thirds of the country and is used for fence posts and as mothproof closet or chest lining.
Eastern white pine is light, semisoft, easy to work but strong, and has been used for everything from clapboards to furniture since colonial days. It grows mostly in the northeastern United States.
Northern red oak is tough and strong but heavy and hard to work. It is excellent for use in timber framing and as flooring. It grows in the northeastern third of the United States.
Shagbark hickory is strong, tough, and resilient, making it ideal for tool handles and sports equipment. It can be steam bent. Hickory grows in most of the eastern and central United States.
Shortleaf or yellow pine is a tough softwood with good grain. Formerly used for sailing ship masts and planking, it makes good clapboards.
Sugar maple, excellent for furniture, floors, and woodenware, is hard, strong, easy to work, and extremely shock resistant. It grows in New England and the north-central United States.
Western white pine, similar to Eastern, resists harsh weather and is a good board wood for house frames and panels. It grows best in the mountains of the northwestern United States.
White oak is similar to red but stronger and more resistant to moisture. It can be steam bent and is often used in boats. It grows in the eastern United States from Canada to the Gulf.
White spruce is light, strong, and easy to work. It can be used for house framing and paneling but is not decay resistant. It grows in the northern United States from Maine to Wisconsin.
Yellow birch is heavy, hard, and strong, with a close, even grain. It is excellent for furniture, interior work, and doors. It is easy to work. It grows in the Northeast and the north-central states.
All About Boards, Beams, Shingles, and Shakes
Making lumber is simpler than most people realize. A chain saw and lumbermaking adapter are almost indispensable accessories if you plan to make boards. The chain saw can also be used to make beams and heavy building timbers, but you may wish to hew these by hand instead. The broadax is the traditional tool for hand-hewing; however, an ordinary utility ax costs less, is more widely available, and will perform almost as well. Of course, axes and chain saws are potentially dangerous tools and should be used with extreme caution. To split shakes and shingles, a special tool called a froe is needed. Froes are available from a few specialty hardware suppliers or they can be made by a blacksmith from a discarded automobile leaf spring. The key to making shingles is not your tools but the wood you use. Choose only straight-grained wood of a kind noted for its ability to split cleanly, such as cedar, oak, and cypress.
Seasoning is probably the most important step in making your own lumber. During this stage the wood is slowly air dried until ready for use. Freshly cut lumber must be stacked carefully to permit plenty of air circulation between boards; at the same time it must be protected from moisture, strong sunlight, and physical stresses that can cause warping. Done properly, drying by air produces boards that are superior in many ways to the kiln-dried stock sold at most lumberyards. Air drying is a gradual process that does not involve the high temperatures used in kiln drying, and the wood cells are able to adjust to the slow loss of moisture without damage, toughening as they dry and shrink and actually becoming stronger than when fresh. Moreover, sap and natural oils, which do not evaporate as quickly as water, remain in the wood for long periods of time, further assisting curing. Air-dried lumber is not only strong but also durable, attractive, highly resistant to moisture damage, and well conditioned against seasonal shrinkage and swelling caused by changes in humidity.
Lumbermaking With a Chain Saw
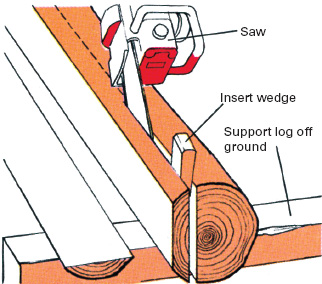
Chain saw can be used without guide to rip logs into boards, but skill and practice are needed to cut long lengths. Raise log off ground to avoid blade damage and kickback; wedges in cut prevent blade from being pinched.

Pitsawing was once the standard method for making boards, and it can still be used. Place the log on trestles or over a pit. The upper man stands on the log, starts the saw cut with short strokes, then continues cutting by pushing the saw blade down from shoulder height (a heavy saw works best). Lower man guides saw and returns blade but does no actual cutting.
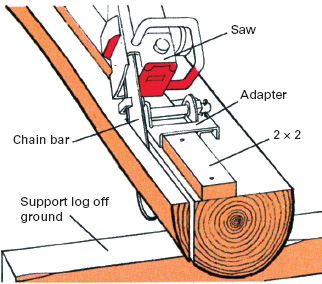
Simple adapter attaches to chain bar; 2 × 4 nailed along length of log acts as guide for making straight cuts. Support log off ground; attach and test entire assembly before starting saw. Reposition board after each cut.
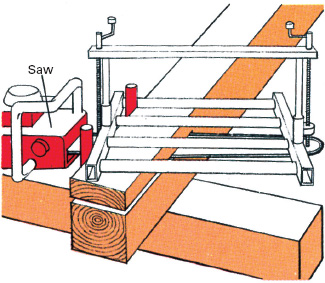
Portable chain-saw mill, best manned by two men, cuts horizontally, permitting operation with log on ground. Rollers keep saw blade level and adjust vertically to make boards of different thicknesses. Mill fits any chain saw.
How to Slice a Log
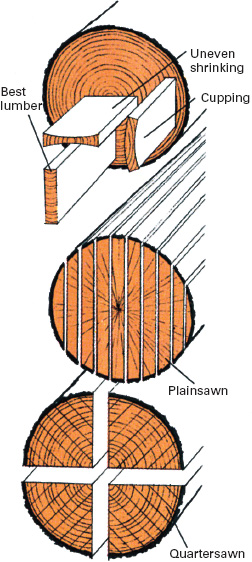
Quality of lumber varies depending upon what part of the tree it comes from. Innermost heartwood is relatively weak; use it only for heavy timbers and thick planks. Best boards come from surrounding area. Avoid using extreme outer sapwood next to the bark. Lumber cut so that rings are perpendicular to the sawn sides of the board when viewed from the end is less likely to warp. Boards whose ends show curving lines tend to cup as they dry.
Two basic ways to cut boards are plainsawing (slicing through the full diameter of the log) and quartersawing (cutting the log into quarter sections before ripping it into boards). Plainsawing yields the widest boards and the most lumber per log; quartersawing yields less lumber, but boards are of higher quality.
Sources and resources
Books
Collingwood, G.H., and Warren D. Brush. Knowing Your Trees. Washington, D.C.: The American Forestry Association, 1984.
Constantine, Albert, Jr. Know Your Woods. New York: Scribner's, 1975.
Hoadley, R. Bruce. Understanding Wood. Newtown, Conn.: Taunton Press, 1987.
Schiffer, Herbert, and Schiffer, Nancy. Woods We Live With. Atglen, Pa.: Schiffer Publishing, 1977.
Seymour, John. The Forgotten Crafts. New York: Knopf, 1984.
Sloane, Eric. An Age of Barns. New York: Henry Holt & Co., 1990.
Sloane, Eric. A Museum of Early American Tools. New York: Ballantine Books, 1985.
Soderstrom, Neil. Chainsaw Savvy. Dobbs Ferry, N.Y.: Morgan & Morgan, 1984.
Underhill, Roy. The Woodwright's Shop. Chapel Hill, N.C.: University of North Carolina Press, 1981.
Wittlinger, Ellen. Noticing Paradise. Boston: Houghton-Mifflin, 1995.
Hand-Hewing a Beam
Squaring a log into a beam is easier if you use green freshly cut timber. You can also save a lot of extra labor by hewing the logs where they have fallen instead of hauling them to a separate site. Before you begin, be sure to clear the area of all brush and low-hanging branches that might interfere with your ax work.
Choose logs that are only slightly thicker than the beams you wish to hew. Judge this dimension by measuring the small end of the log. Place the log on wooden supports (notched half-sections of firewood logs will do) with any crown, or lengthwise curve, facing up. The two straightest edges of the log should face the sides. Do not remove the bark; its rough surface helps hold the ax to the mark and also diminishes your chances of striking a glancing blow with possibly dangerous results. It is not always necessary to square off all four sides of a log. Old-time carpenters often hewed only two sides, and sometimes, as in the case of floor joists found in many old houses, they smoothed off only one. Rafters, in fact, were often left completely round.

1. Scribe timber dimensions on log ends. Cut notches for chalk line; attach line and snap it to mark sides.
2. Notch logs with utility ax. Make vertical cuts at 4-in. intervals to depth of chalk line marks.
3. Hew sides with broadax. Keep ax parallel to log, and slice off waste by chopping along chalk marks.
4. Smooth hewn surface with adz if desired. Straddle beam and chop with careful blows of even depth.
Splitting shingles and shakes
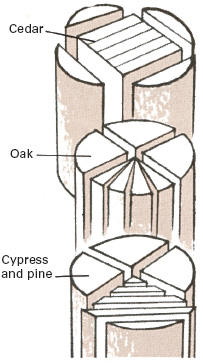
Billets are log sections from which shakes and shingles are split. Use straight-grained logs, 2 ft. or more in diameter, with no knots. Cut logs into 1½ to 2-ft. lengths for shingles; for shakes use 2½- to 4-ft. lengths. (Longer clapboards can also be split but only from exceptionally well-grained timber.) To make cedar billets, split off outside edges of log section to form squared block. Split block in half, then halve each piece again. Continue until all pieces are of desired thickness. With oak, split the log first into quarters, then radially. Discard heart and outermost sapwood. Cypress and pine are quartered, like oak, then split along the grain at a tangent to the growth rings.
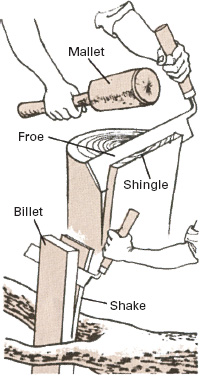
To make shingles with a froe, rest billet on a stump. Drive froe blade into top of log using a heavy wooden mallet or homemade maul. Twist blade to split wood by pulling handle toward you.
To make wood shakes (oversize shingles), brace billet in fork of tree or other improvised holder. Stand behind upper limb of fork, drive froe into wood, and twist blade to start split. Then slide the froe farther down into the crack while holding the split wood apart with your free hand. If the split starts to shift off-center, turn wood around so that opposite side of billet rests against upper limb of fork, and continue twisting with froe.
Seasoning and Stacking Lumber
Commercial lumber mills season new wood in ovens, called kilns, to dry it quickly. Seasoning wood by exposing it to the open air will do the job as well or better, but the process takes much longer—at least six months for building lumber and a year or more for cabinetmaking stock. A traditional rule of thumb is to let wood air dry one year for every inch of board thickness.
The best time of year to begin seasoning new lumber is in the early spring, when the dryness of the cool air coupled with the windiness of the season combine to produce optimal drying conditions. A spring start also permits the curing process to continue uninterrupted for as long as possible before freezing winter temperatures temporarily halt evaporation. Set aside or build a sheltered area such as a shed (it may be no more than a roof set on poles) to protect the wood from harsh weather and direct sunlight. Seal the ends of each newly cut board with paint or paraffin to prevent checking, and stack the lumber in one of the ways shown below so that it receives adequate ventilation and support. Place the poorest quality pieces on the top and bottom of the pile, where weather damage and warping is greatest. Date and label each stack for future reference.
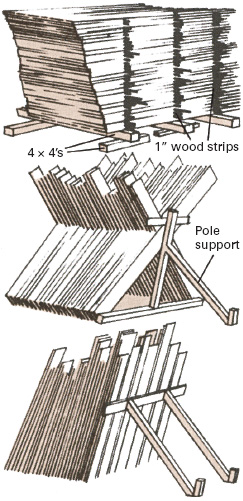
Flat stack lumber that will remain undisturbed for long periods. Place 4 × 4's on floor or on ground treated with pesticide. Lay boards side by side, 1 to 2 in. apart, then stack in layers separated by 1-in.-thick wood strips.
Pole stack saves labor and space, requires less foundation, and allows lumber to shed rainwater. Lean boards against pole support so they are nearly vertical, crisscross pieces for maximum exposure of surfaces.
End stack is used only for nearly seasoned wood because it provides limited air circulation. Lean boards against wall or frame with spaces between boards at bottom. Boards can be removed without disturbing pile.