Homemade Beverages
Potables Made at Home Not Only Taste Better, They Are Better
Almost every morning of his adult life President John Adams drank a tankard of hard cider. The reason, as he put it, was “to do me good.” And, indeed, it seems to have done him considerable good, for he lived to be 91. Of course, making and drinking your own cider and other fruit beverages—whether soft, hard, or in between— may not guarantee longevity but they will make the years pass more pleasantly.
Almost anyone who can follow a simple recipe can make delicious fruit drinks and sodas. With a bit more care and effort alcoholic beverages, such as wine, beer, and hard cider, can be home brewed using simple equipment and ingredients. Lager, ginger beer, applejack, mead (honey wine), dandelion wine, and red table wine are all within the scope of the home beermaker and winemaker. In fact, almost any drink other than those whose alcoholic content is increased by distillation is not only easily made but is also sanctioned by law. (Federal regulations effective since 1979 permit adult citizens to make 200 gallons of beer or wine yearly for home consumption and all the hard cider they want. However, selling these beverages or distilling them to make hard liquors, such as whiskey and brandy, is illegal.)
The fundamental prescription for making safe, delicious beverages at home is similar to that for processing most other food products. Use the best ingredients available, pay scrupulous attention to cleanliness and hygiene, and do not be afraid to experiment; trying a new ingredient or a new mix of old ingredients is the best way to introduce your own tastes and personality into the beers, wines, and fruit drinks that you create.
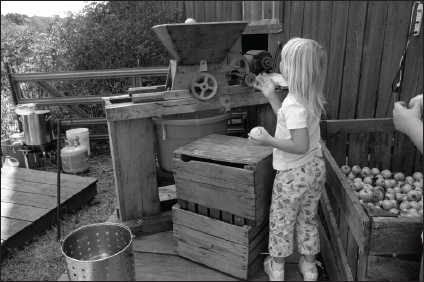
Home cidermaking today is much the same as it was 150 years ago when cider was the most popular drink in America. Presses almost identical to the antique one shown here are still sold by country stores and mail-order houses. Do-it-yourself kits are also available. For still greater savings rig up your own press, or purchase plans that show how to build a traditional type.
Getting the Cider out of the Apple
Old-fashioned cidering is easy. Basically it is simply a matter of separating the juice from the apple. Start by deciding which apple varieties will give a flavor you like. Use a blend of tart and sweet, not just one kind. Fallen and bruised apples can be used, but avoid ones with worms, mold, or rot. A bushel will yield about 3 ½ gallons of cider. Next, wash the apples thoroughly, and if they come from commercial orchards (which often use large amounts of pesticides), remove the stem and the end of the blossom. Chop or grind the apples into a fine pulp, or pomace. You can make or buy your own grinder or you can use almost any device that will aid in pulverizing them—a food chopper, food mill, food grinder, rolling pin, even a leaf shredder. Whatever you use, be sure to clean it carefully before you start and after you finish. Grind the pulp as finely as possible—twice if need be—and save any juice to add to the cider.
The pomace must now be pressed to extract the cider. Wrap the pomace in a clean pillowcase or cheesecloth and place it in a cider press—manufactured presses are widely available, or you can rig up one of your own. Do not rush the process. Apply pressure, wait until most of the juice stops dripping, then apply more pressure. Your patience will result in increased yields and clearer cider. The cider can be used at once or stored in clean glass bottles. Before pouring it into containers, filter the cider through several layers of cheesecloth to clarify it and improve its storage qualities.
The flavor of cider starts maturing the minute it is pressed, progressing from a sweet, tangy tartness to a more mellow, full-bodied, fruity taste. However, unless the cider is stored properly, the changes will continue until the cider becomes vinegar. Provided the fruit was healthy and well washed, the processing equipment clean, and the storage bottles sterile, cider will keep several weeks under refrigeration, frozen cider for a year or longer. Pasteurization improves keeping qualities but harms flavor. To pasteurize cider, heat it quickly to about 170°F, then immediately pour the hot cider into sterile canning jars, seal them, and set them in a water bath of 165°F for five minutes. Let the jars cool in lukewarm water for an additional five minutes, and then cool them completely in cold running water.
Cider Recipes
Cider is a versatile mixer that can be used in both alcoholic and nonalcoholic drinks. It also can be fermented into hard cider, applejack, and cider vinegar. The latter is not so much a beverage (although it is used in a few drinks) as it is a general household do-it-all, serving as a flavoring agent, food additive, and cleanser.
Instant Apple Breakfast
1 cup chilled cider
1 egg
1 banana
Blend all the ingredients for a few seconds in an electric mixer. The flavor can be changed by blending the apple cider with other fruit juices, such as grape, cranberry, or prune. You can substitute a tablespoon of gelatin for the egg. Makes 1 cup.
Cider Syllabub
Syllabubs are frothy drinks made by combining milk with either cider, juice, or an alcoholic beverage. Old-timers used fresh un-pasteurized whole milk in their syllabubs, preferably by milking the cow directly into the mix.
A typical syllabub recipe calls for mixing ½ lb. sugar, 1 pt. cider, and some grated nutmeg; 3 pt. milk is then poured in from a foot or two above the mixing bowl, the stream being directed in a circular motion to yield the maximum amount of froth. As the final touch, 1 pt. of heavy cream is poured over the top. For an alcoholic syllabub combine 1 pt. hard cider, 4 oz. brandy, the juice and the scraped outer rind of one lemon, and ½ cup sugar. Let the mixture ripen for one day; then whip 2 cups of heavy cream until stiff, beat the whites of two eggs until stiff, and fold both ingredients into the mixture. Syllabubs are excellent when served either hot or cold.
Mulled Cider
1 qt. apple cider
10 whole cloves
1 cup maple syrup
4 cinnamon sticks
Nutmeg
Bring the cider and cloves to just below a boil in a saucepan. Add the maple syrup and stir until thoroughly mixed. Serve hot in 8-oz. mugs with a cinnamon stick in each, and top with freshly grated nutmeg. A bit of rum will make the drinks even tastier. Some recipes for mulled cider recommend adding eggs. For this variation beat two eggs, and mix them into the warm cider, stirring constantly as you do. Makes 4 cups.
Hard Cider
Fill a used wine or whiskey keg with cider that is fresh and un-pasteurized, leaving about a tenth of the container empty to allow room for expansion. (The keg should be clean but not new; new wood will impart an unpleasant flavor to the cider.) Cover the keg loosely and place it in a cellar or other cool, dark room where the temperature stays between 40°F and 50°F. Be sure to check the temperature frequently: high temperatures produce rapid fermentation and a bitter flavor; temperatures that are too cool may prevent the cider from hardening.
The cider should start fermenting in a day or less—you will hear hissing when you place your ear near it and tiny bubbles will appear in the liquid. If the cider seems to be fermenting too quickly—the hissing will be loud and the bubbles large—move the cider to a cooler place. If little or no fermentation appears to be taking place, dissolve a cup or two of sugar in some fresh cider and add it to the keg. A more scientific method for adjusting the sugar content is to measure it with a winemaker's saccharom-eter (see p.250). The instrument should indicate a sugar content of about 17 percent.
The cider is ready when the bubbling and hissing have completely stopped. Siphon it off carefully, leaving the residue in the bottom of the container, and bottle it in containers that are clean and airtight. The hard cider is ready to drink right away, but the benefits of delaying for several months until the cider has had an opportunity to age will be well worth the wait.
Applejack
Applejack is hard cider whose alcoholic content has been increased beyond what fermentation alone will produce. Commercially, this is accomplished by distillation, a process that is subject to government regulations, but you can achieve the same effect by putting a bucket of hard cider where it will freeze—outdoors on a cold night or in the freezer. Slushy ice will form on top. Remove the ice in order to concentrate the hard cider.
Cider Vinegar
One of the most valuable of all homemade concoctions, cider vinegar can be used for anything from a salad dressing to cleaning stove tops and removing stains. Open a bottle of sweet cider and let it stand at about 70°F. After about five weeks it will turn to hard cider, then to vinegar. Yo u can speed the process by adding a little “mother” (the cloudy clump of bacteria that forms on the surface of natural vinegar) from a previous batch or from a friend's cider vinegar.
The Traditional Cider Press
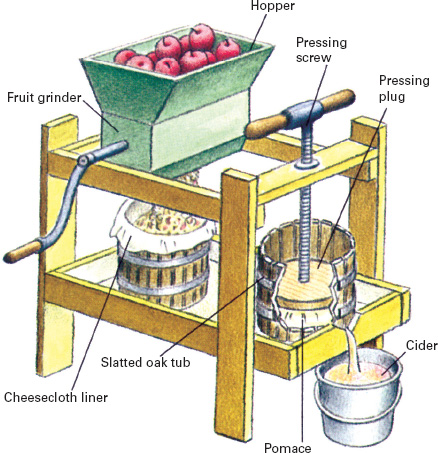
Cider press design has changed little over the years. A slatted hardwood container holds the crushed apples (oak is the favored wood because it is strong yet does not affect the taste of the juice), and a center-mounted screw press forces out the juice. Presses are available at country stores and from some mail-order houses as are grinders for making the pomace. Wine presses are sometimes recommended for cidermaking, but they are too small—a cider press should be at least large enough to handle the pomace extracted from a bushel of apples.
Improvised presses
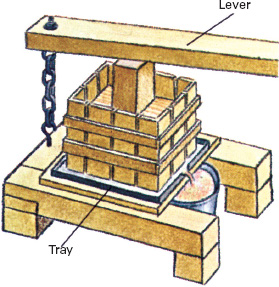
Lever press is simple in design and easy to build. Make the lever arm of strong, durable umber—a 4 × 4 or even the trunk of a small tree can be used as a lever for a large press. Fashion the box and the follower (the piece that actually presses on the pomace) out of 2 × 4's. A long ever arm will make the task of pressing somewhat easier.
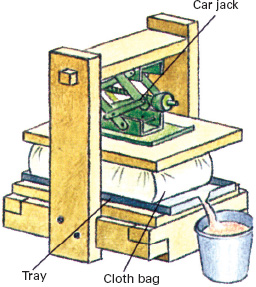
Car jack multiplies muscle power in this homemade press. Use scissors-type jack, and be sure the frame of the press is strong. You can do without a frame if you have an overhang to put the jack under, such as a crawl space beneath the house or a low branch. Apply pressure gradually, and wait until all the juice runs out before applying more.
Soft Drinks and Juices To Slake All Thirsts
Almost any garden fruit or vegetable will yield juice that can be used to make tasty, delicious drinks. Grains, flowers, roots, and barks also contribute flavorings, and you can even make your own soda pop by adding a little bicarbonate of soda or unflavored carbonated water.
The first step in making most juices is to reduce the fruit or vegetable to a pulp. (A frontier wife once described it as “beating the hell” out of the fruit.) A variety of common kitchen tools can be used for this purpose, including potato mashers, fruit blenders, juicers, food grinders, and food processors. You will need a strainer on hand to separate the juice from the pulp and a clean bowl to hold the juice after it is strained.
Clean and peel the fruit or vegetables and cut the larger produce, such as carrots, tomatoes, and peaches, into sections. In some cases, particularly for fibrous vegetables, such as celery, carrots, and beets, it is necessary to cook the produce for a few minutes over a low flame to aid the extraction. Once you have made the pulp, put it in a jelly bag, colander, or cheesecloth and let it stand for several hours over a clean container. Generally, this is all you need to do to get the juice out. Some fruits, however, notably grapes and apples, require extra force to extract their juice. Make a sack out of cheese-cloth or an old pillowcase, put the fruit in the bag, and squeeze it in a cider or wine press. Tighten the press about every half hour. Many fruit juices can be frozen into a frappe (the Italians call it granita). Simply freeze the mixture solid, then reduce it to slush by putting it in a blender. A little egg white or unflavored gelatin will thicken the potion. Bear in mind that coldness dulls the taste buds, so try to make your frozen drinks stronger flavored than their liquid counterparts. With citrus drinks you can add flavor by grating in some of the rind. Extra honey or sugar will also help.
Beverages that have been simmered a few minutes, then bottled in sterile, tightly capped containers, will keep well in the refrigerator. For long-term storage (up to a year), can or freeze the drinks. Vegetable drinks, with the exception of those based on tomatoes, should be canned by the pressure-cooker method (see Preserving Produce, pp.206—209). To freeze a beverage, pour it into clean plastic bottles, cover it securely, and store at 0° F. (Leave the upper fifth of each container empty to allow for expansion as the drink freezes.)

Homemade lemonade is a delicious summertime treat. Don't throw out the peels until you've extracted the lemon oil to mix with the juice.
Old-fashioned Concoctions
Hot summers and hard work produced some mighty thirsts in years gone by, and American inventiveness created the beverages to slake them. Some of these concoctions are as popular now as they have ever been. Others, however, such as shrubs, switchels, and syllabubs, have become as obsolete as their names—a pity, because many are delicious and all are healthful. The decline can be traced to an enterprising Philadelphia druggist named Hires, who in 1893 bottled and sold the first ready-made soda pop—Hires Root Beer.
Lemonade
Lemonade is synonymous with summer. The secret to making old-fashioned lemonade is to extract the aromatic lemon oil from the rinds, either by letting the sugar soak up the oil or by steeping the rinds in boiling water.
4 lemons
1 cup sugar
1 qt. water
Peel the rinds from the lemons, put them in a bowl, and cover with the sugar for about 30 minutes. Then boil the water and pour it over the sugar and rinds. When the water is cool, remove the rinds. Squeeze the lemons, strain the juice, and add it to the mixture. Refrigerate until ice-cold. Pink lemonade can be created by adding the juice from half a bottle of maraschino cherries before serving. Makes 1 qt.
Mint Punch
James Monroe, our fourth president, is said to be responsible for this icy, clean-tasting concoction.
½ cup water
1/3 cup sugar
½ cup fresh mint leaves
1 cup grape juice
1 cup orange juice
½ cup lime juice
Warm the water until it just boils, turn off the flame, and add the sugar and most of the mint leaves (reserve a few leaves for a garnish). Stir the mixture until the sugar is dissolved. When the liquid cools, strain out the mint; add the grape, orange, and lime juices; place in the refrigerator. Serve the punch over ice with a mint leaf on top. Makes six 4-oz. servings.
Hay-Time Switchel
Switchel is a refreshing, energy-boosting drink used by farm-hands to slake their thirsts during the heavy work of harvest season, especially the backbreaking labor of haymaking. Long before refrigerators, or even icehouses, jugs of switchel were kept cool in the springhouse or by hanging them in a well.
2 cups sugar
1 cup molasses
¼ cup cider vinegar
1 tsp. ground ginger
1 gal. water
Heat ingredients in 1 qt. of water until dissolved, then add the remaining water, chill, and serve. Makes 1 gal.
Extracting Juice From Fruits and Vegetables
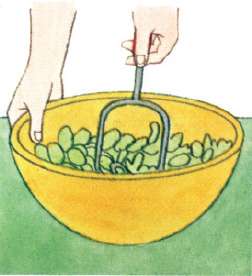
Mashing or crushing is the best way to juice berries and other small fruits such as grapes. A stainless steel potato masher can be used as a pestle and a large, heavy mixing bowl as a mortar. Warming the pulp in a large saucepan (do not boil it) will yield more juice. Strain leftover pulp through a sieve or a cheesecloth, and use it for pies and other fruit desserts.

Small pitted fruits, such as cherries, plums, and elderberries, should be strained through a jelly bag. Heat the fruits first in a little water until they burst; once again, take care not to boil the mixture, since it will damage the flavor and destroy nutrients. You can get the most juice out by letting the pulp drain for a period of several hours or overnight.
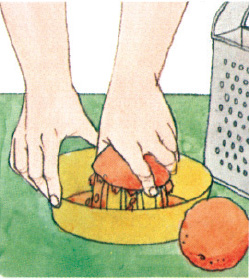
Squeezing is the best way to extract juice from most citrus fruits, especially when they are fully ripe. Remember that much of the distinctive citrus fla-vor is in the rind, so it is a good idea to squeeze some rind into the juice or to include a little grated rind. Add the oil or rind a bit at a time and sample the juice after each addition until the taste is right.
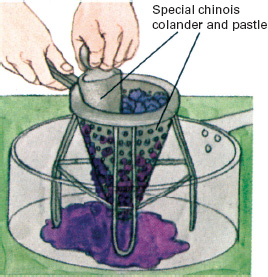
Pureeing is an effective way to prepare juice from hard fruits, such as peaches, pears, and pineapples. Chop the fruits into small sections, then force them through a sturdy colander. A chinois (a conically shaped colander with a matching pestle) makes the job easier. You can also use a food processor or blender. If the puree is too thick, add water.
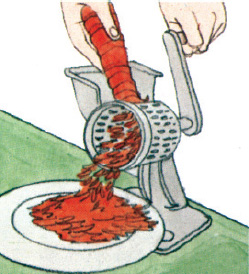
Grinding and chopping is another method of juicing hard fruits. The job is most easily done with a food mill or food processor. Once the fruit is reduced to pulp, drain the juice off with a jelly bag or sieve. Yo u can get extra juice by adding a little water to the pulp, letting it stand overnight, then extracting the juice by straining through a fine sieve.
Homemade Soda Pop
Nowadays we use artificial carbonation for our soft drinks, but years ago a mixture of bicarbonate of soda and tartaric acid was added to a drink to make it fizz.
1 qt. water
4 cups sugar
4 tsp. cream of tartar
1 tbsp. vanilla
Whites of 3 eggs, beaten until stiff
Tartaric acid powder (available from winemaking suppliers)
Bicarbonate of soda
Heat 1 qt. of water to near boiling; dissolve the sugar and cream of tartar in it, and add the vanilla. When the syrup mixture has cooled, add the egg whites, stir thoroughly, then bottle and store in the refrigerator. To make the actual soda pop, dissolve 2 tbsp. of the syrup plus ¼ tsp. tartaric acid powder per 8-oz. glass of ice cold water. Then add ½ tsp. of bicarbonate of soda and stir. Half a teaspoon of lemon juice per glass can be substituted for the tartaric acid, or simply eliminate the bicarbonate and tartaric acid and use carbonated water instead of ice water.
Ginger Beer
Root beer, ginger beer, lemon beer, and a host of similar drinks had little or no alcoholic content. Such beverages were fermented briefly with the same kind of yeast used for making bread, then bottled and stored: the fermentation served only to make them fizzy. Old-fashioned root beer is difficult to make because of the rarity of its ingredients: spice wood, prickly ash, and guaiacum, to name a few. The ginger beer given here is adopted from a Mormon recipe for Spanish gingerette.
4 oz. dried gingerroot
1 gal. water
Juice from 1 lemon
1 packet active dry yeast
½ lb. sugar
Pound the gingerroot to bruise it, then boil in ½ gal. water for about 20 minutes. Remove from stove and set aside. Mix lemon juice and packet of dry yeast in a cup of warm water, and add to the water in which gingerroot was boiled. Pour in remaining water, and let mixture sit for 24 hours. Strain out the root and stir in sugar. Bottle and place in refrigerator. Do not store at room temperature; bottles may explode. Makes ten 12-oz. bottles.
Hot Chocolate
Despite its current reputation as the bane of dieters, chocolate is a highly nutritious food. This recipe derives from the Shakers.
2 oz. unsweetened chocolate
1 cup water
½ cup sugar
Pinch of salt
1 tsp. cornstarch
3 cups milk
1 tsp. vanilla
Melt the chocolate in a double boiler. Boil the water, and stir in the sugar, salt, and cornstarch until dissolved. Pour over the chocolate and stir thoroughly. Scald the milk, pour it into the mixture, and add the vanilla. Then reheat mixture almost to boiling and whip it with an egg beater until frothy. Makes 4 cups.
Raspberry Shrub
Shrubs are effective hot weather coolers. Red raspberry shrubs were the most popular, but almost any fruit can be used, including black raspberry, orange, cranberry, strawberry, and currant.
1 qt. red raspberries
1 qt. water
¾ cup sugar
½ cup lemon juice
Pour berries into a bowl and use a potato masher to reduce them to a pulp. Heat water to a boil, add sugar and lemon juice; continue to boil until the sugar dissolves in the water. Then pour the hot sugar water over the berries. When the mixture is cool, press it through a colander and refrigerate. Serve the shrub over ice cubes. For an alcoholic version of the same shrub, use a pint of water rather than a quart, and stir in 1 ½ cups of brandy and ½ cup of rum before refrigerating. Makes ½ gal.
Fruit Syllabub
This semisoft Connecticut syllabub is of English ancestry. Although not truly a beverage, it still can quench a thirst as well as satisfy a palate. The juice of any berry can be used.
Sugar to taste
1 cup berry juice
2 cups heavy cream
Stir sugar into juice until sweet, then continue stirring until all sugar is dissolved. Add cream, and whip mixture until it starts to stand in peaks. Serve cold or use as a topping. Makes 3 cups.
Home Brew: Fine Flavor At Modest Expense
Beer is one of the oldest and most popular drinks in the world, as much for the ease with which it can be made as for its good taste. And with today's inexpensive instruments for measuring both temperature and sugar concentration—the crucial factors in successful brewing—making home brew is more foolproof than ever. You will need the following equipment:
Bottles, caps, and capping machine. Beer is usually bottled in 12- or 16-ounce containers. You can buy new bottles or save empties, but do not use nonreturn-able bottles—they are too fragile. Beermaking supply houses, some hardware stores, and several mail order houses sell caps and capping machines.
Brewing vessel. Use a 7- to 10-gallon food grade polyethylene pail with a tight-fitting lid.
Fermentation lock. This device mounts on the lid and allows carbon dioxide to escape from the fermenting beer while keeping outside air from entering.
Saccharometer. This instrument measures the level of sugar concentration. It is available at stores selling winemaking or beermaking supplies.
Thermometer. Any immersible thermometer that is accurate in the 50°F to 230°F range will do.
All items should be sterilized before use by soaking them for 10 minutes in a solution of 2 cups of chlorine bleach and 5 gallons of very hot water. Rinse everything thoroughly in more hot water after sterilizing.
The essential ingredients for making beer are brewer's yeast, sugar, water, malt, and hops. During fermentation the yeast consumes sugar and produces carbon dioxide and alcohol. Some sugar is naturally present in the malt, but more is generally added in the form of cane sugar or corn sugar. Good water is important in making beer, but almost any tap water will produce acceptable brew provided it is not heavily chlorinated and does not have a strong mineral taste.
Sweet-tasting malt (made from barley) and bitter-tasting hops (the female flower of the hop vine) give beer its distinctive flavor. Both are available in premeasured packets at stores selling beermaking supplies; beginners should use the packets to avoid disappointment. Making malt from barley corn is not difficult, however. The purpose of the process is to produce an enzyme, diastase, that converts the barley's starch into sugar—the raw material of alcohol.
The first step in making malt is to let the grains of barley sprout (see The Kitchen Garden, p.135, for information on sprouting seeds). When the shoots are as long as the kernels, the growth must be stopped—with-out destroying the diastase—by heating the barley to a temperature above 185°F but never any higher than 230.°F. (The higher the temperature, the darker will be the beer.) Once malted, the barley must be soaked in water so that the diastase can convert more of the kernel's stored starch into sugar. First crack the grain by grinding it very coarsely or rolling it with a rolling pin. Then put it into 150°F water and let it soak for about six hours. Strain the mixture through fine cheesecloth; the resulting liquid is the malt extract.
Hops cut the sweetness of the malt and also contain preservative oils. To bring out the oils, boil the hops in the malt for at least three hours. Because the prolonged boiling reduces flavor, many brewers reserve a small proportion of the hops until the last quarter hour of boiling. Proportions of water, malted grain, and hops vary according to recipe and personal taste, but an average formula is 2 bushels of malted grain and 2 quarts of dried hops to make 5 gallons of beer.
Basic Steps in Making Light Beer
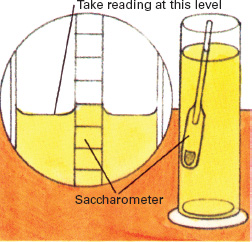
1. Boil 2 ½ gal. of water for five minutes and pour into polyethylene pail. Add 3 lb. hop-flavored malt extract, 3 lb. sugar, and 2 ½ gal. cold water. To test sugar content, pour some brew into a glass cylinder, let it cool to 70°F, and insert saccharometer. Twirl meter to release any air bubbles that are clinging to it, and let float. For beer that will have 6 percent alcohol, reading should be 12 percent.
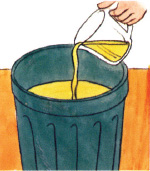
2. Dissolve 1 tsp. tartaric acid in a small quantity of brew and add to pail. When the mixture has cooled to about 70°F, sprinkle a package of brewer's yeast and a package of yeast nutrient (special vitamins and proteins that encourage yeast growth) over the brew; let stand three hours, then stir thoroughly into mixture. (Note: Temperatures over 80°F will harm yeast and slow fermentation.)
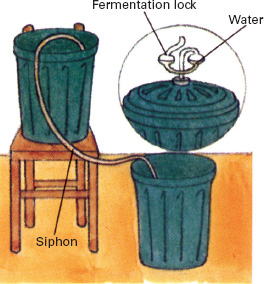
3. Cover pail with tight-fitting lid that includes a fermentation lock on its top to allow carbon dioxide gas to escape. After about five days (when the fermentation slows and the sugar falls to about 5 percent) siphon brew into clean polyethylene pail or 5-gal. glass bottle. Siphon from the top of liquid, being careful not to disturb sediment at bottom of fermenting beer. Replace cover on pail.
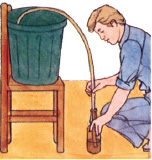
4. Check sugar concentration daily. When it falls below 1 percent, fermentation is complete, and liquid should be siphoned into the bottles at once. (Fermentation time depends upon proportions of ingredients as well as holding temperature but is usually from three to six weeks—most recipes give an approximate time.) Siphon carefully from top of pail; do not disturb sediment.
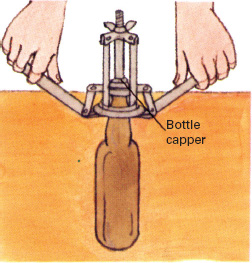
5. Many recipes call for addition of small amounts of sugar (about 1 tsp. per quart) to each bottle to ensure enough fermentation to carbonate beer. To avoid adding too much sugar to any one bottle (it could cause the bottle to explode), dissolve the total amount in a small quantity of malt, then divide malt equally among the bottles. Cap bottles and store at least three weeks before drinking.
Beer and Ale Recipes
The procedure for making dark beer is identical to that for light beer described on the previous page; the only difference is that darker malt is used. For ale, follow the basic beer procedure, but use more sugar for a higher alcohol content and more hops for a stronger taste.
Nowadays, most beer and ale is served cold and unmixed, but in times gone by beer was a basic ingredient in many mixed drinks. These ranged from spiced summer-time coolers to such hearty winter concoctions as the spectacular Ale Flip or the more prosaic but no less pleasing Mulled Ale, Posset, and Yard of Flannel.
Ale
3 lb. hop-flavored malt extract
3 ½ lb. sugar
2 ½ gal. water
¾-1 oz. Hops
2 ½ gal. cold water
1 tsp. tartaric acid
1 package yeast
1 capsule yeast nutrient
Stir hop-flavored malt extract and sugar into boiled water that has cooled for five minutes, as in making beer. Add extra ounce of hops and cold water, and measure sugar level—it should be 5 percent. Add tartaric acid, yeast and yeast nutrient, then ferment and bottle as for beer. Makes 5 gal.
Cold Spiced Ale
2 cinnamon sticks
2 whole cloves
1 allspice berry
Pinch of grated nutmeg
¼ cup sherry
4 cups ale
4 cups ginger beer (see p.247)
Soak the spices for several hours in room-temperature sherry, then strain into a pitcher. Add ale and ginger beer, chill thoroughly, and serve in well-chilled mugs. Or serve the spiced ale as it would have been drunk in the days before refrigeration—only slightly cooled. Makes eight 8-oz. servings.
Ale Flip
1 qt. beer or ale
¼ cup rum
Sugar to taste
Mix all ingredients in a stainless steel or other type of metal container. Heat a poker until red-hot, then insert it into the brew. In the 18th century ale flips were so popular that a special tool, called a loggerhead or flip dog, was kept by the fire ready to be heated to make a tankard of ale steaming hot. Makes two to four servings.
Mulled Ale
2 qt. ale
1 tsp. ground ginger
½ tsp. ground cloves
½ tsp. ground nutmeg
2 tbsp. sugar
1 cup rum
Mix together ale, spices, and sugar, and heat just to boiling. Add rum and serve hot. Makes eight 8-oz. servings.
Summer Refresher
3 cups ale
1 cup ginger beer (see p.247)
Mix the two ingredients together and serve well chilled. Makes four 8-oz. servings.
Ale and Sherry Posset
4 cups milk
1 cup ale
1 tbsp. sugar
1 cup sherry
Grated nutmeg to taste
Heat milk just to boiling. Mix together ale, sugar, sherry, hot milk, and stir until sugar dissolves. Serve in mugs; sprinkle with grated nutmeg. Makes six 8-oz. servings.
Yard of Flannel
½ cup brown sugar
3 eggs, beaten
½ tsp. nutmeg
½ cup rum
4 cups beer or ale
Beat sugar into eggs, add nutmeg and rum, and heat over very low flame or in double boiler. Heat beer or ale just to boiling. Pour ale slowly, beating constantly, into egg mixture. The traditional way to make this drink frothy is to pour it back and forth between mugs. Makes 4 cups.
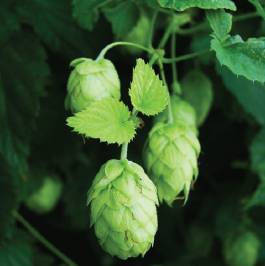
Hop vines grow wild in many sections of the country. It is the female flowers that are used in beermaking (they look just like the males but in the fall contain seeds). Powdered hops and dried hop flowers are also available.
Pat O'Hara, Home Brewer
Brewing or Quaffing: Beermaking Satisfies Twice
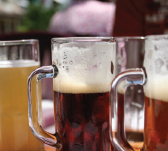
Pat O'Hara, who runs a Bedford, Ohio, general store, loves his home brew. “I've been making beer and wine since 1964. isaw a small article on winemak-ing in the newspaper and, believe it or not, that's all it took to start me. At first most people were interested in making wine, but more and more people are getting into brewing. Some people just like the fuller-bodied taste of home-brewed beer, and others are outraged by high prices in the market. And then there are folks who just ike doing things for themselves. Once somebody starts making beer, pretty soon one of his friends will taste it and start beer-making too. Believe me, you can really make some terrific-tasting beer at home.
“We've got so many people interested in my area that we even have a beermaking club. We meet about once a month, 60 to 80 people, counting wives and a few folksingers. You can really learn a lot tasting the beer that other people make. Of course, some people have already drunk so much of their product that they don't have any beer to bring to the club.
“The biggest disaster in beermaking is the old story about grandpa who brewed some beer and the bottles all blew up. It's possible, of course, but ihaven't heard of it myself in quite a while. Sometimes you get it with what icall these old Prohibition brewers. They brewed the beer, eft it in a crock, and after four days bottled it and added a little sugar. The modern way is to leave the beer in the crock and then transfer it to a 5-gallon jug and let it sit until no more fermentation gas bubbles up. Then you add a specific amount of sugar to the brew and bottle it. If you do it that way, there's very little chance of accident.
“The other time ihear about problems is during the month of August. If it's too warm and if you leave the beer to ferment in an open crock, the air gets to it and it turns to vinegar. The only real nuisance job in brewing is washing all those 12-ounce bottles. You can get real tired of that. Some people are going to quart bottles to cut down on the work. iguess iprobably brew about a case of beer a week myself. What's the most fun in the whole process? Just the joy of drinking it.”
The Delicate Art Of the Home Vintner
Wine, like beer, is made by adding yeast to a sugar-rich solution; as the yeast cells grow, they convert the sugar into alcohol. But a wine's flavor does not come from any one ingredient; it comes from a complex chemistry that gradually transforms a pulpy concoction of fruit and yeast into a clear, flavorful wine.
The trick to making dry wine is to start with exactly the right amount of sugar: too little sugar and the yeast cells cannot produce enough alcohol; too much and they are poisoned before they can convert all the sugar. A saccharometer of the same type used in beermaking (pp.248—249) makes it easy to measure sugar content. There is more to good wine than dryness and alcohol, however. Start with good fruit, avoiding any that is old or overripe. To ensure a taste that is tangy but not too harsh, check your fruit's acidity with a vintner's acid-testing kit. For richness and body add tannin by mixing in ½ cup of strong tea per gallon of juice (note, however, that red wines need no extra tannin, since the grape skins supply enough). Yeast is another variable. Beginners should use an all-purpose vintner's yeast, but there are a wide variety of yeasts, such as those for making sherry and champagne.
Keep all equipment clean. You should also sterilize equipment by rinsing it in a solution of six Campden tablets (available at winemaking stores) per pint of water. These tablets inhibit the growth of unwanted, or wild, yeasts by liberating the gas sodium dioxide. They are also used during the winemaking process itself.
It is after fermentation that the real magic of wine-making takes place. In a process that can take as much as a year, dead yeast cells and other sediments gradually fall to the bottom of the fermentation vat. Whenever they accumulate, the wine is carefully racked off (siphoned) into a clean container. Many experts believe that the longer the wine is aged and the more often it is racked, the better it will taste. Only when it has become so clear that you can see the edge of a candle flame through it is it ready for bottling.
Once your wine is in the bottle, continue to treat it well. Stopper the bottles with new corks, and seal the corks with paraffin. After several days put the bottles on their sides in a cool, dark place to age, a process that takes at least six months but can continue for up to one year for wines made from high-quality grapes.
How to Make Red Wine, Step by Step
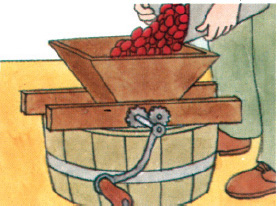
1. Crush 70 lb. of unwashed wine grapes and stems with a crusher or potato masher. Put juice and crushed grapes into 7-gal. pail (it should be three-quarters full). Or fill pail three-quarters full of purchased grape juice.
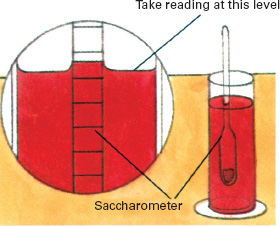
2. Check sugar content. Pour juice (it should be 70°F) into glass cylinder. Twirl saccharometer to dislodge bubbles, and take reading. Add about 4 ¾ tsp. sugar for each percent needed to raise reading to 22 percent (for 11 percent alcohol).
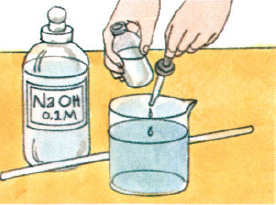
3. Use acid-testing kit to check acidity. Juice should be .6 to .8 percent acid. If too acid, add cooled, boiled water; if not acid enough, add ½ tsp. acid blend per gallon for each .1 percent that acid must be raised. Retest acidity.
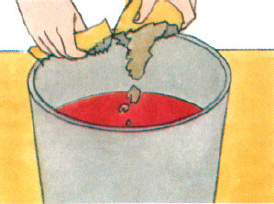
4. Dissolve five Campden tablets in a small quantity of juice, add to pail, and stir. Wait four hours, then add yeast and yeast ener-gizer (packaged nutrients that encourage yeast growth). Add tannin if using purchased grape juice.
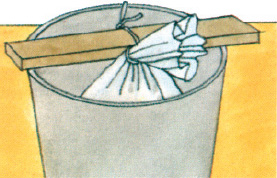
5. Cover pail and place in 65°F to 70°F area to ferment. Stir several times daily to mix skins with juice. When fermentation has nearly stopped and sugar level is 3 to 5 percent (three to seven days), strain through nylon mesh bag.
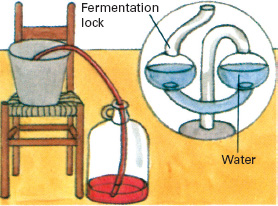
6. Siphon juice into 5-gal. glass bottle, fill-ing it to 1 in. from stopper. Fill smaller bottle with remaining juice. Close bottles with fermentation locks so that carbon dioxide can escape but wild yeasts and other contaminants cannot get in.
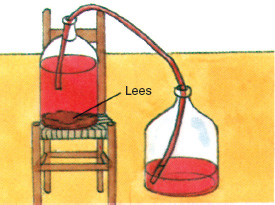
7. When fermentation stops (bubbling ceases and sugar level is almost at zero), rack the wine into a clean 5-gal. bottle. Do not disturb lees. Keep outlet end of siphon near bottom of bottle to avoid splashing and overoxidizing wine.
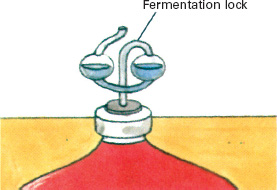
8. Dissolve 2 ½ Campden tablets in some wine, add to bottle, then fill bottle to 1 in. from stopper with reserved juice or previously made wine. Insert fermentation lock and set bottle in 65°F to 70°F area for two to three months.
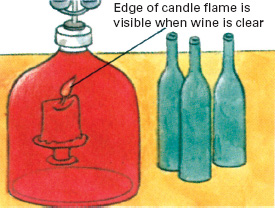
9. Rack wine into clean 5-gal. bottle whenever lees accumulate. When wine is clear (after two or more rackings), refrigerate for two days to stabilize. Let wine return to room temperature, then siphon into bottles, cork, and label.
Other Types of Wines
The best-known wines are made from grapes, but there are hundreds of other excellent wines based on an amazing diversity of ingredients. Honey is used to make a wine known as mead; the flower heads of the lowly dandelion make an excellent spring wine; and almost any pit fruit, including cherries, plums, peaches, and apricots, can be converted to wine.
White Wine
70 lb. white wine-type grapes or 5 gal. juice
10 or more Campden tablets
Sugar
Tartaric acid
1 package vintner's yeast
5 capsules yeast energizer
Crush grapes and stems in grape crusher or with potato masher, taking care not to crush seeds. Strain pulp immediately through nylon mesh bag, but do not squeeze; squeezing may result in cloudy wine. Add sugar to adjust content to 21 percent, and use tartaric acid to adjust acidity to .7 to .9 percent. Add five Campden tablets that have been dissolved in a small amount of juice. After 4 to 12 hours add yeast and yeast energizer and stir thoroughly. Siphon into 5-gal. glass bottle and fill smaller bottle with any excess. Stopper bottles with cotton, and let stand in 55°F to 60°F area.
When fermentation action calms (about five days), fill 5-gal. bottle to within 1 in. of stopper with reserved juice or with previously made white wine, replace cotton with a stopper that has a fermentation lock, and let fermentation continue until bubbling ceases and sugar content is near zero (one to two weeks). Rack wine into new bottle, add 2 ½ dissolved Campden tablets, fill bottle to 1 in. from stopper with reserved wine, and insert stopper with fermentation lock. Rerack wine as often as necessary until clear, adding 2 ½ Campden tablets and filling bottle to 1 in. from stopper each time. Stabilize by refrigerating for two days, then let wine return gradually to room temperature. Bottle and cork as for red wine. Makes 5 gal.
Dessert-Type Fruit Wine
12–15 lb. ripe perfect pit fruit (cherry, peach, plum, apricot)
4 pectic enzyme tablets (to destroy pectin that would otherwise cloud wine)
1 capsule yeast energizer
1 Campden tablet
Tartaric acid
1 package vintner's yeast
4 cups sugar
Peel and pit fruit, then crush it. Place pulp and half the pits in large plastic pail. Test acidity and adjust with tartaric acid to about .5 percent. Crush and dissolve pectic enzyme, yeast energizer, and Campden tablet in a little warm water and add to fruit. Cover the container with a sheet of plastic or cloth, and tie sheet tightly in place to keep out insects. Let stand overnight.
Stir in yeast, re-cover container, and place in 70°F area to ferment. Four days after fermentation starts, strain mixture through nylon mesh bag, squeezing to extract juice. Add 2 cups sugar, stir to dissolve, and siphon liquid into glass bottle that is 2 gal. or larger. (Or divide between two 1-gal. bottles.) Seal with fermentation lock and hold at 70°F to ferment.
When fermentation calms (about seven days) test sugar level and adjust to 22 percent—about 2 cups sugar per gallon of juice is usually required. Replace fermentation lock, and let fermentation continue. When fermentation slows again, rack wine into 1-gal. glass bottle, and add fruit wine or brandy to bring level of liquid to within 1 in. of stopper. Rack as often as necessary until wine is clear. Bottle and cork as for grape wine and age for at least six months. Makes 1 gal.
Dandelion Wine
1 gal. dandelion flower heads
3 oranges
3 lemons
1 gal. boiling water
5 ½ cups sugar
1 package vintner's yeast
1 capsule yeast energizer
1 tbsp. strong tea
Wash flower heads thoroughly in cold water, pull off stalks and other green parts, and place petals in a large plastic pail. Chop fine the colored outer rind of oranges and lemons, add to petals, then cover with boiling water. Drape pail with sheet of plastic or cloth, and tie sheet tightly in place to keep out insects. Stir mixture twice daily for three days. After three days strain the juice into a large kettle, squeezing or pressing to extract as much liquid as possible. Add sugar, to bring its level to about 21 percent, and cook juice at medium boil for 30 minutes. Let cool to 70°F, and mix in yeast and yeast energizer. Divide mixture between two 1-gal. bottles, and seal the bottles with fermentation locks. When fermentation slows (one to three days), siphon all the liquid into one bottle, filling it to within 1 in. of stopper. Add tea. Reseal with fermentation lock, and let ferment at 70°F until the bubbling stops (one to four weeks). Rack as often as necessary to clear wine, adding enough liquid each time to fill bottle to 1 in. from stopper. When wine is clear (usually after three rackings), bottle and cork as for grape wine. Makes 1 gal.
Mead
1 Campden tablet
1 capsule yeast energizer
6 lb. mild-flavored hone
¾ oz. acid (citric, tartaric, malic, or a blend)
1 ½ tsp. strong tea
1 package vintner's yeast or special mead yeast
Crush Campden tablet and yeast energizer, and stir into 3 lb. of honey, then pour the honey slowly into 2 cups of warm water, stirring constantly until honey is completely dissolved. Stir in the acid and tea. Cover the mixture and leave it in a warm area (about 70°F) for one day. Stir in the yeast. Cover mixture, fit with a fermentation lock, and let it ferment for five days. On fifth day dissolve remaining honey in 2 cups warm water and add to the original mixture. Refit lid and fermentation lock, and let mixture continue to ferment for another two days. One week after initial fermentation began, rack liquid into a clean 1-gal. plastic pail or glass bottle, being careful not to disturb sediments at bottom of honey mixture. Fill new container to within 1 in. of stopper by adding 70°F water if necessary. Seal with fermentation lock and allow fermentation to continue. Rack fermenting liquid into a clean container whenever sediments collect. When mead stays completely clear, bottle it; store in cool, dark area. Makes 1 gal.
Siphon enables winemakers to rack homemade wine into bottles. The wine should be chilled to stabilize it, then allowed to return to room temperature so that expansion of cool air in the bottles will not cause corks to pop.
Sources and resources
Books and pamphlets
American Homebrewers Association Staff and National Conference on Quality Beer and Brewing Staff. Just Brew It! Boulder, Colo.: Brewers Publishing, 1992.
Boulton, Roger B., et al. Principles and Practices of Winemaking. New York: Chapman & Hall, 1995.
Brown, Sanborn C. Wines & Beers of Old New England. Hanover, N.H.: University of New England Press, 1978.
Burch, Byron. Brewing Quality Beers. Fulton, Calif.: Joby Books, 1993.
Cox, Jeff. From Vines to Wines. Pownal, Vt.: Storey Communications, 1989.
Johnson, Hugh. Wine. New York: Simon & Schuster, 1987.
Orton, Vrest. The American Cider Book. New York: Farrar, Straus & Giroux, 1995.
Turner, Paul, and Turner, Ann. Traditional Home Winemaking. Santa Rosa, Calif.: Atrium Publishing, 1990.