Weaving
A New Generation Rediscovers the Joys Of the Weaver's Art
When the first European colonists came to the New World, they brought with them a type of loom that had been in use in Europe since before the 1300s. This was the horizontal frame loom; handweavers use the same basic type today.
In the South, plantation owners built weaving shops and set slaves and servants to producing cloth for bed ticking and simple garments. A few estates even began turning out elegant silks and fine linens. Textiles, however, were of little value compared to tobacco, and most planters preferred to import their cloth from England, leaving them free to concentrate on their cash crop.
New Englanders could grow neither tobacco nor an equivalent crop to trade and so were forced to rely almost exclusively on their own weavers for their cloth. In some towns, such as Boston and Salem, bounties of free land and homes induced professional weavers to set up shop. Many an impoverished Englishman earned passage to New England by indenturing himself as an apprentice weaver, then later became a wealthy citizen through his trade. But many families, particularly rural settlers, had to weave for themselves.
In the Southwest, Spanish settlers brought sheep as well as floor looms to their frontier outposts. Through division of labor—some family members worked as carders, others as spinners, and others as weavers—they were able to make wool cloth for export by mule train to mining camps in northern Mexico.
Producing large quantities of cloth on a handloom was a formidable task in those days. It could take an entire day merely to fill enough bobbins with weft (the thread that is passed back and forth across the stretched warp threads) to weave a 5-yard length on a large loom. And the warp string itself had to be measured and put on the loom, a job that could take days.
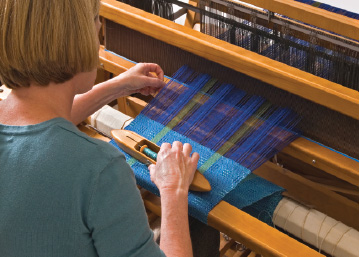
Intricately patterned scarf takes time and patience to weave, but will be cherished by whomever wears it.
Most of the cloth produced was simple and sturdy: plain-woven wool and linen for clothing; coarse homespun made from the part of the flax, called tow, left over after making linen; linsey-woolsey, with its linen warp and woolen weft. But some homemade cloth was beautiful as well. Hope chests were filled with finely woven bed linens, towels, and curtains. Beds were covered with intricately patterned woven coverlets. In the Southwest, Spanish caballeros dressed themselves in elegant serapes.
To produce fine fabric with straight selvages and parallel, evenly spaced weft required care, patience, and a steady rhythm perfected through years of practice. Good weavers were justifiably proud of their work and must have considered it more than just another chore to be completed. They probably shared the feelings of many contemporary handweavers who speak of the joy with which they watch a complicated pattern grow before their eyes and of the day-to-day cares they forget as they work at a loom.

Rag carpets were popular 18th-century floor coverings. This one was woven on a simple, inexpensive loom (pp. 280–281).
Sources and resources
Books
Black, Mary E. The Key to Weaving. New York: Macmillan, 1980.
Bridgman, Rosemary. Weaving: A Manual of Techniques. North Pomfret, Vt.: Trafalgar Square, 1992.
Davison, Marguerite P. The Handweaver's Pattern Book. P.O. Box 263, Swarthmore, Pa.: Marguerite P. Davison, 1977.
Drooker, Penelope B. Samplers You Can Use: A Handweaver's Guide to Creative Exploration. Loveland, Colo.: Interweave Press, 1986.
Oelsner, G.H. Handbook of Weaves. New York: Dover Books, 1915.
O'Reilly, Susie. Weaving. New York: Thomson Learning, 1993.
Regensteiner, Else. The Art of Weaving. West Chester, Pa.: Schiffer Publishing, 1986.
Periodicals
American Craft. American Craft Council, 401 Park Ave. South, New York, N.Y. 10016.
Fiberarts. Lark Communications, 50 College St., Asheville, N.C. 28801.
Shuttle Spindle & Dyepot. Handweavers Guild of America, Inc., 65 La. Salle Rd., West Hartford, Conn. 06107.
Organizations
Handweavers Guild of America, Inc., 2402 University Ave. W, Ste 702, St. Paul, Minn. 55114.
Preparing the Warp
The threads that are tied onto the loom before weaving begins are called the warp. The total length of warp thread that will be needed depends on the particular weaving project and the type of loom being used. (For a discussion of how to compute total warp length, see Calculating the Warp's Dimensions, p.280.) Whatever the amount of warp needed, the warp string must be carefully and systematically measured beforehand and bundled neatly so that it does not become tangled.
The warping board is a simple device for measuring off the individual lengths of string that make up the warp. Each time the string is wound from the first peg to the last or from last to first, another warp length is measured. The process is repeated until a length of warp has been measured for each strand to be placed on the loom. To keep the strands in order, the warp threads are wound on the board so that each crosses over the one below at a certain point (between pegs A and B in the board shown at right). The cross ensures that one thread will not slip down beneath another and thus be out of order.
As the threads pile up on the board, the weaver usually attaches threads of a color that contrasts with the warp, gathering every 20 strands into a separate group. Before taking the warp off the board, the weaver ties string around the cross to keep it intact. The warp is then removed by a process known as chaining.
Tying a slipknot

Use slipknot to tie end of string to warping board peg.
A Warping Board Makes Your Measuring Job Easy
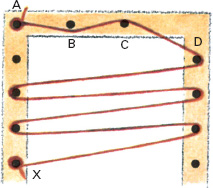
1. Cut a guide string 8 in. longer than the required warp and tie one end to peg A with slipknot. Stretch string over to peg D, keeping it inside of peg B and outside of peg C, then back and forth across board until entire string is used. Tie with slipknot to last peg that string reaches (peg X).
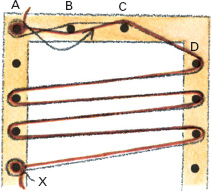
2. Tie end of warp string with slipknot to peg X and wrap it around other pegs, following guide string until you reach peg B. Pass warp outside peg B, then toward center of board and inside peg A. Wrap string around peg A and pass it inside peg B so that warp crosses over itself between pegs A and B.
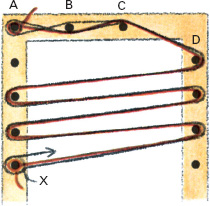
3. Bring warp to outside of peg C and then over to D, following guide string around all pegs until you are back to peg X. From this point until you have completed as many circuits of the warping board as you need, wind the string along the same route, always making the cross between pegs A and B as shown.
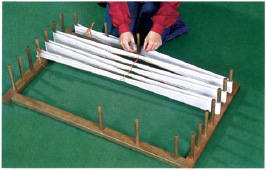
Counting strings (top left of board) are used to keep track of how much warp you have measured. Each time you place 20 strands (not counting guide string), tie them in a bundle with counting string of contrasting color. After entire warp is measured, tie other strings around it at last peg (X) and at several other points to prevent tangling when warp is chained.

Once the entire warp has been measured off on the warping board, the cross (between pegs A and B in the diagrams at left) must be tied to prevent it from coming apart after the warp is removed from the board. Two ties are made: one faces the inside of board, the other faces the outside. The diagrams above show the steps in making one tie. The knot can be a square knot (two overhand knots tied in opposite directions) or any simple knot that will not come apart easily.
Chaining the String Into a Bundle
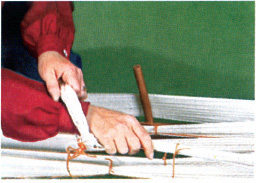
1. Pull warp off last peg of warping board, insert hand through loop that wrapped around peg, and grasp bundle of threads in front of loop.
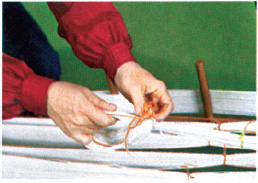
2. Use free hand to hold loop away from wrist while pulling bundle of thread back through loop with other hand. Bundle forms new loop.
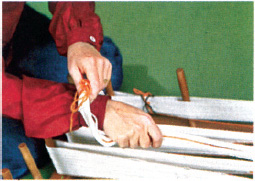
3. Take new loop in one hand and insert other hand through. Grasp thread bundle and pull through loop. Repeat steps to chain entire warp.
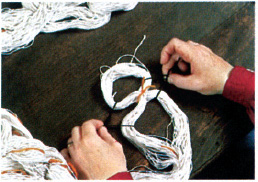
4. When warp is fully chained and removed from board, open up the cross by tugging gently on the two tie threads that keep it in place.
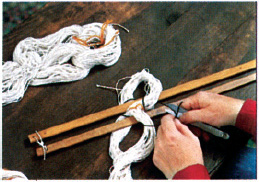
5. Insert lease sticks (special sticks that come with loom) into holes made by cross. Tie stick ends together. Remove ties from cross.
Learning the Ropes On a Simple Loom
A rigid heddle loom is compact, inexpensive, and simple to use—an excellent tool for learning the fundamentals of weaving. With it you can make modestly sized items, such as place mats, pillow covers, small rugs, and ponchos. The rag rug whose construction is described here is a particularly good project because the bulky rag weft fills the relatively wide spaces between warp strands, which are parcel post twine. The rug is made of three 12- by 50-inch strips sewn together into a single 36- by 50-inch piece. Calculate the warp length as explained below, then measure it off on a warping board (see p.279). Note that enough string should be measured so that the loom need be dressed only once to make all three strips. When a strip is completed, cut it loose, retie the warp to the loom, and weave the next strip.
Calculating the Warp's Dimensions
The amount of string needed for the warp depends upon the number of warp strands and their length. To calculate the number of strands, multiply the strands per inch by the fabric width. The loom shown here allows four strands per inch. Since a 12-inch strip is being woven, a total of 48 strands are needed. To calculate each strand's length, you must allow not only for fabric length (three strips of 50 inches each, or 150 inches in all for the rug shown on these pages) but for three other factors as well: shrinkage, tie-on or fringe allowance, and warp lost. Calculate these allowances as follows:
Shrinkage. This is the amount the warp is shortened as it goes over and under the weft. Expect 20 percent shrinkage with rag weft, 10 percent with yarn. For the rag rug, shrinkage is 20 percent of 150, or 30 inches.
Tie-on or fringe allowance. Even for a fringeless rug, 4 inches are needed to tie each end of the warp to the loom, or 8 inches for each of the three strips (24 inches in all). However, the rug shown will have 8-inch fringes, so the allowance must be increased to 48 inches.
Warp lost. This is the extra warp needed so that the strands can be separated for a shuttle to pass through. For the rigid heddle add 8 inches. (For a multiharness loom, as shown on page 282, allow 4 inches per harness.)
To find the total length of warp string needed for the rag rug, add together all the allowances (150 + 30 + 48 + 8 = 236) and multiply by the number of strands (48). The result is 11,328 inches, or 944 feet of warp.
First Steps in Threading
Warp must be centered on the loom so that the heddles will be easy to balance as you weave. To center the warp, subtract the number of warp strands from the total number of sticks and spaces; then divide the result by two to find how many sticks and spaces must remain unused on each side of the warp. Next, count over to find the place where the leftmost warp strand should be inserted. Mark the point with string. You can determine the order in which warp strands must be inserted by the way they cross each other between the two lease sticks. (See p.279 for a discussion of preparing the cross and inserting lease sticks.)
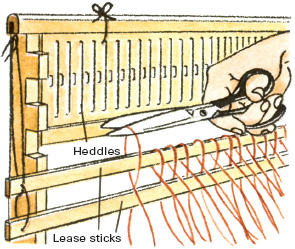
Suspend lease sticks—which hold warp—in front of heddles. Lift up leftmost loop from lease sticks and cut its top, separating it into two strands.
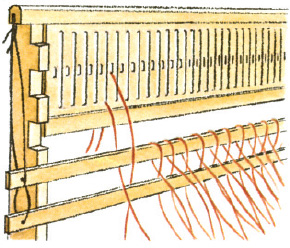
Insert end of left strand through farthest left space you are using. Insert end of right strand through hole in stick just to the right of that space.
Completing the Dressing Operation
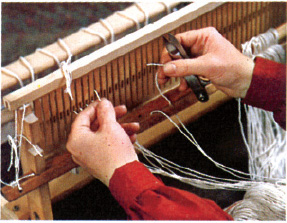
1. After first warp strands are threaded as described above, continue cutting loops and inserting ends in spaces and holes. Pull ends far enough through heddles so that they will not slip out.
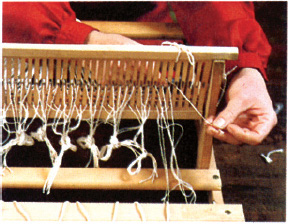
2. When you have inserted about six warp strands, tie their ends together in a loose slipknot. Continue across heddle, inserting threads and tying ends until all strands are threaded.
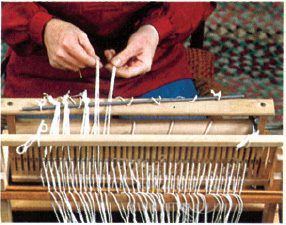
3. Place back apron bar on back beam. Undo first slipknot. Take six threads, divide into two equal groups, and tie with a square knot (p.281) to bar. Continue until all threads are tied.
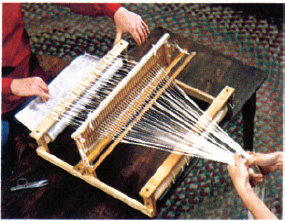
4. While helper pulls to keep warp taut, wind it onto back roller. After two turns, start inserting paper continuously to keep layers of warp separated so that they pile evenly on roller.
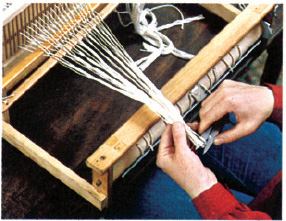
5. When 16 in. of warp remain unwound in front of heddles, cut loops of warp at front of loom. Now move heddles to rest position where all threads are at same level; then remove lease sticks.
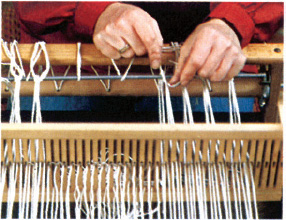
6. Use first part of square knot to tie threads to front apron bar. Work from outer warp to center in groups of six as in Step 3. Adjust so that strands are equally taut, then finish tying knots.
The Rigid Heddle Loom
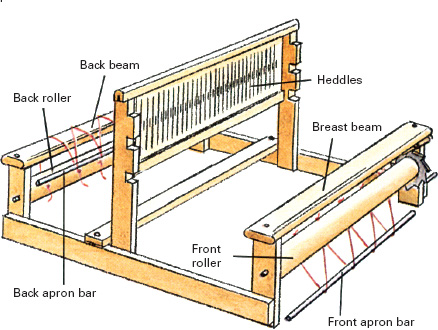
Rigid heddle loom is named for the flat, evenly spaced sticks, or heddles, that hold and separate the warp threads. Each heddle has a hole in it. Half the warp passes through the holes and half between the heddles. When heddles are raised or lowered, warp in the holes rises or falls to let weft pass through.
Preparing the Weft
The weft is the thread or other material that is woven between the warp strands to produce the finished cloth. The rag rug shown here has a weft made of strips of washable cotton calico. To prepare the strips, fold uncut pieces of cloth diagonally to the grain and cut along the fold lines. Next, make cuts parallel to the first cut to create 1-inch-wide bias-cut strips. Sew the strips together end to end and wind them into balls. The next step is to load the shuttles. One should be loaded with doubledstring to be used as heading (the first few rows of weaving). Load any others with rag strips. To load weft on a shuttle, first wrap one end in a figure eight around either double-pronged end of the shuttle (do not tie it). Then wind the weft lengthwise around the shuttle.

How to tie a square knot

Tie two opposite overhand knots to make a square knot.
Weaving a Rag Rug
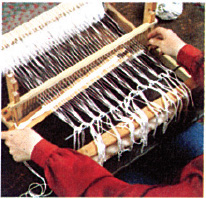
1. With heddles in bottom slot, pass shuttle through warp from left to right. Note that shuttle carries heading (string folded double) for first two rows. After that, use rag.
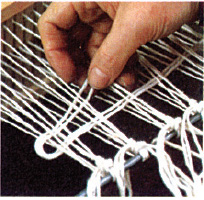
2. Hide weft end by pulling it around outside warp string and laying it alongside first row of weft. Do the same whenever weft runs out or new weft is added.
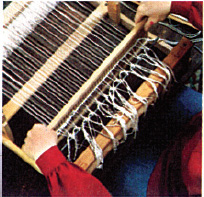
3. Lift heddles with two hands and pull firmly forward, hitting the heading weft several times to pack it. This is called beating. Beat after each pass of shuttle.
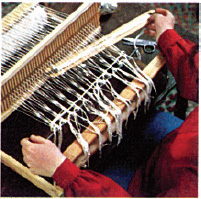
4. Place heddles in highest slot. Unwind one length of weft from shuttle and pass shuttle through warp from right to left. Each pass of shuttle is called a pick.
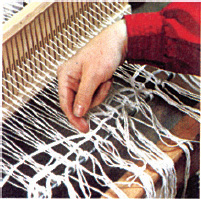
5. To be sure outer warp will not be pulled inward when weft is beaten, “bubble” weft by pushing some spots toward loom front. Work across loom toward shuttle as you bubble.
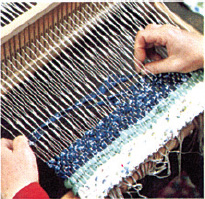
6. After inserting heading rows, weave with rags in same way. Add new weft by laying new end on old. Roll finished material onto front roller as weaving progresses.
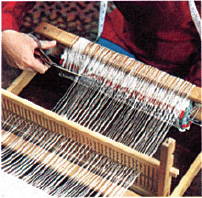
7. When woven strip is 50 in. long, weave two rows of heading as at start of rug. Then cut warp strands 8 in. beyond heading. (Extra warp length is for fringe.)
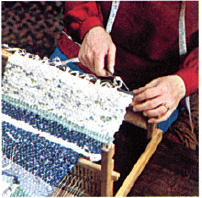
8. Unroll woven strip and untie from front apron bar. Retie warp threads to front apron bar, and weave two more strips. Match color bands in all strips.
Applying the Finishing Touches
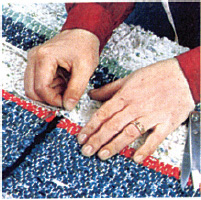
1. Sew strips together with warp string. Work back and forth, sewing under turn of weft at end of each row.
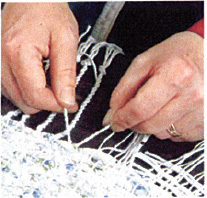
2. To make fringe, remove some heading, take two warp strands in each hand, and twist tightly clockwise.
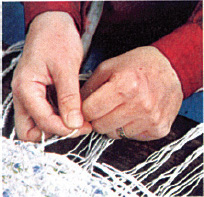
3. As you twist string, wind twisted strands around each other counterclockwise to prevent their unwinding.
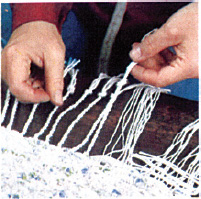
4. Knot ends when twists are 5 in. long. Remove heading a bit at a time as you work across end of rug.
To Clothe a Family Takes a Big Loom
The floor loom is the ultimate tool of the home weaver. A full-sized model is bulky and expensive, but with it an experienced weaver can turn out an almost infinite variety of beautiful patterns and textures. Although floor looms today are largely the province of those interested in weaving as a creative and artistic craft, they were once among the most practical of necessities; before the Industrial Revolution the floor loom was an irreplaceable implement for manufacturing the cloth needed for everyday living.
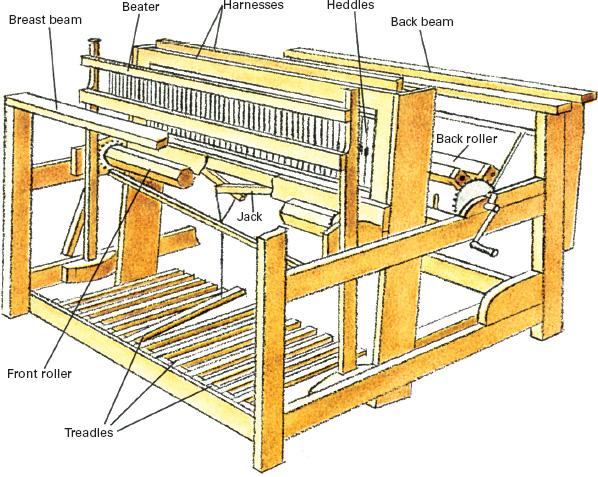
In design the floor loom is basically a larger, more sophisticated, and more versatile version of the rigid heddle loom described on pages 280 and 281. Instead of stick heddles, each strand of warp is held in the eye of a wire or string heddle, the eye being a loop in the center of the heddle. The heddles are suspended from two or more harnesses that, in turn, are connected to foot treadles. By pressing on the appropriate treadle, a particular harness, along with its set of heddles and threaded warp strings, can be raised or lowered.
To make plain weave, every other warp thread is raised and the shuttle passed between the raised and unraised threads just as with the rigid heddle loom. On larger looms with four or more harnesses the weaver can vary the number and sequence of warp strands lifted and so create an amazing variety of patterns.
Loading the bobbin
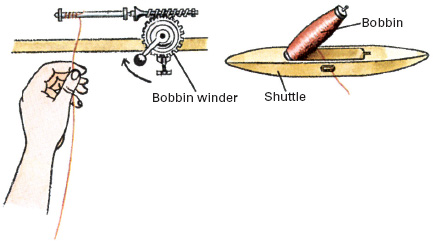
Weft is wound onto bobbin, which will be inserted in shuttle. First, place bobbin on winder. Secure weft end as shown. Turn crank of bobbin winder clockwise to wind weft. Build up weft evenly across length of bobbin until it is full; then place bobbin on pin at center of shuttle and pull thread end through specia hole in side of shuttle.
Dressing a Floor Loom
Dressing a floor loom with warp is much the same as dressing a rigid heddle loom, but the increased number of strands and their greater length make the job slower and trickier. First, the chain of warp is laid over the harnesses, and the lease sticks are tied to the top of the back harness. Next, the warp is centered and tied in evenly spaced groups across the back apron bar. To help apportion the strands, a comblike raddle is temporarily tied to the back beam. Small groups of warp strands are laid between teeth in the raddle, then tied to the apron bar. Next, the warp is wound onto the back roller (the bar is attached by straps to the roller). Paper is inserted on the roller as the warp is wound, just as with the rigid heddle loom. Finally, the warp is threaded through the heddles and beater and tied to the front apron bar.
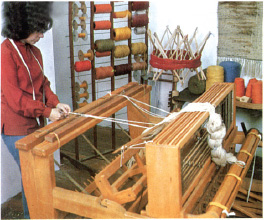
Weaver works from edges to center, laying warp strands in raddle and tying strands with square knots to apron bar.
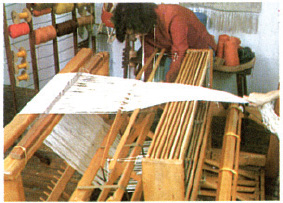
To wind warp on roller, have helper pull warp tight while you slowly wind. To untangle strands, slap warp sharply against harness tops and gently poke through warp strands with your fingers.
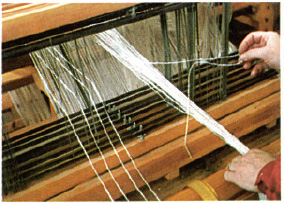
To thread heddles for plain weave, place one strand in frontmost heddle, one in next heddle back, one in third back, one in fourth back. Fifth strand goes in front heddle. Continue across loom.
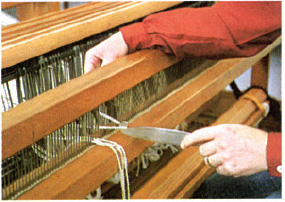
Special sleying hook is used to pull warp strands through beater after they have been threaded through heddles. Strands are then tied to front apron bar, and the raddle and lease sticks are removed.
Weaving With the Floor Loom
By pushing down on a foot treadle, the weaver raises the harnesses attached to it along with the warp threads held by the harnesses. The shuttle is then thrown between the two rows of threads and the beater pulled sharply forward to pack the weft tightly together. Next, the weaver presses a different treadle and throws the shuttle in the opposite direction. The shuttle is always thrown at an angle so that the loose weft does not lie perpendicular to the warp. The angle serves the same purpose as bubbling on the rigid heddle loom—it provides enough extra length so that the weft, when beaten into place, will not pull the cloth edges inward.
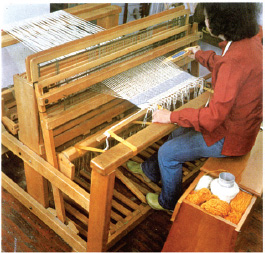
With harnesses raised, warp threads are divided into two groups. Weaver is about to throw shuttle between them.
Patterns Require Multiple Harnesses
Most home-woven cloth made in preindustrial America was an unpatterned plain weave used for suits, dresses, sheets, and other necessities of life. However, special cloth, such as linen for a young girl's hope chest or decorative wool weaves to brighten a bedstead, called for something more elaborate. A pattern of tiny diamonds might be woven from sun-bleached linen to make a delicately textured christening towel; or wool, home dyed with madder and indigo, might be combined in a bold geometric motif for a bed coverlet.
When making plain woven cloth, two sets of warp threads are raised alternately so that the weft always goes under every other thread. To create a pattern, the weaver has to be able to vary the order and number of warp threads that the weft skips under as the shuttle is passed across the loom. The multiharness loom provides the flexibility necessary to do this.
With multiple harnesses a limitless variety of patterns are possible. The pattern made depends on three things: the order in which the harnesses are tied to the treadles, how the warp is threaded into the heddles, and the order in which the weaver presses the treadles.
Any combination of harnesses can be controlled by each treadle, but one arrangement is used so often that it is considered standard. For a four-harness loom the standard tie-up is as follows: the first treadle is tied to the first and second harnesses, the second treadle is tied to the second and third harnesses, the third treadle is tied to the third and fourth harnesses, and the fourth treadle is tied to the first and fourth harnesses. The diagram in the upper right-hand corner of the page shows a standard tie-up on a four-harness loom.
An almost limitless variety of patterns and designs can be woven on a loom set in the standard tie-up. The key to all this variety lies in the way that the warp is threaded through the individual heddles. For example, the loom can be threaded so that a single harness controls intermittent pairs of warp threads, or intermittent trios of threads, or any other arrangement of threads across the loom. For anything but the simplest textures a plan (called a pattern draft) is needed. It specifies where each warp strand is to be threaded. In days gone by, these drafts were handed down from generation to generation, treasured and traded as one might today trade prized recipes. With them weavers created the large-scale patterns of circles, rectangles, stars, and pine trees that are so admired. Nowadays many books on weaving provide a selection of pattern drafts along with directions for tying treadles to harnesses and for the order of pressing the treadles to make a wide variety of favorite traditional designs.
The Jack Loom and How It Works
The pattern draft
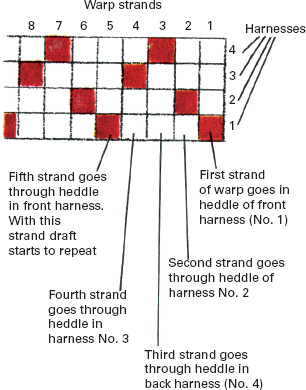
Pattern draft is the weaver's guide for dressing a loom to make a particular pattern. Each column of the draft represents one strand of warp. Each horizontal row represents one of the four harnesses. A dark square (there is one in each column) indicates that the warp strand represented by that column should be threaded through a heddle of the harness represented by that row. The example at right provides the instructions for threading only the first eight strands of warp. Read it from right to left. A draft for a bed coverlet would be several inches long and give instructions for threading several hundred warp threads.
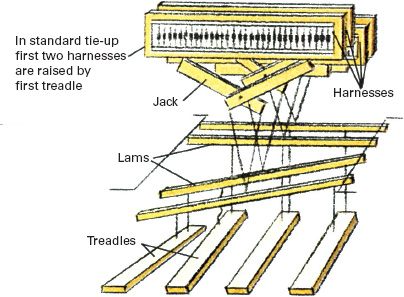
Jack looms are the most versatile modern looms. The name comes from the rods, or jacks, that move each harness up or down. Close-up view (above) of standard tie-up shows that each jack consists of crossed bars held together by a pivot pin. The lower ends of the bars are tied to cross-pieces, or lams. These in turn are tied to the treadles. When a treadle is pressed, the upper ends of the jacks linked to it pivot upward to raise their harnesses.
Traditional patterns
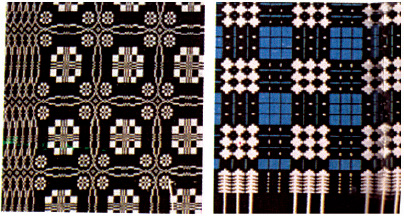
Colonial overshot coverlets have been colorful additions to American homes for centuries. Hundreds of different designs are in existence, many with picturesque names such as Whig Rose (left) and Pine Tree (right). In an overshot pattern, brightly colored wool weft skips over, then under, groups of undyed warp threads. Alternating with the bright weft are rows of undyed weft, called tabby, that go over one thread and then under the next to hold the overshot rows in place.