Woodworking
Re-creating the Designs Of America's Country Carpenters
Among the thousands of anonymous carpenters, joiners, and cabinetmakers who made the bulk of America's furniture during the frontier years were many whose skills equaled those of their rich and famous contemporaries. They worked in small shops all across the land, using hand tools and native lumber to produce furniture that was functional and affordable by the common people. Their work is now called country furniture by antique dealers to differentiate it from the intricately fashioned, highly polished products of such masters as Duncan Phyfe, Chippendale, Sheraton, Hepplewhite, and their colleagues and imitators. (The term “country furniture” has nothing to do with quality of workmanship or grace of design—or even whether or not a piece was made in the country. A city chair was sold as a work of art and as an expensive status symbol. A country chair was to sit on.) Much country furniture was, in fact, quite beautiful despite—or perhaps because of—its simplicity of design and lack of modish ornamentation. The best was so well made that it exists in usable condition today, having grown more beautiful with the passage of years. To study its workmanship and attempt to duplicate its design is to learn a great deal about the nature of fine woodworking—a lesson that will carry over to any craft you undertake.
In this section you will find eight examples of well-made country furniture, along with instructions for re-creating each by time-honored techniques. Every one is a unique creation whose parts are interchangeable with no other piece; all are typical of the kind of craft that only hand workmanship can produce.
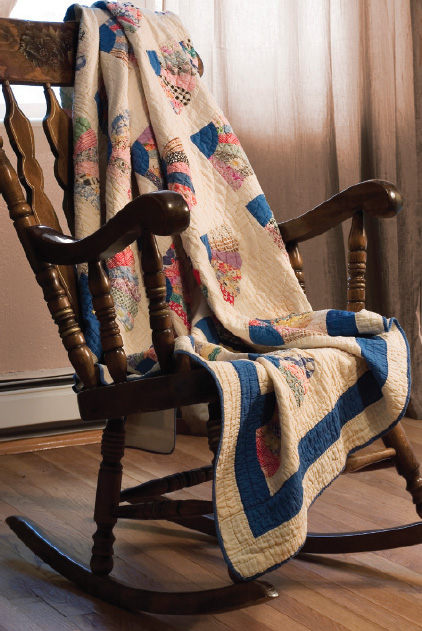
Handmade chairs can be both practical and attractive when made with care. Rocking chairs are an American invention, credited by some to Benjamin Franklin. At first, curved rocker slats were simply attached to legs of existing chairs. In later designs the legs were splayed outward and were often wider at the bottom than at the top to accommodate notches for rocker slats. In this elegant chair (right) the legs are mounted on top of the rockers
Work With Wood, Not Against It
Wood is organic, and every board has its own personality— the record of events in the long lifetime of a single tree. Examine your wood before you begin to work it. Perhaps you will spot a large heartwood knot marking where a branch began to form—a distinctive figure for a tabletop but a distinct problem for the carpenter. Or you might find a tight, dense series of annual rings, the remnant of a long-ago drought. The wood inside those rings will shrink differently than the wood nearby. It will respond differently to the cutting edge of a chisel and accept a finish less thirstily. In shaping a piece of wood, you need not know the cause of such personality quirks, but if you ignore them your work will suffer.
Like the wood from which it is made, every piece of handmade furniture is unique—an intimate collaboration between the woodworker and his material. Perhaps, having chosen one piece of wood over another because of its attractive ?gure, you will discover a knot where you had planned to cut a mortise. To follow your plan in defiance of the nature of the wood is foolish; the joint will be weak at best. You must make a decision: to use a different piece of wood, to make a different joint, or to position the joint differently than you had planned. Similar, more subtle decisions are made with each touch of a tool, and to achieve your original conception requires a ?nely tuned sensitivity to the many variations of grain and texture in the wood you are using. It is by no means impossible to maintain such sensitivity while working with power tools, but it is difficult; when using hand tools, however, it is hard not to be sensitive. The beginner, just learning how to work with wood, benefits from using hand tools as the old-time craftsman did.
The Workshop
A well-organized working space is important. The ideal shop contains a good, solid workbench; a softwood table for assembling and gluing large pieces; plenty of floor space; a storage area for lumber, sorted into kinds and sizes; another storage area for usable scraps, bits, and pieces; and a handy but unobtrusive place for every tool. Such a shop is the dream of nearly every woodworker.
In setting up your work space, however limited or temporary it might be, keep in mind the ideal from which to compromise. A big workbench is a fine thing, but if space is a problem, do not fill up your workroom with a larger bench than you really need; floor space is vital for laying out and working on large pieces. It is better to settle for a narrow bench and, when necessary, use sawhorses and 2-inch planks as a working surface.
A good place to keep your basic tool kit—those tools you are likely to need for almost any project you undertake—is right on the wall behind the workbench. Simply nail up a 1/8-inch pegboard framed with wood, and use metal hooks or your own homemade brackets to hang each tool in its place. (Make it a point to replace each tool after using it.) Other tools can go in a toolbox to be brought out when needed. For small tools, accessories, and hardware, a small chest with several drawers is handy. If you must store even your basic tool kit between work sessions, make an upright toolbox in two sections hinged to open like a steamer trunk. Mount it on casters for mobility, and install 1/8-inch pegboard for hanging tools on both inside surfaces.
Avoid the clutter of a large scrap pile. Store scrap in bins where it can be seen. That way you are more likely to use it than to cut into new lumber unnecessarily.
Kinds of Wood
In carpenter's parlance, hardwood is wood from deciduous trees; softwood is from evergreens. Typically, hard-wood is heavier than softwood, firmer in texture, more difficult to cut, more likely to split while being worked, and less subject to warping and shrinkage. There are, however, exceptions. Some softwoods, such as yellow pine, are harder than most hardwood; and some hard-woods, such as poplar and tupelo, are extremely soft. Structurally, the difference is a matter of the kinds of cells that conduct and control the flow of sap in the two types of trees. In softwoods the cells are called thin-walled tracheids and resemble tiny sponges. They form in the early part of each growing season; later in the season thick-walled tracheids form around them to support the tree. In hardwoods sap flows through pipe-like vessels, which appear as pores among the supportive wood fibers; in most hardwoods these pores are distributed fairly evenly. In a few—called ring porous—they are concentrated in the early-season growth.
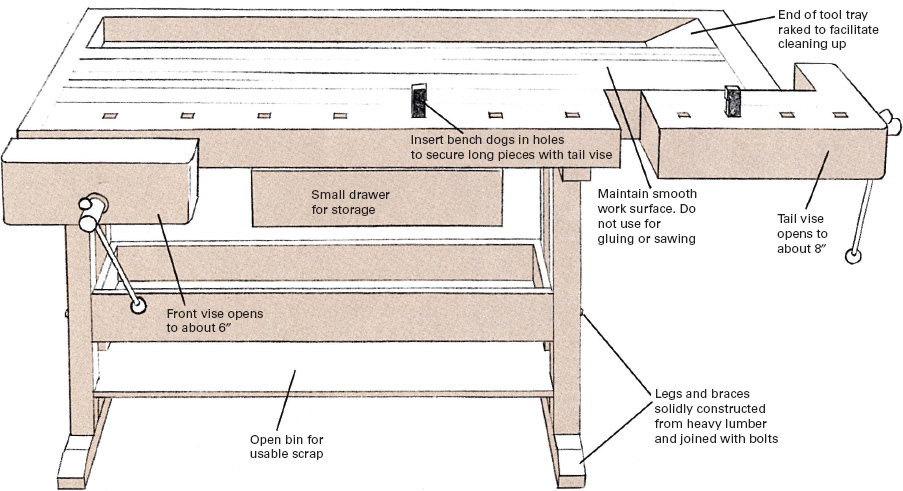
Heart of a workshop is a good workbench. Important considerations in choosing or building a bench are sturdiness, capacity to hold work firmly in a variety of positions, a large, smooth work surface, sufficient storage space, and a handy tool tray. This classic design is solidly built of hardwood and is heavy enough not to need securing to the floor. Front vise holds work for edge-planing; tail vise can be used in conjunction with bench dogs (pegs placed in holes in bench) to secure longer pieces for surface-planing. The tops of both vises should be flush with the bench top. If steel vises are used, line their faces with hardwood to prevent marring wood. Tool tray at rear is deep enough that tools are out of the way when not in use. Storage space consists of small tool drawer in center and bin beneath for scrap wood; some benches include cabinets and many drawers.
As far as the woodworker is concerned, the most important distinction is that softwood tends to splinter, while the longer, ?ner fibers of hardwood are more likely to split. Also, there is usually a greater variance of texture within a piece of softwood than of hardwood.
Popular American softwoods include white pine (the most commonly used wood in many places), western pine, white cedar, western red cedar, Douglas fir, yew, and sequoia (redwood). The orange-hued wood known as pumpkin pine is actually the heartwood of white pine. Hardwoods include ash, beech, yellow birch, maple, cherry, white oak, red oak, walnut, and hickory. (See also Converting Trees Into Lumber, pp.22–25.)
Grain, texture, and figure
Grain is a term that is often misused. It refers to the direction and alignment of the long fibers that run up and down the trunk of a tree and along its branches, not to the pattern made by the annual rings. The grain in most trees is more or less straight, with waves and irregularities caused by stresses in growth.
Texture depends on fiber density, particularly the contrast in growth layers, or rings, and in the size and distribution of pores. White oak, for example, has large pores and is coarse textured; cherry is fine textured.
Figure refers to the pattern on the surface of a piece of wood. It is the result of many structural elements, including grain and texture, conformation of annual rings and rays, color variation, and the angle at which the wood is sawed. To judge the figure of an unfinished surface, wet it with paint thinner; it will dry harmlessly.
Good Workmanship Begins With Good Tools Properly Used
To speak of handmade wood furniture is not strictly accurate. You need tools to work with wood, and nothing—save your own skill—is more important to the work than the quality of those tools. Always get the best you can afford. This is not to suggest that the best tool is always the most expensive, merely that cheap tools are seldom adequate. As a rule of thumb, shop for tools that are above average in price but not in the luxury class.
Chisels. Look for a blade of finely tempered steel, capable of taking and holding a razor-sharp edge, and for a handle of durable hardwood or plastic that will stand up under punishment. In the best chisels either the handle is set into a socket welded to the blade, or a tang on the end of the blade is inserted into the handle and a washer of leather or plastic absorbs the force of blows.
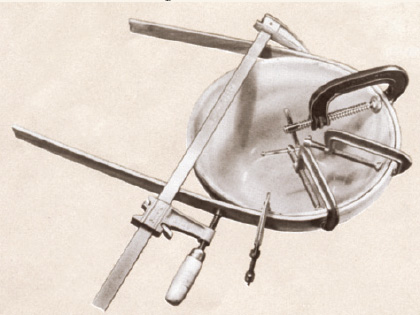
Clamps. You cannot have too many 2- to 8-inch C-clamps. For general use, simple, solidly built steel clamps will outlast costlier kinds. Also of great value are variable hardwood hand screws with jaws 10 to 12 inches long capable of holding oddly shaped pieces at various angles. Pipe or bar clamps are valuable for large jobs, although substitutes can be improvised (see Putting on the Pressure: Three Methods, p.306).
Coping saws. A firm steel frame is important. In a good saw the blade can be turned to face either side, and the tension adjustment will not loosen as you work.
Drawknives. A keen edge is all that is really vital; look for high-quality tempered steel. Try before you buy to be sure the tool is comfortable in your hands.
Drills. You can do anything with a brace and bit that you can with a power drill—it just takes longer. Choose a steel-shanked ratchet brace with an 8- to 10-inch sweep (the circle made by a full revolution of the handle). Auxiliaries include an assortment of double-twist steel auger bits, ¼ to 1 inch in diameter; an expansive bit for cutting holes up to 3 inches across; a countersink; and plug cutters and matching counterbores of various sizes. Also invaluable is a small hand drill with a set of twist bits up to ¼ inch in diameter.
Hammers and mallets. If you were to be restricted to only one hammer, your best choice would be a 10- to 12-ounce bell-faced, adz-eye claw hammer with a hickory handle that is comfortable to your grip. For light work and for shaping hardware, an 8-ounce ball peen is a good second hammer. To drive chisels, pegs, and wedges, use a mallet of hardwood or plastic. Many woodworkers fashion their own mallets from oak, apple-wood, lignum vitae, or other durable hardwood.
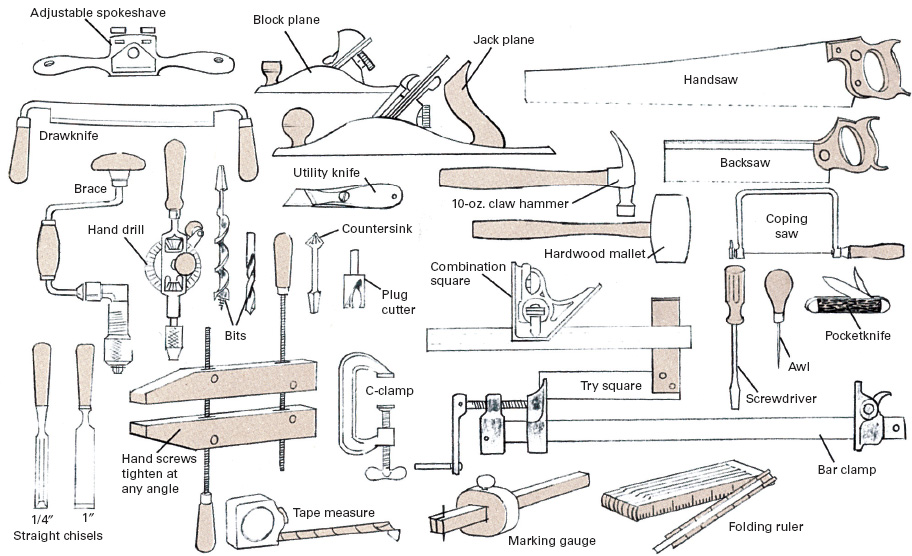
Woodworker's basic tool kit includes all tools used for projects described on pages 308–329 (hatchet, ax, and frame saw are needed for Rustic Furniture, pp.330–331). It is by no means a complete assortment of woodworking tools; add more chisels, carving tools, dovetail saws, mitering equipment, rabbet planes, and other special tools as they are needed.
Handsaws. High-carbon tempered steel is vital for a thin, supple blade that will hold its edge. The teeth should be precision ground, all the same height, all sharpened to the same angle, and all set at the same degree. A good saw is almost certain to be expensive. Teeth of a cheap saw might look the same at a glance, but close examination usually reveals irregularities that result in slower, sloppier workmanship.
Knives. Dedicated whittlers maintain that time, patience, and a good knife are all you really need to make anything at all from wood. A knife is the most personal of tools; when you have found yours, treasure it.
Planes. Iron planes usually cost less than wooden ones, but many carpenters prefer the weight and solidity of the latter type. In either case, sharp blades and precise mechanical control are the vital elements.
Rulers. A 6-foot folding ruler and 12-foot steel tape measure are both valuable. Neither need be expensive.
Screwdrivers. You need several sizes. Tempered steel shanks and blades are the key to quality.
Scribers. Some woodworkers prefer to use an awl, some an ice pick, some the blade of a penknife.
Spokeshaves. For general use, the best of the many forms available is the adjustable type with a flat blade about 2 inches wide, the depth and angle of cut being controlled by means of two adjusting screws.
Squares. The adjustable combination square measures right angles and 45? angles and can serve as a marking gauge, ruler, or depth gauge. Most have builtin spirit levels, some may also contain a scriber.
Cutting Wood With Handsaws
The coarseness of a saw blade is expressed in points (number of teeth per inch). The lower a blade's point count, the faster and rougher the cut; the higher the point count, the slower and smoother the cut. Most crosscut handsaws are 8 to 12 point; most ripsaws, 5 to 7 point. Both kinds cut on the downstroke, and both operate most efficiently when they go through wood at a 30° to 45° angle. Cut a little to the outside of the guideline, leaving some wood for finishing. First make a groove with two or three backstrokes, then proceed with long, even strokes, using the full length of the blade.
A backsaw is a 12- to 16-point crosscut with a reinforced back to keep the blade rigid. With it you can cut closer to a line than with a handsaw. Even more precise is the dovetail saw, like a small backsaw with a very thin rip-sharpened 22- to 26-point blade.
Shaping Wood With Drawknives, Spokeshaves, and Planes
A drawknife is nothing but a long blade, sometimes hollow-ground like a straight razor, with a handle on each end. It is best used by pulling the cutting edge toward you to shave layers of varying thickness from the wood's surface. Because the depth and angle of cut are controlled only by the way the tool is held, its use requires skill and practice. When mastered, it is a versatile tool for shaping curves and irregular surfaces. The blade's bevel should be up when shaping convex curves, down for concave ones.
Spokeshaves are also usually used by pulling. Their narrow blades protrude through a flat base to ensure an even cut; thus they work like small planes for smoothing round surfaces—as in shaping wagon spokes, the job for which they are named—and for working inside curves. When using a spokeshave or a drawknife on a curve, employ a slicing motion, and always try to cut “downhill,” that is, following the direction of the grain.
Planes are pushed rather than pulled. The most generally useful of the many types available is the bench plane. It comes in four sizes: smoother, jack, fore, and jointer. Smoother planes, 7 to 10 inches long, are used for finish-planing; jack planes, 12 to 17 inches long, are the rough laborers among planes, used for reducing the size of a piece of wood and creating a fairly even surface; fore planes, 18 inches long, serve much the same purpose for long boards and can be used in place of jointer planes in flattening shorter pieces; jointer planes, 22 to 36 inches long, are used to produce the flattest possible surface on large pieces of wood. Block planes, only 5 to 7 inches long, are used for shaping and smoothing small pieces as well as for trimming end grain.

Teeth of a crosscut saw are like a series of little knives slicing across the grain of a piece of wood. Those of a ripsaw are like chisels, gouging out a path along the grain. In both types the teeth are set—that is, bent outward in alternate directions so that they make a cut, or kerf, that is slightly wider than the thickness of the blade itself. This reduces friction on the blade and keeps it from binding. A blade with an uneven set is harder to use and will tend to veer to one side as it cuts.
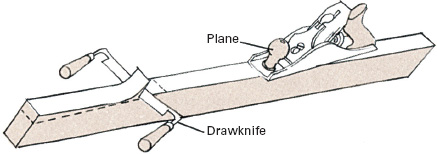
For best results in using plane, drawknife, or spokeshave, try to hold tool at slight angle to direction of cut so that blade slices through, rather than chops at, the grain of the wood.

Short plane, riding over irregularities in wood like a small boat over ocean waves, smooths but does not flatten. Longer plane spans waves and cuts down high spots to make flat surface.
Edge-planing. To flatten and trim the edge of a board, be sure the work is held securely, as nearly level as possible. Apply even pressure throughout long, straight strokes to produce a continuous shaving. Use knob to support nose of plane at end of strokes to prevent chopping or rounding corners.
Surface-planing. To flatten the surface of a large piece, particularly one that has been formed by edge-gluing, first plane diagonally to eliminate high spots, then straight along the grain in long strokes.
Trimming end grain. With a block plane, work from the edges inward, then level the hump in the middle.
Drilling clean holes

To prevent splintering, drill from one side until tip of bit emerges. Then bore back from the other side to clear hole.
The essential chisel
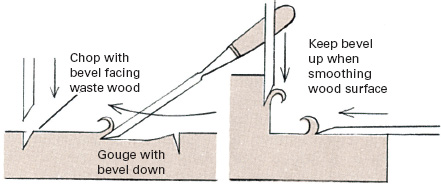
Straight chisel, also called a firmer chisel, is a woodworker's most versatile tool. It is driven with a mallet to chop through the grain of wood, used like a knife to carve wood, or manipulated in many ways to gouge out waste wood and to shave, shape, and smooth wood surfaces. Dozens of other kinds of chisels, including rounded gouges, V-shaped parting tools, and skew chisels with angled blades, exist to perform specific tasks.
Keeping tools sharp
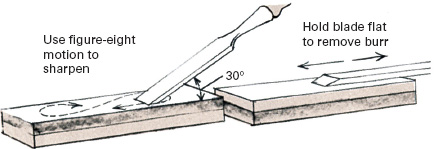
Benchstones, to maintain the critical fine edge of straight blades, are perfectly flat. They come in varying degrees of hardness; the harder the stone, the finer the edge it can impart—and the longer it takes. The best natural stones, quarried in the Ozark Mountains of Arkansas, are quite expensive and so high in quality that they are used for sharpening surgical instruments. Arti?cial stones, such as carborundum, emery, and India stone (oil-filled fused alumina), are cheaper and do an adequate job for most wood-working needs. To sharpen a blade with one beveled edge, first lubricate the stone with water or fine oil; then hold the bevel at the proper angle (30 degrees in most cases) and stroke back and forth evenly over the stone's surface in a figure-eight motion. A burr will be raised on the flat side; remove it by gently rubbing the blade back and forth on the stone. Clean your stone with kerosene after each use, and keep it in a fitted box with a cover that can be removed.
The Art of Joinery: Putting Pieces Together So They Stay Together
Joinery is the woodworker's basic craft. The soundest joints are made by shaping pieces of wood to interlock firmly. They may be further secured by inserting wooden pins through the joint, by driving wedges into it, by applying glue, or by using such mechanical fasteners as screws or nails. The essence of the craft lies in designing each joint to withstand the specific stresses that will be put upon it. The joiner must understand the nature of each piece of wood. Its grain and texture and its strengths and weaknesses must be taken into account, the pieces must be made to fit as nearly perfectly as possible, and the inevitable shrinkage and movement that will occur over time must be anticipated.
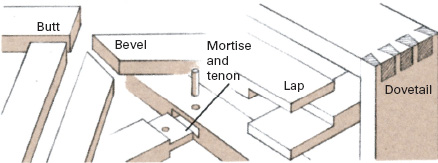
Five types of joints are used in the projects on the following pages. Practice with scrap wood before attempting each joint.
Kinds of glue
A wide range of liquid adhesives is available in ready-to-use form, including many brands of white glue, the somewhat harder drying yellow glue (aliphatic resin), two-part waterproof glue (resorcinol), and liquid hide glue. All work well for specific jobs.
The country carpenter's old standby, hide glue, prepared from the skin, horns, and hooves of cattle and horses, is almost a thing of the past—along with the mess and stench of the bubbling glue pot that was once a ?xture in any woodworking shop. It is still available in flake form, however, and it has two advantages: it is inexpensive, and it will keep indefinitely. It is not a bad idea to keep a pound or two of dry hide glue on hand for use in case of emergencies.
Types of Joints
Butt joints. One piece of wood fits squarely against another and is secured by glue, nails, screws, pins, or other means, such as the metal braces used with the Shaker firewood carrier (pp.308–309). In several of the projects illustrated on the following pages, butt joints are used when edge-gluing narrow boards together to make a wider surface, such as a tabletop.
Bevel joints. Instead of fitting squarely, as with a butt joint, two pieces are beveled to fit at an angle, as in building the colonial cradle (pp.314–315). When both pieces are cut at 45° to form a square corner, the result is called a miter joint.
Lap joints. Two pieces are notched to fit one atop the other, forming a double layer that is the same thickness as each piece. This can be done on the ends of boards or it can be internal, as in joining the feet of the candlestand (pp.316–318). It is important that the notches run across the grain of both pieces and that the fit not be so tight that it puts undue stress on the joint.
Mortise-and-tenon joints. A tongue (the tenon) cut into the end of one piece fits precisely into a hole (the mortise) cut into another. There are countless variations on the theme. Of the several mortise-and-tenon joints employed in the projects, no two are quite the same. Some are “through joints”—the tenon pierces the mortise piece. In others the mortise is blind—only deep enough to accommodate the tenon. Some are secured by pins, some by wedges, some permanently, some temporarily, and some not at all. (See also p.311.)
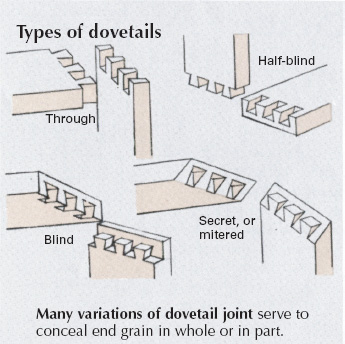
Dovetail joints. Fan-shaped tails in one piece fit between matching pins in another. Although the joint is occasionally glued or even secured with nails or wooden pins, it is at its best when it is self-securing. For instructions on dovetail joinery, see p.313.
Edge-gluing
Whatever kind of glue you use, do not expect it to make up for a poorly fitted joint. Wood surfaces must be flush and clean; joints must be firmly clamped until the glue has set. When edge-gluing, plane both edges square; with long boards, plane to a slight concave curve so that the centers of the boards are 1/16 inch apart. Apply glue lightly to one edge, then clamp with even pressure until a bead of glue emerges along the entire length of the joint.

Before edge-gluing two or more boards, look at curve in end grain caused by circular conformation of annual rings. To control warping, place boards side by side so that curves alternate.
Putting on the Pressure: Three Methods
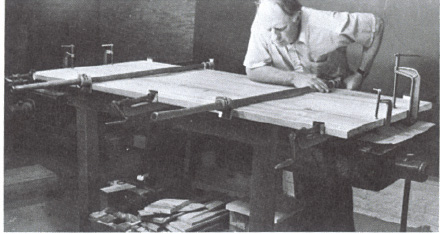
Bar or pipe clamps. Use enough clamps to apply pressure evenly over full length of joint. To prevent buckling, place clamps alternately, one above boards, the next below. With all methods apply C-clamps to ends of joints to keep boards even.
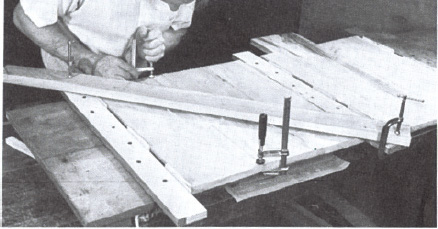
Frame and wedge. Make frame slightly wider than combined width of boards. Apply pressure with pairs of wedges driven together between boards and frame. Diagonal batten prevents buckling. Wax paper under joint prevents gluing to frame.
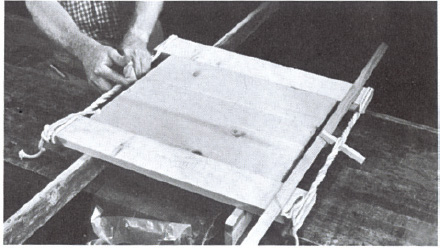
Tourniquet. Cut two battens as thick as and slightly longer than the boards being joined. Wrap ¼-in. rope twice around ends of battens and tie. Apply pressure by winding hardwood spindles. Cross-members hold spindles in place until glue sets.
Using Nails and Screws
Fastidious cabinetmakers scorn the use of metal joining devices, but for ordinary folk—and that includes most of the old-time country carpenters and furniture-makers—nails and screws are reasonable compromises with perfection. If you strive for authenticity in making such pieces as the Shaker firewood carrier (p.308) and the colonial cradle (p.314), use old-fashioned cut nails, available with or without hand-wrought heads from specialty hardware suppliers—or make your own (see Metalworking, p.355). Modern wire nails come in three forms that are most useful in furnituremaking: common nails, with broad, flat heads; box nails, also flat-headed but lighter in weight than common nails; and finish nails, with very small heads for countersinking (brads are small finish nails). Nail size is expressed in terms of pennies (d), which once signified the price per hundred in old England. A 2d nail is 1 inch long; a 4d, 1½ inches; a 6d, 2 inches; and so forth. Cut nails are less likely to split hardwood than are wire nails, provided they are driven with their flat sides parallel to the grain. To prevent splitting with wire nails, blunt the points before driving them so they do not act as wedges; in hardwood drill a pilot hole slightly smaller than the thickness of the nail.
Wood screws are threaded for about two-thirds of their length. The thickness of the shank above the thread determines screw size. To drill a pilot hole for screwing into softwood, select a bit about the same diameter as the inner core of the thread (hold the screw up to the light, hold a bit in front of it, and choose one that allows you to see all the thread on both sides of the bit). For hardwood first drill with a slightly larger bit—one that can barely be seen when held behind the core of the thread. Then enlarge the upper third of the hole with a second bit the same thickness as the shank.
Laying out patterns
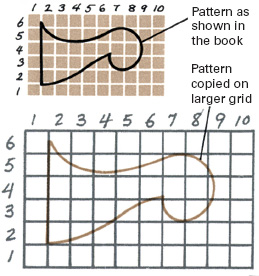
Patterns are given in 1- or 2-in. scale on the following pages. To use them, make grid with lines 1 or 2 in. apart on heavy paper, then copy pattern on grid, using a straightedge where needed. Hold pattern on surface of wood and trace over lines with scriber, or use carbon paper beneath the pattern.
Making Pins and Wedges
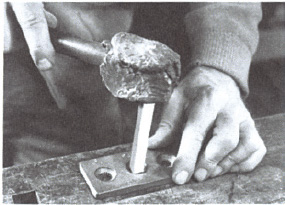
Dowel shaper is metal plate with graduated holes; drive pin through one hole at a time to diminish size. Next, use dowel shaver; its holes are slightly tapered to compress pin driven from wide side and to shave excess when driven back.
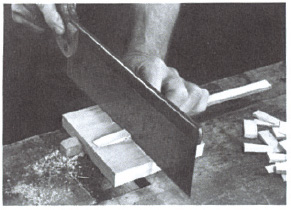
To make wedges, start with length of hard-wood of right width and thickness for butt of wedge. Use block plane to taper to desired degree, then cut off with backsaw. Make wedge a little longer than needed to allow for driving.
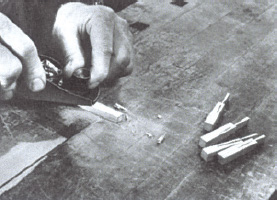
Fox wedges are used to secure tenons and pins in blind mortises where wedges cannot be driven from outside. Cut slot in tenon or pin, insert fox wedge, and drive into blind mortise. Wedge will be forced back into the tenon or pin.
The mortising gauge
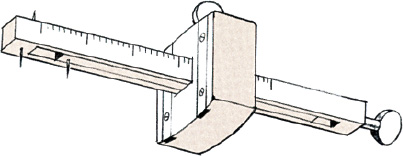
Marking gauge has only one point, for scribing a single line parallel to edge, face, or end of board. Mortising gauge has an additional pair of points—the inner one is adjustable—for scribing two parallel lines a given distance apart.
Finishing
The most important factor in finishing is preparing the wood. Country furnituremakers seldom used sandpaper, relying instead on their skill with planes, spokeshaves, drawknives, and scrapers to achieve a smooth surface. Their usual finishing materials were milk-based paint or boiled linseed oil mixed half-and-half with turpentine. A few suppliers carry old-fashioned milk-based paint in powdered form; if you want to try mixing your own, see Household Recipes, p.343. To apply linseed oil, brush the mixture of oil and turpentine on freely and let it soak in until the wood cannot absorb any more. Wipe off the excess, then rub with a clean linen pad—hard and long enough to generate heat. Let the finish dry for two days and apply another coat. Four or five coats will accent the wood figure with a lustrous sheen.
Sources and resources
Books
Alexander, John D., Jr. Make a Chair From a Tree: An Introduction to Working Green Wood. Mendham, N.J.: Astragal Press, 1994.
Feirer, John L. Basic Woodworking. Peoria, III.: Bennett Publications, 1978.
Margon, Lester. Construction of American Furniture Treasures. New York: Dover, 1975.
Moser, Thos. How to Build Shaker Furniture. New York: Sterling, 1980.
Seymour, John. The Forgotten Crafts. New York: Knopf, 1984.
Spence, William P., and Griffiths, L. Duane. Woodworking Basics: The Essential Benchtop Reference. New York: Sterling Publishing, 1995.
Stickley, Gustav. Making Authentic Craftsman Furniture. New York: Dover, 1986.
Underhill, Roy. The Woodwright's Shop: A Practical Guide to Traditional Woodcraft. Chapel Hill, N.C.: University of North Carolina Press, 1981.
Watson, Aldren A. Country Furniture. New York: New American Library, 1976.
Periodicals
Fine Woodworking. Taunton Press, P.O. Box 355, Newtown, Conn. 06470.
Woodshop News. Sounding Publications Inc., 35 Pratt St., Essex, Conn. 06426.
Woodworkers Journal. Madrigal Publishing, 517 Litchfield Rd., New Milford, Conn. 06776.
Tools and materials
Big Tool Box, Inc. 200 South Havanna St., Aurora, Ga., 80041.
Bimex, Inc. 2687 McCullum Pkwy., Suite 206, Kennesaw, Ga. 30144.
Frog Tool Co., Ltd. 700 West Jackson Blvd., Chicago, III. 60606.
Garrett Wade Co., Inc. 161 Avenue of the Americas, New York, N.Y. 10013.
Leichtung, Inc. 4944 Commerce Pkwy., Cleveland, Ohio 44143.
Tremont Nails. 8 Elm St., Wareham, Mass. 02571.
Woodcraft Supply. 313 Montvale Ave., Woburn, Mass. 01888.
Woodworker's Supply. 5604 Alameda NE, Albuquerque, N. Mex. 87112.
A Shaker-Style Firewood Carrier Is Made to Last
An important tenet of the Shaker religious communities that flourished in isolation during this nation's first century was the sanctity of good workmanship. Each community made its own furniture, tools, and implements of daily life in a style that is instantly recognizable for its uncompromising practicality. “All beauty that has not a foundation in use,” the Shakers believed, “soon grows distasteful and needs continual replacement.” The things designed by the Shakers seldom needed replacement. Their unornamented beauty is that of the perfectly functional, and they were built to last.
This firewood carrier embodies Shaker craftsmanship at its best. The design problem is simple: how to make a container strong enough to hold a load of heavy fire-wood yet light enough to carry. The fact that so many examples of the design still exist more than a century after they were made and used is testament to how well the Shakers solved the problem.
Three kinds of wood are used for this carrier: the sides, ends, and battens are of white or red oak; the bottom is of white pine; and the handle is of clear hickory or ash.
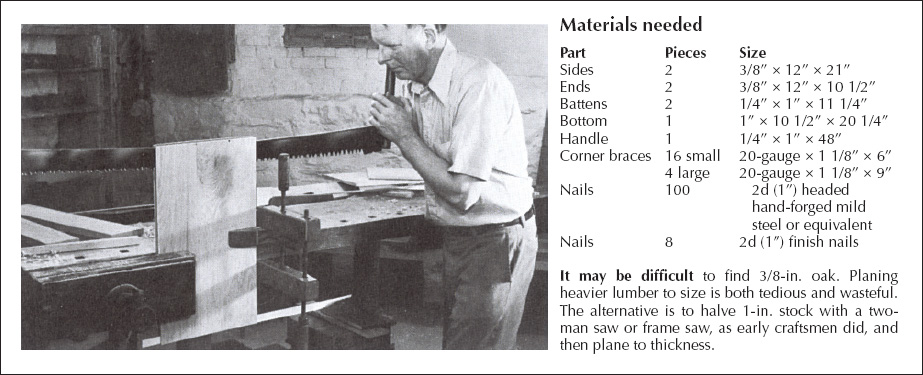
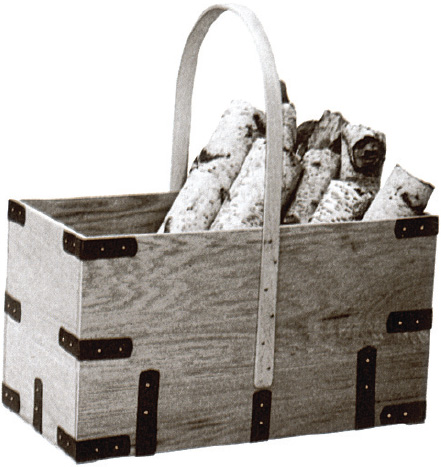
Firewood carrier is joined by corner braces of 20-gauge mild sheet steel (about 1/32 in.) lightly planished with ball peen hammer. For an authentic look use hand-forged nails to secure braces and to join handle to sides. Paint exposed metal in flat black to protect it and to simulate the look of wrought iron.
Preparing the Pieces
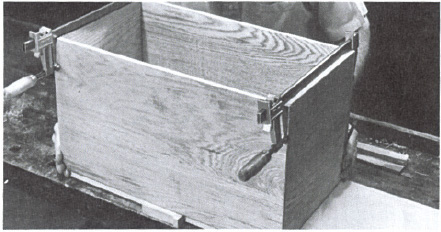
1. Saw side and end pieces roughly to size, allowing an extra ¼ in. in each dimension for finishing. Surface-plane all pieces, then edgeplane to exact dimensions. Stop and clamp the unit to gether from time to time as you work to ensure square joints.
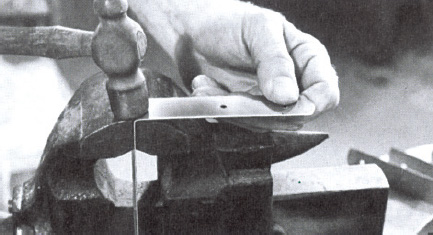
2. Use tin snips to cut corner braces from sheet steel. Before bending them, scribe center lines along length of each strip and drill nail holes ¾ in. and 1¾ in. from either end. Bend 6-in. braces 90° across middle; bend 9-in. braces 5 in. from one end.
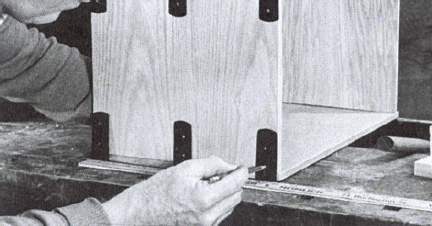
3. A dozen 6-in. corner braces are needed to assemble carrier frame. Begin by positioning three braces on each corner joint and marking for nail holes. To ensure tight fit, mark outer edge of holes, not center. Label all pieces for reassembly.
Nailing It Together
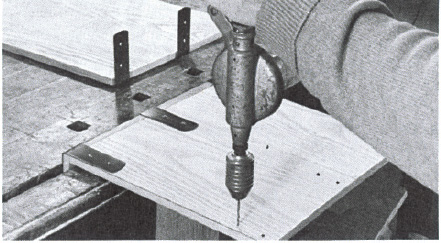
1. Using a bit slightly smaller than shank of nails, drill a pilot hole at each mark. To be certain of proper positioning, pin each brace in place with nails, but do not drive them home.
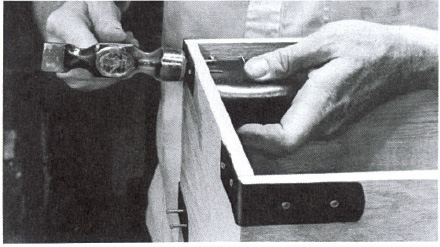
2. When all holes are drilled and all braces in position, drive nails. Use steel block or heavy hammer to back up wood while driving, but do not attempt to clinch nails.
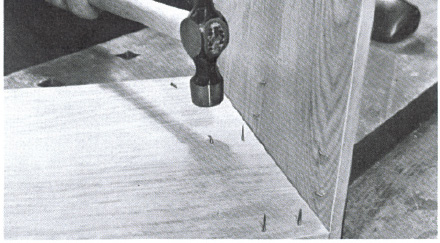
3. Hammer points of nails over and down; flatten across the grain. With softwood, such as white pine, you could clinch nails as they are driven (Step 2), but this can split oak.
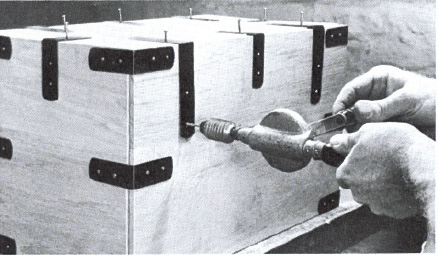
4. Cut bottom piece to fit snugly inside frame. Position two 9-in. braces on each side, about 3 ½ in. from corners; center the four remaining 6-in. braces. Mark, drill, and drive nails as above.
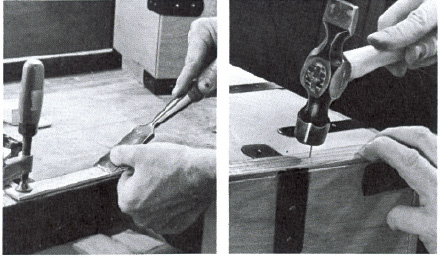
5. Batten strips must be installed on bottom to prevent braces from scuffing floor. Chisel out center of battens (left) to fit over braces; secure with four counterset 2d finish nails.
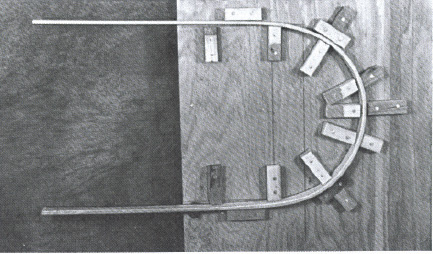
6. Lightly chamfer edges of handle. Steam handle or keep in hot water until supple. Then carefully bend to 5 5/8-in. radius and allow to dry overnight. Wood for handle must be free of knots.
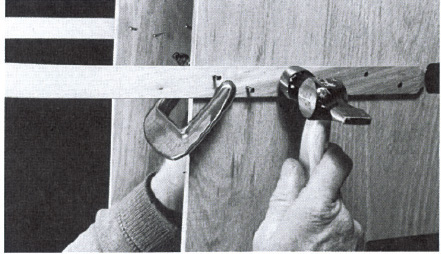
7. When handle dries, clamp it in place. Mark position of six nail holes on each side, using staggered pattern to prevent splitting. Drill through, drive nails, and bend them over inside.
This Walnut Bench Has Moravian Roots
To enter the saal, or chapel, where the Moravian villagers of Bethabara (now Winston-Salem, North Carolina) met to worship, is to sense something of the devout heartiness of their lives. The furniture consists of 20 long black-walnut benches, simple in design, rich and graceful in appearance, upon which the villagers sat— strictly segregated by age, sex, and marital status—while singing rousing, even lusty, anthems of religious praise.
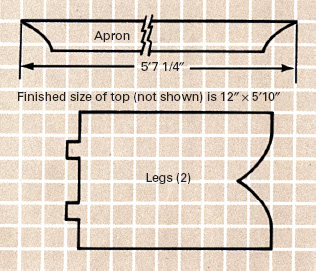
Use 2-in. gridded paper to make templates for cutting out legs and apron piece.
Materials needed
Black walnut is often available only in the form of rough lumber, sawed but not planed. If you buy finished stock, it will be ¾ to 7/8 in. thick rather than 1 in. as listed below. Because black walnut tends to warp a great deal in drying, look for well seasoned stock. Wide boards are often hard to find and always expensive if you find them, so plan on edge-gluing for the top and legs.
| Part | Pieces | Size |
|---|---|---|
| Top | 1 | 1” × 13” × 6” |
| Legs | 2 | 1” × 13” × 18” |
| Apron | 1 | 1” × 3” × 6” |
| Wedges and pegs | 1 | 1” × 11 ½” × 12”or odd 1” scraps |
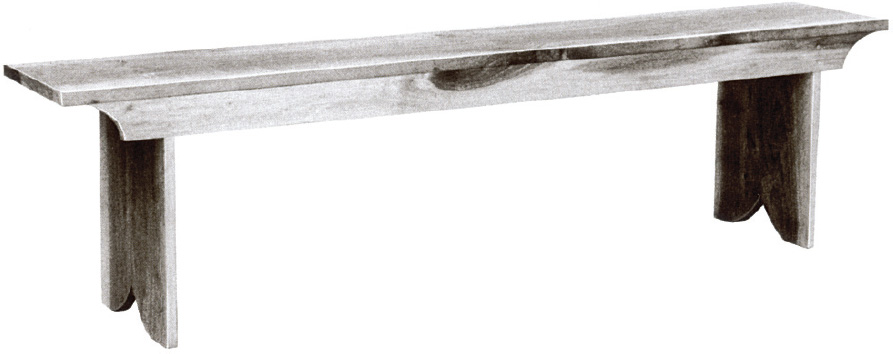
Original 18th-century bench upon which this adaptation is based is 10 ft. long and 15 in. wide and stands on three legs. Like this bench the original has a front side, the side with the apron. You can easily alter the design to suit your own needs. For a bench more than 7 ft. long, add a middle leg. For a bench with two fronts, or to further strengthen the seat, add an apron to the other side.
Preparing the Pieces
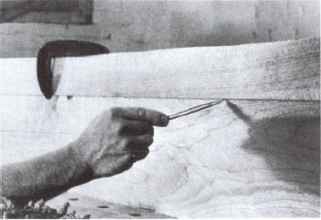
1. Before edge-gluing, surface-plane unfinished lumber until figure shows. Match figures for pleasing effect and mark both pieces lightly with pencil. Edge-plane and glue (see p.306).
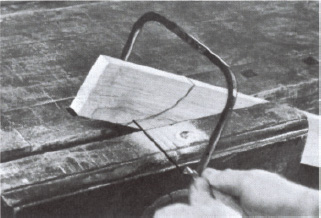
2. While glue is drying on large boards, cut apron piece roughly to length, and edge-plane to width. Use template to scribe curve on both ends; cut ¼ in. outside line with coping saw.
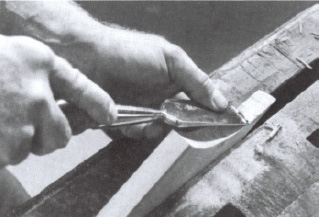
3. Use a straight chisel with the beveled side down to trim both coping-saw cuts to scribed line. To avoid chipping or splitting, carve wood in the direction of grain, not against it.
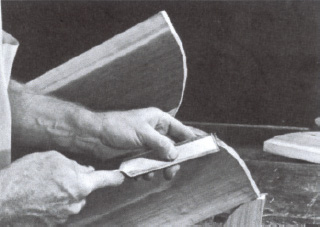
4. When edge-glued boards dry, plane flat. Saw wood to length for top and legs. Scribe legs with template; then use coping saw to rough-cut curved feet. Trim with straight chisel.
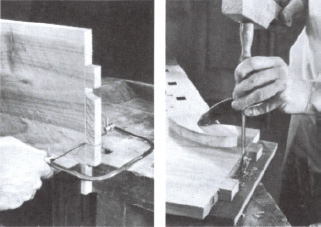
5. Make vertical cuts and outside cuts on both tenons with backsaw. To remove section between tenons, use coping saw first; finish by chopping with straight chisel and mallet.
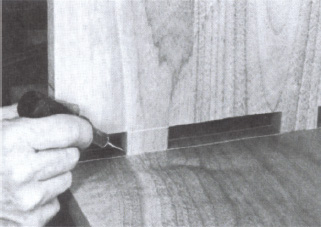
6. To position mortises in top piece, first use square to scribe two lines across underside 7 in. from ends. Center legs inside these lines and scribe around tenons. Label for reassembly
Fitting the Joints
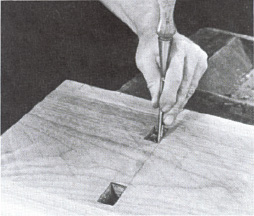
1. With 5/8-in. bit, drill out most waste wood for mortises. Finish with ½-in. and 1-in. chisels. To prevent splintering wood, first cut from top, then from bottom.
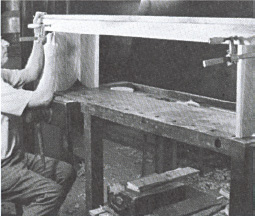
2. When legs fit snugly into top, clamp apron in place and mark the spot where its bottom edge crosses the front of both legs. Use gauge to scribe depth of apron on legs.
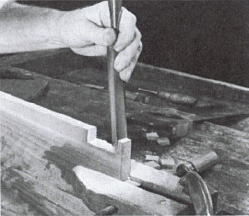
3. Make a series of backsaw cuts to within 1/16 in. of depth line on both legs. Chisel away waste. Trim so that apron fits snugly into notch and is flush with front edge of legs.
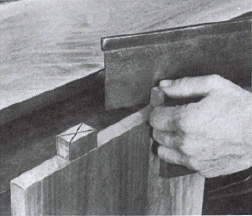
4. Clamp legs securely in vise, and use backsaw to make two diagonal cuts, in the form of an X, to the full depth of each tenon. Assemble legs and top, but do not drive wedges.
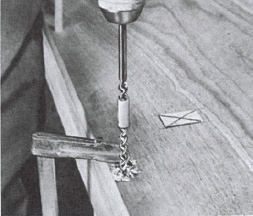
5. Clamp apron in place. With 5/16-in. bit, drill seven 2-in.-deep holes to pin apron to top and two to pin apron to each leg. Start drilling in center of top and space holes 10 in. apart.
Mortise-and-tenon joints
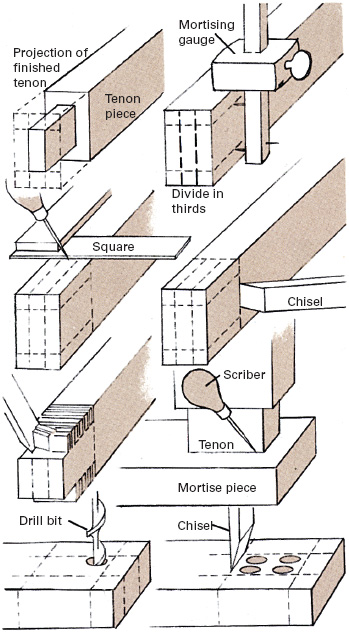
Consult a dozen master woodworkers on the best technique for making a mortise-and-tenon joint and you will probably receive a dozen differing sets of instructions. None is wrong if it works. All will have in common a concern for precise measurement and careful fitting. A loose tenon means a wobbly joint; a tight one can mean split wood. A tenon with uneven or out-of-square shoulders will form a joint with gaps at the edges. A mortise whose sides are not cut straight (or at the same angle as the tenon) will form a crooked joint. Each craftsman eventually devises his own system for preventing these errors. The method outlined here is a conservative one by which the beginner can be fairly sure of achieving a snug and secure fit. Practice it a few times with scrap wood before undertaking a project involving mortise-and-tenon joinery.
Begin with the tenon. Scribe the desired size on the tenon piece's end grain—ideally, it should divide the narrow measure of the piece into equal thirds. For longer dimension scribe lines the same distance from the top and the bottom as the first lines are from the sides. With a mortising gauge or square extend the marks onto both faces of the piece. Then use a square to scribe the depth of the tenon on all four faces of the piece and deepen these lines a little with a straight chisel. Working on one face at a time, make a series of absolutely square backsaw cuts about ¼ in. apart to within 1/16 in. of the scribed lines. Chisel away the waste wood to form the tenon.
Use the tenon itself to outline the mortise, and with a square extend the marks onto all faces of the mortise piece; this will give you a guide to help ensure a straight cut. Drill out most of the waste wood from inside the marked area (see Drilling Clean Holes, p.305). Then remove the remaining waste wood with a straight chisel and mallet, cutting just inside the scribed lines. Finally, test the joint and shave the tenon or the sides of the mortise as needed for a snug but not overly tight fit.
Pinning, Wedging, and Finishing
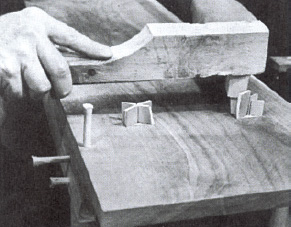
Make 11 pegs 5/16 in. thick by at least 3 in. long and 16 wedges 1 ½ in. long tapering from 1/8 in. thick to a dull point. (See Making Pins and Wedges, p.307). Make wedges wide enough so that two will fit into each diagonal cut in tenons. Position them all. Then remove pegs one at a time, dip in water, and quickly drive with mallet. Use mallet and wood block to drive wedges.
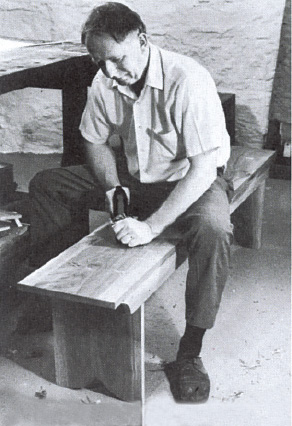
Taped hacksaw blade is useful to saw off pegs and wedges without scarring surface (see Trestle Table, Step 6, p.321). Trim with block plane. Then use smoother plane to lightly surface-plane top and apron. Chamfer all exposed edges slightly. For a traditional finish begin with a mixture of equal parts turpentine and boiled linseed oil. Apply several coats at two-day intervals, rubbing each in well and taking care to fill all exposed end grain. As a final step, apply one coat of pure boiled linseed oil. Occasional applications of boiled linseed oil will maintain finish over the years.
An Open Cupboard For Your Kitchen Or Living Room
This project is inspired by a cupboard dating from the early 1800s that stands in the kitchen of the Van Cortlandt Manor Restoration in Croton-on-Hudson, New York. To build it is equivalent to completing a capsule course in simple joinery. Having mastered the mortise-and-tenon joints for the shelves and the through dovetails for the top, you can use them for many other projects, including cupboards of your own design.
Cutting and Joining the Sides and Shelves
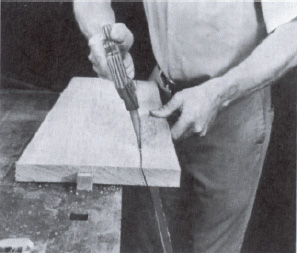
1. With rip and crosscut saws cut all pieces roughly to size, allowing an extra 1/8 in. all around for finishing. When cutting board for top piece, use template to scribe approximate bevel on front edge and saw at that angle, leaving extra wood for final fitting. Lightly surface-plane all pieces.
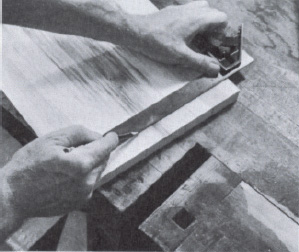
2. Sandwich sides and shelves in vise and plane edges simultaneously to ensure equal width. To scribe tenons on shelves, first find center of boards and measure 16 in. in both directions. Use combination square to scribe lines across boards, then to scribe 2-in.-wide tenons 2 in. from edges.
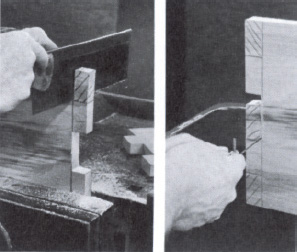
3. Use backsaw to cut straight sides of both tenons to within 1/16 in. of lines and to remove outside waste. Cut out waste wood between tenons with coping saw. Make all saw cuts to within 1/16 in. of lines, then finish shaping tenons by trimming flush to lines with straight chisel.
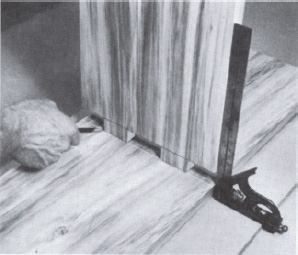
4. Scribe lines for shelves across both side pieces, 11 in. and 24 in. from top. Position shelves squarely on lines and scribe around tenons. Because tenons will vary slightly, label each joint for reassembly. Drill mortises with 1 1/16-in. bit and cut with chisel. (See Mortiseand-tenon joints, p.311.)
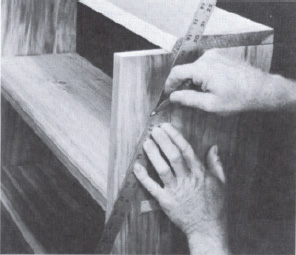
5. Assemble sides and shelves. On sides scribe a straight line from a point 6 ¾ in. from rear corner to a point level with front edge of upper shelf. At the same time check the angle of bevel on top piece. (Note that when joined, upper edge of top will drop down flush with upper edge of side.)
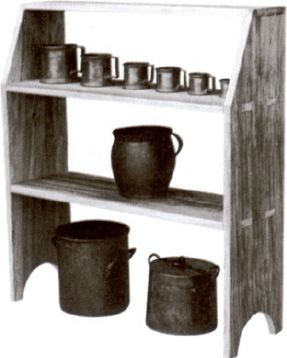
6. Disassemble. Use ripsaw to rough-cut slanting line on both sides. Edge-plane simultaneously. Plane bevel on front edge of top to fit. Then, from center point of bottom edge of both sides, scribe an arc with a radius of 3 ¾ in. Cut out with coping saw; finish with drawknife and spokeshave.
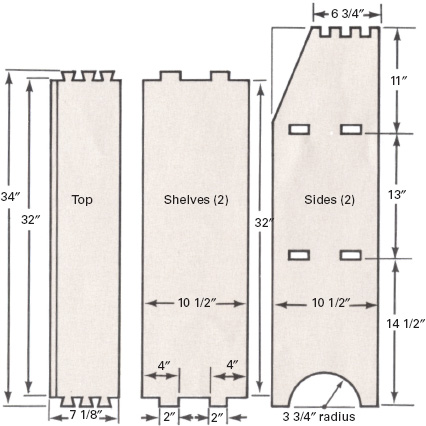
Cut pieces from No. 2 or better white pine, avoiding knots at joints. Dimensions given are not absolute; adjust them to suit your own needs. Finish with linseed oil or paint (see Finishing, p.307).
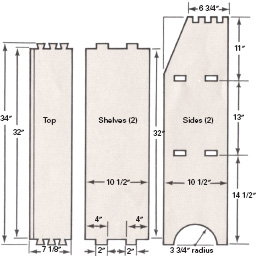
Materials needed
| Part | Pieces | Size |
| Top | 1 | 1 ¼” × 8” × 34 ½” |
| Shelves | 2 | 1 ¼ × 11” × 34 ½” |
| Sides | 2 | 1 ¼ × 11” × 39” |
| Hardwood | 1 | 1” × 6” × 7” or |
| wedges | available hardwood scrap |
Making Dovetails to Join the Top Corners
There is no stronger or more attractive way to join the ends of two boards than with well-made dove-tails. Although instructions are specific to this project, they embody principles that apply to any dovetailing you might undertake. For safety's sake, make some practice joints with scrap before you start work on the cupboard.
Begin by making a pattern to serve as a guide. A traditional angle of rake is 1:5 (1-in. rake over 5-in. length). Make the pins about half as wide as the tails, and always arrange the pattern so that a half-pin (so called because it is angled on only one side) is on both ends.
Set a marking gauge to 1 1/6 in. more than the thickness of the wood, and use it to scribe a depth line around the ends of the top board and upper end of side pieces. (The scribed lines should be 32 in. apart on the top board; if they are not, trim the board to size.) Scribe pattern on end grain of side pieces (Step 1, below) and use a square to extend lines down to depth line (Step 2). Shade tails as waste to be cut away. Use the same template to scribe pattern on upper face of top board, its edge flush with depth line (Step 3). Extend lines onto end grain, shade pins as waste, and compare markings to ensure an exact match (Step 4).
Cut pins into side pieces, using backsaw or dovetail saw to cut on shaded side of vertical lines to just short of the depth line (Step 5). Remove waste with coping saw, then trim with straight chisel (Step 6). Cut tails in top the same way (Step 7), using backsaw to remove outside waste and coping saw for waste between tails. Compare the pieces; if you have cut and trimmed precisely to the waste side of each line, they will match but not quite fit together (Step 8). Mark and trim a little at a time until they fit snugly. To prevent offsetting the top forward or backward, trim both pieces equally.

Pattern at right can be traced for use as a template to scribe tails and pins on wood surfaces for open cupboard.
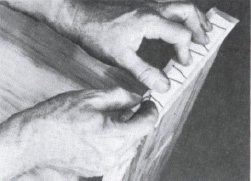
1. Scribe pattern on end grain of sides. Verify angles with bevel gauge.
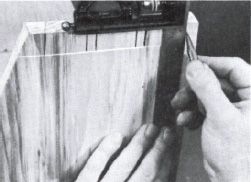
2. Extend lines to depth line. Use pencil to crosshatch waste wood.
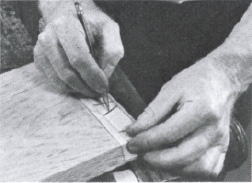
3. Scribe pattern on top piece, the wide part of tails toward ends.
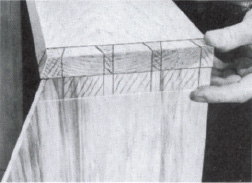
4. Extend lines onto end grain; cross-hatch pins for waste. Compare marks.
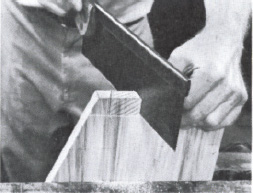
5. Cut pins into side pieces. Saw on the waste side of all lines.
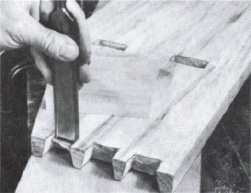
6. Use scrap wood as backing while trimming with straight chisel.
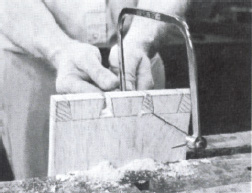
7. Cut tails into top piece, sawing on waste side of lines. Trim with chisel.
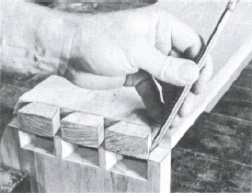
8. Mark and trim evenly until pieces can be tapped snugly together.
Putting It Together

1. Use backsaw to make two diagonal cuts in each tenon to receive the wedges that will secure the joints. Cut slots with the grain, stopping about 1 1/6 in. before you reach the full depth of the tenons.
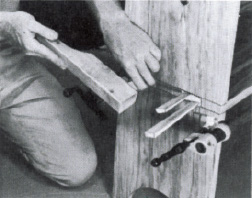
2. Make 16 hardwood wedges about 6 in. long, tapered from ¼ in. to a dull point (see Making Pins and Wedges, p.307). Clamp cupboard together and drive wedges. (Shave sides of wedges to fit inside mortises.)
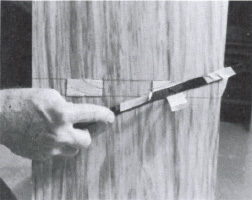
3. Tape hacksaw blade to prevent scratching wood, and trim wedges. Use block plane to smooth off protruding tenons and dovetail joints. Then finish-plane all surfaces and lightly chamfer all edges.
A Snug Colonial Cradle To Rock Baby Asleep
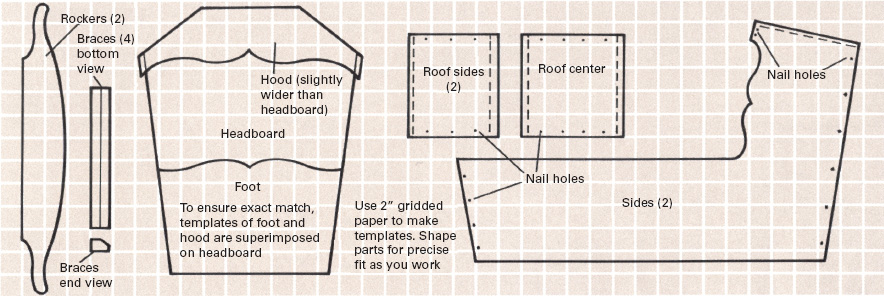
This charming project involves no mortise-and-tenon joints, no dovetails, no pins, and no wedges. All joints are planed for a flush fit and nailed. This seeming simplicity is deceptive, however. Because there are no square corners, at least two edges of each piece of the frame must be beveled at various angles. Some bevels are indicated at right, but for best results do not rely on patterns. Cut each edge square and a little outside the lines, then carefully fit the pieces together, marking and planing a little, refitting and planing some more.
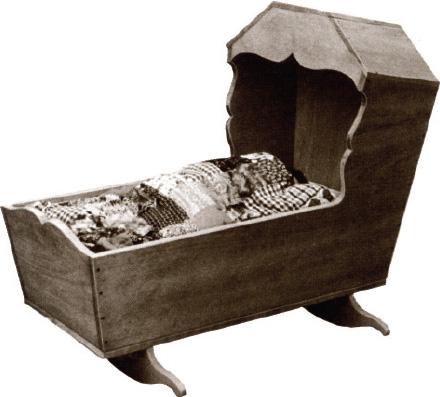
American infants slept snug and warm in cradles like this during the colonial period and Revolutionary War.
Materials needed
Wood (clear white pine)
Needed to make the roof: ½” × 10” × 30”
Needed to make the frame, rockers, and bottom: ¾” × 2' × 10'6”
Needed to make the braces: 1 ¼” × 5” × 12 ½”
Nails (handmade mild steel if possible)
Needed to make the roof: 20 2d (1”) brads
Needed to make the frame: 24 4d (1 ½”) wrought-headed
Needed to make the bottom: 48 6d (2”) fine finish
Fitting the Frame Takes a Delicate Touch

1. A single piece of ¾-in. pine 10 ½ ft. long by 2 ft. wide can yield all parts of the cradle except braces and roof pieces with very little wood wasted. (A 3-ft. section has already been sawn off the end of this board for making the bottom and rockers.) Use 2-in. grid to scribe patterns. Use rip and crosscut saws to rough-cut all pieces; cut scrollwork with a coping saw. Do not saw bevels but allow stock for them.
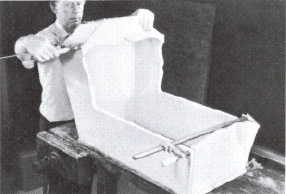
2. Edge-plane footboard and headboard, comparing to ensure identical angles. Do the same with side pieces. Assemble with bar or pipe clamps. Plane ends of hood to fit and clamp it in place.
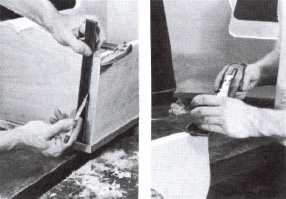
3. Begin the marking and fitting process with sides of footboard. Use straight edge to scribe junctures; loosen clamp, remove footboards, and edge-plane lightly. Reassemble often to check fit.
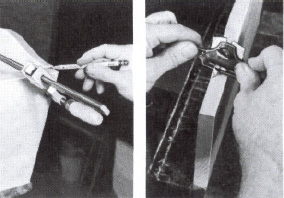
4. When joints are flush, mark top edge of footboard for bevel. Using a spokeshave, drawknife, and chisel, finish scrollwork so that the entire edge is slightly beveled inward to match upper edge of sides.
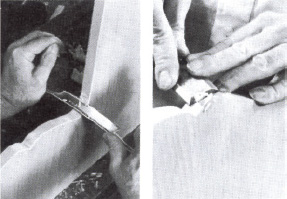
5. To finish sides, first plane ends to match line of footboard and headboard. Next, plane long edge to a slight inward bevel. Finally, finish trimming scrollwork with spokeshave, drawknife, and chisel.
Fitting the Roof and Nailing It Together
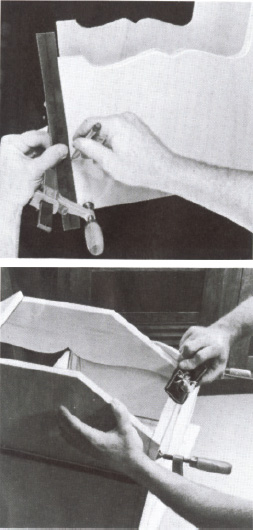
1. With rip and crosscut saws, rough-cut the three roof pieces from ½-in. stock, leaving 1/8 in. all around for fitting and beveling. Label each piece. To find bevel for the top edges of sides of frame, extend lines along slope of headboard and hood to the outer face of each side. Remove clamp that secures the hood while you scribe a straight line between the two points. Then clamp the hood back in place and use a block plane to bevel the edges of both side pieces so that the roof sides will sit flush. Secure the roof sides to the hood with C-clamps so that they overhang the frame slightly all around.
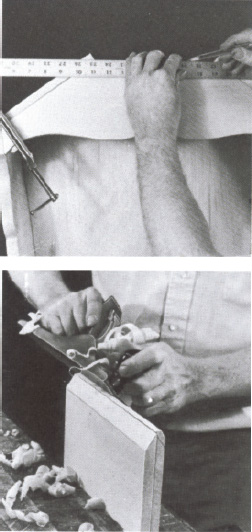
2. On the bottom of the two roof side pieces scribe the outline of the frame. Use a straightedge to find the angle of bevels across the top and along the sides, and scribe lines across the upper surfaces. Undo clamps and remove both pieces. Then sandwich them in vise with upper surfaces together and plane to the lines scribed on the undersides. Next, clamp the pieces together, underside to underside, and plane the bevels, double-checking the fit often. When both pieces fit properly, clamp them to the hood and place the center roof piece in position on top. Mark it, plane it to size, and bevel its two outer edges.
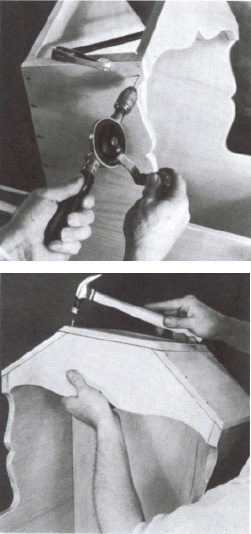
3. Use template to mark placement of nails on sides and roof pieces. Join frame with 4d wrought-headed nails. Clamp frame together and use a bit that is slightly smaller than the upper shank of nails to drill through sides and ½ in. into foot and headboard. Drive nails. Then drill through sides and 1 in. into hood for 6d fine finish nails; drill at upward angle for secure joints. (If you are using round nails, blunt the ends slightly before driving to prevent splitting wood; with cut nails be sure the wide edge is parallel to the grain.) Position roof pieces and drill for 2d brads ¼ in. into hood and headboard. Secure roof side pieces first, then roof center.
Now All It Needs Is a Bottom With Rockers Attached
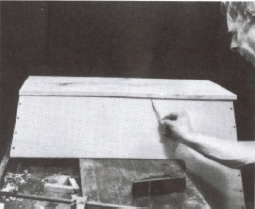
1. Place assembled frame on flat surface and mark a line for beveling about ¼ in. up all around its lower edge. Turn frame upside down on bench and plane its bottom edge to the scribed line for a flat, even surface. Set the bottom piece on this surface and scribe the outline of the frame on it. Saw roughly to size. Edge-plane and surface-plane.
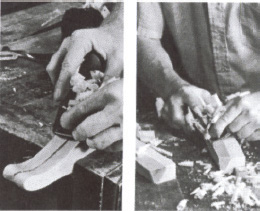
2. Rough-cut the two rockers with a coping saw. Clamp them together in vise for a close match, and use chisel, block plane, and spokeshave to trim and finish them. To make the braces, first rip a 5-in. board into four equal widths; saw to length and edge-plane square. Then plane a long bevel into one edge of each. Plane off corners at ends of beveled edge.
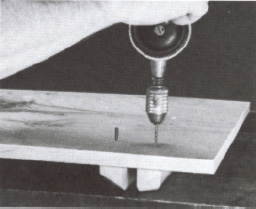
3. Position rockers 4 in. from each end of bottom and outline them on its upper and lower surfaces. Position braces on both sides of each rocker and outline braces as well. Within outlines of braces on upper surface of bottom, mark the placement of four nail holes. Set braces in place and drill through bottom piece into braces for 6d fine finish nails.
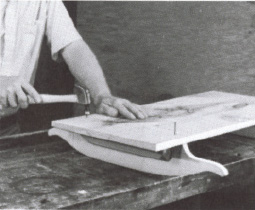
4. Drive nails partway into braces, then position rockers. If they fit snugly, remove rockers and drive nails into braces. Then reposition rockers and mark placement of three nail holes for each. Drill for and drive 6d fine finish nails into rockers. To prevent splitting, blunt the ends of round nails; place square nails with long side parallel to grain.
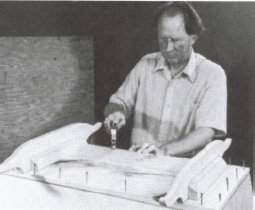
5. Position bottom on frame. Mark placement of four nails in each end, seven along each side. Drill for and drive 6d fine finish nails into frame at slightly outward angle to match angle of frame pieces. With chisel, plane, spokeshave, and scraper, finish and lightly chamfer all edges. Finish with penetrating varnish and well-rubbed coat of wax.
A Handy Stand For Candles, Lamps, And Knickknacks
The term candlestand applies indiscriminantly to a wide variety of stands and small tables, most of which have only a central leg, or stem. While it is certainly true that these portable pieces of furniture were commonly used as pedestals for candles and candelabra, they were not limited to this practical function. In early American households, from log cabins to palatial mansions, you would have been as likely to find a bowl of fruit or flowers, an oil lamp, a birdcage, or the family Bible atop a candlestand as you would a candle.
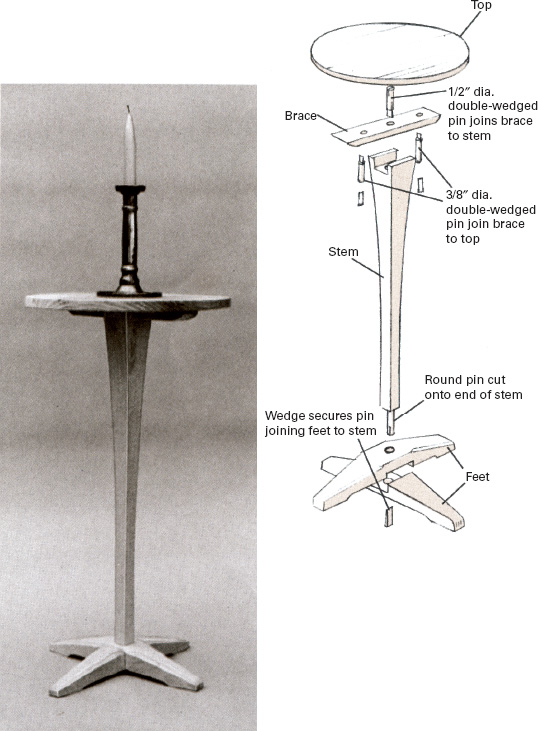
Gracefully tapered candlestand is a copy of a late-17th-century original made in or around Boston. It looks delicate but is solid and strong due to artfully hidden pins and wedges.
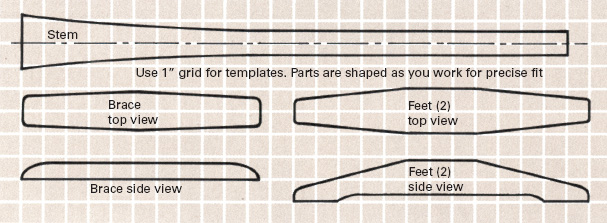
Materials needed
| Part | Pieces | Size |
| Stem | 1 | 2 ½” × 2 ½” × 24 ½” |
| Brace | 1 | ¾” × 2” × 10 ¼” |
| Feet | 2 | 2” × 2” × 13 ¼” |
| Top | 1 | 1” × 13 ¼” × 13 ¼” |
Clear white pine is probably best for this project. Such hardwoods as walnut, cherry, or oak make very attractive candlestands but are more difficult to work with and can split when wedges are driven. Use ash or other hardwood for pins and wedges.
Shaping the Tapered Stem
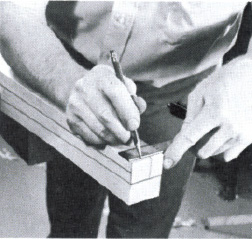
1. Edge-plane stem piece to 2 3/8 in. square. Draw center line on all sides and across end grains. On two opposing sides align template to center line and scribe its outline.
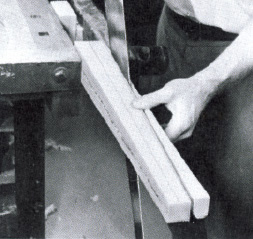
2. With ripsaw make diagonal cuts from one end of piece to the other, outside of scribed lines. Plane square, redraw center lines, mark and saw the other two sides.
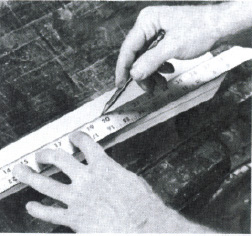
3. Plane these two sides square and redraw center lines using crossed lines on end grain as a guide. On two opposing sides align template with center and scribe its outline.
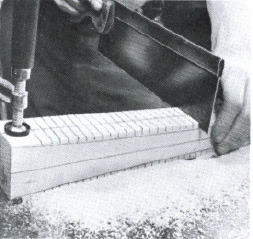
4. Use backsaw to make a series of cuts about ¼ in. apart to within 1/16 in. of scribed lines. To be sure that saw cuts are square and level, use scribed lines on both sides as guides.
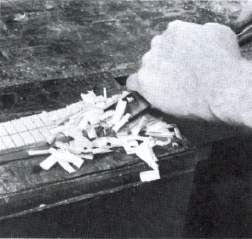
5. Clamp the stem piece firmly in vise while you use the widest chisel you have to remove waste wood from between the saw cuts. Hold chisel with the beveled side down.
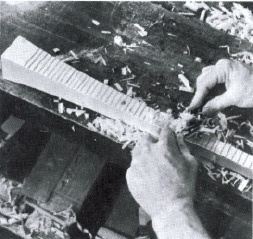
6. Trim both sides to size with spoke-shave. Then lightly redraw center lines and scribe outline of template on finished sides. Shape the remaining two sides in the same way.
Forming the Interlocking Feet
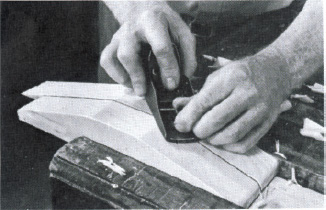
1. Use template to scribe side view of feet on 2-in. by 2-in. pieces. Cut roughly to shape, excluding hollows in bottom, with rip and crosscut saws. Clamp feet side by side in vise, and plane top surfaces to precise shape.
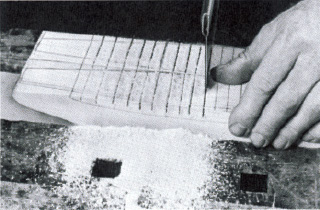
2. Use backsaw to cut the ends off square. Then clamp feet bottom side up in vise and make a series of absolutely level backsaw cuts across both to (but not through) the scribed lines that de?ne the hollows in the bottom surfaces.
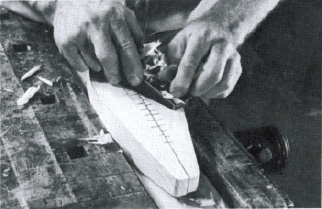
3. To shape sides of feet, scribe outline of template on bottom. Use drawknife to trim almost to line, then clamp feet together in vise and plane for exact match. Finish separately by shaping hollows in bottom with 1-in. chisel.
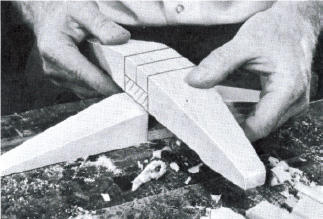
4. To locate lap joint, cross one foot squarely over the other at midpoint; scribe outline on top of lower foot and on bottom of upper foot. Use square to extend lines around both feet. Compare to be certain lines are centered.
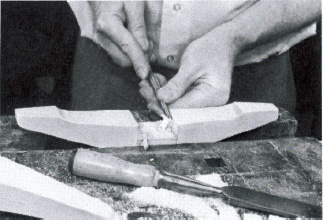
5. Stand lower foot on bench and scribe horizontal line ¾ in. down from top. Use backsaw and chisel as in shaping stem to cut notch in top just short of line. Insert upper foot, scribe across, and cut similar notch from bottom.
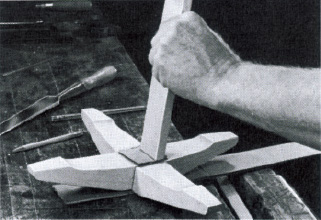
6. Join the notches. Fit should be snug, not tight, but joint should not yet fit flush. Gradually increase depth of notches (tapering both inward slightly for tightness) until tops are flush and both feet sit evenly on flat surface.
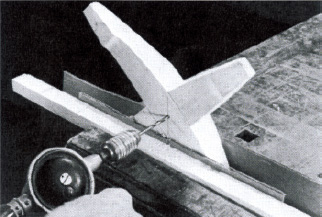
7. Mark center of joint on top and bottom with crossed pencil lines. Make a pilot hole through center using ¼-in. or 5/16-in. bit in eggbeater drill. To ensure straight hole, drill halfway from bottom, then drill back from top to meet.
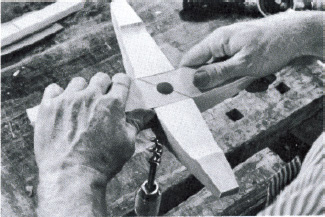
8. For final hole use 13/16-in. bit. To help keep hole straight, clamp brace in vise with bit vertical, and turn foot assembly on it. Bore from the bottom until tip of bit emerges, then bore from top (see Drilling clean holes, p.305).
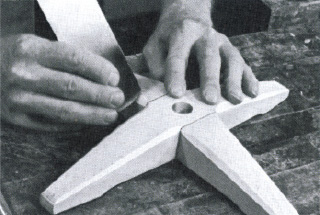
9. Use straight chisel and spokeshave to lightly chamfer upper edges of foot assembly. Finish surface of feet with scraper, leveling off any unevenness in the joint and smoothing away any remaining nicks and blemishes.
Giving the stem a round pin
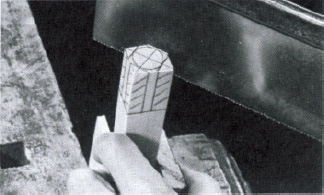
1. Find length of pin on stem by measuring depth of foot assembly at center hole; then scribe depth line around stem. Draw 7/8-in. circle on end grain of stem. Use backsaw to cut away corners to depth line, leaving octagonal pin slightly larger than scribed circle.
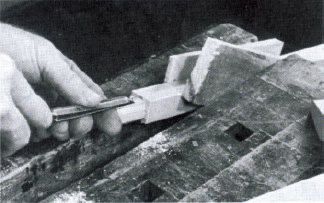
2. With a small chisel carefully trim pin down to a circle until it fits snugly into the hole through the foot assembly. Be sure that shoulder around pin is cut evenly for a flush fit against the upper surface of the feet. Use plane or spokeshave to lightly chamfer all four long edges of the stem.
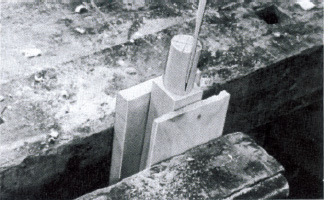
3. Make a 3-in. hardwood wedge ¼ in. thick on top and same width as pin. Use backsaw to slot pin lengthwise along the grain. If stem leans slightly when inserted in foot assembly, locate slot off center. Later, when wedge is driven, stem will adjust toward side with the slot.
Topping Off the Stand And Pinning It Together
Make the top from 1 ¼-inch stock, planed to 1 inch. Scribe a circle 13 inches across and rough-cut it with a coping saw 1/8 inch outside line. Trim to line with a block plane. For a delicate look plane a ¼-inch bevel around the underside, extending inward 1 ½ inches. The joints are made with double-wedged pins; fox wedges (p.307) secure the hidden half. Saw slots in both ends of all pins almost to the center at right angles to each other.
The Brace and Its Joint
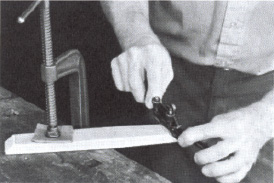
1. Scribe outline of brace from template. Rough-cut with rip and crosscut saws; use block plane to taper sides to scribed lines. Round off both lower corners with block plane and spokeshave.
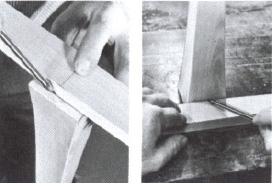
2. Center the brace on upper end of stem, across the main grain line, and scribe its outline. Then scribe its thickness on sides of stem and use square to extend lines from end to this depth line.
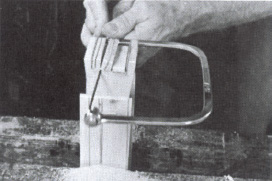
3. Use dovetail saw or backsaw to make a series of cuts to depth line. Remove waste with coping saw rather than chisel to avoid danger of splitting end grain. Then use chisel to trim for snug fit.
Joining It All With Pins and Wedges
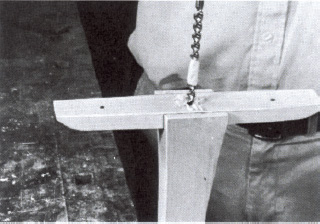
1. Drill ½-in. hole through center of brace and 3/8-in. holes 2 ¾ in. from both ends. Position center hole over center of notch in stem and drill ½-in. hole 1 ½ in. deep in stem.
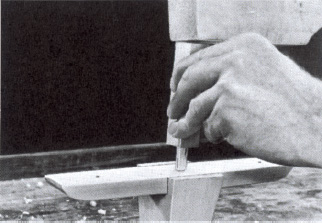
2. Make ½-in. pin 2 ¼ in. long; slot ends 1 in. deep in opposing directions. Insert 7/8-in. fox wedge in one end; drive so that wedge runs across grain of stem. Drive second wedge.
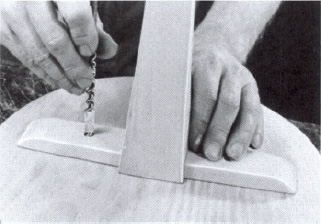
3. Center the brace on underside of top, with its grain running opposite to the grain of the top. Mark its outline in pencil, and mark centers for the two 3/8-in. holes.
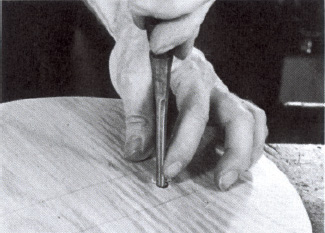
4. Drill two 3/8-in. holes in underside of top no deeper than 9/16 in. (Bit must not break through upper surface of top.) Use small chisel to smooth and clean out bottom of both holes.
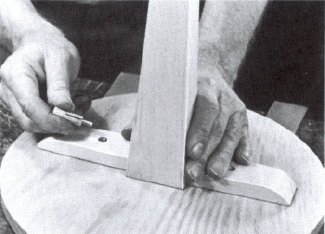
5. Make two 3/8-in. pins 1 ½ in. long; slot both ends in opposing directions 11/16 in. deep. Insert 5/8-in. fox wedges. Drive with mallet so that wedges run with grain of brace across top grain.
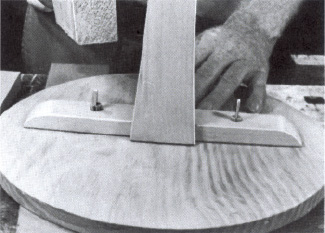
6. Insert both second wedges and drive with hardwood mallet. Trim with taped hacksaw blade and chisel; finish with block plane and spokeshave. Chamfer edges of brace.
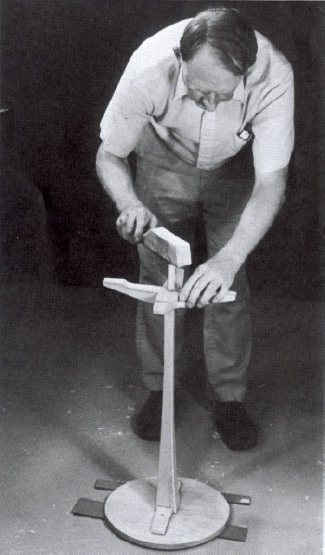
7. Insert stem pin into center hole in feet, and drive 3-in. wedge (p.317). Trim excess with taped hacksaw blade and spokeshave. Chamfer top of stand slightly. Finish with scraper.
The Trestle Table: A True Trencherman's Groaning Board
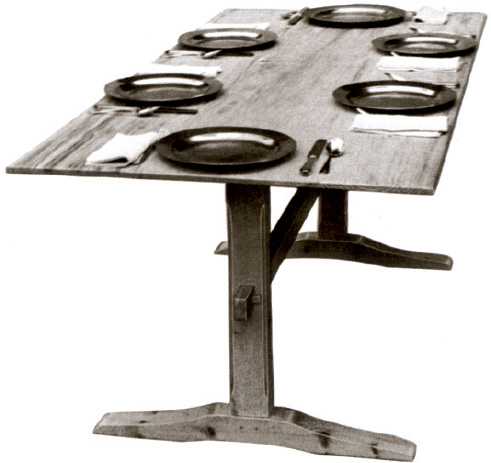
A trestle table in its most rudimentary form is nothing but a long board set across two or three sawhorses, inelegant but functional, with the clear advantages of easy storage and portability. The design shown here and on the following pages—a scaled-down version of a 12-foot-long 18th-century banquet table belonging to New York's Metropolitan Museum of Art—has the same practical virtues and is good looking as well.
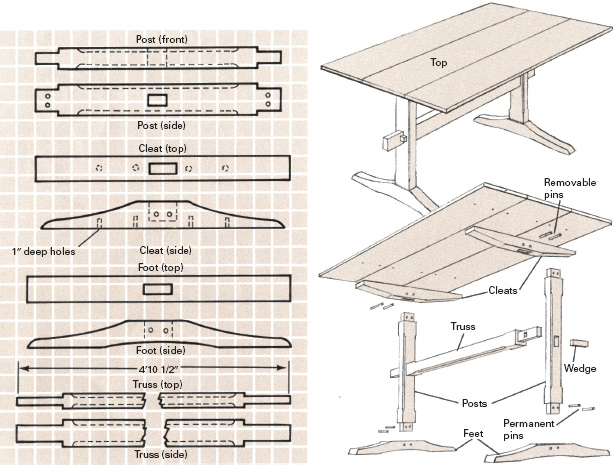
Use 2-in. gridded paper to make patterns for truss, feet, cleats, and posts. Scribe patterns on wood, avoiding knots where mortises are to be cut. Saw to length. Cut pieces roughly to width with ripsaw; then surface-plane truss, posts, and sides of feet and cleats to within 1/8 in. of finished size. Rescribe patterns. Cut tenons on truss and posts with backsaw and chisel (see Mortise-and-tenon joints, p.311).
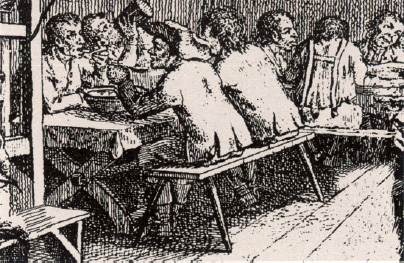
In taverns and inns, homes and churches, wherever many people might gather to eat and drink together, trestle tables were used by early Americans. Like today's folding card tables, they took up little storage space and were easily transported—even through narrow doorways.
Materials needed
The best wood for the tabletop and all parts of the trestle structure is No. 2 white pine, although any good soft pine will do. The pins and wedges for the original were probably made of white oak; however, various light-colored hardwoods, such as white ash or beech, are satisfactory. (See Making Pins and Wedges, p.307.)
| Part | Pieces | Size |
| Top | 3 | 1 ¼” × 11” × 6'1” |
| Trestle structure (all parts) | 4 | 3 ½” × 3 ½” × 5” |
| Pins and wedges | 1 | ¾” × 11 ½” × 1” or odd scraps ¾” thick |
Forming the Feet and Cleats
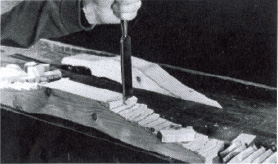
1. To shape curved surfaces on feet and cleats, begin by making a series of backsaw cuts about ¼ in. apart to within 1/8 in. of scribed lines. Be certain cuts are absolutely square and level. Remove waste wood with 1-in. straight chisel.
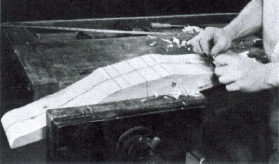
2. Clamp both cleats firmly together and trim them simultaneously to size, using a block plane first, then a spokeshave or drawknife for a finished appearance. Next, clamp both feet together and trim them in the same way.
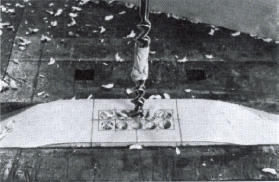
3. Cleats have blind mortises: they go only partway through. Use post tenons as guides to scribe mortises on center of cleats (see Mortise-and-tenon joints, p.311). With 5/16-in. bit, drill holes 1/16 in. deeper than length of tenon.
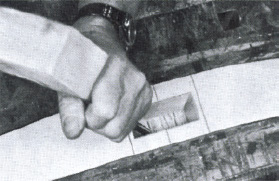
4. Trim mortises with straight chisel so tenon fits snugly. To remove waste wood from bottom of mortise, make a series of cuts across grain by tapping chisel with mallet; then scrape out. Drill and trim foot mortises all the way through.
Pins and Wedges: Some Are Permanent, Some Are Not
Preparing the Pieces for Pinning
Four kinds of hardwood pins are needed to join the table's parts. To secure the feet permanently to posts, use four ¼-inch dowels. For the removable pins joining the posts and cleats, fashion four round pins 4 ½ inches long, tapering from 5/8 to 3/16 inch thick. For holding the truss in place, make two wedges 2 5/8 inches long by ¾ inch wide, tapering from 5/8 to 5/16 inch thick. The cleats are affixed to the tabletop with eight fox-wedged pins that measure 7/16 inch square at the top, tapering to 5/16 by 3/8 inch. (See Making Pins and Wedges, p.307.)
The tabletop consists of three 1 ¼-inch-thick boards edge-glued to form one wide plank. To give the glue plenty of drying time, apply glue and clamp before starting on the frame. (See Edge-Gluing, p.306.)
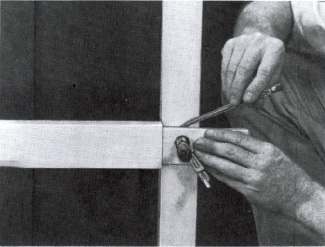
1. Assemble leg systems and stand them on flat surface. Clamp truss tenons to posts, as indicated by post templates, and scribe outlines. Extend lines around posts. Then butt tenons against inner face of each post, centered between lines, and scribe width. Use gauge to mark width on outer face. Drill and cut mortises (see Mortise-andtenon joints, p.311).
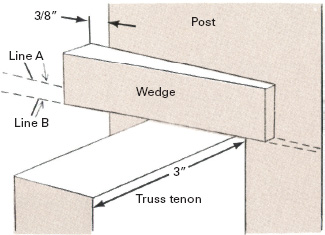
2. Insert truss tenons through mortises (they should protrude about 3 in.), and scribe line A across upper face of each to mark its exit from post. Place wedge atop tenon flush with post, its thick end extending 3/8 in. beyond front face of post, and scribe line B on tenon. Withdraw tenon and use combination square to scribe line C 1/8 in. closer to shoulder than line A.
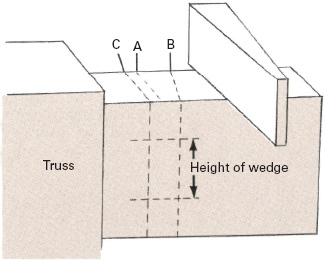
3. With square extend line C all around tenon and extend lines downward from the two ends of line B onto front and rear faces of tenon. Use wedge itself to scribe height of wedge mortise, yielding two rectangles on opposite sides of tenon, one broader than the other. The inner edge of both rectangles should be 1/8 in. inside post mortise when tenon is in place.
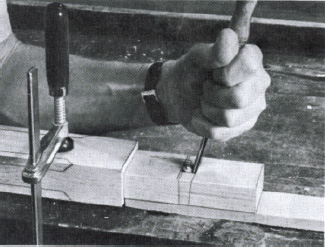
4. To cut wedge mortises, begin by drilling from small side with 5/16-in. bit, at angle indicated by line B on sides of truss tenon, until point of bit protrudes. Then bore back to clear hole. Next, use ¼-in. and ½-in. chisels to trim remaining waste. (The extra width of wedge mortises will leave a 1/8-in. gap inside posts to allow for future tightening as trestle table ages.)
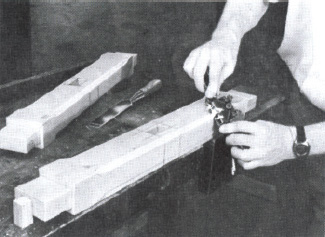
5. Using templates as guides, mark truss and both posts for ½-in. chamfers on all long edges. Cut ends of each chamfer with a chisel; then use plane or spokeshave for long, flat sections. To avoid cutting too deeply, always go with the grain, never against it. Specially designed chamfering planes, spokeshaves, and draw knives are available to make this job easier.
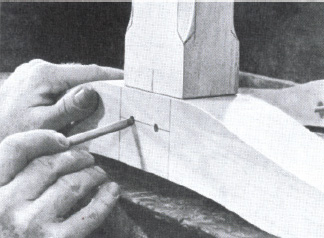
6. Locate holes for pinning foot permanently to post 1 in. down from top of foot and ¾ in. in from sides of mortise. Drill ¼-in. hole through foot at each mark. Insert tenons and mark top edge of holes on posts; then withdraw tenons and drill ¼-in. holes centered on these marks. Since holes are offset, tenons will be drawn tightly down when pins are inserted later.
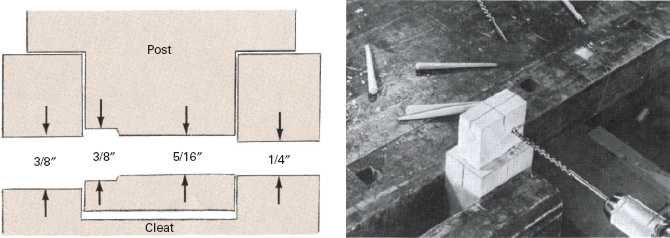
7. To make offset holes for removable pins that will join cleats to posts, begin with same hole-locating procedure as for Step 5. Use 3/8-in. bit to drill through one side of cleat into empty mortise. Place cleat on bench with mortise up, insert post tenon, and make a mark slightly above center point of the hole. Remove tenon and use 3/8-in. bit to bore ¼-in.-deep holes in it at these marks. Change to 5/16-in. bit and continue through tenon until tip emerges, then bore back to clear hole. Replace tenon in mortise and, with ¼-in. bit held against lowest surface of inside of hole, drill through other side of cleat until tip emerges. Bore back to clear hole. When tapered pin is inserted, tenon will be drawn tightly down into mortise.
Putting It Together and Taking It Apart
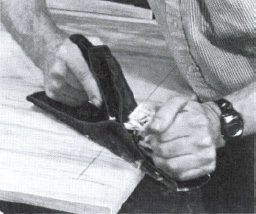
1. Remove clamps from tabletop after glue has set. Surface-plane to about 1 in. thick. Plane ends to size. Then draw a line on underside 2 in. from each edge, another on all edges 3/8 in. up from underside. Bevel edges for a graceful appearance by planing to these lines.
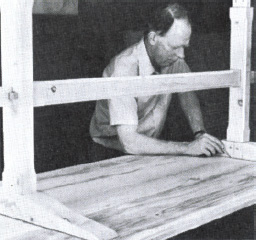
2. Assemble and pin together cleats, posts, and truss. Place top upside down on bench and center this trestle structure on it. Outline cleats. Within outlines use template to mark positions of pins for joining top to cleats. Drill through top with 3/8-in. bit. (See Drilling clean holes, p.305.)
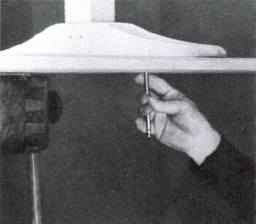
3. With the end of tabletop overhanging bench, replace trestle structure with cleats once again in their outlined positions. Mark center of each hole on cleats. Then shift top so other end overhangs bench, check position of cleats, and mark center of these holes.
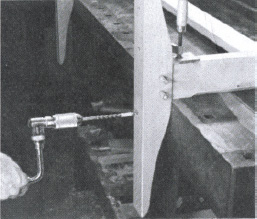
4. Use piece of tape to mark depth of 1 in. on 3/8-in. bit. Drill holes in cleats to that depth, centered on marks. Reposition cleats on tabletop and insert pins to check hole alignment. Label all joints for reassembly, then take trestle structure apart and lightly chamfer all exposed edges.
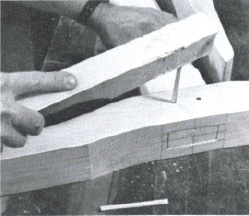
5. To join feet and posts permanently, insert each post tenon into the mortise that was made to fit it. With knife or block plane, whittle slight bevel on one end of each pin so it can work its way through offset holes and draw tenons down. Then use mallet to drive all pins firmly home.
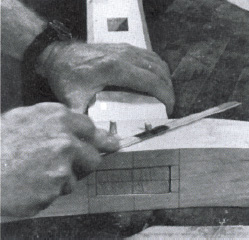
6. Drive pins all the way through legs so that beveled ends protrude, then use hacksaw blade to saw both ends of pins flush with sides of feet. Ends of hacksaw blade are taped to prevent marring wood surface. Finish trimming ends of pins with block plane.
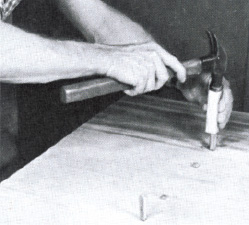
7. Reassemble trestle and secure top to cleats with 2 ¼-in. fox-wedged pins (see Making Pins and Wedges, p.307). Pins should have 1-in. slots. Make fox wedges 1 in. long by 5/16 in. wide, tapering from 3/16 in. to 1/16 in. thick. Insert so wedges run across grain of cleats. Support cleats while driving pins.
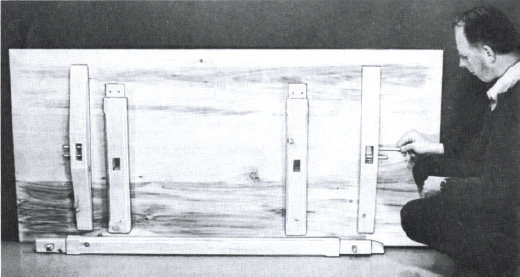
Use taped hacksaw blade and block plane, as in Step 6, to trim pins off level with surface of tabletop. Then use jack or smoother plane to lightly finish the whole top and to chamfer all edges a little. It is almost certain that the original table upon which this design is based was left unfinished or, at most, treated with an occasional application of linseed oil (for instruction in applying linseed oil, see Finishing, p.307). A coat of penetrating varnish followed by a thin layer of wax, carefully rubbed with a soft cloth, is a good way to give your table more protection without destroying its natural look.
To disassemble table for storage, first use hardwood mallet to loosen all four tapered pins that secure the post-and-cleat joints. Then remove pins and lift off top. Next, use mallet to remove wedges from their mortises in the truss. When both wedges are out, pull posts straight off truss tenons. To prevent loss of pins and wedges, always tap them into their appropriate holes while table is in storage. Store parts in a warm (not hot), dry place to minimize the risk of warping.
The Hutch Table: A Rural Space Saver Made From Pine
In the crowded confines of old farmhouses and homesteads the versatile hutch table was a valued piece of furniture. It was a combination table and storage chest with a top that tipped back so the piece could be pushed flat against a wall—in which state it could also serve as a chair. The original of this charming example of the genre, dating from about 1700, was made from white pine by methods very like those illustrated on the following pages. White pine is still the ideal wood to use, although any soft pine will do. It was finished with a milk-based blue paint, so long-lasting that much of the original coat remains. A simple and attractive alternative, albeit inauthentic, is to apply a wipe-on, penetrating resin finish, such as those manufactured by Watco, Minwax, or Dupont, to highlight and protect the natural wood grain. The finish used here is clear, with a slight tint of light walnut stain added for accent.
The seat of this hutch table is a little high for comfort, a problem that is easily solved with the help of a small footstool. In other common designs—called, naturally enough, chair tables—storage space was sacri?ced for the sake of a lower chair seat, with the arms of the chair serving to support the tabletop. Some featured pull-out drawers beneath the seat.
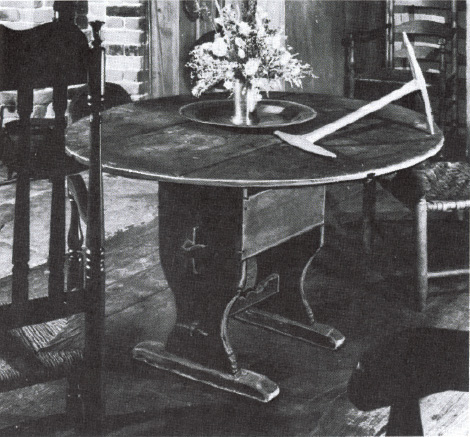
This hutch table is similar—but not identical—to project. Tool resting on it is a niddy-noddy. (See Spinning, p.277.)

Materials needed
| Part | Pieces | Size |
| Tabletop | 1 | ¾″ × 12″ × 43″ |
| Tabletop | 2 | ¾″ × 16″ × 43″ |
| Sides | 2 | ¾″ × 15″ × 27 5/8″ |
| Front and back | 2 | ¾″ × 12″ × 19¾7″ |
| Feet | 2 | 2 ¼″ × 2¾″ × 20″ |
| Top stringers | 2 | 1 ½″ × 3″ × 36″ |
| Foot stretcher | 1 | ¾″ × 4″ × 20″ |
| Hutch lid | 1 | ¾″ × 15xy2 × 18 ½″ |
| Hutch bottom | 1 | ¾″ × 13¾″ × 18¾″ |
| Battens | 4 | ¾″ × 1″ × 14″ |
| Hardwood pins | 2 | 5/8″ dia. × 4″ |
Use 2-in. gridded paper to make templates for all parts of hutch table.
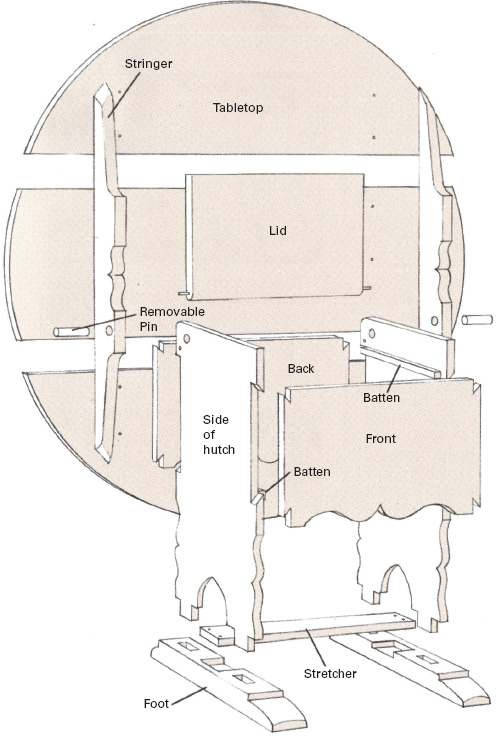
Top is joined to stringers with wood screws. Boards are not edge-glued, so wood can swell and shrink in response to changes in humidity.
Stand assembly comprises front, back, and two side pieces joined with large dovetails and secured by wood screws. Top pivots on removable pins joining its stringers to sides. Lid pivots on permanent pins. Battens supporting lid and bottom are screwed to sides.
Foot assembly consists of two feet joined by a stretcher. Stretcher is recessed into half-mortises and is secured by screws. Mortise-and-tenon joints between stand and feet can be secured with pins or left loose for disassembly.
The hutch table has three component assemblies, each permanently joined. For best results, make the stand assembly first, then fit the top and foot assemblies to it, as demonstrated on the following pages. This will allow you to make creative adjustments as you go along, just as the old-time furnituremakers did, in response to the demands of the wood, a passing inspiration, or even a slight error of craftsmanship. For the same reason, do not make any permanent fastenings until you know that all the parts fit together properly. For example, when the dovetail joints of the stand assembly are finished, use a light string to tie the unit together. The action of moving the stand assembly around while you use it to help set up all other parts of the table will increase the tolerance of the joints a little. As a result, the finished table will be better able to adjust to atmospheric changes.
Shaping the Parts for the Stand
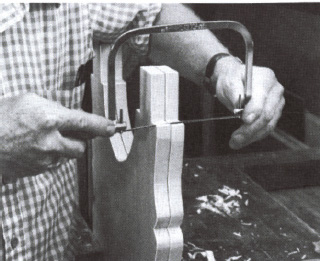
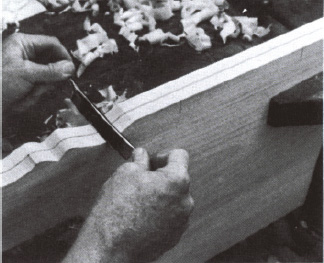
Use rip and crosscut saws to cut front, back, and two side pieces roughly to size. Allow ¼ to 1/8 in. all around for shaping and finishing. If wide boards are not available, turn to edge-gluing (see p.306). To obtain an exact match, clamp the two side pieces together with hand screws and cut both at once with a coping saw. Saw along the outside of the lines scribed on one piece. (Do not at this time cut out the section marked on template “For dovetail.”) Use your straight chisel and drawknife to trim the edges of both pieces simultaneously.
You will find that holding these tools at a slight angle and using a slicing motion will produce an attractive faceted effect, provided that your tools are sharp, your touch is light, and you never attempt to go against the grain of the wood—which means cutting downhill on almost all curves and angles. To smooth some of the marks left by the chisel and drawknife without losing this handmade quality, do as old-time craftsmen did and use a thin piece of steel as a scraper rather than using sandpaper.
Finish the side pieces by shaving about 1/16 in. from both sides of each tenon. When the time comes for fitting them into their foot mortises, the resultant overlap will cover any open space that may exist.
Clamp front and back pieces together and cut and trim them in the same way. Do not cut the dovetail sections at this time; the proper angles will be cut separately later.
Joining the stand with large dovetails
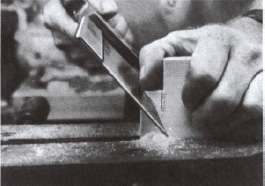
1. Cut male portions of dovetail joints first. They will serve as patterns for female parts. Use template to scribe the 45° angles of dovetail sections on both ends of front and back pieces. Cut just outside the scribed lines with a backsaw. Finish trimming to the lines with a 1-in. straight chisel.
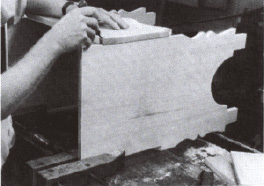
2. Use hand screws as stands to hold sides upright on edge. Position pieces carefully on bench so they are properly spaced and parallel to each other. Lay front piece on them and scribe outlines of dovetail on edge of both side pieces. Scribe line for depth of female dovetail equal to thickness of front piece.
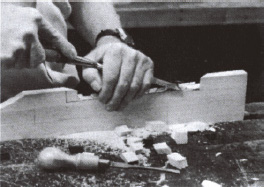
3. Rough out female dovetails by making a series of backsaw cuts about ¼ in. apart to within 1/16 in. of depth line. Chisel out waste wood between them. Trim with straight chisel until front fits snugly into both sides. Then, with front in place, turn sides over and repeat the process with dovetails of back piece.
Feet on the Bottom And a Top That Pivots Finish the Job
For this project we have used 1 ½-in. No. 8 flat-headed wood screws to secure all permanent joints. This is not strictly authentic. The original was probably joined with fox-wedged pegs like those used for the top of the trestle table (p.321) or the candlestand (p.318). The only way to know for certain is to take the original apart, and that has not been done for nearly 300 years. An alternative joining method is to drill 3/8-in. holes 2 in. deep at each spot where a screw is called for, apply glue, and drive in 3/8-in. hardwood pegs. Be sure to cut a small lengthwise groove in each peg to allow air to escape.
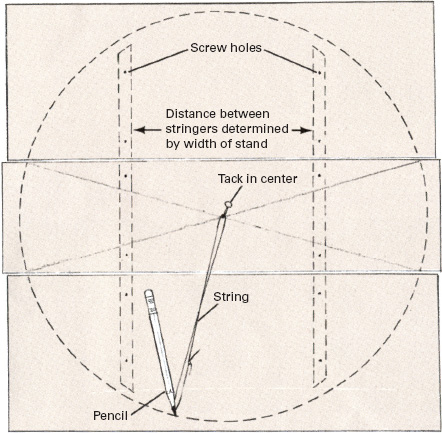
Edge-plane boards for tabletop. Find center of 12-in. board by drawing two diagonals, corner to corner. Place 16-in. boards alongside and scribe circle with 21-in. radius from center point. Cut all three boards with coping saw (old-time country carpenters would have used a frame saw), leaving 3/8 in. outside scribed lines for finishing. Surface-plane to flatten top and bottom surfaces. Store boards in plastic bags to forestall warping.
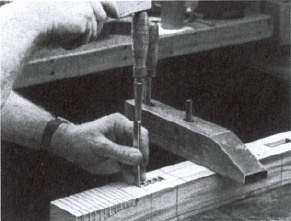
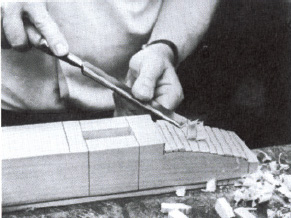
Foot Assembly
Use template to scribe the outline of both feet on 2-in.-thick lumber, then saw the pieces roughly to length. Locate the stand assembly carefully on both foot blanks and scribe around all four tenons. With a square transfer these mortise lines to sides and bottom of feet. (See Mortise-and-tenon joints, p.311.) To start mortises, drill three 7/16-in. holes in each marked area; bore from top until the point of the bit emerges, then bore back from bottom for a clean hole. Finish cutting with ½-in. and 1-in. straight chisels until tenons fit snugly. (To prevent breaking edges of mortises, chisel outline about ¼ in. deep on top and bottom surfaces before driving with mallet.) To shape the feet, make a series of absolutely square backsaw cuts about ¼ in. apart to within 1/16 in. of scribed lines, and chisel out between them with a broad, straight chisel. Use the chisel to carve away the resultant steplike surface, then use a drawknife or spokeshave to trim to the scribed line. To avoid splitting or splintering wood, always work downhill in direction of grain.
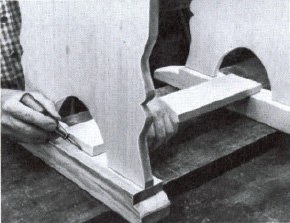
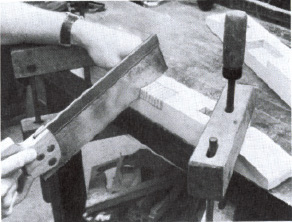
Cut foot stretcher to length, and plane its edges and top and bottom surfaces. To ensure a tight fit when joining it to the feet, do not plane edges square but bevel them about 1/16 in. narrower at the bottom than at the top. To locate half-mortises, center the stretcher across feet and scribe its lower outline on them. Set mortising gauge to the thickness of stretcher, and use it to scribe notch's depth on inner surface of feet. On one foot piece, make a series of slanting backsaw cuts to within 1/16 in. of both lines and chisel away waste wood, leaving a smooth beveled section where notch will be cut. Then use 1-in. chisel to carve this section out square so that end of stretcher fits snugly into it, its upper surface raised about 1/16 in. above foot. Assemble structure and use the stretcher to double-check marking on the other foot; then cut second notch in the same way. Finally, carefully shave the bottoms of the half-mortises in both feet so the stretcher fits down tightly. The “gaining fit” caused by beveling the edges of the stretcher ensures a secure joint.
Top
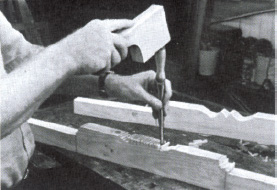
1. To shape top stringers, use template to scribe pattern and proceed as with shaping feet (left) by making a series of back-saw cuts to within 1/16 of line, chiseling out waste wood and finishing with chisel, drawknife, and spokeshave.
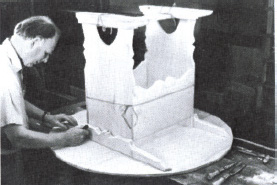
2. To locate position of stringers, assemble top facedown on flat surface and position stand assembly upside down on it. Place stringers across grain of top boards, 1/16 in. from sides of stand. Scribe around stand and both stringers.
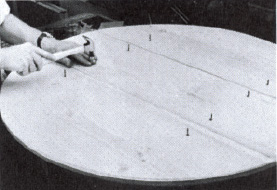
3. Mark placement of six screws within each stringer area and drill 1/8-in. holes. Turn top over and rest it on stringers, using scribed lines as guide. Drive nails ½ in. into stringers to secure top while you drive screws one at a time.
Attaching the Top With Removable Pivot Pins
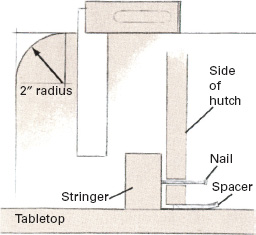
1. To locate pivot point, measure 2 in. down and in from rear corner of each side. Scribe arc and round off corners. Drill 1/8-in. hole at pivot points. Then place top facedown, position stand between stringers, and drive 6d finish nails into them. (To ensure clearance, use cardboard spacer.)
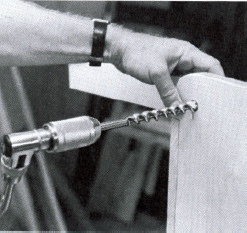
2. Stand table upright and pivot the top back and forth to be sure it moves freely—you may have to shave the rounded corners a little. Then pull out nails, remove top, and drill 5/8-in. holes through sides at pivot points. Back up work with scrap wood while drilling to prevent splintering.
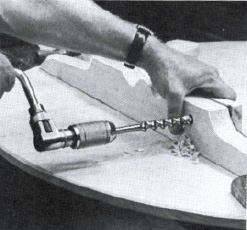
3. Carefully drill 5/8-in. holes through stringers at point where nails were driven. Make two 5/8-in. hardwood pins 4 in. long for pivots (see Making Pins and Wedges, p.307). Finally, using same technique as in Step 1, round off front corners of both side pieces to 1-in. radius.
Countersinking and plugging for screws
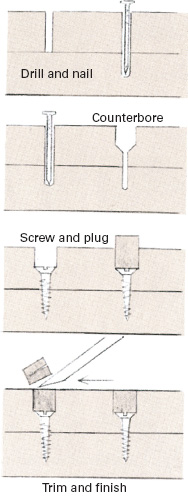
To simulate pegged joints, screw-heads can be countersunk and the holes filled with wood plugs. The first steps in joining two pieces with screws are to mark placement of the screws on top piece and to drill 1/8-in. hole at each mark. Next, position the pieces and drive small finish nails through all holes about ½ in. into lower piece to hold it firmly in place. Remove one nail and drill pilot hole into lower piece, using appropriate bit for screw size (for No. 8 screw, use 1/16-in. bit in softwood, 3/32 in. in hardwood). Then use a larger bit (3/8 in. for No. 8 screw) or a ?uted counterbore to countersink for screwhead. In ¾-in. wood, such as that used for hutch table, countersink ¼ in. to 3/8 in. deep. Drive screw, then repeat the process for the next hole. When all screws are driven, plug holes with pegs of the appropriate size. For authentic-looking peglike plugs, take them from end grain of a piece of scrap with a plug cutter. Lacking this special tool, shape them as you would any peg (see p.307). Trim with chisel and block plane.
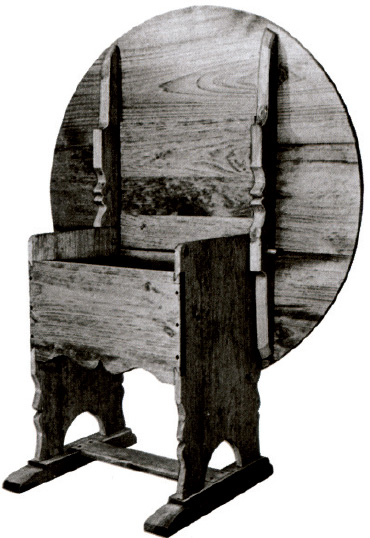
Final assembly
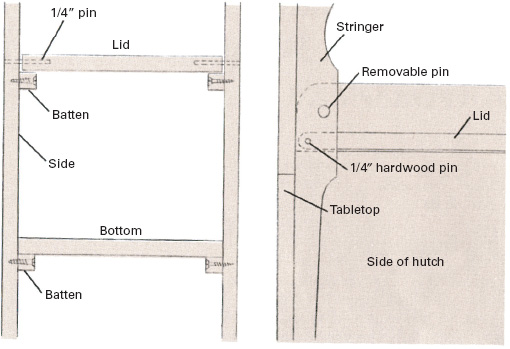
Join stand and foot assemblies with 1 ½-in. No. 8 wood screws, countersunk and plugged (see below left). Cut and plane hutch lid, bottom, and four battens. Make two ¼-in. hardwood pins 3 in. long for lid pivots. Lid should fit between sides of stand with 1/8-in. total clearance; use plane to round its front and rear edges. Place lid on stand, its front edge barely overhanging the front piece, its rear just resting on back, and scribe its outline on sides. Remove lid and drill ¼-in. hole through both sides, centered within scribed outline, its edge 3/16 in. from rear of outline. Replace lid and drill back into it through these holes 2 in. deep. Drive 3-in. hardwood pins and trim. Install supporting battens beneath lid with three No. 8 screws per batten (because these battens are hidden, screws need not be plugged). To install bottom, screw battens to sides and simply set bottom piece on them.
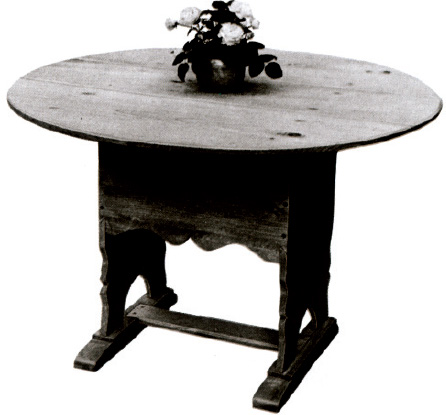
To finish table, use plane and drawknife to trim top evenly round. Lightly surface-plane to remove blemishes incurred in construction and to smooth over end grain of pegs and plugs. Correct other imperfections with scraper. Finally, chamfer top and all sharp edges.
From the Queen Of Spanish Missions: An American Chair
In the Spanish missions of the American Southwest there developed a unique style of furniture, clearly Spanish in origin, often with a hint of Dutch or Flemish in?uence, yet unmistakably American in character. The chair pictured below right, from the Mission of Santa Barbara on the coast of southern California, is at once typical of the style and exceptional in the way its elements blend gracefully together. The scrolled form of the skirt, for example, as well as the decorative carving on it and along the upper edge of the back are hardly as ornate as the work found on much Flemish furniture, but the slight adornment serves to allay the rigidity of the basic Spanish design.
Generally speaking, mission furniture was not overly comfortable. The Franciscan monks who manned the missions considered love of comfort an insidious vice. Yet this chair, with its raked back and gently tapered arms, is quite pleasurable to sit in—although modern taste might dictate a cushion upon the bare wooden seat. With this in mind, the copy described here was designed with the seat 1 inch lower than that of the original.
A Leg Jig to Guide Construction
The mission chair's construction involves 22 mortiseand-tenon joints. Each must be individually formed and fitted into its proper place in the assembled frame if the chair is to be structurally sound. As a result, you will find yourself devoting a great deal of time and effort to the process of disassembling and reassembling the developing piece as you mark, measure, cut, and fit each element in its turn. To make this repetitive chore easier and more accurate, begin by constructing a leg jig.
As a base for the jig, use ¾-inch plywood that measures 24 inches wide by at least 30 inches long. For the sides of the jig use two strips of ¾-inch plywood or stock lumber 4 ½ inches wide by 24 inches long. All three pieces must be finished on one side and free from warp. Next, cut four hardwood blocks to the approx imate dimensions given below. All edges must be square. Glue and nail a block to both ends of each 4 ½-inch strip so that the strips are held upright at a 90° angle. Blocks should be glued to the unfinished sides of the strips, with the notched ends flush with the ends of the strips. Then use a framing square to place the strips 23 inches apart on the base. Clamp all four blocks down, being certain that the upright faces of both strips are square to the base.
Use the side view pattern (below left) to scribe the positions of the legs on the base and on the upright sides of the jig. Note that the rear legs slant slightly forward; the marks should re?ect this. To use the jig, clamp each leg within its mark.
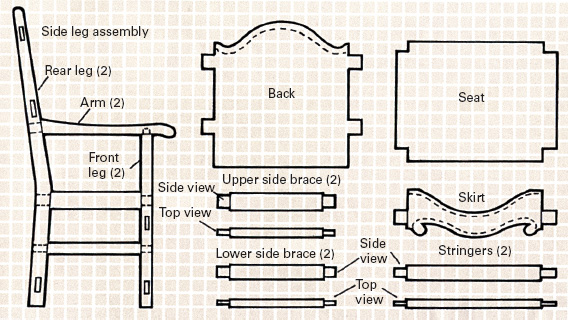
Use 2-in. grid to make templates for all pieces, including those that make up the side leg assembly. Mark mortises and tenons for guidance but do not cut from patterns.
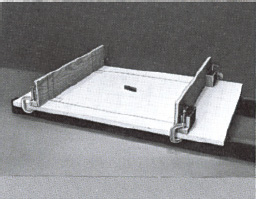
Make leg jig from ¾-in. plywood and four blocks. Glue and nail blocks to side pieces, then clamp to base.
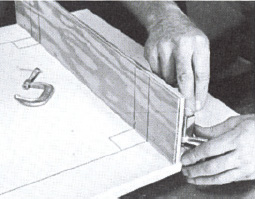
Space upright side pieces 23 in. apart. Scribe outlines of all four legs on base and on both side pieces.

Original Santa Barbara mission, where this chair was built, was founded in 1786 but was later destroyed by an earthquake. The present building, called Queen of the Missions for its great beauty, dates from 1815.
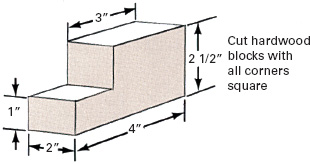
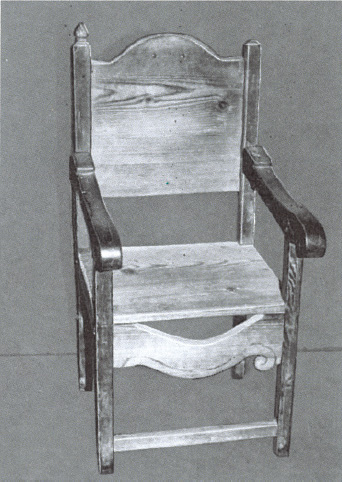
Legs, Braces, and Stringers Make a Frame
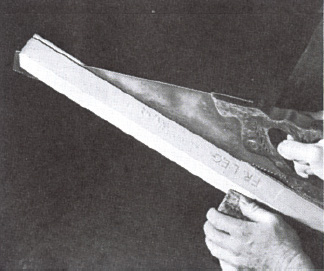
1. Use template to lay out side view of all four legs and both arms on 2-in. stock. Cut them roughly to size with a ripsaw, allowing about 1/8 in. extra for finishing. Cut rear legs so that the grain of the wood runs lengthwise along the center of the curve, not along either end. Cut stringers and side braces from ¾-in. stock.
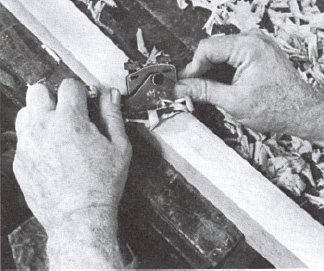
2. Use jack plane and spokeshave to trim the legs, stringers, and side braces to the scribed lines. Compare the pieces often as you work in order to achieve the closest possible match between the two front legs, the two rear legs, and among all six braces and stringers. (For instructions in shaping the arms, see p.329.)
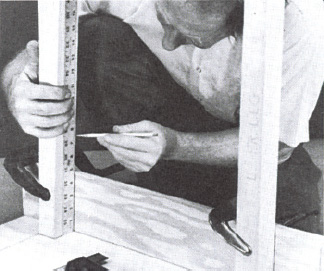
3. Clamp a front and rear leg in place on one side of the leg jig. On both legs make a pencil mark 7 ¼ in. up from base and another 16 ¼ in. up. Clamp side braces to legs, the bottom edge of the lower brace on the 7 ¼ in. mark, the top edge of the upper brace on the higher mark. Do the same with the other two legs.

4. Because the rear legs slant, side braces will not be quite level. Adjust positions on rear legs to correct. Scribe outlines of braces on all four legs and scribe outlines of legs on all braces. Disassemble frame after labeling both parts of all joints for reassembly. With a square extend scribed lines all around each piece.
Materials needed
Original of this mission chair was made of clear western pine, an ideal choice for the project because of its sharp, distinctive figure. Any clear soft wood, such as white pine, will do nicely, however—especially recommended is pumpkin pine, the orange-hued heartwood of white pine. For the leg jig use AD plywood (finished on only one side). Blocks can be made from construction-grade 2 × 4.
| Part | Pieces | Size |
| Skirt, seat, back | 6 | ¾″ × 8″ × 23″ |
| Side braces, stringers | 1 | ¾” × 6” × 42″ |
| Legs, arms, wedges | 2 | 2” × 4” × 7″ |
| Leg jig | 1 | ¾” × 24” × 40″ |
| Blocks | 1 | 1½” × 2 ½” × 20″ |
Joining the Frame One Step at a Time
Before cutting tenons into the side braces, lay out the marked pieces on the side leg assembly template in order to double-check your marks. Make whatever adjustments are needed and replace the assemblies in the leg jig. If the two front legs and the two rear legs are exact duplicates, you can then clamp the two matching pairs of side braces together and cut tenons into the ends of each pair in one operation. If, as is more likely, the legs vary somewhat, the tenons must be cut separately. When all tenons are cut, clamp them to the outsides of the legs to scribe for mortises. (For further instructions in forming mortise-and-tenon joints, see p.311.)
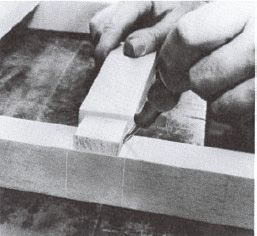
Scribe mortises by extending lines onto all four sides of legs to serve as a guide in cutting. This is especially important with rear legs, as tenons pierce them at a slight angle. Center tenons between lines to scribe width of mortises. Use 3/8-in. bit to drill out waste wood before cutting mortises with ¼-in. and 1-in. chisels.
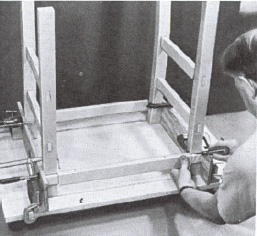
Assemble finished leg systems in jig and position stringers. Clamp front stringer to front of legs, rear stringer to back of rear legs, with bottom edges of both 2 ¼ in. up. Mark and cut tenons; if legs are of equal width, stringers can be formed in duplicate. Mark and cut mortises as for side braces.
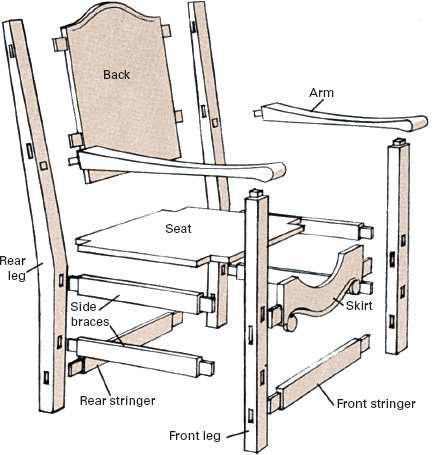
Build the mission chair from the ground up. First make frame; then shape skirt, seat, and back to fit; finish by forming arms. Only when all joints are fitted should wedges be driven, beginning with the fox wedges that secure arms to front legs.
Making the Seat, Skirt, And Back Fit the Frame
While it may be possible to find pieces of ¾-inch clear pine that are wide enough for the seat and back and yet are not exorbitantly priced, the odds are not good. You will more likely have to resort to edge-gluing. That is why the list of materials on page 327 calls for six 8-inch-wide boards to make these two parts and the skirt. Use one board for the skirt. Rip one into two pieces, 2 inches and 6 inches wide. Then join two boards to the 2-inch width for the seat and the remaining two to the 6-inch width for the back. (For instructions in various methods of edge-gluing, see p.306.)
Scribing and Cutting the Back
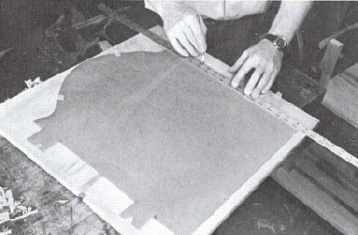
When ¾-in. stock has been edge-glued, plane surfaces smooth and flat for back, seat, and skirt. Use templates and straightedge to scribe patterns. Lay out patterns so that when chair is assembled wood grain will run side to side on all three pieces.
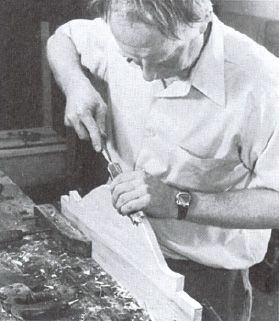
Check the width of the back against the assembled frame before cutting it out. Then use crosscut, rip, and coping saws to cut it roughly to size, including the tenons as marked. Allow about 1/8 in. extra in all dimensions for finishing. With straight chisel, drawknife, and spokeshave, trim the top and bottom edges to the scribed lines, always working downhill on curves to avoid digging into the grain of the wood.
Putting the Pieces in Place
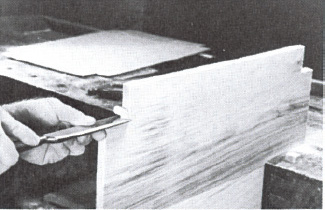
1. Rough-cut seat to within 1/8 in. of the scribed lines. Use chisel to trim notches in all four corners so seat fits easily into frame. Fit should not be tight, as frame will be squeezed somewhat together when joints are secured.
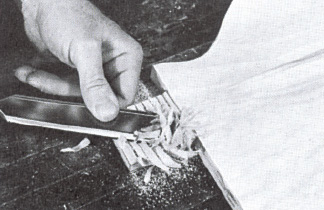
2. Trim sides of back and skirt to fit frame; then cut tenons to size. For a neater fit give all tenons four shoulders; make a series of backsaw cuts 1/8 in. deep on front and rear surfaces and, with bevel down, chisel away waste.
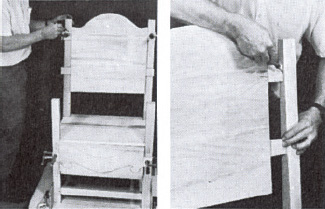
3. Plane upper edge of skirt to fit flush beneath seat. Clamp all tenons in place and scribe for mortises. Position mortises so that when assembled, front face of back and skirt will be parallel to and recessed 1/8 in. from front of legs.
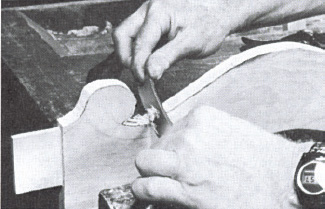
4. Disassemble frame to cut out mortises (see Mortise-and-tenon joints, p.311); reassemble to fit each joint. Edge-plane seat flush with outside of legs. Then use coping saw to cut scrollwork in skirt. Trim with chisel and drawknife.
Adding the decorative touch
A woodcarver's V-shaped parting tool is designed for just such jobs as gouging out the grooves in the back and skirt; next best is a skew chisel. These are special carving tools available from some tool supply houses. You can also do the job with a narrow straight chisel and a sharp knife. First use the templates to scribe a line 5/8 inch below the upper edge of both pieces and 5/8 inch up from the long center arc on the lower edge of the skirt; continue the skirt's lower line freehand around the scrollwork. Cut along all three lines with a knife, about 1/8 inch deep. Use chisel first to carve steep grooves, then to diminish the inner side of each to a gentle bevel.
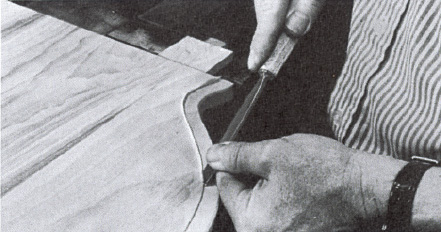
Cut line with knife; then carve V-shaped groove with chisel.
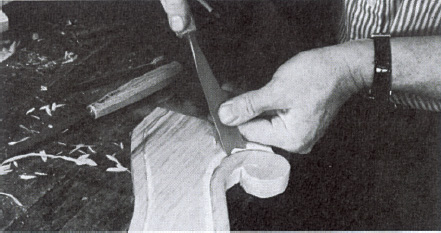
Carve inner side to blend gradually into center surface of piece.
The Arms Come Last
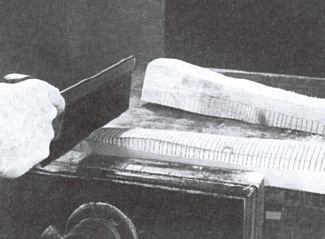
1. Begin by making a series of backsaw cuts squarely across top and bottom of arms to within 1/16 in. of scribed lines. To aid in making level cuts, scribe pattern on both sides.
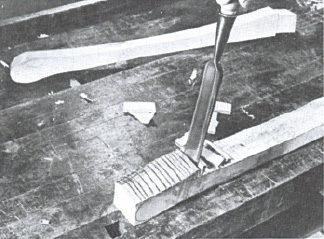
2. Use 1-in. straight chisel to remove waste wood, and smooth surface. Trim to lines with drawknife and spokeshave, comparing arms often as you work to be sure of a good match.
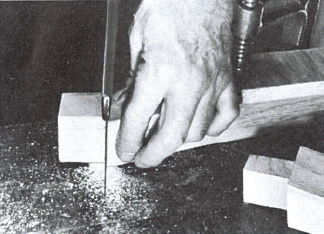
3. Tenons on ends of arms should fit squarely through front edge of rear legs. Use leg assembly template to scribe side view; for top view use mortising gauge to scribe tenons 7/8 in. wide.
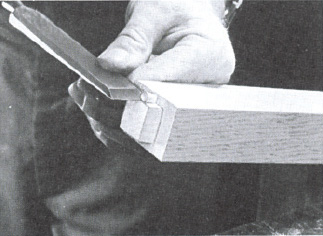
4. Shoulders of tenons on top of front legs should be 26 5/8 in. from ground. Make tenons 7/8 in. square and 5/8 in. high. Scribe with mortising gauge; cut with backsaw and chisel.
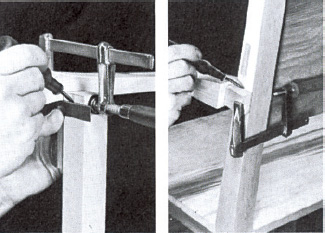
5. Reassemble frame and, using the side view template, clamp arms in place. Mark and trim shoulders of all tenons to fit flush, then scribe for mortises on arms and rear legs.
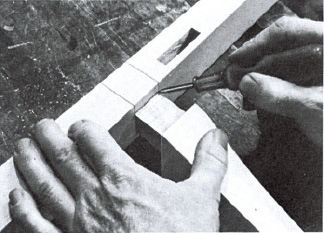
6. Disassemble. Lay pieces on flat surface to scribe width of mortises. Cut blind mortises in arms, and through mortises in rear legs. (See Mortise-andtenon joints, p.311.)
Wedging and Finishing
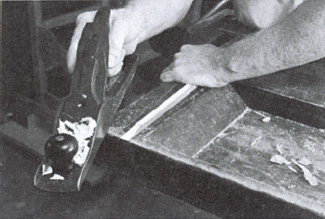
1. Make two 3-in. wedges for each through tenon as wide as the tenon and tapering from 3/16 in. thick to a dull point. Also make four ½-in.-long fox wedges 3/16 in. thick on top.
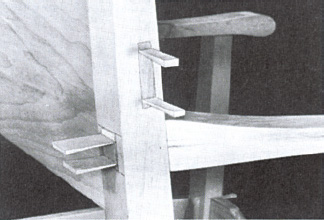
2. Saw two slots across each through tenon 5/16 in. from top and bottom to a little less than the full depth of the tenon. Assemble chair and insert, but do not drive, 3-in. wedges.
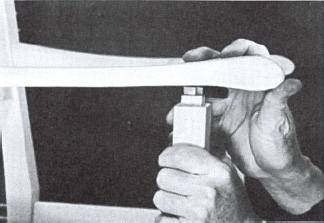
3. Remove arms while you saw two diagonal slots parallel to grain of each blind tenon. Insert fox wedges, and secure arms by driving mortises firmly into tenons with mallet.
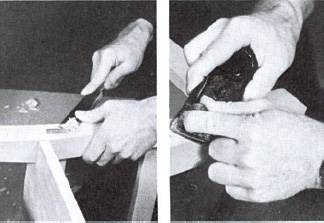
4. Use pipe clamp or tourniquet to tighten joints of chair one side at a time, and drive all wedges home. Trim excess from end grain of tenons with chisel and block plane.
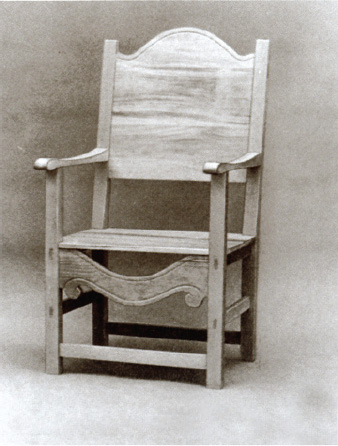
First step in finishing the mission chair comes before final assembly. Chamfer all outside edges slightly, then use a block plane, spokeshave, or scraper to remove any dents or blemishes that may have occurred in construction. Next, wedge the joints together as shown above. If one of the wedges starts to split as you are driving it, drive it no farther, but do not be concerned—the splitting means that the wedge is solidly seated. The original chair was probably left unfinished; certainly no sign of a finish remains. To protect and highlight the natural wood, use a mixture of linseed oil and turpentine (see Finishing, p.307).
Hearthside or Campsite: Rustic Furniture Fits in Everywhere
Whether you are outfitting a rustic vacation retreat or furnishing a suburban patio, you can do it quickly and easily by rough-hewing your own rustic furniture. The results can be every bit as attractive, practical, and satisfying as furniture shaped and joined from finished lumber. You can walk into a wooded grove in the morning, carrying only a knife, saw, drill, and hatchet, and emerge before the end of the day with a solidly built table, chair, or stool that will last the rest of your life, enduring extremes of wind and weather that would ravage a more delicately structured piece. Moreover, the simple mortise-and-tenon joints, if properly made, will grow tighter and tighter as time goes by.
The fundamental technique involves forcing square pegs into round holes. This is not as foolish as it seems. If the hole is drilled in green wood and the peg is made of dry wood, the resultant joint needs no wedging and will grow firmer as the green wood's flexible fibers dry, contract, and harden around the peg. In the basic project demonstrated on these pages—a simple campstool—this principle is applied in two ways: 1-inch-square dry wood tenons are tapered slightly and driven into round mortises of the same diameter, and 3/8-inch-square dry pegs are driven through 3/8-inch round holes to pin green wood in place. In both cases the sides of the pegs must align with the grain of the wood to forestall splitting.

Footbridge over stream was built using techniques of rustic joinery.
A calibrated ruler is not among the essential tools for rustic carpentry. Like old-timers, you can make a measuring stick from a long rod. Cut a notch to record each measurement; then your only problem in matching sizes will be remembering which notch to use.
With a little imagination the design can be adapted for any number of projects. For a table, build the frame to whatever size suits your needs and make the top from split stock with the flat side up. For a straight chair double the height of two posts to provide the stiles for a ladder back—if you can find wood with a natural curve to make the back more comfortable, so much the better.
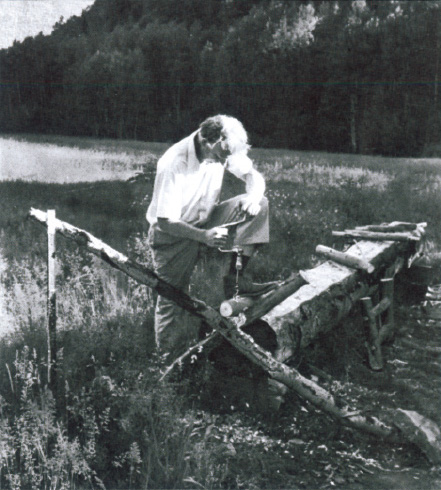
Set up shop in the woods around a solid improvised workbench. The crossed poles at end, one secured to a post driven into the ground and anchored by rocks, make an adjustable sawbuck.
Start Your Campstool by Cutting Down a Tree
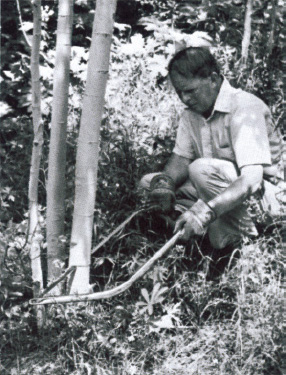
1. Live aspen with trunk about 3 in. thick provides green wood for legs of campstool. Birch, poplar, pine, and ailanthus are among many other suitable woods. Taking a single tree from among a cluster is usually good ecological practice.
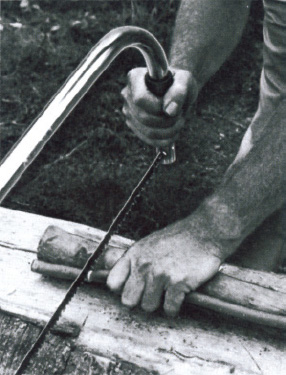
2. Saw eight 2-ft. stretchers from standing dead trees of slightly less girth. Then, 3 in. from both ends of each stretcher, make four saw cuts just deep enough to form center tenon sections 1 in. square. Note use of measuring stick.
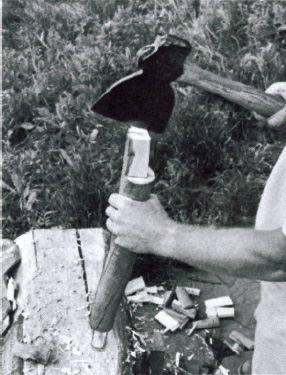
3. To make 1 -in. tenons, hold stringers firmly upright against a solid surface and carefully lop off slabs of waste wood with sharp hatchet. Use knife to trim knots and other irregularities so that tenons are straight but not undersized.
Constructing the Stool Quickly and Easily
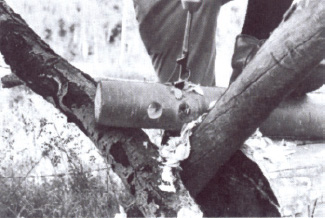
1. Cut four 18-in.-long posts from green wood to serve as legs. Use 1-in. bit to drill parallel mortise holes 3 in. from both ends of each post. Then drill two more 1-in. mortises perpendicular to the first two, 5 in. from the ends.
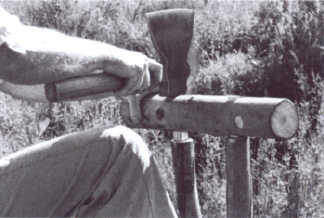
2. Assemble one side of stool by driving tenons of two stretchers into innermost mortises of one post (chamfer ends of tenons to get them started). Drive another post into other end. Assemble second side of stool the same way.
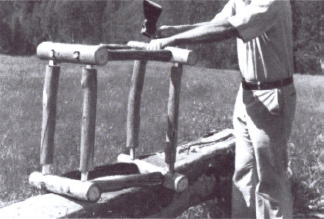
3. Join the two sides with four stretchers. Drive tenons of all stretchers into mortises of one side first, then align mortises of other side with appropriate tenons and drive them down carefully, a little at a time, to avoid breaking tenons.
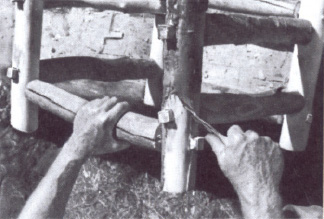
4. Whether to remove the bark or leave it on is a matter of personal taste. There are, however, advantages to be gained by stripping it—the green wood dries faster, and insect pests are denied a good hiding place.
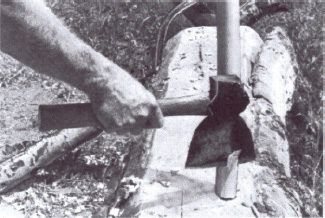
5. Make the seat from 18-in. lengths of green wood, each 1 ½ to 2 in. across. Strip bark and trim pieces to fit snugly without forcing. Use hatchet carefully to shape the undersides of both ends of pieces to sit flat on stretchers.
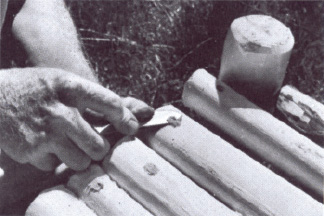
6. From dry wood whittle two 6-in.-long pegs for each seat piece, tapering from about 7/16 in. by 3/8 in. down to ¼ in. square. Position all seat pieces on stretchers, and drill holes for pegs with 3/8-in. bit all the way through both pieces.
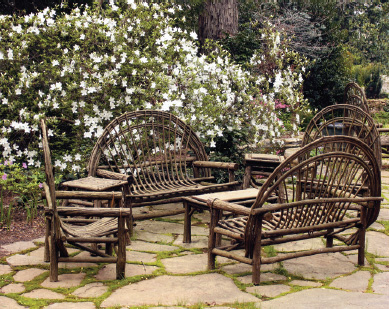
Rustic furniture made of twigs and branches fit perfectly in a garden or patio setting.
With rustic joinery you can make anything out of twigs and branches
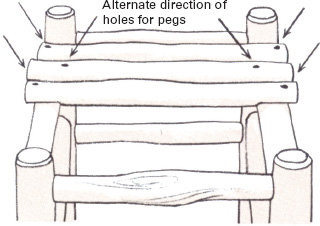
To ensure tight joints when wood has dried, drill holes in opposition—both raked toward or both away from center of piece—at an angle of about 15° from vertical. Alternate the direction of rake from piece to piece.
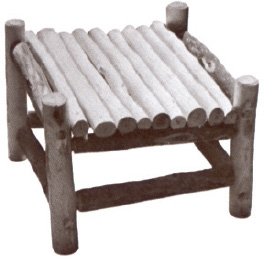
Insert pegs so that the long side runs parallel to the grain of seat pieces, and drive them down into and through stretchers. With saw and knife trim pegs and tenons. Chamfer tops of posts. Saw ends of seat pieces off evenly and chamfer.
