Chapter 4
Database Encryption
Abstract
This chapter talks about all the various ways of encryption and hashing data so that unauthorized users cannot access your data.
Keywords
encryption
hashing
HBA
MPIO
transparent data encryption
IP security
Information in this chapter
• Database encryption
• Encrypting data within tables
• Encrypting data at rest
• Encrypting data on the wire
• Encrypting data with MPIO drivers
• Encrypting data via HBAs
This chapter talks about all the various ways of encryption and hashing data so that unauthorized users cannot access your data.
Database Encryption
A key way to protect the data within your database is to use database encryption. However, no one encryption solution is correct for every database. The encryption requirements of your application will dictate which encryption solution you select. One thing to remember about database encryption is that the more data you encrypt and the stronger the encryption, the more CPU power will be required in order to encrypt and decrypt the data that is needed. So, be sure to balance the encryption requirements with the increased system load.
Hashing versus Encryption
There are two techniques for protecting your data: hashing and encryption. Encryption is done using one of several different algorithms that give you a value that can be decrypted when using the correct decryption key. Each of the different encryption options provides you with a different strength of encryption. As you use a stronger level of encryption, you will be using more CPU load on the Microsoft SQL Server. Microsoft SQL Server only supports a subset of the available encryption algorithms; however, it does support some of the more popular algorithms, from weakest to strongest, which are DES, TRIPLE_DES, TRIPLE_DES_3KEY, RC2, RC4, RC4_128, DESX, AES_128, AES_192, and AES_256. The full list of available algorithms has not changed since Microsoft SQL Server 2005 and the newest version as of the writing of this book, which is Microsoft SQL Server 2014. The list gives you a variety of options that will provide an encryption option for just about everyone.
Triple DES
Triple DES or 3DES are the common names for the Triple Data Encryption Algorithm cipher. This cipher uses the Data Encryption Standard (DES) algorithm three times for each block of data that is to be encrypted. Triple DES actually uses three encryption operations to encrypt or decrypt the data three times for each 64-bit block of data that is to be encrypted or decrypted. The encryption and decryption processes can be expressed as shown in Example 4.1.
Example 4.1
Expressions showing the encryption and decryption processes done using the 3DES algorithm. Processes marked with an E are encryption processes, while processes marked with a D are decryption processes.

As shown in the code block above, three keys are used, shown as k1, k2, and k3. Three keying options are used by the 3DES algorithm, which are defined by how many independent key bits are used. The strongest keying option has each of the three keys with different values of 56 bits, each giving a total of 168 bits represented within SQL Server as the TRIPLE_DES_3KEY algorithm or the DESX algorithm. The second keying option is a little weaker as keys k1 and k3 use the same key values and k2 uses a different value giving you 112 key bits, which is represented within SQL Server as the TRIPLE_DES algorithm. There is a weaker TRIPLE_DES algorithm, which is backwards compatible with the DES algorithm. In this case the TRIPLE_DES algorithm uses the same key values for all the possible keys.
RC Algorithms
Microsoft SQL Server supports two of the four common RC algorithms, RC2 and RC4. RC2 uses a 40-bit key size, making it a much weakened algorithm such as RC4, which supports key sizes from 40 bits to 2048 bits depending on the needs of the application. In the case of Microsoft SQL Server, you can select from 40 bit and 128 bit configurations. There are some weaknesses in the RC4 algorithm, which have caused Microsoft to deprecate the RC4 algorithms in a future release of SQL Server. As such, new database applications should use another encryption algorithm. RC4 is probably the most widely used encryption algorithm, serving as the encryption algorithm that secures SSL (Secure Socket Layer) encryption for both SSH (Secure Shell) and HTTPS communications.
Advanced Encryption Standard
Three different sizes of cyphers can be used with Advanced Encryption Standard (AES) algorithm. These cyphers can be 128, 192, and 256 bits in size, which are represented by AES_128, AES_192, and AES_256, respectively, within Microsoft SQL Server. The variable key sizes are then used to combine data that are 128-bit blocks. Attackers have had some success in breaking the AES encryption algorithm when using the lower end AES encryption. To date, the higher end versions of AES have remained stable.
Hashing
Now on the flip side, you have hashing algorithms. Hashing algorithms provide you with a one-way technique that you can use to mask your data, with a minimal chance that someone could reverse the hashed value back to the original value. And with hashed techniques, every time you hash the original value you get the same hashed value. Microsoft SQL Server has supported the same hashing values from Microsoft SQL Server 2005 to Microsoft SQL Server 2008 R2. You can use MD2, MD4, MD5, SHA, or SHA1 to create hashes of your data. With the introduction of SQL Server 2012 the SHA2 hashing algorithm was added, which can be used as either a 256 bit of 512 bit hashing algorithm. There were no changed to hashing in SQL Server 2014. As long as you use the same hashing algorithm each time you hash a value, then you will always get the same hashed value back. For example, if you use the MD5 hash algorithm to hash the value “SampleValue,” you will always give the value of “0x777E628ACB1D264A8CE4BC69427B3855” back.
Hashing is done, regardless of the algorithm used, via the HASHBYTES system function. The HASHBYTES function accepts two values: the algorithm to use and the value to get the hash for. The catch when using the HASHBYTES system function is that it does not support all data types that Microsoft SQL Server supports. The biggest problem with this lack of support is that the HASHBYTES function does not support character strings longer than 8000 bytes. When using ASCII strings with the CHAR or VARCHAR data types, the HASHBYTES system function will accept up to 8000 characters. When using Unicode strings with the NCHAR or NVARCHAR data types, the HASHBYTES system function will accept up to 4000 characters. When passing in binary data using the VARBINARY data type, the HASHBYTES function will accept up to 8000 bytes of binary data.
There are two ways that a hashed value can be used to find the original value. The first is rather simple: Simply create a database that stores all of the potential values. Then take the hashed value and compare it to the values in the database looking for matches. There are in fact websites such as http://tools.benramsey.com/md5/ that handle this lookup for you across several databases available on the Internet. The second attack method against MD5 is called a collision attack. A collision attack is when you find two different values that can be hashed to the same hash value, effectively allowing the check of the values to pass. Mathematically, you could express the attack as hash(value1) = hash(value2).
SHA2 and SQL Server
Starting with SQL Server 2012 Microsoft has introduced two new hashing algorithms. The first of the two is the SHA2_256 hashing algorithm and the second is the SHA2_512 hashing algorithm. The SHA2 hashing algorithm was written by the National Security Agency (NSA) and was published in 2001 by the National Institute of Standards and Technology (NIST) as a United States Federal Information Processing Standard. SHA2 while based on the older SHA1 hashing algorithm fixes the security issues which were identified by the SHA1 algorithm. As of this printing the SHA2 hashing function is still considered to be secure.
The first big difference between SHA2_256 and SHA2_512 is the amount of CPU power required when using the SHA_512 algorithm when compared to the SAH_256 algorithm. The second big difference between the SHA2_256 and SHA2_512 is the size of the hash which is returned. The SHA2_256 algorithm returns a 256 bit string (32 bytes) while the SHA2_512 algorithm returns a 512 bit string (64 bytes). Because of these size differences you must be sure that the table and variables which will be used with these values are large enough to hold the values.
Encrypting Objects
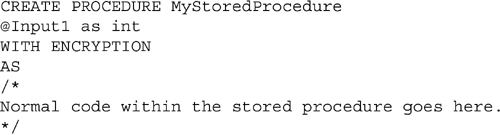
Microsoft SQL Server allows database and application developers to encrypt the code behind specific objects to protect them from being viewed and modified by others. The objects which support encryption of the object are stored procedures and functions, including both table and scalar functions. Encryption of stored procedures and functions is done by adding the WITH ENCRYPTION statement within the header of the CREATE PROCEDURE or CREATE FUNCTION code as shown in Example 4.2.
Example 4.2
Encrypting the code of a stored procedure.
Encrypting stored procedures and functions protects the code within the stored procedure from being changed by others who have db_owner access to the SQL Server database. The most common situation where stored procedures and functions are encrypted within a SQL Server database is when the application is going to be deployed to a client’s site, and the developer does not want the client to view or change the code behind the stored procedures. By encrypting the stored procedures and functions the customer is not able to modify the logic within the objects outside of the bounds of what the applications user interface supports.
By encrypting the stored procedures and functions the customer running the stored procedure may have problems troubleshooting performance problems on their server. Some of the side effects of encrypting the stored procedures include losing the ability to monitor for the SP:StmtStarting and SP:StmtCompleted SQL Profiler events. The person running the stored procedure or function also loses the ability to view the estimated or actual execution plan. When you query the sys.dm_exec_query_plan dynamic management function looking for the plan output the output which is returned is blank, and no plan is returned to the SQL Server Management Studio when a the execution plan is requested.
There are ways to get the code behind the encrypted stored procedures by connecting to the Dedicated Admin Connection then querying the system catalog. There are also third party applications available which can query for the encrypted values and then decrypt them. The encryption algorithm which is used by Microsoft to encrypt the code behind the stored procedures and functions was cracked many years ago allowing many third party vendors to create applications to handle this decryption for you.
Encrypting Data within Tables
When it comes to encrypting data within your database table, there are a few different options. Where you encrypt the data within your application stack is just as important a question as is the technique you use to encrypt the data. Your choices for where to encrypt your data will typically be at the client side (in your fat client or within your web app) or within the database. Each option has pros and cons that have to be properly weighed before you make the decision.
When you handle the encryption within the database, you have the benefit of minimal to no changes to the front-end client (this assumes that you control all your database access via stored procedures). However, the downside here is that all the CPU load of the encryption is handled on the database server. Because all the encryption is handled on the database server, this can cause a bottleneck on the database server as the encryption and decryption of data will increase the CPU load of the database server. The other main disadvantage of encrypting the data with the SQL Server is that you have to store the decryption mechanism within the database. Granted the SQL Server will help mitigate these risks with object-level permissions and strong encryption of the certificates, but given enough time, any encryption scheme is crackable. The stronger the encryption that is used, the longer it would take an attacker to break the encryption with the strongest encryption levels, taking many years of CPU power to break the encryption.
On the other hand, you can handle all the encryption in the application tier (either the fat client or the web app). This gives you the benefit of spreading the entire encryption load across all the computers that run the application, but it gives you the downside of a load of application changes. Now while this does place a lot of extra work on the development team to implement these changes, the workload is spread across the application tier. When using a fat client on the user’s desktop, this work is done on the client computer; when using a web application, this work is done on the web servers. In a web application environment, this increased CPU load on the web servers can be mitigated by adding more web servers to the web farm or by moving the encryption functions to another web farm that is only used to encrypt the data.
No matter where within your application you encrypt your data, and no matter what encryption technique you use your data storage requirements will typically increase by 10–20%. This is because encrypted data is larger due to the nature of encryption as well as any padding data that is put within the data. When planning for data encryption you also need to think about where in the application stack you want to encrypt the data, within the application, the web tier, the application server, or the database server. Adding encryption to the application will cause the CPU load within some part of the application to increase. Putting the encryption within the database server means that more and more powerful SQL Servers will be needed over time as more and more users are added to the system. Where if the encryption was done at the web or application server layer, scaling that workload out would be much easier and much less expensive.
Encrypting within Microsoft SQL Server
When planning to encrypt data within Microsoft SQL Server, there is a clear dividing line that you have to keep in mind. Microsoft SQL Server 2000 or older does not include any usable techniques for encrypting functions natively. However, there are third party DLLs (Dynamic-Link Library), which can be used to encrypt and decrypt data. When using Microsoft SQL Server 2000 or older, the only hashing functions that you can use is pwdencrypt. It is highly recommended, however, that you not use this function, for the algorithms used by this function have changed from version to version of Microsoft SQL Server, and this function has been deprecated in the newer versions of Microsoft SQL Server. If you must use this undocumented system function, it accepts a single parameter and returns a varbinary (255) value (Example 4.3).
Starting with Microsoft SQL Server 2005, you can use native hashing and encryption functions. When encrypting data within the Microsoft SQL Server, you can encrypt the data using one of three functions: EncryptByCert(), EncryptByKey(), and EncryptByPassPhrase().
When using the EncryptByCert() function, you are using a certificate that is created within the database in order to encrypt the data. Encrypting data with a certificate allows you to easily move the certificate from one platform to another or to use a certificate purchased from a third party such as VeriSign and GoDaddy.
When using the EncryptByKey() function, you use a symmetric key to encrypt the data. The symmetric key can be created using a password, a certificate, or another symmetric key. When you create the symmetric key, you specify the encryption algorithm that you want to use in order to encrypt the data.
When using the EncryptByPassPhrase() function, you specify a password when calling the EncryptByPassPhrase function. This passphrase is used to create a symmetric key, which is then used in the same manner as the EncryptByKey function is used.
As of the spring of 2014, none of the encryption functions shown in this section can be used with Microsoft Azure SQL Database. Microsoft Azure SQL Database does not support creating certificates, nor does it support using any of the encryption functions. The encryption functions will return an error saying that they are not supported in that version of SQL Server. The CREATE CERTIFICATE statement will return the same error message. All encryption would therefore need to be done within the web tier of your Microsoft Azure hosted application.
Encrypting Within the Application Tier
The most common (and usually the more scalable) place to encrypt data is within the application tier. Putting the encryption within the application tier probably requires the most changes to the application. However, it is the most scalable place to handle the encryption as the encryption workload is placed on all the web servers or the user’s desktops (when using a fat client). The advantage of handling the decryption within the application tier is that the data is transmitted between the database server and the application tier in an encrypted form without having to configure and manage IP Sec within the network like it is when encrypting the data within the Microsoft SQL Server. These different techniques can be seen in Figure 4.1.
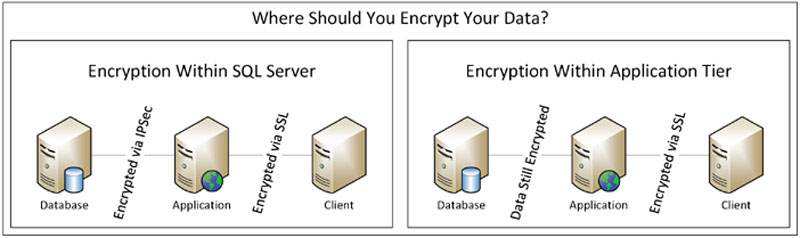
Figure 4.1 Where should you encrypt your data?
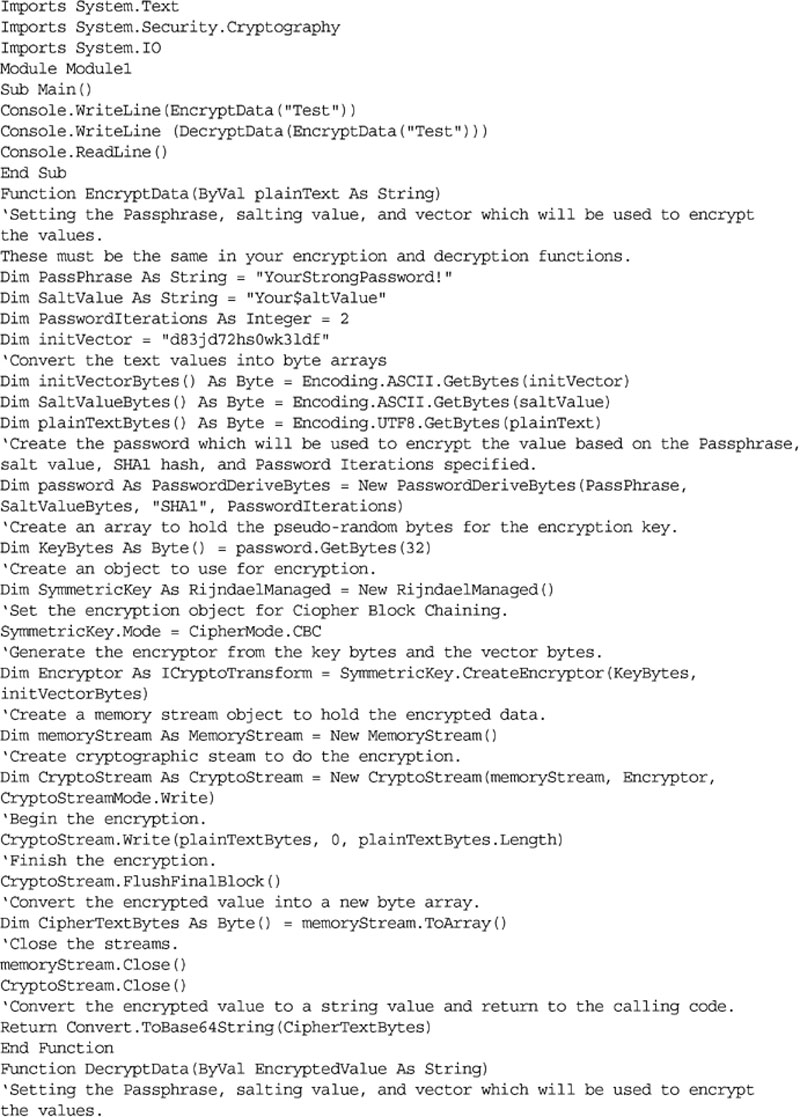
To encrypt data within your application tier, you will need to use the native encryption functions. For the purposes of this book all sample code will be written in VB.NET and C#. These same techniques can be used using other programing languages, but the syntaxes will be different.
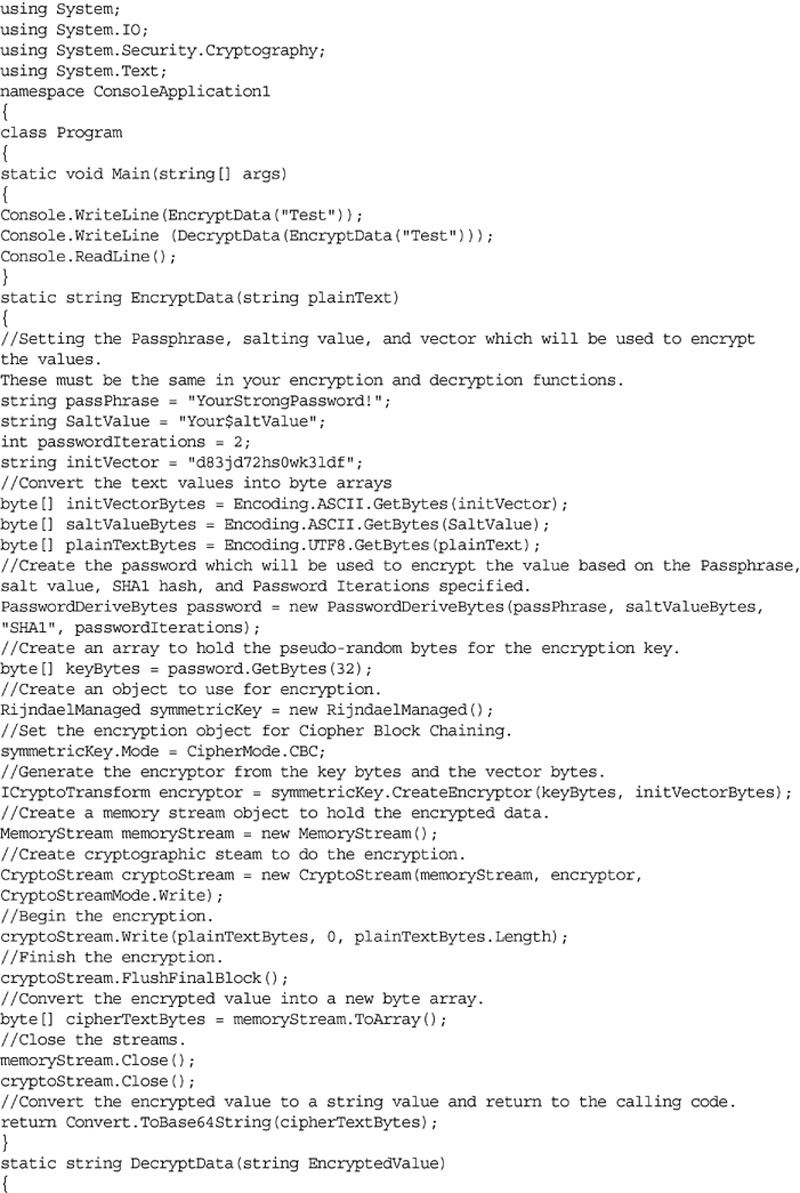
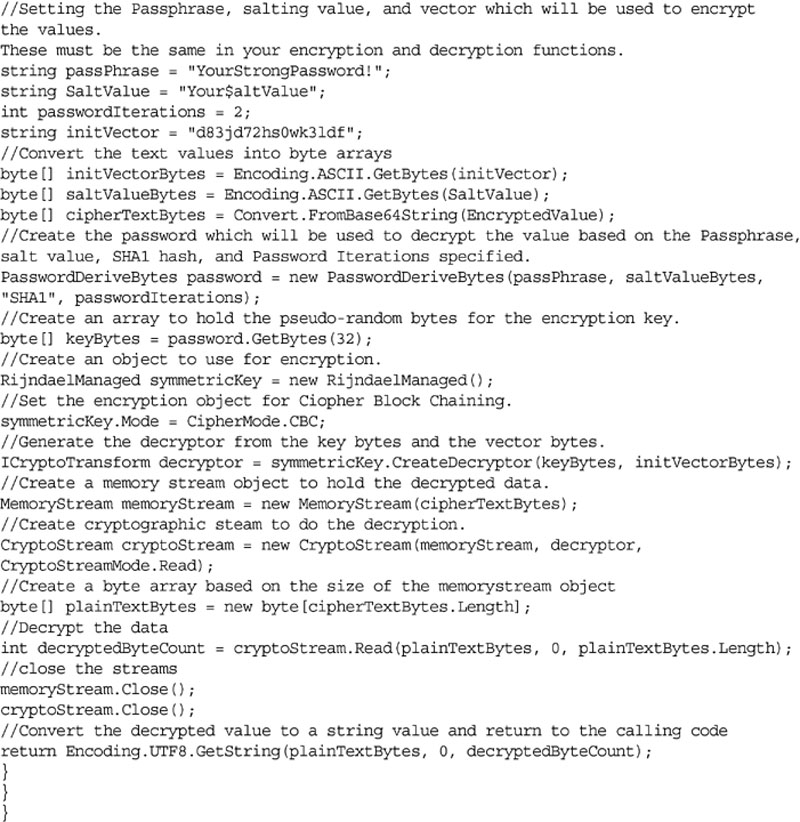
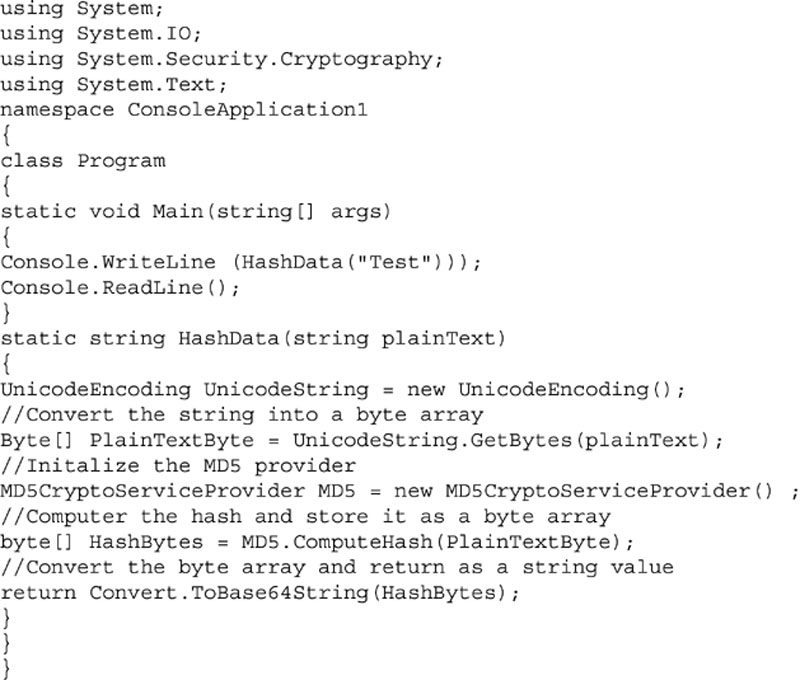
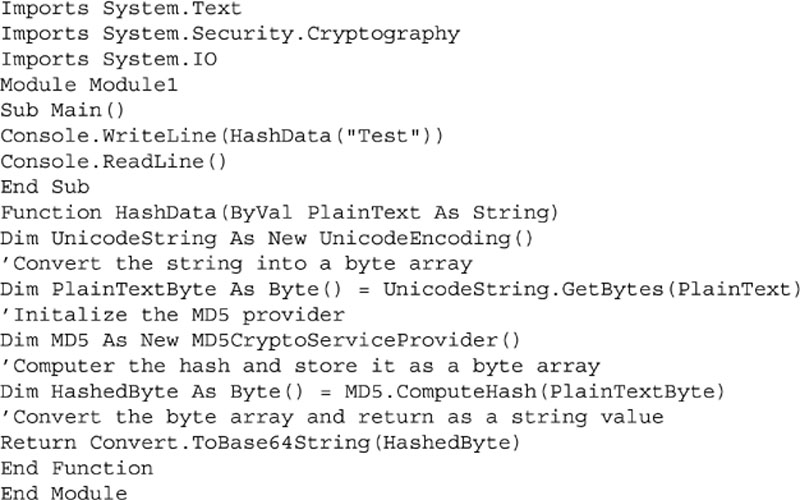
Within .NET this is done using the System.IO.Cryptography namespace. The Cryptography namespace gives you access to a variety of hashing and encryption functions. The specific functions that are available to you will depend on the version of .NET framework that you are using; however, the basic technique will be the same no matter which hashing or encryption function you use. The sample code in Examples 4.4 and 4.5 shows how to use these encryption functions in C# and VB.Net, and in Examples 4.6 and 4.7 how to use the hashing functions in C# and VB.Net. The sample code shown in Examples 4.6 and 4.7 can be downloaded from http://www.securingsqlserver.com.
Example 4.4
C# code showing how to encrypt and decrypt data within the application layer.
Example 4.5
VB.Net code showing how to encrypt and decrypt data within the application layer.
Example 4.6
C# code showing how to hash data within the application layer.
Example 4.7
VB.Net code showing how to hash data within the application layer.
Moving From Plain Text to Encrypted Values in an Existing Application
In the perfect world we would only have to worry about encrypting data in new applications. However, in the real world we need to be able to take existing applications and change so that they support encryption without needing to completely replace the application. For small applications this can be done with a minimal outage to the application by encrypting the data in the tables within a single maintenance window. However, for applications which have huge amounts of data which needs to be encrypted this cannot be done within a single maintenance window. For these applications, the most complex part of the process becomes how to encrypt the data within the table so that the data which needs to be encrypted can be. In either case an application would need to be built to take the plain text values from the database, encrypt those values, then save the encrypted values to the database.
There are a variety of approaches which can be taken when designing the process which handles the data encryption. One method is to add an additional column to the table with the BIT data type called IsEncrypted, or something similar. It would then be recommended that an index be built on the table based on the primary key of the table, including the column to be encrypted, then a filter on the Index where the value of the IsEncrypted column is 0.
At this point the application should have its code modified so that if the value of the IsEncrypted column is 0 then the plain text value should be used. If the value of the IsEncrypted column is 1 then the encryption code should be used to encrypt and decrypt the value. The application should be configured so that if any value is updated in the table, weather it is encrypted when read from the table or not, the value is encrypted and the IsEncrypted column should be updated as well. In a nutshell we encrypt the table as the data is being used.
Once the production application code has been updated to read both encrypted and plain text data and to write encrypted data a separate application should be used to encrypt the plain text data from the table. The rows with the plain text data can be easily queried using the index which was created earlier in the process. Using this method, or a method like this, would allow tables with any number of rows, even into the billions or trillions, to be converted from plain text to encrypted data without any additional downtime to the application.
Once all the rows within the table have been encrypted the code which reads the IsEncrypted column as well as which returns the plain text value from the table can be removed. Once this code has been removed the IsEncrypted column can be removed from the database table and the data encryption project can be listed as completed.
Encrypting Data at Rest
Microsoft SQL Server 2008 introduced the Transparent Data Encryption feature of SQL Server. This feature allows the SQL Server to encrypt the data as it is written to the hard drive of the server, and the SQL Server decrypts the data as it is read from the hard drive into memory. The advantage of this system is that you are able to encrypt all data with no change to the data whatsoever. This feature also protects all your data when it is backed up as the backup is also encrypted. This encryption is done by encrypting the blocks of data instead of the data stored within the blocks. The difference between application level encryption and Transparent Data Encryption is that when the data is encrypted, only the data within the table is encrypted, while TDE will encrypt the metadata about the tables, the white space in the data pages, and so forth.
The downside to using Transparent Data Encryption is that if someone is able to access the SQL Server through normal means, or by using something like an SQL Injection, they will still be able to download the data from your SQL Server by simply querying the data.
Transparent Data Encryption will also increase the CPU load on the SQL Server because each data page being read from or written to the disk must be encrypted. On very high load systems this can turn into a great increase in CPU resources. Turning on Transparent Data Encryption is extremely easy, provided that you already have a master key within the database. From within SQL Server Management Studio simply right click on the database and select properties. Then select the options tab and scroll to the bottom of the option list. Locate the Encryption Enabled option and change it from False to True as shown in Figure 4.2 and click OK. This will enable the Transparent Data Encryption setting for this database. If you do not have a master key created within the database the master key must be created using the CREATE MASTER KEY command before you can enable TDE. More information about the database master key can be found in Chapter 3 of this book.
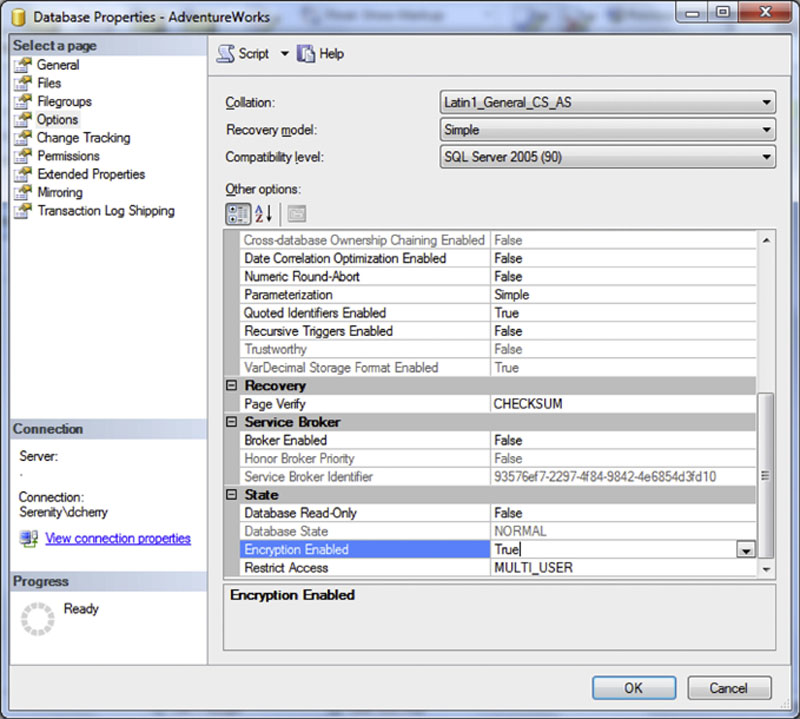
Figure 4.2 Enabling transparent data encryption on a database.
When you enable Transparent Data Encryption as data is being written, the data within the page will be encrypted. As the SQL Server has free cycles available, it will read the unencrypted blocks from the disk, encrypt them, and then write the encrypted blocks to the disk. As data is written to the transaction log, it is also encrypted by the Transparent Data Encryption.
When you enable Transparent Database Encryption for any database within the instance, Transparent Database Encryption will also be enabled for the tempdb database for that instance. This will cause a performance impact to other databases within your instance that use the tempdb database for storing temporary data.
If you wish to enable Transparent Database Encryption with T-SQL, you will need to perform a few steps as shown in Figure 4.3. First, you will need to create a master key within the master database using the CREATE MASTER KEY command. Second, you will need to create a certificate within the master database using the CREATE CERTIFICATE command.
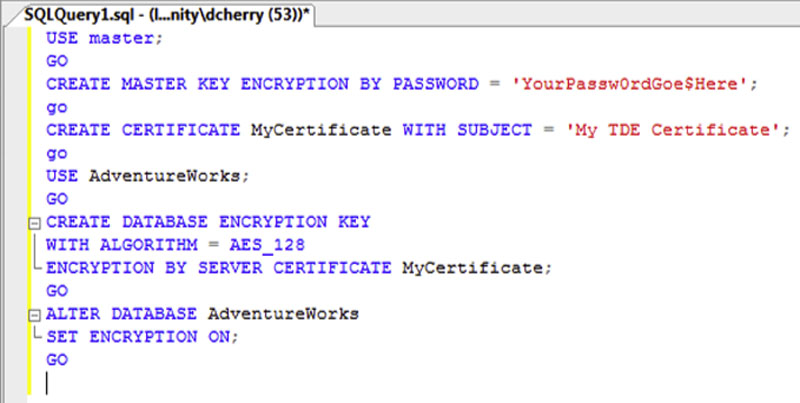
Figure 4.3 Enabling transparent data encryption on a database.
After this switch to the database, you wish to encrypt and create the database encryption key by using the CREATE DATABASE ENCRYPTION KEY command. When you use the CREATE DATABASE ENCRYPTION KEY command, you can select the algorithm you wish to use. Specify the certificate that you created in the prior step. Then lastly use the ALTER DATABASE command to enable Transparent Database Encryption within the database.
Transparent Data Encryption makes use of a database encryption key that is stored within the database’s boot record so that it can be used for recovery when the database is first started. The database encryption key is a symmetric key, which is secured by a certificate stored in the master database of the instance. If you use a third party Enterprise Key Manager, such as the RSA Tokenization Server or the Cisco Key Management Center, then the database encryption key is an asymmetric key that is protected by the Enterprise Key Manager.
When you enable Transparent Data Encryption, you should be sure to backup the encryption keys immediately and store them securely. If you do not backup these keys and the database needs to be restored, you would not be able to read the backup because you will not have the key to the encrypted backup. If the key is downloaded by someone other than your company, that person would then be able to read your database backups, or attach the database to any server.
If you use database mirroring along with Transparent Data Encryption, then both the primary and the mirror will be encrypted. As the log data is moved between the instances, it will be encrypted for transport to preserve the security of the data within the transaction log as well as to protect the data from network sniffing.
If you use full-text indexing with Transparent Data Encryption, the data within the full text index will be encrypted by the Transparent Data Encryption process. This will not happen immediately, however. It is very possible that new data written to the full-text index could be written to the disk in an unencrypted form; therefore, Microsoft recommends not indexing sensitive data when using Transparent Data Encryption.
When using Transparent Data Encryption along with database backup encryption, you will notice a much lower amount of compression when you backup the database. This is because encrypted data cannot be compressed as the amount of unique data within the database greatly decreases when you compress the database.
If you replicate data from a database that has been encrypted by the Transparent Data Encryption, the replicated database will not be fully protected unless you enable Transparent Data Encryption on the subscriber and distributor as well as the publisher.
The big catch with Transparent Data Encryption is that it is an Enterprise Edition and up feature. This means that in SQL Server 2008, SQL Server 2012 and SQL Server 2014 the Enterprise Edition is required. With SQL Server 2008 R2 you can use either the Enterprise Edition or the Data Center Edition.
TDE and FILESTREAM
If you use FILESTREAM within a database encrypted with Transparent Data Encryption, all data written via the FILESTREAM will not be encrypted. This is because the FILESTREAM data is not written to the actual database files. Only the data within the actual database files (mdf, ndf, ldf) is encrypted with TDE. The FILESTREAM files cannot be encrypted by the SQL Server engine because a user can access the FILESTREAM files directly via the Windows network share, so if the files that the FILESTREAM created were encrypted, the user would not be able to access the files. If you wanted to secure the data stored within the FILESTREAM, you would need to use a file system-based encryption process, as long as it is supported by the SQL Server Engine. The native Encrypting File Stream (EFS) encryption process that Windows 2000 and newer support is a supported encryption process for data stored by the SQL Server FILESTREAM.
Log Shipping, Database Mirroring and Alwayson Availability Groups
In order for Transparent Data Encryption to be used on databases which are either logged shipped, Mirrored or protected by AlwaysOn Availability Groups requires that the encryption keys which are used by Transparent Data Encryption to first be restored to the destination server (I am using destination server to represent a log shipping target, Database Mirroring partner, or AlwaysOn partner). Without these encryption keys being first restored the destination server the destination instance would not be able process the initial database restore commands or will be able to process the transaction log entries.
In order for the destination database to be able to restore the backups of the TDE encrypted database the certificate from the master database which the database encryption key is created off of must be manually backed up and restored to the master database of the destination server. When performing this operation be very careful who has access to this backup of the certificate as anyone with the certificate can take your database backup and restore it to their server. Backing up the certificate requires the use of the BACKUP CERTIFICATE statement as shown in Example 4.8 which backs up the certificate named “TDE_Cert.”
Example 4.8
Showing the use of the BACKUP CERTIFICATE statement.
After the certificate has been backed up the certificate should be moved to the destination server and restored by using the CREATE CERTIFICATE statement as shown in Example 4.9.
Example 4.9
Creating a certificate from a certificate backup.
Once the certificate has been restored, delete the certificate backup file from both servers so that the file cannot be recovered. At this point the database backups which has been protected by Transparent Data Encryption can be restored and either Log Shipping, Mirroring or Always On can be setup and configured.
Key Protection
Protecting the certificate which is used for Transparent Database Encryption is extremely important. Without known good copies of the certificate which are stored in a secure location, there is no way to ensure that the certificate used by Transparent Database Encryption can be recovered in the event of a system failure. Backups of this certificate should not be kept sitting on random locations or really anywhere on the network as anyone who is able to access the backup file on the network is able to take your Transparent Data Encryption protected database backups and restore them to their own server, which would then allow the unauthorized person access to all the data within your database; effectively making your encryption useless.
While you have to be very careful to control where the backups of these keys are, having backups in secure locations is very important. It is recommended that there be two copies of the backups of these keys at all times. Both should be burned to a CD or DVD and each disk placed in a sealed envelope, preferably with the signature of the person sealing the envelope over the seal (as a method of tampering detection). One of these disks should remain onsite, locked in someone’s desk drawer or office safe. The head of HR usually has an office safe that stuff like this can be put in. The second copy should be sent offsite to either another company facility such as a remote office, again being placed in a locked drawer or wall safe or sent to an offsite backup storage facility like Iron Mountain where the disk will hopefully sit for ever never needing to be recalled.
Encrypting Data on the Wire
If your worry is that someone will sniff the network traffic coming into and out of your SQL Server, then you will want to encrypt the data as it flows over the network between the SQL Server and the client computers. This is typically done by either enabling SSL for the SQL Server connection or using IP Sec to secure all network communication (or a subset of the network communication) between the client computer (end users’ computer, web server, application server, etc.) and the database engine.
The upside to using SSL is that you manage the connection encryption between the SQL Server and the clients from within the SQL Server. This encryption is also more limited as only the SQL Server traffic is encrypted, while with IP Sec you have the option to encrypt all or some of the network traffic between the SQL Server and the client computer. The advantage of IP Sec is that there are Network Cards that can offload the IP Sec work from the CPU of the SQL Server to a processor on the network card. These IP Sec network cards will require a different configuration than the one shown later in this chapter.
When using Microsoft SQL Server Reporting Services, encryption over the wire is very important between the end user and the SQL Server Reporting Services server. When encryption is not used, the user’s username and password are passed in plain text from the client application (usually a web browser) to the server, and any data that is returned is also returned in plain text. If the reports that are being viewed contain confidential information, this information could be viewed by an unauthorized person if they were to intercept the data between the SQL Server Reporting Services server and the user’s web browser. When SQL Reporting Services is being used within an internal company network, this can be done by using SSL (which will be discussed in Chapter 5 within the section titled “Reporting Services”) or IP Sec (which is discussed later in this section of this chapter). If the SQL Server Reporting Services instance is accessed directly over the public Internet (or another untrusted network), then SSL should be used, as the IP Sec policies may not be in place on both sides of the connection.
SQL Server Over SSL
Before you can configure SQL Server over SSL, you will need to acquire an SSL certificate from a trusted Certificate Authority. If you have an internal Enterprise Certificate Authority, you can get one from there; if not you will want to get one from a recognized Certificate Authority such as Verisign or GoDaddy, among others. After you have acquired the certificate, you will need to import it into the SQL Server. If you are using an SQL Server Cluster, then you will need to export the certificate from the server that you first requested the certificate be created for, and to import it into the other servers in the cluster. When you request the certificate, you will need to specify the name that your users will connect to the SQL Server as the subject of the certificate.
Microsoft SQL Server has some rather specific requirements when it comes to the certificate. The certificate must be stored in either the local computer certificate store or the current user certificate store (when logged in as the account that runs the SQL Server). The certificate must be valid when the valid from and valid to values are compared against the local system time. The certificate must be a server authentication certificate that requires the Enhanced Key Usage property of the certificate to specify Server Authentication (1.3.6.1.5.5.7.3.1). The certificate must also be created using the KeySpec option of AT_KEYEXCHANGE; optionally the key usage property will include key encipherment. SQL Server 2008 R2 and above support the use of wildcard certificates, while prior versions will require a specific name within the subject of the certificate.
Although you can use self-signed certificates to encrypt data connections between the client computers and the SQL Server, it is not recommended as this opens the server up to man-in-the-middle attacks where the user connects to another process; that process decrypts the connect and then forwards the connection along to the final destination while reading and processing all the traffic, exposing all your data you are attempting to protect to the third party process.
Before you can tell the SQL Server that you want to encrypt the connection, you need to request and install a certificate from your Certificate Authority. In the case of these examples, we will be using a local Enterprise Certificate Authority.
To request a certificate, open Microsoft Management Console (MMC) on your Windows 2008 R2 Server (other operating systems may have slightly different instructions than are shown here) by clicking Start > Run and typing MMC and clicking OK. This will open an empty MMC console. When the empty MMC console has opened, click on the File dropdown menu and select “Add/Remove Snap-in.” From the list on the left select “Certificates” and click the Add button to move the snap-in to the right. You will then get the certificate snap-in properties, which asks if you want to manage certificates for your user account, a service account, or the computer account. Select the computer account and click next, then select the local computer and click Finish. Once you have closed the certificate snap-in properties wizard, click OK to close the Add or Remove snap-in page. At this point within the MMC console you should see the Certificates snap-in with a variety of folders beneath “Certificates (Local Computer).” Navigate to Personal > Certificates to view the list of certificates that are installed on the computer. By default there should not be any certificates listed here as shown in Figure 4.4.
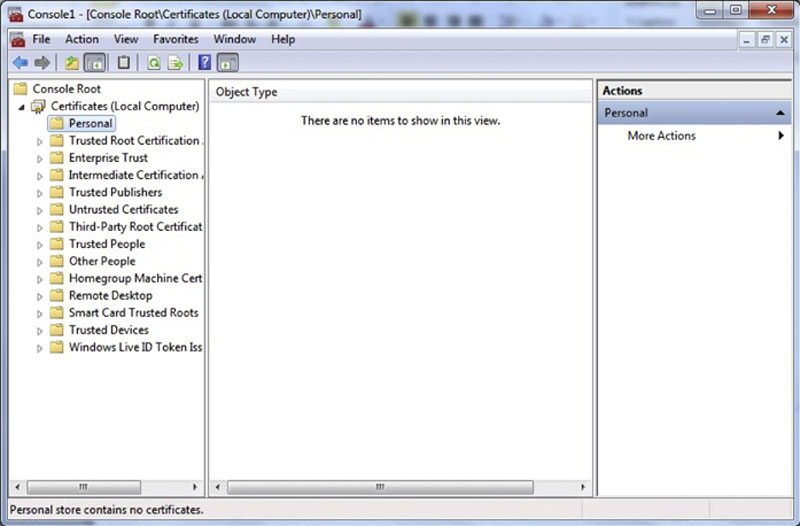
Figure 4.4 MMC with the certificates snap in showing no certificates installed.
To request a certificate from your Certificate Authority (CA), right click on Certificates (under Personal) and select “All Tasks” from the Context menu; then select “Request New Certificate.” This will open the Certificate Enrollment wizard. Click next on the wizard to see the list of certificate templates. Check the box next to the “Computer” template and click the double down arrows next to Details on the right, then select properties. This will pull up the Certificate Properties window.
On the General tab set the friendly name to the DNS name of the SQL Server. In the case of our sample server, the domain name is ati.corp, and the server name is sql2008r2, so the friendly name is sql2008r2.ati.corp. On the subject tab, in the subject name section change the type dropdown to Common name and set the value to the same value as the friendly name, in this case sql2008r2.ati.corp. Click the add button to move the value to the column on the right, and then click OK. Back on the Certificate Enrollment page click the Enroll button to request the certificate. After the Certificate Enrollment window has closed, you should now see the certificate listed in the MMC console.
SQL Server 7 and 2000
In the older versions of Microsoft SQL Server, there is no User Interface (UI) to tell the SQL Server which certificate to use. By default the SQL Server will use the certificate that has the same name as the SQL Server. If you have multiple certificates or you wish to use a certificate that does not have the same name as the server, then you can force the SQL Server on which certificate to use by setting a registry key. This key can be found at HKEY_LOCAL_MACHINE\SOFTWARE\Microsoft\MSSQLServer\MSSQLServer\SuperSocketNetLib. Create a binary value called “Certificate” and place the thumbprint of the certificate as the value of the key. The thumbprint of the certificate can be found by viewing the certificate in the MMC console and looking at the Details tab as shown in Figure 4.5.
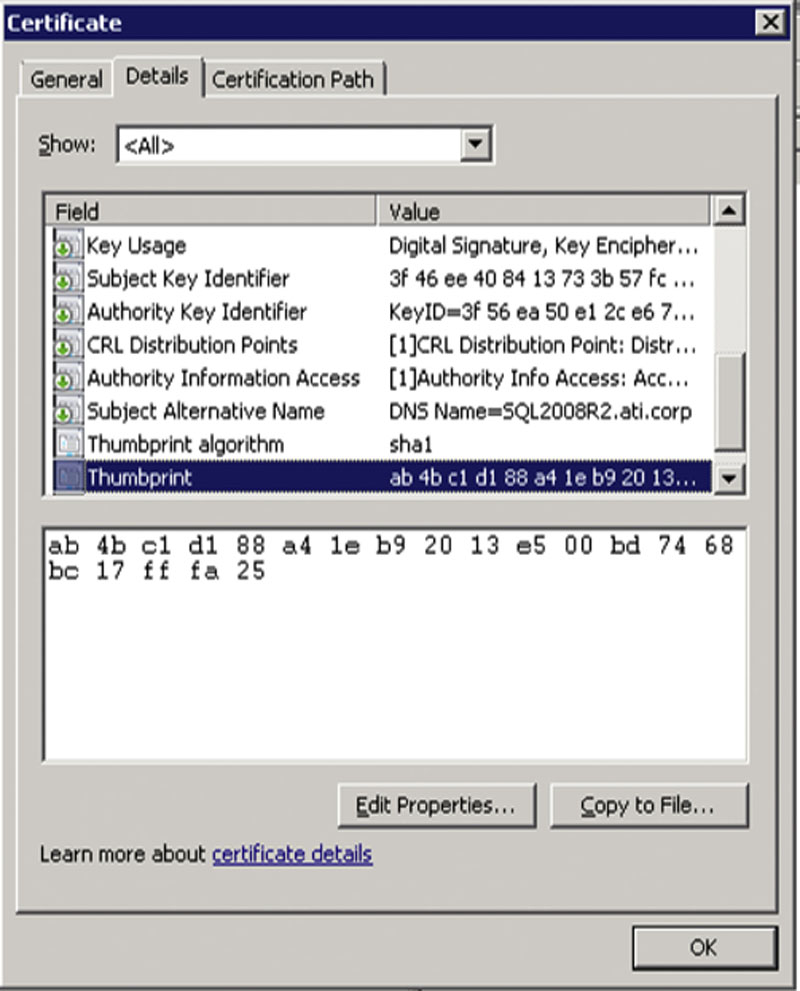
Figure 4.5 The thumbprint value of our sample certificate.
Configuring Microsoft SQL Server 2000 to use encryption is very easy to do. Open the SQL Server Network Utility by clicking on Start > Programs > Microsoft SQL Server, then Server Network Utility. When the Server Network Utility opens, simply select the instance you wish to configure and check the box that says “Force protocol encryption” as shown in Figure 4.5. Then click OK and restart the Microsoft SQL Server Services.
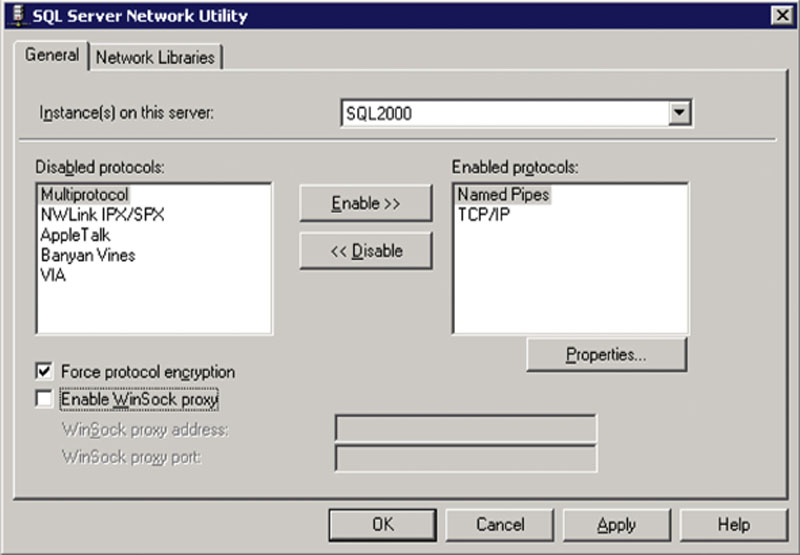
Figure 4.6 SQL Server Network Utility configured for encryption.
If the SQL Service does not start after making these changes, check the ERRORLOG and application log. If the SQL Server cannot find the correct certificate, specify the certificate to use in the registry as shown above. The same applies if the SQL Service does start but you get messages back from the SQL Server saying that the name that you are connecting to does not match the certificate.
SQL Server 2005 and Up
After you have imported the certificate into the SQL Server open the SQL Server Configuration Manager by clicking Start > Programs > Microsoft SQL Server 200n > Configuration Tools. Expand the “SQL Server Network Configuration” menu (if you have installed the 32-bit build of SQL Server on a 64-bit server, then you will need to expand the “SQL Server Network Configuration (32-bit)” menu) and right click on “Protocols for {Instance Name}” and select properties. On the certificate tab select the certificate you wish to use to encrypt the network traffic. After selecting the certificate, switch back to the Flags tab. On the Flags tab you can force enable encryption or you can hide the instance. The screenshot shown in Figure 4.7 shows an instance configured to force encryption, while remaining visible to users on the network.
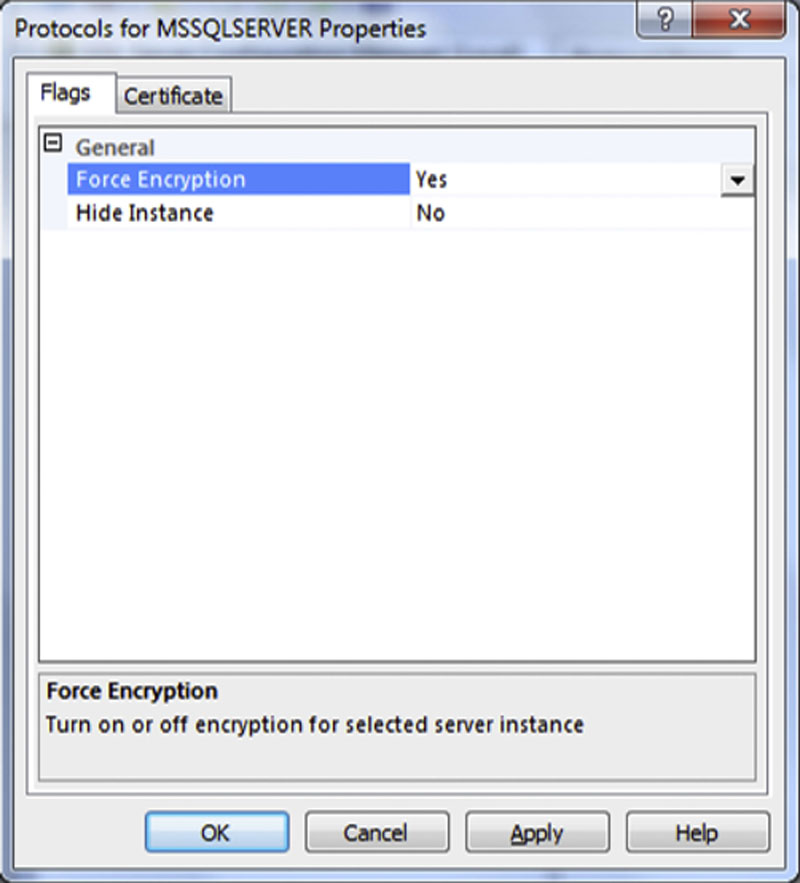
Figure 4.7 Forcing Database Encryption for all connections to a SQL Server Instance.
When you force encryption on an instance, the SQL Server will reject all connections that do not support encryption. If you do not force encryption, the SQL Server will accept both encrypted and non-encrypted connections, allowing you to set specific applications to use encryption via the applications connection string. This is done by putting the “FORCE ENCRYPTION = true” flag within the applications connection string. After you change the encryption settings you will need to restart the SQL Instance in order for the settings to take effect.
Certificate Strength Differences
The settings which were selected when creating the SSL certificate will determine the strength of the SSL protection of the data when sending it over the wire. If the certificate was purchased from a third party Certificate Authority (CA) such as GoDaddy or Verisign then the certificate is most likely a 128 bit certificate, although older certificates could be as little as 64 bit certificates. If the certificate was created from an internal Certificate Authority (CA) then the encryption could be weaker than 64 bit or it could be much stronger than the 128 bit certificates.
The different in the protection comes from the length of the private key which is used to encrypt the data. The longer the private key is the more secure the data is, as it will take longer for an attacker to break the private key. This longer private key comes at a price, however, as it will require more CPU power to encrypt and decrypt the data using the longer private keys.
Selecting the right amount of protection in your key length is really a decision that management and the business need to make with technical guidance from the IT team. The reason for this is that it is the business unit whose data is being protected and they need to have a say in how secure the data is. If they insist on longest possible key for SSL encryption that is fine, as long as they understand that server upgrades will need to happen more frequently as the more load the system is placed under the harder the CPUs of the SQL Server will have to work in order to encrypt and decrypt this data.
An additional side effect of this longer encryption string is that the network will be used more by the SQL Server than it would before. Because the longer private key is used to encrypt the data as it goes out over the wire the data being transmitted over the wire will be larger than it was before. On the local LAN this probably would not be that big of a deal as the SQL Server probably has at least 1 1Gig uplink to the network and the network probably has multi-gig links between the switches. However, if you have remote users is a remote office this will this increase in network traffic will increase the amount of data flowing over the WAN link, and decrease its ability to handle more network traffic as the user base at the remote site increases. This will over time lead to increased costs of running the WAN links as they will need to be upgraded more often as well. The same goes for if there are users working from home connecting to the database on a regular basis. The more of them you add the faster the offices internet connection will become saturated faster, especially if these workers are VPNed in from home which will be taking the already encrypted traffic between the user and the SQL Server and encrypting it again for transport over the VPN.
Managing SSL Certificates
One of the downsides to configuring SSL over SQL Server is that you now have to manage the SSL certificate that the SQL Server clients use to connect to the SQL Server instance. This is because SQL Server certificates, and all SSL certificates, are created with specific start and end dates after which the certificate is no longer considered to be a valid certificate. Before this happens the certificate needs to be replaced with a new certificate.
If the certificate was purchased from a third party Certificate Authority (CA) then the new certificate will need to be purchased from either that CA or another CA (while you do not need to purchase the new certificate from the same CA that issued the first one it is usually easier to do so). If the certificate was issued from an internal Certificate Authority (CA) then the new certificate will probably need to be issued from the internal CA. In either case the process will be the same as getting a new certificate for the first time. Go through the same process which was described earlier in this chapter and then import the new certificate into the SQL Server.
Once the certificate is loaded into the OS then the SQL Server can be told to use the new certificate for connections. To do this, follow the instructions earlier in this chapter for either SQL Server 2000 and below and SQL Server 2005 and up. When you change the certificate that the SQL Server will use for SSL connectivity the SQL Server instance must be restarted in order for the SQL Server to begin using the new certificate.
The biggest reason for wanting to switch out to the new certificate before the old certificate has expired is to ensure that if there is a problem you have time to address the issue before the old certificate has expired. If you wait until the last day, and there is a problem importing the new certificate for some reason you will have a very short window to troubleshoot the issue.
Hiding the Instance
Microsoft SQL Server instance can be easily found by querying the network and using a specific feature within the SQL Server Native Client. When using the sqlcmd command line tool, this feature is exposed by using the -L switch, provided that the sqlcmd application is run from a client machine on the same IP subnet as the SQL Server instance. When using SQL Server Management Studio, this feature can be exposed by selecting the “<Browse for more…>” option from the Connection dialog box and selecting the “Network Servers” tab in the window that pops up. This feature can also be called via a custom .NET application. No matter which technique is used, the same result occurs, showing a list of all the SQL Server Instances that are available on the network.
It is possible to hide an instance of the database engine from reporting that it is there by changing the “Hide Instance” setting within the SQL Server Service’s protocol properties, shown disabled (set to “no”) in Figure 2.7. To hide the instance, change this setting from “no” to “yes” and restart the instance for the setting to take effect. After the setting is enabled and the instance has been restarted, the instance will not respond to queries by the Native drive querying for instance. Users will still be able to connect to the instance as before; however, they must know the name of the server name and the name of the instance, when not using the default instance.
IP Sec
IP Sec is the process by which all network communication between two computers is encrypted. IP Sec can be configured either on the local machine or on the domain via group policies. In the example local configuration will be shown, but the screens look very similar for a group policy configuration.
To configure IP Sec, open the Local Security Policy application by clicking on Start>Programs>Administrative Tools>Local Security Policy. Right click on the “IP Security Policies on Local Computer” option on the menu on the left and select “Create IP Security Policy.” This will bring up the IP Security Policy Wizard.
On the first screen of the wizard, type a name and description of the policy. On the second screen you are asked to activate the default response rule. This default response rule tells the computer how to respond to requests for security when no other rule applies. The default response rule only applies when running against Windows Server 2003 and Windows XP. The third screen of the wizard asks you for the initial authentication method to use when negotiating the connection. You can select from Kerberos, a certificate from a CA, or a preshared key. If your SQL Server or any member of the communication is not a member of the domain (the SQL Server or web server is within a DMZ, for example), then you cannot select Kerberos as the Kerberos settings must come from a Windows domain. After this you have completed the wizard and the computer is configured for IP Sec communication. Once the wizard has been closed, you can see the rule listed in the list on the right-hand side of the window as shown in Figure 4.8.
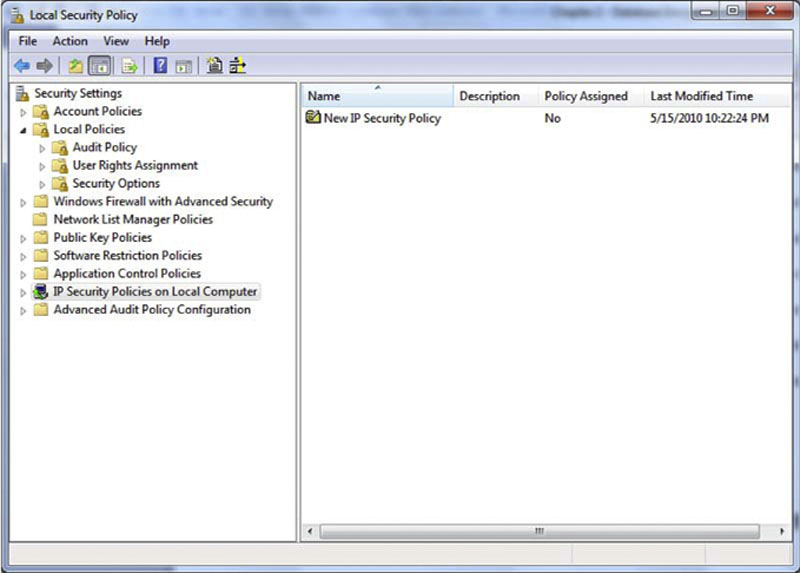
Figure 4.8 Local Security Policy with a newly created IP Sec Policy.
Once the blank policy has been created you need to tell the policy what IP Subnets this policy applies to and what it should do if it cannot set up a secure connection. To do this, right click on the policy and select “Properties” from the context menu. On the rules tab of the Policy Properties click the “Add” button to bring up the Security Rule Wizard. When the wizard opens, click next on the informational screen. The next screen of the wizard allows you to specify a tunnel endpoint. A tunnel endpoint allows you to specify a tunneling endpoint at the remote site, which will then pass the traffic unencrypted to the destination computer. For the purposes of this book, we will assume that you are not specifying a tunnel. After you click next you will be asked to specify the network type that this rule will apply to. Most people will want to select “All network connections” and click next. If you have the server configured as a VPN Endpoint or have dial-in via modem configured on this server (for a third party vendor to have access, for example) and if you do not want to encrypt these connections, you would then want to select the “Local area network (LAN)” option. If you only want to encrypt VPN or dial-in connections, you would select the “Remote access” option. The next screen shows the list of IP Address subnets to which this rule will apply. If this is the first rule you have created, the IP filter list will be empty; to add an entry, click the Add button, which will bring up the IP Filter List editor. When the IP Filter List editor opens, click the Add button, which will open another wizard. Click next on the information screen and enter a description if you would desire and unselect the Mirrored checkbox if desired and click next. On the next screen select the source address you wish to use. The source address is the IP Address, which is the source of the connection. If you are trying to encrypt all traffic coming to this machine, select the “Any IP Address” option. If you are trying to encrypt all traffic from a specific subnet, then select the “A specific IP Address or Subnet” option and fill out the IP Address or subnet field with the correct information. For the purposes of this book we will assume you wish to encrypt all traffic to the server so you will have selected the “Any IP Address” option as shown in Figure 4.9.
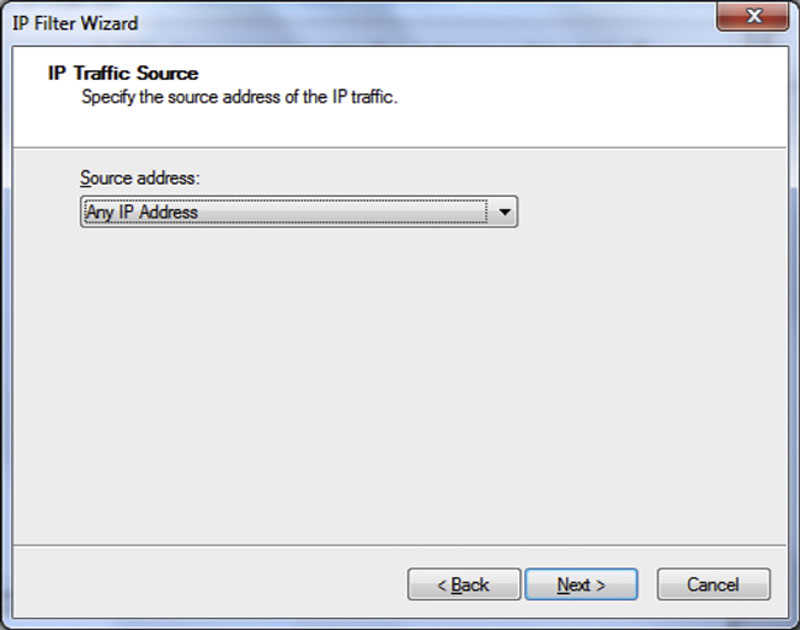
Figure 4.9 IP Traffic Source Screen of the IP Sec Policy wizard.
After you have set the source address information and clicked the next button, you will be prompted for the destination address information. If you only want to encrypt the traffic to the SQL Server but not network traffic from the SQL Server to other machines, you will want to select the “My IP Address” option. If you want to encrypt access to and from the server, then select the “Any IP Address” option. As with the source address screen we looked at on the prior screen, this screen has several other options that can be used depending on your requirements. For the purposes of this book, we will assume that you have selected the “Any IP Address” option as you want to encrypt all network traffic in and out of the SQL Server. After setting your Destination IP Address information click next, which will allow you to configure which protocol should be encrypted. Assuming that you only wish to encrypt the connections to and from the SQL Server Service, select the TCP option from the protocol dropdown as shown in Figure 4.10 and then click Next.
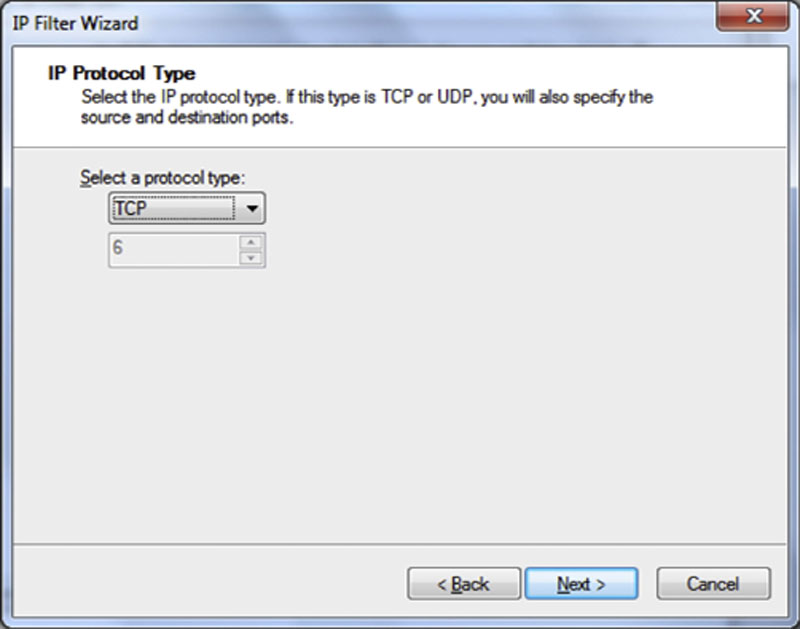
Figure 4.10 IP Protocol Type Screen of the IP Sec wizard.
On the next screen you will be asked which TCP ports you want to encrypt the network traffic between. As we only want to encrypt the traffic to and from a Microsoft SQL Server we select “From any port” and “To this port” and enter TCP port 1433 (or whichever TCP your SQL Server is configured for) in the text box under the “To this port” field as shown in Figure 4.11. Configuring the filter in this way will only encrypt the traffic to or from the SQL Server service. This will leave the network traffic such as to and from Active Directory to be secured through the normal mechanisms and not through IP Sec.
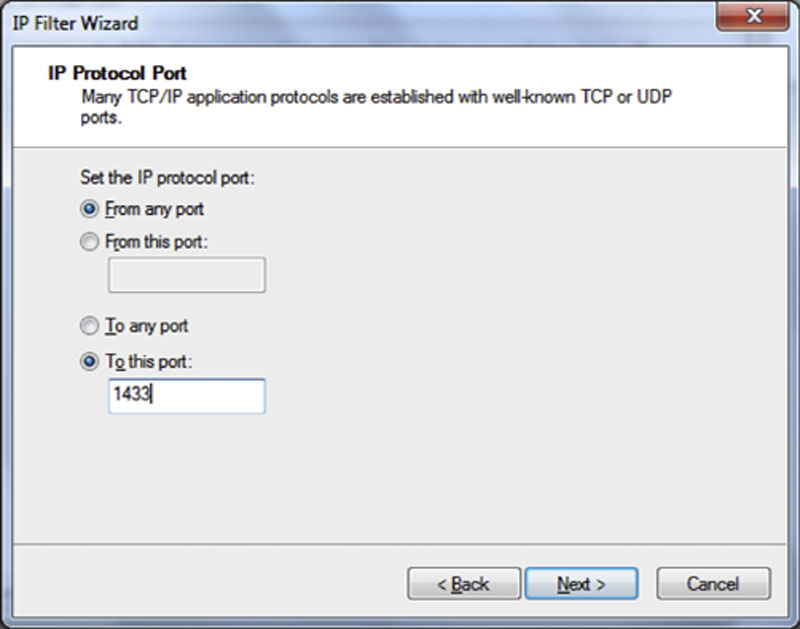
Figure 4.11 IP Protocol Port selection screen of the IP Sec wizard.
After setting the TCP Port numbers, click next and then finish, which will complete the wizard. If you need to add additional connections to encrypt (such as if there are multiple SQL Server instances installed on the machine that you wish to encrypt traffic to), click the Add button again to run through the wizard and add additional configurations. Once you have completed all your IP Address filters to this filter list, click the OK button.
Back on the IP Filter List screen select the IP Filter List that you wish to apply to this IP Sec policy and click the Next button. The next screen in the wizard asks you for the filter action. By clicking Add you will tell the wizard how to handle the network traffic, what do you want to encrypt, what protocol should be used to encrypt the data, what traffic cannot be encrypted, and so on. After clicking on the Add button, click next on the first screen of the wizard to pass the information screen. On the next screen name your filter and provide a description, then click the next button. On the next screen you will be asked what to do with the network traffic: Permit it, Block it, or Negotiate Security. You will want to select the Negotiate Security option and click Next. On the next screen you can specify what to do with communications from computers that do not support IP Sec. The default is to not allow unsecured connections. If you change the option from the default to “Allow unsecured communication if a secure connection cannot be established,” then users who do not have IP Sec configured correctly or that do not support IP Sec may put your SQL Servers data at risk. After making your selections click the next button.
On the next screen you are telling the policy what to do with the data. Three options are shown on this page of the wizard: “Integrity and encryption,” “Integrity only,” and “Custom.” The “Custom” option allows you to select the algorithms that are used for the Integrity and Encryption options as well as how often new keys are generated. If you use Integrity only, then the information is validated upon transmission using the MD5 or SHA1 algorithms. What this means is that the data is hashed using the selected algorithm before it is transmitted. This hash is then transmitted along with the data, and the receiving computer hashes the data and compares the hashes. If they are different, the data has been modified in some way and is discarded. When you enable Encryption you can select from the DES or 3DES algorithms to decide what level of encryption should be used. This encryption setting is in addition to the Data Integrity option. When selecting the Data integrity and encryption option (from the customer editor), you can opt to disable the Integrity option if you prefer. You can also set the triggers, which will cause a new encryption key to be generated. You can trigger new key generation by either the amount of data that has been transferred, or based on the amount of time that the current key has been active, or both. Generally, accepted high security settings for IP Sec are shown in the screenshot in Figure 4.12.
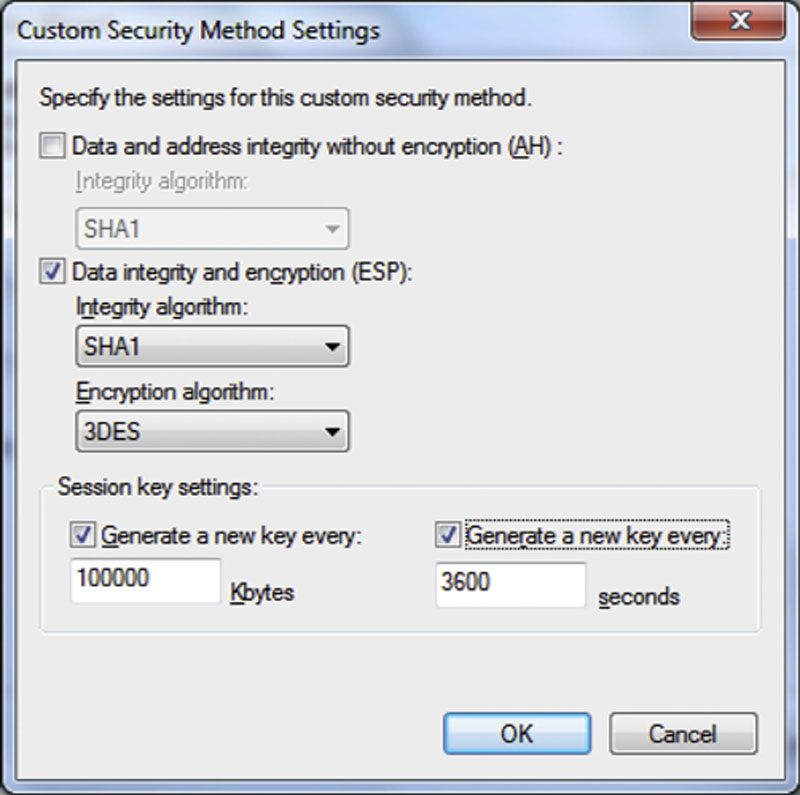
Figure 4.12 Generally accepted high security settings for IP Sec.
If you have customized the settings, click the OK button. After setting the settings on the IP Traffic Security page, click the “Next” and then “Finish” buttons to close this wizard. This will take you back to the “Filter Action” page of the prior wizard. Select the “Filter Action” that you just created from the list and click “Next.”
On the next screen select the initial security method for this rule. The default selection of Active Directory default should be the correct selection for most companies to use. If you prefer to use a certificate or preshared key, you can change the option here before clicking next. If your computer is not a member of a domain, you will need to select an option other than Active Directory as you cannot use Active Directory without both computers being a member of the same Active Directory forest. Complete the wizard using the “Next” and “Finish” buttons. Click OK to close the IP Sec policy properties window.
At this point the policy has been created, but it has not been assigned. To assign the policy, simply right click on the policy and select “Assign” from the context menu. This tells the computer that this policy is now active and should be followed. In order for IP Sec to encrypt the data between the SQL Server and the workstations, you will need to now create a corresponding policy on the workstations that need to connect to the SQL Server.
Encrypting Data with MPIO Drivers
Multipath Input Output (MPIO) drivers are only used when your SQL Server is connected to a Storage Array via either fiber channel or Internet Small Computer System Interface (commonly referred to as iSCSI). When you connect a server to a storage array, you typically do so over multiple cables (also called paths). This allows you to connect the server to multiple controllers on the array and have multiple Host Bus Adapters (HBAs) on the server so that you have a redundant connection in the event of an HBA, cable, or Storage Controller failure. The most common way of making these connections is with two switches so that each HBA is connected to each storage controller. A sample diagram of these connections is shown in Figure 4.13.
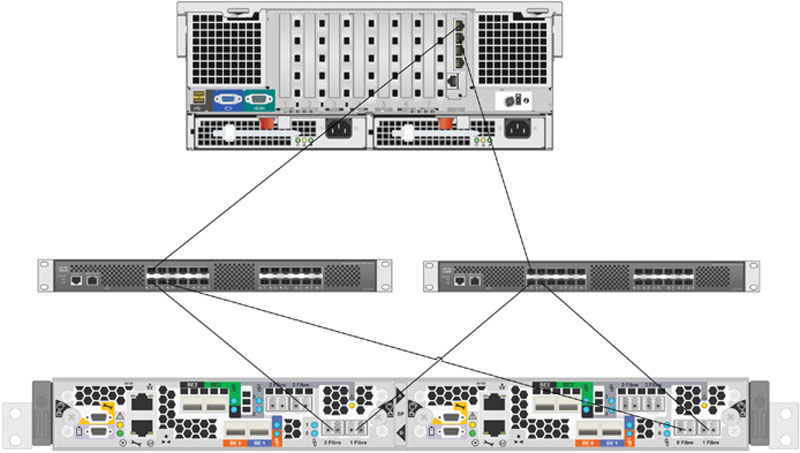
Figure 4.13 A redundant storage network diagram.
Not all MPIO drivers are created equally. Some MPIO drivers, such as EMC’s PowerPath include encryption features which allow the MPIO driver to encrypt and decrypt all the traffic between the server and the storage array. This is done by taking the write requests and encrypting the data portion of the write request (the data within the block, but leaving the block address unencrypted) so that when the data is written to the disk it is in an encrypted form. EMC was able to bundle this encryption into the PowerPath MPIO driver because of its purchase of RSA a few years ago.
The upside to using this sort of technique is that everything gets written encrypted without any changes to any of your code, either in your stored procedures or in your application layer. The downside is that because this is a software package this means that the work to encrypt and decrypt the data has to be done by your SQL Server’s CPU. So as the load on the SQL Server goes up, and the amount of IO being done by the SQL Server goes up, the amount of CPU power needed by the MPIO driver will also increase. The other downside to using your MPIO driver for encryption is that you now have to manage the certificate used by the MPIO driver for encryption. However, this certificate management is done through an Enterprise Key Management system such as RSA Key Manager (RKM).
PowerPath Encryption with RSA Requirements and Setup
The encrypting and decrypting of data with PowerPath is not as simple as installing the component and having it work. Using the PowerPath RSA Encryption requires installing and configuring some additional network components, including the RKM server software that is provided by RSA. Before you can begin configuring the system, you first need to request and install certificates from a certificate authority such as an internal Public Key Infrastructure (PKI). Both the server that will be encrypting the data using PowerPath and the server that will serve as the RKM server will need a certificate installed.
The certificates have some specific requirements that need to be met:
1. The certificate must be a password-protected PKCS#12 file, which contains the credentials that the PowerPath host uses. These credentials are the public key certificate and the associated private key that are used to secure the SSL communications.
2. The hosts are authenticated against the RKM server using a PEM (Privacy Enhanced Mail) encoded trusted root certificate.
After you have configured the RKM server and installed the needed certificates on the servers, the network administrator will need to configure a secure zone of the network for the servers that will be using PowerPath for encryption and the RKM server. A secure zone is a physical and logical area within a data center where all access to the devices within the zone is restricted. This restriction is implemented via a combination of user authentication and firewalls.
Once the secure zone is configured, you can install the RKM server on a server within the secure zone of the network. Walking through the process of installing RKM is beyond the scope of this book, and it is assumed that the RKM server is already setup and in working order.
In order to configure PowerPath to do data Encryption and Decryption, you have to install a newer version of PowerPath. To use the Encryption, you will want to have the newest version of PowerPath. If you do not have access to the newest version, you will need to have PowerPath 5.2 or later. If when PowerPath was installed, the default options were used, then the Encryption with RSA option was not installed and it will need to be installed to be used.
To install the Encryption with RSA feature, launch the PowerPath installer on the server and click next on the information screen. The second screen will ask you if you wish to modify, repair, or uninstall PowerPath; select the modify option and click the next button. The next page shows the features to install. Enable the “Encryption with RSA” as shown in Figure 4.14 and click next. The next screen informs you that the installation is ready to continue; click the Install button on the screen to complete the installation. Once the installation has completed, you will be prompted to reboot the server.
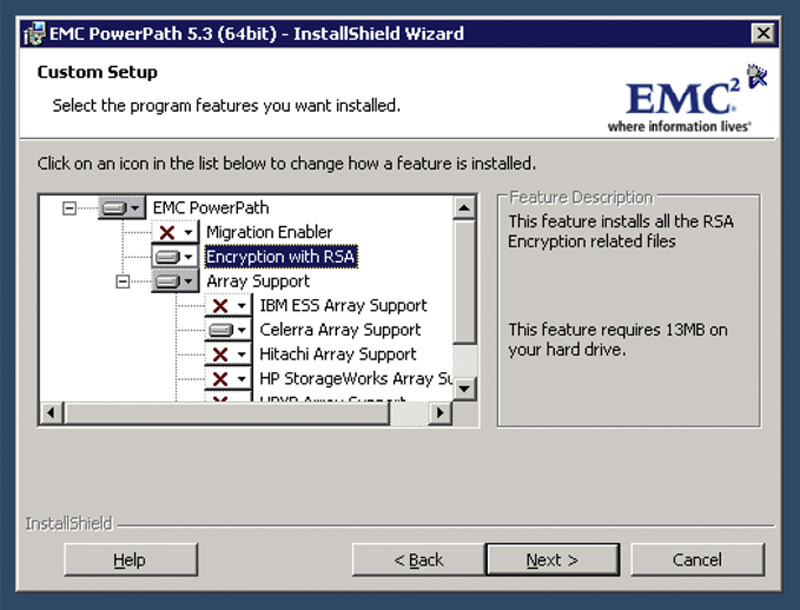
Figure 4.14 Updating an already installed PowerPath installation.
If you have not net installed PowerPath, the installation will be very similar to the upgrade process, with two additional steps. During the installation you will be prompted for your PowerPath key as well as for the folder to which you wish to install PowerPath.
After you have installed the RSA encryption module, you can launch the RKM Client Configuration tool by clicking on the Start button, then the EMC Folder, and then the Configuration folder. This will launch a wizard that will assist you define the Key Manager Client configuration, initialize your encryption LockBox, and initialize the Key Manager Client for PowerPath Encryption on the server.
Before you can begin using PowerPath to encrypt your storage traffic, you need to tell the RKM how you wish to encrypt the data. You will want to start by creating a Key Class by logging into the RKM administration website and selecting the Key Class tab. If there is already a previously defined Key Class that you wish to use, then the process of creating a new class can be skipped; however, if you wish to use a class that is different from those that have already been created, you will need to create one. The Key Class stores the rules by which the keys that are generated for that key class must follow. This includes the algorithm, key size, and cipher mode, as well as the lifetime of the key.
Keys are controlled by Key Classes within the RKM. Optionally, these key classes can have the key specifications defined by a Crypto Policy (which is used by the Key Policy and is set when creating a new key policy later in this chapter). A crypto policy allows you to specify a fixed algorithm, key size, and cipher mode, as well as duration so that various classes have predefined values without having to set those values each time. To create a crypto policy, select the Create button on the Crypto Policy tab. Enter in the name of the Policy and set the values listed as shown in Figure 4.15.
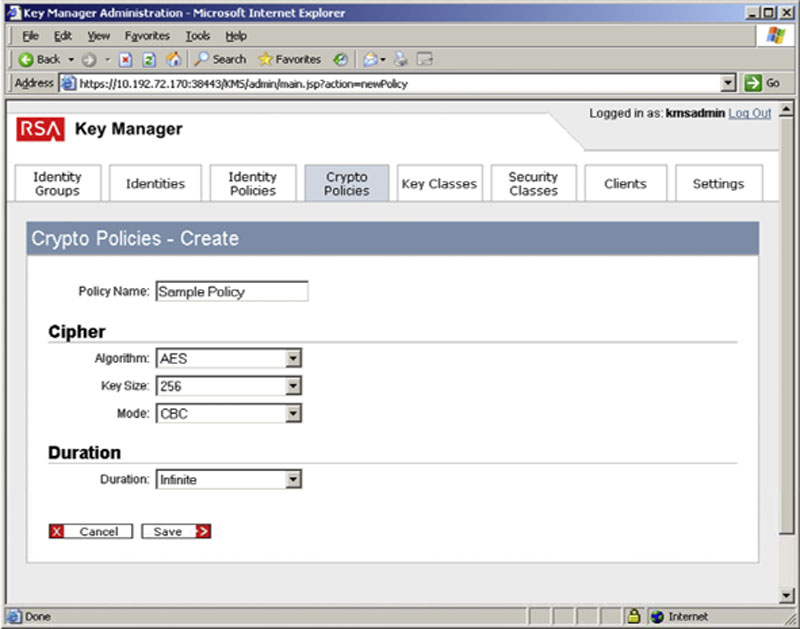
Figure 4.15 Creating a Crypto Policy in RKM’s interface.
To create a new key class, click on the Create button on the Key Classes tab that opens the first page of the five-page wizard as shown in Figure 2.16. On this first page you assign a name to the class, and assign the identity group that can use the Key Class. If the keys will expire, then you can check the box in the key duration option and optionally have the duration be controlled by a key class. This optional checkbox “Get Duration from a Crypto Policy” is shown in Figure 4.16 for reference only.
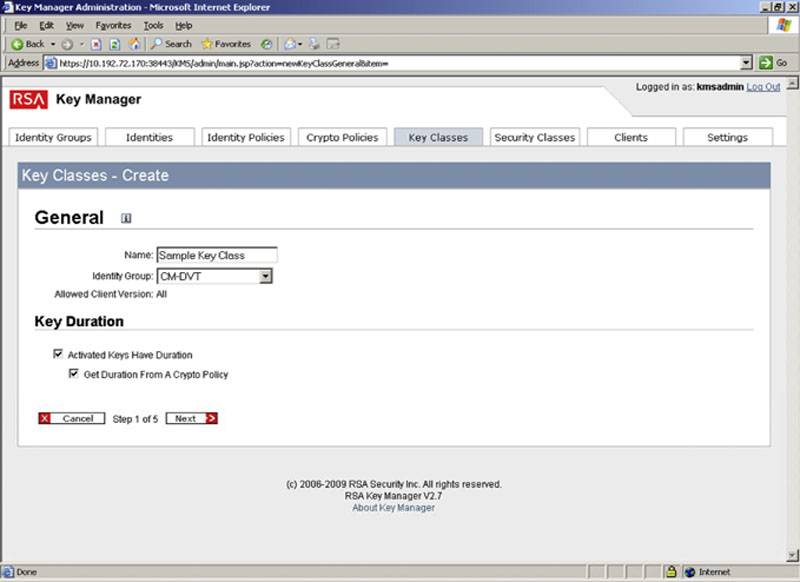
Figure 4.16 The first page of the Key Classes wizard setting the name and the identity group which can use the class.
On the second page of the new Key Class wizard you will set the algorithm, key size, and mode of the cipher, as well as the duration of the key, and if the current key can be reused if needed or if a new key should always be created as shown in Figure 2.17. If on the first screen you did select that the duration should be gotten from the Crypto Policy, then the screen will look as shown in Figure 4.17. If you did not select this option, then this page will look as shown in Figure 4.18.
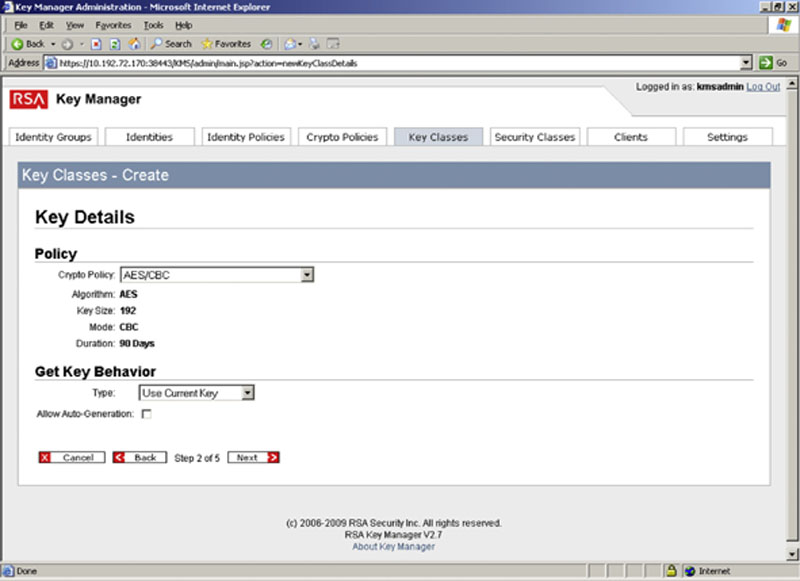
Figure 4.17 Setting the Crypto Policy to control the key details.
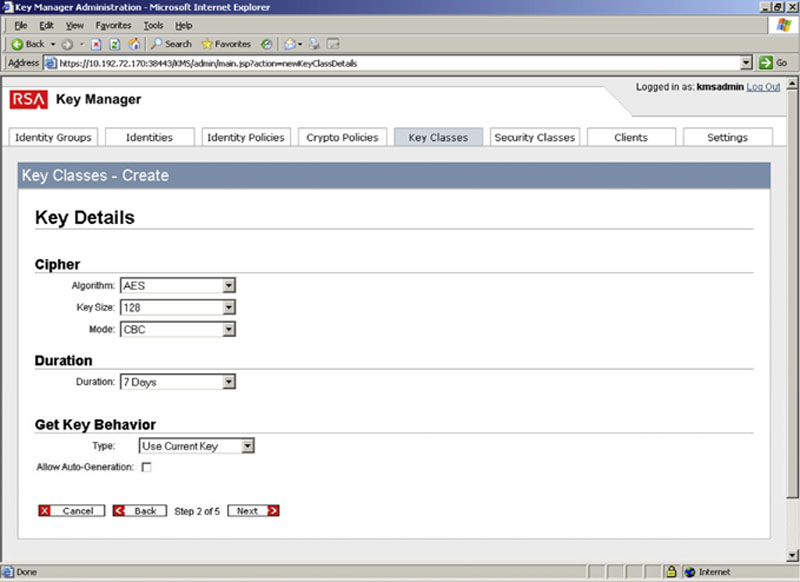
Figure 4.18 Setting the key details manually without the use of a Crypto Policy.
The next page of the wizard allows you to assign attributes to the key class, which is an optional step. The next page of the wizard allows you to assign specifications to attributes, which is also an optional step. The last page of the wizard allows you to review all the various settings for the key class you are about to create.
After setting the key information into the system, you will need to configure the Key Management Server (KMS) to allow the client computer (in this case the SQL Server) to talk to it. This is done on the Clients tab of the RKM. After selecting the Clients tab, click the Create button and on the Create Clients page enter the IP Address, Hostname, and Application Name of the server. You will also want to select the identity of the user that the server will use to log into the RKM, as well as the version of the client software that will be used to talk to the RKM as shown in Figure 4.19. The client version that you select will depend on the version of the MPIO driver that you are using, so please check with your software vendor before selecting.

Figure 4.19 Showing the create client screen of the RKM.
Once you have set up the needed resources within the RKM, you can configure the server’s MPIO driver for encryption. On the server you will be using, open the RKM Client Configuration tool. This will allow you to configure the Key Manager Client, to initialize the LockBox for use, and then to initialize the Key Manager Client for PowerPath Encryption between the server and the storage array as shown in Figure 4.20. Once this has been done, Power Path will begin encrypting all the traffic between the server and the storage array so that when the data is written to the disk all the data will be written in an encrypted form.
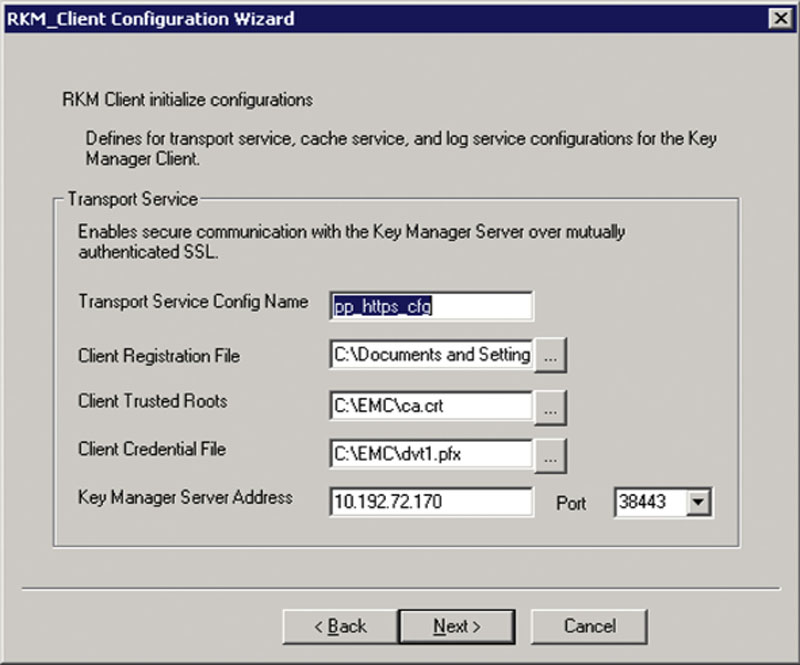
Figure 4.20 The first screen of the RSA configuration with EMC’s PowerPath.
To configure PowerPath open the RKM Client Configuration Wizard by clicking on Start > Programs > EMC > Configuration > RKM Client Configuration. This will bring up the wizard to configure PowerPath to talk to the RKM server. As part of the configuration you will need to supply the certificate and credential file to allow PowerPath to connect to the RKM Server. The Client Trusted Roots certificate and the Client Credential File will need to be exported from the RKM server by your systems administrator.
The next screen of the wizard will ask you for some information about the cache configuration for this server. The RSA client uses this cache to store keys locally after they have been downloaded from the RKM server. If you wish to enable logging of errors, warnings, and audit information to the system log, it is also configured on this page as shown in Figure 4.21.
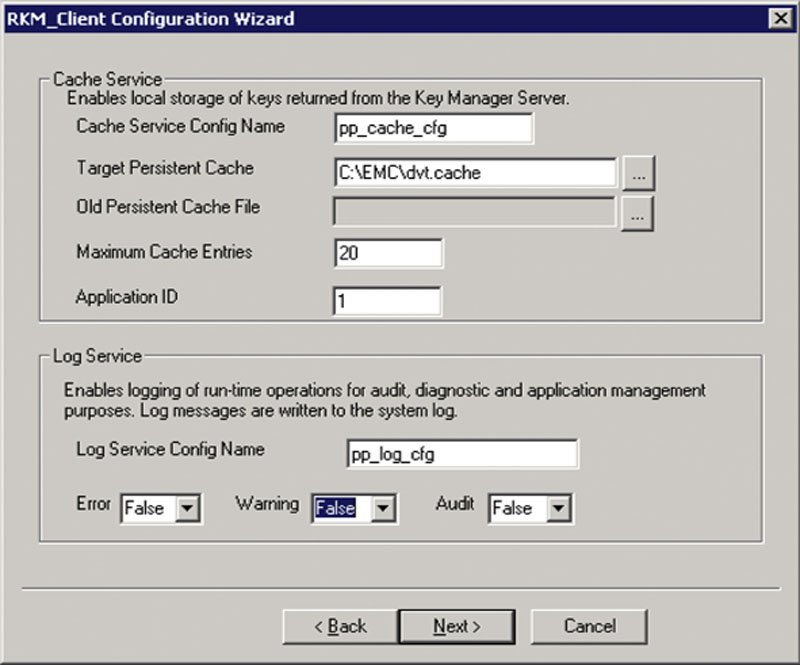
Figure 4.21 The cache and log configuration screen of the RKM setup for EMC’s PowerPath.
The third screen of this wizard is the Client Registration Configuration screen. On this screen the registration state, polling intervals, and other registration settings are set as shown in Figure 4.22.
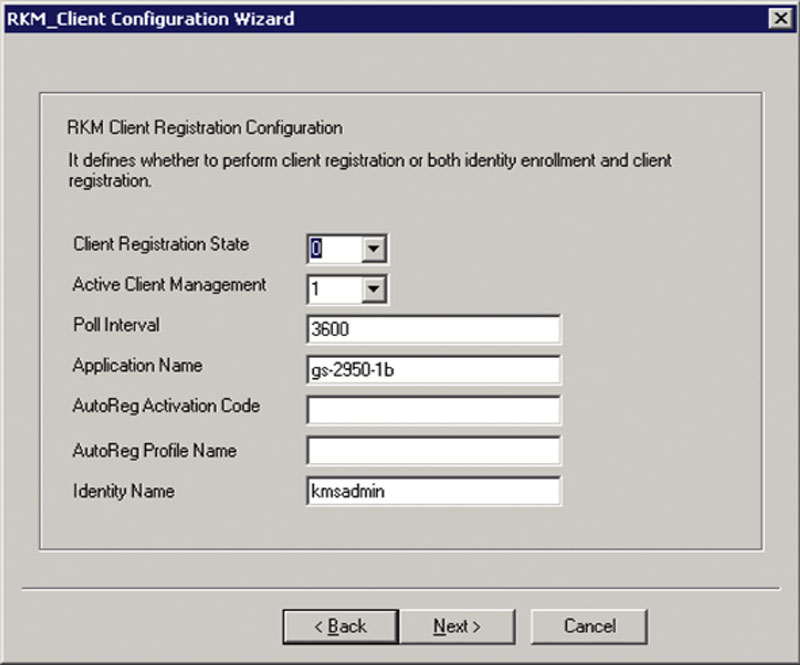
Figure 4.22 Screenshot showing the registration state, polling interval, and other registration settings.
The fourth screen identifies the services based on the names you previously entered. This section is there in case you configure the service manually via the configuration files, and simply need to select the predefined services from the list. This screen also asks for the RKM Client Key Class. This value should be assigned by your systems administrator and will match a key class created within the RKM. As you can see in Figure 4.23, because we defined all the settings for the services, those options are grayed out and cannot be changed. This is because we are configuring the software through the wizard instead of selecting predefined settings from the prebuilt configuration files. The Key Class name shown in Figure 4.23 must match the Key Class that already exists within the RKM.

Figure 4.23 Assigning the default key class which will be used to encrypt the LUNs.
The next screen initializes the lockbox and sets the passphrase for the lockbox. The lockbox is where the keys are stored locally on the server. The next screen requests the password that will be used for client credentials to the KMS. Once you have completed these last two password screens, the configuration is complete and you can click finish to close the wizard. At this point the PowerPath MPIO driver is ready to begin encrypting all data that is written to the volumes it manages and decrypting any encrypted blocks that it reads from the volume.
Before PowerPath will encrypt data, you need to tell PowerPath which volumes you want it to encrypt. This is done using the powervt command line utility. The syntax for this is very straightforward. Your pass is the xcrypt command telling powervt that you want to manage encryption. You then use the –on switch to tell powervt that you want to enable encryption on a LUN (Logical Unit Number). The –dev parameter tells powervt you want to specify a device, and then specify the device name as shown in the Example 4.10.
If you wish to view the status of a volume you also use the powervt command, this time switching the –on flag for the –info flag. This will return one of three return values. They are “encrypted,” “encrypted with HBA assist,” or “not encrypted.” Not encrypted means that you have not encrypted the volume using PowerPath. A volume showing encrypted or encrypted with HBA assist means that the volume is being encrypted by PowerPath. Volumes that are encrypted with HBA assist are offloading the work of the encryption to the HBA, which is discussed later in this chapter.
Encrypting Data via HBAs
One of the newest ways to set up your encryption is to do the encryption via your HBA itself. This provides an interesting option for your encryption and decryption of data because all write and read requests are processed by the HBA so all the data stored on your disks is stored in an encrypted state (much like when you encrypt data via your MPIO driver). However, the workload of the actual data encryption and decryption is offloaded from the CPU of the SQL Server to the processors on the actual HBAs using a technique called HBA Assist.
Like everything else there is a potential downside to this. If you end up pushing so much IO through the HBA, you might overload the processor on the HBA, which would then slow down your IO requests that are queued by the HBA. However, if that were to become the case, you could simply add more HBAs to the server, giving you more processors to process the encryption and decryption of the data.
Another potential downside that you may see if encrypting data within the HBAs is that you are locked into a specific vendor’s HBAs because, as of the spring of 2011, only one vendor can encrypt and decrypt data within the HBA, and that vendor is Emulex. Emulex currently supports only encryption and decryption of data when using the Emulex OneSecure adapters. This lock-in to a specific vendor maybe offputting to some companies, but if you have already standardized on Emulex HBAs then this may not be a turnoff for you. If you need to replace the HBAs to HBAs that do not support encryption, the workload will then be pushed from the HBA back to the CPU of the server.
The Emulex OneSecure adapter encryption works with the PowerPath RSA Encryption configuration, so PowerPath will need to be configured to support encryption. The PowerPath encryption engine then hands off the Encryption work to the processor on the HBA instead of the CPU of the server being used to handle the encryption and decryption.
Setting up the encryption of the Emulex HBAs is incredibly easy. Once the encryption is configured through PowerPath, the HBAs will automatically begin encrypting the data. There is no configuration that must be managed or set up on the HBAs to begin the process. As you switch to the OneSecure HBAs, the output from the powervt command line utility will change from “encrypted” to “encrypted using HBA assist,” which tells you that the HBAs are handling the encryption workload.
Summary
Data encryption can be done at many, many different points in the application depending on the goal that you are trying to meet. Some of these configurations are more complex to configure, such as encryption using the PowerPath MPIO driver, than others, such as the Transparent Data Encryption. There is no single answer to the question “How should I encrypt my database?” because each database is different. This is why it is so important that there are so many options as to how you can encrypt your database. Each option will load on some part of the database-driven application; it just depends on which part of your database-driven application you want to put the additional CPU load on. You can select from the client computer, the middle tier, the database server’s CPU, or the HBAs in the SQL Server as long as where you want to place the processor workload corresponds to the layer where you want to encrypt the data for the SQL Server database.
When using SQL Azure as your database instance, the encryption options are extremely limited as SQL Azure does not support most of the options described in this chapter. With SQL, Azure encryption can be handled within the application tier without issue. However, as of the spring of 2011, SQL Azure does not support any encryption within the SQL Azure database. SQL Azure does, however, support hashing using the same algorithms as the onsite SQL Server instances.