Chapter 5
SQL Password Security
Abstract
This chapter talks about the best practices for creating strong passwords, and ways to deploy your application and protect the potentially sensitive information within the connection string.
Keywords
encryption
hashing
HBA
MPIO
transparent data encryption
IP security
Information in this chapter
• Login types
• SQL server password security
• Strong passwords
• Password change policies
• Renaming the “SA” account
• Disabeling the “SA” account
• Users versus logins
• Contained database users in SQL server 2012 and beyond
• Schemas
• Encrypting client connection strings
• Application roles
• Using windows domain policies to enforce password length
• Contained users
Login Types
Any person or application which needs to get data from the SQL Server database engine needs to access the database engine via a login. SQL Server supports several different ways to authenticate against the database engine which include SQL Authentication logins, Windows Authentication Logins, Credentials, as well as Certificate Authentication options. Of these four options only SQL Authentication and Windows Authentication can be used by users and applications to gain access to the database engine. Credentials and Certificate Authentication are special purpose options which are explained in more details later in this chapter.
SQL Authentication Login
SQL Authentication Logins are logins which are defined within the SQL Server instance. With these logins the username and the password are both stored within the database engine. Logins within the database engine can be viewed by looking in the object explorer within SQL Server Management Studio or by querying the sys.server_principals system catalog view. No matter which method is used to view the login properties there is no way to view the password for the login. Passwords for SQL Server logins are stored as hashes which cannot be reverse engineered to get the original password. If the password for an account is lost and needs to be known the password for the account must be reset.
Creating logins is a very straightforward process when using either the object explorer within SQL Server Management Studio or when using T-SQL. When using the object explorer connect to the database instance and navigate to the instance, then the “Security” folder, then to the “Logins” folder. Right clicking on the “Logins” folder brings up the context menu which includes the “New Login” option. Selecting the “New Login” option from the context menu open the “New Login” dialog which allows you to create a new login as shown in Figure 5.1.
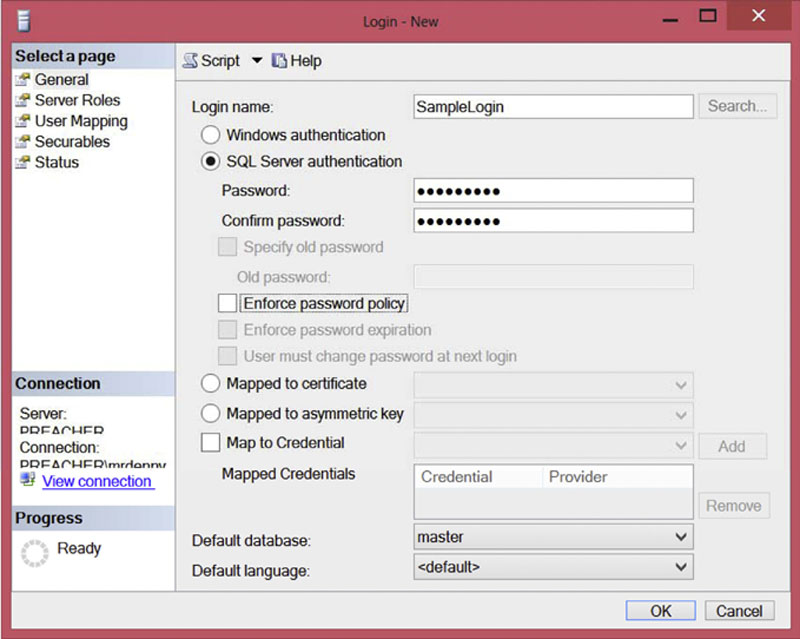
Figure 5.1 New login dialog from SQL Server Management Studio.
When creating a new Login the username goes into the “Login name” field. To create a SQL Server Authentication login change the radio button from the default of “Windows authentication” to “SQL Server authentication.” The password should be placed into both the “Password” and “Confirm password” fields ensuring that the two values match.
By default in SQL Server only Windows Authentication is available. More can be read about enabling SQL Authentication later in this chapter.
Depending on the domain policies which should be enforced for this new login check or uncheck the two domain policy checkboxes. If you wish to force the user to change the password the next time the login is used then the two domain policies need to be checked. More can be read about the domain policy checkboxes later in this chapter.
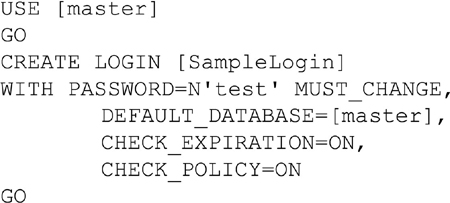
SQL Authentication Logins can be created either using the SQL Server Management Studio User Interface as shown in Figure 5.1 of using T-SQL by using the CREATE LOGIN syntax. The CREATE LOGIN syntax accepts several parameters which all correspond to the options available in the User Interface shown in Figure 5.1. The most important parameter which is accepted is the PASSWORD parameter which sets the password for the new login. The other available parameters which are available are shown in Table 5.1.
Table 5.1
Parameters Available When Creating a SQL Authentication Login
| Parameter | Description |
| PASSWORD | Password which is used when logging into the SQL Server instance. |
| MUST_CHANGE | Specifies that the SQL Server will require that the password be changed the next time the login is used to log into the SQL Server instance. |
| DEFAULT_DATABASE | The default database parameter specifies which database the user should be connected to when logging into the SQL Server instance unless a database if specified within the applications connection string. |
| CHECK_EXPIRATION | Configures the password expiration checking for the login using domain password expiration policies. |
| CHECK_POLICY | Tells the SQL Server to check the domain’s password policy when changing or setting the password. |
| DEFAULT_LANGUAGE | Specifies the language setting which the login should use when connecting to the SQL Server Instance. |
Putting these parameters together is rather straightforward as shown in Example 5.1
Example 5.1
Creating a SQL Authentication Login via T-SQL.
Windows Authentication Login
Windows Authentication Logins are SQL Accounts which are tied directly to a Windows account. The Windows account which the Windows Authentication Login is tied to can be either a domain account created within Active Directory, a domain group created within Active Directory, a local account created within the local Windows server, or a local group created within the local Windows server’s operating system.
Creating a Windows login follows the same basic process as creating a SQL server Authentication login shown in the prior section of this chapter. When using the object explorer connect to the database instance and navigate to the instance, then the “Security” folder, then to the “Logins” folder. Right clicking on the “Logins” folder brings up the context menu which includes the “New Login” option. Selecting the “New Login” option from the context menu open the “New Login” dialog which allows you to create a new login as shown in Figure 5.1. When creating a new Login the username goes into the “Login name” field. To create a Windows authentication login leave the radio button as the default of “Windows authentication.” The username should be entered using one of the two valid domain formats for usernames as either BACON\dcherry or dcherry@bacon.lab where BACON is the older Windows NT style of the domain name and bacon.lab is the DNS name for the domain and in either example “dcherry” is the username of the user. Either format is perfectly acceptable and neither works better than the other.
Like SQL authentication accounts, Windows authentication accounts can be created via SQL Server Management Studio’s User Interface as shown in Figure 5.1 or T-SQL using the CREATE LOGIN statement. Only two parameters are used when creating Windows Authentication Logins which are the DEFUALT_DATABASE and DEFAULT_LANGUAGE parameters which are shown in Table 5.1. In the example shown in Example 5.2.
Example 5.2
CREATE LOGIN statement which shows creating a Windows authentication login

Domain Accounts
Domain accounts are accounts which are created within the Active Directory infrastructure. These accounts can be created within the Active Directory domain which the SQL Server belongs to, or in any Active Directory domain (or LDAP region) which is trusted by the Active Directory domain which the SQL Server belongs to. More can be read about domain trusts in Chapter 6 in the side bar named “Domain Trusts.”
Typically access is granted to SQL Servers via domain groups. This is done for a couple of different reasons. The first is to make granting access easier as access is granted to specific users by simply adding them into the domain group which grants them the access which they need. This makes it very easy for basic SQL Server access to be able to be managed by Help Desk teams or even self-service management applications which some companies use for granting access to resources which will assist with the separation of duties requirements which many companies have. The second reason for using domain groups is to keep the number of logins within the SQL Server to the minimum, which can sometimes be an audit finding for compliance auditors. This makes it much easier to audit the permissions within the SQL Server as they are typically very static at this point with only group membership changing as needed.
When creating Windows Authentication Logins an understanding of how domain groups works to ensure that users are able to access the SQL Server after. There are three different kinds of Windows domain groups which users can be a member of. These are:
• Domain Local
• Domain Global
• Universal
Each of these domain groups serves a different purpose within the domain infrastructure. For companies, which have a single Active Directory domain the majority of the domain groups will be Domain Local groups as this is the default.
When working in an environment which has multiple active directory domains using domain groups, becomes much more complex when users from one domain need access to resources within another active directory domain. This complexity comes from the fact that Domain Local groups can only contain users from within the same Active Directory domain that the domain group sits in. So if we had an Active Directory domain called BACON and that Active Directory domain had a domain group called BACON\DBAs which has a Domain Local group, that group could only contain resources (users, groups, computers, etc.) from within the BACON domain.
If our company which has the Active Directory domain called BACON purchased another company which had an Active Directory domain called STEAK and we wanted the DBAs from the STEAK domain to be able to be in the BACON\DBAs domain group we would not be able to add them, because the Domain Local domain group does not allow resources from another domain. In order to have a domain group with both the BACON and STEAK DBAs in a single group we would need to have a Global Group. The problem with the Global Group is that you cannot use Active Directory global groups to grant a user from another domain access to a SQL Server.
Understanding why this does not work requires understanding more about how Active Directory and SQL Authentication work. (The Windows Authentication process is fully documented later in this chapter in the section titled “SQL Server Password Security,” you may want to review that section before continuing with this section.) A process within the domain controller called the KDC generates the Kerberos token when the user logs in to the domain. When this token is created is includes only the Domain Local and Universal domain groups.
This is because the Domain Global groups which the account belong in may be in other domains and it would be very expensive and time consuming to attempt to access all the other domains to see which Domain Global groups a user is a member of especially when accounting for the fact that there may be connectivity issues to the remote domain. Because of all the potential problems which getting the local of Domain Global groups Microsoft simply choose not to include the Domain Global groups in the Kerberos token. Because of this when a user logs in to the SQL Server if they are attempting to gain access via a Domain Global group the SQL Server will reject the connection request as the Domain Global groups are not in the token. SQL Server does not go out to the domain controllers to get a list of Domain Global groups for the same reason that the KDC service on the domain controller does not, it would be a very time consuming process with potentially slow network links, domain controllers which might be offline, etc. Because of this we are limited to only using Domain Local and Universal groups as they are listed within the users Kerberos token.
So the question becomes how to be get the users from the STEAK domain access to our BACON SQL Servers. Within the STEAK domain a Domain Local group should be created, in this case called STEAK\DBAs. The DBAs within the STEAK domain are then put into this domain group and this domain group is then added to the SQL Servers. This works because when the user from the STEAK domain attempts to connect to the BACON SQL Server the Kerberos token which was created when the user logged in contains the information for the STEAK\DBAs group, so when the token is handed to the BACON SQL Server the SQL Server verifies that the token is valid with the domain controller then matches the fact that the domain group STEAK\DBAs is listed as a Login within SQL Server and access is granted.
Local Accounts
Local Windows accounts, which can be users or groups are a way to use Windows groups to grant access, but leave it within the control of the DBA without the DBA needing to have any enhanced permissions to Active Directory or any additional software installed on their workstations. The local Windows group is created within the operating system of the Windows server and domain or local Windows users are then placed within the local Windows group.
This works even though the local groups are not included in the Kerberos ticket because the SQL Server is able to ask its own operating system for a list of local groups that a user belongs to. The Windows operating system will respond very quickly to this request as everything is happening within the local server.
While local groups can be used, domain groups are a preferred solution. This is due to the fact that if the server fails the local group is lost when the server is rebuild. By using domain groups if the server fails the domain group membership is retained as the group membership lives in Active Directory and not on the SQL server’s operating system.
Certificate Authentication
Certificate Authentication in SQL Server is not quite as cool as it sounds unfortunately. There is no way from within SQL Server to issue a certificate and have the user use that certificate to authenticate against the SQL Server. The only way for a user to use a certificate to authenticate against the SQL Server is to use certificates to verify the user which is logging in is actually the correct user, typically by using a proxy card which is inserted into a card reader connected to the users workstation is by configuring Active Directory to support this sort of authentication and verification. This configuration is beyond the scope of this book, but is becoming more common in large organizations as it provides an additional layer of protection. When logging into the domain using a certificate the user is still granted access to the SQL Server via the Windows user account as shown in the prior section of this chapter.
Within SQL Server itself logins can be created which are tied to a specific certificate (you can see the certificate radio button in Figure 5.1). When this option is selected the login is not a SQL or Windows login so it cannot be used to log into the SQL Server. This type of login is mainly used to sign stored procedures and functions so that other users within the database can be granted rights to the stored procedures. More can be read about signing stored procedures and functions in Chapter 15.
To create a certificate login first create a certificate within the master database using the CREATE CERTIFICATE statement as shown in Example 5.3.
Example 5.3
Example CREATE CERTIFICATE statement

After the certificate is created you can create the login. When using the object explorer connect to the database instance and navigate to the instance, then the “Security” folder, then to the “Logins” folder. Right clicking on the “Logins” folder brings up the context menu which includes the “New Login” option. Selecting the “New Login” option from the context menu open the “New Login” dialog which allows you to create a new login as shown in Figure 5.1. When creating a new Login the username goes into the “Login name” field. Select the radio button toward the middle of the window which says “Mapped to certificate” and select the correct certificate to use for this login as shown in Figure 5.2.
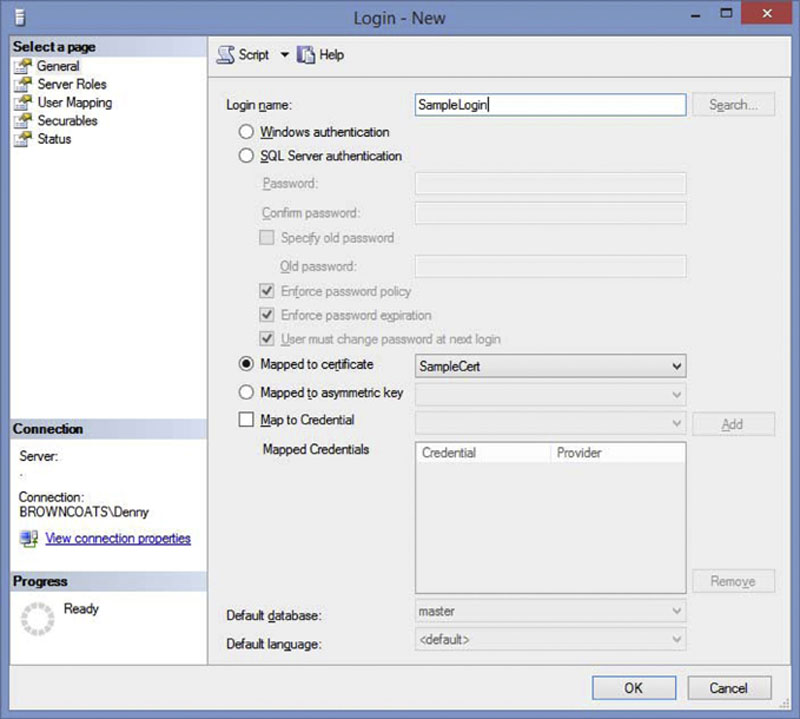
Figure 5.2 Creating a new login mapped to a certificate.
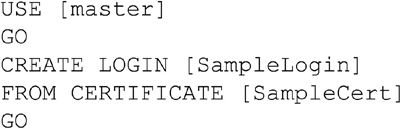
Logins which are mapped to certificates can be created using T-SQL as well as well as using the SQL Server Management Studio User Interface shown in Figure 5.2. Like the SQL authentication logins and Windows authentication logins the CREATE LOGIN statement is used to create Certificate mapped logins. The CREATE LOGIN statement does not accept any parameters when creating Certificate mapped logins as shown in Example 5.4 beyond the name of the certificate which the login is being mapped to.
Example 5.4
CREATE Login example creating a Certificate mapped login.
Asymmetric Key Login
Logins can be created and mapped to Asymmetric Keys must like they can be mapped to certificates. Like the logins which are mapped to certificates, logins which are mapped to asymmetric keys cannot be used to connect to the SQL Server Instance and are instead used to sign stored procedures and functions.
When using the SQL Server Management Studio to create a login which is mapped to an asymmetric key being using the object explorer connect to the database instance and navigate to the instance, then the “Security” folder, then to the “Logins” folder. Right clicking on the “Logins” folder brings up the context menu which includes the “New Login” option. Selecting the “New Login” option from the context menu open the “New Login” dialog which allows you to create a new login as shown in Figure 5.1. When creating a new Login the username goes into the “Login name” field. Select the radio button towards the middle of the window which says “Mapped to asymmetric key” and select the correct certificate to use for this login as shown in Figure 5.1.
Like the other kinds of logins shown in this chapter logins which are mapped to an asymmetric key can be created via T-SQL as well. There are no parameters which are accepted beyond the name of the asymmetric key as shown in Example 5.5.
Example 5.5
CREATE LOGIN command creating a login which is mapped to an asymmetric key.

Credentials
Credentials are a different kind of SQL Server object from a login, though credentials are mapped to a domain or local Windows user. With Windows Authentication logins we give the SQL Server the name of the user or group and the login is used to allow the user access to the SQL Server Instance. Credentials while also being bound to a Windows login are not used to grant access to the SQL Server Instance. Instead they are used to allow SQL Server Agent job steps to run under specific domain or local Windows logins (via proxies which are discussed later in this section of this chapter).
Creating a new credential can be done via the SQL Server Management Studio’s User Interface or via T-SQL. To use SQL Server Management Studio’s User Interface connect to the server in the object explorer. Navigate down the tree to the Security folder then the credentials folder. Right click on the credentials folder and select “New Credential” on the context menu.
In the New Credential window there are 5 fields which can be filled out as shown in Figure 5.3. The first is the name of the credential which can be anything as long as it is a unique name within the instance. For simplicity it is recommended to name the credential the name as the Windows account which it is mapped to. In the Identity field the domain and username of the windows account should be specified. The next two fields are where the password for the domain account is put. The two passwords much match in order to create the credential. If you are using a hardware encryption provider which is configured within SQL Server you can check the “Use Encryption Provider” checkbox and select the provider from the dropdown menu (the checkbox is unchecked and the dropdown menu are grayed out in Figure 5.3).
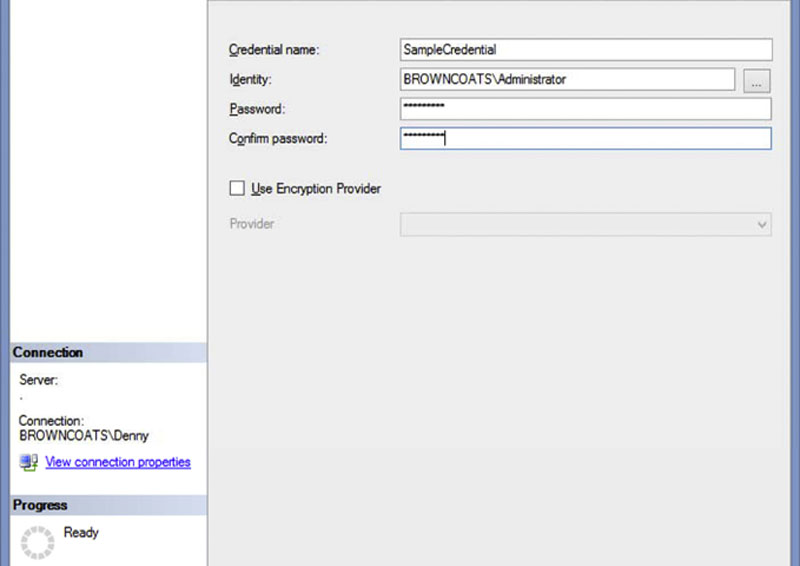
Figure 5.3 New credential window.
Credentials can be created via T-SQL as well as via SQL Server Management Studio by using the CREATE CREDENTIAL command as shown in Example 5.6.
Example 5.6
Sample CREATE CREDENTIAL command to create a new credential.

In SQL Server 2014 Credentials are used to create a connection between the SQL Server Instance and the Microsoft Azure Blob Storage which allows on premise or SQL Server instances running within an Microsoft Azure Virtual Machine to backup to the Microsoft Azure Blog Storage. Creating a credential to the Microsoft Azure Blob Storage requires going to the Microsoft Azure Management Portal and getting your Azure storage name and Azure storage secret key. To create the credential place the Azure Storage Name in the Credential’s username as shown in Figure 5.3 and Example 5.6 and the Azure Storage Secret Key in the Credential’s password field shown in Figure 5.3 and Example 5.6. When connections are made between the SQL Server instance and the Microsoft Azure Blob Storage the credential’s Azure Storage Name and the Azure Storage Secret Key are used to connect to the Microsoft Azure Blob Storage API.
SQL Server Password Security
One of the key ways to protect your SQL Server is to use strong, secure passwords for your SQL Server login accounts. One of the biggest security holes in the SQL Server 2000 and older versions of Microsoft SQL Server was that the server installed with a blank system administrator (SA) password by default and would allow you to use a blank password, thereby permitting anyone to connect without much work at all.
Even with newer versions of Microsoft SQL Server, the SA account is still a potential weakness, as is any SQL Server Authentication based login. This is because SQL Accounts can be easily broken into by brute force password attacks. When using Microsoft Azure SQL SQL Database there is no SA account available to you the Microsoft customer work with. The SA account is reserved for the exclusive use of Microsoft.
When using Microsoft Azure SQL Database as your database instance, only SQL Authentication is available. As of the writing of this book in the Summer of 2014 Microsoft Azure SQL Database does not support Windows Authentication for use by Microsoft’s customers as the Microsoft Azure SQL Database database server does not support being added to a company domain. The Azure database servers do support Windows Authentication buy only for use by the Azure administration team within Microsoft.
SQL Authentication Logins are more susceptible to these login attacks than a Windows Authentication login because of the way that these logins are processed. With a SQL Authentication login, each connection to the SQL database passes the actual username and password from the client computer to the SQL Server Engine. Because of this, an attacker can simply sit there passing usernames and passwords to the server until a connection is successfully made.
One of the big problems with modern password policies and the passwords which are generated from them is that the passwords which are generated become very easy for computers to figure out and they are very hard for people to remember. For example if you require that your users use a password which has at least 8 characters with a number, character and upper- and lower-case characters the password will probably end up looking something like “P@ssw0rd” which fits the password policy but would not take a password cracking application long to figure out. However, if you teach your user to use a passphrase instead of a password, the users would be able to easily remember it and it would take months or years to guess the passphrase. A good passphrase to use would be something along the lines of “I like to have 4 really strong passwords!.” This passphrase is very easy for the user to remember, would not take much longer to type in every day and will take forever to figure out with the password cracker. Even if the user never changes the password (personally I really hate password expiration policies) the password will easily stay secure for a very long time. Much longer than a password cracker application will be left running for.
With a Windows Authentication Login the process is much, much different from the SQL Authentication process. When the client requests a login using Windows Authentication, several components within the Windows Active Directory network are needed to complete the request. This includes the Kerberos Key Distribution Center (KDC) for when Kerberos is used for authentication, and the Windows Active Directory Domain Controller for when NTLM (NT LAN Manager) authentication is used. The Kerberos KDC runs on each domain controller within an Active Directory domain that has the Active Directory Domain Services (AD DS) role installed.
The process that occurs when a Windows Authentication connection is established is fairly straightforward once you know the components that are involved. When the client requests a connection, the SQL Server Native Client contacts the KDC and requests a Kerberos ticket for the Service Principal Name (SPN) of the Database Engine. If the request to the KDC fails, the SQL Server Native Client will then try the request for a ticket again using NTLM Authentication. This ticket will contain the Security Identifier (SID) of the Windows domain account, as well as the SIDs of the Windows groups that the domain account is a member of.
Once the SQL Server Native Client has received the ticket from the KDC, the ticket is passed to the SQL Server service. The SQL Server then verifies the ticket back against the Kerberos or NTLM server service on the domain controller to verify that the SID exists and is active, and was generated by the requesting computer. Once the Windows ID is confirmed against the domain, the SIDs for the local server groups that the user is a member of are added to the Kerberos ticket and the process within the SQL Server is started. If any of these checks fail, then the connection is rejected. The first thing that the SQL Server will verify is if there is a Windows Authenticated login that matches the user. If there is no specific Windows login, the SQL Server then checks to see if there is a Windows Domain Group or Windows Local Group to which the user belongs. The next check is to see if the login or domain group that has the login as a member is enabled and has been granted the right to connect. The next check is to ensure that the login or domain group has the right to connect to the specific endpoint. At this point the Windows Login has successfully connected to the SQL Server Instance. The next step in the process is to assign the Login ID of the Windows Login as well as any authorized domain groups. These login IDs are put together within an internal array within the SQL Server engine to be used by the last step of the authentication process as well as various processes as the user interacts with the objects within the SQL Server databases. The last step of the connection process takes the database name that was included within the connection string (or the login default database if no connection string database is specified) and checks if any of the login IDs contained with the internal array that was just created exist within the database as a user. If one of the login IDs exists within the database, then the login to the SQL Server is complete. If none of the login IDs exist within the database and the database has the guest user enabled, then the user will be connected with the permission of the guest user. If none of the login IDs exist within the database and the guest login is not enabled, then the connection is rejected with a default database specific error message.
Extended Protection
Extended Protection is a feature of the Windows operating system that was introduced with the release of Windows 2008 R2 and Windows 7. This new feature provides an additional level of pre-authentication protection for client-to-server communications when both the client and server software support it. As of the writing of this book, the only versions of the Microsoft SQL Server product that supports this new feature is Microsoft SQL Server 2008 R2 and higher. Patches are available from the website http://www.microsoft.com/technet/security/advisory/973811.mspx for the older Operating Systems. This new feature enhances the protection that already exists when authenticating domain credentials using Integrated Windows Authentication (IWA).
When Extended Protection is enabled, the authentication requests are both to the Service Principal Name (SPN) of the server which the client application is connecting to, as well as to the outer Transport Layer Security (TLS) channel within which the IWA takes place. Extended Protection is not a global configuration; each application that wishes to use Extended Protection must be updated to enable the use of Extended Protection.
If you are using Windows 7 and Windows Server 2008 R2 or later for both the client and server and if the SQL Server 2008 R2 Native Client or later are being used to connect to an SQL Server 2008 R2 SQL Server or later instance, and Extended Protection is enabled, then Extended Protection must also be negotiated before the Windows process can be completed. Extended Protection uses two techniques – service binding and channel binding – in order to help prevent against an authentication relay attack.
Service Binding is used to protect against luring attacks by requiring that as part of the connection process, the client sends a signed Service Principal Name (SPN) of the SQL Server service to which the client is attempting to connect. As part of the response, the server then validates that the SPN that was submitted by the client matches the one that the server actually connected to. If the SPNs do not match, then the connection attempt is refused.
The service binding protection works against the luring attack as the luring attack works by having another service or application (such as Outlook, Windows Explorer, a .NET application, etc) connect to a separate valid compromised connection (such as a file server or Microsoft Exchange server). The attacking code then takes the captured signed SPN and attempts to pass it to the SQL server to authenticate. Because the SPNs do not match and the signed SPN is for another service, the connection to the SQL Server from the compromised server is rejected. Service binding requires a negligible one-time cost as the SPN signing happens only once when the connection is being made.
The channel binding protection works by creating a secure channel between the client and the SQL Server Instance. This is done by encrypting the connection using Transport Layer Security (TLS) encryption for all of the traffic within the session. The protection comes by the SQL Server Service verifying the authenticity of the client by comparing the client’s channel binding token (CBT) with the CBT of the SQL Service. This channel binding protects the client from falling prey to both the luring and the spoofing attacks. However, the cost of this protection is much higher because of the TLS encryption, which must be maintained over the lifetime of the connection.
To enable Extended Protection, you first need to decide whether you wish to use service binding protection or channel binding protection. In order to use channel binding, you must force encryption for all SQL Server connections (more information about enabling SQL Server encryption can be found in Chapter 2). With SQL Server encryption disabled, only service binding protection is possible.
Extended Protection is enabled from within the SQL Server Configuration Manager for all editions of the Microsoft SQL Server 2008 R2 and higher database engine provided that you are also using Windows Server 2008 or newer. Within the SQL Server Configuration Manager select “SQL Server Services” from the left-hand pane and double click on the SQL Server Service you wish to enable Extended Protection for on the right, selecting the Advanced tab from the window that pops up. The Extended Protection option has three values from which you can select. The setting of “Off” will disable Extended Protection and will allow any connection whether or not the client supports Extended Protection. The setting of “Allowed” forces Extended Protection from Operating Systems which supported Extended Protection, while allowing Operating Systems, which do not support Extended Protection to connect without error. The setting of “Required” will tell the SQL Server to accept from client computers only those connections that have an Operating System that supports Extended Protection.
If your SQL Server has multiple Service Principal Names (SPNs) requested within the Windows domain, you will need to configure the Accepted NTLM SPNs setting. This setting supports up to 2048 characters and accepts a semicolon-separated list of the SPNs that the SQL Server will need to accept. As an example, if the SQL Server needed to accept the SPNs MSSQLSvc/ server1.yourcompany.local and MSSQLSvc/ server2.yourcompany.local, then you would specify a value of “MSSQLSvc/server1.yourcompany.local;MSSQLSvc/server2.yourcompany.local” in the Accepted NTLM SPNs setting as shown in Figure 5.4. After changing any of the Extended Protection properties, you will need to restart the SQL Server Instance for the settings change to take effect.
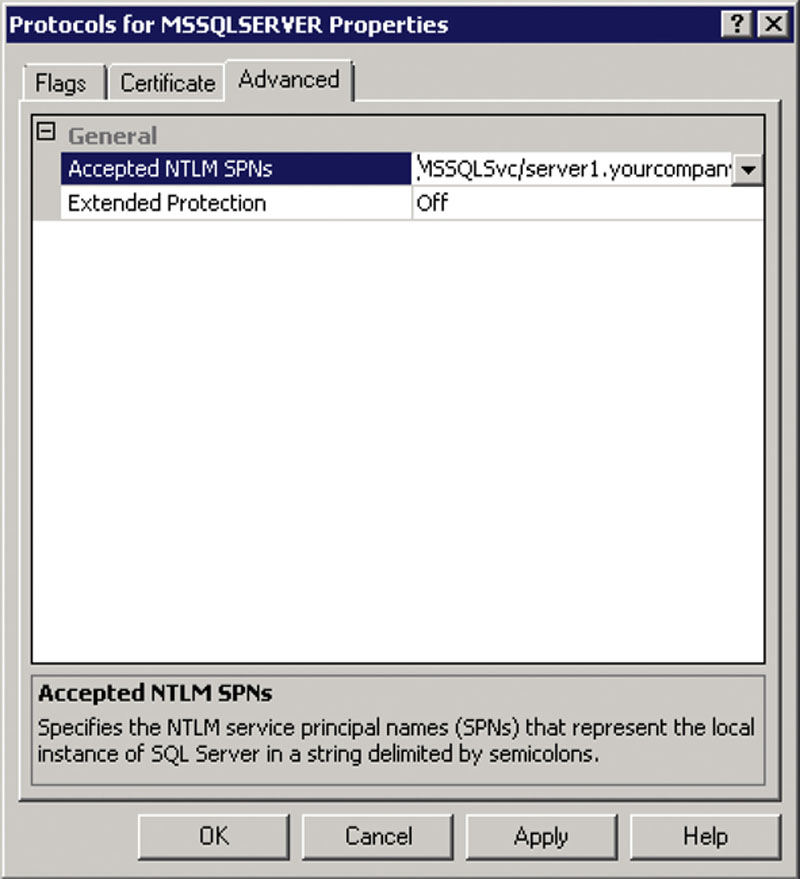
Figure 5.4 Configuring the Accepted NTLM SPNs setting in Microsoft SQL Server 2008 R2 or higher.
As Windows Azure SQL Database servers are installed on Microsoft’s domain and not the company’s server, Extended Protection is not available when using Windows Azure SQL Database as of the writing of this book.
Service Principal Names
Service Principal Names (SPNs) are unique service names within a Windows domain that uniquely identify an instance of a service regardless of the system that the service is running on, or how many services are running on a single machine. While a single SPN can only reference a single instance of a service, a single instance of a service can have multiple SPNs registered to it. The most common reason for multiple SPNs for a service would be that a service needs to be accessed under multiple server names.
Before an SPN can be used by Kerberos authentication, it must be registered within the Active Directory. The SPN when created is registered to a specific account within the domain. The account to which the SPN is registered must be the one under which the Windows service will be running. Because an SPN can only be registered to a single service, this means that an SPN can only be registered to a single Windows account. If the account will be running Windows service changes, then the SPN must be removed from the original account and assigned to the new account. When the client software attempts to connect using Kerberos authentication, the client locates the instance of the service and creates the SPN for that service. The client software then connects to the remote service and presents the created SPN for the service to authenticate. If the authentication fails, the client disconnects returning an error message to the end user.
The client computer is able to create an SPN for the remote service very easily as the format for an SPN is very simple. The format for an SPN is <service class>/<host>:<port>/<service name>. The <service class> and <host> values are required while the <port> and <service name> values are optional. In the case of Microsoft SQL Server the <service class> value will be MSSQLSvc, while the <host> value will be the name that the client computers will use to connect to the SQL Server. As an example, for an SQL Server instance listening on the default TCP port 1433 on a server named DB1.contoso.local and a Windows account named CONTOSO\sqlserver would look like “MSSQLSvc/DB1.contoso.local:1433/CONTOSO\sqlserver.” SPNs are created automatically when the SQL Service starts up, but only for the default name under which the service will be running. Typically this would be the name of the SQL Server. Other SPNs can be manually registered as needed by a member of the “Domain Administrators” group by using the setspn command line application with the -A switch followed by the SPN that should be created. If the DB1.contoso.local server needed to also support the name mydatabase.contoso.local, then the command as shown in Example 5.7 would be used.
Example 5.7
Creating an SPN for mydatabase.contoso.local.

Once the SPN has been created and the SPN has replicated to all the domain controllers, the clients will be able to successfully authenticate against the new SPN. This replication can take anywhere from a few seconds to several hours, depending on how the domain replication is configured and the speed of the network links between sites.
SPNs do not need to be used with Microsoft Azure SQL Database instances as you must use SQL Authentication with Microsoft Azure SQL Database, and SPNs are used when using Windows Authentication with Kerberos.
Strong Passwords
Today there is no excuse for having an insecure password for your login to the SQL Server. Most websites to which you connect, such as your bank and credit card websites, all require that you use a strong password of some sort. It is shocking the number of companies that do not take these same techniques to heart for their internal security.
A strong password is typically defined as a password that contains at least three of the following four categories and is at least eight characters in length, although some companies may require longer passwords.
1. Lower-case letters
2. Upper-case letters
3. Numbers
4. Special characters
Now when it comes to passwords for accounts like the SA account, which are rarely if ever actually used by people, there is no reason to stop limit yourself to just eight characters or the normal set of characters on your keyboard. The longer the password and the more special characters that you use in your password, the less chance that someone will be able to break into your SQL Server using this account. This same use of strong passwords should be used for any SQL Login that you create so as to better secure these SQL Logins against brute force attacks.
One thing that you can do to really secure your SA account is to use some high ASCII (American Standard Code for Information Interchange) characters within the password. This will basically make the account unbreakable to most of the people who use automated scripts to attack the SA password as all of them pretty much use the standard characters from the Latin alphabet. Inserting a character like a smiley face, which can be created by pressing <ALT>257 on your keyboard, will be outside the range of characters that are used by the password cracking program. By using this character, suddenly the word “Password” becomes a much more secure password as shown in Figure 5.5.

Figure 5.5 The word password with a smiley face in place of the letter “a.”
With a little creativity you could in fact turn the word “Password” into a truly strong and secure password. As shown in Figure 5.6, we have taken it to the extreme, replacing the letter S with the Hebrew Lamad, the letter O with a smiley face, and the letter D with a Dong Sign.

Figure 5.6 The word password with the letters S, O and D replaced with high ASCII characters.
You can get more ideas on ways to replace characters with high ASCII characters from the character map that can be found within Windows. You can find the character map by clicking Start>Programs>Accessories>System Tools>Character Map. After the application loads, simply scroll down on the list of available characters until you find ones that you wish to use.
Now there is a catch with using these high ASCII characters for your SA password: If you ever need to log into the SQL Server using the SA account, you will either need to use the character map to get the characters, or you will need to know the <ALT> codes to access these characters.
The SA account needs to be the most secured account on your SQL Server for a few reasons, the most important of which is that the SA account has rights to everything and you cannot revoke its rights to do anything that it wants. On SQL Server 2005 and below the SA account has a known username since you are not able to change the username from SA to something else. Because of this, someone who is trying to break into your SQL Server does not need to guess the username; he or she only needs to guess the password that reduces the amount of work needed to break into the SQL Server by half. Starting in SQL Server 2008 you can change the name of the sa account to another name to make using the sa account by someone who is not authorized much harder as they would need to figure out the new name for the sa account.
The most secure way to secure your sa account is to not enable SQL Authentication, which requires that all connections to the SQL Server come from a trusted computer that is authenticated against your Windows domain. Disabling SQL Authentication is a very easy change for you to make on your SQL Server. However, before you disable the SQL Authentication on an SQL Instance that is already in production, you will need to ensure that there are no applications logging into the SQL Server using SQL Authentication. Once this is done you can disable the SQL Authentication. Whenever possible, new SQL Server installations should be configured to use Windows Authentication only. SQL Authentication can be disabled by connecting the object explorer in SQL Server Management Studio to the instance in question, then right clicking on the Server and selecting properties. Select the Security tab on the right. In the Server Authentication section, select the Windows Authentication radio button as shown in Figure 5.7 and click OK. If you are using Enterprise Manager to configure SQL Server 7 or SQL Server 2000, the properties screen will look similar.
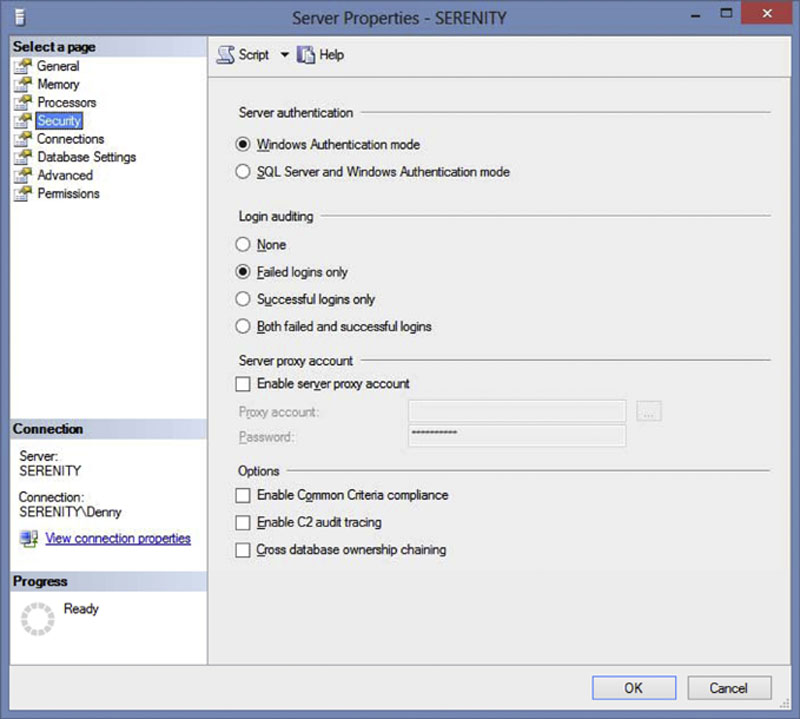
Figure 5.7 The security properties page of the server properties with Windows only authentication enabled.
Now there is T-SQL code available to change this setting. However, the change is not a simple change via the sp_configure settings like most server wide settings. You have to update the registry using the xp_instance_regwrite system stored procedure from within the master database. The T-SQL code needed Figure 5.8. As with all changes made to the registry (either directly or via this T-SQL script), incorrect values or changes will cause the SQL Server to behave incorrectly or to not start at all.
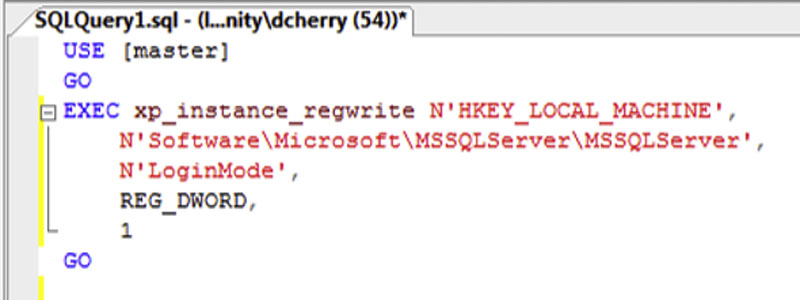
Figure 5.8 The T-SQL Script to enable Windows Only Authentication.
If you find that you need to allow both SQL Server Authentication and Windows Authentication, then using T-SQL use the same code as shown in Figure 5.8, replacing the last parameters value of 1 with a value of 2.
When making changes to the Server Authentication mode, either with the UI (User Interface) or via T-SQL, you will need to restart the SQL Instance. This is because the setting is a registry setting that is only read on the start of the instance and is not refreshed by the instance while the instance is running.
When doing the initial install of the SQL Server 2005 or newer instance, if you select Windows Authentication only the SQL Server will automatically disable the sa account for you. It does this because you are not prompted for a password for the SA account during the installation wizard when installing using Windows only authentication. Thus, if you were to later change from Windows Authentication to SQL Server Authentication, you would have the SA account enabled with no password allowing the SQL Server to be easily broken into.
Password Change Policies
After installing the SQL Server engine on the server, you will probably begin creating SQL Server accounts. Using SQL Server 2005 or newer, creating accounts that use SQL Server Authentication will give you a few checkboxes, shown in Figure 5.9, which you need to understand so that you know how these options work. If you are in a Windows NT 4 domain, then these options will not be available to you and they will be grayed out as Windows NT 4 domain’s password policies are not used by Microsoft SQL Server. If you are using Windows Azure SQL Database these options will also not be available as Windows Azure SQL Database does not enforce domain policies. If you are using SQL Server within a Windows Azure Virtual Machine then the options will be available if the Virtual Machine is a member of your Active Directory domain.
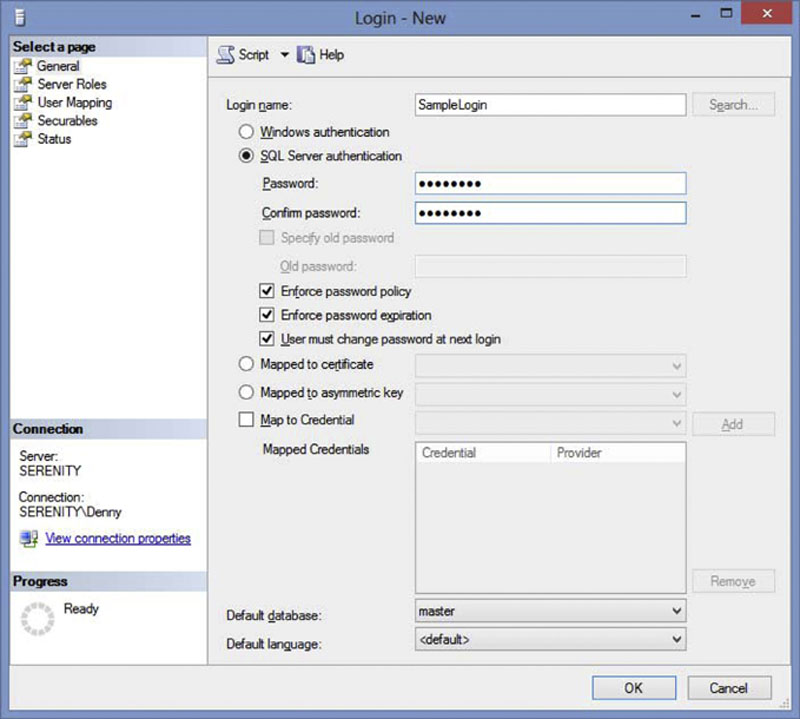
Figure 5.9 The policy option checkboxes for a SQL Authentication account created on SQL Server 2005 or higher.
The first checkbox, “Enforce password policy,” tells the SQL Server that the password must fit within the password requirements of the Windows domain, or the local security policy defined on the server (if the server is not in a Windows domain). The password policies that are being enforced by the first checkbox are the “Enforce password history,” “Minimum password length,” and “Password must meet complexity requirements” policy settings.
The password policies cannot be checked after the login has been created. The password policies are only evaluated when a new login is created or when the password for an existing login has been changed. The system function PWDCOMPARE can be used to check accounts for known or blank passwords easily enough as shown in Example 5.8. The system function accepts three parameters, two of which are the most important and the third of which only needs to be used against a password hash from a SQL Server 2000 system.
Example 5.8
Querying the SQL Server instance for all logins which have a blank password.

The first parameter is the known password that is being checked in plain text, while the second is the password hash. Either a table, such as the sys.sql_logins catalog view, can be queried or a specific hash can be passed in. The third parameter accepts only a zero or a one with a default of 0. When a one is specified this indicates that you will be passing in a password hash which was generated by a SQL Server 2000 or older instance, when you are running the PWDCOMPARE statement on a SQL Server 2005 or newer instance.
The second checkbox, “Enforce password expiration,” tells the SQL Server that this account must change its password based on the “Minimum password age” and “Maximum password age” settings that come from the domain or the local security policy.
The third checkbox shown in Figure 5.10 is the “User must change password at next login” option. In Figure 5.10 the option is disabled because the “Enforce password expiration” option is not selected. If the “Enforce password expiration” option were checked, then the “User must change password at next login” option would be available. By checking this option and clicking OK the next time the user attempts to log into the database engine, the user will need to change their password.
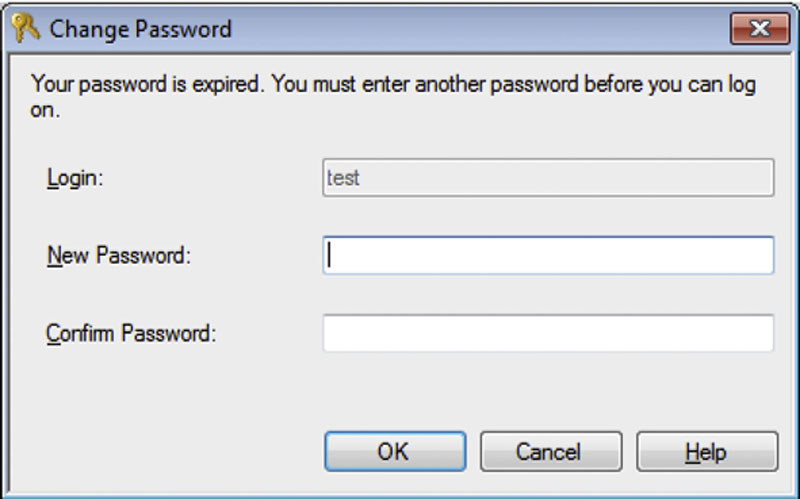
Figure 5.10 The Change Password dialog shown in SQL Server Management Studio.
The advantage of having and using these policies is that all the SQL Authentication accounts that are configured to follow the policies meet the password policies that have been defined on the domain.
Renaming the SA Account
Starting with SQL Server 2008, you have the ability to rename the SA account to another username to make the account more difficult for an attacker to use. This is an important security step to take, especially if the SQL Server is available on the public Internet. To rename the SA account use the ALTER LOGIN command as shown in Example 5.9. Microsoft SQL Server 2000 and older will not have the ability to rename the SA account. After you rename the SA account, the SQL Server Agent will need to be restarted so that any jobs that were configured to run under the SA account will pick up the account name change.
Example 5.9
T-SQL showing the renaming of the SA account.

By renaming the SA account to another non-standard name, we greatly reduce the attack surface of the SQL Server Instance. The attack surface is reduced as we have now taken away the attacker’s knowledge of the name of the account to login with. An attacker would now need to discover not only the password, but also the username for the account as well making a remote brute force attack very, very difficult to complete in any practical amount of time. The practical amount of time, however, is dependent on a variety of factors, including:
• How many computers the attacker has access to?
• How long the username is?
• How many characters the attacker starts with when attacking the SQL Server?
• If the user is able to get someone to tell them the username.
A typical attacker will start with the username SA and will try a large number of passwords before starting to try different usernames. The longer the username is the longer it will take an attacker to gain access to the database instance, with most attackers giving up long before finding the actual username and password. The biggest reason that this attack will take so long is that the SQL Server returns the same error message if the wrong username and password is used or if just the wrong username is used. In either case error 18456 will be returned with a level of 14 and a state of 1, with the wording of the error message simply stating “Login failed for user {username}” where {username} is the username that has attempted to log into the database instance.
Disabling the SA Account
An important security procedure that many people do not follow is disabling the SA account. By having this account enabled, you have done half of the work for an attacker as the username for the SA account is well known by attackers. This means that the attacker just needs to figure out the password. While there is hopefully a very strong password on the SA account, with the account enabled the attacker can sit there and hammer away on the SA account until getting the password correctly. Where you disable the SA account does not matter if the attacker gets the password correct; regardless, the account would not allow the attacker into the SQL Server instance.
If the SQL Instance is configured for Windows Only Authentication, then there is no need to disable the SA account as the SA account is an SQL login and when Windows Only Authentication is used the SA account cannot be used.
Disabling the SA account is a fairly easy process to complete. Connect to the server in question using the Object Explorer and expand the security node. Double click the SA account from the list and select the status tab. Select the disabled radio button and click OK as shown in Figure 5.11.
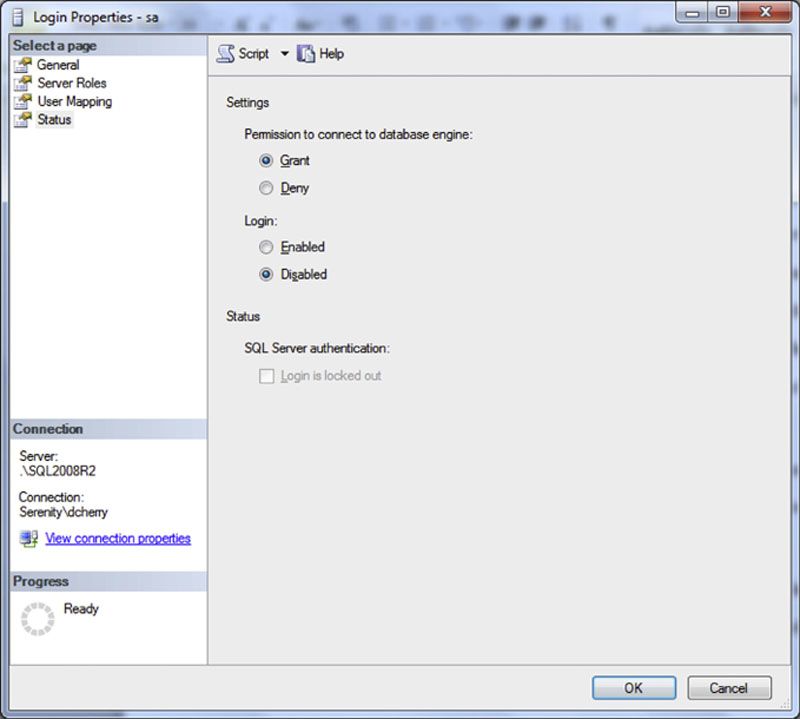
Figure 5.11 Showing how to disable the sa account using the SQL Server Management Studio.
If you prefer to use T-SQL to disable the SA login you can do so with the ALTER LOGIN statement as shown in Example 5.10.
Example 5.10
T-SQL showing how to disable the SA login.

If you wish to leave the SA account enabled, but prevent it from connecting to the instance you can deny the account access to the instance. This can also be done either in the SQL Server Management Studio or via T-SQL. You can see in Figure 4.6 that the SA login is granted login rights, but this permission can be removed by changing the setting to deny and clicking OK. If you prefer to use T-SQL to make this change, you can do so by denying the right to connect to the login as shown in Figure 5.8. This will prevent the login from logging into the SQL Server instance using any available endpoint.
Example 5.11
T-SQL code showing how to deny the SA account rights to connect to the SQL Server.

No matter if the SA login is disabled or denied, the right to connect the result is the same. An attacker cannot use the login to try and get into the instance. As the SA login is disabled or denied login rights, the SA account cannot be used for things like SQL Agent jobs or any authorized process that does use the SA account.
Users versus Logins
Users and Logins are related by different objects within the SQL Server database platform. They are both used to assign rights to allow access to various objects within the SQL Server database engine. Logins are used to connect to the SQL Server database engine as the login is used so that the person connecting is able to authenticate against the database engine. Permissions at the instance level can be granted to logins. This includes the permission to connect to the engine, alter other credentials (logins), create databases, restore databases, etc.
Users are created within databases so that the user is able to access specific databases. Permissions can then be granted to the user so that objects within the database can be accessed. When users are created they are typically mapped to a login so that when a user connects to the database engine using the login, they can then access the database.
This can be viewed within the system catalog views by looking at the sys.server_principals and the sys.database_principals catalog views as shown in Figure 5.12. Here in the first result set we see the output of the logins created at the instance level. In the second result set we see the output of the users created within a sample database. In the third result set we see the output of the name columns from each of the tables when the tables are joined together using the “sid” column. We can see that the login “serenity\Denny” at the instance level is mapped to the user “dbo” at the database level.
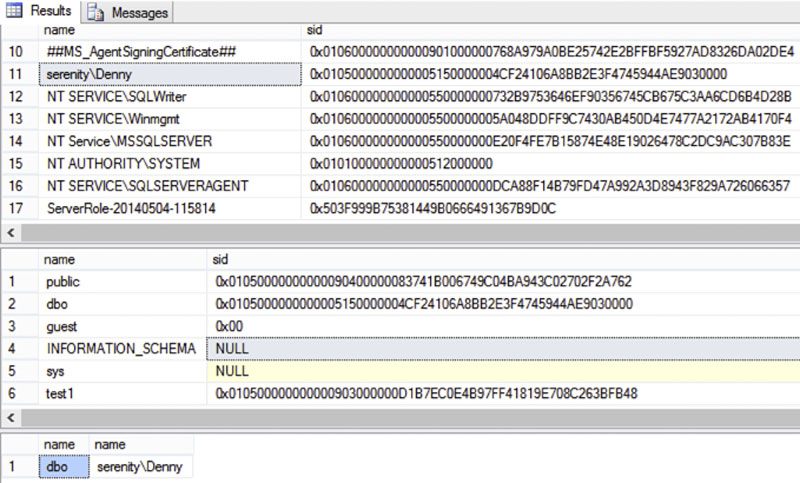
Figure 5.12 Output from the sys.database_principals and sys.server_principals system catalog views.
In SQL Server 2012 and above while logins and users do still exist within the database engine, there are some differences with the introduction of contained users. These contained users will be discussed later in this chapter.
Contained Database Users in SQL Server 2012 and Beyond
With the introduction of contained databases comes a new security piece which is known as the contained login. The biggest advantage to contained databases is the ability to move the contained database from one database instance to another without having to create new logins on the destination SQL Server instance first.
The way this works is that users can now be created within a contained database and that user has its own password assigned to it. These contained logins are not allowed to access resources outside of the specific database that they are in with the exception of a few global objects in master and temporary tables in the tempdb database.
From the connection string and application perspective contained logins work just like regular logins in that there is a username and a password which is specified. There is no special setting which needs to be specified to use a contained login, in fact the application does not need to be changed at all to use a contained login instead of a regular SQL Server Login; with one exception which is that the contained database name must be specified within the connection sting as the default database as shown in Example 5.12.
Example 5.12
Showing the connection string used to connect to a contained database.

Creating a contained login within a contained database requires the use of the traditional CREATE USER statement which has been used to create users within databases since SQL Server 2005. To create a new contained user instead of a user linked to a login omit the “FROM LOGIN” portion and instead specify the WITH PASSWORD clause as shown in Example 5.13.
Example 5.13
Showing the user of the CREATE USER statement to create a contained user within a contained database.

Creating a contained login can also be done within the SQL Server Management Studio. To create a contained SQL user from within SQL Server Management Studio follow these steps.
1. Connect to the SQL Server 2012 or newer instance in the object explorer
2. Navigate to Databases
3. Navigate to YourContainedDatabase that you wish to create the contained login within
4. Navigate to Security
5. Right click on Security
6. Select “New User” from the context menu which appears
Within the “Database User – New” window which opens and change the User Type to “SQL user with password” and enter in the “username,” password and “default schema” for the contained user as shown in Figure 5.13.
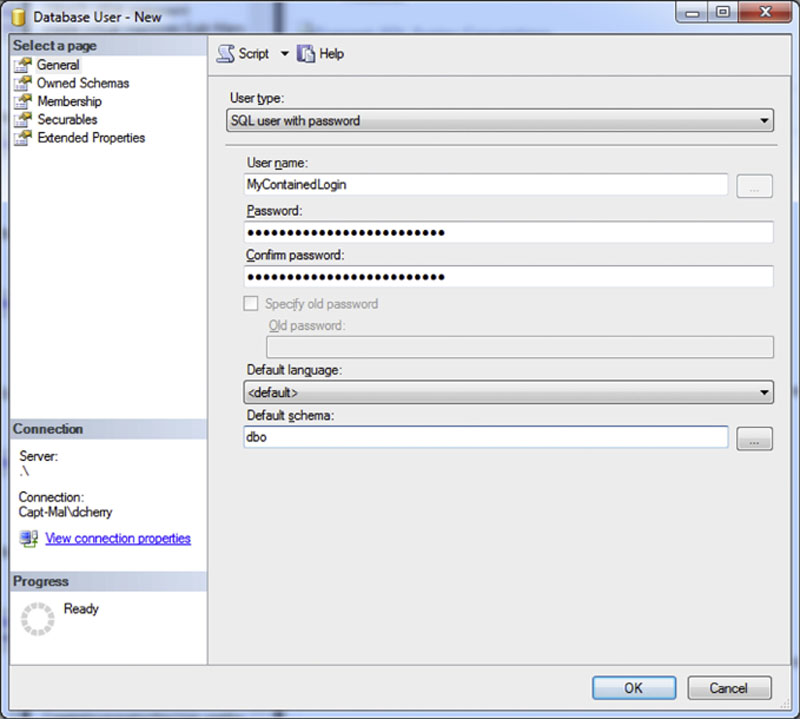
Figure 5.13 Then click OK to create the contained user within the contained database.
Contained users are not limited to SQL users. Windows account can also be created as contained users within a contained database. The principal of a contained Windows user (which is what a Windows account which has been set up as a contained user is called) is the same as that of a contained SQL user. The only change to the connection string needs to be that the default database is specified as the contained database which the user will be accessing.
Creating a contained Windows user via T-SQL is must like creating a contained SQL user in that the CREATE USER statement is used. Instead of specifying the users password simply specify the Windows domain and username as shown in Example 5.14 and the contained Windows user will be set up and mapped to the Windows account.
Example 5.14
Showing the creation of a contained Windows user being created using the CREATE USER statement.

Contained Windows users can also be created from within the SQL Server Management Studio user interface by following the same steps from above to open the “Database User – New” screen. Once opened change the user type to “Windows user” and set the “Username” field to the Windows account that you wish to setup as a contained user. Leave the “Login name” field blank and set the “default schema” to the needed schema as shown in Figure 5.14.
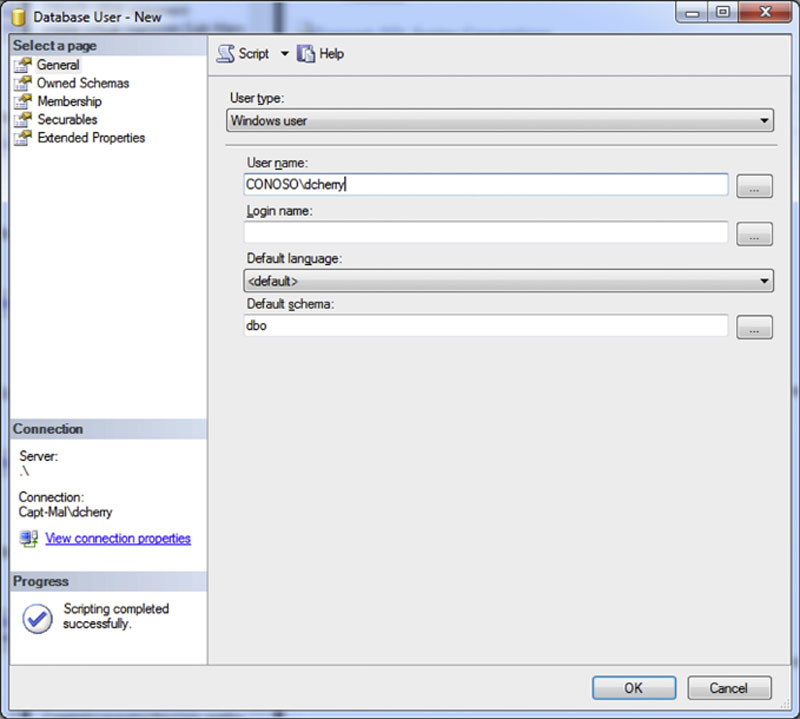
Figure 5.14 Creating a Windows domain account as a contained user from within SQL Server Management Studio.
Once the contained user has been created it can be added to fixed and user defined database roles just like any other non-contained SQL Login. The big difference here is that contained users cannot be granted instance level rights such as the being a member of a fixed or user defined server role.
Schemas
Within SQL Server 2005 and above we have the concept of schemas. When looking at a database object such as “dbo.users” the schema of the database is the portion “dbo.” Schemas give a way to group objects together by functional unit within the company, module within the database, or really using any method that you want to.
SQL Server 2000 and Below
In SQL Server 2000 and below the syntax was exactly the same, but these were not schemas, instead they were the username who owned the actual object. The big problem with having this be the actual object owner is that if a user created an object and then they left the company the object would still be owned by their account so in order to remote their user and login from the database engine you have to change the owner of all the objects within the databases. One of two things would need to happen before the login could be removed, either the objects needed to be assigned to another user which meant that code needed to be changed, or the login and user would need to be left in the database engine cluttering the database with un-needed entries possibly leading to a security issue if the login was a SQL Authentication login.
To fix this, developers would end up making all the objects owned by the “dbo” user as that user always exists and cannot be removed from the database. The other option available would be to create a loginless user and use that loginless user to be the owner of the objects.
In SQL Server 2000 all permissions are granted to the object on an object by object basis.
When creating objects which are owned by another user, such as the “dbo” user the object name must be specified by the person who is creating the object. If the name of the object owner is not included then the object will be owned by the user who created the object.
SQL Server 2005 and Above
Now that we have schemas in SQL Server 2005 and above object ownership is much easier to manage. While schemas do typically match usernames there is no requirement for this. Schemas are still owned by a specific user within the database, however, the ownership of this schema can be changed without impact the name of the objects, or without changing the name of the schema.
With the introduction of schemas the ability to grant permissions to schemas was also introduced. This gives the ability to grant SELECT permissions for example to the entire schema which would then allow the person who received the permissions on the schema the ability to query all the tables and views which are within the schema. More about object level permissions can be found in Chapter 15.
By default when users are created within the database their default schema is set to dbo, provided that the user who creates the new user has rights to the dbo schema. This means that any objects which are created within the database will be assigned to the dbo schema.
Domain Groups and Default Schemas
In most companies rights to SQL Server instances are handled through domain groups so that the helpdesk or IT support desk can simply change domain group membership to grant users access to the databases which they need. The problem with domain groups in SQL Server 2005 through SQL Server 2008 R2 is that when domain groups are mapped to users the default schema is ignored. Starting in SQL Server 2012 the ability for domain groups to have default schemas is introduced.
If a user is a member of multiple domain groups which all have a default schema then the domain groups are sorted by creation date and the default schema for the domain group which was added to the database first is used. If the user wishes to use a different default schema then the domain groups would need to be removed and readded in the correct order so that the oldest one in the database is the one with the schema which the user wants to use. The other option would be to have the user specify the schema within their T-SQL scripts.
Setting the Default Schema
Setting the default schema for a user, either a Windows Group (in SQL Server 2012 or higher) or a specific user is an easy process. When creating a new user on the general table of the new user screen, or edit an existing user, as shown in Figure 5.15, and enter the default schema in the “Default schema” box. The default schema can either be typed in freehand, or searched for by clicking on the button with the ellipse (…) to the right of the “Default schema” box.
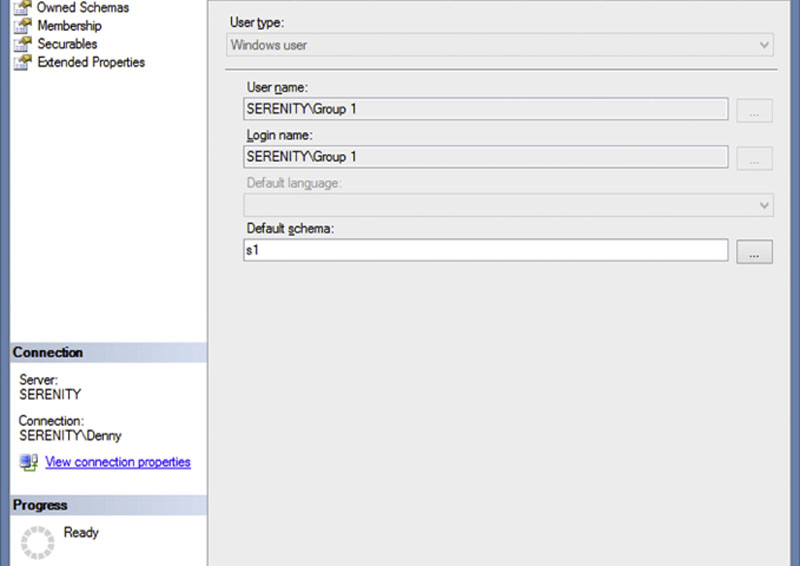
Figure 5.15 Editing an existing user and setting the default schema.
Encrypting Client Connection Strings
While using Windows authentication is the best way to connect to the database server, this is not always possible because the client machine that is connecting to the database server may not be connected do the Windows Domain.
This is most often the case when the web server is located in a DMZ network and the database server is located within the internal network as shown in Figure 1.3 in Chapter 1. In a case like this, the application development team should take extra care to secure the web server’s connection string. Without this extra protection, someone could break into the web server and find the database server’s connection information sitting in the web.config file and simply log into the database using the username and password, which are stored in plain text in the configuration file.
One great technique to do this is to have the web application on startup read the web.config file looking for an unencrypted connection string. Then read that string into memory, delete that node from the web.config file’s XML, and then add a new node labeled as being the encrypted string, encrypt the string, and place the encrypted string within the XML document, saving it when done. On subsequent loads of the XML file, the unencrypted connection string would not be found, and the application would then load the encrypted version, decrypting it in memory, thereby making it much, much harder for someone who has broken into the SQL Server to find any useful connecting string information.
If you do not want to give the web application access to write to the web.config file (as this would technically be a security hole unto itself), the application team could create a small standalone app that takes the normal connection string and outputs an encrypted value, which the Systems Administration could then put within the web.config file during deployment of the application by the Systems Administration team.
SQL Reporting Services
SQL Reporting Services does an excellent job of protecting the connection information to the repository databases, as well as the connection strings that the reports use to connect to the source databases. All database connection strings that are used by SQL Reporting Services are encrypted and stored within the web.config as the encrypted string. Within the SQL Server Reporting Services database, typically named ReportServer, all the connection information that the reports use to connect to the source databases is also stored as an encrypted value. Both of these encrypted values together form a very secure platform that makes it very difficult for an attacker to exploit the SQL Server Reporting Services platform to get any useful information from the database holding the Reporting Server catalog database, or the source data; getting access to the source data via the data stored within the SQL Server Reporting Service repository would require decrypting two layers of information.
Application Roles
When using Windows Authentication, there is an unfortunate side effect that needs to be considered. The user can now log into the database using any Open Database Connectivity (ODBC)-based application such as Microsoft Access, Microsoft Excel, and SQL Server Management Studio, and they have the same rights that they would have if they were logged in via the application. If the user logs into the database by supplying the SQL Login username and password, this same risk is there. However, if the application contains the username and password hard coded within the application, then the user would not have this ability as they will not have the username and password. This is probably something that you do not want to happen. Before you go and switch all your applications to using SQL Authentication and hard coding the password within the application, there’s another solution that gives you the best of both worlds. This solution is to use an application role.
The application role is not a very well understood, and therefore not very frequently used, security feature of Microsoft SQL Server, which allows a user to authenticate against the Microsoft SQL Server Instance, but not have any specific rights within the database. The rights to perform actions are granted to the application role, which would then need to be activated by the application before the user would be able to perform any actions.
Application roles are created by using the sp_addapprole system stored procedure in SQL Server 2000 and below or by using the CREATE APPLICATION ROLE statement in SQL Server 2005 and above. The application role has its own password that is used to ensure that only authorized applications are able to activate the application. The application role is activated by using the sp_setapprole system stored procedure, and then the application role is deactivated by using the sp_unsetapprole system stored procedure, or by simply closing the connection to the database engine.
Example 5.15
Sample code using the sp_addapprole system stored procedure and CREATE APPLICATION ROLE statement to create an application role.

The sp_setapprole system stored procedure has four parameters that are of interest. The first and second parameters are the @rolename and @password parameters to which you supply the name and password that were specified when you created the application role. The third parameter is the @fCreateCookie parameter, which is a bit parameter and tells the SQL Server if it should create a cookie when the application role is activated (I will explain the cookies in a moment). The fourth parameter is the @cookie parameter, which is a varbinary(8000) and stores the cookie that was created if the @fCreateCookie parameter was set to 1.
The @cookie parameter stores a cookie much in the same way that your web browser stores cookies when you browse the web, so that it can correctly identify the session that was used to activate the application role. Thus, when the application role is disabled, the SQL Server knows which session state to return the user’s session to. If you do not plan to revert the application role and will simply close the connection to the SQL Server, then you do not need to set a cookie and can simply set the @fCreateCookie password to 0 telling the SQL Server to not create the cookie.
In the sample code shown in Example 5.16, we create a new database, and then we create an application role within that database. We then create a table within the database, as well as a user within the database. We next give the application role access to select data from the table. We then use the EXECUTE AS statement to change the execution context from that of the user we logged in with to that of the user defined within the EXECUTE AS, which we just created and which has no rights. Next we query the table, which returns an error message to us. After that we switch to using the application role and try and query the table again, this time receiving the output as a recordset. We then unset the application role using the cookie that was created by the sp_setapprole system stored procedure. We then use the REVERT statement so that we are no longer executing code as our MyUser database use, after which we drop the sample database.
Example 5.16
Sample code showing the use of an Application Role.
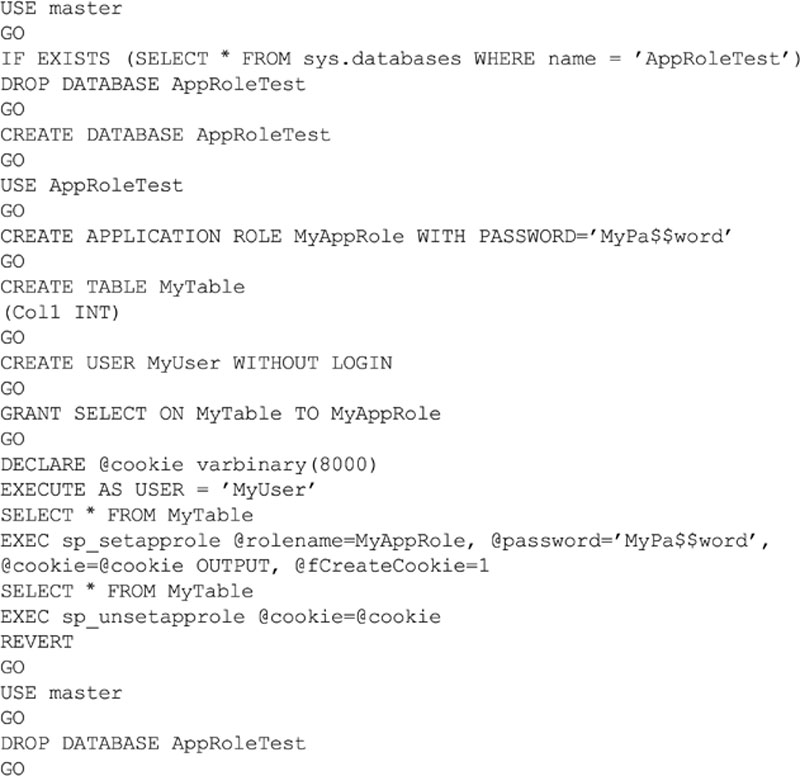
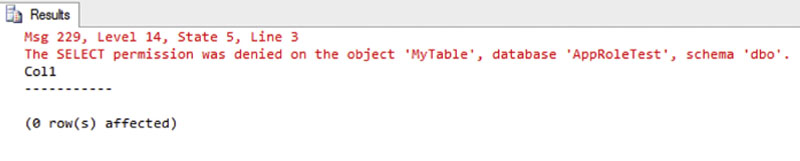
When we run this script as shown in text output mode from within SQL Server Management Studio, we see the output shown in Figure 5.16. The first SELECT statement that we issued was rejected because the user did not have rights to the table dbo.MyTable in the AppRoleTest database. However, the second SELECT statement that we issued after we set the Application Role was accepted by the database, and the contents of the table were returned.
You can now see how use of the application role can enable the use of the very secure Windows authentication without requiring that the user’s Windows account actually have rights to access any objects within the database directly, but the application can run once the application role has been activated.
Another technique that can be used along the same lines of the application role is to create a user with no attached login as done in Figure 5.17 and use the EXECUTE AS statement to run commands as that user. While this will allow you to run all your statements without the user needing to have rights to the database objects, the problem with this technique is that any logging that is done via the username functions returns the dummy user that you created and not the login of the actual user. This is shown along with sample code in Figure 5.17. As you can see in the sample code, we create a dummy user, then output my username using the SUSER_SNAME() system function, then switch to running under the context of the MyUser database user, and then output the value of the SUSER_SNAME() function again with the output being the SID of the MyUser database user account. You cannot even query the dynamic management views to get the correct username of the user logged in, because once the EXECUTE AS has been executed, the dynamic management views show the SID of the user instead of the name of the login that was originally connected to the database.
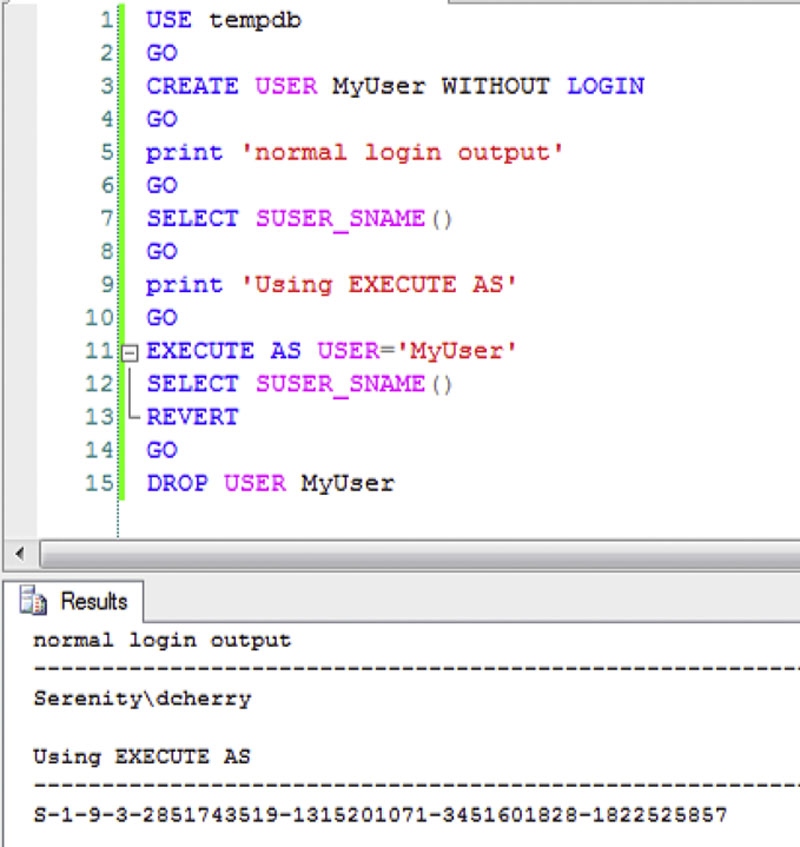
Figure 5.17 Script and output showing how the EXECUTE AS statement is used with a user without a login.
When using an application role, you do not have the database username return problem when using the system functions or the dynamic management views.
Using Windows Domain Policies to Enforce Password Length
Starting with Microsoft SQL Server 2005, Microsoft introduced a new level of password security within the product, as this was the first version of Microsoft SQL Server that could use the domain policies to ensure that the passwords for the SQL Authentication accounts were long enough and strong enough to meet the corporate standards as set forth by the SAs. By default, all SQL Authentication accounts created within the SQL Server instance must meet the domain password security policies. You can, if necessary, remove these restrictions by editing the SQL Authentication account.
Within the Microsoft SQL Server, two settings can be applied to each SQL Authentication Login, which are shown in Figure 5.18.
1. The “Enforce password policy” setting tells the SQL Server engine to ensure that the password meets the needed complexity requirements of the domain, and that the password has not been used within a specific number of days, which is defined within the domain policy, and is explained later in this chapter.
2. The “Enforce password expiration” setting tells the SQL Server that the password for the SQL Authentication Login should have expired based on the domain settings (also discussed in more detail later in this chapter).
3. The “User must change password at next login” option, shown disabled in Figure 5.18, will only become available when the logins password is manually reset and the “Enforce password policy” setting is enabled for the login.

Figure 5.18 The SQL Authentication Login screen showing the two available domain policy settings with the “User must change password at next login” option disabled.
Allowing the SQL Server to ensure that your passwords meet your domain policies has some distinct advantages, especially when it comes to auditing. Without this ability you would need to physically check each SQL server password to ensure that it meets the corporate standards when the Auditor asks you if all your SQL Authentication passwords meet the corporate standards. In a worst case situation, this would require that you either keep a list of all the usernames and passwords somewhere (which would probably cause you to fail the audit) or you would need to contact each person that uses the SQL Authentication login and ask them how long the password is, and if it meets the company policies, and so on. Now with this feature built into the product, a quick and simple SQL query is all that it takes to verify the information.
Example 5.17
Querying the sys.sql_logins catalog view will show you any logins that may not meet the domain password policies.

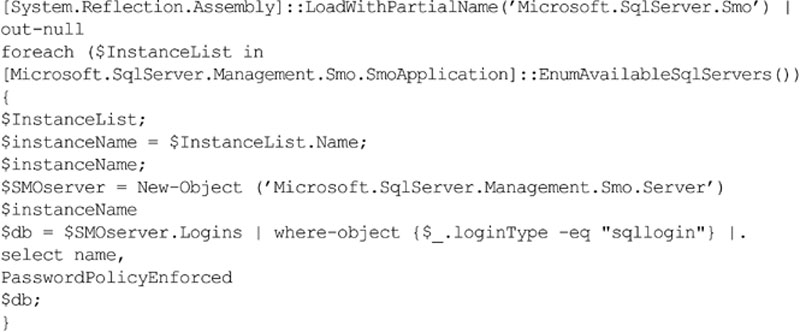
While the T-SQL shown in Example 5.17 works great for a single SQL Server, if there are dozens or hundreds of SQL Servers that need to be verified, a T-SQL script may not be the best way to check all those servers. In this case a Windows PowerShell script may be more effective. Within the Windows PowerShell script shown in Example 5.18, the SMO (Server Management Object) is used to get a list of all the available instances on the network. After this list has been returned from the network, SMO is used to return the SQL Logins along with the value of the PasswordPolicyEnforced setting.
Example 5.18
Using SMO to return the PasswordPolicyEnforced setting for all SQL Logins for all SQL Server Instances available on the IP Subnet.
By setting the is_policy_checked flag to true (shown as the number 1 when you run the sample query in Example 5.17), this tells you that any password that is assigned to the SQL Authentication Login must meet the password requirements of the domain. Expanding on the query shown in Example 5.17, an SQL Server Reporting Services report could be configured that runs against each SQL Server in the environment, giving a simple report that can be run as needed for auditing purposes.
When you have the is_policy_checked flag set to true, there are several domain wide settings that will be evaluated each time the password is changed. These policies can be found by editing the Group Policy Object (GPO) on the domain that holds these settings, or by editing the local security policies for the server in question if that server is not a member of a Windows domain. While you can set these settings on a server that is a member of the domain, doing so would not have any effect as the domain policies but will overwrite any local settings you have set.
If all the SQL Server Instances that need to be polled are registered within SQL Server Management Studio’s Registered Server feature or within the Central Management Server, this select statement can be run against all the instances at once returning a single record with all the needed information. This can be done by opening the registered servers panel within SQL Server management studio by clicking on the View dropdown menu and then the “Registered Servers” menu item. Right click on the folder that contains the SQL Server Instances you want to execute the query against and select “New Query” from the context menu that opens. This opens a new query window which, when executed, will execute the query against all the servers that are within the registered servers folder with all the data from all the servers being returned as a single recordset. SQL Server Management Studio will automatically add in a new column at the beginning of the recordset, which contains the name of the instance; this will allow you to use the same query shown in Example 5.17 against all the SQL Servers at once and giving back a single recordset that can be reviewed or handed off as needed.
Windows Authentication Group Policies
There are a total of six policies that you can set within Windows that affect the domain or local password policy. However, Microsoft SQL Server only cares about five of them. The policy with which the SQL Server is not concerned is the “Store passwords using reversible encryption” policy. This policy tells Windows if it should store the user’s password using a two-way encryption process, instead of a one-way hash. Enabling this policy presents a security vulnerability on your domain as an attacker could download the list of all users and passwords, then break the encryption on the passwords and have full access to every user’s username and password. Due to the security issues with this setting, the setting is disabled by default and should remain so unless there is a specific reason to enable it. The typical reasons to enable it include using Challenge Handshake Authentication Protocol (CHAP) through Remote Access or Internet Authentication Services (IAS). It is also required if one or more Internet Information Service (IIS) servers within the Windows Domain are using Digest Authentication.
The five password policies that the SQL Server does recognize and follow are the following.
1. Enforce password history;
2. Maximum password age;
3. Minimum password age;
4. Minimum password length; and
5. Password must meet complexity requirements.
Each of these settings has a specific effect on what the passwords can be set to and should be fully understood before changing the password of an SQL Authentication Login.
The “Enforce password history” setting on the domain (or local computer) is not a boolean, although the name sounds as though it would be. It is in fact the number of old passwords for the account that the SQL Server should track so that passwords cannot be reused. The setting has a valid range of 0 (or no passwords) to 24 passwords. The more passwords that are kept, the greater the chance that the user will forget their password, but the lesser the chance that someone will break into the system via an old password. The default on the domain is 24 passwords.
The “Maximum password age” setting tells the SQL Server how many days a password is valid. After this number of days has passed since the last password change, the user will be prompted to change the password. If the password is not changed, the user will not be able to log into the database instance. This setting accepts a value from 0 (never expires) to 999 days, with a default value of 42 days.
The “Minimum password age” setting tells the SQL Server how many days from the time a password has been changed until it can be changed again. This setting prevents the user from rapid-fire changing their passwords to eat up the number of passwords specified by the “Enforce password history” setting. Without this setting, or with this setting set to 0, when the user’s password expires, the user can simply change the password 24 times and then change it to the same password that it was before effectively breaking the password requirement feature. This setting accepts a value from 0 (allows immediate password changes) to 998 days, with a default value of 1; however, this setting has a practical upper limit of one day lower than the setting for the “Maximum password age.” If you were to set this setting to the same value or higher than the “Maximum password age” setting, then the users would not ever be able to login until after their passwords had expired.
The “Minimum password length” setting tells the SQL Server how many characters need to be in the password for the password to be acceptable. This setting can be any value from 0 (allowing a blank password) to 14 characters, with a default value of 7 characters. It is typically recommended to increase this value from the default of 7 to a higher number such as 9 characters. While this will make the password harder for the user to remember, it will also make it exponentially harder for an attacker to guess. The “Password must meet complexity requirements” setting tells the SQL Server that all passwords must be considered “strong” passwords. There are several requirements to having a strong password beyond what one would normally consider. By default this setting is enabled.
1. The password cannot contain the username within it.
2. The password must contain characters from at least three of these four categories:
a. Lower-case letters (a–z);
b. Upper-case letters (A–Z);
c. Numbers (0–9);
d. Symbols ($, #, @, %, ^, for example).
The “Minimum password length” setting and the “Password must meet complexity requirements” settings work together very nicely. Without configuring the “Minimum password length” setting the user would have the ability to have a three character password even with the “Password must meet complexity requirements” setting enabled. This is due to the fact that the “Password must meet complexity requirements” setting does not include a password length. The only length requirement which the “Password must meet complexity requirements” forces is a minimum of three characters do to the fact that the password much contain one character from each of the four groups listed earlier in this chapter.
When you enable the “Enforce password policy” setting for an SQL Authentication Login, this enforces the “Enforce password history,” “Minimum password length,” “Minimum Password Age,” and “Password must meet complexity requirements” settings against that login. When you enable the “Enforce password expiration” setting for a SQL Authentication Login, this enforces the “Maximum password age” setting against that login. In order to enable the “Enforce password expiration” setting against an SQL Authentication login, you must also enable the “Enforce password policy” setting. However, you do not need to enable the “Enforce password expiration” setting if you enable the “Enforce password policy” setting.
When working on an Microsoft Azure SQL Database database, the login must meet the password complexity settings that Microsoft has defined. As of the summer of 2010, this means that the password must be 8 characters in length, and meet the complexity requirements shown above. There is no way to configure a login to an SQL Azure instance to not meet these requirements, for the SQL Azure instances do not support using the check_policy parameter to disable the policy checking.
Windows Domain Requirements to Use Domain Policies to Manage SQL Authentication Logins
In order for these settings to be available, specific requirements from the Windows domain must be met. Notably, the domain must be a Windows 2003 domain or higher, and the domain functional level must be Windows 2003 Native or higher. If the domain is a Windows 2000 domain, or a Windows NT 4.0 domain (or older), then these settings will not be available for you to change and will effectively always be set to false.
There are two ways to configure these settings for an SQL Server login. You can use the SQL Server Management Studio to edit the login, or you can use T-SQL to change the settings. To edit a login within the SQL Server Management Studio, follow these five steps:
1. Connect to the server within the object explorer;
2. Navigate to Security;
3. From Security navigate to Logins;
4. From Logins navigate to the login that you want to configure;
5. Right click on the login, and select properties from the context menu which opens.
The window that opens, as shown in Figure 5.19, will allow you to configure which of the two properties you wish to enable.
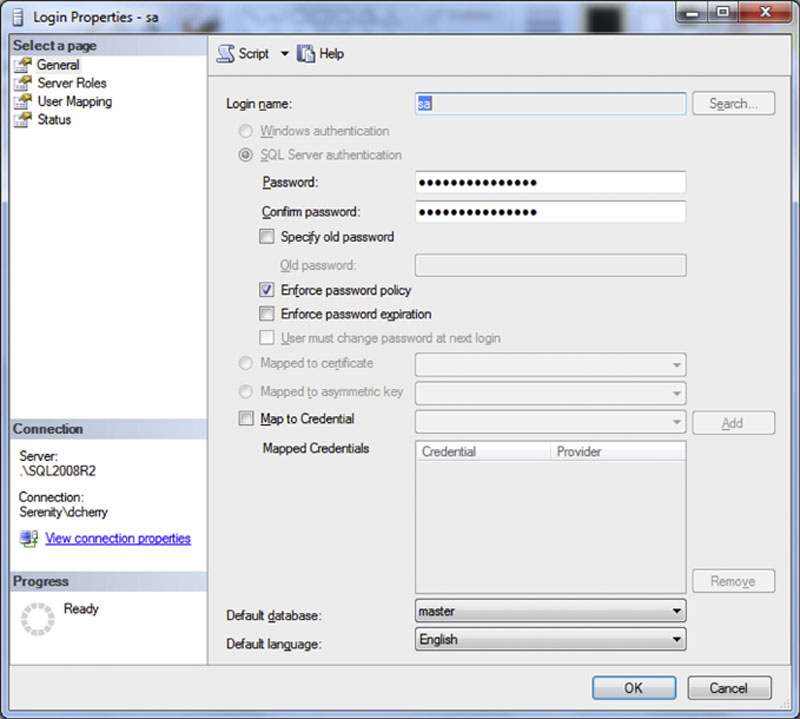
Figure 5.19 The login properties dialog box.
If you prefer to use T-SQL to edit these settings, then you will need to use the ALTER LOGIN command as shown in Example 5.19.
Example 5.19
T-SQL Code setting the policy and expiration settings for an SQL Authentication Login.
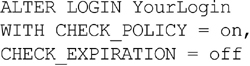
While you can configure these policy settings for a SQL Server Authentication login after the login has been created, the current password will not be checked against the policies until the next time that the password is changed. This is due to the fact that the SQL Server is storing a hashed copy of the password in its database and not the actual password which prevents the SQL Server database engine from being able to validate that the existing password meets the newly applied policies. If these policies are enabled for a login it is recommended that the password be changed in order to verify that the password meets the complexity requirements. This does not mean that the actual password needs to be changed. The password can in fact be changed to the same value as it was originally set for. Changing to the password to any value after enabling the policy settings will cause the policy settings to be evaluated for the new value. The check policy settings can be enabled within the same T-SQL statement as the password change or it can be done within a separate T-SQL statement. If the password is being changed to verify that the existing password meets the password policy configuration it would be recommended that the policy setting be changed before attempting to change the password as the password failing would cause the policy settings change to also fail.
Contained Users
Contained databases which were introduced in SQL Server 2012 allow the administrator to create a database which can be quickly and easily moved from one SQL Server instance to another without the need to create logins at the instance level before moving the database thereby removing the need to realign user SIDs with login SIDs.
When contained users are created within the contained database the user does not exist anywhere in the master database. This means that not only is the username stored in the contained database, but also the password is also stored within the contained database.
You can query from the sys.database_principals catalog view to see if users are contained users or traditional non-contained users. While there is no “is_contained” flag you can look at the authentication_type column. When the value is 2 the user specified by that row is a contained SQL user. There is no easy way to tell from within the sys.database_principals catalog view is a Windows user is contained or not. Both contained and non-contained Windows users will show an authentication_type of 3. The only real way to tell is a Windows user is contained or not would be to check the sys.server_principals catalog view to see if a matching row exists.
Contained Databases and Auto-close
There are, however, a couple of problems that can come up when using contained databases from a security perspective, specifically if the contained databases are set with the auto-close setting enabled. With the auto-close setting enabled, if the contained database is not used very often the database will be closed most of the time. However, when a contained user attempts to log into the database, the database must then be opened, the user authenticated, and if authentication fails, the database must then be closed as per the auto-close setting. This opening and closing of databases does not take much in the way of resources when it is an occasional event, however, if someone was attempting to brute force the password for an account this opening and closing of the database will eventually take over the systems CPU resources and bring the server to its knees performance wise.
db_owners Can Now Add New Users to the Instance
Another security issue when using contained databases is the fact that any member of the db_owners or db_securityadmin fixed database role can create additional contained users who can then allow other contained users into the contained database. This means that the ability to control who has the ability to log into the database instance has just left the control of the database and could now be in the hands of users that may not understand that not everyone in the company needs to be a member of the db_owner fixed database role.
Password Policies and Contained Users
Unlike non-contained users, there is no way as of SQL Server 2012 to enforce domain password policies on contained SQL users. The reason for this is because the contained database may be moved from one Windows domain to another, and when the contained database was moved to the new domain the passwords may not follow the new Active Directory domain security policy. So instead of leaving SQL accounts which do not meet the new domain’s security policy a decision was made to not allow contained SQL users to follow any domain security policies. There is no easy way to force the passwords for contained database users to follow a password policy except through written policies when creating newly contained users.
Summary
One of the biggest problems in today’s IT world is that once you have created your nice secure passwords, how do you track them? Those usernames and passwords are probably going to be documented somewhere, typically within an Excel sheet that is kept on a network share so that all the database administrators within the group have quick and easy access to them. However, by doing this you now have placed all the passwords that you have taken the time to ensure that are strong and secure within your web.config and app.config files are easily readable and usable by anyone who has access to the network share. Typically, not just the database administrators would have access to the network share. In addition to the database administrators, the SAs, backup software, and monitoring system would all have access to the network share. And this is in addition to whoever has found the lost backup tape for your file server. In other words, be sure to store that password list in a nice, safe place and not in the public arena available to everyone to read and network share. There are a variety of tools available for password management including applications which store those passwords in a secure file on your local network such as KeyPass, or applications which store passwords securely on a website such as the Password Vault available at http://dcac.co/go/pv.