Chapter 15
Securing Data
Abstract
This chapter talks about the security of the actual data within the SQL Server instance.
Keywords
permissions
rights
privileges
column level
row level
grant
deny
revoke
Information in this chapter
• GRANTing rights
• DENYing rights
• REVOKEing rights
• Table permissions
• View permissions
• Stored procedures
• Functions
• Service broker objects
• Separation of duties
In this final chapter we are looking at the securing of the data within the SQL Server instance. As you have probably noticed by now the rest of the chapters in this book are more about securing the network, or the instance, or granting rights through the roles within the database engine. In this chapter we are looking at securing the information within the database at the smallest levels possible such as the row or column level.
By default SQL Server takes a view nothing approach to the data within the databases. In prior versions such as SQL Server 7 and SQL Server 2000 the metadata within the database engine was not secured as well as it could have been. This meta-data would have included items such as the objects within the database, the databases within the instance, logins at the instance level, etc. However, starting with SQL Server 2005 even the meta-data has been locked down with a deny by default approach for most if not all of the metadata. When it comes to the metadata the approach now has become that the user can only see information about their own connection and nothing else unless they have been granted special rights to view more data.
As we plan the data security strategy for Microsoft SQL Server we should be keeping the best practice of granting the user the minimum possible permissions to the data within the database that they need to do their job. There are several reasons that we want to secure the data in this way. The biggest reason being that if the user does not need to be able to see the data, then there’s no reason that they should be able to see the data. Users who can see data they do not need to see present a potential security risk. While we would love to be able to trust our users and give them access to information beyond what they need to do their job, as Database Administrators we simply cannot trust anyone. Our job is to protect the data, no matter how many people we upset in the process.
GRANTing Rights
When granting rights within a SQL Server database rights can be granted to specific users, to user defined database roles or to fixed database roles. It is recommended that rights should only be granted to user defined database roles instead of to specific users or to fixed database roles. This gives a security schema which is much easier to manage with the least amount of work.
There are four commonly used rights which can be granted to tables and views within the SQL Server database. These rights are to SELECT, INSERT, UPDATE and DELETE. Each of these privileges is pretty self-describing. Granting the SELECT right to a user allows them to see the data within the table or view that the right is granted up. Granting the INSERT right allows a user to add new rows to the table or view. Granting the DELETE right allows a user to delete existing rows from the table or view. Granting the UPDATE right allows a user to modify the rows which already exist within the table or view.
Stored procedures and functions have five additional rights which can be granted to them which are EXECUTE, VIEW DEFINITION, ALTER, CONTROL and TAKE OWNERSHIP. The EXECUTE right, which can also be shortened to EXEC, allows the user being granted the right to run the stored procedure. The VIEW DEFINITION right gives the user being granted the right the ability to review, but not modify, the code which makes up the stored procedure. The ALTER right gives the ability to change the code which makes up the stored procedure. The TAKE OWNERSHIP right gives the user who has been granted the right the ability to become the owner of the object. The CONTROL right grants the user the other four possible rights (EXECUTE, VIEW DEFINITION, ALTER, and TAKE OWNERSHIP) on the object.
Granting rights to tables, views, functions and stored procedures, as well as any other object within the SQL Server instance, is done via the GRANT statement. In Example 15.1 a user named msouza is being granted the SELECT right to the table dbo.Orders.
Example 15.1
Granting the SELECT right to the user msouza.

Multiple rights can be granted to a table by simply including them in a comma separated list using the same format as shown in Example 15.2 where the user msouza is granted SELECT, INSERT and UPDATE rights to the dbo.Orders table.
Example 15.2
Granting several rights to the user msouza in a single command.

When granting rights there is no difference in granting the rights in a single statement or in multiple statements. The rights are cumulative so the user will get each of the rights no matter what order they are granted in them.
Granting rights to stored procedures and views is done in the exact same way as with tables and views. The permissions being granted are listed in a comma separated list, if there is more than one right being granted, with the object and the username or role which the right is being granted to as shown in Example 15.3.
Example 15.3
Granting multiple rights to a stored procedure.

Not all rights are as easy to grant as tables, view, procedures and functions. Some objects require that the GRANT statement (as well as the REVOKE and DENY statements discussed later) be told what kind of object they are. This includes objects such as Certificates, End Points, Symmetric Keys, Asymmetric Keys, Message Types, Contracts, Services, Routes, Remote Service Bindings, and Broker Priorities. These objects require that you specifically call out the type of object that it is before making the security change. This is done by placing the object type name and two semicolons before the object name as shown in Example 15.4.
Example 15.4
Granting control of a certificate to the user msouza.

The object names are simply spelled out, including spaces as needed. As shown in Example 15.5 we grant the CONTROL right on a symmetric key to a user.
Example 15.5
Granting control of a symmetric key to the user msouza.

Granting rights to server wide objects is done using the same technique. In Example 15.6 we see how to grant rights to an Endpoint which has previously be created on the database instance.
Example 15.6
Granting a user the connect right to a non-standard T-SQL Endpoint.

With any objects which rights are being granted to, if the object name contains special characters such as spaces then the object name, and only the object name should be contained within square brackets as shown in Example 15.7.
Example 15.7
Granting the login msouza rights to connect to the T-SQL Endpoint named “TSQL Default TCP.”

When granting rights to objects there is an optional parameter which can be specified when granting any right to any object. This additional parameter is the WITH GRANT option. This allows the user to not only have and user the right being granted, but it also gives them the ability to grant rights to other users within the database. The syntax for this right is quite simple; at the end of the existing GRANT statement simply place the “WITH GRANT” syntax at the end as shown in Example 15.8.
Example 15.8
Showing the syntax for the WITH GRANT portion of the GRANT statement.

Rights can be granted to objects by using SQL Server Management Studio’s Object Explorer as well as with T-SQL for most objects. Most of the objects within the database can have their permissions controlled through the object explorer with the exception of some of the more exotic objects such as Certificates, Symmetric Keys, and Asymmetric Keys.
To change the permissions on an object navigate to the object in the object explorer. Right click on the object and select properties from the context menu. If properties are not listed then the permissions for the object cannot be managed from within object explorer and T-SQL will need to be used instead. Even if there is a properties option on the context menu for the object this does not mean that for sure that you can manage the permissions from within the object explorer. With the properties window open select the Permissions page for the object. This is where the various permissions can be modified as shown in Figure 15.1.
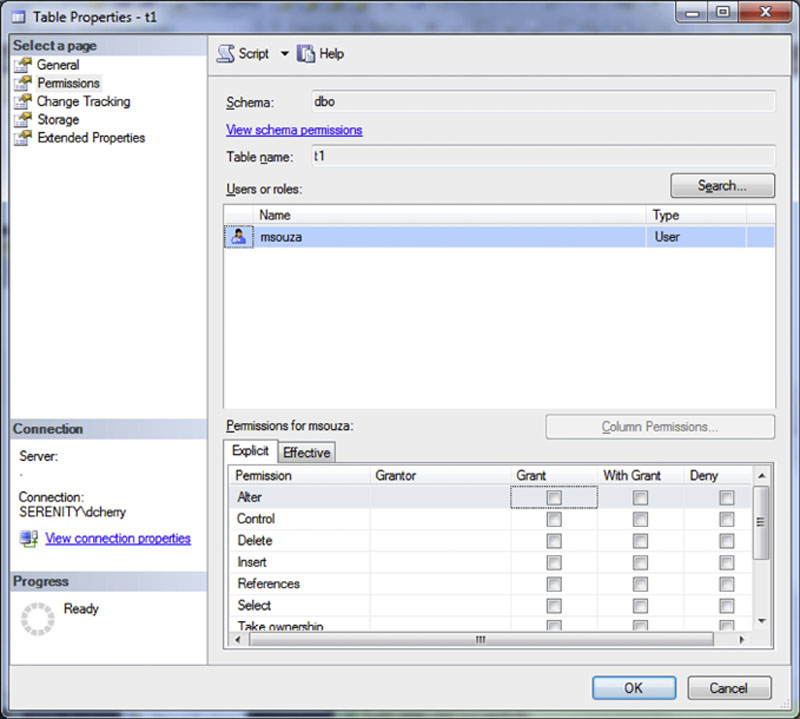
Figure 15.1 Showing the granting of rights to a table.
On the permissions screen the user whose permissions are being modified needs to be selected. This is done by clicking the “Search” button and locating the user or role which should be modified. Once the user or role has been selected the available permissions for the object become available in the bottom part of the screen. From this screen simply select the rights which the user should be granted. If you wish to give the user the ability to grant the right to other users, you may also check the WITH GRANT checkbox.
If you check the WITH GRANT checkbox you will notice that the checkbox in the GRANT column is checked automatically. Likewise if after checking the WITH GRANT checkbox if you uncheck the GRANT checkbox the WITH GRANT checkbox will automatically be unchecked as well. This is because there is no way to specify the WITH GRANT right without granting the user that same right. Along these lines if you check the DENY checkbox, which we’ll discuss more in the next section, the GRANT and WITH GRANT checkbox are automatically unchecked.
After setting the various permissions for the user click the OK button to save the permissions changes.
DENYing Rights
Denying users rights to objects takes away any permissions which have been granted to them through any GRANT statements, no matter what. The rule when it comes to permissions is pretty simple, DENY will always win over GRANT. This is an exception to this rule when using column level permissions which is discussed later in this chapter. If for example a user is a member of two roles, and both those roles have been granted select rights to the table dbo.Orders, but the user has been denied the select right on that table the user will not be able to select from the table. Similarly if the user has been granted the select right on the table and one of the roles which the user is a member of have been denied rights on the table the user will not be able to access the table. In Microsoft SQL Server there is no way to override the fact that the user has been denied rights to an object unless that user is a member of a database level or instance level administrative fixed role.
The T-SQL syntax for denying rights to objects is exactly the same as the syntax for granting rights, with the exception of replacing GRANT with DENY. Example 15.9 shows the syntax for denying a right to a user.
Example 15.9
Denying the SELECT right to the user msouza on the dbo.Orders table.

Like the GRANT statement the DENY statement allows for the denying of multiple rights in a single statement using a comma separated list of the rights to DENY as shown in Example 15.10.
Example 15.10
Denying multiple rights to a user on a table in a single T-SQL statement.

SQL Server Management Studio can be used to deny rights just like it can be used to grant rights. Navigate to the same screen shown in Figure 15.1. Instead of clicking on the checkboxes in the GRANT or WITH GRANT columns clicking the checkbox in the DENY column and clicking the OK button will deny users the rights to the object.
REVOKEing Rights
Revoking rights is done much is the same way as granting or denying rights to users. The syntax is the same as with the GRANT and DENY statements simply replacing GRANT or DENY with REVOKE. Revoking rights does exactly what it sounds like, it removes the specified right from the user or role. The right which is being removed could be either a GRANT or a DENY. For example if a user had been granted the SELECT right on the table dbo.Orders and had been denied the DELETE right on the same table, both of these rights could be removed using the REVOKE statement shown in Example 15.11.
Example 15.11
Revoking multiple rights from a user in a single statement.

The reason that this can be done in a single statement without specifying that a grant and a deny are being revoked is because you cannot have a grant and a deny for the same object for the same user. If a user is granted the select right, then denied the select right if you were to query the system catalog views for the permissions the user would only have the deny right listed.
Rights can be revoked within SQL Server Management Studio’s Object Explorer as well as via T-SQL. Navigate to the properties page shown in Figure 15.1 earlier in this chapter. By unchecking any unwanted permissions and clicking the OK button any un-needed permissions will then be revoked from the object.
Table and view Permissions
Both tables and views have 10 permissions that can be granted on them, less in older versions of Microsoft SQL Server.
Most of the permissions shown in Table 15.1 are available in all versions of Microsoft SQL Server. The prime exception to this is the View Change Tracking permission which was introduced in SQL Server 2008 when Change Tracking was introduced to Microsoft SQL Server.
Table 15.1
Permissions Which are Available for Tables
| Permission Name | Description |
| ALTER | This right allows you to change the schema of the table including adding columns, changing column data types, dropping columns, and dropping the table. |
| CONTROL | This right allows you to make any changes to the table, permissions on the table, the schema of the table, the extended properties of the table, etc. This permission gives the user the same rights as if the user owned the object. |
| DELETE | This right allows you to delete rows from the table. |
| INSERT | This right allows you to insert downs into the table. Rows can be inserted as singleton inserts, or bulk inserts provided that the user has the bulkadmin fixed server role. |
| REFERENCES | This right allows the user to create foreign keys that reference the table. |
| SEELCT | This right allows the user to query the rows within the table. |
| TAKE OWNERSHIP | This right allows the user to take ownership of the table. |
| UPDATE | This right allows the user to make changes to data within the table. |
| VIEW CHANGE TRACKING | This right allows the user to view the change tracking configuration for the table. |
| VIEW DEFINITION | This right allows the user to view the schema of the table. |
Permissions to tables and views can be granted using SQL Server Management Studio or by using T-SQL. When using SQL Server Management Studio permissions can be granted to objects by editing the user, or the object. If multiple users need to be given rights to an object then editing the table or view is more efficient. If a single user need rights to a multiple objects then editing the user is more efficient.
To edit the permissions for an object, shown in locate the object in object explorer. Right click on the table and select properties. When the table properties opens, select the “Permissions” page. Clicking on the “Search” button allows you to search for the user which needs permissions granted to it.
After selecting the user, the available permissions are shown in the bottom of the window, as shown in Figure 15.2. Check the permissions which need to be GRANTed, granted WITH GRANT, or denied and click the OK button to grant the permissions.
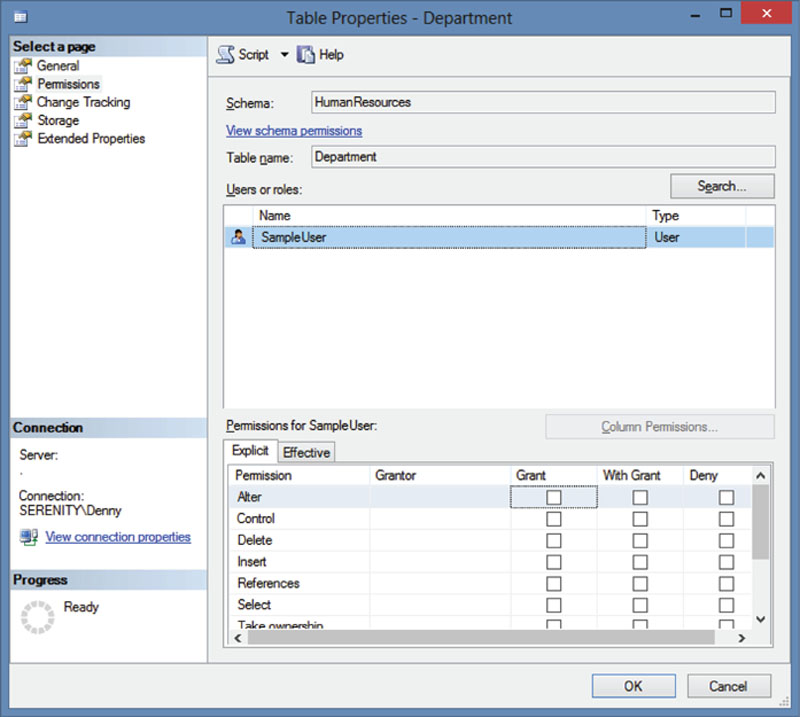
Figure 15.2 Table properties window on the Permissions tab.
To grant permissions to multiple tables at once locate the user within the object explorer within the database. Right click on the user and select properties from the context menu. When the user properties opens, select the Securables tab where permissions can then be modified. Click the “Search” button, shown in Example 15.3, and locate the objects which you want to grant rights to.
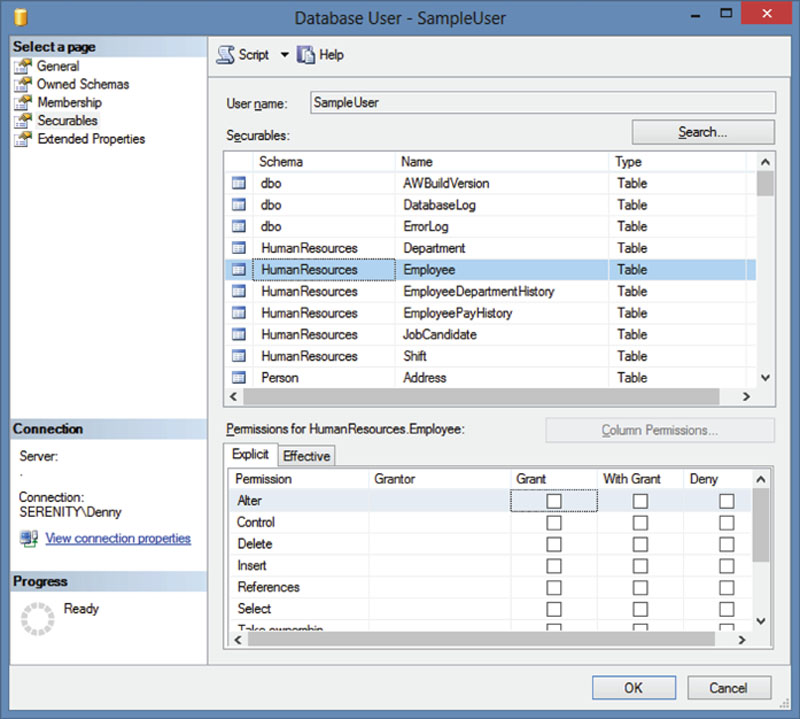
Figure 15.3 User Properties on the Securables tab.
Once the tables have been found, select each table and grant the correct set of permissions for that table. After all the permissions have been selected click the OK button to modify the rights on the database.
Permissions can be granted by using T-SQL as well as by using SQL Server management studio. Permissions are granted by using the GRANT or DENY commands, which are discussed earlier in this chapter and as shown in Figure 15.2.
Example 15.12
Granting a user select permissions to a table

Column Level Permissions
With tables and views permissions are not limited to just the entire object. Rights can be granted, denied and revoked at the column level as well as at the object level as well. The ability to grant rights to specific columns within table is very important as this allows the user to use the data which they need within the table without having access to the other data. This can be very handy when dealing with high security data such as medical data, credit card information, passwords or other personally identifiable information. These column level permissions should be in additional to column level encryption which is discussed in Chapter 4 of this book.
Working with column level permissions is done by specifying the list of columns in a comma separated list within the GRANT, DENY or REVOKE statement as shown in Example 15.13.
Example 15.13
Granting rights to specific columns within a table.

Column level permissions can be managed using SQL Server Management Studio’s Object Explorer as well as T-SQL. To manage the column level permissions in SQL Server Management Studio navigate to the same permissions window shown in Figure 15.1 then click on the “Column Permissions” button. This will open another window shown in Figure 15.4 which allows the granting or denying of rights to the specific columns within the table.
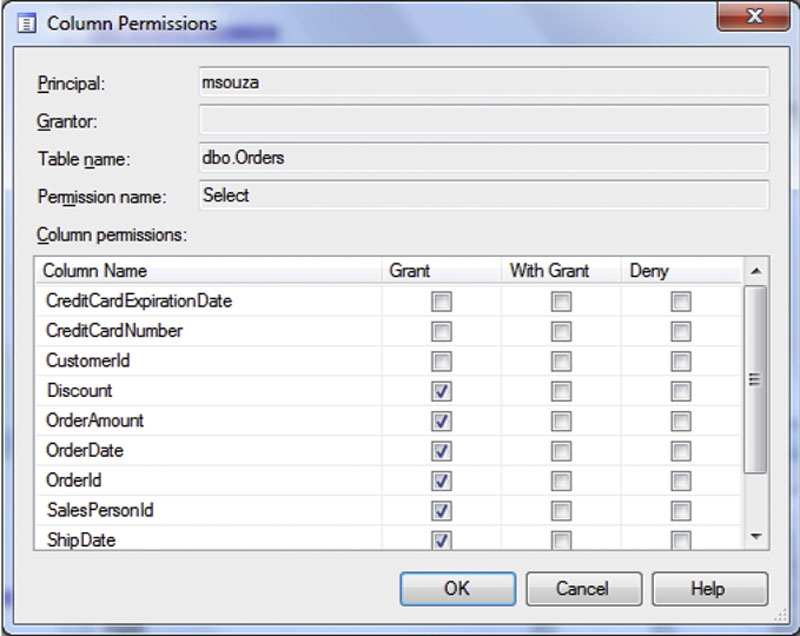
Figure 15.4 Showing the screen which grants rights to specific columns within the tables.
When using column level permissions there is an additional step which users will need to take in order to access the table. This additional step is that the user must write the queries to not request the columns which the user does not have rights to. If the end user in the example shown in Figure 15.4 were to write a query using SELECT * FROM dbo.Orders the user would get an error back from the database engine for each column which they do not have access to saying that the SELECT permission was denied on that column, which would look similar to that shown in Figure 15.5.

Figure 15.5 Showing the error messages if the user msouza were to run a SELECT * FROM dbo.Orders query when column permissions have been applied.
In order for the sample user in Figure 15.4 to be able to view all the columns which they have rights to each column must be specified as a separate column in the SELECT statement. Unfortunately the user cannot simply query the sys.columns catalog view to see what columns they have rights for as the sys.columns catalog view will return all the columns for all the tables which the user has the rights to view any of the columns on.
Row Level Permissions
Granting rights at the row level is probably one of the hardest security concepts to configure in Microsoft SQL Server. This is because there is no built in way to provide row level security in Microsoft SQL Server. The concept behind row level security is that a user is granted rights to a subset of the rows in the table, and those rows are the only rows which the user is allowed to see. This sort of security would be similar to the concepts used in multi-tenant databases where you have rows for multiple customers stored in a single database and the application always passes in an Account Id or Customer Id or in some other way identifies which account the customer is allowed to see, based on the credentials they used to authenticate to the SQL Server. However, the difference here is that we need to provide this sort of protection while giving the users direct access to query the database directly without using our custom written app.
The exact technique which is used to handle this level of security will depend a lot on the database design and the function of the database application. No matter the database design the one big rule which always applies is that we cannot force the user to specify the account number or any other identifier as we cannot validate that they are passing in their identifier. This means that we need to use something which we know that they have which will be unique across all of the customers who will be accessing the database. The most reliable way of doing this would be to use the username which they will be using to log into the database to figure out which rows of data the end user will have access to.
In general the way that this works is to create a view which the user would have permissions to, and that view then handles the access rights for the user instead of giving them access to the base tables. An example table would be the dbo.Orders table which has been used throughout this chapter so far. Before we can create the view we must create a mapping table which will be used to filter all the other tables which the user attempts to access. The table which would be used to filter the dbo.Orders would look similar to that shown in Example 15.14.
Example 15.14
A sample table to use for row level filtering.

When the table in Example 15.14 is created we use that table joining it to the Orders table as we create our view as shown in Example 15.15.
Example 15.15
A row filtering view against the orders table.

For each customer is who allowed to log into the database an unique SQL Login, or contained user is created a row must be inserted into the SqlUserMapping table so that the view v_orders will allow them access to the rows which they need access to.
If there are columns that we know for a fact the users who the row filtering is being setup for will never need such as the Credit Card information in the example dbo.Orders table, these columns should be removed from the view instead of then using column level permissions against the view as this will greatly improve the user experience when running queries against the views.
Row Level Permissions and Active Directory Groups
Using Active Directory Groups to do row based filtering is a surprisingly complex task. This is because Microsoft SQL Server does not have direct access to the domain groups that a user is a member of within Active Directory.
Stored Procedure Permissions
Stored procedures have five permissions which can be assigned to users (Table 15.2).
Table 15.2
Permissions for Stored Procedures
| Permission | Description |
| ALTER | Make changes to the stored procedure |
| CONTROL | This right allows you to make any changes to the stored procedure including the extended properties of the object, etc. This permission gives the user the same rights as if the user owned the object. |
| EXECUTE | This right gives the user the ability to run the stored procedure. |
| TAKE OWNERSHIP | This right gives the user the ability to take ownership of the stored procedure |
| VIEW DEFINITION | This right gives the user the ability to view the code which makes up the stored procedure. |
Signing Stored Procedures, Functions and Triggers
Signing of stored procedures can be done to allow users to execute stored procedures without needed to explicitly give them the rights to run the stored procedure. This sort of code signing is very useful when permissions chains are broken or cannot be followed for some reason, for example when dynamic SQL is being used to execute the stored procedure. In some cases the EXECUTE AS clause (discussed later in this chapter) can be used to execute the stored procedure under the context of another user. The difference with signed stored procedures is that the signed stored procedure is still executed under the context of the user who is running the stored procedure, where using the EXECUTE AS clause causes the stored procedure to run under the context of the user specified within the EXECUTE AS clause. Stored procedures can be signed with either a certificate or an asymmetric key.
Signing a stored procedure, function or trigger is done by following a four-step process.
1. Create the certificate using the CREATE CERTIFICATE statement
2. Create a database user to bind the certificate to
3. Grant the user created rights to the objects which will be signed
4. Sign the objects using the ADD SIGNATURE statement
The first step to signing objects within SQL Server is to create the certificate. This is done with the same CREATE CERTIFICATE statement which is discussed in Chapter 5. If the object to be signed is a database level object then the certificate should be created within the user database. If the object is a server level object, such as a DDL trigger then the certificate should be created within the master database.
Example 15.16
Creating a certificate

The second step is to create a loginless use within the SQL Server database which will map to the certificate. Once the user is created the permissions will be granted to this user.
Example 15.17
Creating a user mapped to a certificate

After permissions have been granted to execute the objects which will be signed, the objects can then be signed by using the ADD SIGNATURE statement.
Example 15.18
Signing a stored procedure using the certificate which was created

EXECUTE AS for Stored Procedures
The EXECUTE AS clause within the definition of a stored procedure can be used to change the context of the execution of the stored procedure. The EXECUTE AS clause supports for different values which are CALLER, OWNER, SELF or a specific user. By default stored procedures are executed with the context of the OWNER of the stored procedure unless otherwise specified.
If CALLER is specified then the user running the stored procedure must have permissions on all the objects which are referenced within the stored procedure. If SELF is specified it is the same as if tht specific user had been specified where the specified user is the user who created the stored procedure. When a specific user is specified then the stored procedure executes under the security context of that specific user. This means that this user account must have permissions to the objects which are called by the stored procedure.
More can be read about EXECUTE AS in Chapter 9 of this book.
In Memory OLTP Natively Compiled Stored Procedures
Permissions for the In Memory OLTP Natively Compiled Stored Procedures are the same when it comes to granting rights to the stored procedures. Inside the code of the stored procedure something is a little different. While normal T-SQL stored procedures can have their EXECUTE AS clause set to be CALLER, OWNER, SELF or a specific user within the database, in SQL Server 2014 the stored procedures must be configured to EXECUTE AS OWNER as permissions chaining of In Memory OLTP objects is not supported in SQL Server 2014.
Function Permissions
Functions have seven permissions which can be granted to users which are shown in Table 15.3. Of these six apply to scalar functions and six apply to table functions. The difference is that the select permission is only available to the table function and the execute permission is only available to the scalar function.
Table 15.3
Permissions Available for Functions
| Permission | Description |
| ALTER | Make change to the object. |
| CONTROL | This right allows you to make any changes to the function including the extended properties of the object, etc. This permission gives the user the same rights as if the user owned the object. |
| EXECUTE | This allows the user to execute scalar functions. |
| REFERENCES | This allows the user to use the function as a foreign key. |
| SELECT | This allows the user to select from table functions |
| TAKE OWNERSHIP | This allows the user to take ownership of the function. |
| VIEW DEFINITION | This allows the user to view the definition of the function. |
Service Broker Objects
While Microsoft SQL Server includes a wide variety of objects within the SQL Service Broker, many of these objects have permissions which can be managed.
Message Type
Message types have a single permission which can be granted, which is the REFERENCES permission. This permission allows the user who has the permission to create contracts which use the message type.
Contracts
Like the message type the contracts within SQL Service Broker only have a single permission which is the REFERENCES permission. Users with this permission may build services which bind to the contract.
Queues
Queues have permissions which users can be granted rights to. Queues have seven permissions which can be granted which are found in Table 15.4.
Table 15.4
Permissions Available for Service Broker Queues
| Permission | Description |
| ALTER | Allows the user to change the settings for the queue. |
| CONTROL | Gives the user the same permissions as the owner of the object. |
| RECEIVE | Gives the user the ability to receive messages from the queue. |
| REFERENCES | Gives the user the ability to create services which reference the queue. |
| SELECT | Gives the user the ability to query from the queue without receiving messages from the queue. |
| TAKE OWNERSHIP | Allows the user to take ownership of the queue. |
| VIEW DEFINITION | Allows the user to view the definition of the queue. |
Services
Services within SQL Service Broker have two permissions which can be granted. The first is the REFERENCES permission which gives the user the right to create routes on the service. The second is the SEND permission which allows users to send messages to the service and the queue underneath it.
Route
There are no permissions which can be granted for SQL Service Broker routes.
Remote Service Bindings
There are no permissions which can be granted for Remote Service Bindings.
Broker Priorities
There are no permissions which can be granted for Broker Priorities. Creating broker priorities requires having ALTER DATABASE permissions.
Separation of Duties
SQL Server 2014 enhances the concept of separation of duties where users can be given permissions to perform administrative actions such as backing up databases while not being able to query the data within the database tables. More can be read about these new permissions within the section titled “User Defined Server Roles” in Chapter 13.
This separation of duties concept provides for a much more secure database environment due to the fact that administrators no longer need to be able to see data which resides within the systems which they are managing. While this separation of duties concept cannot be applied to members of the sysadmin fixed server role it allows for people who are managing the system without being members of the sysadmin fixed server role to be more limited in what they can see while still doing their day-to-day jobs.
When it comes to what permissions are needed to complete the tasks needed by a database administrator, there are only a few tasks which actually require being members of the sysadmin fixed server role. On a day-to-day basis most database administrators do not need to be members of the sysadmin fixed server role, and can instead logins with lesser permissions most of the time.
Implementing Separation of Duties
Some companies are now requiring that the database administration teams perform their day-to-day operations without being members of the sysadmin fixed server role. In order to meet this goal a solid understanding of the fixed server roles and the server wide permissions is required. When it comes to designing a security model with separation of duties in mind the first thing which needs to be done is to identify the actions which the database administrator needs to perform. In many companies the day-to-day work which needs to be performed is reviewing logs, reviewing execution plans for poorly performing queries, and deploying changes to applications as well as SQL Server Agent job monitoring.
Reviewing SQL Server error logs and the Windows Application and System logs within SQL Server Management Studio requires being a member of the securityadmin fixed server role as well as by having EXECUTE rights on the master.dbo.xp_readerrorlog extended stored procedure. SQL Server Agent job monitoring can be done by granting the SQLAgentReaderRole within the msdb database. Monitoring for performance, long running queries, and querying the execution plan cache can be completed by granting the VIEW SERVER STATE right within the instance.
Of the tasks which were identified as needing to be performed only deploying new applications and changes to existing applications truly requires being a member of the sysadmin fixed server role. And even in many cases this still is not the case. Often time software upgrades only require membership within the db_ddladmin fixed database role. The permissions which are required will depend on the application and the changes which are being made. In some cases no data change permissions are needed, in other cases there are, it simply depends on the changes which are being made to the application and the permissions which the developer of the installer, if there is one, expects.
Summary
There are a variety of ways that the actual data within the database can be secured. These include granting rights to tables, allowing users to grant rights to others, denying rights, revoking rights at the table and/or column level, as well as setting up the database schema to specifically allow the filtering or rows at the row level giving the appearance of a separate database for each customer without having to setup and maintain a database for each customer instead using the much simpler to manage multi-tenant database approach.