Chapter 8
Reporting Services
Denny Cherry
Abstract
This chapter talks about securing the SQL Server Reporting Services service and the objects within the SQL Server Reporting Services service.
Keywords
SQL server reporting services
certificates
reports
folders
Information in this chapter
• Setting up SSRS
• Security within reporting services
• Anonymous authentication
• Forms authentication
• Report server object rights
Setting up SSRS
SQL Server Reporting Services is a web based report presentation tool which is included as a part of the SQL Server product. This allows for users to run pre-defined reports as need from a web interface. SQL Server Reporting Services is installed using the traditional SQL Server installer. After SQL Server Reporting Services is installed it needs to be configured by using the Reporting Services Configuration Manager. This application allows you to configure a variety of configuration options including several security related options.
When you first open the SQL Server Reporting Services Configuration Manager you will be prompted for the server name and report server instance to connect to as shown in Figure 8.1. As you can see in Figure 8.1 there is no place to put any sort of credentials when connecting to the Reporting Services service. This is because like SQL Server Analysis Services (discussed more in Chapter 7), SQL Server Reporting Services only supports Windows Authentication for managing and configuring the service.

Figure 8.1 The SQL Server reporting services configuration connection dialog box.
After connecting to the reporting services instance you will be greeted with a screen which looks much like that which is shown in Figure 8.2. From this screen you can configure a variety of settings which are shown in Table 8.1. These various screens all look basically the same for all the various versions of SQL Server Reporting Services from its introduction in SQL Server 2000 through SQL Server 2014. The screenshots which are shown in this chapter are from SQL Server 2014 so they may look slightly different from the version you are using.

Figure 8.2 Showing the home page of the SQL Server Reporting Services Configuration Manager.
Table 8.1
Describing the Various Screens of the SQL Server Reporting Services Configuration Manager
| Setting Name | Description |
| Service account | The Windows local or domain account which the SQL Server Reporting Services service will run under. |
| Web Service URL | The TCP port, SSL certificate and virtual directory which the Web Service will run under. |
| Database | This screen will show you two different sets of settings. The first is if the report server instance will be configured in Native Mode or in SharePoint integrated mode. The second is the SQL Server database engine which will host the reporting services databases (ReportServer and ReportServerTempDB by default) as well as the way that the SQL Server Reporting Services server connect to the SQL Server database engine. |
| Report Manager URL | The TCP port, SSL certificate and virtual directory which the Report Manager will run under. |
| Email Settings | The SMTP settings which the SQL Server Reporting Services will use to send emails |
| Execution Account | The local or domain account which is used to connect to database sources that do not require credentials or to connect to remote servers within the Active Directory network for accessing graphics, etc. |
| Encryption Keys | Screen which with the SQL Server Reporting Services symmetric keys can be backed up, restored, changed and encrypted content within the reporting services databases can be deleted. |
| Scale-out Deployment | Screen from which reporting services instances can be joined to the cluster. |
Service Account
The “Service Account” screen within the Reporting Services Configuration Manager, shown in Figure 8.3, allows you to select from either a built-in account or a specific domain or local Windows account to run the SQL Server Reporting Services service under. The account which the service runs under that is used will depend on what features of SQL Server Reporting Services that you wish to use and how you wish to connect to the SQL Server instance which will host the SQL Server Reporting Services databases as well as how the SQL Server Reporting Services service will connect to the databases which hold the data which the reports will be built off of.
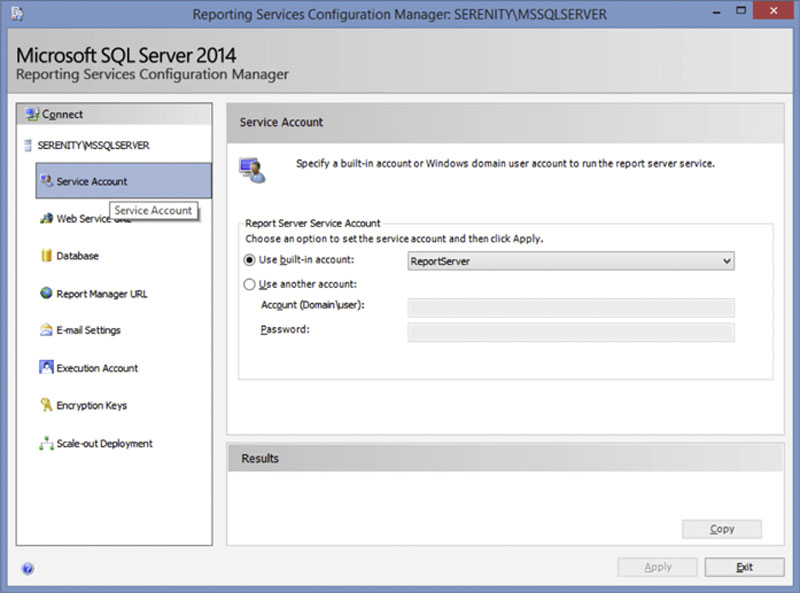
Figure 8.3 Showing the “Service Account” screen of the Reporting Services Configuration Manager.
A domain user, which follows the “Minimum Permissions Possible” technique discussed in Chapter 4, should be used when the SQL Server Reporting Services service will be connecting to the database instance which holds the reporting services databases by using the Windows account which the Reporting Services Account is running as, and the SQL Server database instance will be running on a different server than the SQL Server Reporting Services instance. The SQL Server Reporting Services service can be configured to run under a local account when the Reporting Services service will be connecting to the database instance using a SQL Authentication login or when the SQL Server instance which hosts the Reporting Services configuration databases is on the same server as the SQL Server Reporting Services instance.
Web Service URL
The “Web Service URL” page allows you to set the IP Addresses, TCP ports, SSL Certificates and Virtual Directory which are used to host the Web Service URL for the Reporting Services instance as shown in Figure 8.4. The first field on the screen is the Virtual Directory. This field sets the path which is used from the root of the website which the web service will run under. By default this is the Report Server virtual directory. When configuring an Internet facing SQL Server Reporting Services instance this should be changed to a non-standard value to make it more difficult for unauthorized people on the Internet to attempt to access the URL.
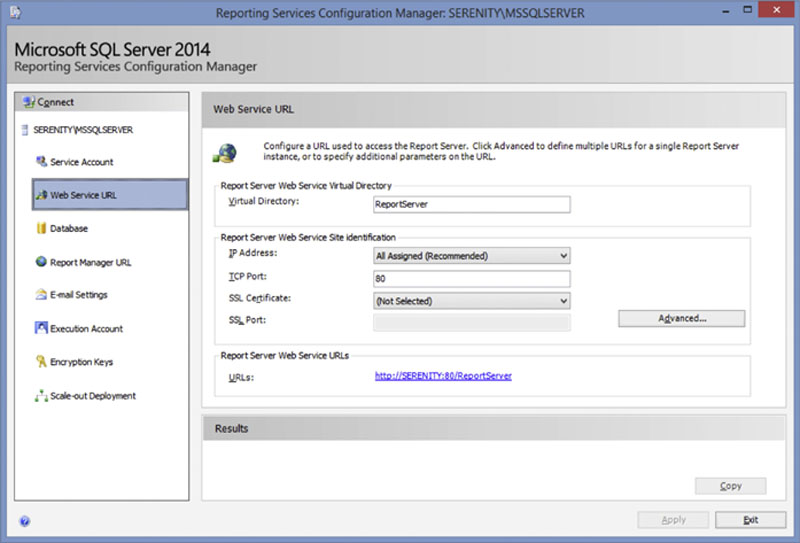
Figure 8.4 Web Service URL page of the Reporting Services Configuration Manager.
The second section of the “Web Service URL” page configures the various IP addresses, TCP ports and SSL certificates which will be used for the Reporting Services service to listen for requests. If a single IP address should be used, or the Reporting Services service should listen on all IP addresses on the server then the Advanced button does not need to be used. If multiple specific IP addresses need to be configured then the Advanced button should be clicked allowing for multiple IP addresses to be selected as shown in Figure 8.5. If different websites need to be hosted on the same internal IP addresses, host headers can be configured by placing the host header in the “Host Header” column which can be seen on Figure 8.5. More information about Host Headers can be found in most web server books such as Windows Server 2008 R2 Unleashed by SAMS Publishing.
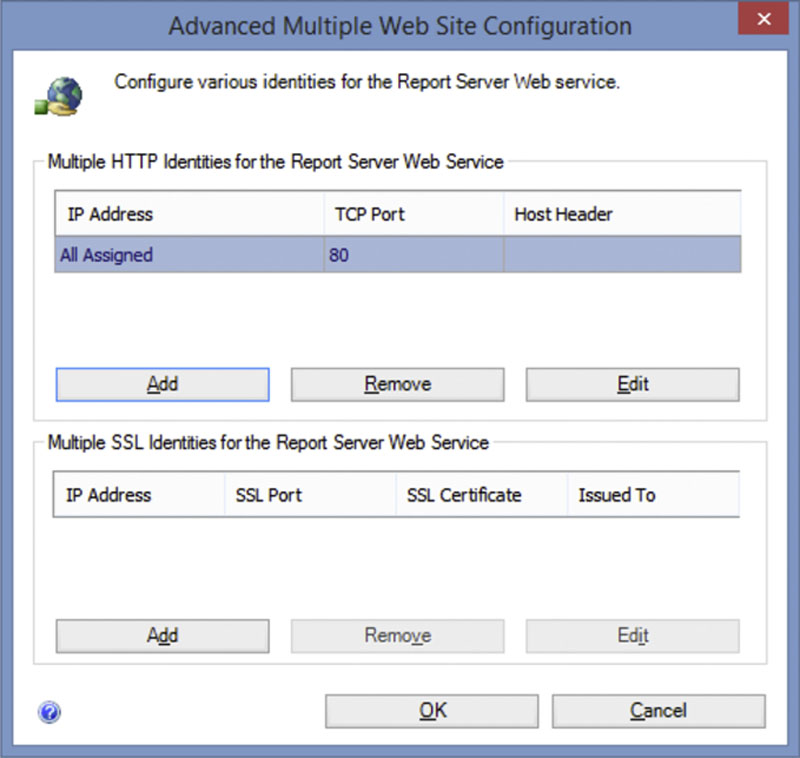
Figure 8.5 Showing the screen from the Reporting Services Configuration Manager which allows for multiple IP addresses and ports which SQL Server Reporting Services should listen on.
If SSL certificates need to be used in order to secure communications between the end user and the SQL Server Reporting Services server they should be configured on the screen shown in Figure 8.4. SSL certificates must be installed on the server which will be running the SQL Server Reporting Services service before the Reporting Services Configuration Manager is launched. If a certificate needs to be installed the Reporting Services Configuration Manager will need to be closed and reopened to reload the list of certificates. Multiple SSL certificates can be configured for multiple IP addresses from the screen shown in Figure 8.5 as well.
At the bottom of the “Web Service URL” screen all the various URLs which can be used to connect to the ReportServer virtual directory. If multiple IP addresses are entered on the screen shown in Figure 8.5 then multiple URLs will be shown at the bottom of the screen shown in Figure 8.4.
Any time that the Web Service URL is exposed to the public Internet is should be secured via an SSL certificate. SSL Certificates, including how to request SSL Certificates, are discussed more in Chapter 4. The Web Service URL should also be protected by an SSL certificate even if the Reporting Services instance is an internal only Reporting Services instance and the instance is serving up reports which contain confidential or personally identifiable information.
Database
The “Database” screen within the Reporting Services Configuration Manager allows for the configuration of the connection to the configuration database (ReportServer by default) and the cache database (ReportServerTempDB by default). On this screen, shown in Figure 8.6, the database server and database name are shown. To change the SQL Server instance or the database name the Change Database button should be clicked. This will present a wizard which will walk through the options needed to change the instance and/or database. During this wizard the user will be prompted for a set of credentials. These credentials are only used to connect to the instance while the wizard is running for the purposes of creating and verifying the needed databases. The credentials specified within this wizard should be members of the Database Creator (dbcreator) fixed server role and the Security Administrator (securityadmin) fixed server role if not a member of the System Administrators (sysadmin) fixed server role.
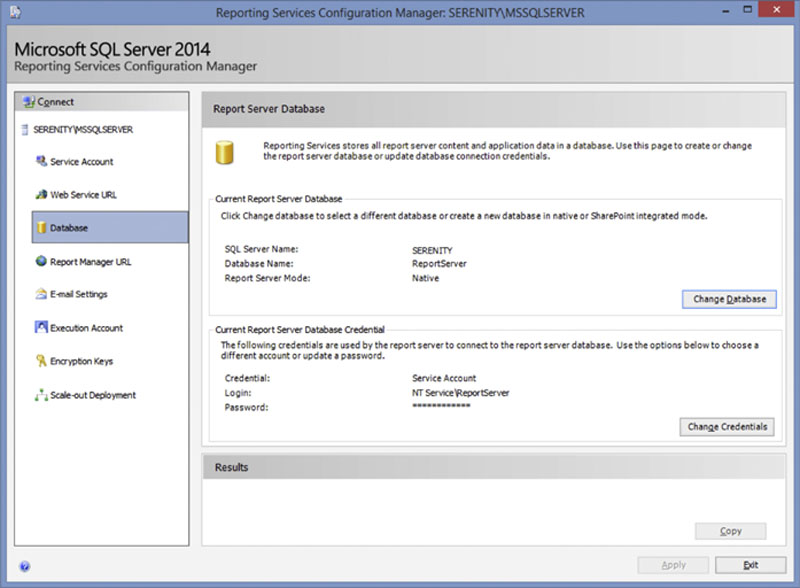
Figure 8.6 Showing the database screen of the Reporting Services Configuration Manager.
On the lower half of the screen shown in Figure 8.6 shows how the SQL Server Reporting Services service will connect to the SQL Server instance which is configured in the top half of the screen. Clicking the “Change Credentials” button starts the wizard to change the credentials. The wizard will ask for two sets of credentials. The first set of credentials that are asked for on the first screen, shown in Figure 8.7 specify how the user running the wizard should connect to the SQL Server instance. This user needs the ability to create a login by being a member of the Security Administrators Fixed Servers Role as well as being a member of the db_owner fixed database role within each of the Reporting Services databases.
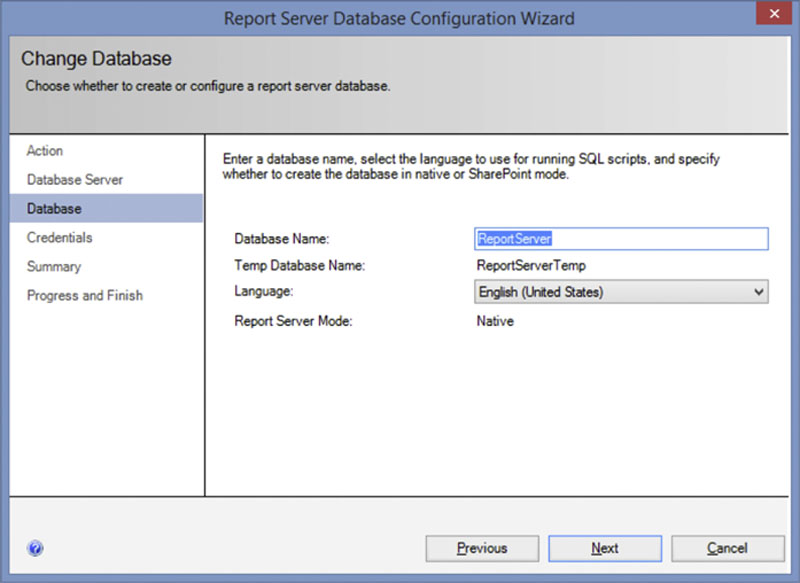
Figure 8.7 Showing the first screen of the wizard to change the account which is used by the reporting services service to connect to the SQL Server instance which hosts the configuration database.
The second screen of the “Change Credentials” wizard, shown in Figure 8.8, allows for the setting of the account which will be used to connect to the SQL Server instance which hosts the Reporting Services configuration databases. There are three options shown in the Authentication Type drop down menu, which are “Windows Credentials,” “SQL Server Credentials” and “Service Credentials.” When “Windows Credentials” is selected, as shown in Figure 8.8, a specific domain username and password can be used to connect to the SQL Server database instance. This account does not need to be the same account which the SQL Server Reporting Services server can run under. When “SQL Server Credentials” is selected from the drop down menu (not shown) a traditional SQL Server login credentials are used to connect to the SQL Server database instance which hosts the configuration database. While a username and password are being typed into the management console, and this information is saved to the app.config on the server, the information is encrypted within the configuration file. When “Service Credentials” is selected (not shown) the SQL Server Reporting Services service will use whatever Windows account the service is running under to connect to the SQL Server database instance which is hosting the configuration database.
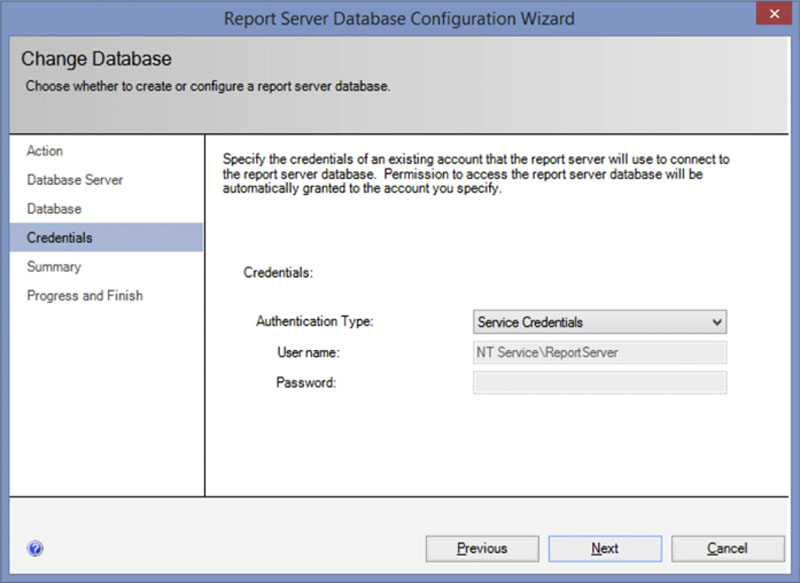
Figure 8.8 Page two of the “Change Credentials” wizard.
The third screen of the “Change Credentials” wizard will show a summary of the settings which will be set. The fourth screen of the “Change Credentials” wizard will show success or failure of making the needed changes to the Reporting Services service. At this point the .config file for the SQL Server Reporting Services service is being updated with the new connection string. When using SQL Server Reporting Services 2000 or SQL Server Reporting Services 2005 the web.config file is what is being updated as those versions use IIS as the web server for serving the web pages and reports. When using SQL Server Reporting Services 2008 or higher the app.config and other .config files are being updated. This change is because in SQL Server Reporting Services 2008 and higher SQL Server Reporting Services no longer requires the use of IIS to serve the web pages as it handles the serving of the web pages and reports internally.
Report Manager URL
The “Report Manager URL” screen of the wizard services the same basic purpose as the Web Service URL in that it configures the IP address, TCP ports and SSL certificates that are used for access to the reporting services site. In this case however the configuration is for the end users to view and administer reports via their web browser instead of for the web service. When the screen appears, as shown in Figure 8.9 only the virtual directory and URL list is shown. With the “Web Service URL” screen it displays the basic connection information where on this screen clicking the Advanced button is required to make any changes to the IP addresses, TCP ports and SSL certificates which are used for end user connections. Clicking the “Advanced” button on the screen shown in Figure 8.9 bring up a screen which looks identical to the one shown in Figure 8.5. Like the Web Service URL if at any time the Reporting Services instance will be serving data over the public Internet or customer data is being transferred over any network including an office network the connection should be encrypted using the industry standard SSL encryption.

Figure 8.9 Showing the “Report Manager URL” screen of the Reporting Services Configuration Manager.
Email Settings
The email settings screen does not have any security related configuration on it, but I wanted to include it for completeness. On the “Email Settings” screen there are only two options available as shown in Figure 8.10. The first is the email address to send emails from and the second is the SMTP server to use to send emails.
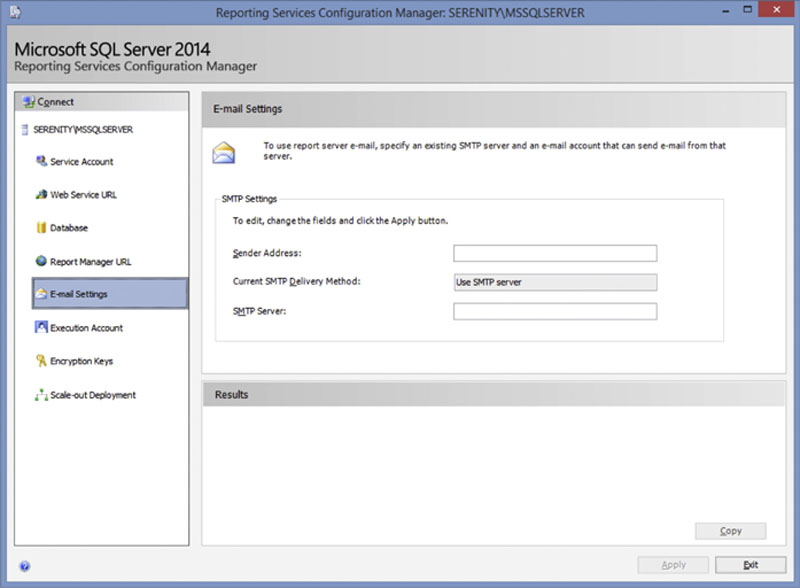
Figure 8.10 Showing the Email Settings screen of the Reporting Services Configuration Manager.
Execution Account
The “Execution Account” screen, shown in Figure 8.11, allows you to specify a separate account which the SQL Server Reporting Services service should use to access objects within the domain such as graphics which are stored on file servers. Reports that are scheduled for execution can also be run under this account. If any reports will be including objects from file servers, or will be writing to file servers for scheduled delivery this account should be a domain account from the Active Directory domain.
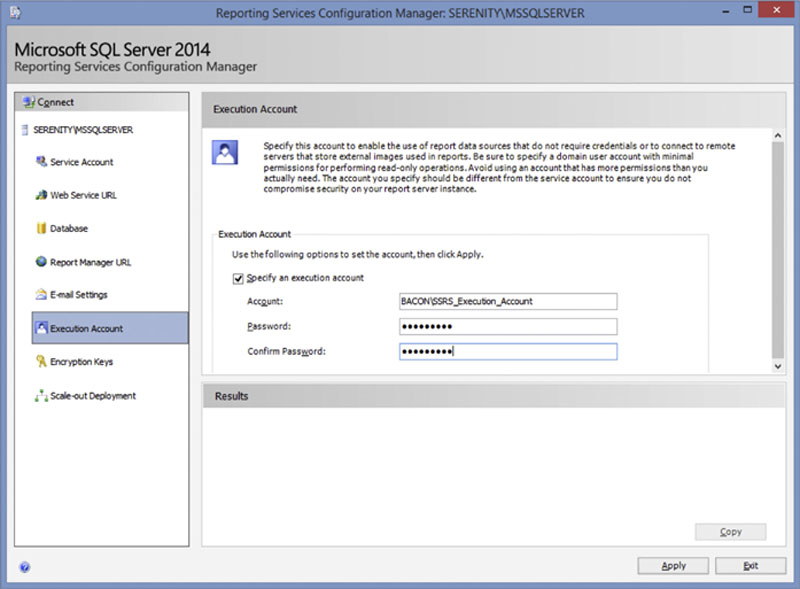
Figure 8.11 Showing the “Execution Account” screen of the Reporting Services Configuration Manager.
Encryption Keys
SQL Server Reporting Services encrypts a variety of data within the SQL Server Reporting Services database (ReportServer by default) and the caching database (ReportServerTempDB by default) such as connection string, stored credentials among other sensitive data. This data is protected by a symmetric key which is created by the SQL Server Reporting Services during the initial configuration. From the “Encryption Keys” screen, shown in Figure 8.12, there are four operations which can be performed. The first operation is to backup the keys. This will protect the keys in the event of a total database failure. When the keys are backed up a password must be specified to secure the backup of the key. The second operation is to restore the encryption key. Restoring the key will require the password which was specified when the keys were backed up. Restoring the key replaces the existing key.
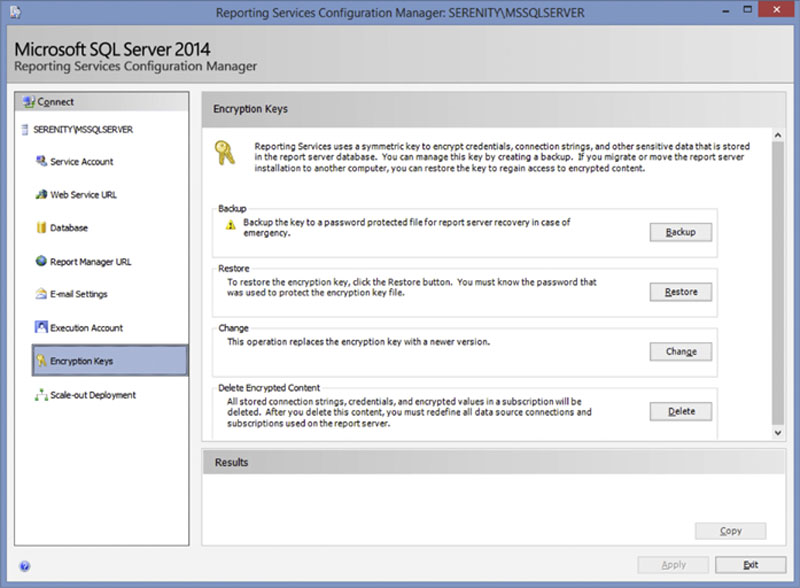
Figure 8.12 Showing the “Encryption Keys” page of the Reporting Services Configuration Manager.
The third operation is to change the encryption key. Normally the encryption key should not need to be changed unless it becomes known that the encryption key has become compromised. If the encryption key is replaced the key should be immediately backed up and the backup placed in a safe place. The fourth operation is to delete the encrypted content. When the encrypted content is deleted all data sources within the Report Server environment will need to be recreated and all report subscriptions will need to be recreated.
Scale-out Deployment
The “Scale-out Deployment” screen, shown in Figure 8.13, is used to allow other Reporting Services servers into a farm configuration. Only servers which are known to be valid servers in the farm should be added into the farm. Once a server is a member of the reporting services scale out farm the server can run reports as well as add other server to the farm. If an attacker server became authorized as a member of the Reporting Services farm the attacker would have access to any data which the data sources which were configured within reporting services had access to. They would also be able to upload new reports into the Reporting Services farm which could give them access to more data than the current set of reports allow access to.
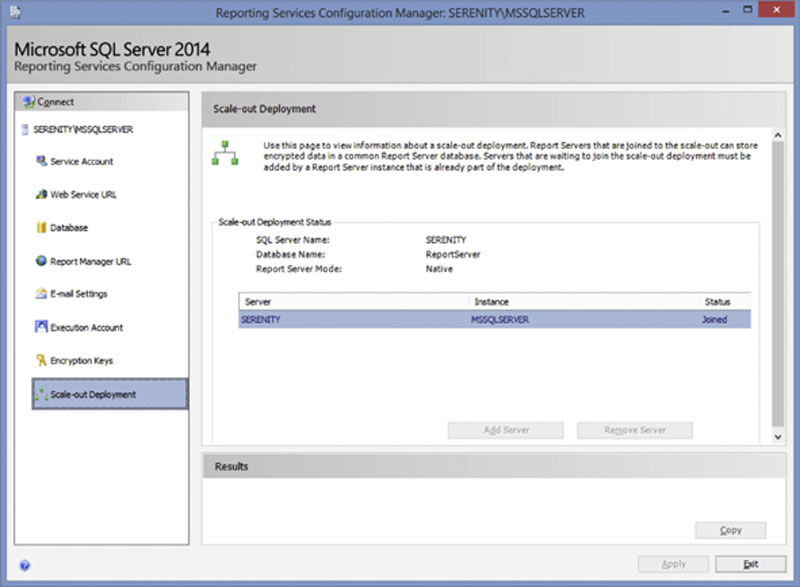
Figure 8.13 Showing the “Scale-out Deployment” screen of the Reporting Services Configuration Manager.
Logging onto SQL Server Reporting Services for the First Time
The first time that you attempt to log onto SQL Server Reporting Services (especially versions 2008 R2 and higher) you will probably be greeted with a screen similar to that shown in Figure 8.14. This is because when User Access Control (UAC) is enabled on a computer running SQL Server Reporting Services even if the users account is a member of the local administrators group when IE (or FireFox or Chrome) runs the application is not running with administrative rights. In order to successfully connect to SQL Server Reporting Services for the first time the web browser will need to be started in administrative mode so that the ACL (Account Control List) which says that the account is a member of the local administrators group to the Reporting Services server.
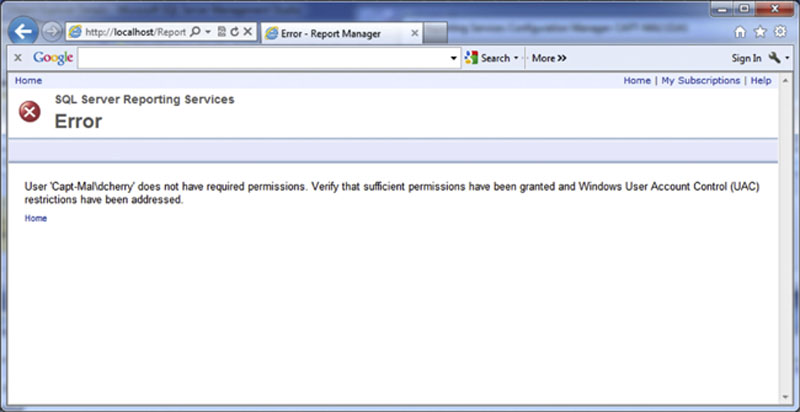
Figure 8.14 Showing the default error message when attempting to access SQL Server Reporting Services.
Security within Reporting Services
When connecting to a brand new SQL Server reporting services instance the first thing that needs to be done is that rights need to be granted to the root folder of the Reporting Services website so that the users who need to view the Reporting Services site can. This is done by logging into the SQL Server by an account which has administrative rights to the reporting services site by default. If there is no way to get connected to the Reporting Services site the list of users who have administrative rights to the Reporting Services site can be found by querying the dbo.Users table from within the ReportServer database. If when configuring the Reporting Services site you are logged into the server which is running Reporting Services it may be necessary to run the web browser in administrative mode by right clicking on the web browsers icon in the start menu or the task bar and selecting “Run as administrator” as shown in Figure 8.15.
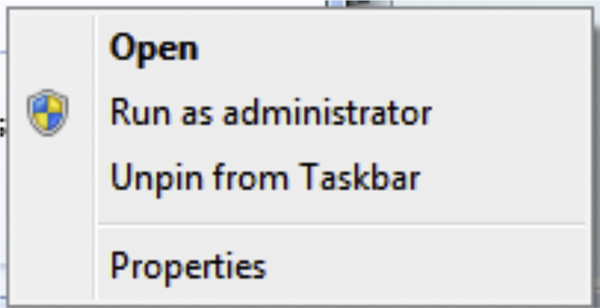
Figure 8.15 Context menu shown when right clicking on the Internet Explorer icon on the task bar.
Item Roles
After successfully connecting to the SQL Server Reporting Services website you should see a screen similar to that shown in Figure 8.16. From the home screen click on the “Folder Settings” option in the menu on the top in order to add new users rights to the home folder as shown in Figure 8.17.
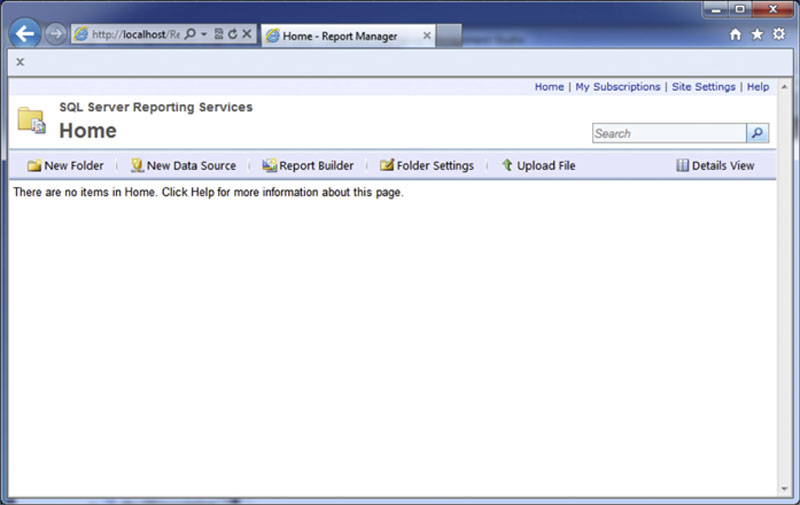
Figure 8.16 Showing the default SQL Server Reporting Services home screen.
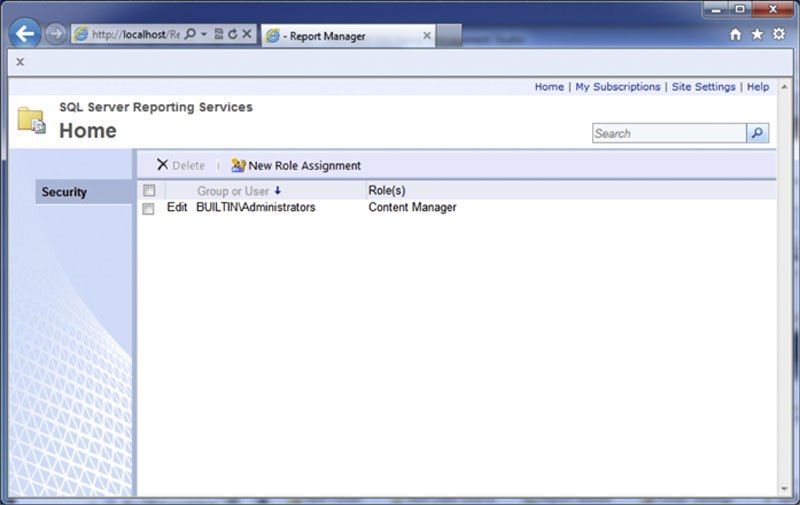
Figure 8.17 Showing the default permissions to the root folder of the SQL Server Reporting Services website.
After getting the permissions list, as shown in Figure 8.17, new rights can be added by clicking on the “New Role Assignment” button which can be seen in the middle-ish top part of Figure 8.17. The “New Role Assignment” screen, shown in Figure 8.18, allows for adding a Windows domain or local account rights to the SQL Server Reporting Services site.
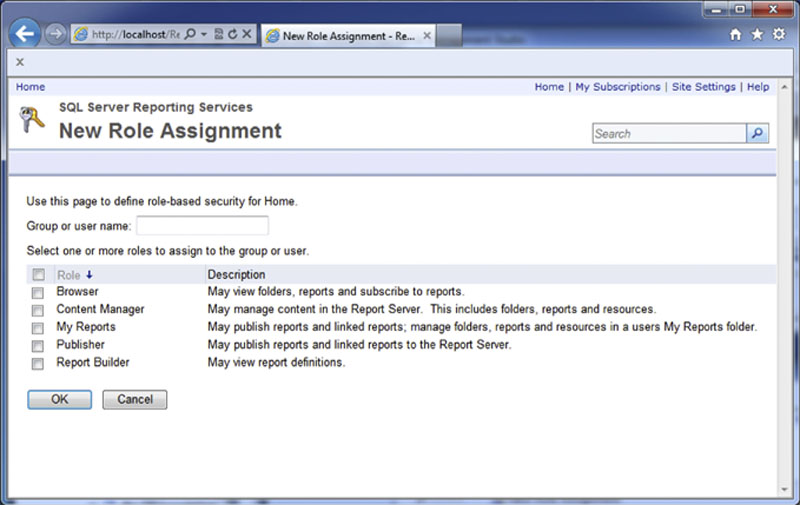
Figure 8.18 Showing the “New Role Assignment” screen within SQL Server Reporting Services.
There are five different roles which can be granted by default to users. The “Browser” role allows users to view folders, reports as well as to subscribe to reports. The “Content Manager” role allows the user to manage the content within the report server folder that the user has the right within. The “My Reports” role allows the user to publish reports, link to reports, manage folders, reports and resources within the users “My Reports” folder. The “Publisher” role allows the user to publish reports and create links to other reports. The “Report Builder” role allows the user to view the report definitions.
Users who will be managing the SQL Server Reporting Services Reports, probably the DBA staff and/or the system admin team and/or the BI developers should be added to the Content Manager role as this will give them full rights within the SQL Server Reporting Services website.
System Roles
There are two system-wide roles which can be assigned to users which are separate from the folder roles. These system roles are the “System Administrator” role and the “System User” role. The “System Administrator” role allows for total management of the SQL Server Reporting Services website, while the “System User” role allows for users to view system properties, shared schedules, and grants them the ability to use Report Builder or other clients that execute reports.
Adding users to the system roles is done by clicking on the “Site Settings” link in the upper right of any page, then by clicking on the “Security” tab on the left as shown in Figure 8.19. Adding users to system roles requires that the user making the change be a member of a system role which has the “Manage report server security” right granted to it (more about this right later in this section).
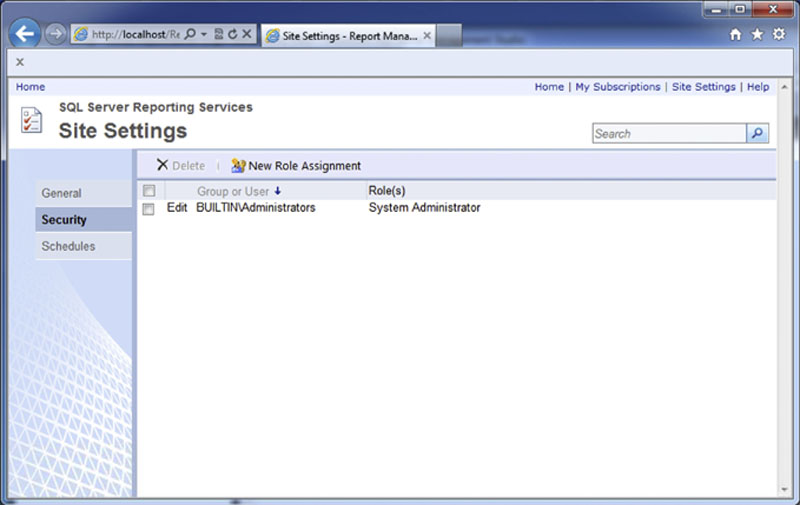
Figure 8.19 The Site Settings > Security page.
From the security tab new members of the system roles can be added by clicking the “New Role Assignment” button which will bring up the screen shown in Figure 8.20 which allows a Windows group name or Windows username to be entered as well as for the correct system role to be selected.
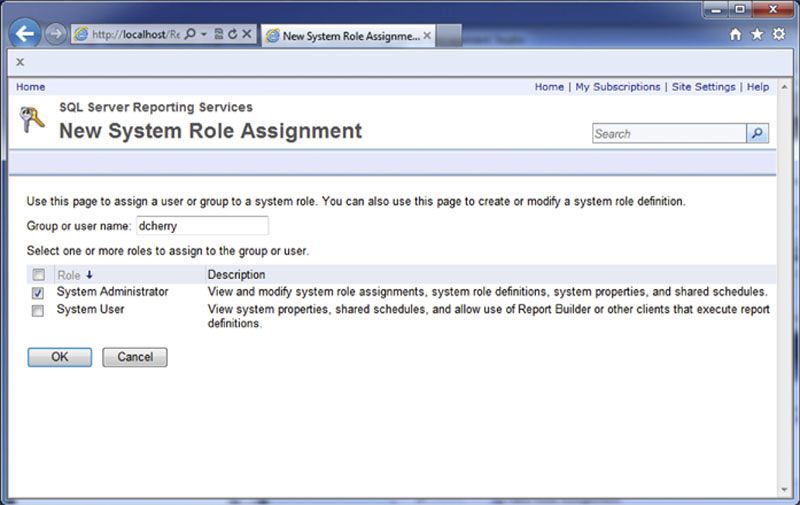
Figure 8.20 Showing the page to add new users to the system roles.
After clicking OK on the screen shown in Figure 8.20 the user will have the granted rights and will be added to the list of users shown in Figure 8.19.
Adding System Roles
New System Roles can be added by using SQL Server Management Studio. To do so connect to the SQL Server Reporting Services instance with the SQL Server Management Studio object explorer. Then navigate to Security > System Roles to view the current roles and to add new ones. Adding a new role requires simply right clicking on System Roles and selecting “New System Role” from the context menu which opens. This will open the window shown in Figure 8.21 which allows the new system role to be named and the specific tasks to be granted to the role. Adding system roles within the SQL Server Reporting Services farm requires that the user be a member of a role which has the “Manage Roles” right granted to it.

Figure 8.21 Creating a new system role.
There are 9 tasks which can be granted to system roles as shown in Table 8.2. While the rights to the pre-defined system roles can have their rights modified it is recommended that they not be changed and instead new system roles be created.
Table 8.2
System Roles Available in SQL Server Reporting Services
| Task Name | Description |
| Manage roles | Create, view, modify and delete role definitions. |
| Manage report server security | View and modify system-wide role assignments. |
| View report server properties | View properties which apply to the report server. |
| Manage report server properties | View and modify properties that apply to the report server and to items managed by the report server. |
| View shared schedules | View a pre-defined schedule that has been made available for general use. |
| Manage shared schedules | Create, view, modify and delete shared schedules used to run reports or refresh a report. |
| Generate events | Provides an application with the ability to generate events within the report server namespace. |
| Manage jobs | View and cancel running jobs. |
| Execute report definitions | Start execution from report definition without publishing it to the Report Server. |
Adding Folder Roles
Like system roles, new folder roles can be added for customizing permissions within the Report Server Interface. Like the system roles new folder roles are created within SQL Server Management Studio. To do so connect to the SQL Server Reporting Services instance with the SQL Server Management Studio object explorer. Then navigate to Security > Roles to view the current roles and to add new ones. Adding a new role requires simply right clicking on Roles and selecting “New Role” from the context menu which opens. This will open the window shown in Figure 8.22 which allows the new system role to be named and the specific tasks to be granted to the role. Adding new roles requires that the user be a member of a system role which has the “Manage Roles” right assigned to it.
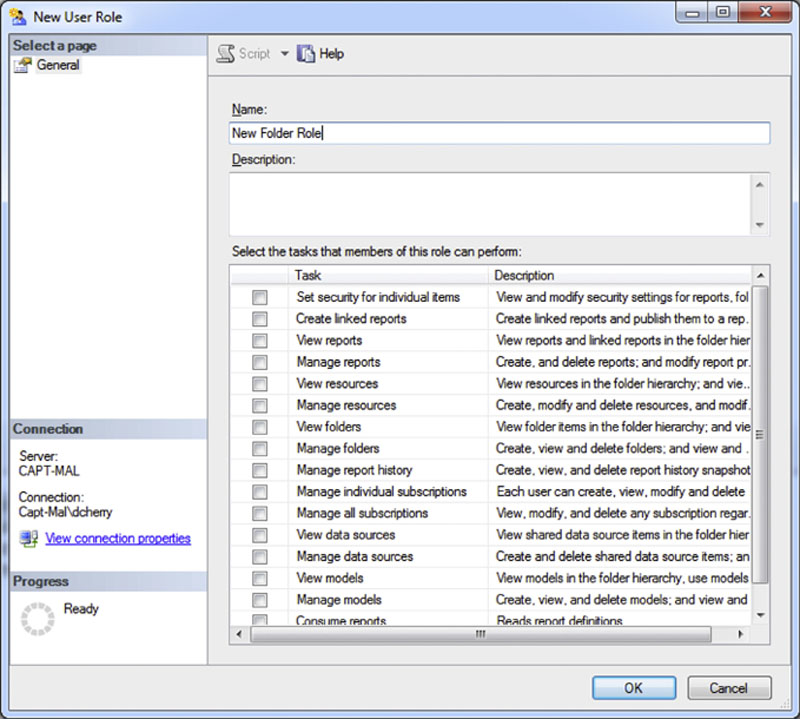
Figure 8.22 Creating a new folder role within SQL Server Management Studio.
There are 16 tasks which can be granted to new folder roles which are listed in Table 8.3. While the rights to the pre-defined folder roles can have their rights modified it is recommended that they not be changed and instead new folder roles be created.
Table 8.3
Tasks Available for New Folder Roles
| Task Name | Description |
| Set security for individual items | View and modify security settings for reports, folders, resources and shared data sources |
| Create linked reports | Create linked reports and publish them to a report server folder |
| View Reports | View reports and linked reports in the folder hierarchy; view report history snapshots and report properties |
| Manage reports | Create, and delete reports; and modify report properties |
| View resources | View resources in the folder hierarchy; and view resource properties |
| Manage resources | Create, modify and delete resources, and modify resource properties. |
| View folders | View folder items in the folder hierarchy; and view folder properties |
| Manage folders | Create, view and delete folders; and view and modify folder properties |
| Manage report history | Create, view and delete report history snapshots; and modify report history properties |
| Manage individual subscriptions | Each user can create, view, modify and delete subscriptions that he or she owns. |
| Manage all subscriptions | View, modify, and delete any subscription regardless of who owns the subscription. |
| View data sources | View shared data source items in the folder hierarchy; and view data source properties. |
| Manage data sources | Create and delete shared data source items; and modify data source properties. |
| View models | View models in the folder hierarchy, use models as data sources for a report, and run queries against the model to retrieve data. |
| Manage models | Create, view, and delete models; and view and modify model properties. |
| Consume reports | Reads report definitions |
Reporting Services Authentication Options
Other than the database engine (which hopefully is not ever configured directly connected to the Internet, as talked about in Chapter 1), SQL Reporting Services would be the only SQL Server Service that would be directly connected to the Internet. SQL Server Reporting Services can be directly connected to the internet so long as it is secured by using SSL encryption. As SQL Reporting Services provides a wide variety of information, it should be properly configured to prevent unauthorized access to the reports.
SQL Server Reporting Services 2005 and below require Internet Information Services (IIS) in order to function. When installing these older versions of SQL Server Reporting Services on Windows 2008 or newer, there is a much more granular control about what IIS features are being installed on the server. As with the SQL Server Services, only install the features that you will be using. If the server hosting the SQL Server Reporting Services will not be using classic ASP (as an example), then do not install and/or configure classic ASP. The same goes for the other native features that the Reporting Services does not need to use. The features that SQL Server Reporting Services uses that should be installed are the following:
• .NET Extensibility
• ASP.NET
• ISAPI Extensions
• Default Document
• Directory Browsing
• HTTP Errors
• HTTP Redirection
• HTTP Logging
• Request Filtering
• Windows Authentication
Other features can be installed as needed, but only when needed.
When configuring SQL Reporting Services to be accessed from the public Internet, it is always recommended to use SQL Reporting Services over SSL (or HTTPS) instead of HTTP. When using HTTP and SQL Reporting Services prompts for authentication, the username and password that the end user submits will be transmitted in plain text between the web browser (or other application that is calling the SQL Reporting Services website) and the web server. When SQL Reporting Services is configured to use SSL and the user uses SSL by putting HTTPS in front of the SQL Reporting Services website name, instead of HTTP, then the username and password are encrypted before being sent from the web browser (or other client application) and the web server that is hosting the SQL Reporting Services application. This holds true for SQL Reporting Services 2008 and higher, even though these versions do not rely on IIS in order to run.
Anonymous Authentication
Whenever possible, Anonymous Authentication should be disabled on all SQL Server Reporting Services instances. When Anonymous Authentication is enabled, anyone who connects to the reporting services instance will have access to the reports that are configured to be viewed by the account to which the Anonymous Authentication account is mapped. When using SQL Reporting Services 2000 or 2005, Anonymous Authentication can be easily enabled within the IIS Manager. However, when using SQL Reporting Services 2008 and above, Anonymous Authentication is very difficult to configure as SQL Reporting Services 2008 and above no longer are hosted by the Windows IIS. This is because SQL Reporting Services 2008 and above use the Windows APIs and host the web service within the SQL Reporting Services service directly. When configuring SQL Reporting Services 2005 and below, always ensure that Anonymous Authentication is disabled, as shown in Figure 8.23. This is done by following these X steps on Windows 2003:
1. Right click on the “Reports” or “ReportServer” virtual folder within IIS Manager (the folder names may be different depending on your configuration).
2. Select properties from the context menu that opens.
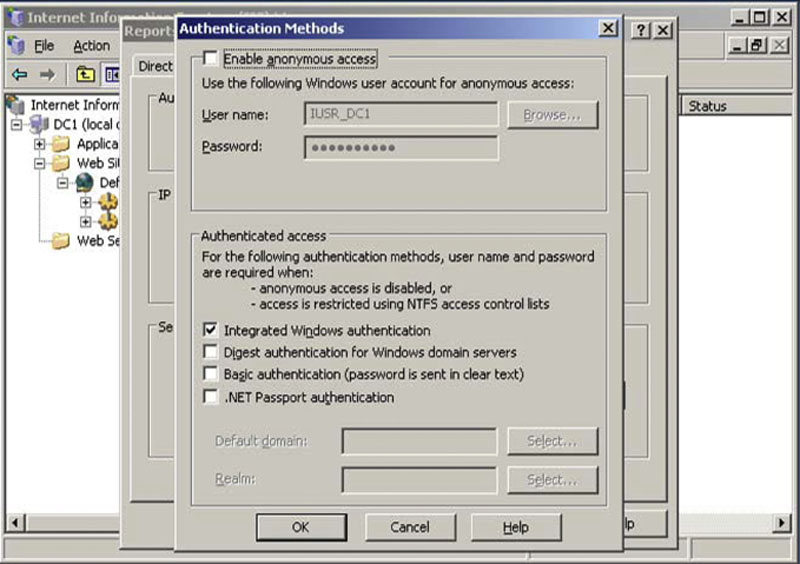
Figure 8.23 Internet Information Manager showing Anonymous Authentication being disabled for the Reporting Services web application when using Windows 2003 or lower.
When using Windows 2008 or newer, the steps are a little different, with the final result shown Figure 8.24.
1. Navigate to the reports folder in the menu tree.
2. Double click Authentication from the menu on the left.
3. Select Anonymous Authentication from the new screen on the right.
4. From the “Actions” menu on the far right, select disable (this can also be found by right clicking on “Anonymous Authentication”).

Figure 8.24 Internet Services Manager for Windows 2008 or higher showing Anonymous Authentication being disabled for the Reporting Services web application.
Once Anonymous Authentication has been disabled, ensure that some sort of authentication is used that requires the user to specify a username and password. Typically this would be done via domain authentication through active directory authentication, but it can also be done using a technique called forms authentication.
Working Around Anonymous Authentication Requirements
Often we use Anonymous Authentication so that report services users can simply navigate to the reporting services website and browse the various reports which are available. Often this is done because the URL to access the reporting services website is imbedded within another website so it is assumed that all the authentication is being done at the parent application layer. However this still exposing the reporting services website potentially to the public Internet with some of your company’s data therefore potentially being exposed to those who should not have access to the data.
A more secure option would be to build the reporting services reports directly into the application. This allows the web server which needs to display the reports to authenticate against the reporting services website using the web servers service account instead of allowing anyone to access the reporting services website. This has an added bonus of taking the reporting services website off of the public Internet as it only needs to be accessed from the web server and not from the public internet.
The native folder structure can be displayed in the calling application by using the native Reporting Services APIs to request the directory structure which can then be displayed, with the reports then shown in the report viewer object within the .NET web application. This presents not only a more secure report delivery method but also a more consistent user experience for the end users of the application.
Forms Authentication
The security technique called forms authentication allows for a database table of usernames and passwords to be used for the authentication against reporting services. Forms authentication is an advanced configuration which, though complex to set up, allows for greater flexibility when designing the reporting solution. The reason that it allows for greater flexibility is that forms authentication permits users to use a username and password that are stored securely within a database table, or LDAP database, and so on, allowing for the reporting services authentication to be keyed off of another application’s authentication provider instead of being tied specifically to Active Directory authentication.
When using Windows credentials to handle Reporting Services authentication, the process is very straightforward. The login process happens in the same way that is described within the “SQL Server Password Security” section of Chapter 3. After the normal Windows Authentication process is completed, the Reporting Services ASP.NET application passes the user’s information to the reporting services database to see what folders and/or reports the user should be able to view. When using forms authentication, however, the process is much different.
1. The user browses to the Reporting Services website.
2. The website redirects the user to the login form where the user enters in the username and password.
3. The username and password are passed from the website to the user-supplied security extension, which then checks against the database table or other authentication source.
4. Upon a successful authentication attempt, the Reporting Services ASP.NET application creates an authentication ticket (which is stored within a web browser cookie) and verifies the role that the user has been assigned to within the Reporting Services environment.
5. The cookie created in the prior step is passed to the user’s web browser, and the user’s reporting services page is displayed.
6. When the user navigates throughout the SQL Reporting Services website, the cookie is uploaded for each request, and the reporting services application checks with the user-defined security extension to determine whether the user has the right to perform the requested action.
7. If the user has the needed right, then the report or the menu is displayed to the user.
Security within Reporting Services
Once SQL Reporting Services is set up and is prompting users for authentication, the security job is not done. In most Reporting Services environments, not all users have the need to view all the reports within the SQL Server Reporting Services environment. When this is the case, the native security should be used to enforce security on the folders and reports.
Probably the easiest way to secure the reports and folders is to create domain (or local) groups for each group of people who need access to a group of reports (you can use existing domain groups if those exist already). You can then edit the security properties of the folders, or the specific reports, and remove the rights for all users to view the objects; you can also add in the specific groups that need to have access to the objects. When removing rights from the groups, be sure to leave in (or put in) the group that contains the database administrators (or other users who have the rights to deploy reports), so that report deployment is not blocked.
If forms-based authentication is being used, then the permission to view folders and reports must be controlled through the security provider, which is developed in house.
Report Server Object Rights
Once the System Roles and Folder Roles and created within SQL Server Management Studio (earlier in this chapter), not much administration of SQL Server Reporting Services is done via SQL Server Management Studio. Securing the reports and data sources is done from within the Report Manager itself where users and added to roles which rights users rights on various folders and if needed specific objects within the folders. Each object can have its security inherited from its parent object, the folder which it resides in, or rights can be granted to each specific object within the Reporting Services website so that specific users have rights to see specific reports. The default configuration is that all objects inherit their permissions settings from their parent making it very easy to change the permissions of an entire branch of the reporting services configuration quickly and easily.
Another neat feature of the Reporting Services website is the ability to hide objects from the default view. While this is at best “security by obscurity” this does give a quick way to change make objects not available for general users who would normally only use the object view but still making the objects available for the more advanced users who know how to view the list view.
Changing Permissions on an Object
Changing rights on an object within the SQL Server Reporting Services web site is easy. The easiest way is to open the object you wish to modify then select the “Folder Settings” button if the object is a folder or the “Properties” button if the object is a report, then select the “Security” tab on the left hand side of the screen as shown in Figure 8.25.

Figure 8.25 The security properties of a folder.
After bringing up the security properties clicking the “Edit Item Security” button will bring up a screen similar to that shown in Figure 8.18. This will allow for adding or removing rights to the object.
Hiding Objects
Hiding objects requires simply viewing the properties of an object. To do so open the folder or report and click the “Folder Settings” button if the object is a folder or the “Properties” button if the object is a report. On the properties page which opens by default there is a “Hide in tile view” checkbox as shown in Figure 8.26. Checking this checkbox and clicking apply will make the object hidden in the default tile view for all users including administrators.

Figure 8.26 Showing the “Hide in tile view” checkbox on the properties of a folder.
This “Hide in tile view” settings can also be applied to Data Sources by simply editing the data source by clicking on it as shown in Figure 8.27.
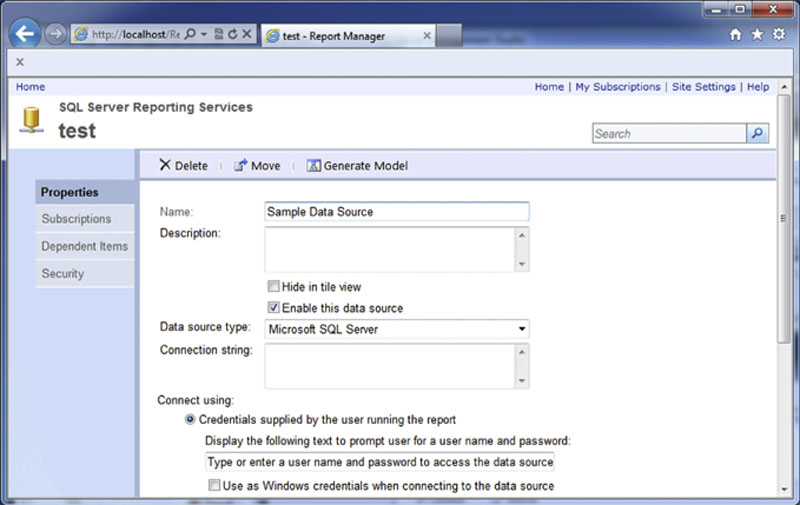
Figure 8.27 Showing the “Hide in tile view” setting on the properties page of a data source.
Summary
Microsoft SQL Server Reporting Services can when properly configured provide a secure and safe report delivery system which is fully capable of delivering reports to users which contain sensitive data with no risk of data being leaked to unauthorized users. While the security configuration of SQL Server Reporting Services can seem complex at first, once you get used to the specific terminology and concepts it becomes rather straightforward rather quickly.