Chapter 12
Auditing for Security
Abstract
In this chapter we look into using auditing to ensure that security best practices are being followed so that the database instance is secure.
Keywords
auditing
C2
policy-based management
PBM
xEvents
Information in this chapter
• Login auditing
• Data modification auditing
• Data querying auditing
• Schema change auditing
• Using policy-based management to ensure policy compliance
• C2 auditing
• Common criteria compliance
Setting security policies is a great start, but you need to ensure that the system remains secure. This is where auditing comes into play. Auditing by itself is not good enough; someone needs to review the auditing information that has been collected in order to ensure that the system has remained as secure as expected. This includes monitoring the logins into the database, the data that has been changed, and any changes to the schema.
As you move from the newer versions of Microsoft SQL Server into older versions of the product, there are fewer and fewer auditing features available to you. Microsoft really began putting auditing features into the SQL Server product starting with Microsoft SQL Server 2008. Prior to SQL Server 2008, the auditing options are very limited and have to be mostly done through third-party products or homegrown systems.
Login Auditing
Login auditing in SQL Server falls into two categories: SQL Server 2005 and prior and SQL Server 2008 and newer. SQL Server 2005 and older only provides very basic information, and that information is written to the SQL Server ERRORLOG file and to the Windows Application log. The only configuration option is to enable login failure logging, successful login logging, logging of both successful and failed logins, or logging of neither. SQL Server 2008 and newer allow for a much more granular level of auditing controlled through “Server Audit Specifications.”
SQL Server 2005 and Older
In the older auditing version, a change was made between SQL Server 2000 and SQL Server 2005. While this was a relatively small change, it is a very important one. The change was to include the source IP Address that was attempting to log into the database engine. Before the change to the login auditing specification, the logged messages looked like that shown in Example 12.1, while the post-change audit message looks like that shown in Example 12.2.
Example 12.1
Sample auditing information for a successful login into an SQL Server 2000 or order instance.

Example 12.2
Sample auditing information for a successful login into an SQL Server 2005 or newer instance.

Changing the auditing level setting for the SQL Server instance is most easily done through the Enterprise Manager or SQL Server Management Studio (depending on the version you are using) as the setting is controlled via a registry key. When using Enterprise Manager, connect to the server and right click on the server and select properties. When using SQL Server Management Studio, connect to the server in the object explorer and select properties. Regardless of which version is used, then select the Security tab. Next look for the “Login auditing” section in the dialog box. Here you can select from None, failed only, successful only, or both failed and successful, as shown in Figure 12.1. While the screenshot shown in Figure 12.1 is from Microsoft SQL Server 2008 R2s Management Studio, the dialog from SQL Server 7 and 2000s Enterprise Manager looks very similar to the one shown.
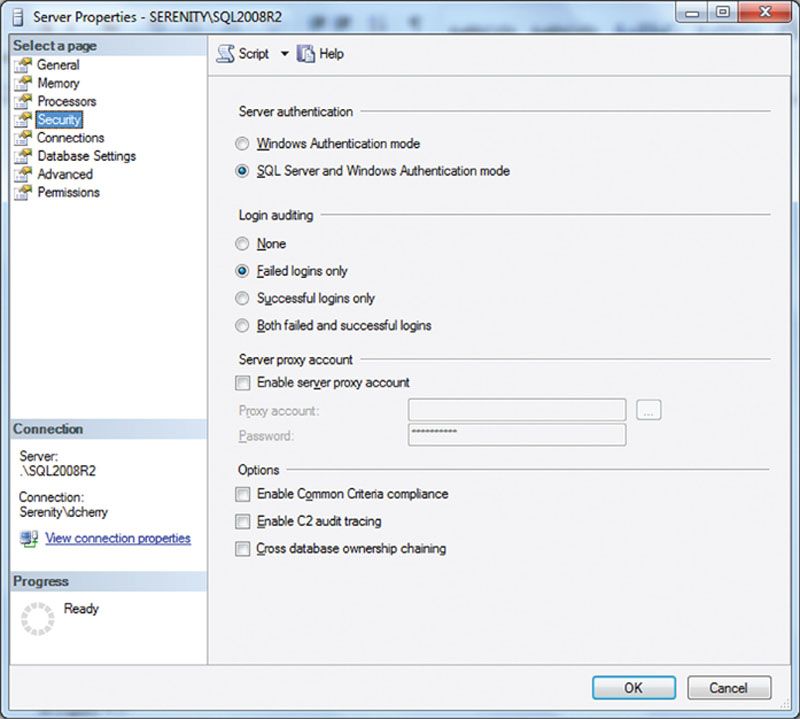
Figure 12.1 The security tab of the server properties dialog from the 2008 R2 version of the SQL Server Management Studio.
If you want to change this setting via T-SQL, you will need to use the xp_instance_regwrite system stored procedure to do this passing in an integer, which defines what the setting should be set to as shown in Example 12.3. A setting of 1 indicates that successful login only should be logged. A setting of 2 indicates that failed logins only should be logged. A setting of 3 indicates that both successful and failed logins should be logged. A setting of 0 indicates that neither failed nor successful logins should be logged.
No matter if you change this setting via T-SQL or the management tool, a restart of the SQL Instance is required before the setting change will take effect.
Example 12.3
Sample T-SQL code: how to change the logging level.

SQL Server 2008 and Newer
Starting in SQL Server 2008, Microsoft introduced SQL Server Audit, which allows the SQL Server to capture a wide variety of information into audit files. The files can then be viewed with SQL Server Management Studio directly, or they can be loaded in mass into a central repository using SQL Server Integration Services for long-term storage, querying, and trending.
When auditing information using the new server-side auditing specification, you first need to tell the SQL Server where to store the audit log. This is done by defining a new audit. An audit can be written to a file on the SQL Server’s local hard drive, a network share, to the Windows Application Log, or to the Windows System Log. In the event that the audit log gets full, one of two things will happen; depending on the configuration of the audit, the auditing will simply stop or the SQL Instance will be shut down. This is controlled through the “Shut down server on audit log failure” checkbox that is shown unchecked in Figure 12.2. The easiest way to create an audit is to do so within the SQL Server Management Studio. To do so:
1. Connect to the SQL Server Instance within the object explorer.
2. Navigate to Security.
3. Navigate to the Audits folder under Security.
4. Right click on Audits and select “New Audit” from the context menu which pops up.
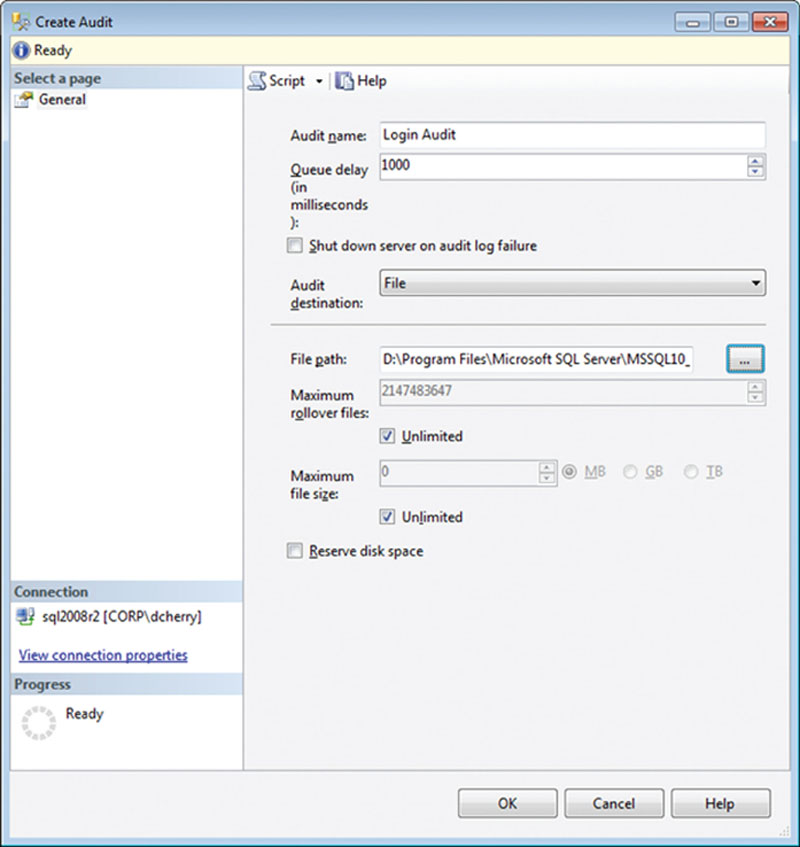
Figure 12.2 The filled out Create Audit screen creating a new audit file in SQL Server.
In the Create Audit screen that opens, give the audit a name, specify the queue delay in milliseconds, and select the audit destination as shown in Figure 12.2. Using a delay of 0 milliseconds indicates that the audit data should be written synchronously to the disk as the commands are executed.
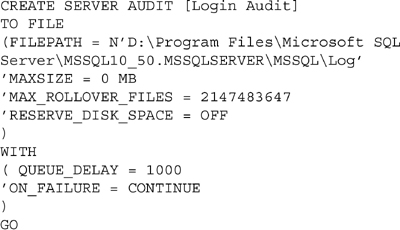
Like all new features with Microsoft SQL Server, you can also create an audit using T-SQL. This is done by using the CREATE SERVER AUDIT command. The command creates the same server audit destination that is created from within SQL Server Management Studio as shown in Example 12.4.
Example 12.4
Creating a server audit using the CREATE SERVER AUDIT statement in T-SQL.
Weather you create the audit using SQL Server Management Studio or T-SQL, you need to enable the audit. You can do this either by right clicking on the Audit within the object explorer and selecting “Enable Audit” or by using the ALTER SERVER AUDIT statement in T-SQL as shown in Example 12.5.
Example 12.5
Enabling a server audit using the ALTER SERVER AUDIT statement.

After creating the audit destination using the CREATE SERVER AUDIT, you can create the Server Audit Specifications. The Server Audit Specifications tell the SQL Server exactly what instance wide actions to audit. In this example, we create a single audit specification that monitors for failed or successful logins and logs that information into the Login Audit file we just created. When creating a Server Audit Specification within SQL Server Management Studio, right click on “Server Audit Specifications” in the object explorer (found directly under the “Audits” folder in the object explorer) and select “New Server Audit Specification.”
In the Create Server Audit Specification window that opens, name the audit and select the Audit to which the information should be saved, as well as the actions that should be audited in the Actions section. In the example presented in Figure 12.3 two different audit actions are shown. The first audit action captures failed logins, while the second audit action captures successful logins.
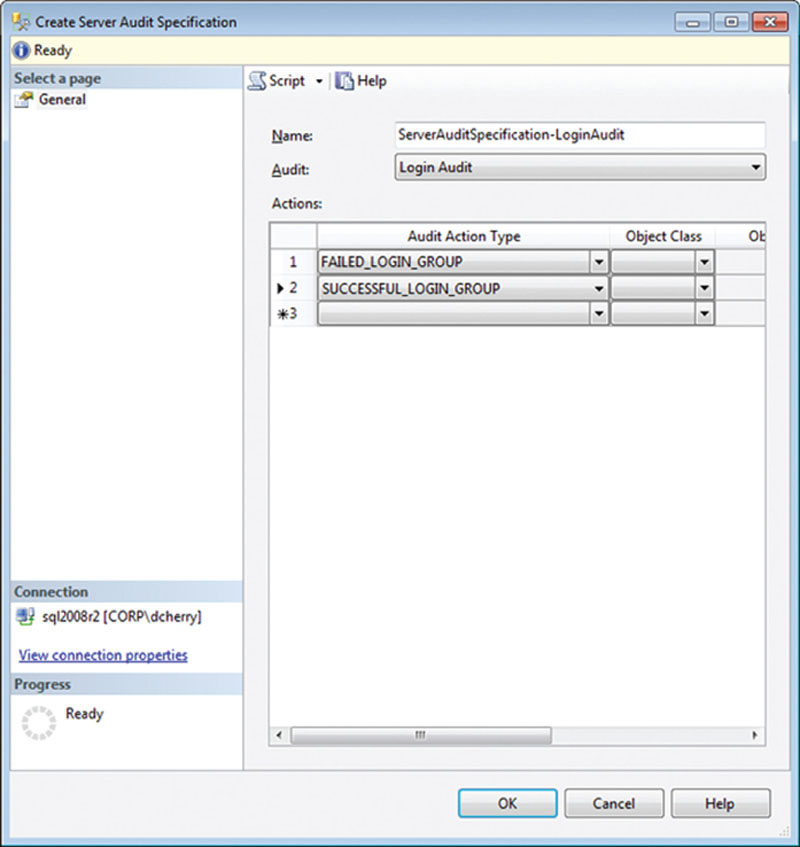
Figure 12.3 Create Server Audit Specification screen capturing both failed and successful logins and writing the data to the “Login Audit” audit file.
A server audit specification can also be created via the CREATE SERVER AUDIT SPECIFICATION statement in T-SQL as shown in Example 12.6.
Example 12.6
Creating a Server Audit Specification using the CREATE SERVER AUDIT SPECIFICATION command in T-SQL.

Weather you create the specification using the SQL Server Management Studio or by using T-SQL, you will need to enable the Server Audit Specification. To enable the specification within SQL Server Management Studio, you can right click on the specification and select “Enable Server Audit Specification” from the context menu. To enable the specification using T-SQL, you can use the ALTER SERVER AUDIT SPECIFICATION statement as shown in Example 12.7.
Example 12.7
Enabling a Server Audit Specification using T-SQL.

Once the Audit and the Server Audit Specification have been enabled and a user logs into the database, instance data will begin being logged into the Audit file. If the Server Audit Specification is enabled but the Audit is disabled, then no information will be collected for any of the Audit Specifications which are writing to that Audit. Both the Server Audit Specification and the Audit need to be enabled for data collection to begin. To view the information within the file, locate the Audit within the object explorer. Then right click on the Audit and select “View Audit Logs” from the context menu that pops up. This will open the log file viewer reading the log file information into the grid for easy viewing, filtering, sorting, and searching, as shown in Figure 12.4.
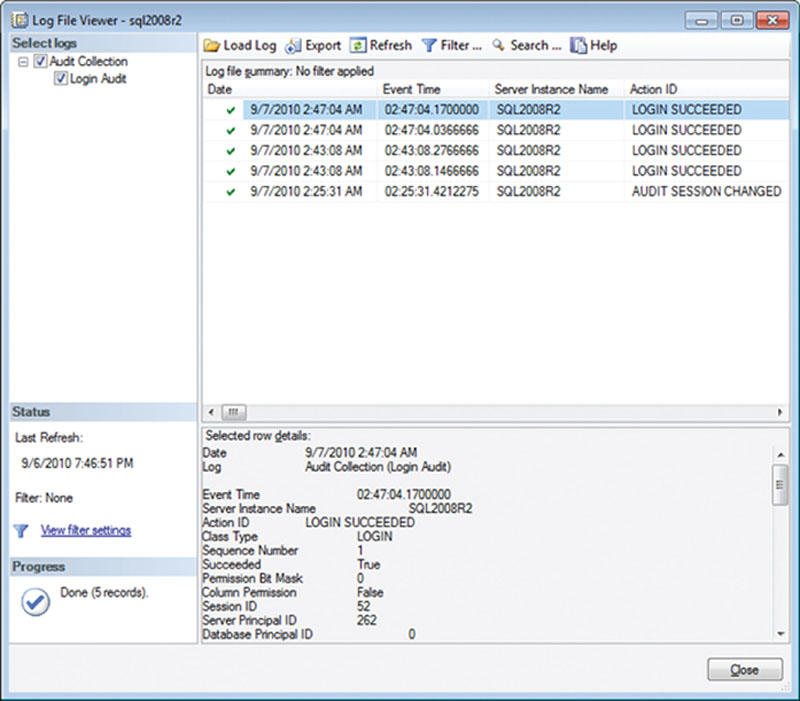
Figure 12.4 Showing the audit log for the Audit and Server Audit Specification shown in Figures 12.2 and 12.3.
You can also query the data using a T-SQL statement by using the fn_get_audit_file function as shown in Example 12.8. The guide shown in the file path can be found in the audit_guid column of the sys.server_audits system catalog view. The guide shown in your database will be different from that shown in Example 12.8.
Example 12.8
T-SQL code to view the audit information from the specified audit log.

When looking at the output from the fn_get_audit_file system function, the columns of importance are the succeed column, which tells you if the action (in this case a login attempt) was successful; the server_principal_name, which tells you the login name that was used to connect; and the additional_information column, which contains an XML document that has a variety of information in it including the IP Address from which the user was attempting to connect. If the login was not successful, the server_principal_name may be NULL depending on the cause of the login failure, as the login may not have been transmitted to the server.
In the case of login audit information, there will be two different values in the action_id column. These are LGIS and LGIF, where LGIS is for a successful login attempt and LGIF is for a failed login attempt.
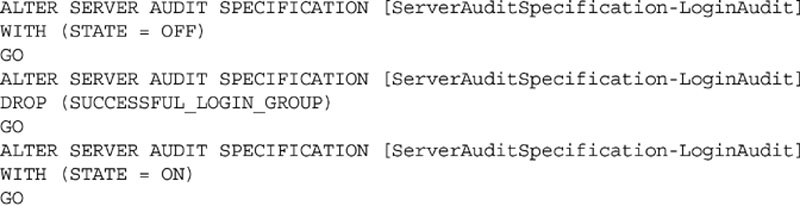
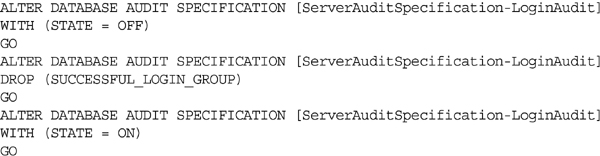
After the Auditing Specifications have been created, they can be modified using either the user interface or the ALTER SERVER AUDIT SPECIFICATION T-SQL statement. In order to make changes to a Server Audit Specification, the Audit Specification must be disabled using the ALTER SERVER AUDIT SPECIFICATION. Then the changes can be made, and the Server Audit Specification can be enabled, allowing it to begin capturing data again as shown in Example 12.9.
Example 12.9
The T-SQL code to disable a Server Audit Specification, changing the specification, then enabling the specification, allowing it to begin capturing data.
One very important item that needs to be audited is any change to the auditing, in order to ensure that the auditing has not been disabled and to allow unaudited changes to be made to the data within the database. Without auditing the configuration of the Auditing, there is no way to guarantee that the auditing configuration today is the same as it was yesterday.
Using xEvents for Auditing Logins
One of the features introduced in SQL Server 2008 is the Extended Events features, also called xEvents. Extended Events are system level events which are triggered when specific things happen within the SQL Server database engine. The variety of things which can be monitored by Extended Events is very large, and will not be covered here in its entirety. One of the things which Extended Events can monitor for is for logins to the database engine.
The beauty of the Extended Events system is that the event is logged before it is allowed to be completed. So for example if we wanted to create an Extended Event session which would allow us to capture login information to the SQL Server we would know that all the successful login attempts are being captured as the SQL Server will trigger Extended Events to capture the information before the login is allowed to complete.
Capturing Login Information
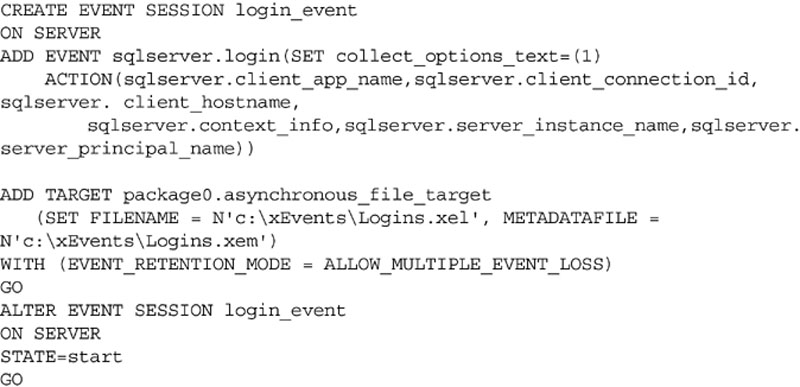
Due to the flexibility of extended events we can capture a great deal of information about the person logging into the SQL Server instance. This includes the application which they are using (as specified by the application_name parameter of the connection string) the client machine name, the ANSI settings they are using, the ID number of the database they are connecting to, if they are using the Dedicated Admin Connection (DAC) to connect as well as the time which they connected. The T-SQL used to create the Extended Event is shown in Example 12.10.
Example 12.10
Creating an Extended Events session to monitor successful logins to the Microsoft SQL Server Instance.
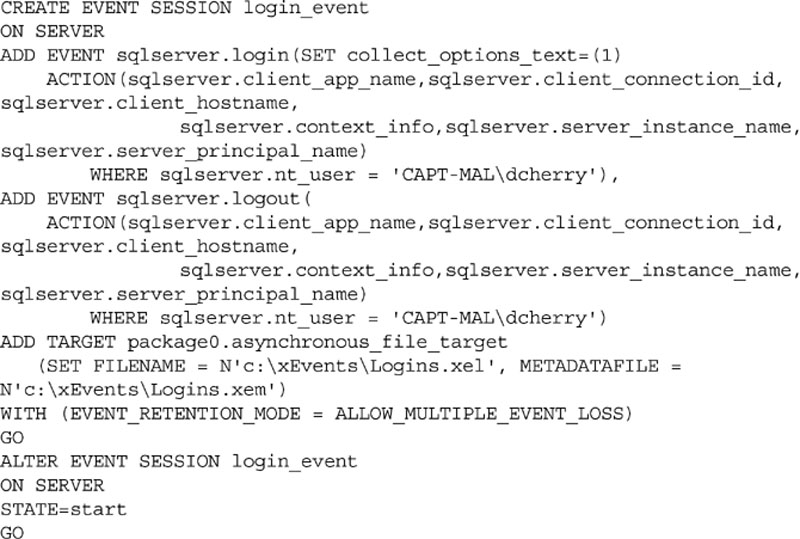
In addition to logging successful logins to the system, you may wish to also monitor logoffs as part of the same Extended Events session. This way you would have an audit trail which shows when a user connected and when they disconnected providing proof that they were (or were not) using the system. Adding the logoff auditing to the session would require simply adding a second ADD EVENT section to the T-SQL shown in Example 12.10, as shown in Example 12.11.
Example 12.11
Monitoring all logins and logouts via Extended Events.

In addition to the values included in Example 12.10 and Example 12.11 there are a lot of other values which can be captured depending on the needs of the audit. Some other values which can be captured are shown in Table 12.1. The values shown in Table 12.1 are not an exhaustive list of items which can be captured.
Table 12.1
A List of Some of the Values Which Can be Captured by an Extended Event Which is Monitoring Logins
| Name | Description |
| client_app_name | Name of the client application which is connecting |
| client_connection_id | ID of the connection by the client |
| client_hostname | The hostname of the connecting computer |
| collect_system_time | The system time when the login was attempted with 100 microsecond precision and interrupt tick resolution |
| database_id | The ID of the database which the user is connecting to |
| database_name | The name of the database which the user is connection to |
| is_system | If the connection is a system process or a user process |
| nt_username | The Windows NT username of the connection user |
| numa_node_id | The NUMA node which the user connection was processed by |
| process_id | The Windows process ID |
| server_instance_name | The name of the SQL Server instance which handled the login |
| server_principal_name | The name of the Service Principal which handled the login |
| server_principal_sid | The SID of the Service Principal which handled the login |
Event Loss Settings
You will notice in Example 12.10 and Example 12.11 that the EVENT_RETENTION_MODE is configured for ALLOW_MULTIPLE_EVENT LOSS. It is important to know what this setting means when configuring events for auditing. The EVENT_RETENTION_MODE setting tells the Extended Event session what should happen to the calling command if the event is not able to be written to the Extended Events logs due to system load. If the setting is set for ALLOW_MULTIPLE_EVENT_LOSS like it is in Example 12.10 and Example 12.11 then logins would be allowed to continue even if the event could not be logged. If the setting is configured for the value ALLOW_SINGLE_EVENT_LOSS than only a single event at a time could be dropped while succeeding causing any other events that could not be logged during the same stretch of time when the system was overloaded to fail if they cannot be logged. The third setting of NO_EVENT_LOSS means that the event must always be logged. When doing critical auditing the NO_EVENT_LOSS audit might be the one which you select, however doing so may cause system issues if the system becomes overloaded as the users would not be able to log into the database engine if the system became too busy.
Typically it would be recommended to not configure a login audit via Extended Events with NO_EVENT_LOSS unless the Extended Event was configured for a specific user. Starting with SQL Server 2012, the event session supports adding WHERE clauses to the event creation instead of just the viewing of the captured data. This is done by adding WHERE clauses to each of the ACTION sections of the CREATE EVENT SESSION statement as shown in Example 12.12.
Example 12.12
Creating an Extended Event session to monitor a single user’s logins.
When monitoring just a single users as shown in Example 12.12 use of the NO_EVENT_LOSS setting is much safer as a single user should not be attempting to log into the database that often and because the other users logins would not be triggering the event to begin with there should be no risk of the login failing due to not being able to log the event.
Viewing Login Audits
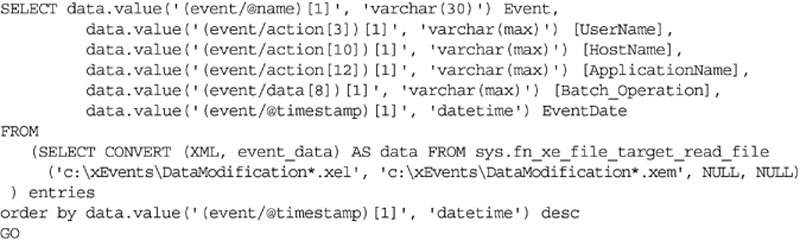
Viewing data which has been captured by extended events is done through T-SQL by using the fn_xe_file_target_read_file system function as shown in Example 12.13. This function will return no data until the Extended Event capture listed above has been configured, started, and data has been captured by it.
Example 12.13
Querying the captured login and logoff data using sys.fn_xe_file_target_read_file.

There would be no need to use extended events on a SQL Server instance which is already configured to monitor for logins and logoff by using the Server Audit Specifications discussed earlier in this chapter. This is because Server Audit Specifications use Extended Events under the covers to handle the monitoring and data collection, so using both Server Audit Specifications and Extended Events on the same system would be rather pointless as the same information would be audited twice. Both options are available to the database administrator so that they can make the decision as to which option is better for their specific situation.
Auditing Sysadmin Domain Group Membership
Another potential area which can be exploited by people wishing to grant themselves membership to the System Administrators fixed server role is by attacking Active Directory directly. Typically all the people who would need to be members of the System Administrators fixed server role (which would typically be the Database Administrators) have all their domain accounts placed into a single domain group then that domain group is simply added to the System Administrators fixed server role on each of the SQL Server instances.
While this process makes it very easy to give new Database Administrators and Database Consultants admin rights to the SQL Server there is an inherent risk to this as well. Any account who is not a supposed to be a member of that group but is will also be a member of the System Administrators fixed server role on the SQL Server instances. Because the SQL Server does not control the membership of this domain group, SQL Server itself cannot audit the membership of this group. This means that the group membership should be audited manually on a regular basis to ensure that the group membership has not changed.
In addition to this, the domain group which is used to grant membership to the System Administrator fixed server role should be secured so that the only people who can add or remove members from this domain group are the domain admins. Typically, especially in larger companies, groups other than Windows Administration team, such as the internal Help Desk, would handle Active Directory group changes. While this is normally a fine procedure to have in place, there are some domain groups which these other teams do not have access to so that they are unable to give themselves higher level privileges. By default these would include domain groups like the Domain Admins, Enterprise Admins, etc. The domain group which grants sysadmin rights to the SQL Servers should be treated like another high level permissions group along the same lines as the Domain Admins and Enterprise Admins groups. By having support personal other than the Domain Admins granting membership to this group presents an unacceptable risk of someone being put into the sysadmin fixed server role either by accident or on purpose.
The simple fact is that the people in the Help Desk or another group which have permissions to manage the bulk of the Active Directory security groups are probably lower level staff. These lower level staff while a trusted group of employees are typically paid less, have less experience, and are not given the keys to the entire enterprise. They therefore should not have the ability to grant themselves or anyone else, either by accident or on purpose, administrative level rights to the SQL Servers within the enterprise.
Data Modification Auditing
Auditing of Data Modification in versions of Microsoft SQL Server 2008 and older is much harder to do because it all needs to be done manually. Microsoft SQL Server 2008 R2 introduced the Change Data Capture (CDC) feature to the product. Once configured, CDC is used to capture all insert, update, and delete activity that occurs on the tables in question.
Adding any auditing to the database will increase the CPU load by some extent as additional work is being performed by the database engine. To keep this increase to the minimum, only audit the information required so as to reduce the performance impact on the database engine. The amount of additional load that will be added to the database by enabling Change Data Capture will depend on a variety of things, including the number of transactions per second and the number of columns that are being changed within each transaction.
Change Data Capture Configuration
Before you can use Change Data Capture, it must be enabled on both the database that is to be monitored and the specific tables within the database that are to be tracked. CDC is enabled on a specific database using the sys.sp_cdc_enable_db system stored procedure as shown in Example 12.14. Change Data Capture is disabled by using the sys.sp_cdc_disable_db system stored procedure.
Example 12.14
Enabling Change Data Capture on the MyDatabase database.

When the sys.sp_cdc_enable_db system stored procedure is run, a new user will be created within the database with the name cdc, as will a new schema named cdc, which will hold the Change Data Capture tables. The tables that are created are as follows.
1. cdc.captured_columns, which contains one row for each column in each table that is being tracked.
2. cdc.change_tables, which contains one row for each table being tracked.
3. cdc.ddl_history, which contains the schema modification changes to the tables that are being tracked.
4. cdc.index_columns, which contains one row for each index column within the tables that are being tracked.
5. cdc.lsn_time_mapping, which contains one row for each transaction that has rows in a table being tracked. This is used to map the time transactions that are logged to the specific log sequence number (LSN) that logged the change. There may be rows in this table when there are no changes, which allows for the completion of LSN processing in time periods of low or no user activity.
After Change Data Capture has been enabled for the database, it can then configure Change Data Capture for the specific tables that need to be tracked. This is done using the sys.sp_cdc_enable_table system stored procedure. The stored procedure sys.sp_cdc_enable_table has nine parameters, but only three of them are required. These required parameters are as follows.
1. @source_schema, which is the schema of the table to be tracked.
2. @source_name, which is the object name (without the schema) of the table to be tracked.
3. @role_name, which is the name of a database security role that will be created if it does not already exist. This role can be ignored, or it can be used to assign permissions to users so that they can access the data that Change Data Capture has captured. Multiple captured tables can use the same role, but any user who is a member of this role will have access to read the captured data for all those tables.
The six optional parameters for the sys.sp_cdc_enable_table system stored procedure are as follows.
1. @capture_instance, which is the name that will be used to capture the change data for this specific table. If not specified, the system will auto generate a name based on the values of the @source_schema and @source_name parameters.
2. @supports_net_changes, which indicates whether the captured data should support querying for net changes in addition to row-level changes. If this parameter is set to 0, then the functions that support this querying are not created. If this parameter is set to 1, which is the default, then the functions that support this querying are created.
3. @index_name, which indicates the name of the unique index that can be used to uniquely identify the rows within the source table. If the @index_name value is included, the specified index takes precedence over the defined primary key columns as the unique identifier that Change Data Capture uses.
4. @captured_column_list, which indicates what columns within the specified table should be tracked. If not included, all columns are tracked. The column list is a comma-separated list of columns and can be quoted using double quotes (“”) or square brackets ([]) as needed. If a column list is specified, then all columns that are included in the primary key (or the index specified by the @index_name parameter) must be specified.
5. @filegroup_name, which is the filegroup where the Change Data Capture tables should be created. If not specified or if a NULL value is passed in, then the default file group will be used.
6. @allow_partition_switch, which tells the SQL Server if the SWITCH PARTITION command of the ALTER TABLE statement can be executed against the monitored table. If the value is set to 0 (the default is 1) and the table is partitioned, data cannot be moved between partitions. This is done to ensure that CDC data matches the actual data in the table. The SWITCH PARTITION command of the ALTER TABLE statement will move data between partitions, but this change is not logged by Change Data Capture. Thus data captured will not match the source table data if data is moved from one partition to another.
Enabling Change Data Capture to capture all changes on all columns can be easily done using just the first three parameters – @source_schema, @source_name, and @role_name, as shown in Example 12.15.
Example 12.15
Enabling Change Data Capture for the table dbo.MyTable with the role name cdc_MyTable.

Querying Changed Data
Querying data from the Change Data Capture tables is done through a system of table-valued functions. For each table being tracked by CDC, a function whose name starts with “cdc.fn_cdc_get_all_changes_” and ends with the name of the capture instance as specified by the @capture_instance parameter (or the @source_schema and @source_name parameters if the @capture_instance parameter is not specified) of the sys.sp_cdc_enable_table system stored procedure.
If the @supports_net_changes parameter of the sys.sp_cdc_enable_table system stored procedure was set to 1 (or true), then a table-valued function whose name starts with “cdc.fn_cdc_get_net_changes_” and ends with the name of the capture instance as specified by the @capture_instance parameter (or the @source_schema and @source_name parameters if the @capture_instance parameter is not specified) of the sys.sp_cdc_enable_table system stored procedure will also be created. This “cdc.fn_cdc_get_net_changes_” function allows the user to query for the net changes instead of the individual changes.
Querying these table-valued functions requires use of the cdc.lsn_time_mapping system table. This table will show the transaction log LSN and will map it to the system time that the LSN was logged. These LSNs must be used to pass into the table values functions as the first two parameters. Both table-valued functions require three parameters:
1. from_lsn is the first LSN to process.
2. to_lsn is the last LSN to process.
3. filter_option accepts one of two values “all,” which returns all values within the LSNs, or “all update old,” which returns both the old and new values for each row. The “all update old” value will return twice as many rows as the “all” option, as the “all update old” returns one row for the old value and one for the new value.
The easiest way to get the needed data from the cdc.lsn_time_mapping table is to use the system functions sys.fn_cdc_get_min_lsn and sys.fn_cdc_get_max_lsn. The min_lsn function accepts a single parameter, which is the name of the capture instance that is specified when creating the capture and the function returns the minimum stored LSN for that table. The max_lsn function does not accept any parameters and returns the most recent LSN for the database. These functions are used in conjunction with the cdc.fn_cdc_get_all_changes and cdc.fn_cdc_get_net_changes functions.
Example 12.16
Sample T-SQL code showing the usage of the Change Data Capture functions to return data.

Using XEvents for Data Modification Auditing
We saw earlier in the chapter how we could use XEvents to monitor for logins to the SQL Server instance. We can also use XEvents to monitor for people who are making data changes directly to the database tables when they should not be. As you can see from the sample code in Example 12.17 we are collecting a good amount of information about the person running the query and the query which was run.
Example 12.17
Sample XEvents capture which collects all changes to data tables.

In Example 12.17 we are only monitoring for insert, update and delete statements as in this case are not worried about users reading data (that will be covered later in this chapter).
Once the data has been captured by the xevent code you will need to monitor it to see who has been mucking around with the data. This can be done using the sample code shown in Example 12.18.
Using SQL Server Audit for Data Modification
In order to use SQL Server Auditing to capture rogue data modification you must first create a SQL Server Audit in which to capture the audit data. After the audit has been created a Database Audit Specification can then be created.
When creating a Database Audit Specification connect to the server you wish to audit using object explorer. Navigate to the database in question and then navigate to the Security branch of the tree, then the “Database Audit Specification” branch of the tree. Right click “Database Audit Specification” and select “New Database Audit Specification” from the context menu that opens. In the “Create Database Audit Specification” window which opens you can select the “Audit Action Types” which you wish to monitor. To monitor for data medication select INSERT, UPDATE and DELETE one of each line of the window as shown in Figure 12.5.
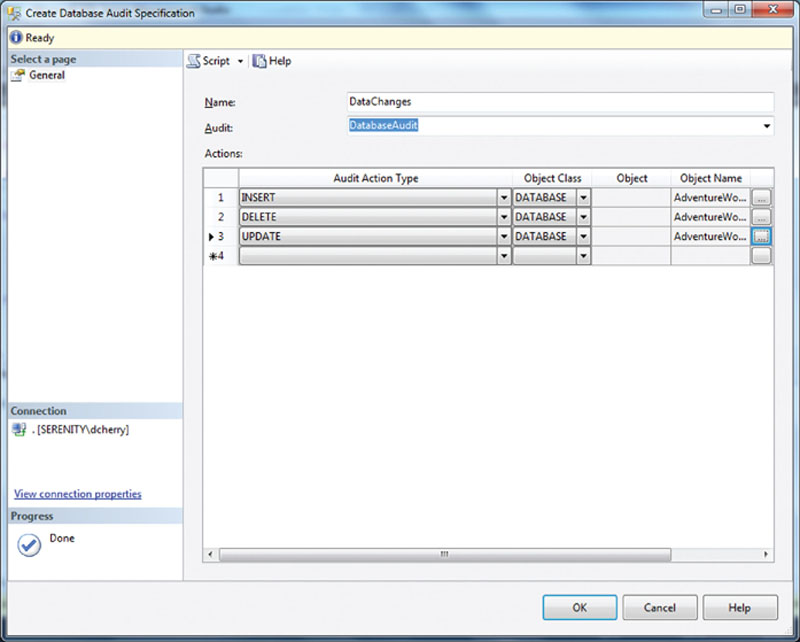
Figure 12.5 Showing the Database Audit Specification settings window.
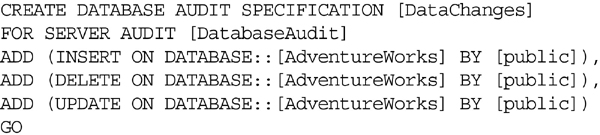
The Database Audit Specification can be created using T-SQL as well as by using SQL Server Management Studio as shown in Example 12.19.
Example 12.19
Sample code showing the creation of a Database Audit Specification.
Data Querying Auditing
Auditing when someone runs a query against database tables has historically been the hardest audit to perform, with the traditional answer being run start an SQL Trace against the engine looking for select statements and logging that information somewhere where it can be easily read. Starting with SQL Server 2008, Microsoft has had a solution for this auditing problem, and that is to use the server-side auditing, which was discussed earlier in this chapter, but instead of creating a Server Audit Specification create a Database Audit Specification.
Before you can configure a Database Audit Specification, however, you must create an audit to write the data to, unless you intend to write to an existing audit, as discussed earlier and shown in Figure 12.3 and Example 12.4.
To create a Database Audit Specification using the SQL Server Management Studio User Interface, follow these steps:
1. Connect to the database instance using the object explorer.
2. Navigate to the “Databases” folder.
3. Navigate to the Database you wish to create the Database Audit Specification in.
4. Navigate to the Security folder.
5. Navigate to the “Database Audit Specification” folder.
6. Right click on the “Database Audit Specification” folder and select “New Database Audit Specification.”
A Database Audit Specification, which would be used to capture select statements, should have its “Audit Action Type” set to “SELECT.” When you create a Database Audit Specification, you can set the Object Class to Database, Schema, or Object, depending on how wide you want to set your audit. An audit that has the Object Class set to database will capture all the select statements that are executed against the specified database, as shown in Figure 12.6. An audit that has the Object Class set to Schema will capture all select statements that are executed against the specified schema. An audit that has the Object Class set to Object will capture all queries that are executed against the specified object.
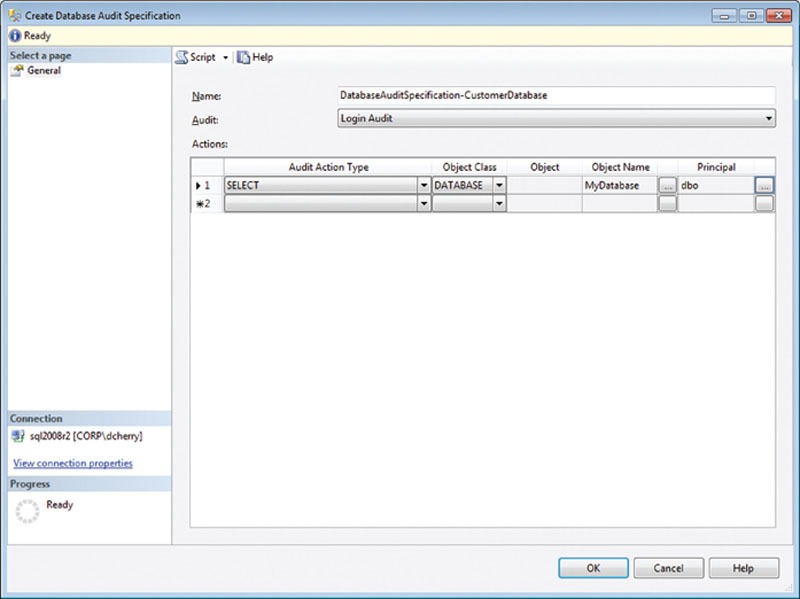
Figure 12.6 Creating a Database Audit Specification to monitor all select statements issues against the MyDatabase database.
Database Audit Specifications can also be created using the CREATE DATABASE AUDIT SPECIFICATION T-SQL statement as shown in Example 12.20.
Example 12.20
Creating a Database Audit Specification using T-SQL to monitor all select statements against the database MyDatabase.

As with the Server Audit Specifications, the Database Audit Specification must be enabled before it can be used. Enabling can be done by right clicking on the Database Audit Specification in the object explorer and selecting the “Enable Database Audit Specification” or by using the ALTER DATABASE AUDIT SPECIFICATION statement as shown in Example 12.21.
Example 12.21
T-SQL code enabling a Database Audit Specification using the ALTER DATABASE AUDIT SPECIFICATION statement.

Once the Database Audit Specification has been enabled, data will be captured to the Audit specified when the Database Audit Specification was created, and it can be viewed using the log explorer discussed earlier in this chapter.
After the Database Auditing Specifications have been created, they can then be modified using either the user interface or the ALTER DATABASE AUDIT SPECIFICATION T-SQL statement. In order to make changes to a Database Audit Specification, the Audit Specification must be disabled using the ALTER DATABASE AUDIT SPECIFICATION. Then the changes can be made, and the Database Audit Specification can be enabled, allowing it to begin capturing data again as shown in Example 12.22.
Example 12.22
The T-SQL code to disable a Server Audit Specification, changing the specification, then enabling the specification, allowing it to begin capturing data.
Schema Change Auditing
Like auditing select statements, auditing schema changes have traditionally been difficult to make without running a server-side trace. Like auditing select statements, this problem has been solved starting in SQL Server 2008, as have auditing schema changes, by using the Database Audit Specifications.
To audit schema changes, there is a specific Audit Action Type that will track all schema changes; this is the SCHEMA_OBJECT_CHANGE_GROUP, as shown in Figure 12.7. This will then log all schema changes to the specified Audit destination.
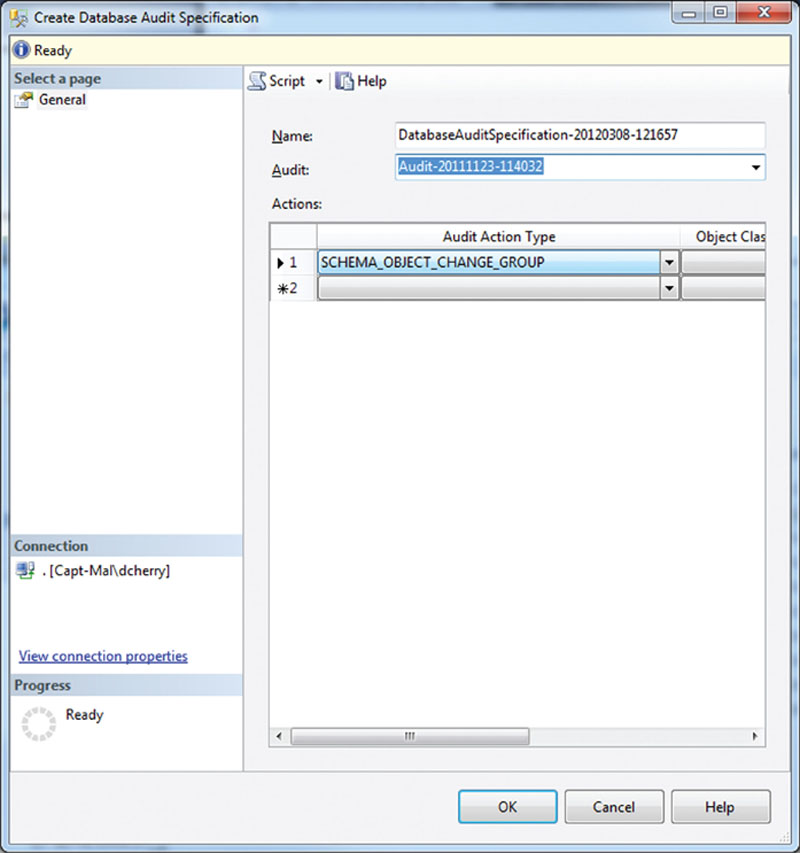
Figure 12.7 Creating a Database Audit Specification which will audit all schema changes.
Like the other Database Audit Specifications, you can also create a schema audit in T-SQL, as shown in Example 12.23.

Like the other Database Audit Specifications, the schema audit specification would need to be enabled using the ALTER DATABASE AUDIT SPECIFICATION T-SQL statement or by using the object explorer.
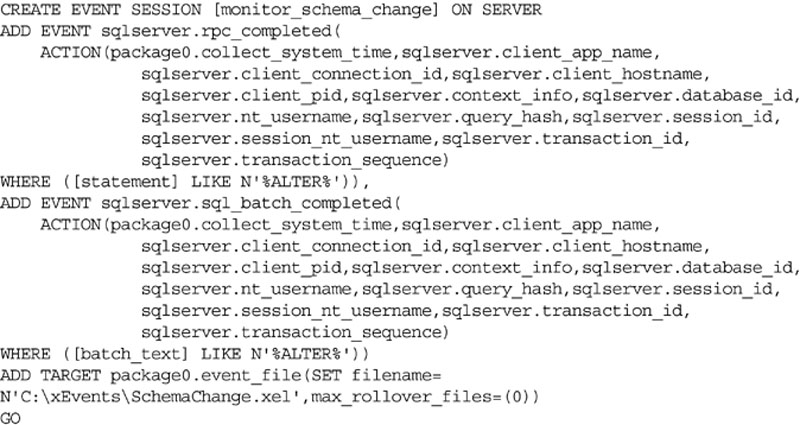
Using Extended Events for Schema Change Auditing
Like with data change auditing extended events can be used for auditing for schema changes. This allows you to capture all the changes by the extended events subsystem of the database engine to an extended events capture. A sample capture can be found in Example 12.24.
Example 12.24
Sample code to collect database object changes via Extended Events.
Using Policy-based Management to Ensure Policy Compliance
Policy-based Management, which was introduced in Microsoft SQL Server 2008, can be used to audit the servers automatically on a regular basis either when the server starts or on a regular schedule, such as daily or monthly. Policy-based Management can be used to audit a wide variety of security-related settings to ensure on a regular basis that the settings are set correctly. Once the Policies and Conditions are set (these are defined more fully in Chapter 4 in the section entitled “Using Policies to Secure Your Instance”) and the policies are configured to check automatically, the results are easily available for viewing by using the Log viewer by right clicking on the Policy Management folder and selecting “View History.”
Policy-based Management can be accessed in the object explorer within SQL Server Management Studio by:
1. Navigating to Management
2. Navigating to Policy Management
Conditions can be created with multiple expressions in them, as long as the expressions are all within the same Facet. In the Facet shown in Figure 12.8, three expressions are being monitored, which all must pass in order for the condition to be successfully evaluated.
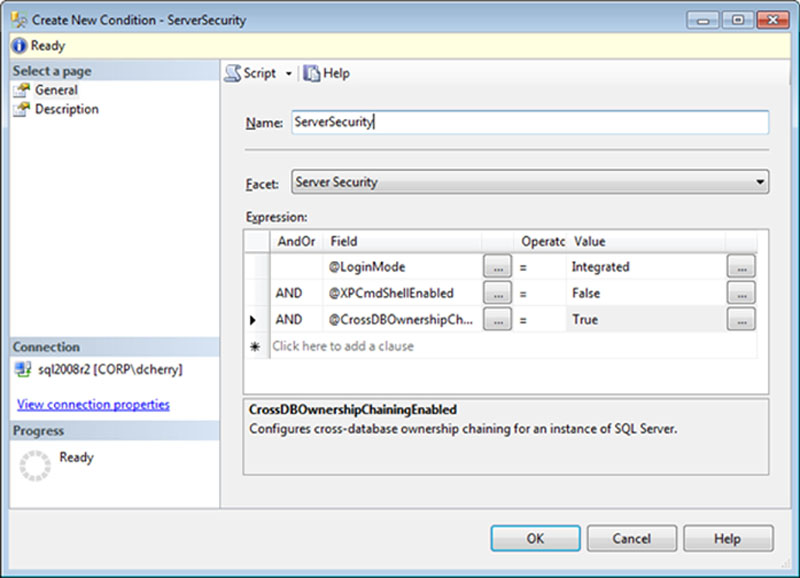
Figure 12.8 Creating a new condition which evaluates three instance wide settings.
After creating the conditions that you wish to evaluate, policies need to be created, such as those in Figure 12.9, to evaluate the condition and run it on a schedule. Additional information about the conditions that are monitored by the policy can be entered on the Description page, including a link to a webpage that can be set up with more information.
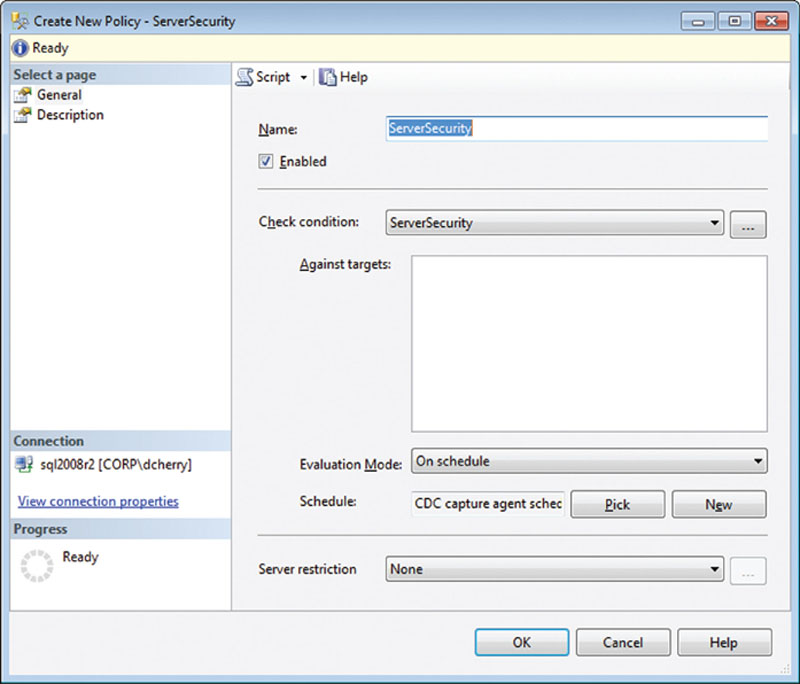
Figure 12.9 Creating a policy to monitor the Server Security condition shown in the figure.
If you manually evaluate a policy such as the ones created in Figure 12.9 by right clicking on the Policy and select evaluate on the context menu, a screen will pop up with the results of the evaluation, as shown in Figure 12.10.
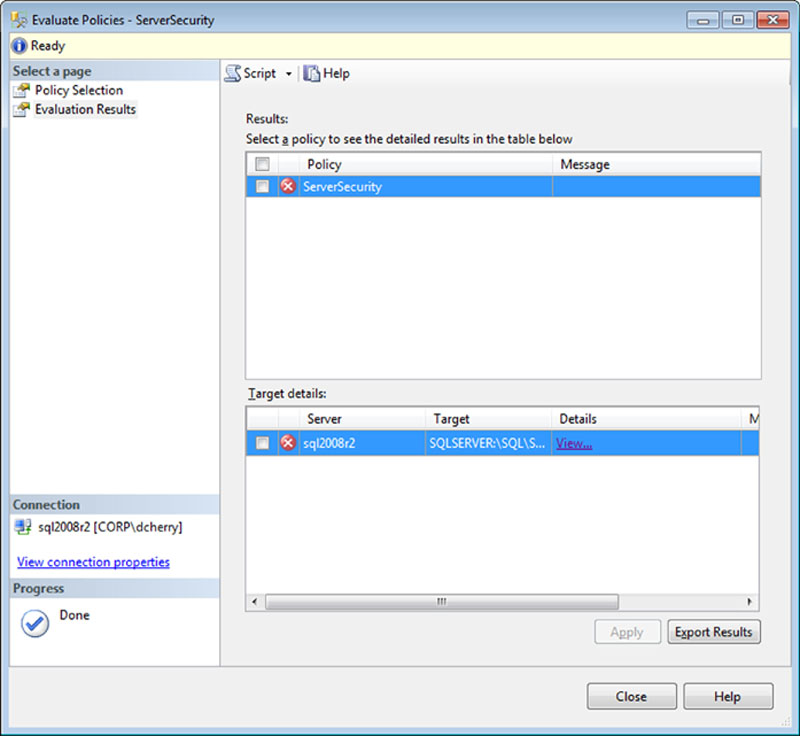
Clicking on the “View…” link in the “Target details” section of the “Evaluate Policies” window shown in Figure 12.10 will bring up the window shown in Figure 12.11, which shows exactly which expressions were evaluated and the results of each expression.
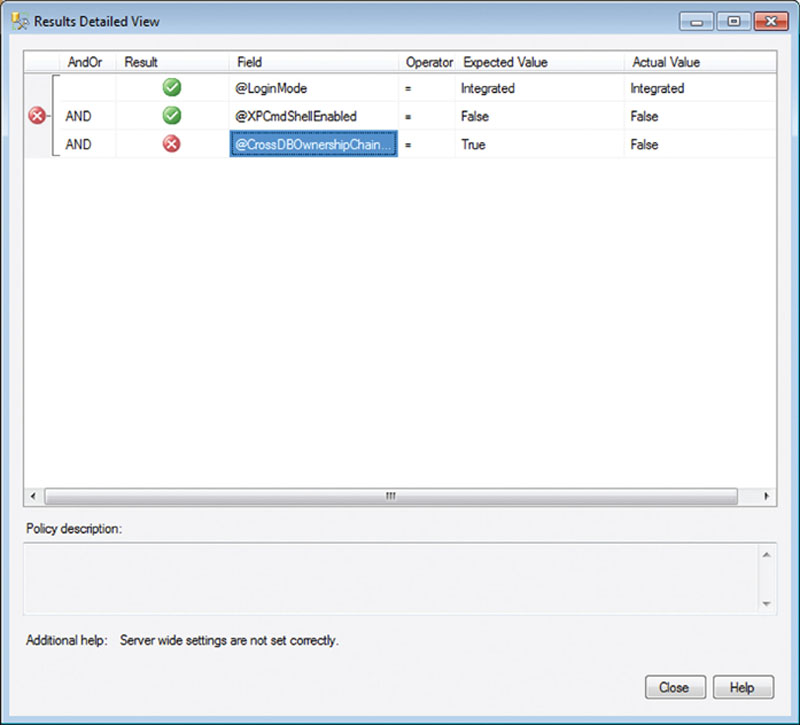
Figure 12.11 Showing the results of the expressions evaluated by the policy shown in Figure 12.9 with one expression failing and two expressions succeeding.
When policies are evaluated on a schedule there is a way to see if those policies were evaluated successfully or not. Within the SQL Server Management Studio this evaluation can be done by right clicking on the Policies folder under the “Policy Management” folder and selecting “View History” from the context menu (you can also right click on a Policy and select “View History”). This will bring up the Log File Viewer, which will be configured to view the policy history. When a policy has failed, you can drill down into the entry of the evaluation, which will give you a Details link, shown in Figure 12.12, which, when clicked, will present the same screen shown in Figure 12.11.
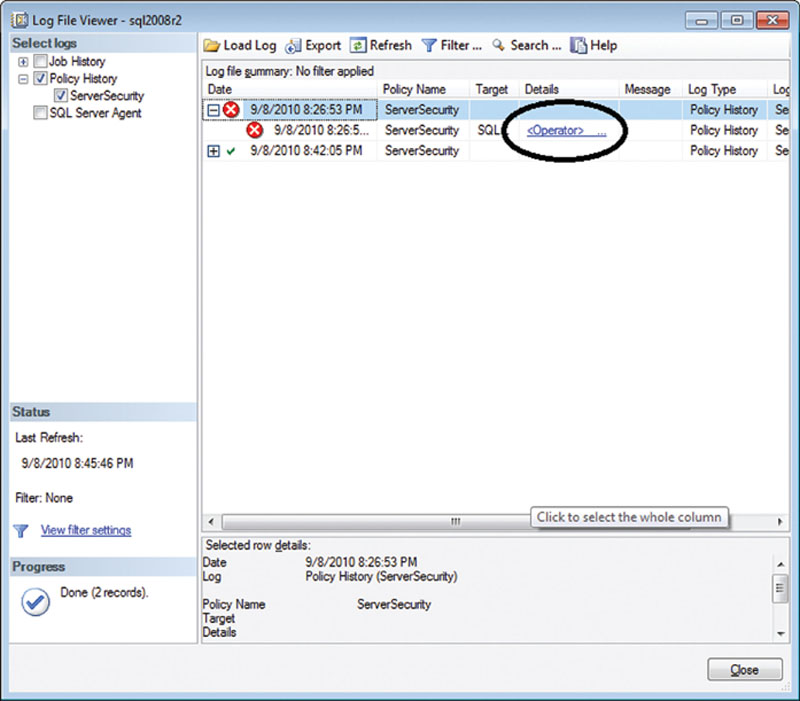
Figure 12.12 Showing the Log File Viewer showing Policy History.
Using SQL Server Management Studio is great when you have only a couple of policies on a couple of servers. However, if you have dozens or hundreds of servers, you could easily have thousands or tens of thousands of policies whose results you would have to check. In this case your best bet would be to create a central repository and use either an SQL Agent job or an SQL Server Integration Services (SSIS) package to query for the policy evaluation history from the msdb.dbo.syspolicy_policy_ execution_history table and the msdb.dbo.syspolicy_policies table. To get the details of which Expression succeeded or failed, that information is located in msdb.dbo.syspolicy_policy_execution_history_details table, specifically in the result_detail column.
C2 Auditing
C2 auditing is an auditing specification which was designed by the United States government Department of Defense and is probably the oldest form of auditing within Microsoft SQL Server. C2 auditing is an option that will configure the SQL Server instance to record all attempts to access statements and objects within the instance. When C2 auditing is enabled, the information is written to a log file within the default log folder.
The C2 auditing data is written to a file until the file reaches 200 Megs in size, at which point the SQL Server engine will close the file and begin writing to a new file. This will continue until C2 auditing is disabled or until the hard drive fills, at which point the database engine will shut itself down and it will not be able to be restarted until space has been made available.
C2 auditing can be enabled in two ways: by using SQL Server Management Studio as shown in Figure 12.13 (or SQL Enterprise Manager for SQL 2000 and older) or by using the sp_configure system stored procedure.
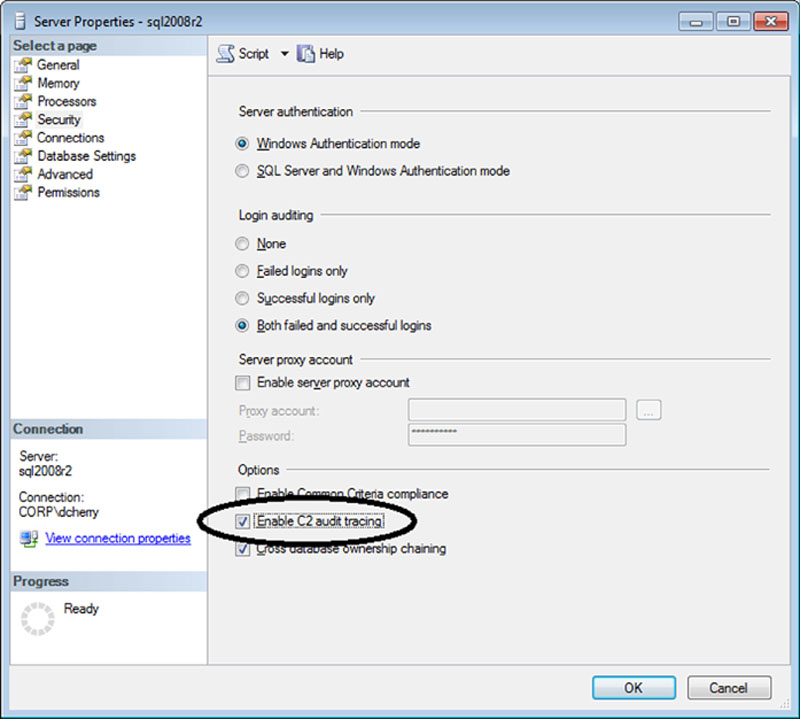
Figure 12.13 Showing where to enable C2 auditing on the Security Tab of the instance properties in SQL Server Management Studio.
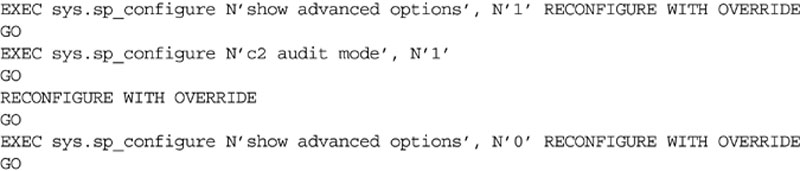
In order to enable C2 auditing using T-SQL, the sp_configure procedure is used. Before C2 auditing can be enabled, the advanced options setting must also be enabled using the sp_configure procedure, as shown in Example 12.25.
Example 12.25
T-SQL code used to enable C2 auditing.
In either case using SQL Server Management Studio or sp_configure to change the C2 auditing setting, there is no restart of the database engine to begin the C2 auditing. With either configuration method the auditing change will begin immediately.
When using sp_configure on an SQL 2000 server or older, change the schema from sys to dbo. C2 auditing has been superseded by “Common Criteria Compliance” starting in Microsoft SQL Server 2008. As of the writing of this book, C2 auditing has not yet been deprecated.
Common Criteria Compliance
Common Criteria was first ratified in 1999 as an international standard, although it was not introduced into the SQL Server platform until the SQL Server 2005 release of the product. The Common Criteria standard is maintained by more than 20 nations and is recognized by the International Standards Organization as ISO standard 15408. The specifics behind Common Criteria can be found at http://www.commoncriteriaportal.org/.
Three elements are required for Common Criteria within Microsoft SQL Server. The first element is called Residual Information Protection (RIP), which requires that memory be overwritten with a known pattern before the memory can be reallocated to another process. This RIP process, while making the data in memory more secure, can slow down system performance because of the memory rewriting. The second element involves turning on login auditing. This login auditing is exposed within the SQL Server by including the last successful login time, the last unsuccessful login time, and the number of attempts between the last successful and current login times within the sys.dm_exec_sessions dynamic management view. The third element is that column-level GRANTs do not overwrite table-level DENY privileges.
Common Criteria can be enabled via SQL Server Management Studio by viewing the properties of the instance and by viewing the security tab as shown in Figure 12.14 or by using the sp_configure system stored procedure as shown in Example 12.26.
Example 12.26
Enabling common criteria using T/SQL.

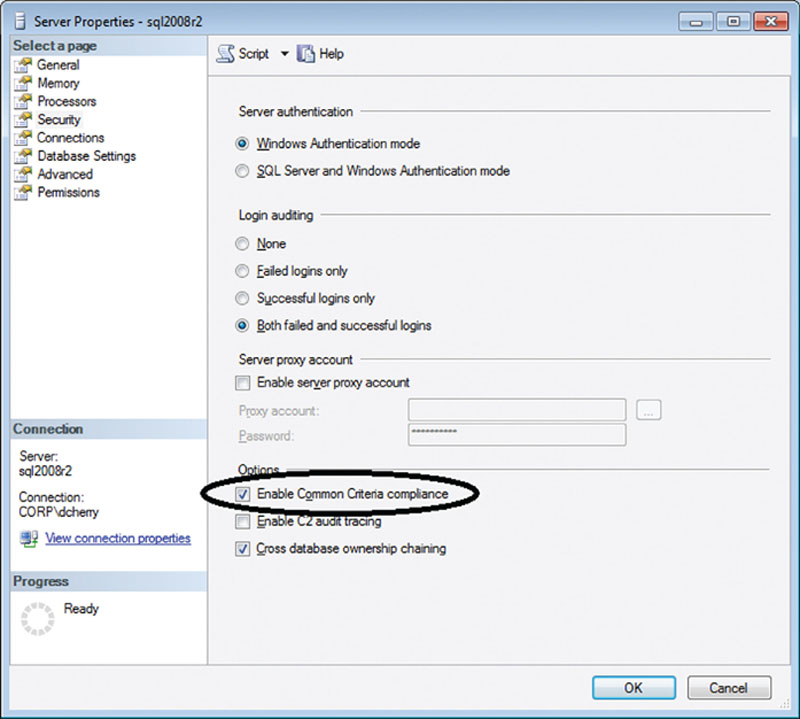
Figure 12.14 Enabling Common Criteria using the SQL Server Management Studio.
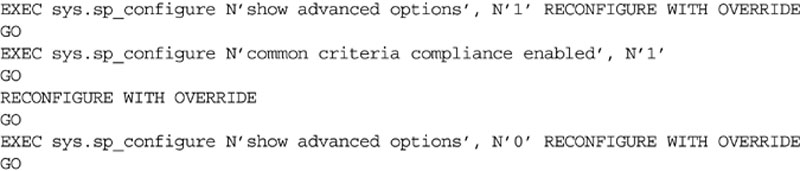
Like enabling C2 auditing, Common Criteria is an advanced option that must be made visible by turning on advanced options using sp_configure as shown in Example 12.27.
Example 12.27
Enabling common criteria using sp_configure.
Common Criteria is a feature available only in the Enterprise, Evaluation, and Developer editions of Microsoft SQL Server 2005, 2008 and 2012, as well as the same editions of SQL Server 2008 R2, in addition to the Data Center edition.
If you are using Microsoft SQL Server 2008 and you wish to use Common Criteria, some extra steps need to be performed. First, you need to run a script called SQL_Server2008_EAL1_trace.sql, which can be downloaded from Microsoft at http://download.microsoft.com/download/9/5/F/95FDD106-4E98-47B4-B676-7FDB9A403AF0/SQL_Server2008_EAL1_trace.sql. This script creates a stored procedure that starts a server-side trace and then marks the stored procedure as a startup stored procedure.
Some other downloads are available to assist in implementing Common Criteria, the first of which is integritycheck_SQL2008_EE.zip, which is available for download from http://download.microsoft.com/download/1/B/1/1B18883E-BDBF-4A58-861B-C6A551A172DA/integritycheck_SQL2008_EE.zip. This zip file contains a batch file and an XML document that will ensure that the files making up the SQL Server 2008 binaries are unchanged. It does this by comparing the files on the server’s hard drive against the known MD5 hashes for each of the files.
The second file is permission_hierarchy.zip, which is available for download from http://download.microsoft.com/download/B/F/8/BF81F5DE-8CD5-4531-87A1-F57D9ED09E0D/permission_hierarchy.zip. This zip file contains a set of PDF documents that show how permissions are related to each other at various levels and through the various nesting of permissions. While this is not specific to Common Criteria, it is useful information to anyone who is new to SQL Server Security.
The third file is MS_KEAL1_ST_1.2.pdf, which is available for download from http://download.microsoft.com/download/E/1/2/E12F1277-D096-44FB-8442-EC77B3790C88/MS_KEAL1_ST_1.2.pdf. This document is a paper written by Roger French, and it describes in painstaking detail the goals for the Common Criteria certification of the database engine of Microsoft® SQL Server® 2008. The abstract for this document is “This document is the Security Target (ST) for the Common Criteria certification of the database engine of Microsoft® SQL Server® 2008.”
The fourth file is MS_SQL_AGD_ADD_1.3.pdf, which is available for download from http://download.microsoft.com/download/C/7/6/C763829F-6F3C-4A70-9D97-37F8482FF2E1/MS_SQL_AGD_ADD_1.3.pdf. This document is a paper, also written by Roger French, that builds on the information in the MS_KEAL1_ST_1.2.pdf. The abstract for this document is “This document is the Guidance Addendum for the Common Criteria certification of the database engine of Microsoft® SQL Server® 2008.”
Summary
A wide variety of auditing options are found within Microsoft SQL Server. As applications are moved from older versions of Microsoft SQL Server to the newer versions, more and more auditing features are made available. As future versions of the product are released, even more auditing options will surely be made available, which we have seen with the introduction of being able to do auditing through extended events in SQL Server 2012.