The body gains its graceful appearance in large part due to the asymmetry of the muscles. By asymmetry, I refer to groups of muscles that peak in different places. For example, the biceps crest further up the arm than the triceps. As a result, the arm muscles are not uniform, but rhythmic in appearance. The asymmetry of this walking man is demonstrated by the dotted lines, which pass through the highest cresting points of a limb or muscle group.

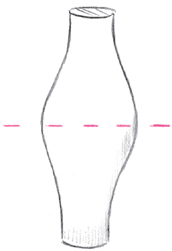
SYMMETRY
The bulge on both sides peaks at exactly the same point. It is uniform and uninteresting.
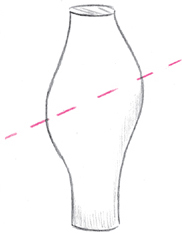
ASYMMETRY
The bulge on both sides peaks at different points, creating a more interesting rhythm.
The triceps peak higher up on the arm than do the biceps.
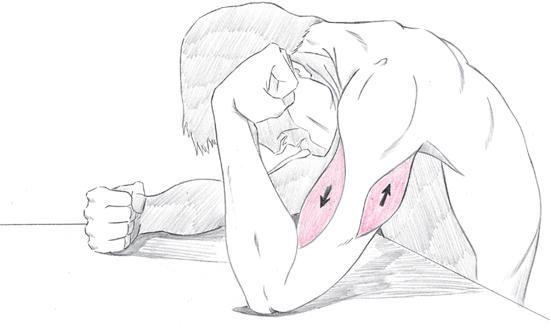

There can even be asymmetry within a single muscle group. For example, the outer head of the triceps is higher than the inner head.
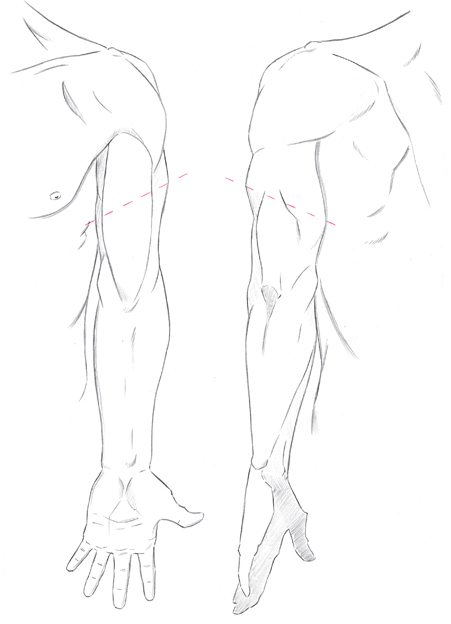
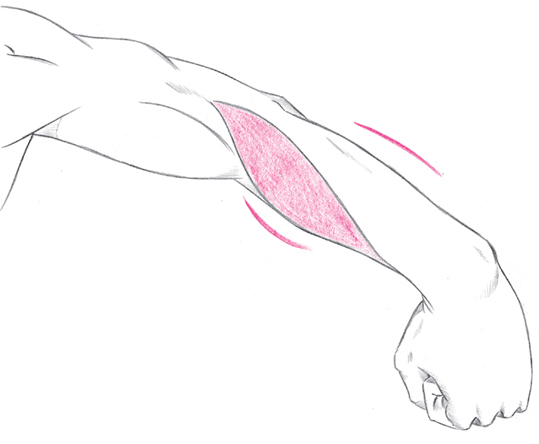
The highlighted group of muscles on the forearm rotates as the hand and arm rotate. Note how this group of muscles dictates the asymmetry of the forearm.


The outer calf muscle peaks higher up than the inner calf muscle. The knee appears to peak higher on the front of the leg because the patella is attached to the femur.

FRONT

BACK

SIDE
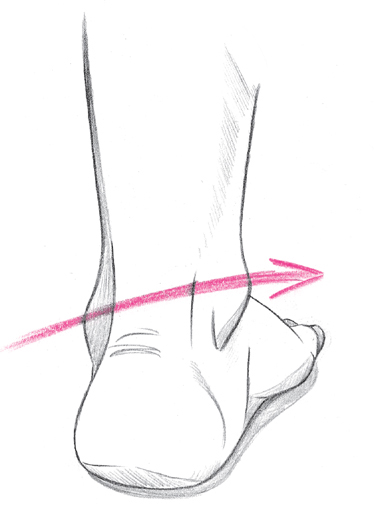
The inner ankle is always higher than the outer ankle, as demonstrated below.

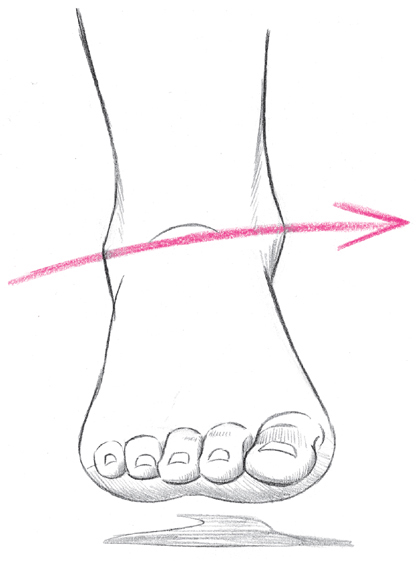
Note that when you observe the foot straight on, off the ground, you can see a good deal of the sole as well as the top of the foot.
When a limb flexes, the muscles on the side that bends in contract and bulge, while the muscles on the opposite side of the limb lengthen and stretch.
ARM, STRAIGHTENED
When the arm straightens, the triceps contract and bulge, while the biceps straighten and stretch.

ARM, FLEXED
When the arm bends, the biceps bulge while the triceps straighten and stretch.

UPPER LEG, STRAIGHTENED
As the leg locks, the front of the thigh contracts and bulges, while the muscles on the back of the leg, the hamstring muscles, lengthen and stretch.

UPPER LEG, FLEXED
When the leg flexes, the leg biceps contract and bulge, while the front of the thigh lengthens and stretches.

Diminution occurs when an object appears to be going away from you. The object becomes sharply diminished in size. The clearest example is a set of train tracks diminishing into the distance.
DIMINUTION: THE ARM
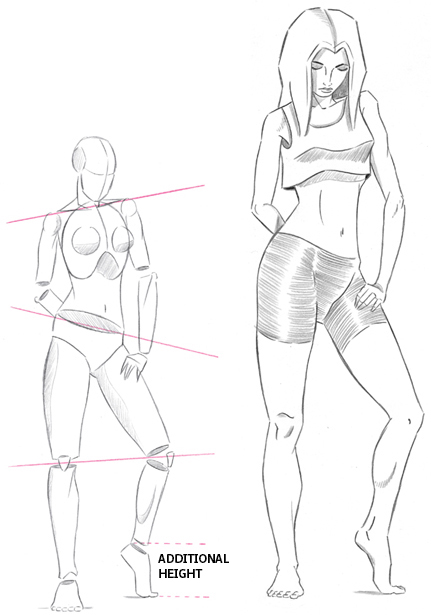
An inexperienced artist might draw this standing woman with both bent arms of equal length, not recognizing that because she is turned at an angle to the viewer, the far arm must diminish in size, as the near arm lengthens in size.

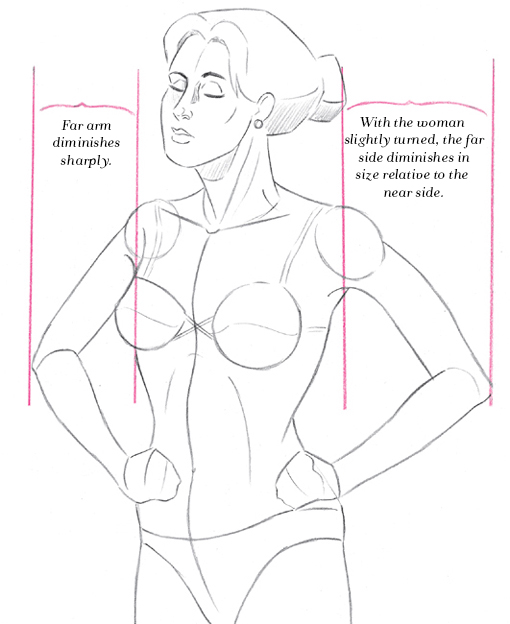
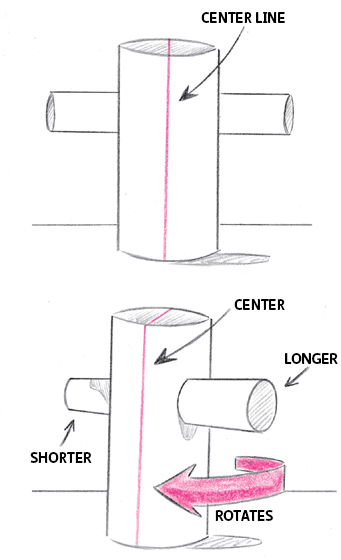
Here is an example of the mechanics of diminution.
Because of the severe angle of the far arm, it is drawn short. The only reason it doesn’t look wrong is that the far arm diminishes sharply into the distance. Note how the subject’s right hand overlaps the right forearm at the wrist and how the right forearm overlaps the right upper arm.
When an arm or a leg, or the body itself (in a reclining pose, for example) looks as if it is coming right at you, then foreshortening is required. The most famous example is the poster in which Uncle Sam points a finger straight at you. Foreshortening flattens out and shortens the length of an object to simulate perspective.
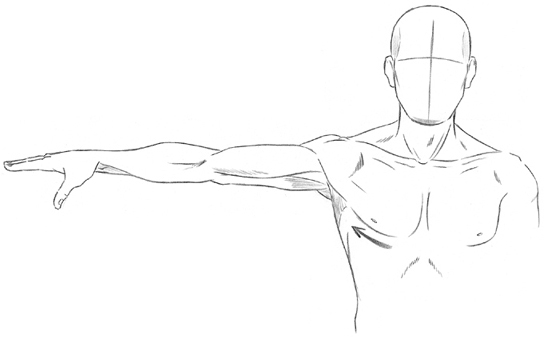
THE ARM
In this pose, there is no foreshortening because the arm is parallel to the picture plane. It is neither traveling toward nor away from us. Note that when an arm lifts, the pectoral muscles also lift.
Some foreshortening now occurs, as the arm starts to point toward the viewer. We begin to draw the arm shorter and overlap some muscles. The trapezius tenses to aid in raising the arm.

This position shows significant foreshortening. The muscles of the arm sharply overlap, but all the landmarks of the arm are still evident: the shoulder muscles, the upper arm muscles, the elbow joint, the forearm muscles, and the hand. The pectoral muscle nearest the raised arm tenses.

FORESHORTENING: THE LEG
In perspective, the leg moves forward not in a circle, but in an oval. Note how the muscles surrounding the inner knee area overlap the upper and lower leg, to aid in the effect of foreshortening.

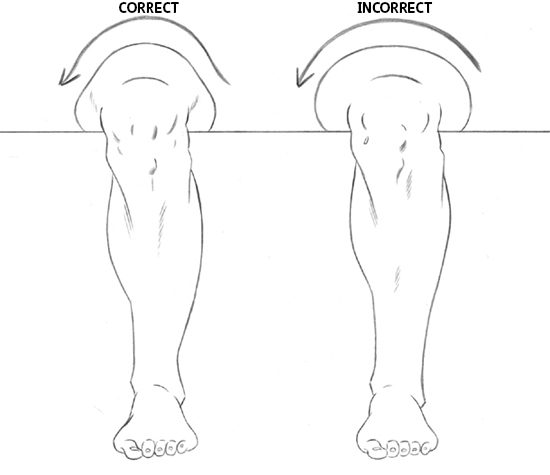
COMPRESSION AND FORESHORTENING
When the leg lies flat against a surface, it widens out, just as a balloon filled with water would. But because of the musculature, it does not widen in a uniform manner, but widens more significantly at the bottom.
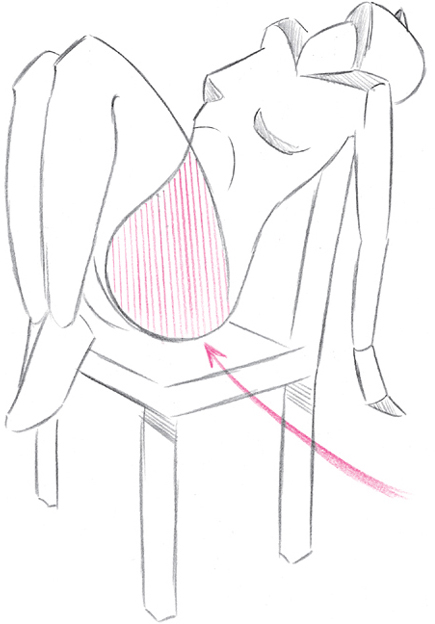
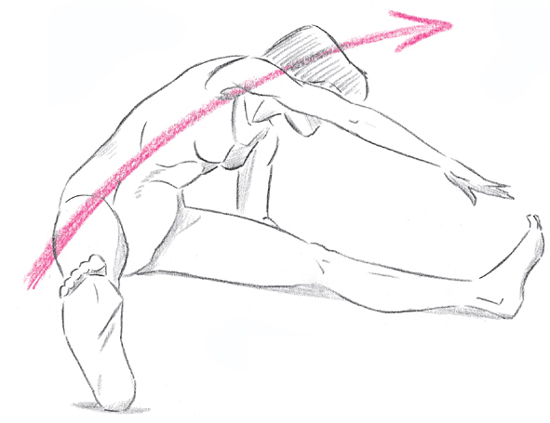
It sometimes feels intuitively wrong to omit a part of the body that is actually hidden behind another part of the body. But it is rarely a good idea to force the hidden part back into the picture. The woman in this picture has her feet tucked behind her legs. In a case like this, you might be tempted to add the feet so that her legs don’t look cut off at the knees. But if you were to stick the feet onto the subject, as in the following example, it would create more questions; for example, where are the calves? Why can’t they be seen? If you were to add the calves, then the legs would become straighter, and her posture would then need to compensate for that, and before you know it, you’ve destroyed the pose.

In this example, a great deal of the body is being eliminated, because the legs overlap it. This effect makes the legs look closer to the viewer. But in the rough sketch it is important to draw the part of the body that the viewer does not see. Skipping this step can easily throw off the proportions and the fit of the joints.

DIMINISH EVERYTHING NOT PARALLEL TO THE PICTURE PLANE
Every limb in this drawing that is not traveling left to right across the picture plane, but is angled so that it appears to be traveling away from the viewer (see arrows), must diminish. The greater the angle at which the limb is traveling away from the viewer, the greater must be its diminution.

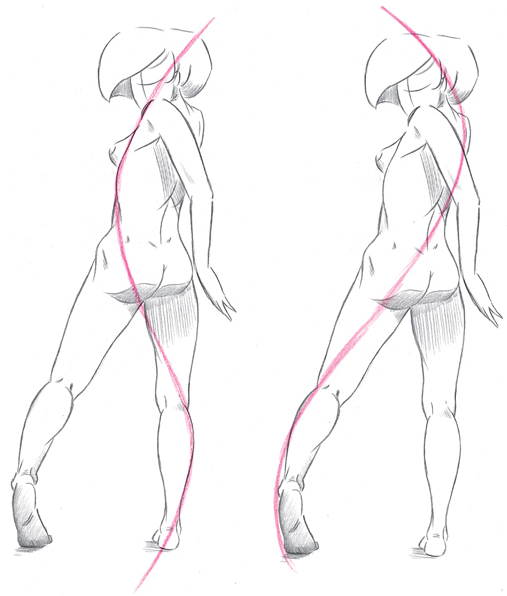
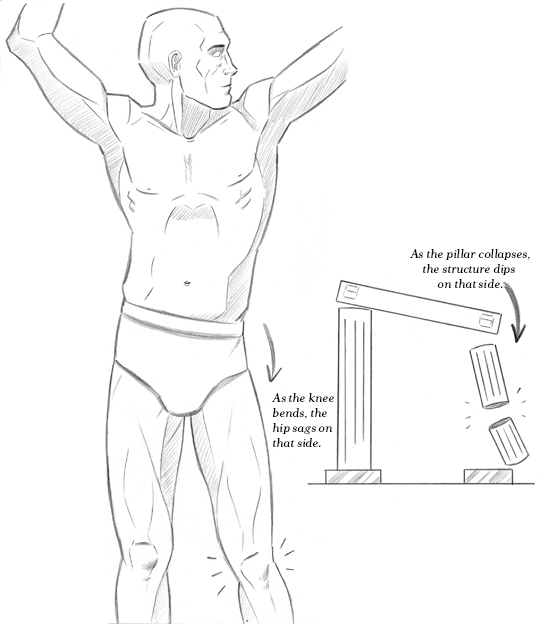
Some people stand with their weight evenly placed on each foot. But the more common stance, especially for someone standing in the same spot for longer than thirty seconds, is to shift the majority of the weight onto one foot, thereby removing most of the weight from the other. When this happens, the body compensates in a way most pleasing to artists and illustrators. The body takes on dynamism. As one leg straightens to accommodate the added weight, the knee locks, pushing up the hip on the same side. To compensate for that hip rising, the shoulder on the same side dips, which in turn causes the arm on that side to lower. To compensate for the shoulder dipping, the head leans in the other direction, away from the weight-bearing side.

The weight is on the right leg. The locked leg pushes up the hip, causing the shoulder to dip and the arm on the same side to dip.

As a result of the compensation, the hand on the weight-bearing side is closer to the knee than is the other hand.

Note how one side of the body lengthens as the other side shortens.
Think of the legs as two pillars holding up the hips. If one pillar breaks, the structure will sag on that side. As you lift up one leg to walk, the hip on that side sags, because of the same principle.
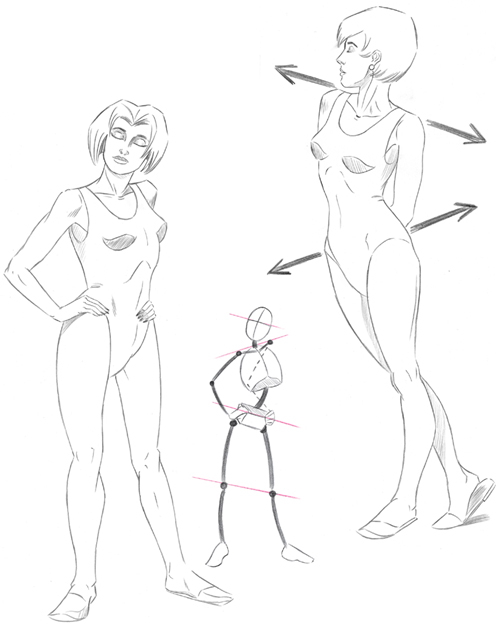
Here are more examples of standing poses with the majority of the weight on one foot. If you’re having difficulty distinguishing which leg is the weight-bearing one, look to the hips for the answer. The higher hip is the weight-bearing leg.
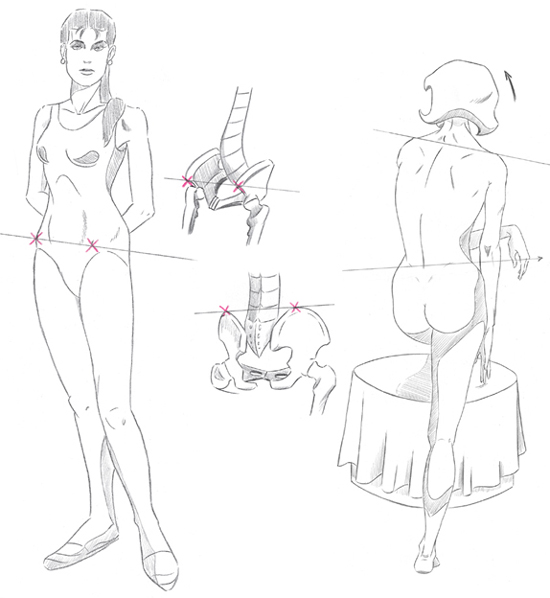
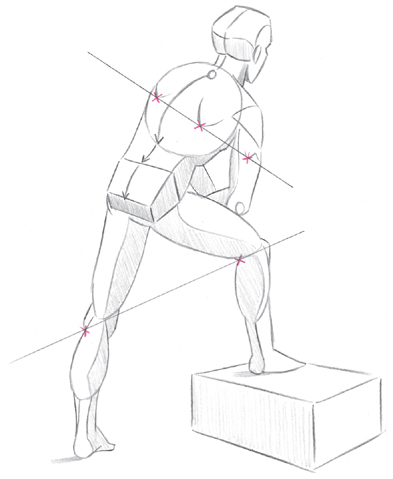
Where do you look to observe the slant of the hips? I find the most reliable method, in the front view, is to use the protruding bones just below the belt line as measuring points. You can find these bones (anterior superior illiac spine) on your own body. They are marked by the red “X” in the illustration.
In a back view, look for the high point of the hips, known quite aptly as the “high point of the pelvis.”
In the previous example, I recommended using the hips to find the weight-bearing leg. Why not the knee, you might ask. Shouldn’t it be higher, as well? The answer is not necessarily.
Take a good look at this pose. The locked leg is bearing the majority of the weight, as is evidenced by the slant of the hips. The weight-bearing knee is actually lower than the more relaxed knee. By standing on the ball of her left foot, the model has added more height to the relaxed leg without shifting the weight onto it.
In each of these illustrations, the height of the knee is not dictated by the slant of the hips. Let’s look at some examples:

The height of the curb gives the relaxed leg extra height, making the relaxed knee the highest, even though it is the other knee that carries the majority of the weight, pushing up the hip in the process.

The lifted knee is relaxed, yet it is higher than the knee of the weight-bearing leg, which also has the higher hip.
The weight here is evenly divided between both legs. But because the figure is in a 3/4 pose, perspective dictates that the far knee is slightly higher than the near knee.

Due to the incline, the non-weight-bearing knee (his right leg) is higher than the weight-bearing knee.
If you have never drawn from a model, I highly recommend it. Most art schools or liberal arts colleges offer life drawing classes.
The beginner can be overwhelmed by the complexity of drawing from a model. Our aim is to make it a manageable affair. One way to do this is to look for measuring points along the way, almost as a road map. For example, when drawing from a model in this pose, I first noticed that his shoulders and the top of his left hand are on the same level. The bottom of his waistband and the bottom of his right fist are also on the same level. And his two heels share yet another level. Use points like these to constrain your interpretation of the pose to reality.

Note the curve of the spine, which doesn’t completely straighten even when the back looks straight.

Another way of measuring the model by sight is to observe the negative spaces created in a pose. Negative spaces are the empty shapes created within the outline of the pose. For example, look at the triangular shape of negative space under the model’s raised leg. If you were drawing the model, and the negative space you drew resulted in a smaller area of negative space in comparison to what you observed on the model, you would know that you had erred.
You can also use negative spaces when drawing strictly from your imagination. Pleasing negative spaces within a pose tend to open up a drawing.
Notice how the shift in weight changes at places on the body.

HOW THE BODY TWISTS WHEN WALKING
As a person walks, the pelvis and leg move in an opposite direction to the rib cage and arm on the same side. The forward arm will always pull the rib cage forward. The backward arm will always pull the rib cage back. Likewise, the forward leg will always pull the pelvis forward. The backward leg will always pull the pelvis back.

Up until now, we’ve been concentrating mainly on drawing various parts of the body. That’s all to the good, but I have always felt that anatomy books in general are seriously deficient when they stop there. Drawing the figure is more than the sum of all of its parts. You can illustrate a perfectly proportioned man, yet it could still be stiff and lifeless. This problem is solved by the correct use of the line of action.
The line of action is an important guideline that the artist sketches in lightly before he begins to draw a figure. You can also rough out your drawing first, then sketch in the line of action afterward. This will help you to see if the figure’s pose is stiff or working against the natural flow of the body. Then you can correct it before firming up the drawing.
Note that the line of action doesn’t have to travel in the same direction as the arms and legs, although it often does. It is simply a line denoting the general, overall flow of the pose. The line of action is most helpful when drawing the figure from memory, rather than from a model. I’ve indicated the line of action with a heavy line only for clarity’s sake in these examples.
Finding the line of action within a figure is not a science. Although some poses will reveal obvious lines of action, others will not. It is up to the artist to decide where he or she feels the flow of the pose is going, and to choose where to put the line of action based on that feeling. Following is an example of the same poses repeated three different times with three different lines of action, any of which is correct.

Poses where a lot is going on sometimes require two separate lines of action. Try to see flowing patterns within the pose.

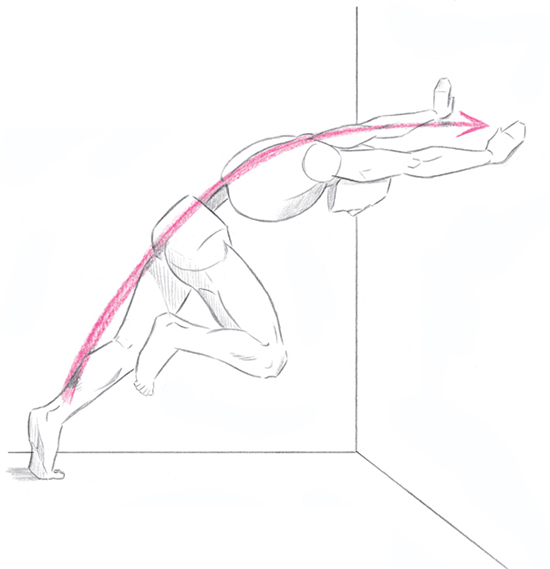
The most obvious line of action is the diagonal line indicating the angle of the runner’s momentum. By drawing the line of action through both arms, we can turn the arms into a single, graceful line, rather than two abrupt right angles.

The most obvious line of action is the one through the torso. By adding a line of action through the legs, we increase the flow of the drawing, making it more pleasing to the eye.

There are poses where a single line of action can’t flow through the entire pose because the body itself is making too abrupt a shift in angle. In cases such as these, it’s best to use half a line of action.
A line drawn from the pit of the neck directly to the ground indicates the point of balance. Posture, weight distribution, and motion are all involved in determining the point of balance.

As you can see from the following examples, people tend to accommodate their point of balance by shifting positions. The rollerblader’s point of balance is so far behind her that falling is her only recourse. When you think about shifting the weight in poses, remember to account for the point of balance.

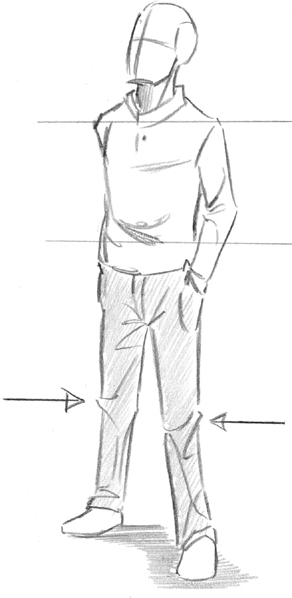
The body is affected by perspective, just as any other object. The body is narrow in width and long, not unlike a slim rectangular box. We can use two-point perspective to draw the body when it is at an angle to us.
Don’t worry if two-point perspective is a new concept for you. The important thing to remember is that as the body diminishes in either direction, all the parts of the body will diminish along the same lines. For example, the two hands of the man in the drawing share the same vanishing lines. So do the knees, feet, pectoral muscles, eyes, elbows, and so on.

LEVELS OF THE FEET
Perspective also requires us to adjust the levels of the feet, so that the far foot is higher than the near foot. Both feet could stand on the same level if he were not turned away, but rather stood squarely in front of us.
The horizon line represents the furthest visible distance. It is always at the viewer’s eye level. Its placement is an arbitrary decision that you, the artist, decide according to your personal taste. In this example, I have placed the horizon line in the middle of the page.
The viewer always looks up at anything above the horizon line and down at everything below the horizon line. This principle applies when drawing the figure. Here we are looking up at the man’s chin and his raised arm, and down at his legs and feet.