The countdown is officially here, and you should be eating a pretty “normal” diet at this point. Well, I suppose it wouldn’t seem normal to a person coming directly from the Standard American Diet, but hopefully GAPS will become your new normal very shortly. People on GAPS are often amazed to look back at their old eating habits. When I remember my days of fat-free eating, I can’t believe I ever even thought that was normal, let alone healthy. Now if someone tells me that fat makes you fat, I tell them about my husband, who dropped thirty pounds in about thirty days while drinking coconut oil in his tea and putting a tablespoon of pastured lard in his soup three times a day.
It’s true: You will lose weight in the beginning, especially if you have weight to lose. I, too, lost weight and had a few comments that I was looking too skinny, but I knew that the GAPS program is a very balancing diet, and that things would soon even out. Sure enough, I eventually put some weight back on and landed right where I should be. Nick has maintained his weight loss and gets comments almost daily on how great he looks. Our kids, too, remain happy, strong, and healthy looking.
Unlike fat, overindulgence in sweets can make you fat. And most important: It’s sugar that fuels the proliferation of bad bacteria in our guts. So be mindful of this as you enter Stage 6, which features the introduction of GAPS-friendly desserts and an increase in honey if desired and tolerated. The introduction of these desserts is not necessary for healing; it’s an option since there’s always a time and place for a sweet treat in everyone’s life.
Many of the GAPS-approved treats are nut-based. Nuts are very high in calories, so be sure to keep them to a limit; it is easy to overdo it! I have tried to keep desserts fairly simple in our lives, such as seasonal fruit with cultured cream or Coconut Manna. I always add fat to modulate sugar absorption. Fruit and honey still break down into sugar in the body, so just because bananas and mangoes are now GAPS-legal doesn’t mean you should have three a day! Try to keep fruit consumption to about 1/2 cup per day, if that, and go with a seasonal option whenever possible since it’s more nutritious, ecological, and delicious. Remember: You don’t want your taste buds getting hijacked again by those pesky bad bacteria clamoring for sugar down there, but every now and then something special is called for. So just be mindful, keep it limited, have fun, and enjoy that treat when you have one!
Continue with previous stage foods. If everything you have introduced thus far is well tolerated, slowly introduce some raw peeled apple as well as other raw fruits, introducing one at a time. Raw honey can be increased, as can GAPS-friendly desserts. If possible, use dried fruit, instead of honey, as the sweetener for cooked desserts.
In Stage 6, you can add:
• Raw fruits: Gradually introduce raw fruits from GAPS-approved list of fruits: pears, kiwis, huckleberries, raspberries, nectarines, apricots, berries (all kinds), blackberries, very ripe bananas (covered with brown spots), blueberries, coconut, cherries, prunes, peaches, and ugli fruit
• Honey: You can increase honey if it’s tolerated
• Brazil nuts: Introduce these slowly, and watch for tolerance issues
• Additional foods: raisins, cinnamon, coriander, coconut milk, dates, black radishes, and capers
• Sweet treats and baked goods: Gradually introduce these as allowed on the diet
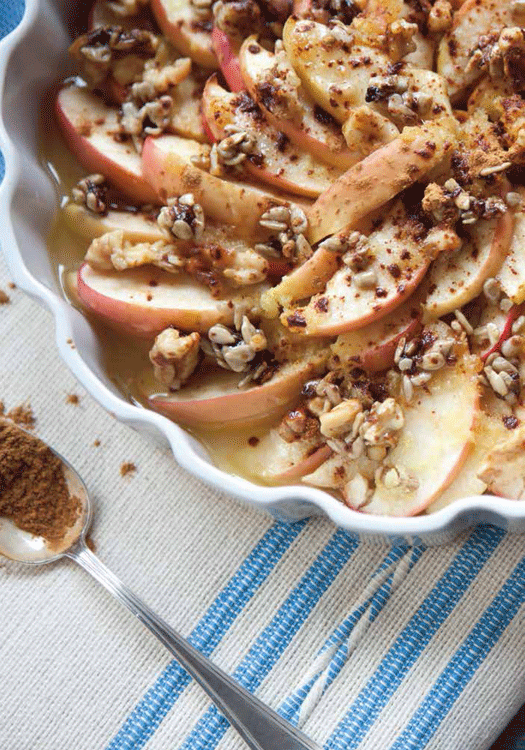
Cinnamon Apple Bake
Serves 6 to 8
7–10 apples (depending on size of baking dish), cut in quarters and sliced into half-moons
1/4 cup coconut oil, plus 1 tablespoon for topping
2 tablespoons ghee, plus 1 tablespoon for topping (use additional coconut oil if you cannot tolerate ghee)
2 inches fresh gingerroot, peeled and grated
2 tablespoons honey, plus 1 tablespoon for topping
1/4 teaspoon sea salt
1/2 cup sprouted walnuts, chopped
1/2 cup sprouted sunflower seeds
Preheat the oven to 350°F. Spread the apple slices in a spiral in a round ovenproof dish. In a small saucepan, melt the coconut oil and ghee together over medium-low heat. Add the grated ginger and 2 tablespoons honey, then pour the mixture over the apples. Sprinkle with sea salt, and bake for 20 minutes. While the apples bake, place the walnuts and sunflower seeds in a saucepan with the reserved coconut oil, honey, and ghee. Cook ever so lightly for about 5 minutes. Remove the apples from the oven, and pour the nut mixture over them, making sure to coat them all evenly with the oils. Enjoy as is, or with a dollop of cultured cream (page 30).
Makes 10 to 12 macaroons
2 cups unsweetened shredded coconut
6 egg whites
1/4 cup raisins
2 teaspoons Homemade Vanilla Extract (page 96)
Pinch of sea salt
3–4 dates, pitted, soaked, and blended (optional)
1 tablespoon raw cacao powder for chocolate macaroons (optional, Full GAPS)
Preheat the oven to 350°F. In a bowl, combine all of the ingredients. Line a baking sheet with parchment paper, and place 1 tablespoon of dough for each cookie on the sheet. Press down to flatten each cookie out a bit. Bake for 12 to 15 minutes until golden. After you’ve made mayonnaise (page 107), this is a great way to use up leftover egg whites. (See photo on page 265.)
Variation: For a sweeter macaroon add dates to the recipe and follow these instructions: Remove the pits, and soak the dates in a bowl of hot filtered water for 5 minutes (if you don’t have the time for this step, skip it). Add the dates to your food processor with all the remaining ingredients except the raisins. Process to combine and form a sticky dough. If it is too dry, add a teaspoon or two of the date water. Fold in the raisins, and follow the cooking instructions above.
Lemon Curd
Serves 4 to 6
After making macaroons, this is a great way to use up the leftover egg yolks! This is surely a crowd pleaser!
6 egg yolks
Juice and zest of 3 lemons
1/4 cup of honey
1/4 cup ghee or butter, chilled (Full GAPS)
Pinch of sea salt
Using a double boiler, whisk together the egg yolks, lemon juice, lemon zest, and honey, combining thoroughly. Slowly whisk in small pieces of the ghee or butter (if you’re using it) until it’s all incorporated. Gently simmer, and occasionally whisk the mixture until it thickens, 5 to 10 minutes. Once you have reached the desired custard-like consistency, remove the curd from the heat and place it in a bowl of ice-cold water to halt the cooking process. Pour it into a glass dish or single-serving ramekins, and store in the fridge. Yum!
Serves 2 to 4
My amazing homeopath friend, Joette Calabrese from Homeopathy Works (see resources), inspired this delicious and nutrient-dense smoothie. Her CD Secret Spoonfuls is all about getting the good stuff into your kids.
1 quart 24-hour cultured, raw yogurt or kefir
1/2 cup raw cultured cream
1–2 tablespoons extra-virgin coconut oil (melted at a low temperature) or 2 tablespoons coconut manna (if tolerated)
1–3 raw pastured egg yolks (from a reliable source, such as a local farmer)
1–2 tablespoons raw honey
1 teaspoon cold-pressed flax oil, or fresh ground flax (Full GAPS)
1 banana, 1/2 cup combined raspberries, strawberries, and/or frozen fruit
1 teaspoon vanilla extract (optional; homemade recipe below)
Place all of the ingredients in a blender, and blend until smooth. Be sure to crack your eggs in a bowl before transferring to the blender, just in case you ever happen to get a rotten egg.
Homemade Vanilla Extract
Makes 1 pint
According to Joette, vanilla supports thyroid function and is a great addition to any smoothie once tolerated.
8–10 highest-quality vanilla beans
1 pint organic, or best-quality, vodka, rum, or brandy
Score the beans down the center to release the flavor. Place them in a pint-sized bottle (I love to use Grolsch bottles; see resources). Fill the bottle with alcohol, cap, and let it sit in a cool, dark place for 1 month or so. Upon finishing the vanilla, you can reuse the beans one more time: Just fill the bottle up with alcohol again, and repeat the steeping process. This is a great cost savings and makes a lovely housewarming gift!
The Benefits of Smoothie Ingredients
• Raw cultured cream: fat-soluble vitamins such as B6 and valuable enzymes
• Raw yogurt (or kefir): probiotics that provide live enzymes necessary for quality digestion
• Pastured raw egg yolks: omega 3 fatty acids and cholesterol needed for mental development; fat-soluble vitamins A and D
• Coconut oil: nourishing fat that is loaded with antibacterial, antifungal, and antiviral properties and promotes brain development and strong bones
• Raw honey: enzymes that aid in digestion and ward off infections
• Flax oil: unsaturated omega 3 fatty acids that support lungs, brain, and skin
Fruit “Jell-O”
Serves 4 to 6
2 pints hot filtered water
1 tablespoon raw honey (optional)
2 tablespoons gelatin (I like Great Lakes Gelatin unflavored)
1/2–1 cup fresh or frozen berries (pomegranate seeds and blueberries are some of our favorites)
Bring the water to a boil, then separate it into two bowls and let it cool slightly. Dissolve the honey in one bowl and the gelatin in the other. Stir the gelatin, and let it set for about 10 minutes. Add the two together and stir. Pour into a glass dish, Jell-O mold, or fun glasses, then add the berries or your flavorings of choice (see the variations below). Stick it in the fridge to set overnight or until completely gelled. You can eat the “Jell-O” out of the dish—but if you carefully pop it out and onto a plate, the berries will be right on top! We always top with a dollop of cultured cream (page 30).
Variations: Try these flavor combos:
• Lemon or lime zest and coconut flakes
• Blueberry “Jell-O” with a dollop of cultured cream on top
• Kombucha with fruit, water kefir with fresh lemon juice, or fruit kvass of any kind (if you’re using live cultures, be sure to not add to very hot water)