
We love dining rooms because they create the setting for one of everyone’s favorite pastimes—eating. Don’t even try to pretend you’re not in this club. But when you really think about it, the dining room is a place where some of the most precious memories in your home are made. It is around the dining room table that we laugh with friends over cocktails, make big announcements over coffee with our parents, or share a laid-back but intimate breakfast with our significant other.
When we were in Palm Springs last spring I realized that the thing my dining room was missing was a restaurant vibe. I made lists of all the places I loved eating at and why. The results surprised me because the places I loved to be were very different from the rooms I liked in photos on Pinterest. Keeping with that theme, I finished designing my dining room with inspiration from all my favorite foodie spots and bars. The result was a cozier, happier dining room that is super versatile for parties year-round!
The best advice we can give for designing your dining room is to forget everything you think you know about what makes a nice dining room and create a place that’s comfortable and exciting to eat in. Make meals a daily treat and a cherished ritual.
GET THE LOOK: Globe Lantern/Young House Love for ShadesOfLight.com

Create your own custom serving dishes inspired by classic patterns, like Blue Willow china.
SUPPLIES
plain white dishes
blue Sharpie or ceramic pen
1. Draw on the surface of your dishes.
2. Bake for 30 minutes at 350°F.
3. Allow to cool completely before using or washing. To ensure that your designs last longer, try hand washing.

If your dining room table is often too crowded to add fresh flowers, consider making a few hanging vases.
SUPPLIES
twine
duct tape
glass bud vases
1. Make a loop with the twine that is your desired hanging length for the vase.
2. Use the duct tape to secure this loop to the vase.
3. Run a piece of twine under the bottom of the vase and bring it up to the top.
4. Secure with tape, move the twine over a quarter turn, and loop down under the bottom of the vase again and back up again. Secure with tape.
5. Wrap the twine around the top of your vase to completely cover the duct tape and tie off to finish.

d.i.y. Simple and Colorful Side Table
Are you in need of additional serving space to host buffet-style dinners or to hold your growing liquor collection? Try making your own simple side table to match the colors of your dining room.
SUPPLIES
wooden sawhorse
wooden board for tabletop (36 by 20 inches)
paintbrushes
primer
white latex paint
orange latex paint
wood glue
1. First, prime your sawhorse and wooden board with primer.
2. Once the primer is dry, use the white paint to paint the top of your tabletop.
3. Paint the sawhorse with 2 to 3 coats of the orange (our color, but use your favorite).
4. With a smaller paintbrush, paint the side edge of your tabletop orange.
5. Add wood glue to the top of the sawhorse and center your board on top. Place a heavy object on top while the glue dries. If you plan to have lots of weight on this table, you should add screws to secure the two pieces together.

Here’s an easy way to create cake stands to fit your own style. Use any patterned paper and paint color you like to make your cake stands unique.
SUPPLIES
patterned paper
scissors
glass plates and cups
Mod Podge
spray primer
spray paint
crazy glue
1. Cut patterned paper to fit the undersides of your plates. Use Mod Podge to glue in place and then seal.
2. Prime the cups.
3. Paint the cups once the primer is dry.
4. Glue the cups to the bottoms of the plates to create cake stands!
Create handmade menus for each setting to greet guests as they arrive.

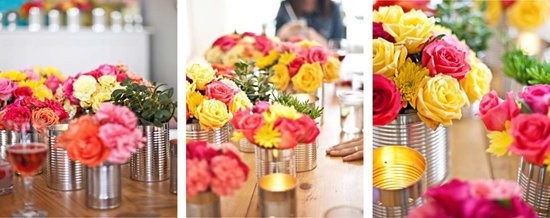
Reuse clean coffee or soup cans as vases for colorful flowers or poke holes in them and add tea lights.

Use bandannas as cloth napkins to add a pop of color.

This is probably the most daunting question for a dinner party. A few things to consider before you dive into any recipe book or food blog: budget, your cooking skill level/comfort zone, and special dietary needs of guests. These three factors can really help you plan your menu.
• Go casual. Just because it’s a dinner party doesn’t mean it has to be fancy. You can totally host a taco and beer night.
• Be collaborative. A great way to keep a party budget friendly is to invite guests to join in preparing a dish. Have one couple bring the salad or a side dish while another guest brings dessert.
• Try classic dishes with a twist. Unexpected flavors can be fun and a great way to start conversations. Prepare a menu of gourmet comfort foods. Try vegan versions of your childhood favorite dishes. Choose a specific theme or ingredient and incorporate it into every course (lavender everything!).

MAKES 1
½ peach, cubed
Juice of ½ lime
4 basil leaves, chopped
4 mint leaves, chopped
2 ounces white rum
1 ounce simple syrup
Club soda
In a glass, combine the peach cubes, lime juice, basil, mint, rum, and simple syrup. Stir to combine. Add ice and top with club soda. Serve chilled.
TIP: Use fabric paint for best results. Read brand instructions, you may need to heat-set the paint to make it permanent!


