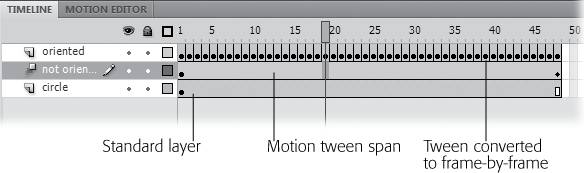
The tween span in the timeline deserves a closer look (Figure 8-9), since it gives you a good overview of what's going on in a tween. When you create a motion tween, Flash colors it blue to set it off from the other layers, so you can easily find your way around. Property keyframes are diamond-shaped in the timeline to distinguish them from the circle-shaped standard keyframes. Clicking anywhere on the tween selects the entire tween and moves the playhead to that frame in the tween. What if you need to select a single frame in a tween? Perhaps you want to copy a tweened symbol's properties at that point in the timeline. In that case, Ctrl-click (⌘-click) the timeline to select a single frame. Then, right-click the frame and choose Copy Properties from the shortcut menu.

Figure 8-9. The tween layer is a light blue to distinguish it from the other layers. The small diamond-shaped markers are property keyframes.
When you apply a motion tween to an object, Flash automatically sets aside a certain number of frames for the tween, marking them with the blue highlight. If there's only one keyframe in the layer, Flash uses all the layer's frames for the tween. Otherwise, if there are several keyframes on a layer, Flash uses all the frames between two keyframes. So, being the clever designer you are, you take this into account when you create your motion tweens; you lengthen or shorten the available space in the timeline to make your tweens just the right length. Still, there are times when you need to make a tween longer or shorter after the fact. The main thing to consider when you change the number of frames in your tween is the effect the change has on your carefully positioned property keyframes. For example, suppose you have the perfect tween for a basketball bouncing, but it seems to be running too slowly. You want to speed up the bouncing motion but keep the relative positions of the property keyframes the same. In that case, use the first option in Table 8-1—drag the end of the timeline. In another case, you may want to trim a few frames off the end of your timeline, making it shorter, but you don't want the property keyframes to change position at all. To do that, Shift-drag the end of the timeline.
Table 8-1. Want to lengthen or shorten the timeline of your motion tween? Here are the commands and the way they affect the property keyframe.
Action | How to do it… | Effect on property keyframes |
|---|---|---|
Make a motion tween longer or shorter. | Drag the end of the timeline. | Property keyframes move proportionately, keeping their relative position along the tween. |
Keep a tweened object on the stage after its motion is complete. | Shift-drag the end of the timeline. | Has no effect on property keyframes. |
Remove frames from a tween. | Ctrl-drag (⌘-drag) to select the frames to be deleted. Then press Shift-F5 to remove frames. | The number of frames between property keyframes stays the same, except for the segment where the frames are removed. |
Insert frames into a tween. | Ctrl-drag (⌘-drag) to select the number of frames to insert in the timeline. Then right-click the selected frames. Choose Insert Frame from the timeline. | Inserts frames at the point of selection. Keyframes before the insertion point remain in the same position. Keyframes beyond the insertion point move down the timeline. |
Move a tween span in the same layer. | Drag the tween span to a new point in the timeline. | The relationship of all the keyframes stays the same; however, the move erases the existing frames at the new location. |
Change the breakline between two adjacent tween spans. | Drag the breakline to a new point. | Property keyframes move proportionately, keeping their relative position along the tween. |
Delete a tween span. | Right-click the tween span, and then choose Remove Frames or Clear Frames to replace the selection with standard frames. | Deletes all the property keyframes. |
Property keyframes appear in the tween span at the point when any property changes. Those properties can include the following:
Position shown as X/Y coordinates in the Properties panel.
Scale shown as H/W (height and width) coordinates.
Skew, created with the Transform tool.
Rotation around the transformation point.
Color, including tint, brightness, and alpha (transparency)
Filters, like Drop Shadow, Blur, and Glow.
Suppose you want to change the width of a symbol or text field in the middle of a motion tween. So, you drag the playhead to the point in the timeline where you want the change to happen. Then, with the tweened object selected, you make the width change using the W setting in the Properties panel. Flash automatically adds a diamond-shaped property keyframe to the tween span to mark the change. As seen on Editing a Tween Span, a single tween span can end up with bunches of property keyframes scattered all up and down the timeline. Single property keyframe markers can represent more than one property change, too; for example, you may have both a color change and a scale change in the same frame. Sometimes when you're working with your tween, you want to zero in on property keyframes for specific types of changes. Perhaps you want to double-check all the color property keyframes. In that case, right-click the timeline, and then choose View Keyframes from the shortcut menu, as shown in Figure 8-10. Toggle the different options until only the Color option is checked.
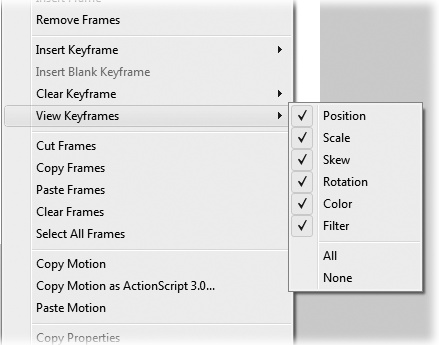
Figure 8-10. You can select which property keyframes you want marked in the timeline. Right-click a tween span, and then choose View Keyframes to see this menu.
Tip
As you're trying out different effects with the Motion Editor, you may experiment your way from a good motion tween to a not-so-good motion tween. Don't forget about the History panel (Windows→Other Panels→History), where you can backtrack to a previous (and better) point in your work. Just drag the arrow handle on the left side of the panel back to where things looked good.
There may be times when you want to duplicate the properties in one property keyframe to another elsewhere in the tween span, or perhaps to an entirely different tween span. For example, it's a great way to freeze the action for a certain number of frames. (Create two motion keyframes with identical properties. Insert frames in-between the keyframes to lengthen the amount of time the action freezes. Or remove frames to make it shorter.)
Start by Ctrl-clicking (⌘-clicking) the property keyframe you want to copy to select a single frame. Right-click that frame, and then choose Copy Properties from the shortcut menu. Head over to the destination frame where you want to paste the properties and select that single frame using a Ctrl-click (⌘-click). Then, right-click that selected frame; you can then choose Paste Properties to paste in all the properties, or Paste Properties Special, where you can specify which properties to paste.