When your Flash project includes ActionScript programming, you have some decisions to make at the outset. As explained in the previous section, you need to decide whether you're using ActionScript 2 or ActionScript 3, since you can't mix version 3 with earlier versions. (The exercises in this book all use ActionScript 3.) Once you've made that decision, you choose the type of Flash file you want to create in the intro screen or in the File→New dialog box (Figure 12-2).

Figure 12-2. When you create a Flash file, you need to decide between ActionScript 3.0 and ActionScript 2.0. You can't use code from both in a single Flash document (.fla). Use the Intro splash screen (top) or the File→New command to create a new document (bottom). If you're using a separate ActionScript document for your code, then choose ActionScript File to create an .as document.
Next, you need to decide where you're going to place your ActionScript code. You have two choices. You can place your ActionScript code in frames in the Flash timeline, or you can place your code in a completely separate ActionScript (.as) file:
To place ActionScript code in the timeline of your Flash file, create a Flash document (.fla) by choosing File→New→ActionScript 3.0. You have a choice between creating a Flash document based on ActionScript 2 or ActionScript 3. When Flash creates a new .fla file, it includes information that (ultimately through the .swf file) tells the Flash Player what flavor of ActionScript to use. You can use timeline programming for smaller projects and when you're not working with a team of other programmers. It's more difficult to reuse your ActionScript code if it's embedded in a Flash document's timeline.
To place ActionScript code in a separate ActionScript file, create an ActionScript document (.as) by choosing File→New→ActionScript File. When you work with teams of programmers and artists, it's likely the team manager will tell you to keep ActionScript code in a separate file. Even if you're working alone, you may want to keep code in a separate .as file so that your work can be reused with other Flash projects. There's a bit more programming overhead when you keep your ActionScript code in a separate file. On the plus side, that overhead leads to better object-oriented practices, making your code easier to reuse.
For more details on making the choice between timeline programming and keeping your code in a separate ActionScript file, see the box on Timeline Programming: Pros and Cons.
Note
Most of the examples in this book use timeline programming to show ActionScript programming principles.
If you've got a Flash document open, you're ready to begin adding ActionScript code to the timeline. Here are the steps to get you started:
Create a new layer in the timeline to store your code.
To make your life easier later, keep your ActionScript code in one place—a single layer at the top of the timeline that holds only ActionScript code. You can use any name you want for this layer, but for clarity's sake, call it actions or scripts.
Click a keyframe where you want to add your code, then press F9 (Option-F9) to open the Actions panel.
The Actions panel is divided into three main parts, as shown in Figure 12-3. The Script pane is where you type your ActionScript code. The Actions toolbox holds a list of ActionScript objects, properties, methods, and events. The Script navigator shows a list of objects that have ActionScript code attached.
Figure 12-3. The Actions panel has three parts: the Script pane, the Actions toolbox, and the Script navigator. In the Actions toolbox, the circle-arrow icons represent ActionScript elements that can be added to your script. Click the book icons to expand and collapse the different ActionScript categories.
Type your statements in Script pane, or choose statements from the Actions toolbox.
You can type code directly into the Script pane, or you can double-click or drag the ActionScript elements in the Actions toolbox. As you add code to individual frames, you see them listed in the Script navigator (in the toolbox, located on the left side of the Actions panel), giving you a running list of the objects that have code attached. To view or edit code for a particular object, click the object in the Script navigator, and you see the code in the Script pane.

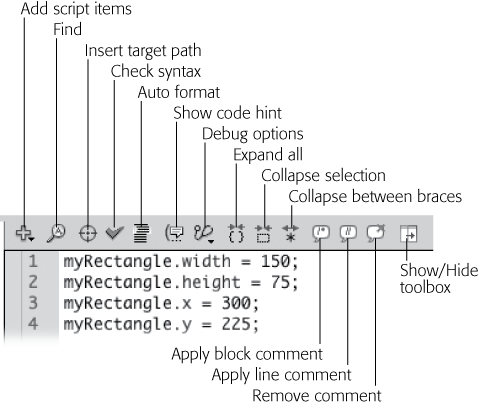
The toolbar above the Script pane provides helpful tools for working with your ActionScript code (Figure 12-4). The buttons aren't labeled, but you can see their names when you mouse over them. From left to right, these are the buttons:
Add a new item to script. Provides access to the same elements as the Actions toolbox. Useful if you've hidden the toolbox using the Show/Hide toolbox command (last in this list of buttons).
Find. Searches your script for words and characters.
Insert a target path. Click this button, and then choose your target object from a list, and this tool writes the proper code identifying it.
Check syntax. Inspects your code for obvious errors.
Autoformat. Formats your script, making it easier to read, by using colors and indents. To set formatting options, go to Edit→Preferences→ActionScript (Flash→Preferences→ActionScript on a Mac).
Show code hint. Displays tooltips with suggestions for your script.
Debug options. Inserts and removes breakpoints in your code. Breakpoints stop your program from running, giving you an opportunity to examine your program.
Collapse between braces. Hides the text between a set of curly braces {}, making it easier to read and understand your code. Similar to collapsing an outline in a word processor.
Collapse selection. Select the text you want to hide, and then click this button to hide it. Hold down the Alt (Option) key when you click this button, and the Actions panel collapses the code not selected.
Expand all. Expands collapsed portions of your script after you've used one of the two previous commands.
Apply block comment. Inserts the /* and */ used to create a block comment.
Apply inline comment. Inserts the // used to create an inline comment.
Remove comment. Removes the comment characters from a comment.
Show/Hide toolbox. If you need more room to see your Script pane, use this button to hide the Actions toolbox. When the toolbox is hidden, you can use the "Add a new item to script" button to insert elements.
When you want to store all your code in an ActionScript (.as) file, the first thing you need to do is create the file:
Create a new ActionScript file (File→New→ActionScript File).
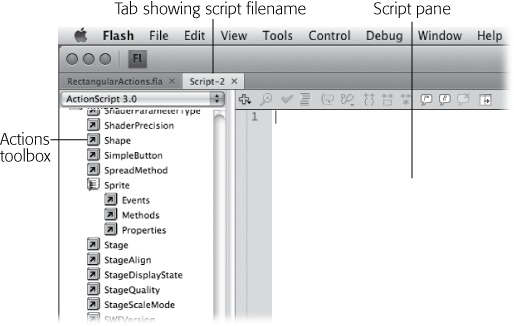
A new window opens, as shown in Figure 12-5. Initially, the window has a tab that reads Script-1 or something similar. When you save the ActionScript file with a name of your choice, that name appears on the tab. The Script window has two sections, a Script pane and the Actions toolbox. The toolbar above the Script pane is identical to the one described on Using the Script Pane Toolbar.
Save your ActionScript file in the same directory as your Flash file (File→Save).
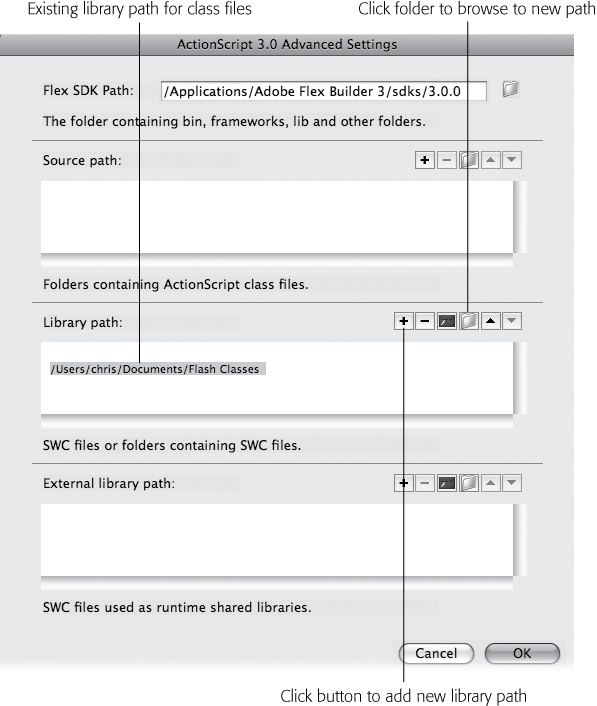
A dialog box opens where you can select a folder and then name your document. You want to save your file in the same directory as your Flash file. This way, Flash's compiler can find it when it creates an .swf file for distribution. Another option is to save your file in a folder that's designated as the ActionScript class folder. Steps to do that are described in the box below.
Type your statements in the Script pane or choose statements from the Actions toolbox.
You can type code directly into the Script pane, or you can double-click or drag the ActionScript elements in the Actions toolbox.
When you separate your ActionScript code from a Flash document, it's up to you to establish links between your code and the objects in the Flash document. Because this chapter focuses on the basics, the following examples use timeline programming.