Starting and stopping an animation is similar to hitting the Pause and Play buttons on a DVD player. If your audience is viewing your animation in the desktop version of Flash Player, then they can pause and play the animation by pressing Enter or Return, just as when you start and stop the playback when you're working in the Flash authoring environment. ActionScript gives you the tools to start and stop animations programmatically. There are all sorts of ways you can put this feature to use. Suppose you want the Stutz Bearcat to make a real stop at that stop sign, instead of the kind of stop that'll get you a ticket. You can place a stop() command in the timeline at the frame where you want the animation to stop.
Note
The stop() and go() examples in this section also use the car-driving frog graphics. If you're continuing to use your document from the previous exercises, delete the code on Frames 1 and 22 that changes the timeline speed. If you want to start with a new sample document, download 15-2_Timeline_ Stop_Go.fla from the Missing CD page at www.missingmanuals.com/cds.
Here's how to tell your animation when to stop using ActionScript:
Open 15-2_Timeline_Stop_Go.fla.
The actions layer at the top of the timeline has keyframes at Frame 1 and Frame 22, but there's no code in the frames.
Right-click Frame 22, and then choose Actions from the shortcut menu.
The Actions panel opens, and the current selection is set to Frame 22.
Type the following code:
stop();
This line of code is a little more complex than it may appear. In essence, it tells the main timeline of the animation to stop playing. A more complete version of this statement would read this.stop(). In that case, "this" refers to the main timeline. If you don't explicitly reference the timeline you're stopping, ActionScript assumes you mean the current timeline, which in this case is the main timeline.
Test your animation using Ctrl+Enter (⌘-Return).
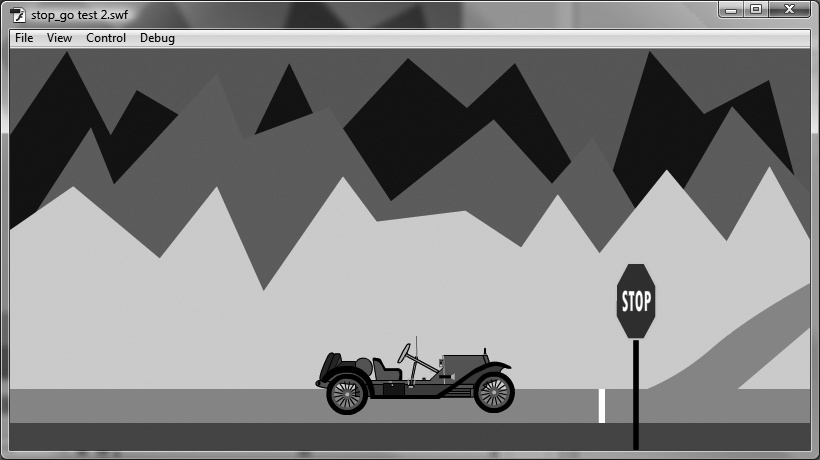
When the main timeline reaches the 22nd frame, it stops. Oddly, the wheels of the Stutz Bearcat keep on spinning (Figure 15-4). (That's got to be hard on the tires!) The car on the stage is an instance of the StutzBearcatFrog symbol in the Library. The symbol is a movie clip made up of two frames that make the car's wheels spin. To stop the wheels from turning, you need to stop the StutzBearcat animation, too.
Figure 15-4. In this scene, the animation of the main timeline stops, but the animation in the car's movie clip keeps running, so the wheels spin even when the car is stopped. To restore the laws of physics, you have to stop both the main timeline and the car's movie clip using ActionScript statements.
In the Actions panel, add the following line of code:
stutzBearcat.stop();
Now, Frame 22 has two stop() statements. The first stops the main timeline, and the second stops the instance of the stutzBearcat movie clip.
Test your animation using Ctrl+Enter (⌘-Return).
When the animation runs, the car and the car's wheels make a legal stop in front of the stop sign.
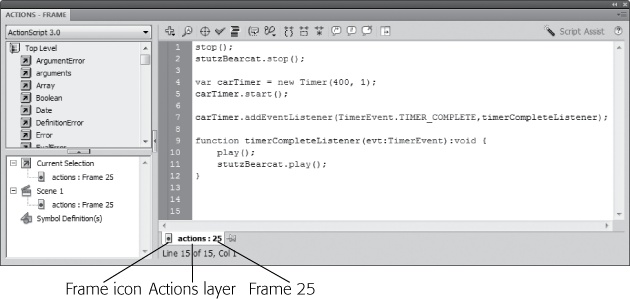
As you saw in the previous steps, the stop() command stops an animation nicely. But what about getting that Bearcat rolling again? You stopped the animation by putting the stop() statement in the frame where you wanted to stop, but putting a play() statement in the following frame, as logical as it sounds, will do you no good. The Flash Player will never reach the next frame—it's stopped. So you have a couple of choices, depending on what you want to trigger the starting and stopping. If you want your audience to control it, then you can give them clickable buttons or controls. If you want the animation to resume on its own, then a TimerEvent is the best tool in your toolbox. You can add a TimerEvent to the same frame where the stop() happened, as shown in Figure 15-5. When the timer is complete, it can trigger a play() statement for both the main timeline and the stutzBearcat movie clip. Modify the code on Frame 25 of the actions layer to read as follows:
1   stop();
2   stutzBearcat.stop();
3
4   var carTimer = new Timer(400,1);
5   carTimer.start();
6
7   carTimer.addEventListener(TimerEvent.TIMER_COMPLETE, timerCompleteListener);
8
9   function timerCompleteListener(evt:TimerEvent):void
10  {
11       play();
12       stutzBearcat.play();
13  }
Figure 15-5. The tab at the bottom of the Actions panel provides details about the location of the code shown. In this case, the code resides on the 25th frame of the actions layer.
The first two lines were already in the code. Line 4 creates a new timer called carTimer. The first number in parentheses (400) sets the timer to wait a little less than half a second (400 thousandths of a second). The second number (1), sets the timer to run once. Line 5 starts the timer. The remainder of the code sets up the event handler.
Line 7 registers the event listener to run the function timerCompleteListener() when the timer runs out. (For more details on events and event listeners, see How Events Work.) The code between the curly brackets (line 11 and line 12) are the statements that start the main timeline and the stutzBearcat movie clip. For the completed exercise, download 15-3_Timeline_Stop_Go_done.fla from the Missing CD (www.missingmanuals.com/cds).

