Creating common Flash elements like playback controls (Play and Pause buttons), text fields, checkboxes, and buttons can add up to a lot of grunt work. Since they pretty much look the same in every animation, some kind Flash developers did the grunt work for you and put ready-made versions of these Flash bits and pieces—called components—right into the program.
A component is a compiled, prebuilt movie clip that you can drag onto the stage and customize. Flash comes with dozens of components (Figure 16-1). If you do a lot of work in Flash, you'll appreciate the time that components can save you. But another great thing about components is the consistency they give. For example, the user interface components discussed in this chapter all look like they belong together. If you don't like their style, Flash gives you some convenient ways to change their appearance. So, if you're working in a design shop, you can add time-tested components to your projects and still give each client a look that matches her image and brand.
There's a consistency in the way you work with components, which also makes them easy to use. This chapter starts off showing you how to add, modify, and write code for the Button and ColorPicker components. By the time you're done, you'll not only know how to work with Button components, but you'll also be 90 percent of the way to knowing how to use the other Flash components.
After you learn how to add, modify, and program a couple of components, you'll learn about the different types of components available and what they can do for you. To wrap it all up, you'll learn how to find and install components that come from sources other than Adobe.
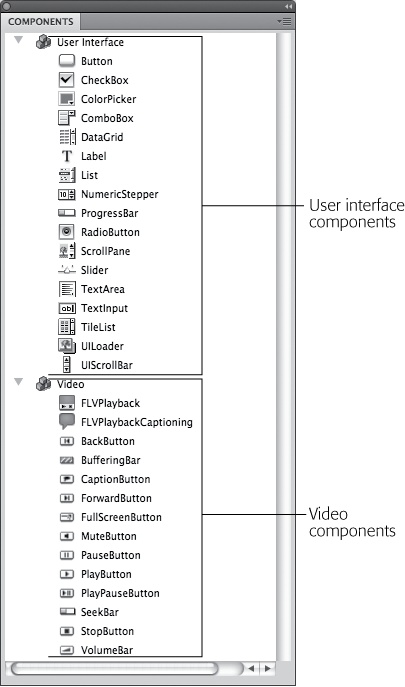
Figure 16-1. Flash CS5 Professional comes with dozens of components. Components for ActionScript 3.0 documents include: User Interface controls to create interactive buttons, boxes, and lists (similar to HTML form controls; and Video controls, as discussed on page 393). The Flex category is used to create components for use with the Flex application development program.
Note
Using components requires a fair amount of ActionScript knowledge. But creating your own components is an even more ActionScript-intensive proposition. If you'd like to explore creating your own components, check out both the ActionScript 3.0 and Components reference you find in Flash Help (see Getting Help for Events and Event Listeners), and a good book that covers both ActionScript and object-oriented design. Colin Moock's Essential ActionScript 3.0, and ActionScript 3.0 Cookbook, by Joey Lott, et al. (both O'Reilly) are two of the best on the market.
Adding a component to your animation is the first step in using that component. As you'll see in the following sections, adding an instance of a component to the stage is similar to adding an instance of a symbol: All you have to do is drag and drop. But instead of dragging components from the Library panel, you drag them from the Components panel.
To add a component to your animation:
The Components panel appears.
In the Components panel, click to a select the component you want, and then drag it to the stage.
As Figure 16-2 shows, Flash displays an instance of the component on the stage. It also places a copy of the component in the Library (Window→Library).
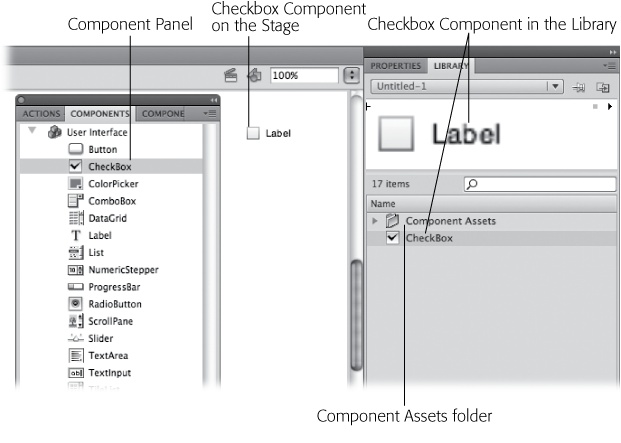
Figure 16-2. When you drag a component from the Components panel to the stage, Flash automatically adds the component and a Component Assets folder to the Library.
Tip
Flash gives you another way to add a component: In the Components panel, double-click the component. When you do, Flash immediately places an instance of the component on the center of your stage.
In most cases, adding a component to the stage is just part of the process. After you add the component, you still need to customize it and—depending on the component you choose—add ActionScript code to make it work with the other parts of your animation. That's exactly what you'll do in the following steps. In this example, you'll learn how to add buttons to an animation and then use those buttons to control both the main timeline and the timeline of a movie clip that's added to the main timeline.
This project uses a file, 16-1_Button_Component.fla, that you can download from the Missing CD page (www.missingmanuals.com/cds). If you'd like to see the completed project, you can download 16-3_Map_Components_done.fla. The first steps in this example set up the Flash document so it works with Button components and the ActionScript code that makes the buttons work. That involves creating new layers for actions, labels, and buttons.
In Flash, open 16-1_Button_Component.fla.
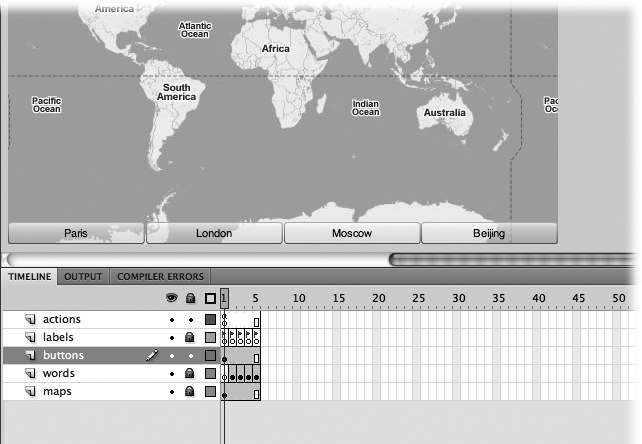
There's a layer named "words" containing five keyframes. In the last four keyframes are the names of famous cities. There's a second empty layer called "maps." In the Library, there's a folder called "map jpgs" and a movie clip called "Maps".
Click the New Layer button in the lower-left corner of the timeline to add three layers. From top to bottom, name them "actions," "labels," and "buttons."
In the labels layer, click Frame 1, and then Shift-click Frame 5.
Flash selects all five frames.
With the frames selected, press F6.
Empty keyframes are created in each of the frames. You need to have keyframes to create labels in each of the frames.
Add labels to each of the five keyframes by clicking each frame and then typing its name in the Properties→Label→Name box.
Name Frame 1 world; name Frame 2 paris; name Frame 3 london; name Frame 4 moscow; and name Frame 5 beijing. ActionScript uses these labels to find specific frames in the timeline. You won't be using this layer again, so you can go ahead and lock the contents by clicking the button under the padlock.
In the Library, double-click the Maps movie clip.
The movie clip opens in Flash.
Drag the playhead to inspect the individual frames in the movie clip, and then click the Scene 1 button.
As you move the playhead, each frame shows a different map. The labels in the timeline name the map. When you click the Scene 1 button, the movie clip closes and brings you back to the main timeline.
Click the maps layer in the main timeline, and then drag the Maps movie clip to the stage.
The Maps movie clip appears in all five frames of the main timeline because there's only one keyframe in the maps layer.
You don't have to sweat positioning the movie clip by hand; you can do the job with the Properties panel, as shown in Figure 16-3.
With the Maps movie clip selected, in the Properties panel, type the instance name "maps"
You have to name the instance of the Maps movie clip before you can control it with ActionScript.
Figure 16-3. The Maps movie clip is exactly the same size as the Flash document, 550 x 400 pixels. Here, the Maps movie clip isn't lined up with the stage, but setting the X/Y coordinates in Properties to 0,0 positions it perfectly to cover the entire stage. © 2008 Google Maps
Once the Maps movie clip is positioned and named, lock the maps layer so you don't accidentally move it when you're repositioning other elements on the stage.
If you test your animation at this point (Ctrl+Enter or ⌘-Return on a Mac), you'll see the maps and city names flash by rapidly. So far, your steps have set up a sort of a slideshow with labels that you can use as bookmarks for your buttons and ActionScript code. In the next steps, you'll add buttons and use ActionScript to control both the main timeline and the Maps movie clip timeline.
In the timeline, click the buttons layer.
You want to place all the new buttons in the buttons layer of the timeline.
Select Window→Components to open the components panel, and then drag the Button component to the stage.
The button appears on the stage, and two items appear in the Library: a button symbol and a folder named Component Assets.
Note
When you add your first component to a Flash project, it increases the file size of the published .swf file by about 20 to 50 kilobytes. This isn't a whopping leap in file size by today's standards, but it's good to know that if you add more components, they usually won't increase your file size by the same amount. They'll add only a few more kilobytes for each component. That's because most components share a certain amount of underlying code. Once the basic code is added to the .swf file, it's available to any components that need it.
With the button selected, in the Properties panel, type the instance name "btnParis".
When you select the button, the Instance Name box is at the top of the Properties panel. As with other symbols, you have to name the Button components before ActionScript can work with them.
Select the button on the stage, and then in the Properties panel, if necessary, expand the Component Parameters subpanel.
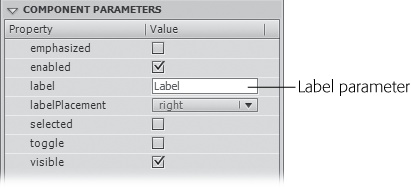
The Component Parameters subpanel shows the two parts of each parameter: name and value, as shown in Figure 16-4. You customize components for your project by changing the parameter values. Some parameters, like those with true/false values, have drop-down menus. Other parameters, like the label parameter for buttons, have text boxes where you can type a new label.
Note
In earlier versions of Flash, you used the Components Inspector (Shift-F7) to set component parameters. In Flash Professional CS5, those responsibilities have shifted to the Component Parameters subpanel in the Properties panel. Not a bad move, since it puts all you property and parameter settings in the same neighborhood, and you have one less window cluttering the screen.
Click the text box for the label parameter, and then type "Paris."
What you type in this text box changes the word that appears on the button. You don't need to change any of the other parameters right now, but here's a rundown on their uses:
emphasized. If this value is checked, or in programmer-speak true, it changes the button's appearance. Use it when you want to make one button stand out from a group of buttons.
enabled. If this value is deselected, the button won't work. It's helpful in situations where you don't want your audience to use a button but you still want it to be visible.
labelPlacement. As it sounds, this parameter gives you several choices for the way a label is positioned: left, right, top, or bottom.
selected. Like emphasized, this parameter changes the button's appearance to show that it's selected.
toggle. If this value is true, the button works like a toggle, and its appearance changes to reflect that.
visible. You can hide a button by deselecting the visible parameter.
Drag three more buttons from the Library to the stage. Give them the instance names "btnLondon," "btnMoscow," and "btnBeijing," and then label them "London," "Moscow," and "Beijing."
As shown in Figure 16-5, you don't have worry too much about how the buttons are arranged. In the next steps, you'll use the Align tool to position them precisely.
Select all the buttons, and then select Modify→Align→Distribute Widths.
The Distribute Widths command evenly lines the buttons up end to end.
Select Modify→Align→To Stage, and then Select Modify→Align→Bottom.
A checkmark appears next to To Stage on the menu, meaning that subsequent align commands will be relative to the stage; the Bottom command pushes all the buttons to the bottom of the stage.
Press Ctrl+G (⌘-G) to group the buttons, and then select Modify→Align→Horizontal Center.
This command centers the buttons at the bottom of the stage. You won't be doing anything immediately with single buttons, but you may as well ungroup them now with a Ctrl+Shift+G (⌘-Shift-G).

At this point, you've got everything positioned on the stage and you've labeled all the necessary frames. The only thing that's missing is the ActionScript code that glues it all together. If you test the animation at this point, it's pretty clear what that code needs to do. The first thing it needs to do is stop the movie clips from playing when the animation starts. The second thing the code needs to do is program the buttons to jump to specific frames in the main timeline and the Maps movie clip timeline.
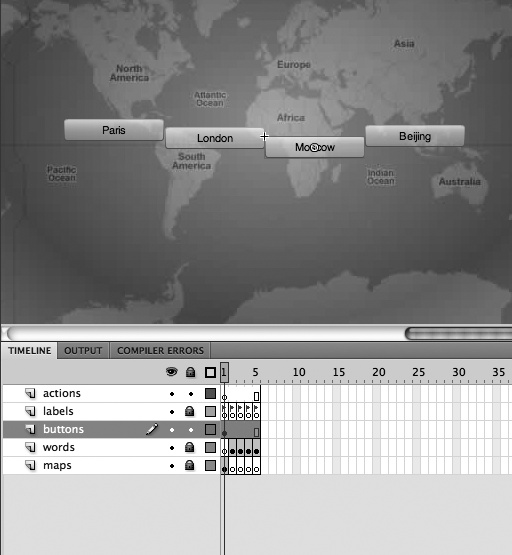
Figure 16-5. Arrange the buttons so that they're roughly, end to end, in a left-to-right order: Paris, London, Moscow, and Beijing. Then use Flash's Modify→Align tools to tidy them up. © 2008 Google Maps
If you've followed the ActionScript code exercises earlier in this book, chances are you've been introduced to ActionScript 3.0's event listeners. Unlike previous versions, ActionScript 3.0 uses a single method for recognizing and reacting to events. The following example uses event listeners to react to clicks on the Button components. If you need to brush up on using event listeners, see How Events Work.
In the actions layer, click Frame 1, and then press F9 (Option-F9).
The Actions panel opens.
Type the following code to stop the main timeline and the Maps movie clip.
stop();
maps.stop();
The first line stops the main timeline. The second line stops the Maps movie clip from playing.
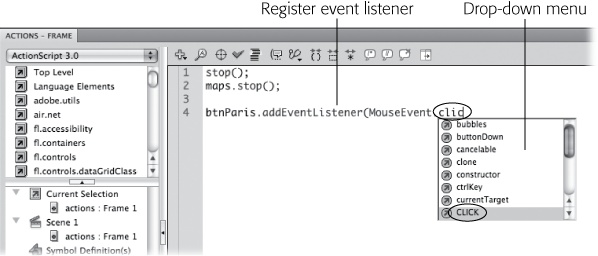
Type the following code to register an event listener for the Button component with the variable name btnParis, as shown in Figure 16-6.
btnParis.addEventListener(MouseEvent.CLICK, clickParisListener);
Event listeners come in two parts. This first part registers an event listener. In other words, it tells ActionScript to wait for a mouse click on btnParis. When there's a click, the clickParisListener() function runs.
Type the code for the clickParisListener() function:
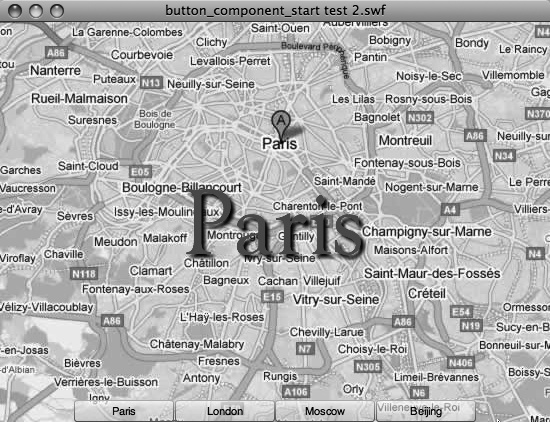
function clickParisListener(evt:MouseEvent):void
{
    gotoAndStop("paris");
    maps.gotoAndStop("paris");
}
The clickParisListener() function has two lines of code that control movie clip timelines. As you might guess, the gotoAndStop() method moves to a specific frame and then prevents the playhead from moving beyond that frame. The first line inside the curly brackets moves the playhead on the main timeline to the frame labeled "paris," which displays the word "Paris" on the stage. The second line inside the curly brackets moves the playhead on the Maps movie clip to a frame also labeled "paris." This displays the map of Paris background, as shown in Figure 16-7.
Press Ctrl+Enter (⌘-Return) to test the animation.
When the animation runs, it stops on the first frame showing the world map. Click the Paris button, and the word "Paris" appears and the background map changes to a city map of Paris.
Add event listeners for the remaining three buttons with the following code. When you're done, the code in Frame 1 in the actions layer should look like this:
1   stop();
2   maps.stop();
3
4   btnParis.addEventListener(MouseEvent.CLICK,clickParisListener);
5   btnLondon.addEventListener(MouseEvent.CLICK,clickLondonListener);
6   btnMoscow.addEventListener(MouseEvent.CLICK,clickMoscowListener);
7   btnBeijing.addEventListener(MouseEvent.CLICK,clickBeijingListener);
8
9   function clickParisListener(evt:MouseEvent):void
10  {
11       gotoAndStop("paris");
12       maps.gotoAndStop("paris");
13  }
14  function clickLondonListener(evt:MouseEvent):void
15  {
16       gotoAndStop("london");
17       maps.gotoAndStop("london");
18  }
19  function clickMoscowListener(evt:MouseEvent):void
20  {
21       gotoAndStop("moscow");
22       maps.gotoAndStop("moscow");
23  }
24  function clickBeijingListener(evt:MouseEvent):void
25  {
26      gotoAndStop("beijing");
27      maps.gotoAndStop("beijing");
28  }
Test the animation again.
When you test the animation, button clicks display the city name and a matching background map.
In this example, it would have been easier to use a single timeline for both the words and the background maps, but the point is to show how buttons or events can control multiple timelines—in this case the main timeline with the words and the Maps movie clip timeline with the maps.
There are several ways you can modify components after you've added them to your project. The most straightforward way is to change the properties of the component in the Component Parameters subpanel. Suppose you'd like to make the buttons in the previous example wider, so they run all the way across the bottom of the stage. Select btnParis, and in the Properties panel's Position and Size section, click the link button "Lock width and height values together". When the link is broken, you can change width and height independently. Change the width setting to 137.5 (a fourth of the width of the stage). The width of btnParis changes, but all the other properties (position, height, and color) remain the same, as shown in Figure 16-8.

Figure 16-8. Changing the properties of an instance of a component changes that single instance. Notice that the other buttons, btnLondon, btnMoscow, and btnBeijing, remain the same width. © 2008 Google Maps
For this example, go ahead and make all the instances of the Button component the same width: 137.5. Then use the Align commands to align them along the bottom of the stage, so it looks like Figure 16-9.
One of the great things about Flash components is their consistency. Once you know how to add and customize one component, like the Button component, it's easy to apply that knowledge to other components. For example, the ColorPicker tool appears in an animation as a little color swatch. When your audience clicks the swatch, it displays a palette of colors to choose from, as shown in Figure 16-10. Using this handy tool, you can give your audience the power to change the colors of elements in your animation. Even though components like buttons and color pickers have very different purposes, the steps for adding them to the stage, setting their parameters, and creating event listeners to react to them are very similar.
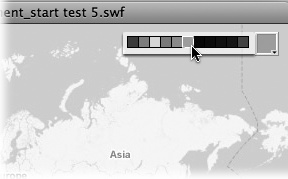
Figure 16-10. The ColorPicker is one of those components that's fun for your audience. It gives them a way to customize elements in your animation to suit their own tastes. © 2008 Google Maps
In this example, you'll add a ColorPicker component to the animation so your audience can choose a background color for the main timeline.
Note
This example continues exercises that started at the beginning of this chapter. If you didn't work on those examples but would like to jump in at this point, download the file 16-2_Color_Picker.fla from the Missing CD page at www.missingmanuals.com/cds. To see the final version, get 16-3_Map_Components_done.fla.
In the timeline, unlock the maps layer.
The maps layer is a good place to put the ColorPicker because there are no keyframes. Placing the ColorPicker in the maps layer makes it available in every frame in the animation.
Select Window→Components, and then drag a ColorPicker component on the stage.
You can place the ColorPicker anyplace you like, but the upper-right corner is a good spot if you can't decide. In addition to the instance on the stage, a ColorPicker gets added to the Library. If you delve into the Library folder named Component Assets, you find that folders and items specific to the ColorPicker have been added as well.
With the ColorPicker selected, type cpBackground in the Properties panel for the instance name.
It's good to instance names. In this case cp is used to identify the object as a ColorPicker. Background indicates what the ColorPicker is changing.
Press F9 (Option-F9) to open the Actions window, and then type the following code to import the ColorPickerEvent.
import fl.events.ColorPickerEvent;
When you create documents with Flash, you automatically have access to the most commonly used ActionScript classes, like the MovieClip class, the Shape class, and so on. The ColorPickerEvent isn't included, so you need to import the packages that define those classes. If you try to run your program without importing the package, you see an error that says "Error 1046: Type was not found…"
Continue your code by registering an event listener for the ColorPicker and a function that runs when the ColorPicker changes:
cpBackground.addEventListener(ColorPickerEvent.CHANGE,changeColorPicker);

function changeColorPicker(evt:ColorPickerEvent):void
{
         opaqueBackground = evt.color;
}
This code follows the standard event listener format. One statement registers the event listener for an object, and the function explains what to do when the event happens. If you're already familiar with event listeners, the juicy bit of this example is the line that says opaqueBackground = evt.color;. This line changes the background color of the main timeline. The opaqueBackground property is inherited by all DisplayObjects. The ColorPicker event has a property, appropriately called color, that holds the value of the color that was selected. (If you need to brush up on events and event handling, see How Events Work.)
With the ColorPicker selected, in the Component Parameters, change the selectedColor and the showTextField parameters.
At first the selectedColor parameter is set to black. If you want folks to notice that they can change the color, it's best to set this to something more colorful. Note that this command changes only the color displayed in the ColorPicker. It doesn't actually change the background color at this point; that's done by the code within the event listener.
The showTextField parameter gives the audience a text box where they can type a color's hexadecimal value. You can assume that your audience would rather click a color swatch, so set this parameter to false.
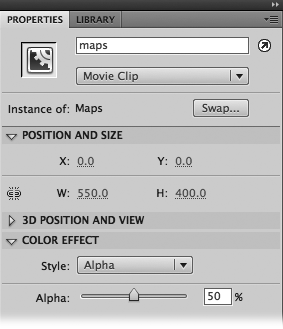
Select the Maps movie clip on the stage, and then select Properties→Color Effect→Alpha and type 50.
The Maps movie clip becomes semi-transparent, letting the background color show through, as explained in Figure 16-11.
Press Ctrl+Enter (⌘-Return) to test the animation.
When the animation first runs, there's no background color, since the code that sets the background color is inside the ColorPicker event. The color changes when you select a new color in the ColorPicker. If you use the buttons to jump from city to city, the background color remains constant until a new color is selected.
As this example shows, the steps for putting the ColorPicker component into action are similar to those for using the Button component. Adding an instance of the component to the stage, creating an event listener, and changing the component parameters are much the same. The only differences are related to the components' purpose and behavior.
Components have properties just like any other objects. When you change the parameters of a component, you're changing properties that the author of the component has made available to designers. (Other component properties are hidden, where you can't mess with them.) You can change those properties using ActionScript, too. Specifically, you can change a component's properties while an animation is running, or as coders like to say, "You can change the properties at runtime."
Here's an example that changes the ColorPicker using ActionScript code. The ColorPicker's palette shows bunches of colors, many of them very similar. There may be times when you don't want to offer so many color choices. For example, if you're letting customers choose the color for their new Stutz Bearcat automobile, you may offer only a handful of color options. Using ActionScript, you can specify each color shown on the palette, as long as you know the hexadecimal code that identifies the color.
Add this to the code for your ColorPicker project (Adding a ColorPicker Component). You can place it following the line that begins with the word "import":
cpBackground.colors =
[0xFF0000,0xFF7700,0xFFFF00,0x00FF00,0x000044,0x0000FF,0x0066FF];
The colors property of the ColorPicker is an array. The values held inside an array are enclosed in square brackets and separated by commas. Each of the odd-looking numbers, like 0xFF7700, are hexadecimal values. Now when you test the animation, the ColorPicker shows a palette of only seven colors, as shown in Figure 16-10.
Tip
Use Flash's color panel (Window→Color) to look up the hexadecimal numbers for the colors you need. Select a color and the hexadecimal value appears in the text box, as shown in Figure 16-12. Replace the # with ActionScript's identifier for hex values, 0x.
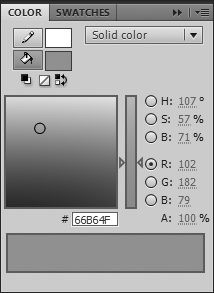
Figure 16-12. Drag the crosshairs to choose a hue, and then adjust the brightness of the color using the vertical slider on the right. When you're happy with the color previewed at the bottom, select and copy the hexadecimal number that appears in the box. To use the number in ActionScript, replace the # with 0x (ActionScript's identifier for hex values).
You can use similar code to change the properties of the ColorPicker (or other components). In step 6 on Adding a ColorPicker Component, you used the Component Parameters subpanel to change the ColorPicker's showTextField property. To change that setting using ActionScript, use a statement like this:
cpBackground.showTextField = false;