If you were one of those kids who loved the Etch-A-Sketch, then you're probably going to love this chapter. With ActionScript, you can draw lines and shapes in your Flash animations. The great advantage of drawing with ActionScript is that your animations can draw new objects on the fly.
This chapter will introduce the Graphics class and all the power it puts at your fingertips. To start with, you'll learn how ActionScript works with points and lines. You'll learn about the virtual pen and how, as it moves from one spot to another, you can tell it to draw lines (or not). Then you'll learn how to draw and display Flash's built-in shapes, including ellipses, rectangles, and rounded rectangles. There are times when prebuilt shapes won't do the job, so you'll see how to draw more complex and irregular shapes using nothing but ActionScript code. To wrap things up, this chapter shows how to move the shapes you've drawn about the stage using ActionScript's TimerEvent to trigger the motion.
It all comes down to the point. Flash's stage is a mass of points measured by x/y coordinates. In the upper-left corner, there's a point that's referenced by 0, 0, which means it's at the 0 point on the horizontal axis and the 0 point of vertical axis. ActionScript describes the point as x = 0 and y = 0. If you put something on the stage and don't tell Flash or ActionScript where you want to place it, chances are that something will end up at 0, 0. If your stage is one of Flash's standard sizes, say 550 x 400 pixels, the lower-right corner is 550, 400 or x = 550 and y = 400. When drawing with ActionScript, you can bet that you'll be dealing with a lot of x/y coordinates and a lot of points. If you want to draw a line from one place to another, you need to define two points. If you want to draw a trapezoid, you need to define, at least by inference, the four corner points.
Since the point is a building block for all the lines and shapes and drawings to follow, ActionScript has a special Point class. Not only does the class give you a place to store information about specific points, but it also provides some helpful methods that you can use when you're working with points and their relationships. For reference, the Point class is part of the flash.geom package. You create instances of the Point class the same way you create other objects in ActionScript, like so:
var ptNear:Point = new Point();
When you enter this line of code, you're doing a couple of things at once. First of all, you're creating a new variable and providing a variable name, ptNear. The word after the colon declares the data type—in this case, Point. Then, after the assignment operator (=), you use the reserved word new to explain that you're creating a new instance of an object. The word Point() with its parentheses is the constructor for the Point class. When all is said and done, you've got yourself a new instance of the Point class that's addressed by the variable name ptNear.
As you might guess, Point objects have two properties, x and y. You can assign values to these properties to set a point's location, and if you have the name of a point but you don't know where it is, you can read these properties to learn its location.
ptNear.x = 20;
ptNear.y = 20;
trace("The location of ptNear is:",ptNear);
The first two lines assign values to ptNear, an instance of the Point class. The third line uses that handy trace() statement to place information in the Output panel. In this case, the trace() statement reports:
The location of ptNear is: (x=20, y=20)
The Point class has just one other property, oddly called length. Thankfully, it's not referring to the length of the point. That would confuse everyone, including Euclid. In this case, length refers to the length of a line from 0, 0 to the point. It's a read-only property, meaning you can't assign a new value to length; all it does is report on its value.
Most of the interesting and useful features of the Point class are the methods:
distance(). Calculates the distance between two points. Example:
distanceBetweenPoints = Point.distance(ptNear,ptFar);
add(). Adds the coordinates of two points and returns another point in x, y values.
sumOfPoints = ptNear.add(ptFar);
subtract(). Subtracts the coordinates of two points and returns another point in x, y values.
differenceOfPoints = ptNear.subtract(ptFar);
equals(). Tests to see if two points are equal. Useful for creating conditional statements, like if ptBall equals ptGround, then bounce.
if (ptBall.equals(ptGround)) bounce(); //run the function Bounce()
interpolate(). Calculates a point between two end points. You use a third parameter, with a value between 0 and 1, to find a point and to determine how close that point is to one or the other of the end points. Think of it as a percentage.
ptHalfWay = Point.interpolate(ptNear, ptFar, 0.5);
ptQuarterWay = Point.interpolate(ptNear, ptFar, 0.75);
The interpolate() method uses three parameters, which as usual make their appearance inside the parentheses. The first two parameters have to be points. The third parameter is a number between 0 and 1; that's a common ActionScript technique for indicating a percentage. In this case, the closer the number is to 1, the closer the point is to the first point. The closer the number is to zero, the closer it is to the second point. So, in the examples above, the value 0.5 finds the midpoint between ptNear and ptFar. The value 0.75 is closer to the first point, so it finds a point a quarter of the way between the two points.
The best way to understand how these methods work is to use them in ActionScript. Follow these steps to see how to run the Point class through some of its paces.
Note
You can download 18-1_Point_Methods.fla with the following code from the Missing CD (www.missingmanuals.com/cds).
Select File→New and choose ActionScript 3.0. Select the first frame on the timeline, and then press F9 (Option-F9).
The Actions panel opens. Figure 18-1 shows the Actions panel with some code entered.
Type the following code (but not the line numbers at left):
1  var ptNear:Point = new Point();
2  var ptFar:Point = new Point();
3  var distanceBetweenPoints:Number;
4  var sumOfPoints:Point;
5  var differenceOfPoints:Point;
6  var pointBetweenPoints:Point;
7  var ptHalfWay:Point;
8  var ptQuarterWay:Point;
9  var ptBall:Point = new Point();
10 var ptGround:Point = new Point();
11
12 ptNear.x = 0;
13 ptNear.y = 20;
14 ptFar.x = 100;
15 ptFar.y = 20;
16
17 distanceBetweenPoints = Point.distance(ptNear,ptFar);
18 sumOfPoints = ptNear.add(ptFar);
19 differenceOfPoints = ptNear.subtract(ptFar);
20 ptBall.x = 200;
21 ptBall.y = 350;
22 ptGround.x = 200;
23 ptGround.y = 350;
24 ptHalfWay = Point.interpolate(ptNear,ptFar,0.5);
25 ptQuarterWay = Point.interpolate(ptNear,ptFar,0.75);
26
27 trace("The location of ptNear is:",ptNear);
28 trace("The location of ptFar is:",ptFar);
29 trace();
30 trace("A line from 0, 0 to ptNear is",ptNear.length, "long.");
31 trace("The distance between ptNear and ptFar is:",distanceBetweenPoints);
32 trace("If you add ptNear to ptFar you get:", sumOfPoints);
33 trace("If you subtract ptFar from ptNear you get:",differenceOfPoints);
34 trace("This point is half the way between ptNear and ptFar:", ptHalfWay);
35 trace("This point is a quarter of the way between ptNear and ptFar:",
   ptQuarterWay);
36 trace();
37 trace("The location of ptBall is:",ptBall);
38 trace("The location of ptGround is:",ptGround);
39 if (ptBall.equals(ptGround))
40 {
41     bounce();
42 }
43
44 function bounce():void
45 {
46     trace("I'm bouncing");
47 }
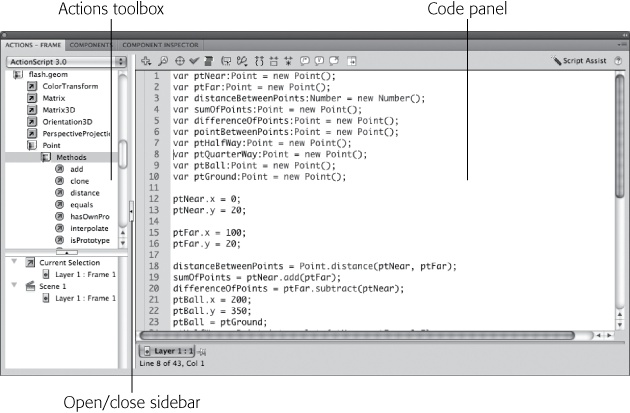
Figure 18-1. The appearance of the Actions panel changes depending on the way you configure it. Here the Actions toolbox is displayed. You can open or close it by clicking the open/close sidebar button.
The first 10 lines in the code create instances of objects. All except one are Point class objects. The data type for distanceBetweenPoints is Number. Lines 12 through 15 assign values to the x and y properties to ptNear and ptFar. The next block of statements (lines 17 through 25) show the Point methods discussed in this section. If you want to experiment with these methods, you can use these examples as a model. From line 27 to line 38 there are trace() statements that send text to the Output panel. The text inside quotes is displayed literally; the items outside the quotes are the variable names. Most of the variables refer to points, so the Output panel lists the values of their x and y properties. In some cases the output is a distance, which is a number. Line 39 is a conditional if() statement that demonstrates the Points class's equals property. The two points are equal, because they have the same values for the x and y properties, so the value of the statement ptBall.equals(ptGround) is true. With the condition true, the if statement calls the bounce() function, which is written on lines 44 through 47. The bounce function sends the words "I'm bouncing" to the Output panel, as shown in Figure 18-2.
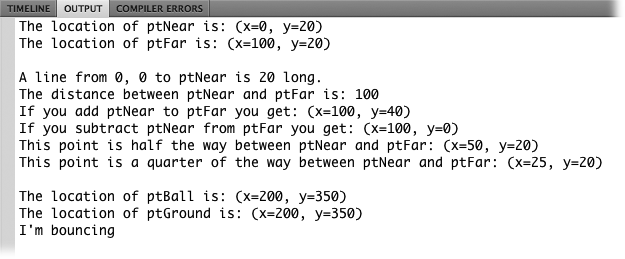
Figure 18-2. When you put a reference to a point in a trace() statement, Flash automatically shows the values of the x and y properties. This Output panel shows the results of several Point class methods.
Working with points is a little abstract, because you can't really add a point instance to the display list in Flash. It's good to understand how points work in ActionScript and to be aware of the methods of the Points class, but the fun really begins when you start drawing lines and shapes.