Retrieving Submitted Data
Example 11-1 is only one part of the multipart form handling process. If you enter a name and click on the Submit Query button, absolutely nothing will happen other than the form being redisplayed. So, now it’s time to add some PHP code to process the data submitted by the form.
Example 11-2 expands on the previous program to include data processing. Type it in (or modify formtest.php by adding in the new lines), save it as formtest2.php, and try the program for yourself. The result of running this program and entering a name can be seen in Figure 11-2.
<?php // formtest2.php
if (isset($_POST['name'])) $name = $_POST['name'];
else $name = "(Not entered)";

echo <<<_END
<html>
    <head>
        <title>Form Test</title>
    </head>
    <body>
    Your name is: $name<br />
    <form method="post" action="formtest2.php">
        What is your name?
        <input type="text" name="name" />
        <input type="submit" />
    </form>
    </body>
</html>
_END;
?>
The only changes are a couple of lines at the start that check the
$_POST associative array for the field
name submitted. The previous chapter
introduced the $_POST associative
array, which contains an element for each field in an HTML form. In Example 11-2, the input name used was
name and the form method was POST, so element name of the $_POST array contains the value in $_POST['name'].
The PHP isset function is used to
test whether $_POST['name'] has been
assigned a value. If nothing was posted, the program assigns the value
“(Not entered)”; otherwise, it stores the value that was entered. Then a
single line has been added after the <body> statement to display that value,
which is stored in $name.

register_globals: An Old Solution Hangs On
Before security became such a big issue, the default behavior of
PHP was to assign the $_POST and
$_GET arrays directly to PHP
variables. For example, there would be no need to use the instruction
$name=$_POST['name'];, because
$name would be given that value
automatically by PHP at the program start!
Initially (prior to version 4.2.0 of PHP), this seemed a very
useful idea that saved a lot of extra code writing, but this practice
has now been discontinued and the feature is disabled by default. Should
you find register_globals enabled on
a production web server for which you are developing, you should
urgently ask your server administrator to disable it.
So why disable register_globals? It enables anyone to enter a
GET input on the tail of a URL, like
this: http://myserver.com?override=1. If your code
were ever to use the variable $override and you forgot to initialize it (for
example, through $override=0;), the
program could be compromised by such an exploit.
In fact, because many installations on the Web have this gaping hole, I advise you to always initialize every variable you use, just in case your code will ever run on such a system. Initialization is also good programming practice, because you can comment each initialization to remind yourself and other programmers what a variable is for.
Note
If you ever find yourself maintaining code that seems to assume
values for certain variables for no apparent reason, you can make an
educated guess that the programmer wrote the code using register_globals, and that these values are
intended to be extracted from a POST or GET. If so, I recommend you rewrite the code
to load these variables explicitly from the correct $_POST or $_GET array.
Default Values
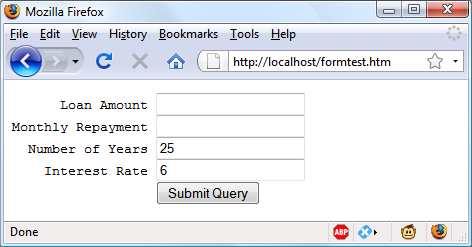
Sometimes it’s convenient to offer your site visitors a default value in a web form. For example, suppose you put up a loan repayment calculator widget on a real estate website. It could make sense to enter default values of, say, 25 years and 6 percent interest, so that the user can simply type in either the principal sum to borrow or the amount that she can afford to pay each month.
In this case, the HTML for those two values would be something like Example 11-3.
<form method="post" action="calc.php"><pre>
      Loan Amount <input type="text" name="principle" />
Monthly Repayment <input type="text" name="monthly" />
  Number of Years <input type="text" name="years" value="25" />
    Interest Rate <input type="text" name="rate" value="6" />
                  <input type="submit" />
</pre></form>
Note
If you wish to try this (and the other HTML code samples), type it in and save it with a .html file extension, such as test.html, then load that file into your browser.
Take a look at the third and fourth inputs. By populating the
value parameter, you display a
default value in the field, which the users can then change if they
wish. With sensible default values you can often make your web forms
more user-friendly by minimizing unnecessary typing. The result of the
previous code looks like Figure 11-3. Of course, this
was created just to illustrate default values, and because the program
calc.php has not been written, the
form will not do anything if submitted.
Default values are also used for hidden fields if you want to pass extra information from your web page to your program, in addition to what users enter. We’ll look at hidden fields later in this chapter.
Input Types
HTML forms are very versatile and allow you to submit a wide range of different types of inputs, ranging from text boxes and text areas to checkboxes, radio buttons, and more.
Text boxes
Probably the type of input you will use most often is the text box. It accepts a wide range of alphanumeric text and other characters in a single-line box. The general format of a text box input is:
<input type="text" name="name" size="size" maxlength="length" value="value" />
We’ve already covered the name and value parameters, but two more are
introduced here: size and maxlength. The size parameter specifies the width of the
box, in characters of the current font, as it should appear on the
screen, and maxlength specifies the
maximum number of characters that a user is allowed to enter into the
field.
The only required parameters are type, which tells the web browser what type
of input is to be expected, and name, for providing a name to the input that
is then used to process the field upon receipt of the submitted
form.
Text areas
When you need to accept input of more than a single line of text, use a text area. This is similar to a text box but, because it allows multiple lines, it has some different parameters. Its general format looks like this:
<textarea name="name" cols="width" rows="height" wrap="type">
</textarea>
The first thing to notice is that <textarea> has its own tag and is not
a subtype of the <input> tag.
It therefore requires a closing </textarea> to end input.
Instead of a default parameter, if you have default text to
display, you must put it before the closing </textarea>, like this:
<textarea name="name" cols="width" rows="height" wrap="type">
This is some default text.
</textarea>
It will then be displayed and be editable by the user. To
control the width and height, use the cols and rows parameters. Both use the character
spacing of the current font to determine the size of the area. If you
omit these values, a default input box will be created that will vary
in dimensions depending on the browser used, so you should always
define them to be certain about how your form will appear.
Lastly, you can control how the text entered into the box will
wrap (and how any such wrapping will be sent to the server) using the
wrap parameter. Table 11-1 shows the wrap
types available. If you leave out the wrap parameter, soft wrapping is
used.
Type | Action |
| Text does not wrap and lines appear exactly as the user types them. |
| Text wraps but is sent to the server as one long string without carriage returns and line feeds. |
| Text wraps and is sent to the server in wrapped format with soft returns and line feeds. |
Checkboxes
When you want to offer a number of different options to a user, from which he can select one or more items, checkboxes are the way to go. The format to use is:
<input type="checkbox" name="name" value="value" checked="checked" />
If you include the checked
parameter, the box is already checked when the browser is displayed
(the string you assign to the parameter doesn’t matter; the parameter
just has to be present). If you don’t include the parameter, the box
is shown unchecked. Here is an example of an unchecked box:
I Agree <input type="checkbox" name="agree" />
If the user doesn’t check the box, no value will be submitted.
But if he does, a value of “on” will be submitted for the field named
agree. If you prefer to have your
own value submitted instead of the word “on” (such as the number 1),
you could use the following syntax:
I Agree <input type="checkbox" name="agree" value="1" />
On the other hand, if you wish to offer a newsletter to your readers when submitting a form, you might want to have the checkbox already checked as the default value:
Subscribe? <input type="checkbox" name="news" checked="checked" />
If you want to allow groups of items to be selected at one time, assign them all the same name. However, be aware that only the last item checked will be submitted, unless you pass an array as the name. For example, Example 11-4 allows the user to select her favorite ice cream flavors (see Figure 11-4 for how it displays in a browser).
   Vanilla <input type="checkbox" name="ice" value="Vanilla" />
 Chocolate <input type="checkbox" name="ice" value="Chocolate" />
Strawberry <input type="checkbox" name="ice" value="Strawberry" />
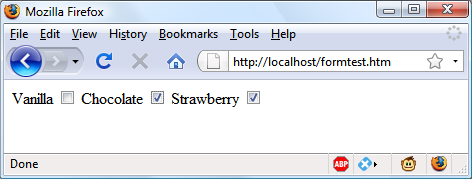
If only one of the checkboxes is selected, such as the second
one, only that item will be submitted (the field named ice will be assigned the value "Chocolate"). But if two or more are
selected, only the last value will be submitted, with prior values
being ignored.
If you want exclusive behavior—so that only
one item can be submitted—you should use radio
buttons (see the next section). If, however, you want to
allow multiple submissions, you have to slightly alter the HTML, as
shown in Example 11-5
(note the addition of the square brackets, [], following the values of ice):
   Vanilla <input type="checkbox" name="ice[]" value="Vanilla" />
 Chocolate <input type="checkbox" name="ice[]" value="Chocolate" />
Strawberry <input type="checkbox" name="ice[]" value="Strawberry" />
Now when the form is submitted, if any of these items have been
checked, an array called ice will
be submitted that contains any and all selected values. In each case,
you can extract either the single submitted value or the array of
values to a variable, like this:
$ice = $_POST['ice'];
If the field ice has been
posted as a single value, $ice will
be a single string, such as "Strawberry". But if ice was defined in the form as an array
(like in Example 11-5),
$ice will be an array, and its
number of elements will be the number of values submitted. Table 11-2 shows the seven
possible sets of values that could be submitted by this HTML for one,
two, or all three selections. In each case, an array of one, two, or
three items is created.
One value submitted | Two values submitted | Three values submitted |
|
|
|
If $ice is an array, the PHP
code to display its contents is quite simple and might look like
this:
foreach($ice as $item) echo "$item<br />";
This uses the standard PHP foreach construct to iterate through the
array $ice and pass each element’s
value into the variable $item,
which is then displayed using the echo command. The <br /> is just an HTML formatting
device, to force a new line after each flavor in the display.
By default, checkboxes are square.
Radio buttons
Radio buttons are named after the push-in preset buttons found on many older radios, where any previously depressed button pops back up when another is pressed. They are used when you want only a single value to be returned from a selection of two or more options. All the buttons in a group must use the same name and, because only a single value is returned, you do not have to pass an array.
For example, if your website offers a choice of delivery times for items purchased from your store, you might use HTML like that in Example 11-6 (see Figure 11-5 to see how it displays).
8am-Noon<input type="radio" name="time" value="1" />|
Noon-4pm<input type="radio" name="time" value="2" checked="checked"/>|
 4pm-8pm<input type="radio" name="time" value="3" />
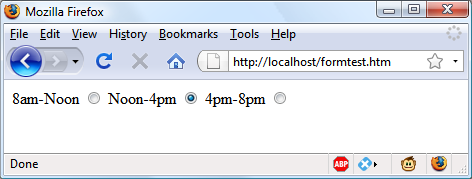
Here, the second option, Noon–4pm, has been selected by default.
Providing a default choice ensures that at least one delivery time
will be selected, which users can change to one of the other two
options if they prefer. Had one of the items not been already checked,
the user might forget to select an option and no value would be
submitted at all for the delivery time.
By default, radio buttons are round.
Hidden fields
Sometime it is convenient to have hidden form fields so that you can keep track of the state of form entry. For example, you might wish to know whether a form has already been submitted. You can achieve this by adding some HTML such as the following to your PHP code:
echo '<input type="hidden" name="submitted" value="yes" />'
This is a simple PHP echo
statement that adds an input field to the HTML form. Let’s assume the
form was created outside the program and displayed to the user. The
first time the PHP program receives the input, this line of code has
not run, so there will be no field named submitted. The PHP program recreates the
form, adding the input field. Then, when the visitor resubmits the
form, the PHP program receives it with the submitted field set to "yes". The code can simply check whether the
field is present:
if (isset($_POST['submitted']))
{...
Hidden fields can also be useful for storing other details, such as a session ID string that you might create to identify a user, and so on.
Warning
Never treat hidden fields as secure, because they are not. The HTML containing them can easily be viewed using a browser’s view source feature.
Select
The select tag lets you
create a drop-down list of options, offering either single or multiple
selections. It conforms to the following syntax:
<select name="name" size="size" multiple="multiple">
The parameter size is the
number of lines to display. Clicking on the display causes a list to
drop down showing all the options. If you use the multiple parameter, the user can select
multiple options from the list by pressing the Ctrl key when clicking.
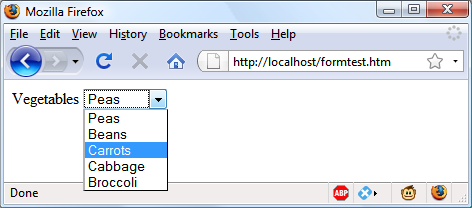
So, to ask a user for his favorite vegetable from a choice of five,
you might use HTML like that in Example 11-7, which
offers a single selection.
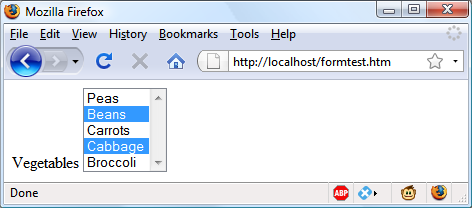
Vegetables <select name="veg" size="1">
<option value="Peas">Peas</option>
<option value="Beans">Beans</option>
<option value="Carrots">Carrots</option>
<option value="Cabbage">Cabbage</option>
<option value="Broccoli">Broccoli</option>
</select>
This HTML offers five choices, with the first one, Peas, preselected (due to it being the first item). Figure 11-6 shows the output where the list has been clicked on to drop it down, and the option Carrots has been highlighted.
If you want to have a different default option offered first
(such as Beans), use the selected tag, like this:
<option selected="selected" value="Beans">Beans</option>
You can also allow for users to select more than one item, as in Example 11-8.
Vegetables <select name="veg" size="5" multiple="multiple">
<option value="Peas">Peas</option>
<option value="Beans">Beans</option>
<option value="Carrots">Carrots</option>
<option value="Cabbage">Cabbage</option>
<option value="Broccoli">Broccoli</option>
</select>
This HTML is not very different; the only changes are that the
size has been changed to "5" and
the parameter multiple has been
added. But, as you can see from Figure 11-7, it is now
possible to select more than one option by using the Ctrl key when
clicking.
You can leave out the size
parameter if you wish, and the output will be the same, but with a
larger list the drop-down box might take up too much screen space, so
I recommend that you pick a suitable number of rows and stick with it.
I also recommend against multiple select boxes smaller than two rows
in height—some browsers may not correctly display the scroll bars
needed to access it.
You can also use the selected
tag within a multiple select and can, in fact, have more than one
option preselected if you wish.
Labels
You can provide an even better user experience by utilizing the
<label> tag. With it, you can
surround a form element, making it selectable by clicking any visible
part contained between the opening and closing <label> tags.
For example, going back to the example of choosing a delivery time, you could allow the user to click on the radio button itself and the associated text, like this:
<label>8am-Noon<input type="radio" name="time" value="1" /></label>
The text will not be underlined like a hyperlink when you do this, but as the mouse pointer passes over it it will change to an arrow instead of a text cursor, indicating that the whole item is clickable.
The submit button
To match the type of form being submitted, you can change the
text of the submit button to anything you like by using the value parameter, like this:
<input type="submit" value="Search" />
You can also replace the standard text button with a graphic image of your choice, using HTML such as this:
<input type="image" name="submit" src="image.gif" />
Sanitizing Input
Now we return to PHP programming. It can never be emphasized enough that handling user data is a security minefield, and that it is essential to learn to treat all such data with the utmost caution from the word go. It’s actually not that difficult to sanitize user input from potential hacking attempts, and it must be done.
The first thing to remember is that regardless of what constraints you have placed in an HTML form to limit the types and sizes of inputs, it is a trivial matter for a hacker to use her browser’s view source feature to extract the form and modify it to provide malicious input to your website.
Therefore, you must never trust any variable that you fetch from
either the $_GET or $_POST arrays until you have processed it. If
you don’t, users may try to inject JavaScript into the data to interfere
with your site’s operation, or even attempt to add MySQL commands to
compromise your database.
Instead of just using code such as the following when reading in user input:
$variable = $_POST['user_input'];
you should also use one or more of the following lines of code. For example, to prevent escape characters being injected into a string that will be presented to MySQL, you should use the following (remembering that this function takes into account the current character set of a MySQL connection, so it can be used only with an open connection):
$variable = mysql_real_escape_string($variable);
To get rid of unwanted slashes, such as those inserted using the
(now deprecated) magic_quotes_gpc
directive, use:
$variable = stripslashes($variable);
And to remove any HTML from a string, use the following:
$variable = htmlentities($variable);
For example, this would change a string of interpretable HTML code
like <b>hi</b> into
<b>hi</b>, which
displays as text and won’t be interpreted as HTML tags.
Finally, if you wish to strip HTML entirely from an input, use the following:
$variable = strip_tags($variable);
In fact, until you know exactly what sanitization you require for a program, Example 11-9 shows a pair of functions that bring all these checks together to provide a very good level of security.
<?php
function sanitizeString($var)
{
    if (get_magic_quotes_gpc()) $var = stripslashes($var);
    $var = htmlentities($var);
    $var = strip_tags($var);
    return $var;
}

function sanitizeMySQL($var)
{
    $var = mysql_real_escape_string($var);
    $var = sanitizeString($var);
    return $var;
}
?>
Add this code to the end of your PHP programs and you can then call it for each user input to sanitize, like this:
$variable = sanitizeString($_POST['user_input']);
Or, when you have an open MySQL connection:
$variable = sanitizeMySQL($_POST['user_input']);