CSS Selectors
The means by which you access one or more elements on the page is called selection, and as we saw earlier, the part of a CSS rule that does this is known as a selector. As you might expect, there are many different varieties of selector.
The Type Selector
The type selector specifies the HTML element to style, such as
<p> or <i>. For example, the following rule
will ensure that all text within <p>...</p> tags is fully
justified:
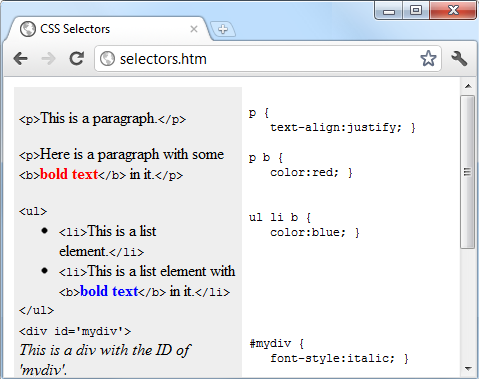
p { text-align:justify; }The Descendant Selector
Descendant selectors let you apply styles to elements that are
contained within other elements. For example, the following rule sets
all text within <b>...</b> tags to red, but only
if they occur within <p>...</p> tags (like this:
<p><b>Hello</b>
      there</p>
):
p b { color:red; }Descendant selectors can continue nesting indefinitely, so the following is a perfectly valid rule to make bold text inside a list element of an unordered list appear in blue:
ul li b { color:blue; }As a practical example, suppose you want to use a different numbering system than the default for an ordered list that is nested within an unordered list. You can achieve this in the following way, which will replace the default numbering (starting from 1) with lowercase letters (starting from a):
<!DOCTYPE html>
<html>
    <head>
        <style>
            ul ol { list-style-type:lower-alpha; }
        </style>
    </head>
    <body>
        <ol>
            <li>One</li>
            <li>Two</li>
            <li>Three</li>
        </ol>
        <ul>
            <ol>
                <li>One</li>
                <li>Two</li>
                <li>Three</li>
            </ol>
        </ul>
    </body>
</html>
The result of loading this HTML into a web browser is as
follows—as you can see, the <li> elements within the second <ol> section display differently than
those in the first ordered list:
1. One
2. Two
3. Three
   a. One
   b. Two
   c. Three
The Child Selector
The child selector is similar to the descendant selector but is
more constraining about when the style will be applied—it selects only
those elements that are direct children of another element. For example,
the following code uses a descendant selector that will change any bold
text within a paragraph to red, even if the bold text is itself within
italics (like this: <p><i><b>Hello</b>
there</i></p>):
p b { color:red; }In this instance, the word “Hello” displays in red. However, when more specific behavior is required, a child selector can be used to narrow the scope of the selector. For example, the following child selector will set bold text to red only if the element is a direct child of a paragraph, and is not itself contained within another element:
p > b { color:red; }Now the word “Hello” in the previous HTML example will not change
color because the <b> is not a
direct child of the <p>
tag.
For a practical example, suppose you wish to embolden only those
<li> elements that are direct
children of <ol> elements. You
can achieve this as follows, where the <li> elements that are direct children
of <ul> elements do not get
emboldened:
<!DOCTYPE html>
<html>
    <head>
        <style>
            ol > li { font-weight:bold; }
        </style>
    </head>
    <body>
        <ol>
            <li>One</li>
            <li>two</li>
            <li>Three</li>
            <ul>
                <li>One</li>
                <li>two</li>
                <li>Three</li>
            </ul>
        </ol>
    </body>
</html>
The result of loading this HTML into a browser will be as follows:
1. One
2. two
3. Three
   o One
   o two
   o Three
The Adjacent Sibling Selector
A sibling selector is similar to a child selector, except that rather than applying to parent and child elements, it applies to elements that are at the same level and that follow one directly after the other, with no other element between them (although text is allowed between them).
It comprises two or more selectors with a + symbol between each, like this:
i + b {color: red; }This will make any bold text display in the color red, but only
when it immediately follows an element in italics. For example, the text
between <b> and </b> in the following will be displayed
in red:
<!DOCTYPE html>
<html>
    <head>
        <style>
            i + b {color: red; }
        </style>
    </head>
    <body>
        <div>This is text in a div.
            <i>Here is some italic text.</i>
            And back to the main text.
            <b>Now to bold text, which will display in red.</b>
        </div>
    </body>
</html>
The ID Selector
If you give an element an ID (like this: <div id='mydiv'>), you can directly
access it from CSS in the following way, which changes all the text in
the named element to italic:
#mydiv { font-style:italic; }Reusing IDs
IDs can be used only once within a document, so only the first occurrence found will receive the new property value assigned by a CSS rule. But in CSS you can directly reference any IDs that have the same name, as long as they occur within different element types, like this:
<div id='myid'>Hello</div> <span id='myid'>Hello</span>
Because IDs normally apply only to unique elements, the
following rule will apply an underline to only the first occurrence of
myid:
#myid { text-decoration:underline; }However, you can ensure that CSS applies the rule to both occurrences like this:
span#myid { text-decoration:underline; }
div#myid  { text-decoration:underline; }
Or, more succinctly, like this (see the section on grouping a little further on):
span#myid,#myid { text-decoration:underline; }Note
I don’t recommend using this form of selection—any JavaScript
that also must access these elements will not be able to easily do
so because the commonly used getElementById function will return only
the first occurrence. To reference any other instances, a program
would have to search through the whole list of elements in the
document, which is a trickier task to undertake. It’s generally
better to always use unique ID names.
The Class Selector
When there are a number of elements in a page that you want to
share the same styling, you can assign them all the same class name
(like this: <span
class='myclass'>) and then create a single rule to modify
all those elements at once, as in the following rule, which creates a
10-pixel left margin offset for all elements using the class:
.myclass { margin-left:10px; }In modern browsers, HTML elements may also use more than one class
if you separate them with spaces, like this: <span class='thisclass thatclass
otherclass'>. Remember, though, that some very old browsers
allow only a single class name in a class argument.
Narrowing class scope
You can narrow the scope of action of a class by specifying the
types of elements to which it should apply. For example, the following
rule applies the setting only to paragraphs that use the class
main:
p.main { text-indent:30px; }In this example, only paragraphs using the class main (like this: <p class="main">) will receive the new
property value. Any other element types that may try to use the class
(such as <div class="main">)
will not be affected by this rule.
The Attribute Selector
Many HTML tags support attributes, and using this type of selector
can save you from having to use IDs and classes to refer to them. For
example, you can directly reference attributes in the following manner,
which sets all elements with the attribute type="submit" to a width of 100
pixels:
[type="submit"] { width:100px; }If you wish to narrow down the scope of the selector to, for
example, only form input elements
with that attribute type, you could use the following rule
instead:
form input[type="submit"] { width:100px; }Note
Attribute selectors also work on IDs and classes, so, for
example, [class="classname"] works
exactly like the class selector .classname (except that the latter has a
higher precedence). Likewise, [id="idname"] is equivalent to using the ID
selector #idname. The class and ID
selectors prefaced by # and
. can therefore be viewed as
shorthand for attribute selectors, but with a higher
precedence.
The Universal Selector
The * wildcard or universal
selector matches any element, so the following rule will make a complete
mess of a document by giving a green border to all of its
elements:
* { border:1px solid green; }It’s unlikely that you will use the * on its own, but as part of a compound rule
it can be very powerful. For example, the following rule will apply the
same styling as above, but only to all paragraphs that are subelements
of the element with the ID boxout,
and only as long as they are not direct children:
#boxout * p {border:1px solid green; }Let’s look at what’s going on here. The first selector following
#boxout is a * symbol, so it refers to any element within
the boxout object. The following
p selector then narrows down the
selection focus by changing the selector to apply only to paragraphs (as
defined by the p) that are
subelements of elements returned by the * selector. Therefore, this CSS rule performs
the following actions (in which I use the terms “object” and “element”
interchangeably to refer to the same thing):
Find the object with the ID of
boxout.Find all subelements of the object returned in step 1.
Find all
psubelements of the objects returned in step 2 and, since this is the final selector in the group, also find allpsub- and sub-subelements (and so on) of the objects returned in step 2.Apply the styles within the
{and}characters to the objects returned in step 3.
The net result of this is that the green border is applied only to paragraphs that are grandchildren (or great-grandchildren, and so on) of the main element.
Selecting by Group
Using CSS it is possible to apply a rule to more than one element,
class, or any other type of selector at the same time by separating the
selectors with commas. So, for example, the following rule will place a
dotted orange line underneath all paragraphs, the element with the ID of
idname, and all elements using the
class classname:
p, #idname, .classname { border-bottom:1px dotted orange; }Figure 18-3 shows various selectors in use, with the rules applied to them alongside.