


Configuring the DS8000 for TCT
This chapter describes how to configure the IBM DS8000 to support Transparent Cloud Tiering.
In the first part we explain how to set up the network connection. Then, we describe how to set up the cloud connection, providing examples for most supported cloud target types.
Finally, we show how to set up the DS8000 HMC as cloud proxy for DFSMS.
This chapter includes the following topics:
5.1 Configuring the IBM DS8000 for TCT
To access the cloud services, your DS8000 hardware must be configured to communicate with the cloud by using TCPIP connections. This configuration includes defining the following the components:
•Ethernet port configuration
•Cloud storage configuration
•Prepare a DS8000 userid for the cloud proxy functionality (for all cloud target types except Swift).
5.1.1 Ethernet configuration
Assuming you have connected the DS8000 to your network according to 4.1, “Ethernet connections on DS8000” on page 34, you can now configure the Ethernet ports that you are using for TCT. This is required to enable network connectivity. Use the lsnetworkport command from the DS8000 command-line interface (DSCLI) to display any current Ethernet configuration. Example 5-1 shows a sample output from the lsnetworkport command.
Example 5-1 Output from lsnetworkport command
ID IP address Subnet Mask Gateway Primary DNS Secondary DNS State
I9813 0.0.0.0 0.0.0.0 0.0.0.0 0.0.0.0 0.0.0.0 Offline
I9814 0.0.0.0 0.0.0.0 0.0.0.0 0.0.0.0 0.0.0.0 Offline
I9B13 0.0.0.0 0.0.0.0 0.0.0.0 0.0.0.0 0.0.0.0 Offline
I9B14 0.0.0.0 0.0.0.0 0.0.0.0 0.0.0.0 0.0.0.0 Offline
|
Note: There is no way to delete a network port at this time. You can only clear the IP address or just leave it.
|
Ensure that you have the correct IP addresses, subnet mask, and DNS information available while you are configuring your hardware. Then, use the setnetworkport command to define the network settings, as shown in Example 5-2.
Example 5-2 Defining the network settings
setnetworkport -ipaddr 10.0.1.2 -subnet 255.255.255.0 I9814
setnetworkport -ipaddr 10.0.1.3 -subnet 255.255.255.0 I9B14
After the configuration is complete, issue another lsnetworkport command to confirm that the network was properly configured. Example 5-3 shows the new network configuration.
Example 5-3 Verifying the network configuration
ID IP address Subnet Mask Gateway Primary DNS Secondary DNS State
I9813 0.0.0.0 0.0.0.0 0.0.0.0 9.0.000.10 0.0.0.0 Offline
I9814 10.0.1.2 255.255.255.0 0.0.0.0 9.0.000.10 0.0.0.0 Online
I9B13 0.0.0.0 0.0.0.0 0.0.0.0 9.0.000.10 0.0.0.0 Offline
I9B14 10.0.1.3 255.255.255.0 0.0.0.0 9.0.000.10 0.0.0.0 Online
With the Ethernet configuration complete, you can proceed to the cloud configuration process.
|
Note: Although you can have up to six Ethernet ports available in each DS8000 internal server, only one is used for data transfer at any given time. Configure at least two ports of the same type per server for redundancy. All configured ports in a server must be connected to the same network.
|
5.1.2 Cloud configuration
In the next step, you configure the DS8000 for access to the cloud storage. Use the mkcloudserver command to define a cloud object storage to your DS8000 system. Generally you provide the cloud target type, endpoint information, and cloud credentials with the command. However, the usage differs for the different cloud target types.
The following parameters are available for the mkcloudserver command:
-type (required): the cloud object storage target type. TCT supports the following types of Object Storage protocols and authentication mechanisms:
– swift: unencrypted (HTTP) communication to Swift cloud object storage
– swift-keystone: SSL/TLS secured authentication to a Swift keystone service to access Swift cloud object storage.
– ibmcos: IBM Cloud Object Storage (COS) either on premise or in the IBM cloud
– aws-s3: Amazon Simple Storage Service cloud object storage using the S3 API
– s3: Generic S3 compatible cloud target
– ts7700: IBM Virtual Tape Server TS7700 as cloud object storage
•-endpoint (required for all cloud target types except ts7700): the URI to access the cloud object storage. For the swift-keystone type, it is the URI of the keystone authentication service.
•-tenant (required for the swift and swift-keystone types, not used for all others): specify the tenant name provided by cloud storage administrator.
•-username (required for all cloud target types, not allowed for TS7700): a user identifier for the cloud object storage account. For S3 type object storage solution, use the access key provided by the cloud administrator.
•-pw (required for all cloud target types, not allowed for TS7700): a user credential for the cloud object storage account. For S3 type object storage solution, use the secret access key provided by the cloud administrator.
•-rootcaloc, intermcaloc, syscaloc (required for swift-keystone and all S3 type targets if IP security is to be used): use these parameters to provide certificates to the DS8000 for secure authentication with the object storage. Specify the location of the certificate (PEM) file that you want to import into the DS8000 system with each parameter. If you use self-signed certificates, only the SysCA option is required. If you use a certificate authority (CA), the root CA and intermediate CA can be provided. These parameters cannot be used if -nossl is specified.
•-nossl (required for the TS7700 cloud target type, optional for all others): allow insecure authentication with the object storage target. This parameter cannot be specified together with -rootcaloc, -intermcaloc, or -syscaloc.
•-loc (optional and valid only for aws-s3 and ibmcos type targets):
– ibmcos: specify the name of your vault template on the IBMCOS service.
– aws-s3: specify the AWS Region as defined by the endpoint of the Amazon S3 service.
•-keygrp (required if DS8000 TCT encryption is used, not valid for TS7700): specify the key group that you defined for TC encryption (refer to 3.6, “Transparent Clout Tiering encryption” on page 29 for more information).
•-primary7700IPs (required and valid only for TS7700): specify IP address(es) of the primary TS7700 VTS that you use as TCT cloud storage. You can specify up to four IP addresses (only IPv4 is supported). Separate them with a comma.
•-secondary7700IPs (optional and valid only for TS7700): specify IP address(es) of the secondary TS7700 VTS that you use as TCT cloud storage. You can specify up to four IP addresses (only IPv4 is supported). Separate them with a comma.
When you run the mkcloudserver command, the ability of the DS8000 and the object store to communicate is verified. Running the command also verifies that the data path is accessible and encryption certificates are valid. We provide examples for most supported cloud target types in the following sections.
|
Note: Anybody with access to the cloud credentials you use to connect a DS8000 to cloud storage has full access to all object TCT stores in the cloud, including the capability to update, move, or delete data. Make sure that you treat these credentials with the appropriate care.
|
Connection to on-premise IBM Cloud Object Storage
In this section we explain how to connect your DS8000 to an on-premise IBM Cloud Object Storage (IBMCOS) system. Before connecting the DS8000, you have to prepare the IBMCOS according to the DS8000 Knowledge Center section Configuring the IBM Cloud Object Storage System for Transparent Cloud Tiering. The following link leads you to the DS8000 Release 9.0 version:
During the configuration, you create an IBMCOS user and a Vault Provisioning Profile. To set up the DS8000 cloud connection, you need the Access Key and the Secret Access Key for this user and the provisioning code for the profile.
In Example 5-4, we show the command to configure the DS8000 cloud connection for the simple case without SSL and encryption.
Example 5-4 DS8000 cloud connection to IBMCOS without SSL and encryption
dscli> mkcloudserver -type ibmcos -username zbg...DId -pw jMn...AcA -nossl -endpoint http://9.155.115.167 -loc ztct IBMCOS
CMUC00560W mkcloudserver: Use of the -nossl flag allows user credentials such as username and password to be transmitted on the network insecurely. Are
you sure that you want to continue? [y/n]: y
CMUC00505I mkcloudserver: The entered Cloud server IBMCOS was created successfully on node 0.
CMUC00505I mkcloudserver: The entered Cloud server IBMCOS was created successfully on node 1.
We used the following command options:
•type: the cloud storage target type ibmcos
•endpoint: the IP address of one of the IBMCOS accessor nodes
•username: the Access Key for the IBMCOS user
•pw: the Secret Access Key for the IBMCOS user
•nossl: connect without authorization security
•loc: the provisioning code for the IBMCOS Vault Provisioning Profile
•The last parameter is a required positional parameter without keyword. Specify the name of your DS8000 cloud connection here.
|
Note: In our example, we specified the IP address of one accessor node of the IBMCOS. This is a single point of failure. For a production configuration, you would either provide the IP address of a load balancer that has access to several accessor nodes, or the virtual address of an accessor node pool.
|
In Example 5-5, we show another IBMCOS connection, this time with SSL and encryption support.
Example 5-5 DS8000 cloud connection to IBMCOS with SSL and encryption
dscli> mkcloudserver -type ibmcos -username zbg...DId -pw jM...AcA -endpoint http://9.155.115.167 -syscaloc ibmcos_sle_certificates.pem -loc ztct -keygrp 2 ibmcos
CMUC00505I mkcloudserver: The entered cloud ibmcos was created successfully on node 0.
CMUC00505I mkcloudserver: The entered cloud ibmcos was created successfully on node 1.
The meaning of the parameters for type, user name, password, endpoint, and cloud connection name are the same as in Example 5-4. We still provide a URL starting with http: for the endpoint, although we specified that SSL is being used. The systems will switch to https communication automatically after successful SSL negotiation.
We use the following additional parameters:
•syscaloc: specifies the file containing the IBMCOS system certificate. You can download it from the IBMCOS manager.
•keygrp: specify the key group used for TCT encryption.
|
Note: Before you can use TCT encryption, you have to configure your SKLM servers and DS8000 encryption settings (key server and key group) according to IBM DS8000 Encryption for data at rest, Transparent Cloud Tiering, and Endpoint Security (DS8000 Release 9.0), REDP-4500.
|
Connection to cloud object storage service in the public IBM Cloud
In this example, we connect the DS8000 to the cloud object storage service in the public IBM cloud.
After you signed up to the IBM Cloud and defined the cloud object storage instance, you can create credentials for your service. The credentials are provided in JSON format like that shown in Example 5-6 on page 46.
Example 5-6 Credential provided by IBM Cloud for cloud object storage
{
"apikey": "LB1Iki88rfqXJSy1oXFlAn8i0WLu_lzigjn0xTpAYG73",
"cos_hmac_keys": {
"access_key_id": "f9ae19f116de4a37a9e9f0e7d80348e3",
"secret_access_key": "97f858f693dfcbf4236b16b1c6f512295fcb99d034b138ad"
},
"endpoints": "https://control.cloud-object-storage.cloud.ibm.com/v2/endpoints",
"iam_apikey_description": "Auto-generated for key f9ae19f1-16de-4a37-a9e9-f0e7d80348e3",
...
Use the access_key_id and secret_access_key as user name and password in the mkcloudserver command.
The endpoints definition does not directly provide an endpoint. It refers to a web page with all endpoints for the IBM Cloud object storage services. We show a section of this page in Figure 5-1.
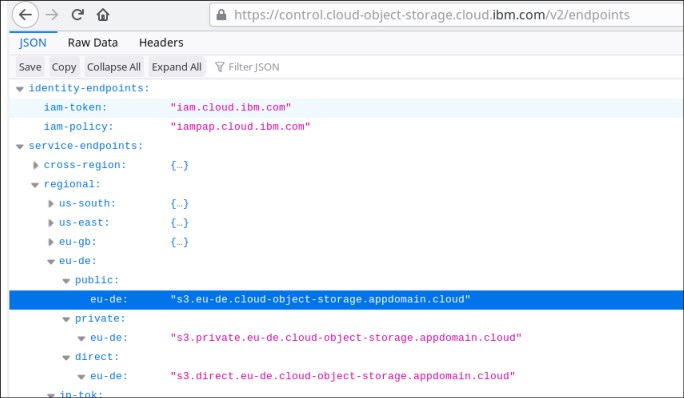
Figure 5-1 IBM Cloud object storage service endpoints
Find the endpoint that matches the regional settings of the cloud object storage service you defined and use it for the endpoint parameter of the mkcloudserver command, as shown in Example 5-7.
Example 5-7 DS8000 cloud connection to the public IBM Cloud without SSL and encryption
dscli> mkcloudserver -type ibmcos -username 648...630 -pw f7b...e6f -nossl -endpoint http://s3.eu-de.cloud-object-storage.appdomain.cloud pubcos
CMUC00560W mkcloudserver: Use of the -nossl flag allows user credentials such as username and password to be transmitted on the network insecurely. Are you sure that you want to continue? [y/n]: y
CMUC00505I mkcloudserver: The entered cloud pubcos was created successfully on node 0.
CMUC00505I mkcloudserver: The entered cloud pubcos was created successfully on node 1.
|
Note: If you want to use SSL for secure authentication with the IBM cloud, you can download the endpoint security certificate (for example, using the openssl command). Then provide the certificate file in the syscaloc parameter of the mkcloudserver command.
|
Connection to on-premise S3 compatible object storage
The Generic S3 cloud target type of the DS8000 allows to connect any other cloud storage using the S3 API for access. In Example 5-8, we show a command that creates a connection to our own on-premise cloud object storage based on the open source project minio (minio.io).
Example 5-8 DS8000 cloud connection to a generic S3 target without security and encryption
mkcloudserver -type s3 -username Y0B...8SX -pw 7Sv...Iex -nossl -endpoint http://9.155.49.146:9000 minioz
CMUC00560W mkcloudserver: Use of the -nossl flag allows user credentials such as username and password to be transmitted on the network insecurely. Are you sure that
you want to continue? [y/n]: y
CMUC00505I mkcloudserver: The entered cloud minioz was created successfully on node 0.
CMUC00505I mkcloudserver: The entered cloud minioz was created successfully on node 1.
The parameters we have to specify follow the same rules as in “Connection to on-premise IBM Cloud Object Storage” on page 44, with the exception of the -loc parameter. The Generic S3 cloud target type does not support a location specification.
Connection to a TS7700 Virtual Tape Server
Before you can connect a DS8000 to a TS7700 Virtual Tape Server (VTS), the VTS must be prepared:
•A license for the DS8000 Object Store feature (FC 5282) is required.
•The client activates the feature.
•An IBM service representative configures the TS7700:
– Configures the system to handle object data and creates an object partition Object Partition.
– Defines the DS8000 systems that can store objects on this machine, by providing the IP addresses and serial numbers.
•The client can now set the size of the Object Partition as needed.
If the TS7700 is a standalone system, there is an additional step to connect the TS7700 grid links to the network.
|
Additional information: For more information, see IBM TS7700 Series DS8000 Object Store User’s Guide Version 1.0, REDP-5583, or the IBM white paper, TS7700 Series DS8000 Object Store Users Guide V1.0 which is available on the following website:
|
The connection to a TS7700 Virtual Tape Server is different from the other cloud types, because we need no cloud credentials. The DS8000 systems that are allowed to access the TS7700 as cloud storage are defined in the TS7700 by their IP addresses and serial numbers.
In Example 5-9, we show the DSCLI command to connect a DS8000 to a single TS7700.
Example 5-9 DS8000 cloud connection to an IBM TS7700 Virtual Tape Server
dscli> mkcloudserver -type TS7700 -primary7700IPs 192.168.100.1,192.168.100.2 -nossl TS7700
CMUC00560W mkcloudserver: Use of the -nossl flag allows user credentials such as username and password to be transmitted on the network insecurely. Are you sure that you want to continue? [Y/N]: y
CMUC00505I mkcloudserver: The entered cloud TS7700 was created successfully on node 0.
CMUC00505I mkcloudserver: The entered cloud TS7700 was created successfully on node 1.
The following parameters are required:
•type: specify the cloud target type, TS7700.
•primaryTS7700IPs: a comma-separated list of IP addresses of the Grid links of the TS7700 that you want to use for TCT data transfer.
•nossl: the nossl parameter is required, because there is no authentication.
•The last parameter again is a required positional parameter without keyword. Specify the name of your DS8000 cloud connection here.
You can optionally specify an alternate TS7700, using the secondary7700IPs parameter. If you specify a second VTS, the DS8000 will mirror all cloud objects to both of them. Therefore, migrate objects can be retrieved from the TS7700 cloud targets, even if one of the VTSs where unavailable.
If one of the two TS7700s should become unavailable while the DS8000 is transferring data to the pair, the transfer and therefore the migration will complete regardless, with the single copy. The DS8000 will instruct the TS7700 to send the missing objects to the second one as soon as it is back in operation.
|
Note: You can specify up to four IP addresses for each TS7700. Only one link is used at a given time. The others are for redundancy. Only IPv4 is supported.
|
Connection to on-premise Swift cloud object storage
Example 5-10 shows a sample mkcloudserver command to configure a Swift Keystone authenticated cloud object storage as cloud server.
Example 5-10 Configuring a Swift cloud server
dscli> mkcloudserver -type swift-keystone -tenant tenant -username username
-pw password -endpoint http://9.155.117.45:5000/v2.0/ -rootcaloc
/home/ssl_cacert.pem -intermcaloc /home/user/ssl_cacert.pem -syscaloc
/home/user/ssl_cert.pem ibmcloud
For the swift and swift-keystone cloud target types, the cloud credentials are provided according to the following list:
•tenant: The Tenant name that you were given (or specified yourself) when you signed up for the Swift cloud service. The tenant is sometimes also referred to as a Project.
•username: User that can access to objects of your tenant (or Project).
•pw: The password for this user.
•rootcaloc, intermcaloc, syscaloc: For the swift-keystone type that uses SSL/TLS to encrypt the authentication path, certificates are required to maintain a chain of trust between the DS8000 and the object store. If you use self-signed certificates, only the SysCA option is required. If you use a certificate authority (CA), the root CA and intermediate CA can be provided in the mkcloudserver command. These items point to a PEM file type that you can import into the DS8000 system.
•The last parameter again is a required positional parameter without keyword. Specify the name of your DS8000 cloud connection here.
5.2 Maintaining the cloud server configuration
The following sections show how to list, update, or remove a cloud server configuration.
5.2.1 Listing a cloud server configuration
You can also list the cloud configuration on your hardware. Use the lscloudserver command to list cloud information. Sensitive information, such as user ID and password, is not displayed in the output. The Example 5-11 displays a sample output from the lscloudserver command.
Example 5-11 Listing cloud information
dscli> lscloudserver
Date/Time: November 30, 2017 2:24:31 PM MST IBM DSCLI Version: 7.8.31.118 DS: -
name node type tenant endpoint
ibmcloud 0 swift-keystone test https://ibmcloud.ibm.com:5000/v2.0/
ibmcloud 1 swift-keystone test https://ibmcloud.ibm.com:5000/v2.0/
5.2.2 Updating or removing a cloud server configuration
If you need to update any cloud settings, the existing configuration must first be deleted. Then, the new configuration can be defined. Use the rmcloudserver command to remove the existing cloud configuration. When the command is issued, a prompt message displays requesting a confirmation if the cloud server configuration is to be removed. If you want to continue with the removal, enter y, as shown in the Example 5-12.
Example 5-12 Removing a cloud server configuration
dscli> rmcloudserver ibmcloud
Are you sure you want to delete cloud server ibmCloud? [y/n]:y
The cloud server ibmcloud successfully deleted.
After deleting the old configuration, you can add a new configuration using the mkcloudserver command.
|
Note: At the time of this writing, only a single cloud can be configured at a specific time. If a new cloud must be configured, the current setting must be deleted before the new cloud definition is used, using the rmcloudserver command.
|
5.3 Prepare the DS8000 as cloud proxy
With the TCT feature, the DS8000 acts a cloud proxy for the mainframe. This capability enables support for S3, IBM COS, and TS7700 cloud interfaces for Transparent Cloud Tiering. This way, z/OS and DFSMS do not have to connect to the cloud object storage directly, but use the DS8000 to relay the cloud requests. We describe required preparations for this functionality in the following sections.
5.3.1 Configure a DS8000 user for REST API proxy
You need a DS8000 user ID that will be used by DFSMS to authenticate on the DS8000 system, using the REST API interface. The REST API proxy service is automatically enabled when the DS8000 Code level is upgraded to R8.3 or higher. No other tasks are required to enable the communication other than configuring the network and the user ID that will be used by DFSMS. Example 5-13 shows how to create a local user ID in the DS8000 using DSCLI.
Example 5-13 Creating a DS8000 user ID for DFSMShsm to connect
dscli> mkuser -pw REDB00KS -group monitor itsouser
Date/Time: December 13, 2017 8:56:41 AM MST IBM DSCLI Version: 7.8.31.118 DS: -
CMUC00133I mkuser: User itsouser successfully created.
When a user ID is created on the DS8000, the initial password used in the mkuser command is temporary and expired. You have to change to the final password that will later be used by DFSMS, by logging on as that user and issuing a chuser command. Alternatively, this can also be done by your DS8000 security administrator.
After the user ID is created and the password is changed, you will be able to connect the DFSMS to the DS8000 using the steps described in Chapter 6, “Configuring DFSMS for TCT” on page 53.
|
Attention: The user ID created for the DFSMS to connect to the DS8000 follows the security rules defined in the Authentication Policy of the DS8000. Therefore, depending on your policy rules, this password can expire after a certain number of days. To avoid connectivity issues with TCT, change the password of this user ID both in the DS8000 and the DFSMShsm before the expiration date, or modify the expiration date policy to never expire.
|
Optionally, you can use LDAP to create the user ID that will be used by DFSMShsm to connect to the DS8000 REST API Proxy interface.The step-by-step instructions to configure LDAP on the DS8000 system can be found in the IBM DS8880 Integrated Copy Services Manager and LDAP Client on the HMC, REDP-5356 publication.
5.3.2 External CA versus self-signed certificates and REST API Proxy
Section 4.4.3, “Certificates (if using SSL/TLS)” on page 39 describes how to secure the communication between the DS8000 system, DFSMS, and the cloud service provider. You can use encryption-based security with certificates that are exchanged during the authentication process, which can be External CA (signed by a third-party Certificate Authority) or self-signed certificates.
Also, if using S3 or IBMCOS cloud types, DS8000 uses a REST API Proxy interface to communicate with DFSMShsm. To do so, DFSMShsm connects to the DS8000 using its HTTPS interface, so the certificate used by the DS8000 must be added to the IBM RACF® for the DFSMShsm authentication to be successful.
We demonstrate how to configure both the self-signed and External CA certificate options in the DS8000 next. The steps required to configure RACF with the certificates are described in Chapter 6, “Configuring DFSMS for TCT” on page 53.
|
Note: To work with certificate files on the DS8000, you need a user ID with an Administrator role in the DS8000.
|
Creating a self-signed certificate on the DS8000
To create a self-signed certificate on the DS8000, you can use the DS Storage Manager GUI, by completing the following steps:
1. Log on to the DS Storage Manager GUI.
2. Select Settings > Security.
3. Access the “Communications Certificate” tab.
4. Click Create Self-signed Certificates.
5. Enter the information requested regarding your organization.
6. Click Create. A warning message is displayed stating that the HMC will be rebooted and any users connected will be automatically logged off.
7. Click Yes to continue with certificate creation. After creation, the certificate is automatically loaded at the HMC.
This self-signed certificate must be uploaded to the z/OS host that will connect to the DS8000. First, download the certificate to your workstation using an openssl command, as shown in the Example 5-14. (In the example, “DS8000-HMC-IP” is the IP address of the DS8000 HMC that is configured as the REST API Proxy server):
Example 5-14 Downloading the DS8000 HMC self-signed certificate
openssl x509 -in <(openssl s_client -connect DS8000-HMC-IP:8452 -prexit 2>/dev/null) -text -out certificate.pem
|
Note: Certain operating systems support the openssl command natively. Others may require a client to be installed to support the openssl command.
|
The procedure to upload the certificate from your workstation to the z/OS host is demonstrated in the section 6.2.1, “Uploading the certificate files to the z/OS host” on page 54 of this book.
Creating and using an External CA certificate on the DS8000
To create an External CA certificate on the DS8000, you may also use the DS Storage Manager GUI to create a Certificate Signing Request (CSR) file that will be signed by the third-party Certificate Authority in the creation of the CA certificate, using the following steps:
1. Log on to the DS Storage Manager GUI.
2. Select Settings > Security.
3. Access the “Communications Certificate” tab.
4. Click Create Certificate Signing Requests.
5. Enter the HMC DNS host name and the information regarding your organization.
6. Click Create. The CSR file is created, and you receive a Web-browser download window to specify the destination path to be used to save the file in your computer.
7. Save the file, and send it to the Certificate Authority to generate the certificate.
After the Certificate Authority generates and sends you the final certificate file, you must import it to the DS8000. You can do this through the DS Storage Manager GUI, using the steps below:
1. Log on to the DS Storage Manager GUI.
2. Select Settings > Security.
3. Access the “Communications Certificate” tab.
4. Click Import Existing Certificates. A message window prompts you to select the certificate file from your local computer.
5. Navigate to the folder in your computer where the file is stored, select the certificate file, and click Import. A warning message states that the HMC will be rebooted and any users connected will be automatically logged off.
6. Click Yes to import and load the certificate at the HMC