“Even monkeys fall from trees.”
—JAPANESE SAYING
BETWEEN THE AGES OF FORTY-TWO AND FORTY-FOUR, I slept with a crutch at my bedside. I was suffering from plantar fasciitis, an injury that’s been compared to having a nail hammered into your heel with every step (sounds about right to me), and an injury that is most painful after a night’s sleep. Without the crutch, I would have had to crawl on all fours in the morning. As it was, I’d hang on to the crutch through breakfast, keep it while I showered and dressed, and then finally leave it by the front door as I exited for work. By then, I’d warmed up enough to limp through the day. And by late afternoon, I was ready to grit my teeth through a distance run, repetitions, or whatever was on the schedule. I did that for three years. And then one day the pain was just too much, forcing me to quit in the middle of my workout. I took five months off, and the pain went away. So I laced up my shoes, headed out the door, and made it almost a mile before pain shot through my heel, jolting me so badly that I tasted iron on my tongue. My plantar fascia hadn’t healed. Time off hadn’t worked. If I was going to run again, I’d need a different plan. So this is what I did: I designed a routine to strengthen the tendons, muscles, and ligaments around my plantar fascia, to ease the stress on the injured tissue. Every day, I did towel toe curls, foot orbits, rope stretching, and more. Within a week, I could run with reduced pain. Within a month, I could train again. And three months later, I won the 2005 USA masters 10K cross country championship.
Injury prevention isn’t just the art of avoiding injuries. It’s also a plan of action: You strengthen your body to reduce the possibility of injury and to minimize the effects when injuries occur. And injuries do occur. Between 50 and 80 percent of runners get injured every year. But before you get alarmed, probably 90 to 99 percent of those injured runners don’t include injury-prevention exercises (or any kind of resistance training) in their programs. Maybe they don’t think they’re training hard enough to bother with injury prevention. Maybe they don’t think they have enough time. Whatever the excuse, it’s almost a given that runners who ignore the possibility of injury will get injured.
Luckily, most non-acute injuries develop slowly, and there are usually warning signs. For plantar fasciitis, it’s a sharp pain in your heel. For Achilles tendinitis, it might be tight calves. Iliotibial (IT) band syndrome can be preceded by a prickly feeling on the outside of your knee. For these types of injuries—and for chronic injuries that need to be resolved—the injury-prevention exercises after this chapter can offer immunization and relief.
This chapter will help you to understand running injuries, identify them, prevent them, and, if necessary, rehabilitate them. For smart runners, what follows isn’t just Injury Prevention 101; it’s Basic Training 101.
Not every ache is an injury. Most runners can expect to feel some aches and pains during their first weeks of training. That’s because your transformation from nonathlete to runner requires a full-body rebuild. You damage muscles, bones, and tendons in order to repair them so that they’re stronger than they were before. That’s going to engender the occasional owie.
So when should you worry?
That’s a good question. And to answer it, we’ll examine a few types of injuries, and we’ll suggest some guidelines for dealing with different injury scenarios.
While infrequent, there are emergency situations that arise while running. Emergency situations include life-threatening health conditions, serious accidents (e.g., collisions with cars), and severe and debilitating injuries (e.g., a badly sprained ankle or muscle tear). In these instances, you should immediately end your workout. And then don’t be shy. If the situation warrants, find someone nearby—even if it means flagging down a car or knocking on a door (unless your physical condition precludes walking)—and get the help you need. When these emergency situations occur, you should:
![]() Call 911 if you suffer chest pain that persists for more than a minute, spreads to your neck or shoulders, or is accompanied by severe sweating or faintness. Stop immediately and alert someone nearby. It might not be a heart attack, but better safe than sorry.
Call 911 if you suffer chest pain that persists for more than a minute, spreads to your neck or shoulders, or is accompanied by severe sweating or faintness. Stop immediately and alert someone nearby. It might not be a heart attack, but better safe than sorry.
![]() Seek immediate medical attention if you suffer heart arrhythmia, breathing difficulties, disorientation, sudden cessation of sweating (heat stroke), severe fever or headache, badly blurred vision, or other potentially life-threatening symptoms. Also, if you’re struck by a car or suffer some other major accident, you’ll need to be checked out pronto by a health professional—if the situation warrants, refer to the advice directly above: Call 911.
Seek immediate medical attention if you suffer heart arrhythmia, breathing difficulties, disorientation, sudden cessation of sweating (heat stroke), severe fever or headache, badly blurred vision, or other potentially life-threatening symptoms. Also, if you’re struck by a car or suffer some other major accident, you’ll need to be checked out pronto by a health professional—if the situation warrants, refer to the advice directly above: Call 911.
![]() See your doctor if you suffer a stress fracture, meniscus tear, torn tendon or ligament, or some other structural damage. Do not walk home if you’re on a run. Wait for a ride.
See your doctor if you suffer a stress fracture, meniscus tear, torn tendon or ligament, or some other structural damage. Do not walk home if you’re on a run. Wait for a ride.
![]() Consider seeing a health professional if you suffer a sudden or severe muscle injury (sharp or debilitating pain) while training. Do not walk home if you’re on a run. Wait for a ride.
Consider seeing a health professional if you suffer a sudden or severe muscle injury (sharp or debilitating pain) while training. Do not walk home if you’re on a run. Wait for a ride.
Next, let’s break down the types of running injuries that occur. Most runners will deal with each of the following four classifications of injuries. When reading through them, see if you can spot the common thread. (Answer: They all begin with runner error).
OVERUSE INJURIES: You do the same exercise over and over (e.g., all same-pace distance running), which leads to irritation of some tissue (e.g., runner’s knee).
OVERLOAD INJURIES: You increase the volume or intensity of your exercise too quickly, triggering acute inflammation (e.g., DOMS, Achilles tendinitis, etc.).
CHRONIC INJURIES: These develop when you ignore minor overuse or overload injuries, creating degenerative damage in the affected area that simply won’t go away (e.g., Achilles tendinosis).
ACCIDENTS: Single incidents that stop your workout in its tracks. You step on a rock and sprain your ankle. Or jam your toe, pull a hamstring, trip and fracture your wrist, and so on. The best way to avoid accidents is to pay attention—always remain 100 percent aware of your surroundings, foot placement, and fatigue levels (tired runners tend to trip, kick things, and step in potholes).

No one wants to curtail his or her training due to injury. But the sooner you address the situation, the sooner you can put it behind you. Many long-term injuries begin as minor ones and can be remedied by preventative care. You’ve heard the old saying, A stitch in time saves nine. Well, in this case, the “stitch” is your injury-prevention exercises, and the “nine” represents the days, weeks, or months you’ll spend on the couch if you ignore the warning signs.
Of course, once you’ve accepted that something is wrong, the next step is to decide whether it’s really wrong (in which case you should end your workout) or just sort of wrong (you can continue your workout). The ability to correctly assess the severity of your injury will help keep your training program on track. By recognizing that an injury is minor, you’ll be able to continue training and won’t sacrifice fitness. At the same time, you won’t ignore major injuries, a mistake that can land you back on the couch for an extended stay.
SUDDEN PAIN: If you experience sudden pain while running, you’ll want to do two things. First, stop exercising—immediately. Second, if the pain subsides, walk for a minute or two to ensure that you haven’t broken, twisted, sprained, strained, or otherwise damaged the area that’s hurting. If you can walk comfortably, try jogging; if jogging is OK, then gradually return to your previous pace. If you can’t walk without pain—and if the pain just won’t go away—then it’s time to end your workout. Find a phone, call a friend, family member, or cab, and wait for a ride home.
MUSCLE SORENESS: If your muscles are so sore that it’s torture to exercise, you’ll need to take the day off. If you recently performed an extremely hard workout, or if you’re a new runner who overdid your first workout(s), you probably have DOMS (see advice on treating DOMS). If your soreness came on suddenly, you might have a strained muscle; this generally requires time off until the muscle heals.
MUSCLE CRAMPS: If you experience a cramp (most often in your calves or hamstrings) during a run, you’ll need to stop running until the cramp subsides. Running with a cramp can result in more serious muscle strains (see advice on treating muscle cramps). If you suffer heat-related cramps, you’ll need to end your workout (see advice on heat illness).
INFLAMMATION: If you notice inflammation that’s not related to a recent injury, such as swelling in your feet or lower legs (often experienced by people who work at desks), use your fingers to press and probe the affected area. If there’s soreness or pain (or if the inflammation is severe), take the day off. If there’s no pain and only mild swelling, you can attempt your workout—start with walking, then jogging, then easy running, and quit if you develop pain. If the inflammation persists or worsens, consider seeing a health professional.
LONG-TERM PAIN: If you’ve been running through a painful condition that’s persisted for days, weeks, or even months—and if the condition has not gotten worse during that time—you can continue to train as long as you add injury-prevention exercises to your routine. If the symptoms don’t get better within a month or two, you’ll need to consult a health professional or take time off. You don’t want to develop a chronic injury, which can last for years—or forever.
ALTERING YOUR STRIDE DUE TO PAIN: This one is easy: Don’t do it. If pain forces you to alter your stride, you need to stop running. Your stride represents movement that is biomechanically correct for your body. Changing your stride creates movement that is biomechanically incorrect. The result will be yet another injury.
LIGHTHEADEDNESS: Sometimes, we runners get lightheaded. This can be caused by low blood sugar, low muscle glycogen (carbohydrates stored in your muscles), dehydration, extreme fatigue, post-caffeine crash (for those who like a cup of Joe pre-run), or various types of anxiety. If you suspect low blood sugar or low muscle glycogen, pop a gel (or some other carbohydrate snack). If dehydration, drink some water. Whatever the cause, you’ll want to walk until the dizziness goes away. Then restart your run at a reduced effort level. If the dizziness persists, you might consider seeing a health professional to rule out anemia, diabetes, or some other condition.
For advice specific to individual injuries, see the “Identify Your Running Injury” in this chapter and proceed to the pages indicated for further information and injury-prevention instruction.
It’s also important to know what not to do when pain, inflammation, or other symptoms of injury strike. First, never panic. You might not even be injured. If you were to slap your hand on your thigh, both your hand and your thigh would sting for a few seconds; that doesn’t mean either is injured. Same goes for momentary stinging, tingling, throbbing, and other discomfort on the roads and trails—after all, each stride creates an impact force that’s two to three times your body weight, adding up to one hundred to three hundred tons of impact force (depending on your weight) per mile. The occasional niggle or twinge is to be expected. Second, if you think that you really are injured, resist the following debunked strategies for dealing with your injury:
STRETCHING: Your parents always told you not to pick at scabs. Don’t stretch a freshly injured muscle (muscle cramps excluded), tendon, or ligament, either—not without guidance from a physical therapist or other health professional.
ICING: Icing relieves pain, but it also interrupts the body’s normal healing process. For minor muscle injuries and inflammation, don’t do it. For more serious injuries or inflammation that’s spiraling out of control, ice for the first 24–48 hours (12–15 minutes at a time).
HEAT: Never in the first 24 hours following an acute injury, as you’ll only increase inflammation. Wait two or three days before turning to heat therapy.
ANTI-INFLAMMATORIES: Like icing, anti-inflammatories can theoretically interrupt the normal healing process for muscles. That said, studies have shown increased strength gains in older runners who use ibuprofen (e.g., Advil) or the pain-reliever acetaminophen (e.g., Tylenol). A cautious approach for all runners would be to limit the use of anti-inflammatories to instances of significant pain or immobility.
ANTIOXIDANT SUPPLEMENTS: Yes, antioxidants (e.g., vitamin C, selenium, and flavonoids) can reduce the damage that free radicals (pesky atoms and molecules that can form during exercise) inflict on your cells. But that doesn’t mean that antioxidant supplements are helpful. Recent studies have linked antioxidant supplementation to accelerated lung, prostate, and skin (melanoma) cancer and have debunked anecdotal claims for cardiovascular health benefits. Of specific concern for runners, these supplements can partially negate the minor damage required to stimulate improvement in your muscles.
“SHAKE IT OFF”: You can’t “shake off” a pulled hamstring or a stress fracture. Don’t listen to anyone who advises differently.
Before you decide that running is simply too scary a sport to endure, what with the multitude of injuries lurking around every corner, understand that most injuries aren’t serious. They’re bumps in the road. Yes, you might have to deal with a sore spot here and there. But, overall, your training will leave you feeling much healthier and more energetic. And, as explained previously, you’ll increase your odds (dramatically!) of avoiding major hip, knee, and disability issues that affect non-runners. Plus, the injury-prevention exercises after this chapter can help immunize you against many common injuries. Consider them a form of prescient healing—as reinforcement for your body’s various Achilles’ heels before injury can strike.
If you do decide to schedule injury-prevention exercises, you’ll need to know when and how often to perform the exercises. The easiest plan is to add the injury-prevention exercises to your strength training program (e.g., the Beginner’s Body Strengthening routine). If you do your strength program twice a week, that should be enough. If you only include a strength program once per week (or don’t schedule one at all), you’ll still want to perform your injury-prevention exercises at least twice a week (three times is better). The best time for scheduling injury-prevention exercises is directly after easy distance runs, when your muscles are warmed up. You don’t want to perform your exercises after a high-intensity workout, as your muscles and connective tissue will already be fatigued.
We’ve all seen werewolf movies, watched a bitten human endure the curse of bones elongating and skin stretching and organs becoming engorged with new mass, the afflicted person screaming in agony during the hideous transmogrification.
The good news is that you’re not becoming a werewolf. You’re becoming a runner. And while your transformation will be equally all-encompassing, it will be gradual. Any discomfort you experience will be short-lived and manageable. And the only scream to emerge from your throat will be one of triumph as you achieve your personal running goal.
And now, before I leave you to the injury-prevention photo instruction in this chapter—and then to the Beginner’s Body Strenthening routing and the acknowledgments and the index—I’d like to share one last thing about running.
What I’d like to share is this: The best part of becoming a runner is not the physical transformation you’ll experience. And it’s not achieving your running goals. If goals were all there was to running, millions of people wouldn’t have made the sport a lifestyle. They would have made it a fad, like ThighMaster, stripper aerobics, the Shake Weight, and Tae Bo. But they didn’t. And that’s because, at its core, running isn’t a sport of fleeting fitness gains; it’s a sport of universal and transcendent intangibles. It’s the courage to start a program. And the patience and perseverance to stick with it. It’s the passion we bring to chasing our goals. And our pride when we achieve them. It’s inspiration and discipline, and exhilaration and disappointment. And sometimes it’s pain. And other times it’s joy.
But mostly, for me, it’s gratitude—gratitude that the simple act of running allowed me to reclaim my health, my fitness, and, most importantly, my relationship with my son. Gratitude that in my fifties, I can function fully as a physical being. Gratitude for the nomadic freedom of my daily runs. And gratitude for the ineffable spirit that running has laid bare, the vital blend of body and mind that I experience every day, and for the interconnectedness I’ve discovered between that spirit and the world through which I travel.
I believe that you, too, will come to understand that your running body is not merely a body, that the souped-up, flesh-and-blood machine you’ll create is instead an incarnation of something bigger—of the change you’ll bring into your life, the optimism that will fuel your days, and the gift that will define your path forward: control of your own destiny.
Eric Dixon, of Buena Park, California, who at age fifty-six is one of the world’s top age-group sprinters, didn’t run in high school. “I always wanted to,” he says. “But I couldn’t run for a track team because everyone would see the bruises on my body.” For Eric, the beatings from his mother and father began when he was two years old and continued through his teenage years. Once, he was locked in a basement closet for four days without food. Another time, his mother hog-tied and beat him all day. Three times, he attempted suicide, twice with pills and once by walking with his eyes closed into a busy street. The abuse finally ended on New Year’s Day, 1978, when his father shot his mother dead in front of Eric. After briefly turning to gangs and drugs, Eric joined the Air Force. He was stationed in Germany, and, finally ready to run, challenged the Air Force’s top sprinter at Ramstein Air Base to a race. “I kicked his butt,” says Eric. And so he found himself on the Air Force track team. At a meet in Frankfurt, Eric posted a time of 10.05 for 100 meters, ranking him as one of the top sprinters in the world. A scholarship offer from the University of Maryland brought him back to the States, but it wasn’t to be. Crossing the street, on his way to a summer job in Washington, DC, Eric was struck by a car traveling sixty miles per hour. His lower left leg was shattered. “It looked like Cap’n Crunch’s Crunch Berry cereal,” says Eric. His doctor gave Eric a 5 to 10 percent chance of walking again—and no chance to run. “I told him I was going to run,” says Eric. And he meant it. He’d felt helpless during the years of child abuse. Through running, Eric had regained control of his life. “I wasn’t giving up,” he says. With ten rods in his leg, secured by a Hoffman External Fixator, Eric started rehab, doing leg curls and leg extensions. More than a year later, the Hoffman was replaced with a long cast, and six months after that with a short cast. “I would do a lot of meditating,” says Eric, “visualizing my leg healing.” After two years, he could walk. A year after that, he was able to increase the intensity of his training. But it would be decades before he regained top form as a masters runner, claiming world age-group top-ten performances in the 100m, 200m, and 400m races. Along the way, he’d claim even greater non-running achievements, rearing his son Ryan, now twenty-one, in a loving household, and working with the Wounded Warrior Project, using his experience to help injured veterans find physical and psychological healing. Eric’s message for all injured warriors, veteran and civilian, is the same: “If I can come back from this, then you can come back from yours.”
IF YOU DETERMINE that specific injury-prevention exercises should be part of your program, you’ll want to schedule them two to three times per week. They can be added to your regular strength training routine or performed separately, with the optimum time being the first fifteen to thirty minutes after easy distance runs (while your muscles are still warm and supple from the run).
For an illustrated and interactive guide to help diagnose your injury, you can visit my website—petemagill.com—and click the link for the “Interactive Runner,” or you can access the Interactive Runner directly at: petemagill.com/interactive-runner/#/irunner. The resistance bands, resistance tubing, and wobble board featured in some of the following exercises are available from Thera-Band, sporting goods stores, or online vendors (just Google them).
Achilles pain is experienced in several ways. Achilles bursitis is an inflammation of the bursa that acts as cushioning between the Achilles tendon and where the tendon inserts at the heel. Achilles tendinitis is an overuse injury accompanied by painful inflammation in the Achilles tendon. And Achilles tendinosis involves degenerative damage in the Achilles tendon that produces chronic pain without inflammation (this is the cause of most Achilles pain). The decision to run while experiencing Achilles pain should be based on the type and intensity of the pain: Runners who experience Achilles tendinitis will need to take a few days off, while those with tendinosis or bursitis might choose to train (unless the pain becomes incapacitating). The following exercises can help prevent all three conditions (and are great for rehabbing Achilles bursitis and Achilles tendinosis).
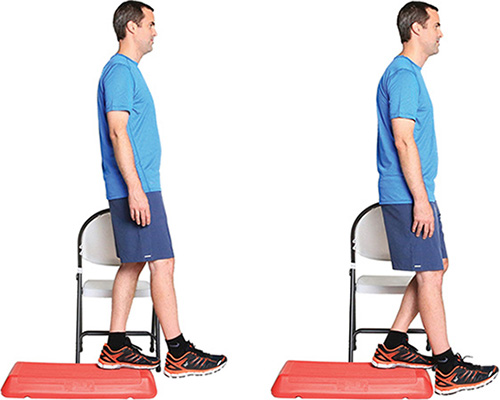
Heel dips affect your Achilles tendon directly, strengthening this connective tissue.
1 Use the balls of your feet to balance on a platform with your heels extending over the edge. Then put all of your weight on one foot and slowly lower the heel of that foot toward the floor (through your full range of motion). Beginners or runners with significant flexibility issues with their Achilles tendons can start on a flat surface (e.g., the floor), rising up on their toes and then lowering the heel until it reaches the flat surface; after a few weeks, they can switch to using a platform. You should always use a chair or other support for balance.
2 Use both feet to rise back up, then repeat. As you become stronger, hold a weight (e.g., a dumbbell) in the same-side hand as the heel you’re lowering. Increase the weight as your strength increases. Start with 2–5 repetitions for each foot. Gradually build up to 3 sets of 20 repetitions for each foot and perform the exercise 3–5 times per week.
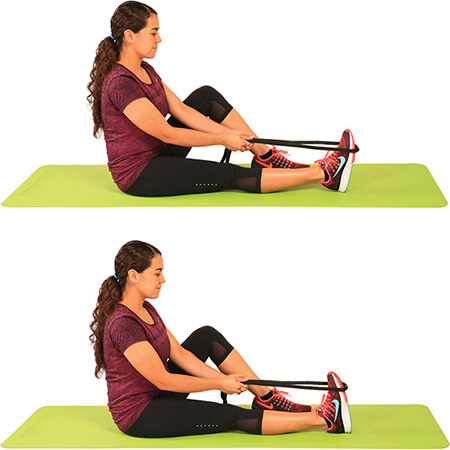
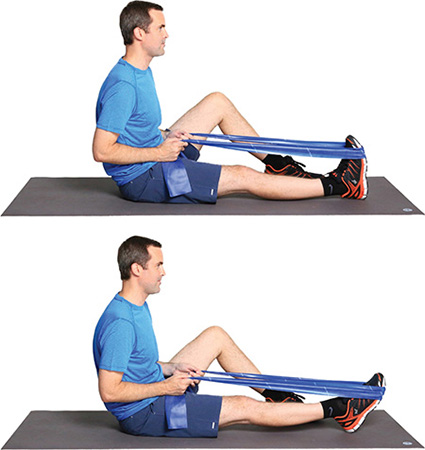
This stretching exercise increases the range of motion for your gastrocnemius muscle (the largest muscle in your calf), relieving stress on your Achilles tendon.
1 Sit with one leg extended in front of you, the other bent. Loop your rope around the ball of your foot.
2 Use the muscles of your lower leg—specifically, the muscle on the outside (front) of your shin—to pull the ball of your foot toward your shin (bending at the ankle). When you can’t pull your foot any closer to your shin, use the rope to gently pull your foot just a tiny bit more (never beyond your natural range of motion). Don’t hold the stretch for more than a single second; then immediately return to your starting position. Do 10 reps, then switch sides.
For Achilles tendinitis, some runners get relief by placing a heel lift into their shoe (use athletic tape on the bottom of the lift to hold it in place). The lift should be ⅛ to ¼ inch cork or felt. Don’t use for more than a few days, and remove the heel lift as soon as the pain goes away.
For Achilles bursitis (pain on the very back of the heel that can radiate to the ankle and bottom of the heel), you might consider performing surgery on your running shoe. Many shoes have extremely rigid heel counters (the plastic insert reinforcing the heel cup of your shoe); these heel counters can aggravate the Achilles tendon at its insertion point. Cutting off the upper back portion of this counter or carving out a big piece of it over the inflamed heel area can go a long way to reducing the pain of this injury. You’ll need a box cutter or other sharp instrument to perform this shoe surgery.
An ankle sprain involves pain, inflammation, discoloration, and reduced mobility of the ankle due to torn (or partially torn) ligaments. For severe ankle sprains, you’ll need to see a health professional. To help prevent ankle sprains (if you’ve sprained your ankle previously, you’re more likely to do it again) and to strengthen your ankle after the sprain has healed, try the following exercises.
This is the simplest balance exercise of all. Beginners can wear shoes. Once you can balance on one foot for 30 seconds, try it with bare feet.
Stand straight with your knees slightly bent. Lift one foot off the floor and hold it. When you can’t balance any longer, put your foot down. Do a single rep of up to 60 seconds on both sides.
These easy-to-do exercises improve your nervous system’s control of the muscles responsible for movement at your ankles.
1 Lie on your back with one leg straight, toes pointed upward, and one leg raised and bent 90° at the knee. Prop up the raised leg with your hands.
2 Make circular orbits with your foot, doing 10 rotations clockwise and then 10 rotations counterclockwise. Limit movement to your ankle and foot. After performing the rotations, move your foot backward and forward—toward your shin and then away from it—as if working the gas pedal in your car. Again, do 10 reps with each foot.
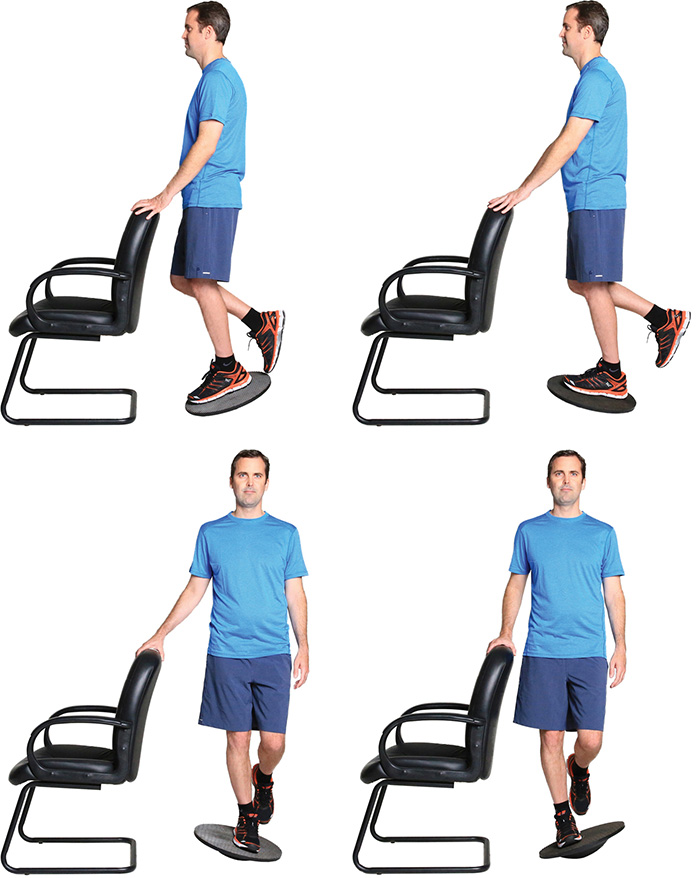
Wobble board training has been shown to reduce the recurrence of ankle sprains by almost 50 percent. It also helps to immunize your body against most knee, lower leg, and foot injuries.
1 Hold on to a chair or other support for balance. Center your weight over the middle of the wobble board. Then rock forward to touch the front of the wobble board to the floor—or as close as you can get. Limit the bend at your knee and focus on working your ankle’s range of motion.
2 Rock backward until you touch the floor—or as close as you can get. One rep includes both the forward and backward rock. Begin with 5–10 reps, then increase your reps over time to a maximum of 50.
3 After forward/backward rocking, rock side to side. First, rock inward and touch the side of the wobble board to the floor—or as close as you can get.
4 Next rock outward until you touch the floor—or as close as you can get. One rep includes both the inward and outward rock. Begin with 5–10 reps, then increase your reps over time to a maximum of 50.
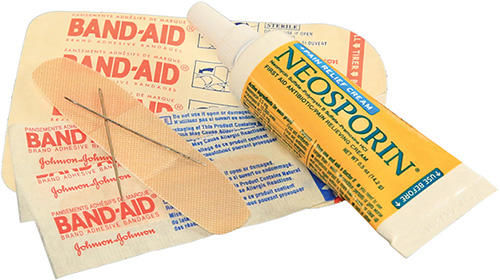
Black toenails are painful, discolored (e.g., black or purple) toenails. The toenail is lifted from its bed by fluid or blood buildup. Eventually, it will probably fall off on its own, at which point you can apply antibiotic ointment and a Band-Aid. If the toe becomes red and painful, it might be infected, at which point you should see a health professional. As long as the pain isn’t too intense, you can run with black toenails (pretty much every elite runner in the world does—personally, half my toenails are usually black or missing).
A blister is a (sometimes painful) bubble of fluid trapped beneath the skin that is caused by friction and irritation. For runners, blisters on the feet are a concern. Running on a blister can lead to tearing the blister open—not a pleasant training experience, and one that can lead to infection. By using the following two techniques, you should be able to continue running while the blister heals.
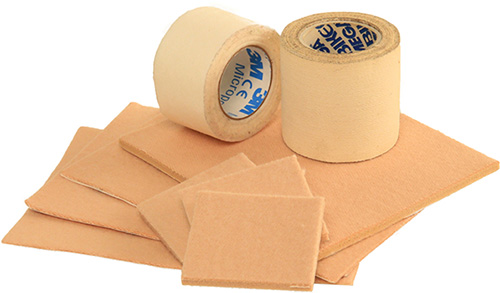
You can build up the area surrounding the blister so that you don’t put pressure directly on the affected area during a run.
Cut small pieces of moleskin (or other sticky padding) and apply on both sides of a blister (must stack higher than the blister). Wrap sterilized gauze around your foot and across the top of the moleskin/blister. Wrap athletic tape on top of the gauze to hold it in place.
If you’re not squeamish, reducing the size of the blister can negate the problem.
Use a sterilized needle or pin to puncture the blister at its outside edge. Push gently on the blister to drain it. Then apply antibiotic ointment and, if necessary, a bandage.
A bunion is a bony bump at the base of your big toe (caused by your first metatarsal bone turning outward, pointing your big toe inward), right at the joint connecting your big toe to your foot. Bunions can be red and painful. Outside surgery, your best bet is to make sure that your forefoot has plenty of room by purchasing shoes with wide toe boxes. You’ll want to avoid narrow shoes and high heels. You can train with a bunion as long as the pain doesn’t force you into an unnatural stride and the pressure doesn’t result in severe inflammation of the bursa that surround the joint.
Calf strains cause pain and tightness in your calves, usually following intense exercise, such as running repetitions, hill repeats, drills, or heavy resistance training. With minor pain, you can move straight into the following exercises. If the strain makes it hard to walk (and impossible to run), you’ll need to take a few days off to allow healing. If you’re susceptible to calf strains, you’ll want to include both of the following exercises in your post-run routine (two to three times per week).
This stretch helps to relieve tightness in your calves post-run, leaving you less susceptible to lingering pain and stiffness.
Lie on your back with one knee bent, foot flat on the floor, and with the other leg raised and straightened. Loop the rope around the ball of your foot. Gently pull your toes and the ball of your foot toward your shin while simultaneously tightening (flexing) your raised quadriceps muscle (front thigh). Hold for 30 seconds, then repeat with the opposite leg.

Straight knee heel raises help strengthen your calves through a full range of motion.
1 Place the balls of your feet on a platform, feet hip-width apart, with your heels hanging off the platform. Use a chair or other support for balance. First, lower your heels so that they drop beneath the edge of the platform (don’t overstretch!).
2 Next, raise your heels as high as you can, coming up on your toes. Pause at the top for 1–2 seconds, then return to your starting position. Repeat 10–15 times.
Chafing refers to painful irritation that results when you have skin rubbing against skin (e.g., your inner thighs during a run) or skin rubbing against certain fabrics (e.g., nipples rubbing against a loose shirt, causing “runner’s nipple,” in which the nipples are rubbed so raw that they often bleed). The best way to combat chafing is to apply products (e.g., Body Glide) that reduce friction without staining your clothes. Lubricants like petroleum jelly also work, but staining will be an issue. For inner-thigh chafing, you can opt for half tights, tights, or long shorts to prevent skin-on-skin rubbing. Post-run, apply an antibiotic ointment to speed healing and prevent infection. Unless the pain is unbearable, there’s no reason you can’t run.
DOMS is muscular soreness that runners experience in the days following excessive exercise. Pain usually peaks forty-eight to seventy-two hours after the exercise bout. DOMS is thought to be caused by eccentric muscle contractions (contractions that occur when the muscle must contract and stretch simultaneously, as happens when your foot touches down during a running stride, simultaneously contracting and lengthening your quadriceps muscles). Recently, researchers have also proposed that there’s a nervous system component to the syndrome. For immediate relief of symptoms, try icing, a cold bath, massage, or anti-inflammatories. If all else fails, try complete rest. Symptoms disappear within five to seven days, and episodes of DOMS usually immunize runners against repeat episodes (for at least a few weeks). If you have pain but normal muscular range of motion, you can try the following easy recovery activity.
The best remedy might be limiting your next workout to easy walking or an easy-effort distance run. Keep it short. Keep it slow. And don’t extend your stride beyond what feels (relatively) comfortable.
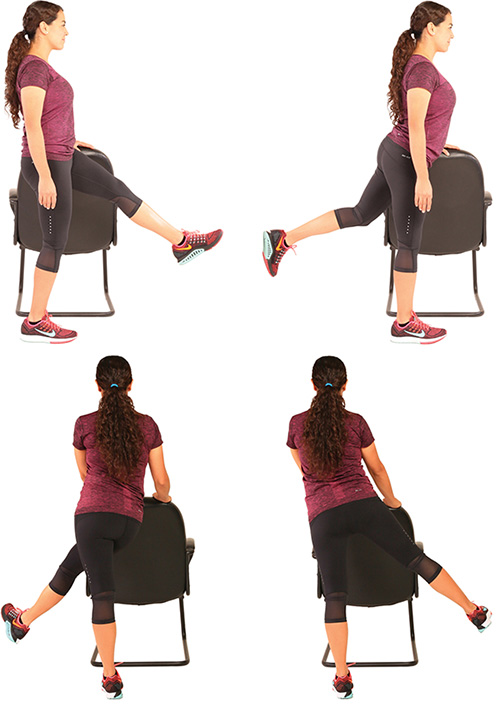
Groin strains occur when you strain any of five adductor muscles (muscles that pull your leg inward toward the midline of your body) or damage the associated connective tissue. Pain will be felt in the groin or inner thigh area, especially when lifting your knee, and it can come on suddenly or gradually. You can usually train through mild groin pain (although you may need a reduced workload). If the pain is severe, you’ll need to see a health professional to rule out a sports hernia or some other severe muscular or connective tissue damage. To help prevent groin strains or to limit the recurrence of strains once your injury has healed, try the following exercises.
This exercise strengthens your hip adductors and keeps your hips stable through your full stride and during foot strike.
1 Secure a resistance band to an anchor or stationary object at ankle level. While standing, loop the band around your anchor-side leg, just above the ankle, with your other foot positioned slightly back (so that it’s not in the way). Hold on to a chair or other support for balance.
2 Keeping your leg straight, pull your leg inward, in front of and across your other leg. Slowly return to the start position and repeat for 5–10 repetitions. Switch legs and repeat.
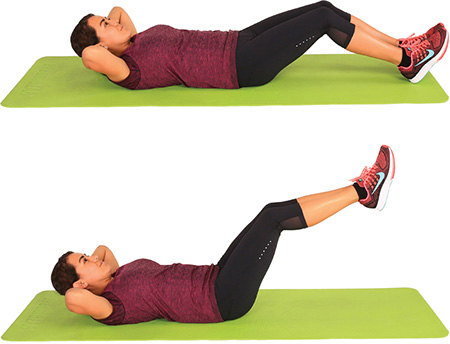
Leg lifts strengthen your lower abdominals, aiding core stability and knee lift.
1 Lie on your back with your knees bent, your heels on the floor, your hands behind your head, and your head lifted slightly off the floor.
2 Keeping the bend in your knees, raise your feet to about 45°. Then lower your legs until your heels almost touch the floor. Start with 10–15 repetitions, and gradually build up to between 40 and 50 reps.
Leg swings are a form of dynamic stretching that can help activate your core and create a better range of motion in your hip flexors, hip abductors, and hip adductors. Many runners include leg swings as part of their warm-up routine.
1 Begin with forward and backward leg swings. Balance against a wall, hold on to a chair, or use some other support.
2 Standing tall, swing your leg (on the same side as your supporting hand) forward and backward at the hip, allowing your swinging leg to bend slightly at the knee, for 10 or more repetitions.
3 Next, use both hands to support yourself while facing the wall, chair, or other support, then lean slightly forward while swinging your leg across your body, keeping your upper body mostly motionless and pointing your toes upward as you swing.
4 Then swing your leg back the other way, pulling the leg as high as it will go, for a total of 10 or more repetitions.
Hamstring strains cause pain and tightness in your hamstrings (your rear thigh muscles) that can restrict your movement. With mild hamstring strains, you can sometimes continue training with reduced volume, but understand that hamstring injuries have a tendency to become chronic; a majority of runners who suffer hamstring strains will become reinjured within a year. In other words, you might be better served taking a week off rather than risking long-term injury. Severe hamstring injuries will absolutely require time off (from a few weeks to a few months). Rushing your return to training will only lead to reinjury—and hamstrings, when they reinjure, tend to reinjure completely. Icing and anti-inflammatories can help with pain management. And the following exercises can help to prevent or, when you’re ready, rehabilitate hamstring injuries.
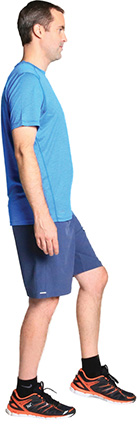
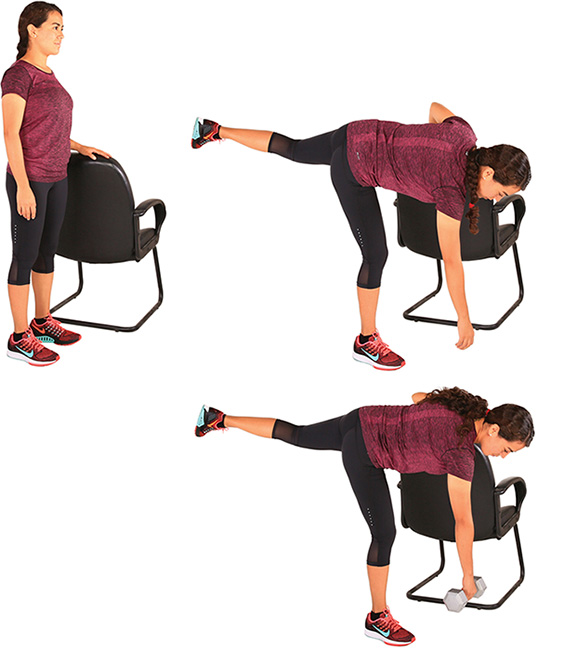
This is a great exercise for strengthening your hamstrings (and glutes) while simultaneously increasing your range of motion. It also improves balance and stability.
1 Start from a standing position, feet hip-width apart. I’d recommend using a chair or other support for balance.
2 Keeping your spine straight, bend forward at the hips while lifting the leg closest to your chair (or other support) straight behind you (it’s OK for both your knees to bend slightly) and reaching with your free hand toward the ground. If not using a support, reach with both hands toward the ground. Then return to your starting position. Do 5–10 repetitions, then switch legs.
3 As you improve at this exercise, add weight by holding a dumbbell.
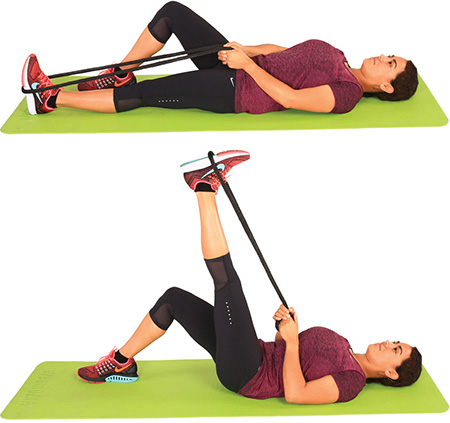
This stretching exercise increases the range of motion for your hamstrings.
1 Lie on your back, bend your non-stretching leg (foot flat on the floor), and loop your rope around the arch of your foot (exercising leg), with that leg extended flat on the floor.
2 Lift your exercising leg off the floor, using your thigh and hip-flexor muscles, while keeping your hips on the floor. When you can’t lift your leg any higher, use the rope to increase the stretch a tiny bit more (never beyond your natural range of motion). Don’t hold the stretch. Instead, immediately return your leg to the start position. Do 10 repetitions, then switch legs.
Heat illnesses can include heat cramps, heat exhaustion, and heat stroke. All result from overheating due to high temperatures, high humidity, or hard training. Heat exhaustion will produce the following symptoms: cramps, nausea, headache, and general weakness. Since heat exhaustion can progress to heat stroke, it’s important that you stop training, get in a cool environment, and rehydrate. Heat stroke is a life-threatening condition caused by prolonged exposure to extreme heat and/or humidity, as well as by exercising in those extreme conditions. It can cause damage to the brain and other organs, as well as leading to shock or even death. Symptoms include:
![]() Fever greater than 104°F
Fever greater than 104°F
![]() Dry, hot, red skin
Dry, hot, red skin
![]() Confusion
Confusion
![]() Rapid, weak pulse
Rapid, weak pulse
![]() Seizures
Seizures
![]() Unconsciousness
Unconsciousness
For heat stroke, according to the National Institutes of Health:
![]() Have the person lie down in a cool place with his or her feet lifted 12 inches
Have the person lie down in a cool place with his or her feet lifted 12 inches
![]() Call 911 immediately
Call 911 immediately
![]() Apply cool, wet cloths to the person’s skin
Apply cool, wet cloths to the person’s skin
![]() If the person is conscious and alert, offer a sports drink or salted beverage (1 teaspoon of salt per quart) to sip
If the person is conscious and alert, offer a sports drink or salted beverage (1 teaspoon of salt per quart) to sip
Heavy legs syndrome often results from training too hard, either during a single workout or over the course of several workouts. Your legs will feel heavy and unresponsive. Your energy levels will be low. Your motivation will be sapped. The best recovery plan is to schedule a series of long, easy distance runs—the easier the better. Another approach that sometimes works is to increase carbohydrate and fluid intake for a few days; this rebuilds your muscle glycogen stores and rehydrates your body (both potential factors in heavy legs).
You might experience nonspecific pain in your hip area. Unless you experience sharp pain, icing isn’t advised, as hip pain often radiates, making it hard to pinpoint the specific origin. The decision to run or not run should be based upon the level of pain—if it’s mild, you can train with reduced volume and intensity; if it’s severe, better to take a few days off. For injury prevention and rehab once the injury has healed, try the exercises that follow. You might also consider the hip adduction exercises from the groin strain entry and the lunge walk and side steps exercises from the IT band syndrome entry.
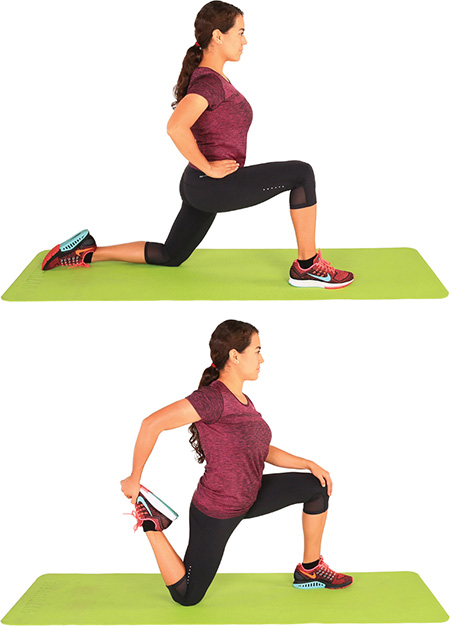
This simple stretch loosens your hip flexors (the muscles at the front of the hip that move your knee toward your chest).
1 Kneel with your left knee forward. With your hands on your hips, move forward by shifting your hips forward (not by bending at the waist); this increases the stretch on your hip flexors. Hold for 30 seconds, then switch legs.
2 As long as you’re already in this position, you might as well take the opportunity to stretch your quadriceps (front thigh muscles). Grab your trailing foot and lift upward until you feel the stretch on your quadriceps. At this point, you have the option of moving your hips forward to increase the stretch on your hip flexors. Hold for 30 seconds. Then switch legs and repeat.
Monster walking works your hip flexors, hip extensors, and hip abductors, providing a terrific all-around strengthening workout for your hips.
1 Loop a resistance band or resistance tubing around your ankles (or for less resistance, right above or below your knees), bend your knees slightly, feet hip-width apart, with arms either hanging loosely at your sides or with your hands on your hips.
2 Step forward and to the side at a 45° angle, keeping the bend in your knees. Step forward and to the opposite side at a 45° angle. Take 10 to 20 steps. Start with 1 set and work up to 2–3 sets.
Your iliotibial (IT) band is a thick cord of connective tissue that runs along the outside of your leg, from your hip to your knee. IT band syndrome is usually felt as sharp pain on the outside of your knee, but it can also cause pain on the outside of your hip—on the bony prominence at the top of your thigh bone (femur). IT band syndrome has been attributed to both overuse (repeating the same physical motion, as occurs during distance running) and to weak hip and glute (butt) muscles. Barring preventative exercises or treatment, it can progress to an injury requiring weeks (or months) of non-running. Unless you’re immobilized by pain, you can train—unlike other injuries, you might do best by including your normal variety of training, rather than limiting yourself to easy running (since this is often an overuse injury, performing the same running stride over and over can make the injury worse). If your pain is mild, there’s no reason you can’t start including the exercises below in your strength program (if your pain increases, of course, you’ll need to discontinue the exercises). For this injury, prevention is the best cure. In the meantime, icing and anti-inflammatories can provide temporary relief from the pain.
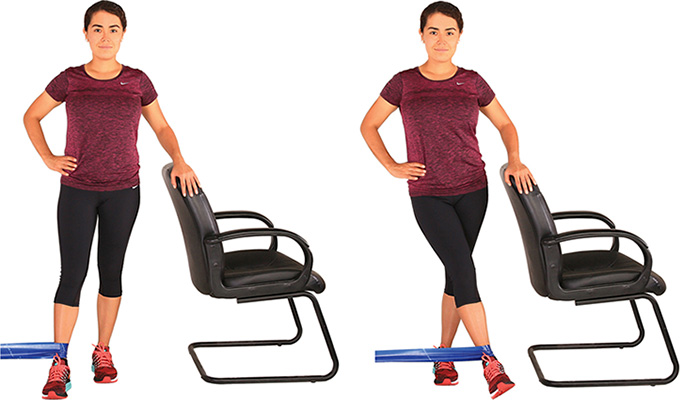
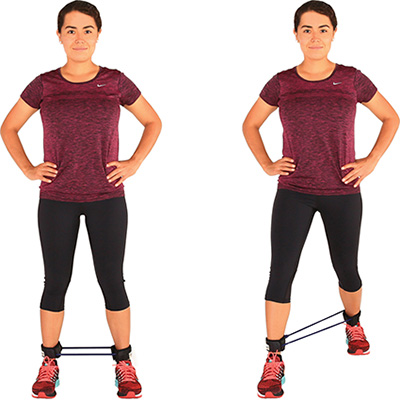
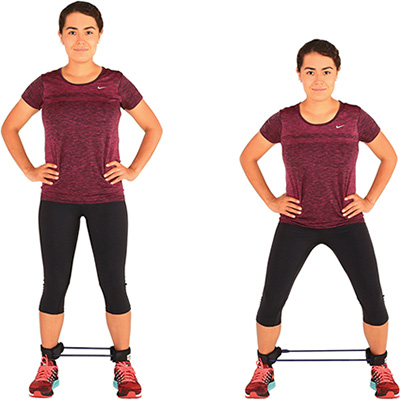
Side steps will strengthen and stabilize your hip abductors.
1 Loop the resistance band or tubing around your ankles (or for less resistance, right above or below your knees). Bend your knees slightly with your feet hip-width apart.
2 Step directly to the side with one foot until the band provides significant resistance. Then slide your other foot over to re-create your original stance. Repeat 5–10 times in one direction, and then reverse direction for 5–10 more repetitions.
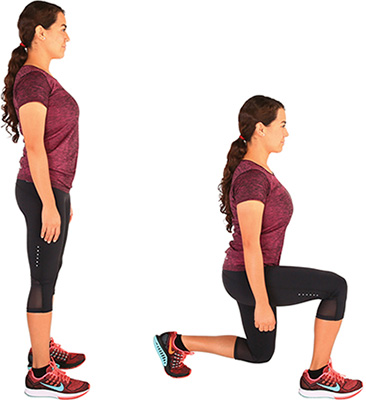
The lunge walk will strengthen your hips and glutes, improving your stability during runs.
1 Start from a standing position with your arms hanging at your sides.
2 Take a step forward, bending at the knee until your thigh is parallel to the ground. Your front knee should be lined up over your front foot (but not ahead of it!). Now step forward into another lunge with the opposite leg (obviously, you’ll have to rise up as you step forward). Start with 5–10 steps, then gradually increase to between 20 and 30 steps (don’t overdo this one!).
This stretch is only advised for people who are flexible (i.e., who can get into the position without discomfort).
Sit on the floor with one leg extended in front of you, and with your other leg folded back, your foot tucked next to your hip. Your knees should be 1–2 inches apart, your thighs almost parallel. Reach toward your toes while bringing your head over the straightened knee. You should feel the “pull” along the outside of your stretched leg. Hold for 30–60 seconds, then repeat with the opposite leg.
Generalized, sharp knee pain can occur on the front of the knee without an obvious inciting incident or structural impairment (i.e., there will be no visible swelling or damage). This pain is hard to diagnose and might result from damage to pain nerves themselves (through poor running mechanics). As with most other injuries, the decision about whether to train should be based on the level of pain you’re experiencing. The following exercises will strengthen muscles that help stabilize the knee, making them advisable for injury prevention and a must during rehabilitation once the pain has receded. Aside from the following exercises, consider performing the lunge walk from the entry for IT band syndrome.
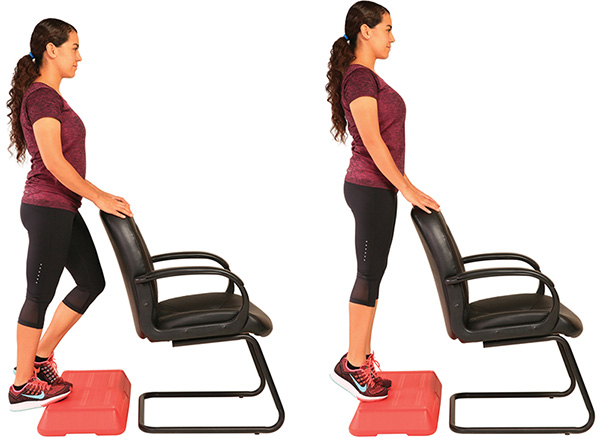
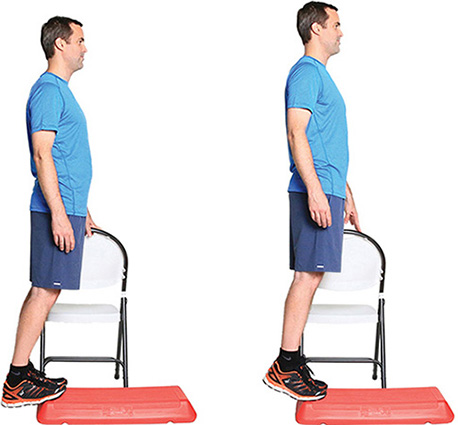
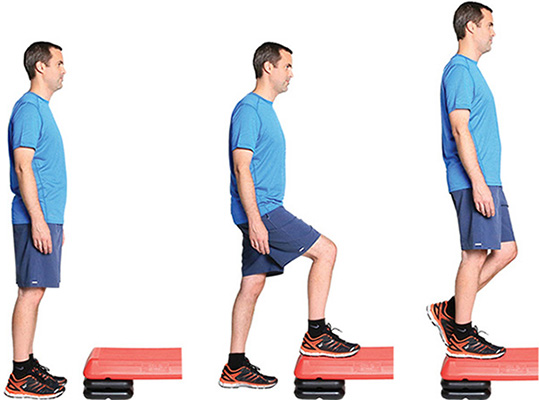
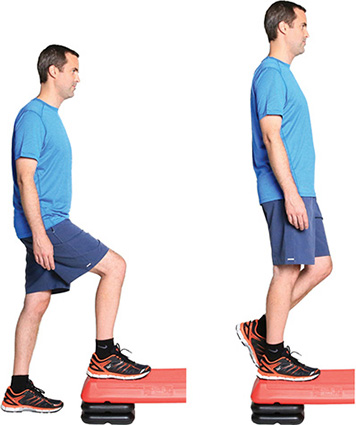
Step-ups strengthen your quadriceps and glutes, helping to stabilize your stride.
1 Stand in front of a raised platform.
2 Step onto the platform, making sure that your entire foot is on the platform. Your platform shouldn’t be so high that your knee exceeds a 90° bend.
3 Rise up onto the platform, generating force with your forward (bent) leg. Use your opposite leg for balance only, letting it come to rest lightly on the platform. Do 5–10 reps, then switch legs. As you get stronger, you can add weight by holding dumbbells.
This exercise builds stability in the hips and knees, and it’s great for preventing and rehabbing knee injuries.
1 Balance on one foot at the edge of a raised platform. Feel free to use a chair or other support for balance. Hold your other foot out in front of the platform, with that knee slightly bent.
2 Lower your hips by bending the knee of your weight-bearing leg. Your free leg/foot will drop as you lower your hips—as if you’re “stepping down.” To avoid injury, make sure the knee and foot of your weight-bearing leg remain aligned. Rise to your starting position. Do 5–10 reps with each leg.
Pain and stiffness in your lower back can affect your running stride and make it difficult to perform everyday activities. While this condition can result from spinal problems (e.g., a bulging disc) or sciatica, it’s often caused by lower back muscles that are in spasm (and won’t release). If pain and stiffness are mild, you’re probably OK to run easy distance. If pain and tightness are severe, you should see a health professional to rule out a spinal injury or sciatica.
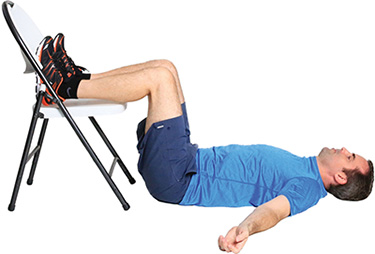
This position helps relieve tension in your lower back (when muscle spasms are the cause) in just a few minutes.
Lie on your back with your arms out to your sides, hands at approximately waist level, with your lower legs and feet propped on a chair. Keep a 90° bend in your knees and try to position your feet so that they don’t roll outward. Take slow, deep breaths. Relax in this position for 5–10 minutes.
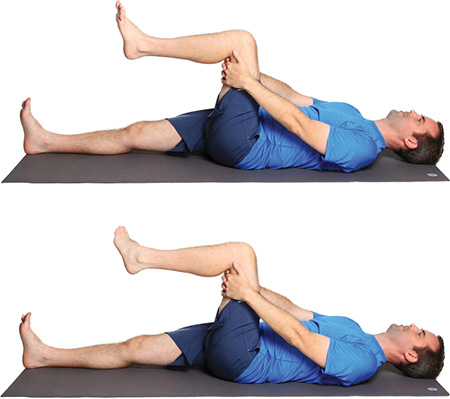
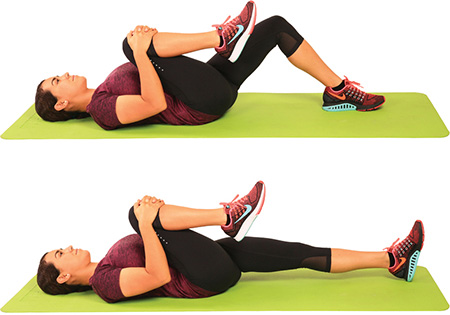
This traditional stretch helps relieve tension in your lower back.
1 Lie on your back, one leg bent at the knee, foot down. Grasp your opposite leg at the knee and lift it toward your chest, keeping your hips on the floor. Don’t overstretch.
2 If you’re flexible, repeat the above instructions with your down leg flat on the floor.
Your lateral and medial menisci are two pads of fibrocartilage that provide shock absorption and structural support for your knee. Damage to your meniscus is felt as pain at the side or center of your knee, accompanied by swelling and usually following a twisting motion. Symptoms can include a popping sensation at the time of the injury, swelling that gets worse, or, in the aftermath of the injury, the feeling that your knee is “catching” or otherwise unstable. For this injury, you’ll need to see a health professional—and stop running until you do.
These are sudden, involuntary, and sustained muscle contractions that cause pain. Static stretching is an effective, immediate, traditional remedy for hamstring and calf cramps (illustrated below). A quicker remedy (but hard for many less-flexible runners to perform) is “weight-bearing ankle dorsiflexion,” which is a confusing way of saying that you should stand, then reach down and pull up your same-side toes of the leg that is cramping. You must stop running until the cramp is relieved. Once it’s gone, you can exercise as long as you limit both volume and intensity.
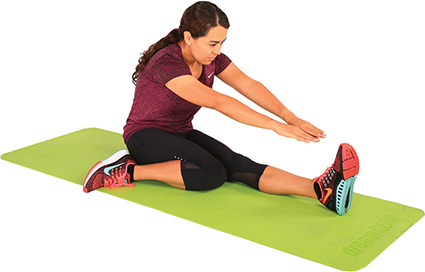
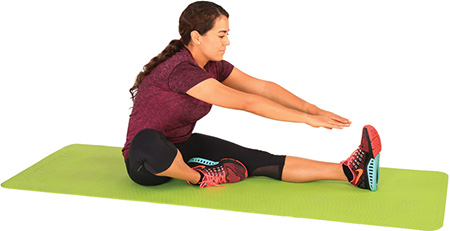
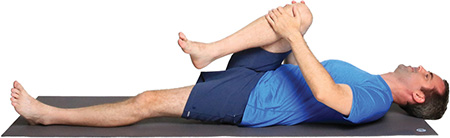
A traditional hamstring static stretch should relieve your cramp pronto.
While sitting tall on the floor, extend one leg in front of you and fold the other with the bottom of your foot pressed against the opposite inner thigh. Bend forward from the waist without hunching your back and reach toward your toes. Don’t overstretch! When you reach the end of your range of motion, hold until the cramp releases (hold up to a maximum of 60 seconds—if the cramp persists, release the stretch for a few seconds and then try again).
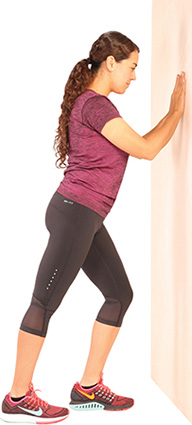
While there are many different static stretches for the calves, this is the quickest and easiest to perform when a cramp strikes.
Put your hands shoulder height and palms flat against a wall or other support. Step back with one leg. Bend the knee of the front leg while keeping the back leg straight. Move forward at the hips while keeping your back heel firmly planted on the ground. When you reach your full range of motion, hold until the cramp releases (hold up to a maximum of 60 seconds—if the cramp persists, release the stretch for a few seconds and then try again).
Osteoarthritis causes pain, swelling, and immobility in a joint, and it occurs when your articular cartilage (the cartilage that provides the smooth coating on the surface ends of bones) becomes thin; this narrows the joint space, sometimes to the point of bone-on-bone contact. Most osteoarthritis is genetic, with age and trauma as additional factors. Running doesn’t cause it, but there’s an indication that running can help prevent or delay its onset. Masters runners should consider getting an X-ray to check on their cartilage thickness; that way, if thinning has occurred, you can make informed training choices. A post-run strengthening routine can keep your hips and knees tracking more efficiently, possibly reducing symptoms. If you suspect you have osteoarthritis, you should consult a health professional.
Your piriformis muscle is located slightly above the center-middle portion of your glutes (butt), immediately adjacent to the sciatic nerve (see “Sciatica” in this section). Sharp pain, tingling, or numbness in this area is usually related to pressure on the sciatic nerve, but it can also originate from the piriformis muscle itself—if the muscle is irritated, the nerve tends to be irritated. As long as pain allows, you can continue running. But you should implement the following exercises.
This stretch should relieve tension in the piriformis.
Lie on your back, one leg flat on the floor. Grasp your opposite leg at the knee and lift it toward your opposite shoulder, keeping your hips on the floor. Don’t overstretch.
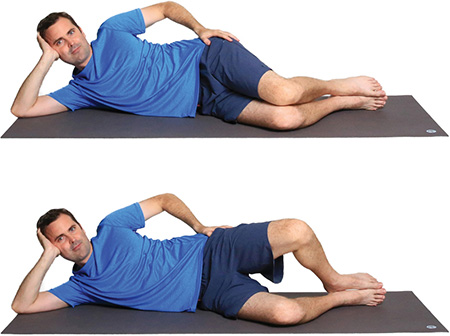
Doing the clam should strengthen the piriformis and other muscles involved in hip abduction and rotation.
1 Lie on your side with your legs stacked one on top of the other, and your knees bent at about 45°.
2 Lift your top knee while keeping your feet stacked. Then close your legs. Repeat 10–15 times with each leg. To increase resistance, loop a resistance band just above your knees.
Plantar fasciitis (the bane of masters runners) can be felt at the point where the heel meets the arch (press on the inside of your arch, against the heel, and you’ll probably scream if you have PF). That said, pain from PF can radiate, and many runners mistakenly identify the first sign of PF as a heel bruise. Pain might also be felt along the arch or elsewhere in your foot. PF can stop your running in its tracks, then linger for months or even years. The onset can be sudden, with an inciting incident (like stepping wrong on a rock), or it can develop gradually, over weeks or months (often, in the latter case, the cause is thought to be injured or weakened muscles in the foot rather than injury to the PF itself). In the case of sudden onset, you’ll have to stop running—immediately—until the injury heals. For PF that develops gradually, you’ll probably be able to continue running during the early stages of the injury. At some point, however, PF tends to progress to a point where running becomes impossible. That’s why you’ll want to start injury prevention exercises at the very first hint of pain.
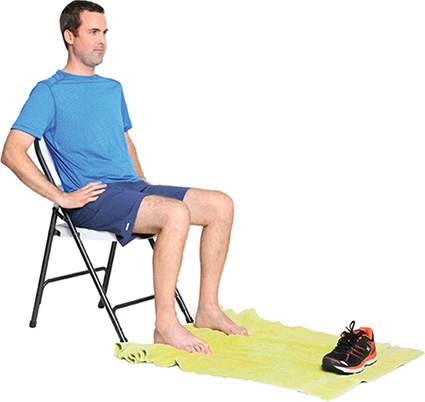
This is the simplest exercise for staving off plantar fasciitis. It strengthens the intrinsic muscles of your feet.
Sit barefoot in a chair with a towel spread on the floor in front of you. Put a shoe on the towel’s opposite end to create minor resistance. While keeping your heels on the floor, pull the towel toward you by scrunching your toes. Bunch the towel beneath your arch (or behind your heels) until you’ve reeled in its full length. Do this 1–3 times.
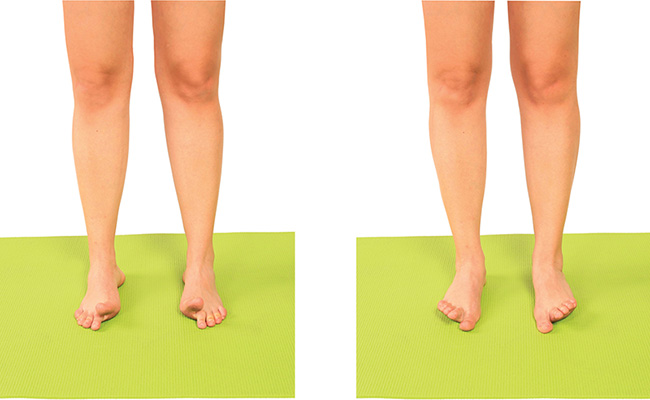
This exercise helps strengthen the muscles that control extension and flexion of your toes, which, when strong, help reduce pressure on the plantar fascia.
1 Stand barefoot with your feet hip-width apart. Lift your big toes as you simultaneously press down with the other four toes of each foot.
2 Now reverse what you’re doing. Press down with your big toes as you raise your remaining toes. Start with 5–10 reps, then increase to 15–20 reps. (And be prepared for it to take a couple of tries before you get the coordination down for this exercise.)
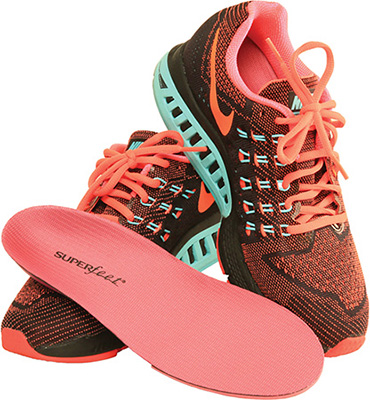
Some runners get temporary relief from Superfeet Arch Supports (especially while walking), although I’d recommend against making this a permanent solution, as developing a stronger and properly functioning arch without artificial support is key to avoiding and beating this injury.
Insert the Superfeet Arch Supports into your running shoes.
Sometimes, runners find themselves with achy, painful quadriceps (front thigh) muscles and no idea how it happened—no specific mistake they can put their finger on. Untreated, this pain can become chronic. And it can become intense enough to make running torture. Even walking up and down stairs can become pure agony. Besides some of the quad-strengthening exercises we’ve already introduced (e.g., step-ups from the knee pain entry and lunge walk from the IT band syndrome entry), the following exercise has proved effective.
Downhill running increases the workload on your front thighs (quadriceps), triggering greater strength adaptations in the muscles. But you need to be careful with downhill running. A few years back, in an article that appeared in both Running Times and Runner’s World (same parent company), I recommended downhill running as a cure for chronic quadriceps pain. I’d personally had such a severe case of quad pain before the 2005 national cross country championships that I’d considered withdrawing. In desperation, I’d jogged up a local mountain, then charged a two-mile downhill run, hoping to trigger overcompensation (increased strengthening in the quads). It worked. The soreness cleared up, and a week later I won the masters national championship. In the article, I suggested that runners start with some short downhill strides, then build up to a longer downhill run. Unfortunately, one reader decided to copy my two-mile downhill charge. “Now I can’t walk,” she wrote in an email. By skipping the downhill strides, she left her body unprepared for the longer downhill run. There was nothing I could do for her. But there’s something I can do for you: “Start with strides!”
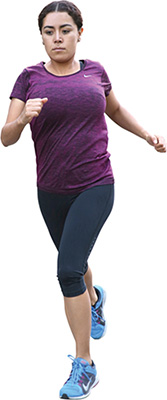
DOWNHILL STRIDES: After warming up, run 4 downhill strides (10–15 seconds) at about an 85 percent effort. Walk back to the start for recovery. Add 2 strides to each successive workout until you reach a maximum of 8 strides.
DOWNHILL CONTINUOUS RUNNING: Once you can complete 8 downhill strides, try 3 minutes of downhill running at tempo effort. Add 1–2 minutes to successive workouts until you reach a maximum of 12 minutes.
This is the most common running injury, accounting for up to one third of reported injuries every year. If you’ve got runner’s knee, you’ll feel pain behind or around your kneecap, and there might be a popping or crackling sensation in the knee. It’s caused by irritation of the cartilage in your kneecap joint. This can be a biomechanical issue, or it can result from trauma to the kneecap. Your best bet for combatting runner’s knee is to prevent it. And the best way to do that is to perform the Beginner’s Body Strengthening routine, since strong quadriceps muscles, hips, and hamstrings are essential for smooth patella (kneecap) tracking. You might also consider including the monster walk from the entry on hip pain and step-downs from the entry on knee pain. If you experience runner’s knee, cut back on your mileage and try to avoid excessive bending or loading at the joint (e.g., squatting). Anti-inflammatories can help with the pain and inflammation. If the condition persists, you’ll want to see a health professional.
Your sciatic nerve runs from each side of your lower spine through the center of your glutes (buttocks), down your hamstrings, and all the way to your feet. It’s the biggest nerve in your body. And when you feel pain—from a herniated disc or irritated piriformis muscle or some other cause—it’s known as “sciatica.” Runners will feel pain, tingling (pins and needles), and/or numbness in one or all of the following areas: lower back, buttocks, hamstrings, calves, and feet. For many runners, chiropractic treatment provides relief. Others have found success with core-muscle and stability-exercise programs designed by physical therapists. Since complete rest isn’t always effective, try the following three exercises if you’re experiencing symptoms.
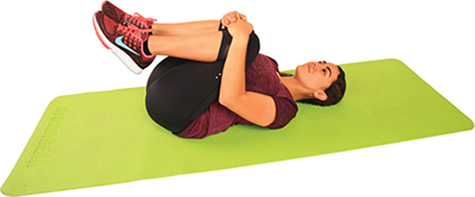
This simple stretch can reduce tension on your lower back and pelvis.
Lie on your back with your knees bent, feet flat on the floor. Now, gently grasp your knees with your hands and bring them slowly toward your chest (for your first time, you might want to bring your knees to your chest one at a time, as this will put less sudden pressure on your back and abdominal muscles). Relax while you gently hug your knees toward your chest. Only hold this stretch for a few seconds, then return to your start position. Repeat 5–10 times.
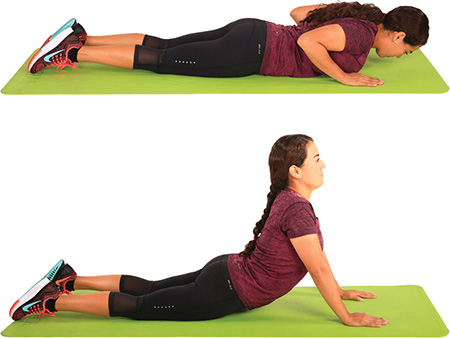
This stretch works well if you have a herniated disc and if you’re young. Older runners might have trouble with the flexibility required for this stretch.
1 Lie facedown on the floor, feet hip-width apart, palms next to your shoulders.
2 Inhale as you straighten your arms and slowly lift your upper torso and head, keeping your pelvis on the floor. Only go as far as is comfortable, then slowly return to your starting position. Start with 3–5 reps and build up to 10–15.
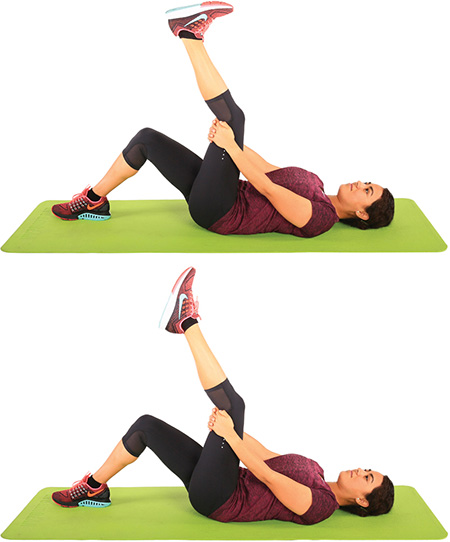
Here’s one final exercise to stretch the sciatic nerve, helping it to move through the tight tissue that surrounds it.
1 Lie on your back, one leg bent with the foot flat on the floor. Lift your other leg, grasping behind the knee (it’s OK for the knee to be slightly bent) until you reach your full range of motion.
2 Pump the ankle by moving it forward and backward, like you’re working a gas pedal. Start with 10 reps for each leg, then gradually increase to 30, performing about one ankle pump per second. As you become more skilled at this exercise, you can create a true glide of the sciatic nerve by lifting your head and neck up (flexion) as you point your toes away from you (plantarflexion), and then lowering your head and neck back down (extension) as you pull your toes upward toward your head/neck (dorsiflexion).
With front shin splints, you’ll feel sharp pain along the outside of your shin(s). Continued training will be determined by your level of pain (i.e., it’s up to you). Icing and anti-inflammatories can provide temporary relief. Besides the following exercises, the wobble board exercises from the ankle sprain entry are very effective for preventing and rehabbing this injury.
These directly strengthen the muscles on the front of your shins.
1 Sit in a chair with your legs bent 90° at your knees, feet flat on the floor.
2 Quickly lift and lower your feet without raising your heels, until you feel a “burn” in the muscles on the front of your shins, which could take from a few seconds to 2–3 minutes (the entire time counts as one set). Start with 1 set and build to 2 or more.

This is a more intense version of the strengthening from seated toe-taps.
1 Sit on the floor with one leg extended in front of you, the other leg bent at the knee. Attach a resistance band around the top of your foot (extended leg) and anchor it to a secure object. Put your hands behind you, palms down, for support. Start with your foot angled forward.
2 Pull your foot back toward your shin. When you can’t pull it any farther back, slowly return your foot to its starting position. Do 5–10 reps with each foot.
With medial shin splints (also known as “medial tibial stress syndrome”), you’ll feel sharp pain along the inside of your shin(s). You can usually run through the early stages of medial shin splints, but be forewarned that this injury tends to worsen, often to the point where running becomes impossible (in worst-case scenarios, this syndrome is a precursor to a stress fracture). You’ll want to start injury-prevention exercises at the very first inkling of pain.
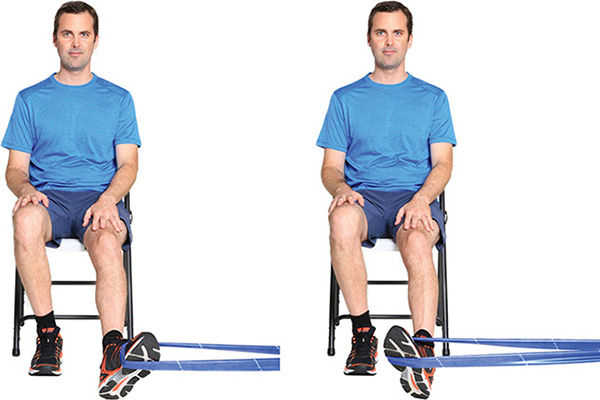
This is the best exercise for both preventing and treating medial shin splints.
1 Sit in a chair with one end of a resistance band secured to an anchor (or other secure object) at ankle level. Loop the band’s other end around the arch side (inside) of your foot.
2 Keep your knee facing forward and your heel on the floor as you pull your foot inward (i.e., limit motion to your lower leg). When your foot reaches its maximum range of motion, slowly return to your starting position. Do 5–10 reps with each foot.
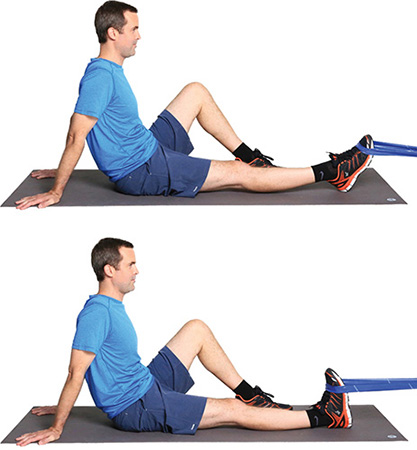
This is another good exercise for preventing and treating medial shin splints.
1 Sit on the floor with one leg extended in front of you, the other bent at the knee. Loop a resistance band around your foot (extended leg) and apply pressure against the bottom of your foot by pulling the band toward your torso.
2 Push your foot forward—holding the band taut to provide resistance—until you reach your maximum range of motion, then slowly return to your starting position. Do 5–10 reps with each foot.
A side stitch is a sharp pain that runners generally feel just beneath their rib cage (usually on the right side, but it can occur on the left as well—and also less frequently in other regions of the abdomen). Far from a minor ache, a side stitch can be completely crippling when it occurs during a training run or a race. While the cause of side stitches has yet to be definitely determined, several theories have emerged. For a long while, the operating theory was that stitches were the result of a spasm of the diaphragm. Recently, a new culprit has emerged: irritation of the parietal peritoneum; this occurs when core muscles grow tired, causing back muscles to exert pressure on nerves that cause pain in the abdomen and side. Less-credible theories put the blame on breathing patterns, diet, dehydration, and fitness. My personal favorite trick for combating side stitches (not illustrated) is four-step breathing: First, inhale twice in succession (without exhaling), taking the two breaths in sync with two strides and filling your lungs to maximum capacity; next, purse your lips and blow out intensely for two more strides; repeat for thirty to sixty seconds. Four-step breathing helps relieve the tension (regardless of origin) that fuels stitches.
You’ll often see runners performing a mix of these exercises to provide relief from a stitch.
1 First, with your hands on your hips, bend sideways away from the side of the stitch. Hold for a few seconds.
2 Next, try bending forward while grabbing your side (pinching the point of the stitch between thumb and fingers). Hold for a few seconds. While you’re trying these exercises, practice deep breathing: Take slow, deep breaths, inhaling and exhaling fully.
Since a fatiguing core is thought to be behind stitches, it can’t hurt to add a couple of core exercises to those you’ll already be doing as part of your post-run routine.
1 Start with a set of “bird dogs.” Get on all fours, with your spine straight through your neck and head.
2 Lift one arm and the opposite leg, extending the leg straight back and reaching forward with your open palm. Hold for 5–10 seconds, then repeat 5–10 times (or as fitness dictates).
3 Next up is a “side bridge.” Begin by lying on your side, resting on your forearm, hip, knee, and foot with your legs stacked, your other hand on your hip.
4 Lift your hips from the floor until your spine is straightened, with your weight on your forearm and feet. Hold for 5–10 seconds, then repeat 5–10 times (or as fitness dictates).
Stress fractures are tiny cracks in bone. Runners are especially susceptible to them during periods of increased training intensity and volume (e.g., at the very beginning of new running programs). During these periods, your body digs out tiny pockets of old, weak bone so that you can replace it with newer, stronger bone, leaving you with porous bone that’s more likely to fracture. (This is a good reason to schedule only incremental increases in training!) If you suspect that you have a stress fracture, you should see a podiatrist, orthopedist, or other health professional. Stress fractures most frequently occur in the feet (metatarsals) and the lower leg (tibia), but they can also occur in the femur, pelvis, and anyplace where training puts excessive stress on bone. You’ll have to stop running while the fracture heals—and be prepared for a walking boot or cast.
BEGINNING THE SECOND OR THIRD WEEK of your program, you can start to incorporate sessions of resistance training into your weekly schedule. Start with two sessions, and then only add a third session if your schedule allows (i.e., if you’re not too fatigued from the running and resistance training you’re already doing). As your running volume increases, you may choose to scale back on the number of strength sessions per week, with competitive runners performing only a single session per week. For your initial sessions, you should include the following eight exercises. You’ll also find an additional nine exercises listed (along with page numbers for photo instruction); after you’re comfortable with the initial exercises, you can add these additional exercises to your routine—one or two exercises at a time. Five quick guidelines:
1 Start with no more than a single set of each exercise for your first week of training (some runners will stay at 1 set for several weeks). After that, you can add 1 set per week, up to a maximum of 3 sets. Never add sets if you’re sore from the previous workout.
2 Add free weights (e.g., dumbbells and barbells) to exercises when a session including 3 sets becomes too easy.
3 Never do resistance training on consecutive days; you need at least 1 recovery day between sessions.
4 Allow 2–3 minutes between sets.
5 Perform resistance training after running, not before. Or you can do your resistance training at a different time of the day than your running.
Always remember that, as a runner, your resistance-training goals are governed by a commitment to all-around strength. You aren’t a bodybuilder, and you aren’t an Olympic power lifter. Don’t train to exhaustion. A moderate effort level will produce the best results.
Note: Some of the following exercises also appear in the injury-prevention exercises photo instruction. In those instances, the photo instruction is being reproduced here.
The following eight exercises should be included in the initial routines of all runners.
Air squats strengthen your quadriceps, hamstrings, and glutes.
1 Stand straight with your feet hip-width apart, arms straight out from your shoulders. Your toes should be pointed slightly out (this keeps pressure off your knees during the squat and also helps prevent your knees from angling inward).
2 Bend your knees, pushing your hips back until your thighs are parallel to the floor. Simultaneously bring your arms forward; this helps you to maintain balance. Push upward with your quadriceps (front thighs) to return to your starting position. Start with 5 reps, then build up to 10–12.

Step-ups strengthen your quadriceps and glutes.
1 Stand in front of a raised platform.
2 Step onto the platform, making sure that your entire foot is on the platform. Your platform shouldn’t be so high that your knee exceeds a 90° bend.
3 Rise up onto the platform, generating force with your forward (bent) leg. Use your opposite leg for balance only, letting it come to rest lightly on the platform. Do 5–10 reps, then switch legs. As you get stronger, you can add weight by holding dumbbells.
This is a great exercise for strengthening your hamstrings (and glutes) while simultaneously increasing your range of motion. It also improves balance and stability.
1 Start from a standing position, feet hip-width apart. I’d recommend using a chair or other support for balance.
2 Keeping your spine straight, bend forward at the hips while lifting the leg closest to your chair (or other support) straight behind you (it’s OK for both your knees to bend slightly) and reaching with your free hand toward the ground. If you’re not using a support, reach with both hands toward the ground. Then return to your starting position. Do 5–10 repetitions, then switch legs.
3 As you improve at this exercise, add weight by holding a dumbbell.
Side leg lifts work your hip abductors.
1 Lie on your side with your legs stacked. Rest your head on your arm, and keep your shoulders, hips, and feet in a line.
2 Lift your top leg to 45° in a smooth motion, then bring it back down. Do 10–15 reps with each leg.

Heel dips strengthen your calves, Achilles tendons, and other muscles and connective tissue in your lower leg.
Standing on the floor, rise up on your toes. Now, put all of your weight on one foot and slowly lower the heel of that foot toward the floor. At the moment your heel touches the floor, use both feet to rise back up, then repeat. Start with 2–5 repetitions for each foot. Gradually build up to 20 repetitions for each foot. Once you’ve mastered heel dips on a flat surface, begin using a platform and, when ready, dumbbells (see “Heel dips”).

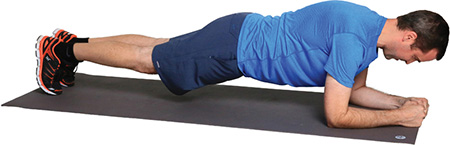
This is one of the best-known core exercises, terrific for building a stable and powerful torso.
This is basically a push-up position, except that you’re resting on your elbows. Your elbows should be directly under your shoulders, and, at the other end, you should be resting on your toes. You should also have a nice straight line (or as nice as you can get) from your head to your heels. Try squeezing your glutes and tightening your abs if you feel a little wobbly. Begin by holding as long as you can maintain the position (up to a maximum of 30 seconds). Build up to one minute.
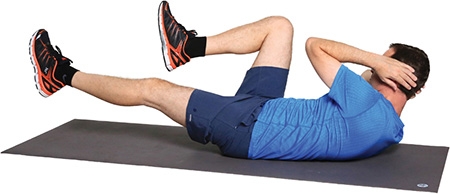
This is another great exercise for building your core, and it’s especially beneficial for strengthening your hip flexors and quadriceps, the drivers of knee lift (good knee lift is essential for fast, fluid running).
Lie on your back with your hands behind your head and your heels slightly off the floor. Now bring one knee toward your chest, while simultaneously rotating the opposite elbow toward that knee. Don’t worry if you can’t touch elbow to knee; just get as close as is comfortable. Then return that leg and elbow to their starting positions as you simultaneously perform the same action with the opposite knee/elbow. Begin with 10 reps for each side, then build up (gradually, over several workouts) to a maximum of 50 reps on each side.
This is the simplest balance exercise of all. Beginners can wear shoes. Once you can balance on one foot for 30 seconds, try it with bare feet.
Stand straight with your knees slightly bent. Lift one foot off the floor and hold it. When you can’t balance any longer, put your foot down. Do a single rep of up to 60 seconds on each side.

The following nine exercises can be added to your routine, either in addition to the exercises you’re already performing or, where noted, as replacements. You can find photo instruction for each exercise at the page indicated.