Chapter 5. Mounting Specimens
Equipment and Materials
You’ll need the following items to complete this lab session. (The standard kit for this book, available from www.thehomescientist.com, includes the items listed in the first group.)
Materials from Kit
Goggles
Coverslips
Forceps
Glycerol
Pipettes
Scalpel
Slide (well)
Slides (flat)
Stain, methylene blue
Stirring rod (optional)
Materials You Provide
Gloves
Butane lighter (or other flame source)
Carrot (raw)
Microscope and illuminator
Microtome (purchased or homemade)
Petroleum jelly
Specimen: carrot
Specimen: human hair
Specimen: pond water
Toothpicks
Vegetable oil (olive or similar)
Water, distilled
Background
You must mount a specimen before you can observe it with your microscope. Mounting consists of preparing the specimen (if necessary), placing it on a microscope slide, adding a drop of water or another mounting medium, and covering the specimen and medium with a coverslip. In this lab session, we’ll prepare and observe several types of slide mounts.
Procedure I-2-1: Making Wet Mounts
A wet mount is the simplest and quickest way to prepare a specimen for observation. To make a wet mount, simply position the specimen in the center of a slide, place a drop of water or other mountant on the specimen, and lower a coverslip into place, making sure to avoid bubbles.
The advantage of a wet mount is that it takes about 15 seconds to make one. The disadvantage is that the mount is only temporary because the mounting fluid will evaporate. In fact, using hot quartz-halogen illumination, water may evaporate after only a minute or two.
Note
To avoid the problem of wet mounts drying out, you can make a permanent mount by substituting a permanent mounting fluid for the water or other temporary mounting fluid. You can purchase permanent mounting fluids—Permount is one popular brand—from science supply vendors, or you can simply use a drop of colorless nail polish. We’ve used Sally Hansen Hard as Nails successfully. It dries more slowly than Permount, but it does eventually dry to produce a good-quality permanent mount.
Mounting a Hair Specimen
Obtain a hair specimen. You can simply snip a bit of your hair, but it’s more interesting to examine a specimen that includes the root. (It’s also interesting to compare and contrast the appearance of specimens from different people of different ages and hair colors, from the head, beard or mustache, trunk, limbs, pubic, axillary [armpit] regions, from pets, and so on.)
Use forceps to position the specimen in the center of a microscope slide. Add a drop of water, carefully position a coverslip at a 45° angle to the slide, and then lower the coverslip into place. If there are any bubbles under the coverslip, use the tip of the forceps to force them out from under the coverslip.
Place the slide under the stage clips or in the mechanical stage, and center the specimen under the 4X objective. Adjust the illumination level and diaphragm to obtain the maximum contrast. Readjust them, if necessary to obtain maximum image detail. Note the amount of detail visible in the main body of the hair versus the boundaries.
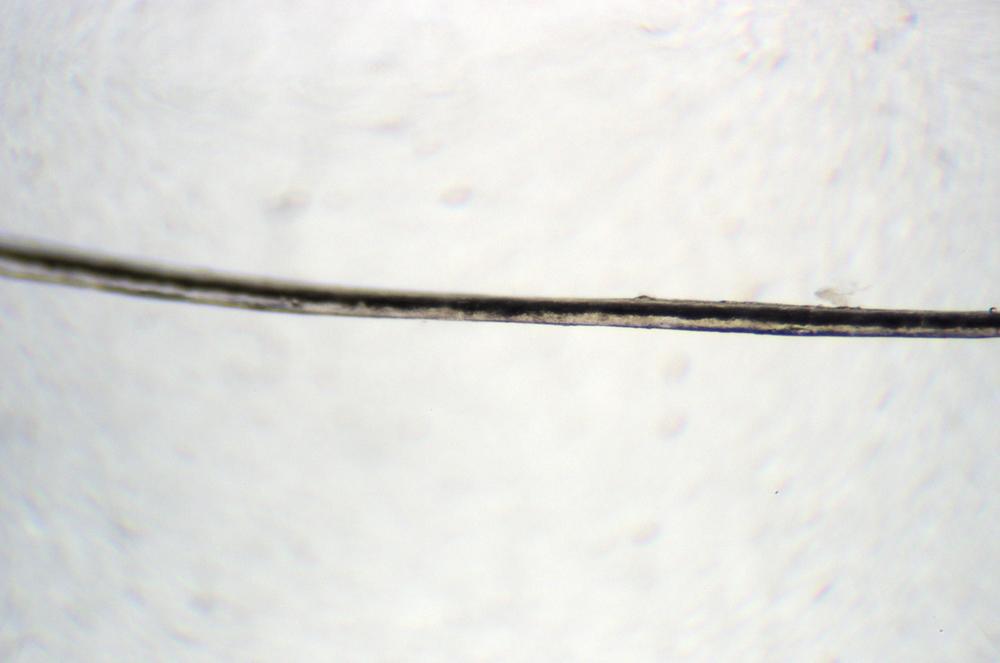
Repeat step 3 to view the hair at 100X and 400X, noting any additional detail that’s visible at higher magnifications. Record your observations in your lab notebook. Shoot an image or make a sketch, as shown in Figure 5-1, to illustrate the major structural elements visible in the hair. If you have an eyepiece reticle, use it to estimate the width of the hair and the size of any structures visible.
Retain this slide for later comparison.
Note
Because you’re mounting an entire macroscopic specimen, this method is called a whole mount, abbreviated wm. The alternative is to slice (section) the specimen, which results in a sectional mount. The types of sectional mounts are a cross-section mount (cs or xs), a vertical-section mount (vs), a radial-section mount (rs), a longitudinal-section mount (ls), and a tangential-section mount (ts). Bacteria and other individual cells are usually mounted with a smear mount (sm).
Comparing Temporary Mounting Fluids
The refractive index of the mounting fluid you use can have a major effect on the amount and type of detail visible in a specimen. The RI of keratin, a protein that is the major component of hair, is about 1.52, close to that of the glass used in the microscope slide and coverslip, but far from the 1.33 RI of water.
If a colorless solid object is immersed in a colorless liquid with the same refractive index as the object, it disappears. You can verify this with a glass stirring rod and some water and vegetable oil. Fill a beaker or other container with water and immerse the stirring rod. The rod remains clearly visible because its RI (about 1.5+) is quite different from the 1.33 RI of water. If you replace the water with vegetable oil (RI about 1.5+) the rod becomes invisible in the liquid (or nearly so) because the refractive indices of the liquid and solid object are so similar. If they’re identical, the object disappears completely. That’s why it can be nearly impossible to see bacteria or other microorganisms in water unless they are stained.
Make a wet mount of a hair specimen, but this time use glycerol (or vegetable oil) as the mounting fluid.
Place the slide under the stage clips or in the mechanical stage, and center the specimen under the 4X objective. Center the specimen in the field of view and then rotate the 40X objective into place. Focus carefully on the specimen, and then adjust the illumination level and diaphragm to obtain the maximum contrast. Readjust them, if necessary to obtain maximum image detail. Note the amount of detail visible in the main body of the hair versus the boundaries.
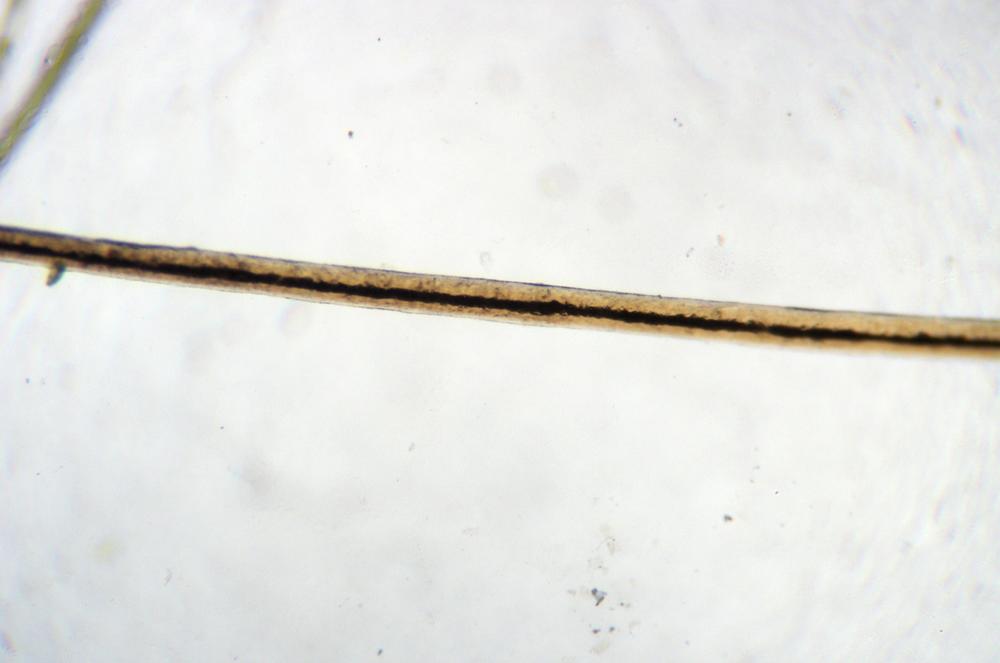
Switch to the slide you made previously, and compare the amount and type of detail visible using water as the mounting fluid versus using glycerol or vegetable oil. Record your observations and conclusions in your lab notebook. Figure 5-2 shows human facial hair mounted in glycerol.
Consider the implications of the mounting fluid you use. In the first instance, you used water, by far the most common mounting fluid used for wet mounts. In the second instance, you used glycerol or vegetable oil, whose RI is close to that of Permount and other permanent mounting fluids. The amount and type of detail differed noticeably between the two fluids. That’s why experienced microscopists generally keep a selection of different mounting fluids readily available.
Procedure I-2-2: Making Smear Mounts
A smear mount is just what it sounds like. You place a solid or liquid specimen that contains bacteria or other cells on a slide and then smear it to produce a thin layer. If the specimen is liquid, use it as-is. If it’s a solid specimen, mix a bit of it with a drop of water or another mounting fluid before doing the smear.
Transfer one drop of distilled water to the center of a slide.
Use a toothpick to gently scrape a specimen from your teeth along the gum line. Immerse the end of the toothpick in the water drop and stir to mix the solid material from the toothpick with the water.
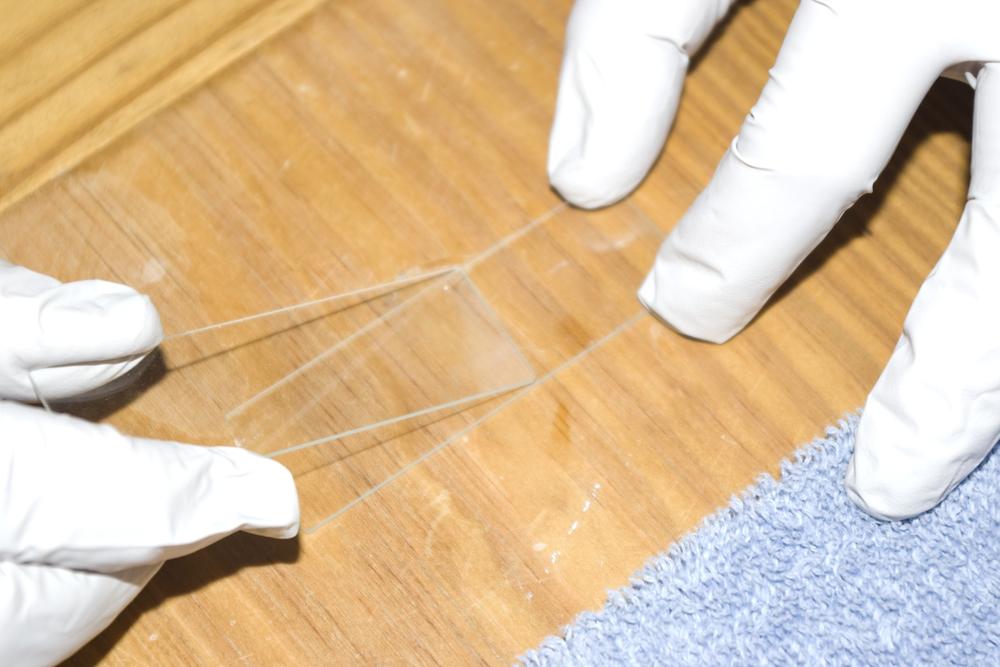
Choose a smearing tool. Some people make smears with glass stirring rod held flat against the surface of the slide. Others use the edge of a second microscope slide or a coverslip held at a 45° angle to the specimen slide and spread the specimen into a thin layer about the size of your coverslip, as shown in Figure 5-3.
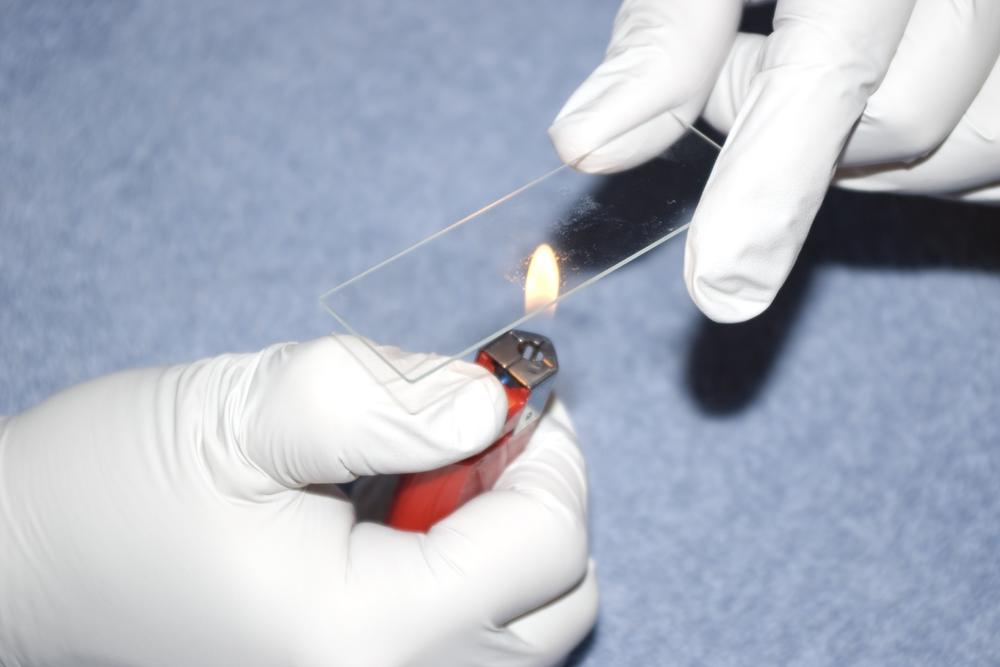
Although you can now observe the specimen, it is in a very fragile state because it has not adhered to the slide. Heat-fix the slide by passing it several times, specimen side up, through a butane lighter or alcohol lamp flame, as shown in Figure 5-4. The slide should remain in the flame for a second or two on each pass.
Position the slide on the stage, without a coverslip, and use the 4X objective to scan for an interesting area of the smear. Center that area in the field of view, and rotate the 40X objective into position. Record your observations in your lab notebook.
Procedure I-2-3: Making Hanging Drop Mounts
The hanging-drop method is used to observe living microorganisms, typically protozoa, in their natural environment. The advantage to using the hanging-drop method is that you can observe the organisms live and undamaged going about their business, moving around, feeding, and so on. The disadvantage is that some of the little buggers are fast. (You can slow them down by adding a drop of methyl cellulose or glycerol to the water.) Because they can move around in three dimensions, it can be challenging to keep them in the field of view and in focus.
You can obtain a specimen to observe anywhere you find standing or slowly moving water. Water from the edge of a pond contains an amazing diversity of microlife—even in cold weather—but if there’s no convenient pond you can use water from a puddle or a birdbath. In a pinch, you can even try water from a flower vase.
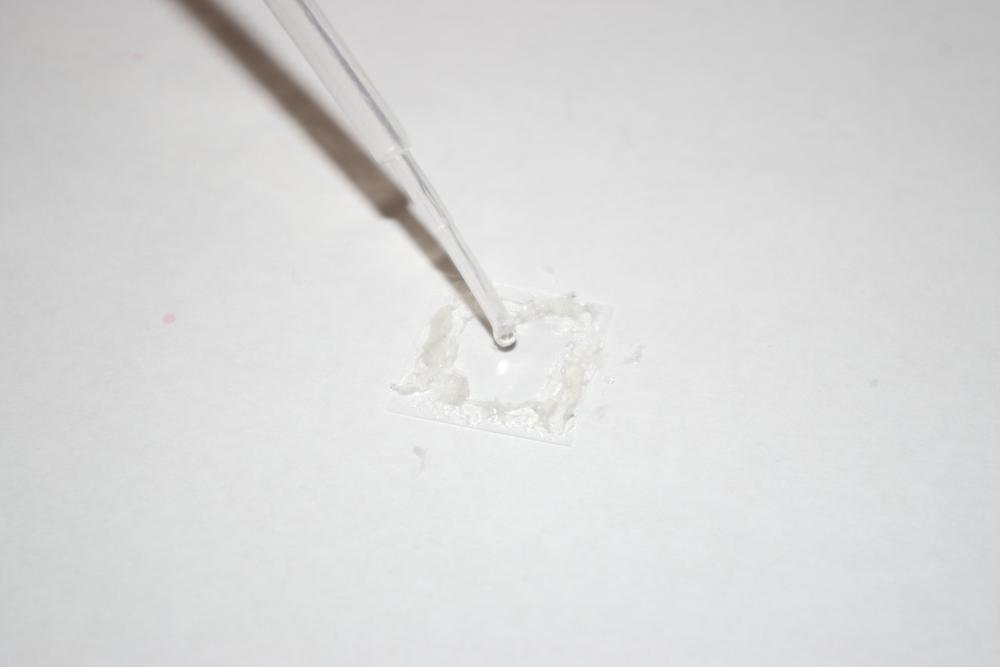
Place a coverslip on a clean, flat surface. Use a toothpick to spread a small amount of petroleum jelly along all four edges of the coverslip. Use just enough to form a seal between the coverslip and the slide.
Place one drop of the specimen in the center of the coverslip, as shown in Figure 5-5.
Invert a well slide (well down). Center the well over the coverslip and lower the slide onto the coverslip. Use just enough pressure to make sure the coverslip seals to the slide. (Don’t press too hard, or excess petroleum jelly will squoosh into the specimen area.)
Invert the assembly to put the coverslip on top. Note that the drop is now hanging from the coverslip, suspended in the well.
Place the slide on the stage, centering the edge of the drop under the 4X objective.
Adjust the diaphragm to its smallest setting and the illuminator to the middle of its range.
Focus on the edge of the drop, which should be visible as an irregular line, and reposition the slide if necessary to place the edge of the drop in the center of the field of view.
If you’re fortunate, there may be a paramecium, amoeba, or other protozoan in the field of view. If so, center it (as best you can) in the field of view and switch to the 10X objective to observe further details. Note that it is motile (moves on its own) and may be difficult to keep focused as it zooms around in the water drop.
If there are no protists visible in the field of view, recenter the field on the edge of the drop and rotate the 4X objective into position. Scan the water drop to locate one or more lifeforms, center the area of interest in the field of view, and rotate the 10X objective into position to observe it more closely. Continue scanning at low power to locate additional lifeforms, and identify as many different ones as you can find.
Procedure I-2-4: Making Sectional Mounts
Making a sectional mount allows you to view the internal structure of a specimen that is too thick, large, or opaque to view in its entirety by transmitted light. The goal of sectioning is to produce a very thin slice of the specimen, so thin that it is nearly transparent.
There may be one, two, or three sectional types possible, depending on the nature of the specimen. For illustrative purposes, assume that you are making sections of yourself. Cutting through yourself horizontally (for example, at the waist) produces a cross-section, also called an x-section, a transverse section, or an axial section. Cutting through yourself vertically, from head to foot, produces a longitudinal section, of which there may be one or two types, depending on the type of specimen.
Longitudinally asymmetric specimens, such as a person, have left and right halves and front and back halves. A sagittal section divides the specimen into left and right halves, while a coronal section divides the specimen into front and back halves.
Longitudinally symmetric specimens, such as a carrot, have no left, right, front, or back, so the longitudinal sectioning angle is arbitrary and only one type of longitudinal section is possible.
Symmetric specimens, such as a potato, can be sectioned only one way, because they have no front, back, left, right, top, or bottom. By convention, such sections are called simply sections.
In this procedure, we’ll make and mount cross sections and longitudinal sections of a carrot.
Obtain a raw carrot that is thin enough to fit the well of your microtome.
Note
If you don’t have a microtome (purchased or homemade), you can use a scalpel or single-edge razor blade to cut carrot sections freehand, although it’s difficult to get the sections thin enough—so thin that they’re almost transparent. Keep trying until you have shaved off a usable section. It needn’t be the full diameter of the carrot. Even a tiny piece is sufficient, as long as it’s thin enough.
Use extreme care when using a scalpel or razor blade to avoid cutting yourself.
Use the scalpel to cut the carrot crosswise, producing a piece large enough to fill the well of the microtome and extend above the cutting surface.
Place the carrot specimen in the microtome, oriented to produce a cross-sectional cut, and use the scalpel, oriented nearly parallel to the cutting surface, to trim the surface of the specimen flush with the cutting surface of the microtome.
Turn the microtome micrometer screw a quarter turn or so to raise the surface of the specimen slightly above the cutting surface.
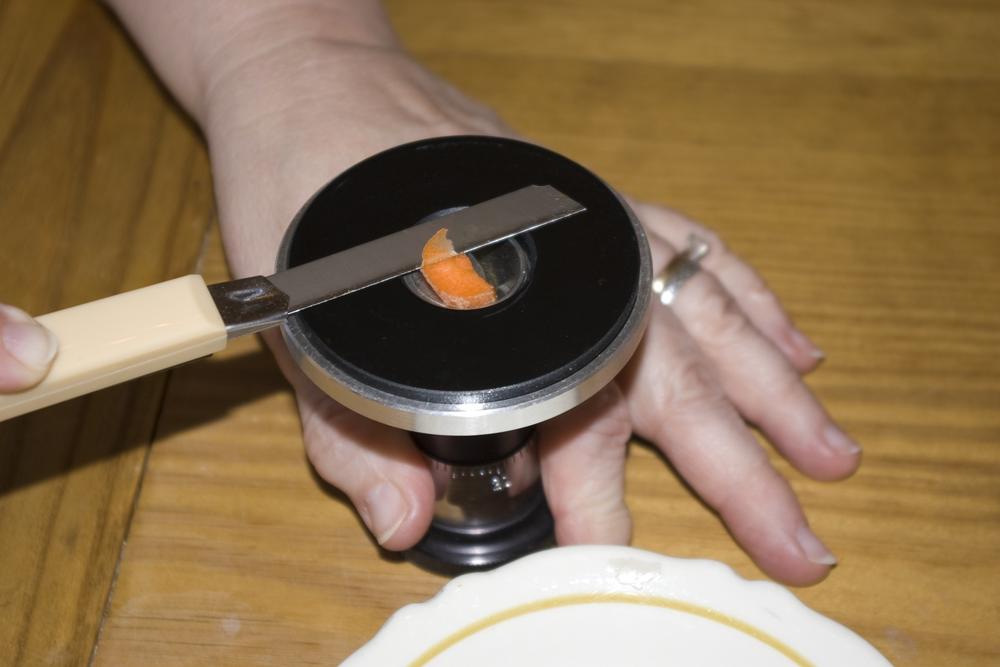
Again orient the scalpel almost parallel to the cutting surface, and cut a thin cross-section of the carrot, as shown in Figure 5-6. (It may take you several tries to get this right.)
Transfer the section from the scalpel blade to a microscope slide. You may find it easier to flush the section onto the slide using a drop or two of water from a pipette.
Repeat steps 4 through 6 to produce a second carrot cross-section slide.
To the first slide, add one drop of water and carefully lower a coverslip into place, making sure there are no bubbles. (If there are bubbles, press gently on the coverslip to expel them.) To the second slide, add one drop of methylene blue stain, allow it to work for 30 seconds or so, and then use the corner of a tissue or paper towel to draw off the excess stain. Add one drop of water to the specimen and put a coverslip in place.
Observe both slides at low, medium, and high magnification. Record your observations in your lab notebook.
Repeat steps 2 through 9, using a piece of carrot oriented to produce a longitudinal section. Compare and contrast the stained cross-section and longitudinal-section slides and record your observations in your lab notebook.
Review Questions
Q1: What are the advantages and drawbacks of wet mounts?
Q2: Why might you use a mounting fluid other than water for making a wet mount?
Q3: What are the advantages and drawbacks of a hanging-drop mount?
Q4: How would you slow down fast-moving live microorganisms to make it easier to view them?
Q5: Why might you make both cross-sectional and longitudinal-sectional mounts of a specimen?
Q6: If a forestry company cuts down a tree, which type of section are they performing? If they cut that tree trunk into long planks, what type of sectioning are they doing?
