• 10 •
Aging Rooms, Cellars, and Caves
Nothing quite conjures up a romantic, gastronomic response when talking about fine cheese like the term “cave-aged.” The consumer’s mind is immediately transported to a cool, limestone vault where wheels of cheese sit aging on wooden planks—even if the reality is an aboveground walk-in cooler with wire racks and a complicated refrigeration system. While I personally have a bit of an issue in referring to such a system as a “cave,” the term is becoming accepted usage in describing any space dedicated to aging cheese. (It’s similar to the practice of calling a wine storage room a “cellar” even if it is not underground.) For this book, however, I will refer to any aboveground aging space as an aging room and any underground space (created by humans) as a cellar or cave. Call it what you will, the proper building of a functional aging space can add both tangible and intangible value to your cheese.
The type of cheese you choose to make will dictate the design of the aging room. Some cheeses will also require a drying room for the first phase of aging. (Drying rooms are similar to aging rooms but usually have a lower humidity and greater air flow.) The drying room can also contain brine tanks (instead of the aging room). I will not talk about drying rooms as a separate topic in this chapter, as the design issues and equipment will be the same; only the application will differ.
I will approach the topic first by discussing the “big three” issues facing the affineur (cheese-ager): temperature, humidity, and air flow/movement. Then we will go over design, equipment, and construction options. Finally, we will discuss some unmentionables, such as cheese mites, that might be a future obstacle for you and your cheese.
AGING ROOM RESOURCES
A very fine, in-depth study of aging room options was done by Jennifer Betancourt with help from Amanda DesRoberts in their SARE Farmer Grower Grant publication Current Options in Cheese Aging Caves: An Evaluation, Comparison, and Feasibility Study. You can access it on Jennifer’s farm website at www.silverymooncheese.com or via a web search. A lot of thought and work was put into this publication, and it is well worth studying. Also, Jim Wallace, with New England Cheesemaking Supply, and private consultant Peter Dixon have both documented many of the steps needed for cave and aging room construction—Jim on the company’s website (www.cheesemaking.com; click on Aging Help in the Help section) and Peter through his own publication Farmstead Cheesemaking (available in back issues) and his writing in books and for the periodical CreamLine.
The Aging Room: The “Big Three” Design Issues
When designing an aging space, there are three main factors to consider: temperature, humidity, and air (both air exchange and movement). Each of these factors will be influenced by the volume and type of cheese being aged; your area’s native influences (weather and soil/earth stability and properties; also, if your building is underground); and the building structure and size. Because of the uniqueness of each building situation, there is no single book or guide that will be able to accurately tell you the perfect design for your aging space. By understanding the requirements for a good aging room, however, you will be able to evaluate the options for your space and successfully design a satisfactory aging room.
By understanding the requirements for a good aging room,
you will be able to evaluate the options for your space and
successfully design a satisfactory aging environment.
Temperature
Most cheeses age beautifully at between 50° and 55°F (10° and 12.7°C). Certain cheeses, however, such as bloomy-rind types (e.g., Camembert and Brie) and Emmentalers (eye-formation cheeses), will have unique needs at different stages in their maturation. It is obviously very important to know what type of cheese will be inhabiting your aging space. Quite often cheesemakers will have more than one aging room, even if one is a walk-in at 55°F (12.7°C) and one a commercial refrigerator at 38°F. While many people simply plan on using mechanical, power-thirsty compressors to cool their space, if you plan well you will be able to greatly reduce, and perhaps eliminate, the need for equipment that will affect your profit margin by raising energy usage costs. I have written each of these sections under the assumption (and hope) that cheesemakers will attempt to design a system that is as energy efficient and environmentally friendly as possible.
Often an aging space is constructed that can maintain a constant, year-round temperature in the acceptable range for aging cheese. But then, once that room is filled with cheeses, an additional cooling source must be added. The fact that aging cheese actually generates heat is often overlooked. The enzymatic processes occurring within aging cheese cause the release of energy, thus creating heat—which is all fascinating, but what does it mean for you as the affineur? According to author Jean-Claude Le Jaouen in his book The Fabrication of Farmstead Goat Cheese, one ton of ripening cheese will release between 1,000 and 3,000 calories of heat every 24 hours. Just what is a calorie? One calorie is what is required to raise one liter of water by one degree centigrade (1.8°F). So let’s say you have aging space for two hundred 10-pound wheels (that is exactly one ton of cheese). Even though it won’t all be going through the same stage of enzymatic activity at one time, let’s assume that it is releasing 3,000 calories every day. You can see how, over time, you will have a temperature increase in your aging space that could be detrimental to your cheese. So even if your structure is able to maintain a constant 55°F temperature when it is empty, you will not be able to hold that temperature without some sort of cooling assistance once the room is filled with cheeses. Remember to do your calculations based on the maximum amount of cheese your room can hold; otherwise you will be in for an unpleasant surprise at the worst possible time—when you are at maximum capacity.
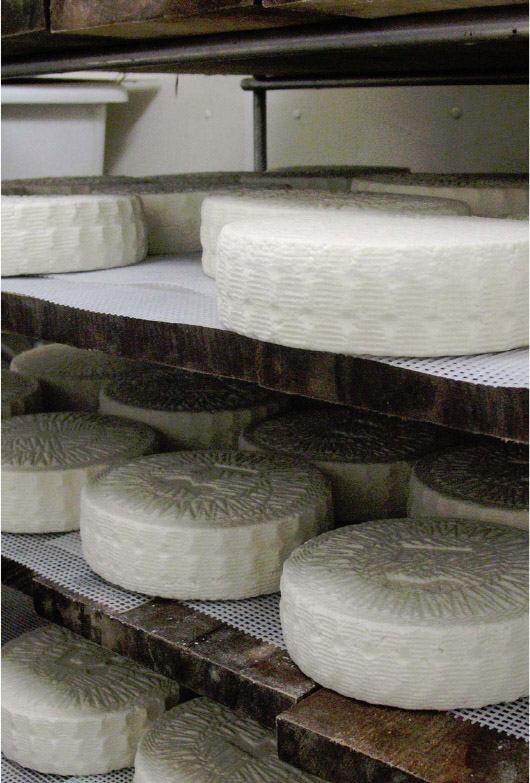
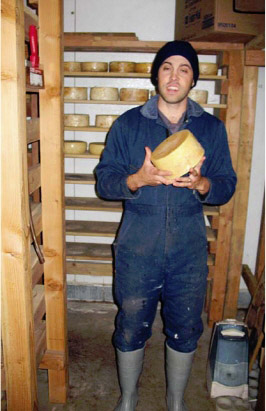
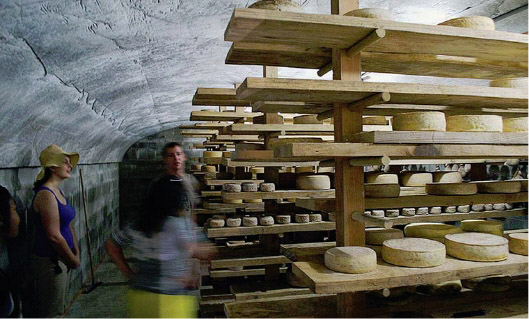
Young cheeses aging at Consider Bardwell Farm, Vermont.
The fact that aging cheese actually
generates heat is often overlooked.
Several other factors can influence your aging space’s ability to maintain an optimal temperature without excessive need for mechanical cooling. These include temperature fluctuations for your area (especially night-to-daytime differentials); soil thermal potentials, in both R-value (insulation capability; see sidebar) and thermal mass (heat-storing capability); site location (north-facing being ideal); and even shading from trees and cooling masses of green surface plantings.
You can use the Internet to search for temperature records for your area. Finding out average highs and lows (both daytime and nighttime), as well as record highs and lows, will help you anticipate the possible temperature fluctuations and plan for them adequately. Sustained highs or lows without a nighttime variation will make it more difficult to recover an appropriate temperature for your cheese. For example, if your daytime summer high is 98°F (like it gets where we live) but your nights cool off to the mid-50s, you have a good chance of storing some of that coolness in thermal mass in your building. But if that same thermal mass is exposed to the hot sun all day (say your aging room faces south), then it will be more difficult to maintain an adequate aging temperature. (More about thermal mass later.)
If you are building an underground aging space, the material you cover it with will affect your temperature control. Soil, according to one source, has an average R-value of 0.25 per inch. (Solid granite has an R-value of 1.0 per inch.) So 5 feet of soil covering your aging cave will give you a value of about R-19. But soil’s other property of thermal mass will allow you to hold temperatures for longer (traditional fluffy insulation, by contrast, has a very low thermal mass). This can work for you, or against you, depending on what is happening that might heat up the soil or rock. For example, I have seen some beautiful aging cellars that are faced with stone, but when exposed to the sun all day, the stone heats up and transfers much of that heat to the structure behind it. This is why it is ideal to face the aging space north (no direct sun) and/or plant shade trees or vines to help keep that thermal mass from building up too much heat during the hotter parts of the year. You can also use these properties to help warm a too-cold cellar during the winter, by making sure that those shade trees and vines are deciduous—when they lose their leaves in the winter, the rock and soil will be exposed to the warmth of the sun. This is why it is so important to know the temperature extremes for your area before you decide upon the material and orientation of your cheese cave.
R-VALUE EXPLAINED
R-value is the ability of a material to resist the transfer of heat (or cold, for that matter). A single layer of window glass has an R-value of 1. Most homes rely upon high-R-value insulation to prevent heat loss through walls, attic, and floor space. Wood-framed (stick) structures have insulation blankets (batts) placed between the wood framing members (or loose insulation fill pumped into the open bays between the wood). While this insulates the open space well, each wood framing member will have a much lower R-value, allowing for heat loss and gain in an otherwise well-insulated wall.
Nothing says your aging space has to be in a separate building. Many fine aging rooms are attached to the cheesemaking room or to a farm store, or located underneath the main creamery. Whatever your approach to the space, you will want to optimize the materials selected as well as create enough space to house the maximum amount of cheese you plan on aging at any one time.
Volume of product is the main concern when determining the size of the aging space. Not only will you need room for the cheeses, but you must leave enough space behind and between shelves as well as between cheeses to allow for air flow. Large wheels will optimize space better than small ones. So before you decide on the size of the room, sit down and figure out your approximate volume of cheese (in pounds or wheels) and how many shelves you will need. Then you should be able to determine what size room you will need to accommodate that volume. Be sure to allow for some extra shelf space for times when production is high or outflow of product is low. Also, don’t forget to factor in room for brine tanks!
When constructing your aging room, it is almost impossible to build it with too much insulation (there’s that “R-value” again). In residential “conditioned” spaces (meaning spaces that have heating and cooling controls), most heat loss is through poorly insulated ceilings, leaks around windows and doors, and thermal mass that works against the desired temperature goals (such as concrete slabs).
Here is a perfect example of thermal mass working against the cheesemaker’s goals: We thought we had planned out our first aging room very well. We situated it totally interior (meaning none of its walls were exposed to the outside), did not run any of the hydronics (in-slab hot water heating system) close to the space, filled the concrete block walls with pelleted insulation, and provided a wine cellar cooling unit sized properly for the space. It worked great until the really hot part of summer hit—over 100°F for several days. Then we watched in horror as the cooling unit worked nonstop and the temperature continued to creep up. Vern took his handheld infrared temperature sensor and aimed it on the walls and floors. Even though the slab in the aging room was not directly a part of the slab outside the room, the sensor’s probe clearly showed the cool leaking out of the room and the heat creeping into the room via the slab. So the lesson is, don’t discount any building material that will act as a reservoir for heat or cold. Choose materials appropriately to work for you, not against you. (More on building material options later in the chapter.)
So what did we do to fix our little problem? We waited until the following winter, moved all of the cheese out of the room, and basically made the room smaller. We added a layer of rigid foam insulation (with an R-value of 14) to all of the walls and covered that with fiberglass-reinforced panels (FRPs). We didn’t change the floor or ceiling, figuring we could do that later if this was inadequate. Now the aging room cooler runs only during the hottest of days. As the wine cellar cooler we use to chill our aging room vents directly into the cheese make room, we also have a window air conditioner that we run during those same time periods. If this room gets too hot, then the cooling unit cannot function at its optimum level.
Other factors, such as heat from lights, fans, and even your body, will add to the temperature control challenges of an aging room. Using cool bulbs, such as compact fluorescents, and limiting your time in the aging room will help. (For example, putting your cheeses on a cart and taking them to a separate room for rind care, instead of performing that work in the aging room, will help keep heat contributions from your body to a minimum.)
Humidity
Relative humidity (referred to as simply “humidity” throughout this book) is as important to cheese aging as temperature, but easier to control. As noted with temperature, humidity goals will vary depending upon cheese type, but most will require humidity levels between 85 and 95 percent.
Without the proper level of moisture (called available water), the bacterial and enzymatic processes that must occur during cheese aging will come to a screeching halt and your cheese will, to put it bluntly, die. So the cheesemaker who is also the affineur must know the ideal humidity required for his or her cheese type. For some cheeses this will not be the same throughout the entire aging process, so either you will need a way to change the humidity, or you will need two separate aging spaces.
RELATIVE HUMIDITY (RH) EXPLAINED
The amount of water vapor that air can hold at a specific temperature is called relative humidity. When air reaches 100 percent humidity, it is fully saturated and condensation will occur. Warm air can hold more moisture than cold air. For example: If your aging room is 55°F and 85 percent RH and you decrease the temperature, the RH will go up because the amount of moisture the cool air can hold is lower. (Here is an experiment I like that demonstrates relative humidity: Take an airtight container at room temperature and normal humidity, close it tightly, then place it in a freezer. After a few hours, open the container—you will find that ice crystals have frozen to the lid. The colder air could not hold the moisture and it condensed out as ice crystals.) This is why it is typically easier to maintain humidity (meaning RH), all other factors being equal, in cooler climates. (Not to mention that when refrigeration equipment runs it removes moisture from the air.)
As with weather patterns, you should be able to look up humidity ranges for your geographical location. Some of us live in areas where winters are cold and dry, others where winters are cold and wet. Knowing the seasonal variations for your area will help you anticipate the needs for your space.

A psychrometer for measuring relative humidity by comparing the difference between readings from wet and dry bulb thermometers.
The same features of a building’s structure that aid with temperature control will also assist with humidity control. A well-insulated building that does not have a temperature difference between the interior surfaces and the air in the space will not likely have condensation problems on the walls and ceilings. I will talk more about this in the equipment section, but just think of a glass of ice water in a warm room with droplets of condensation beading up on the glass—you don’t want this to occur in your aging room! Water in the air is good—but not on the walls and ceiling where it could drip on your cheeses. Aging rooms built under living spaces (which are kept warmer than the aging space) and not adequately insulated will have this problem, as will cellars where ice water is pumped through radiant tubing in the walls. The material used to construct the walls and floor can have a great impact on relative humidity in the aging room. Brick walls are probably the ideal, as brick has the best potential for absorbing and releasing moisture without having condensation issues. Brick structures are much more readily accepted in Europe, but you might be able to at least make a case for a brick-paved floor in your aging space.
Water in the air is good—but not on the walls and
ceiling where it could drip on your cheeses.
Air
Cheese needs both air movement and air exchange to age properly. I have tasted (and smelled) cheeses at competitions that were obviously not aged in adequately ventilated spaces. Musty cellar odors are not what your cheese should exude. Remember to think in terms of both the rate of flow (movement of air across the cheeses) and the volume of exchange (how often the entire air volume in the room is replaced with fresh air). Of course, the more air you exchange, the more challenged you will be to maintain steady temperature and humidity!
Some cheeses need more oxygen in the beginning stages of ripening; others produce ammonia gas and carbon dioxide during ripening. These cheese types, especially when you have a large volume in proportion to the space, will require some means to exchange the “used” air with fresh, clean air.
Air quality and movement are not the only factors you need to keep in mind for the aging room—you also need to think about what is in that air. There are certain molds and bacteria that cheesemakers want to encourage in the aging room space; however, there may be times of the year when you will have to deal with unwanted spores entering the fresh air supply. Very few of us will be able to build a totally controlled, airtight, positive-pressure aging room. But never fear, this does not mean the demise of the cheese, only the unlikelihood of producing a uniform, possibly uninspired product. Most artisan cheesemakers learn how to deal with unwanted surface molds through various affinage techniques.
An oversized room will have fewer air issues than a small, overcrowded aging room. There must be adequate airspace both behind shelving as well as between cheeses to allow for air circulation. For optimal, natural air movement in the aging room, vaulted ceilings are the best (although most costly) choice. Locate shelving several inches from the wall surface to facilitate airflow along the walls and also to keep cheeses away from any moisture that might accumulate on wall surfaces. If adequate air movement is not achieved (placing thermometers at different levels in the room will help you determine this), then a small fan (not blowing directly on the cheeses) can assist with air movement. Again, the more cheese you have in the room, the more impedance there will be to air movement—so be sure to monitor the stratification of air in the room as your aging room fills with cheese.
Design, Equipment, and Construction
Now that you understand the three most important issues that affect your aging space—and what you can do about them—you can more readily choose the other options and features of the aging space, such as floor plan, cooling (and possibly heating) options, humidifiers, shelving choices, and construction material options.
Floor Plan and Utilities
The single most overlooked floor plan feature in many cheese cellars and caves is an antechamber—a room you enter before you enter the aging space. The antechamber/entry room (we won’t call it a mudroom!) will serve first and foremost as an airlock and thermal barrier that will help keep the aging room from experiencing fluctuations in temperature and humidity. The best antechambers have at least one sink, a place to change shoes and hang lab coats, and temperature and humidity charts for documenting proper aging temperatures (part of a good quality assurance program; more on that in chapter 12); in addition, they offer access to any mechanical systems necessary for your aging room. Many people also install a window between the antechamber and the aging room, to allow visitors a peek at the cheese without having to enter what should be one of your most protected rooms. When I interviewed people who have built caves and cellars that are not attached to their cheesemaking facility, the number-one thing they would change about the design was to add an entry room and provide a sink for washing, shelving, etc.
CEILINGS: TO VAULT OR NOT TO VAULT?
Most cheesemakers and affineurs will agree that, all other things being equal, a vaulted ceiling is preferable to a flat ceiling. This type of configuration has two main advantages: Airflow is improved, by allowing for a natural, circular flow; and any condensation on the ceiling is less likely to drip onto cheeses but will instead run to the sides and down the walls. Then there is that romance factor. Along with wood shelves, a vaulted ceiling in your cave or cellar oozes old-world charm. On the downside, a vaulted ceiling will increase the cost of construction considerably. I would suggest investigating the options for vaulting, while keeping in mind that plenty of wonderful aging spaces have flat ceilings, not dripping with moisture, out of which have come some of the most acclaimed aged cheeses in the U.S.
When considering lighting for the aging room, choose vapor-resistant, shatterproof fixtures (just as you did for the milkhouse and make room). Also remember that lighting will create heat, so whenever possible, select compact fluorescent or other “cool” light bulbs.
In the main aging room, calculate space for shelving, including a gap along the wall, as well as comfortable working space between shelves. If you will be transporting your cheese to and from the room on a cart, make sure you have enough space to maneuver without running into shelves. And don’t forget to provide space for brine tanks, unless you will be using a cooled, freestanding brine tank in your make room.
Equipment
Now that you have an idea of how you want your aging room space to look and feel, what equipment will you need to put in it? While we introduced you to the importance of the “big three” design issues earlier—temperature, humidity, and air—let’s look at some items that will help you address these issues and prepare your aging space for ripening cheese!
Coolers
You will have several choices for mechanical cooling assistance, should you need it for your aging space. Typical choices include traditional refrigeration units (often referred to as condenser/compressor units), floral cooling units, Burch Industries egg room coolers, wine cellar cooling units, chilled water lines, and window air conditioners with a CoolBot (more on those later). The important issue with any unit is customizing and optimizing it to meet your cheeses’ needs without excess energy loss/ waste and/or undue financial investment.
“LOW-VELOCITY” COOLING
The key phrase with any of these cooling units is “low velocity.” In a nutshell, it is the velocity of the air moving over the cooling fins, or coils, combined with the compressor’s capacity that dictates the amount of humidity removed from the air. Maybe a bit too technical for most of us (me included), but when your heating, ventilation, and air conditioning (HVAC) specialist starts spewing information, perhaps the glaze-over will be minimal! Suffice it to say that any system not specifically designed to cool and condition cheese—as opposed to something else—will have technical issues to overcome.
Refrigeration units are designed to—guess what?—refrigerate, so if you are aging at refrigeration temperatures as well as waxing, vacuum-sealing, or otherwise protecting your cheese from drying, this type of cooling will work well. But if you are aging at warmer temperatures, 55°F being the most common, then modifications will be required to maintain proper temperature and humidity. Refrigeration equipment should be selected with the assistance of a qualified heating, ventilation, and air conditioning (HVAC) specialist or manufacturer of appropriate units.
Egg coolers (the only U.S. manufacturer is Burch Industries; see appendix A for contact information) are similar in look to condenser/compressor refrigeration equipment except that they are designed to keep eggs at either 50°F and up or 45°F and up (depending on whether the eggs are intended for hatching or for table use). They can also be equipped with humidifiers and heaters. The smallest units will cool 924 cubic feet.
Wine cellar cooling units are another good option. They come in many different sizes, keep the cheese at the proper temperature, and remove minimal humidity from the air. The humidity goal for wine aging is 50 to 75 percent, but the moisture removed can usually be drained directly back into the room, depending upon the unit’s format (self-contained or split). Wine cellar coolers are quiet, efficient, and easy to install. The biggest drawback, as far as I can determine, is that the self-contained units must vent the heat removed from the aging space into a room whose ambient temperature does not exceed 80°F—in other words, a conditioned room. Otherwise the unit will have to work too hard to cool air as it goes into the aging space.
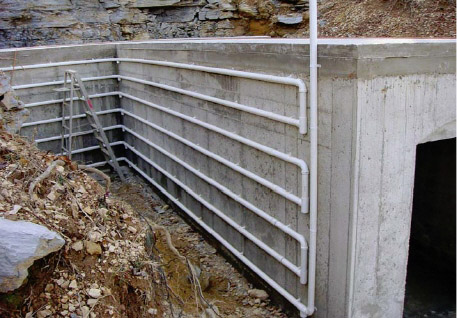
Chilled water lines can be plumbed as a part of the walls of the aging room. I have seen this done by cutting channels into rigid insulation and embedding flexible water tubing (known as PEX), and even by chiseling channels into cement block and placing the water lines in the grooves; both were then covered with a waterproof surface. Chilled water (from an ice bank or remote chiller) is then pumped through the tubing, thus cooling the walls and radiating into the aging space. The wall behind the piping should be covered with reflective insulation so as to minimize both loss of cooling to the outside as well as heat gain from outside of the room. The biggest drawback I have seen for this type of system is the accumulation of condensation on the walls. If you avoid putting the cooling pipes in the ceiling (where the condensation could drip onto cheeses), this should not be too big of an issue.

Chilled water lines in masonry wall, Consider Bardwell Farm, Vermont.
The use of window air conditioners and a CoolBot, a relatively new development, is an interesting option for cooling your aging room. Residential air conditioners are not designed—and indeed have no controls—to cool air to below 65°F, but the CoolBot is an electronic device that “tricks” a window air conditioner into functioning at cooler temperatures and, according to the manufacturer, with much more optimal energy usage. At this writing, the price of a CoolBot is about $300. Considering that you can use it on successive air conditioners (should the first unit you buy not work out or wear out), it seems like a reasonable investment. The CoolBot website advises sizing the AC larger than the cubic square feet of the space demands in order to reduce load on the motor when cooling. It is important to note that it is always better to buy any cooling unit “too large” rather than undersized, as motors will give out much more quickly when working too hard.
With any cooling unit, it is wise to have a backup, or at least a backup plan—you should know if your unit can be replaced or serviced quickly. Consider the possibility of the unit failing at the worst possible moment—what would that cost you in terms of product? Can a replacement be shipped quickly enough to prevent inventory loss? Be sure to size units correctly: If they are undersized and have to work harder than they were designed to, you could be voiding the warranty while you also shorten the system’s life span—costing you more in the long run.
What about heating the room in extreme cold climates? If you live in an area of extreme cold in the winter, you may need to provide a source of heat for your aging room. In some cases this can simply be an incandescent light bulb, since even a single 100-watt bulb will generate enough heat to warm a small space. Unless the space is extremely well ventilated, avoid any propane or kerosene heaters, as the fumes will not be healthy for you or your cheese. Small electric heaters with thermostats are another option, although most will not have a setting as low as you need for cheese aging; however, you can plug the heater into a timer and regulate the temperature that way.
Humidifiers
The most efficient way to humidify the air in your aging space will be passively—in other words, with a moisture source that is not mechanical—as any mechanical means will also generate a certain amount of heat. That being said, you may have to choose a mechanical source, should other efforts not provide the relative humidity needed for your cheese.
The most basic passive source of moisture in the air of an aging room is the simple dousing of the floor with a bucket of water. In some cases this will be enough, but in others, maybe not, depending upon the absorption ability of the floor surface and the airflow and temperature in the space. Other effective passive means include terra cotta pots filled with water, or moistened lava (pumice) rocks. You can also plumb a perforated water pipe into the room and drape a sheet of fabric over it—the water will slowly saturate the fabric, and it can then evaporate into the room.
When selecting a humidifying machine, choose cool-fog types—the most popular and effective are labeled “ultrasonic.” Instead of spitting heavy water droplets into the air (potentially causing problems on cheese surfaces), ultrasonic units dispense the water in a cool fog that does not cause excess droplets to collect near the humidifying unit. If your water is heavy in minerals, these will be dispersed in the room and form a mineral dust on surfaces. By the same token, be sure that the water supply that feeds the unit is clean and pure, as bacteria and contaminants in the water will be dispersed into the aging room. When buying a humidifier, you should be able to obtain a technical data sheet (either on the Internet or through the manufacturer) that will tell you how many watts the unit will use. If you think in terms of a light bulb, you should get an idea of both the amount of power the unit will use as well as the potential heat it will create.
Air Exchange
In small settings adequate air exchange is often accomplished simply by opening and closing the aging room door throughout the day. If you are willing to monitor your cheese’s changing needs, this can work satisfactorily. A more regulated method is to provide an exhaust fan (located near the ceiling so that warmer air will exhaust first) on a timer and a screened and louvered (with flaps that remain closed when the exhaust fan is not on) clean air intake vent. A mechanical timer can be set to provide air exchange as needed. Keep in mind that ammonia fumes will accumulate low in the space. If air movement is not adequate to stir these gases so they can exit through the exhaust vent (which, presumably, will be located up toward the ceiling), then they will not be adequately dealt with.
If you recall the principle of conduction, you will remember that hot air rises, creating air movement. This law can be utilized both to help remove heat from the aging space and to draw fresh air into the room. An exhaust chimney or duct should be installed in the room at a high point and an air intake duct at a low point. These ducts should be filtered and screened to prevent the entry of pests and dust. The low intake should be set above the level at which water from wash-down of the floor could enter the ducting.
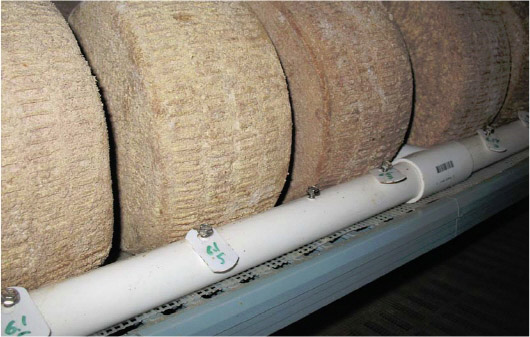
Fresh air intake piping, poured concrete aging cellar, Bonnie Blue Farm, Tennessee.
What size should the ductwork be? Most cheesemakers find that it is better to have a pipe that is too large rather than too small; 6 to 12 inches is usually adequate, depending upon the cubic feet of your aging room. Anything under this size will not likely provide enough draw to remove and replace the air in the room.
To further control the airflow, in-line or surface-mounted fans can be used. If installing a fan at either the exhaust pipe or the intake (or both), you can likely get away with smaller-diameter ductwork. Remember to look for wet-environment fans (such as for a shower), as the air in the aging room will be quite humid. Consider wiring the fan’s switch to a timer that will allow you to vary the length and frequency of operation. When utilizing an intake fan, you might consider adding an air distribution “sock” to help disperse the air evenly throughout the room. These fabric socks are available from HVAC suppliers and come in different sizes and configurations. Another method to control airflow is the use of an irrigation gate valve that will allow you to restrict the airflow when needed. Some people have mentioned using a home ventilation system to exchange air in aging rooms; however, these units are designed to sense humidity and temperature of both the interior and the exterior air, and they ventilate only when certain parameters are met. For example, one popular brand will not bring in outside air if that air would raise the interior relative humidity above 55 percent—this is designed for the comfort of humans, not cheese. I would imagine that a skilled HVAC technician could bypass some of these parameters, but you might find it simpler to control the air exchange with a timer or manually.
What about the temperature of the fresh air? When you bring outside air into your aging space, it is important to make sure that you do not introduce warm air in the summer and cold air in the winter, unless you are willing to have your cooling or heating unit compensate for this factor (at a higher cost to you). One of the most effective methods for pre-conditioning the air entering the aging room is to run long lengths of ductwork or pipe from the exterior intake underground, at a depth where the ground temperature is stable, before it enters the aging room. If you are building underground, this can easily be accomplished during construction. Piping can be laid alongside the walls, under the slab, or at any other location accessible during construction. Estrella Family Creamery in Washington even ran extra piping through a buried water vault (basically an unused septic tank filled with water) to provide additional air temperature stabilization. If done successfully, this will provide you with year-round fresh air at the proper temperature. If you cannot provide ground cooling, shunt air intake from another room that has as few temperature fluctuations as possible. This may even mean providing two air intake sources, depending upon the seasonal influences experienced by the surrounding spaces.
Shelving
Shelving options in the aging room will depend not only on what you would like to use, but upon what surfaces your inspectors will allow. Across the U.S. people are using, with their inspectors’ approval/acceptance, everything from knot-free hardwood or pine (softwood) boards to epoxy-finished or coated metal. Before we focus too much on just what the inspectors will accept, I would like to emphasize that your priority should be what is good for the cheese as well as the cheesemaker. Wood boards may increase the potential quality and romance factor for the marketing of your cheese, but will you be willing and able to keep up with the steps necessary to maintain them as a safe surface for aging a perishable product? If your cheeses will be waxed, vacuum sealed, or plastic (cream wax) coated, then you can probably age them on wooden planks without too much concern from your inspector. (Whether the wood actually adds any tangible quality to plastic-sealed cheese, however, could be debated.)
PVC pipe racking system with plastic bread-bag tags as inventory labels, Pholia Farm, Oregon.
Plastic or Chrome-Coated Wire
Plastic or chrome shelving is readily available and relatively inexpensive. It will do well for a few years, but in a very humid environment the cut ends and any tears in the plastic coating or abrasions on the chrome will rust. Also, painted metal or chrome-finished wall mounts used with these shelving systems will begin rusting rather quickly, and any wall-mounted hardware that is not stainless steel will also be vulnerable to rust.
Epoxy-Coated Wire
Epoxy-coated wire shelving is more expensive than its plastic-coated cousin but will last much longer. It can be wall mounted or purchased as freestanding shelving. Freestanding shelving of this type is usually assembled in sequence—in other words, the shelves are slid over the vertical supports starting with the bottom shelf and then moving up. This creates a very stable platform for cheeses. It also means that you will not be able to remove any single shelf (except perhaps the top shelf ) for individual cleaning. This is not an issue if you have enough space and shelves to move cheese to a new set of shelves should you need to do a thorough cleaning. And trust me, if you are making natural-rind cheeses, you will be needing to thoroughly clean those shelves!

Easy-to-clean MetroMax shelving, Pholia Farm, Oregon.
MetroMax
My personal favorite shelving is called MetroMax. Plastic, anti-microbial, snap-off grids sit on an epoxy framework. This allows you to remove portions of a shelf for cleaning without having to disassemble the entire unit, or even the whole shelf. They are the most expensive of these three coated-wire options, but in my experience, they are well worth the cost. With all of these shelf types, I recommend freestanding units that can be rearranged as necessary or removed entirely for aging room cleaning.
Wood
What type of wood makes good cheese shelving? While quite a few people are aging cheese on rather porous softwood planks, such as pine and spruce, the best choice is more likely to be a tight-grained, low-resin hardwood. Soft-grain woods are not only more porous—meaning harder to clean and more likely to harbor bacteria—but often more resinous (with pitch or sap), meaning that possible off-flavors may be imparted to the cheese. Some states that allow wood shelves still require that they be coated with a finish, such as polyurethane or wax. This greatly reduces the breathable nature of unfinished wood but still allows for the romance of the phrase “aged on wood” in your product description.
What about cleaning and maintaining wood shelves? A variety of approaches are being used in the U.S. One state requires periodic scrubbing and kiln-heating of the wood to kill bacteria. Vinegar washes (to create an acidic surface not hospitable to most pathogenic bacteria) and/or inoculating the shelves with beneficial bacteria via buttermilk or culture washes are two other techniques used to maintain a good aging surface. Wood shelves should not be scrubbed with a strong chlorine solution, as the chlorine will begin to break down the softer parts of the wood, leaving a more textured, hard-to-clean surface on the shelves.
Common wood shelving construction.
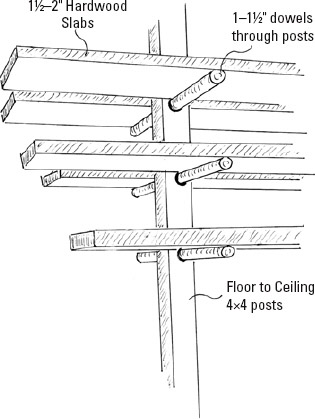
What about mounting wood shelves? One of the simplest ways to get started with wood shelves is to simply lay the boards across freestanding, coated shelving units. This has the added advantage of allowing the use of thinner pieces of often costly hardwood. When using wood alone, it must be quite thick to prevent warping and sagging under the weight of heavy wheels of cheese. Another simple approach is to build a framework of galvanized or powder-coated metal onto which the boards can be laid. Still another popular method is to install floor-to-ceiling vertical posts or poles into which holes are drilled at different levels. A long, sturdy dowel or pipe is inserted completely through this post, providing a bracket for shelving on each side (see the illustration above). There are many other creative approaches to building wood shelving in aging rooms. Whatever method you choose, keep in mind the following: ease of shelf removal for cleaning; stability of the entire unit when cheeses are placed at various places along the shelf; and rust-resistant hardware and material when building the unit.
Walter Nicolau in his walk-in cooler aging room with wood shelving, Nicolau Farms, California.
PHOLIA FARM
When we wanted to use wood shelving in a state that “doesn’t allow” wood, we worked with the state’s land grant university dairy department to prove the effectiveness of our methods of maintaining the shelves. We utilized two methods (vinegar and culture washes) on two different types of wood (myrtlewood and Pacific maple) and tracked the shelves’ sanitation by routinely sending off swabs for pathogen testing. In the face of evidence, along with the support of academia, it was rather hard for the regulators to refuse our methods. (We waited to implement this plan until we had a couple of years of proven safe product using more conventional aging methods. We felt it was important to set a track record for understanding the process before we “pushed the envelope.”)
Wood shelves should not be scrubbed with
a strong chlorine solution, as the chlorine will begin
to break down the softer parts of the wood, leaving a more
textured, hard-to-clean surface on the shelves.
Plastic Matting
You might have already seen the food-surface-approved, plastic mesh matting/ netting that cheeses are often placed on while they drain or age. You will also often see this type of matting over the top of plastic-coated/epoxy/plastic shelving as well as wood shelves. This is usually done to increase air circulation around the cheeses. Depending upon the type of cheese and how frequently the wheels are turned, this matting can help equalize the airflow around the cheese. Whether or not cheese sitting on matting over wood actually benefits much from the qualities of the wood (as with plastic-coated or waxed cheese sitting on wood) is a matter of opinion. But the matting could serve as an acceptable surface for the cheese in places where inspectors balk at having it sit directly on wood shelves.
Building Materials and Systems
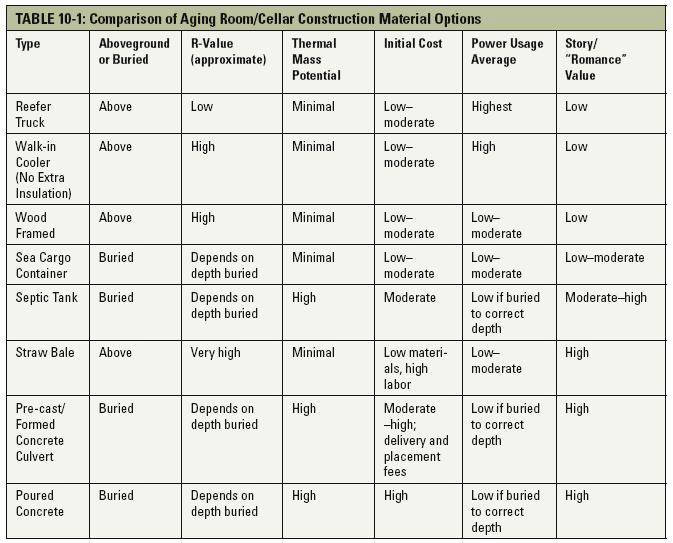
This is the fun part! When building a new, freestanding aging room, you have a lot of options (depending on what your inspectors will allow) for building materials. Choosing the right ones can be a bit daunting. In the U.S. there are aging rooms built from pre-formed concrete culverts, straw-bale construction, metal sea shipping containers, poured concrete, sprayed concrete (“shotcrete”), refrigerated (reefer) trailers, and walk-in coolers, and of course wood-framed ones as well. Whether your aging room is to be aboveground or buried will greatly influence your choice. Also, keep in mind the “big three” materials issues—cost, longevity, and the qualities the substance might bring (both tangible and intangible) to the aging process—when selecting the material that is best for you.
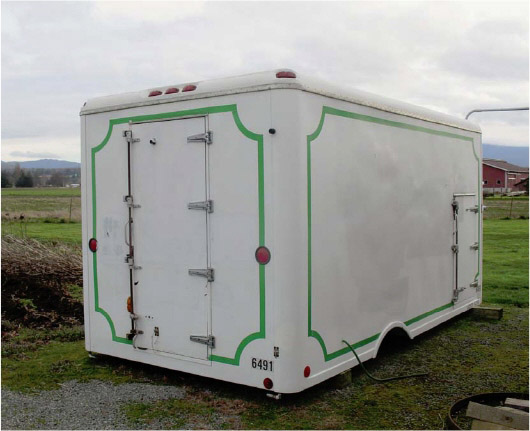
A charming, old refrigerated trailer provides aging space at Gothberg Farms, Washington.
Reefer Trailers
Let’s start with the least romantic aging space, the reefer trailer. A refrigerated truck trailer is a convenient, immediate solution for many creameries. You can find these food-ready units used and ready to go for decent prices. That being said, they are designed to refrigerate to an approximate temperature of 38°F, which is not ideal for most cheeses. They have minimal insulation and a moderate thermal mass. In other words, they will be one of the most energy-thirsty choices you could make for aging cheese. But they serve many fine cheesemakers quite well and can bridge the gap at a time when no other space is available.
Walk-in Coolers
Prefabricated walk-in coolers, with or without refrigeration units, are also easy to find new or used and quick to install. Some manufacturers will help you choose a cooling system for a walk-in that is better suited to cheese. (One company I spoke with was coincidentally asked by another cheesemaker—at the same time—for a quote on customizing a walk-in cooler to cheese-friendly standards. Evidently the salesperson thought we were playing some sort of trick on him and called us “cheese pranksters.”)
Florist Coolers
These units are basically like a walk-in cooler, but designed for storing cut flowers. While often cooler than cheese aging temperatures, the equipment is designed to maintain a higher relative humidity than most typical refrigeration equipment. Floral coolers offer limited aging space and so are more often used as an interim solution when no other aging space is available.
Wood Frame
A traditional wood-framed aging room is an affordable, easy-to-build option. If you are designing the aging room to be a part of your dairy building, try to locate it on interior walls; in other words, no wall of the aging room should be a part of any outside wall. This will greatly assist in the control of temperature fluctuations caused by climate. In addition, when pouring the slab of the building, the aging room portion should have a thermal “curtain” (a layer of reflective insulation or other material inserted in the slab between the two spaces) separating the aging room slab from the main slab, to prevent the thermal mass of the slab from influencing the temperature inside the aging room. When building the walls, choose the thickest lumber you can accommodate in the space (and afford). The ceiling should be even better insulated than the walls. As noted earlier in this chapter, the less wood framing, the better the overall R-value will be. The thickness (and R-value) of the insulation you use will be dictated by the thickness of the wall. For example, if your wall is constructed of 2 × 4s you cannot force R-19 insulation into the space, as compacting the fiberglass batts (or alternative material) will negate its insulation potential. I recommend that aging room walls be of no less than 2 × 6 construction, which will allow for R-19 to R-21 insulation. Even better would be to cover the interior of the wall with rigid insulation; the rigid insulation will help mitigate the heat transfer that will occur at each stud in the wall (see illustration).
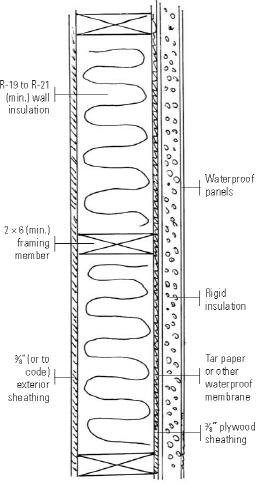
Details for framed wall construction in cheese aging room.
Ceilings can be easier to “overinsulate” if you have a flat ceiling with space above. A minimum of R-38—which requires 2 × 12 ceiling joists/rafters—is recommended. Again, applying a layer of rigid insulation will greatly reduce the amount of heat transfer that will occur. Venting the space above your ceiling and insulation will ensure that excess heat will not build up above the space.
With all wood-framed rooms, you will need a waterproofing membrane covering the wood members on the interior. Tar/roofing paper is the usual choice. Even if you are finishing the walls with fiberglass panels (FRPs), or dairy board you should further protect the wood with a waterproof membrane, such as tar paper. If you will be mounting shelves into the wood framing, use a bit of silicone caulking on each screw or bolt to keep moisture from following the hardware into the wood.
Structural Insulated Panels (SIPs)
Structural insulated panels (SIPs) are an excellent choice, when possible. SIPs are prefabricated panels of insulation and structural supports. They have a high R-value and are quick to install. All design needs, such as outlets, window openings, etc., must be determined before the panels are ordered. Finished wall surfaces can sometimes be added at the factory. The panels have a low environmental cost due to the decreased use of lumber, the lack of waste material at the jobsite, and their high insulation factor. If we had it to do all over again, as the saying goes, this is the building material we would have chosen for our creamery and aging room.
Sea Cargo Containers
It is becoming common to hear of using buried sea cargo containers as root cellars. These are large metal containers designed for transporting goods on ships. They are usually not insulated. People have discussed using these for aging cheese, as well. Indeed, at the time of this writing one brave cheesemaker I know has done so—but not with complete satisfaction. Sea cargo containers can be obtained on either coast at a relatively low cost. They are sturdy and can be insulated or even finished on the inside. If you bury one, you will need to reinforce the ceiling or it could buckle under the weight of the earth above. Because these containers were designed for heavy use in salty air, they are extremely durable even when exposed to the elements. Most certainly they are not as long lived as a poured concrete structure, but, given the cost difference, they’re possibly worth considering. A metal surface interior is not likely to be adequate for a moist aging room, however, so insulating and finishing would be advisable. Ridged or sprayed-on insulation covered by cement board and plaster would create a surface more closely resembling the properties of a poured cement building or rock cave. Because the containers are long and narrow, I would recommend partitioning off the front section for an antechamber and using the back as the aging room. Building a partition will also help support the ceiling. The entire structure can be draped with heavy-duty pond liner or, even better, liner material designed for use in septic sand filters. This type of construction, however, falls under the unproven category.
Septic Tank
Now who would associate the words “septic tank” with an appropriate cheese aging cave? But when you really think about it, what is a septic tank but a pre-engineered, underground room? If you don’t need too much aging space, and you have a manufacturer fairly close by, a septic tank can be a viable option. The biggest advantage is that they are designed to be buried; you will have no fears that the ceiling could come down on your cheese—and yourself! To get enough ceiling height, choose a large, single-compartment tank. For example, a 3,000-gallon tank (which is really two 1,500-gallon tanks sandwiched top-to-top) has a ceiling height of about 10 feet and will give you about 600 cubic feet of aging space. A door can be cut after the tank is installed (the tank will come in two pieces), or in some cases the manufacturer might create one during the pouring of the tank at the plant. Septic tanks are already considered waterproof, so you won’t need to drape or coat the structure with a waterproofing material. Remember to cut holes for water and power lines, or you can run them through the access hole on top. This method should also be considered unproven.
Septic tank root cellar, Fornaciari home, Oregon.
Septic tank root cellar, Fornaciari home, Oregon.
Straw Bales
There are a couple of ways you can use straw bales to construct an aging room. The first is to simply stack bales around the exterior of a wood-framed room or freestanding walk-in cooler as additional, cheap insulation. The bales can be left raw, if protected by the surrounding building, or finished with plaster, as in typical straw-bale construction. It is possible to build an aging room completely of straw bales, but there are a few issues that must be adequately addressed to ensure success. The number-one enemy of straw bales is moisture. The bales must be protected from exterior water by adequate roof eaves. In a residential setting, the walls are usually left “breathable” so water vapor doesn’t get trapped in the bales. Unless you are aging cheeses in plastic or wax, your aging room will be a very humid environment, so the walls must be sealed from the inside. It is possible to allow the bales to breathe from the exterior or through the top layer, but depending upon your climate and humidity, there could be problems down the road. Moisture sensors should be embedded in the walls at critical levels to monitor bale dryness over time and seasons (this is a common precaution with many straw-bale structures). At the time of writing, I know of no straw-bale aging room more than a few years old; therefore, I would advise that this construction method be approached very thoughtfully (see sidebar).
RELATIVE HUMIDITY IN STRAW BALES
A large straw-bale winery in California has extensively documented the hygrothermal (moisture and temperature) performance of its earth-plaster-covered straw-bale walls (see www.ecobuildnetwork.org). Part of the winery includes a wine barrel room where relative humidity is often 80 percent (still lower than most cheese aging rooms should be). The winery’s study showed that relative humidity within the bales surrounding this more humid room pushed the limit of what is acceptable.
Concrete Culverts
Pre-cast concrete culverts are rectangular culverts manufactured off-site, then delivered and placed. They can be ordered in many sizes, both in interior height and in length. They arrive on a semi-trailer and are put in place with a crane. They have similar advantages to the septic tank option in that they are engineered for being buried and supporting a great deal of weight, but they are much larger and a better choice for most cheesemaking operations. They are open at both ends, however, so you will still have to construct a back and front wall. Culverts can be placed side by side or intersecting.
Poured/Sprayed Concrete
Poured or sprayed concrete construction will give you the most flexibility regarding design, the longest life span, and possibly the highest initial cost. The expense comes not only from the concrete itself, but from the amount of rebar and steel needed to make it structurally sound. You may be required to have an engineer provide details as to the construction (commonly called “having the plan engineered”), which will also add cost. The weight and composition of earth fill around the cave will dictate wall thickness and thus the amount and placement of steel (rebar) in the walls.
While you may be tempted not to waterproof the exterior of a concrete aging cellar, remember that moisture can be almost as detrimental to unfinished concrete as it can be to wood. Exposure to moisture will cause the inside walls to develop efflorescence—moisture moving through the walls carries minerals that are deposited, leaving a white residue. In addition, while the aging room should be buried deep enough to resist freezing, should water enter a crack and freeze, then over time the whole building could be structurally compromised. The interior should be finished smooth and be cleanable. Ideally, you will be allowed to leave the interior unsealed to promote the establishment of an environment that promotes the beneficial microflora and microbial growth desired for cheese aging. Some inspectors will allow the use of a whitewash in place of a sealing paint. This old-fashioned paint is made from hydrated (masonry) lime, table salt, and water.
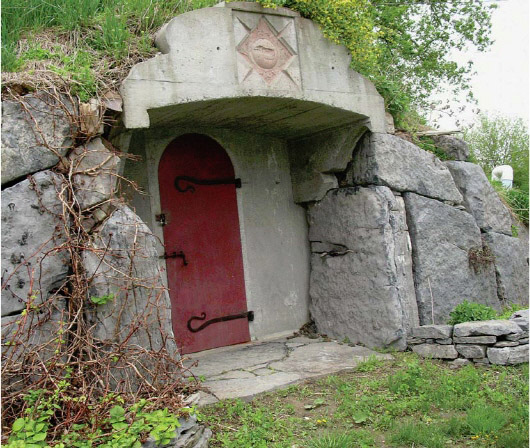
A beautifully designed front entrance for the underground aging cave at Orb Weaver Farm in Vermont.
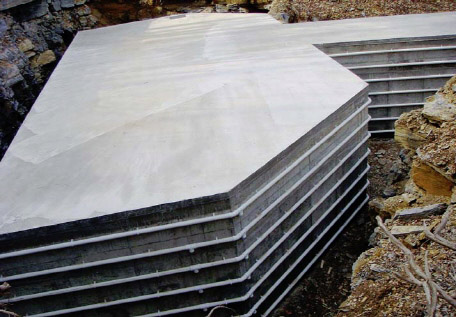
Poured concrete aging cave (“Cave Beulah”) with vaulted ceiling, Estrella Family Creamery, Washington.
FIAS CO FARM’S WHITEWASH RECIPE
Mix in a large bucket (a 5-gallon paint bucket is ideal):
• 3 large coffee cans of hydrated lime (about 12 cups)
• 1 pound or 1 small coffee can of salt (about 4 cups)
• 2 gallons of water
To mix this together, mix a little lime and salt, then a little water, then a little lime and salt, etc. If you just dump it all together it’s like stirring with a boat anchor. You should let the mixture sit overnight, but we usually just use it right away and have had no problems.
The whitewash should be fairly watery; remember it’s a wash, not a paint. Give it a stir once in a while as you use it.
To use the whitewash, just get a big brush and slop it on. Don’t worry about getting it on your clothes; it washes out very easily. It may seem like it’s not covering very well as you paint it on, especially on new pine 2 × 4s, but it will whiten up considerably when it’s completely dry, so be patient. www.fiascofarm.com
If your inspector allows you to use this type of finish, you will preserve the breathability of the walls and add some antibacterial properties (as the coating is quite alkaline). It will need to be recoated periodically.
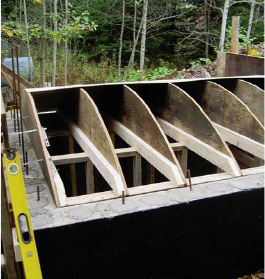
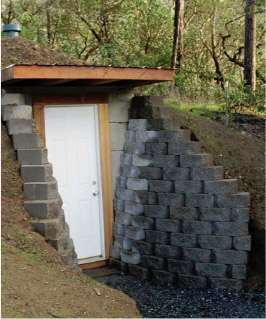
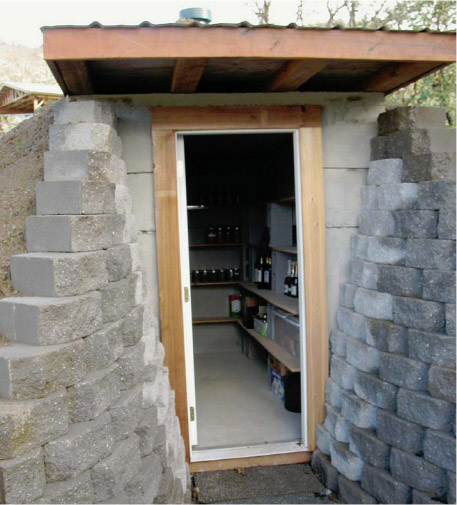
Construction of concrete masonry unit (CMU) root cellar with vaulted ceiling, home of Pierre Cloutier, Nova Scotia.
Concrete Masonry Units (CMUs)
More commonly known as concrete blocks, concrete masonry units (CMUs) are another option for building an underground aging room. CMU construction has some advantages because it is easier for an owner-builder to do and it can be done in stages. CMU walls are not as strong as poured concrete walls, however; they are more likely to have air pockets—open cells that do not get filled with concrete when the walls are filled. Engineering might be required when the wall will be retaining pressure and mass from surrounding geographical features.
Dealing with Unwanted “Visitors”
No, these are not members of the press or public sneaking into your cellar for a quick peek at the cheese; these are creepy-crawlies and other unwanted varmints that affineurs deal with but rarely discuss. While there are certain pests, such as cheese mites and cheese skipper flies, that actually seek out aging cheese, there are other critters that will just be attracted to the warm, moist environment of the aging room. A certain amount of vigilance and diligence is required to keep these unwanted visitors under control.
Cheese Mites
How do you know if you have cheese mites? The first sign of cheese mites will be a fine gray or brownish dust that you will notice on the cheese surface, the floor of the aging room, and shelves. This “dust” is made up of dead and living mites as well as their excrement (yes, mite poop). A quick way to find out if your cheese “dust” is mites is to place a small amount in a pile on a white piece of paper. If you come back in an hour and the dust has spread out, you know it has legs. Given time with your cheese, the mites will begin to pit and crater the surface. Eventually they become more than an aesthetic problem—they actually change the flavor of the entire wheel, giving it a sweetish, herbal flavor. You have probably heard that cheese mites are intentionally allowed to live and work their “magic” on some types of European cheeses, such as Mimolette.
If you come back in an hour and the “dust”
has spread out, you know it has legs.
How do mites get into your aging room? Cheese mites also enjoy feasting upon flour and grains. They can enter an adjoining or nearby building, either by being transported on a host (clothing, hair/body, flies) or by drifting through cracks . . . and eventually find your cheese. If you make aged, naturally rinded cheeses and age them for long enough, you will most likely find mites in your aging room—after they find you!
How do you deal with cheese mites? While some say that mites appear only in cellars that are too dry or too warm, in fact even refrigeration for several days does not kill them. (Don’t even ask how I know that. . .) In the past, fumigation with sulfur was used to control cheese mites, but that method has luckily fallen out of favor. Oiling or vinegar-washing of the rind will prevent or slow the progress of cheese mites. Deciding to sell cheese a bit younger has its advantages as well, since cheese mites are slow to affect cheeses under six months of age. Also, keeping the oldest cheeses at a lower level on the shelves will help prevent the mites from “dusting” the younger cheeses. I have also been told that ozone machines (air purifiers) will sterilize the mites, eventually ridding your room of the population. Such units also kill molds and other microflora, however, so this would not necessarily be a good choice when you trying to make a naturally rinded cheese.
Are cheese mites dangerous to humans? Usually not, but there are some reports of dermatitis being caused by contact with the mites. Ingesting them (again, don’t ask!) does not seem to be a problem.
Cheese Skipper Flies
How do you know if you have cheese skipper flies? Cheese skippers are named for the legless larvae’s ability to contract their bodies and launch themselves several inches into the air, essentially appearing to “skip.” The adult females (small, shiny black two-winged flies) lay their eggs in aged cheese and cured meats (quite the gourmands!). The maggots feast on the cheese, causing rapid decomposition. The larvae are fairly large, about 1/5 of an inch long. Between their size and jumping ability, and the state of the cheese when infested, it should be fairly apparent if you have a problem with cheese skippers.
How do you deal with cheese skippers? As the adults are flying insects, you can prevent their entry into the room by utilizing screens on air intakes and antechambers or double-entry doors. Hanging non-insecticidal fly strips or black-light flytraps is also recommended. Thorough, periodic cleaning of the aging room—including shelves and any nooks and indentations where puparia (after the larva has feasted, it will go into a pupal stage before hatching out as a new adult) could hide—will help prevent infestation.
Are cheese skippers dangerous to humans? Ingestion of skipper fly larvae is a cause of severe intestinal problems for humans. The larvae can live in the intestine, dining on the host’s tissue and attempting to bore through the intestinal wall. Not a good thing! It’s hard to believe that some people intentionally eat a black market cheese in Italy called Casu Marzu whose tangy, aromatic, and creamy texture is caused by cheese fly larvae feeding (with the encouragement of the cheesemaker) on the paste of the cheese.
Rodents and Other Pests
Pest control consists of commonsense measures such as tight construction, well-fitted doors and other openings, screening, and filters. If a mouse or other four-legged small pest should get into your aging room, non-poisonous trapping methods should be used, followed by a thorough cleaning and inspection of cheeses for nibbling. For flying insects you can hang non-insecticidal strips and black-light traps. Always keep in mind that not only is the aging room a cozy, moist environment, but it is also well stocked with nourishment for a myriad of unwanted visitors.
You can see that building a successful aging room is a matter of understanding both your cheeses’ needs as well as what your geography, climate, and building can offer. This is a complicated topic that is not as well researched and documented in the U.S. as it is in countries where there is a longer history of cheese-making. I imagine it will be some time before regulatory agencies, industry, and academia here come into alignment on the topic. Until then, many cheesemakers will continue to forge ahead and pave the way—through both their mishaps and their successes.