THE CLOUD, CLOUD COMPUTING, AND THE CLOUD OPTIMIZED STACK
It is only a matter of time before you begin creating applications that run completely or partially in the cloud. It’s no longer a question of “if” but “when.” Deciding which components of your program will run in the cloud, the cloud type, and the cloud service model requires some investigation, understanding, and planning. For starters, you need to be clear on what the cloud is. The cloud is simply a large amount of commoditized computer hardware running inside a datacenter that can run programs and store large amounts of data. The differentiator is elasticity, which is the ability to scale up (for example, increase CPU and memory) and/or out (for example, increase number of virtual server instances) dynamically, then scale back down with seemingly minimal to no effort. This is an enormous difference from the current IT operational landscape where differentiated computer resources often go partially or completely unused in one area of the company, while in other areas there is a serious lack of computer resources. The cloud resolves this issue by providing access to computer resources as you need them, and when you don’t need them those resources are given to someone else. For individual developers, the cloud is a place to deploy your program and expose it to the world. If by chance the program becomes a popular one, you can scale to meet your resources needs; if the program is a flop, then you are not out much money or time spent on setting up dedicated computer hardware and infrastructure.
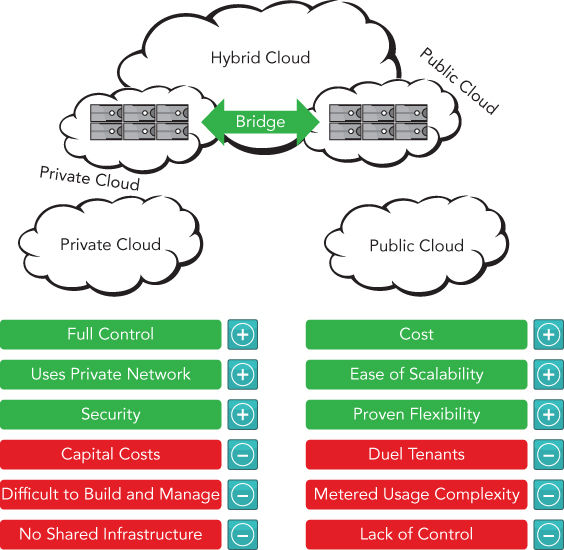
Let’s explore cloud type and cloud service models in more detail now. The common cloud types are public, private, and hybrid and are described in the following bullet points and illustrated in Figure 16‐1
.
Public cloud
is shared computer hardware and infrastructure owned and operated by a cloud provider like Microsoft Azure, Amazon AWS, Rackspace, or IBM Cloud. This cloud type is ideal for small and medium businesses that need to manage fluctuations in customer and user demands.
Private cloud
is dedicated computer hardware and infrastructure that exists onsite or in an outsourced data center. This cloud type is ideal for larger companies or those that must deliver a higher level of data security or government compliance.
Hybrid cloud
is a combination of both public and private cloud types whereby you choose which segments of your IT solution run on the private cloud and which run on the public
cloud. The ideal solution is to run your businesses‐critical programs that require a greater level of security in the private cloud and run non‐sensitive, possibly spiking tasks in the public cloud.
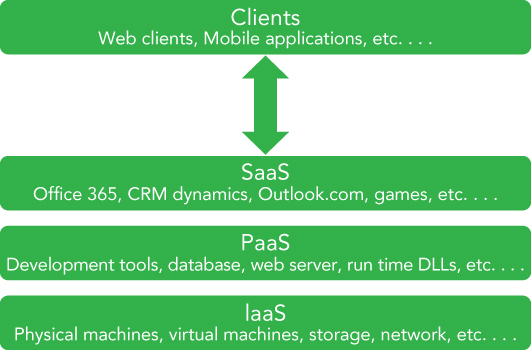
The number of cloud service models continues to increase, but the most common cloud service models are described in the following bullet points and illustrated in Figure 16‐2
.
Infrastructure as a Service (IaaS)
—You are responsible from the operating system upward. You are not responsible for the hardware or network infrastructure; however, you are responsible for operating system patches and third‐party dependent libraries.
Platform as a Service (PaaS)
—You are responsible only for your program running on the chosen operating system and its dependencies. You are not responsible for operating system maintenance, hardware, or network infrastructure.
Software as a Service (SaaS)
—A software program or service used from a device that is accessed via the Internet. For example, O365, Salesforce, OneDrive or Box, all of which are accessible from anywhere with an Internet connection and do not require software to be installed on the client to function. You are only responsible for the software running on the platform and nothing else.
In summary, the cloud is an elastic structure of commoditized computer hardware for running programs. These programs run on IaaS, PaaS, or SaaS service models in a Hybrid, Public, or Private Cloud type.
Cloud programming is the development of code logic that runs on any of the cloud service models. The cloud program should incorporate portability, scalability, and resiliency patterns that improve the performance and stability of the program. Programs that do not implement these portability, scalability, and resiliency patterns would likely run in the cloud, but some circumstances such as a hardware failure or network latency issue may cause the program to execute an unexpected code path and terminate.
Reflecting back to the elasticity of the cloud as being one of its most favorable benefits, it is important that not only the platform is able to scale, but the cloud program can as well. For example, does the code rely on backend resources, databases, read or open files, or parse through large data objects? These kinds of functional actions within a cloud program can reduce its ability to scale and therefore have a low support for throughput. Make sure your cloud program manages code paths that execute long running methods and perhaps place them into an offline process mechanism.
The cloud optimized stack is a concept used to refer to code that can handle high throughput, makes a small footprint, can run side‐by‐side with other applications on the same server, and is cross‐platform enabled. A small footprint
refers to packaging into your cloud program only the components for which a dependency exists, making the deployment size as small as possible. Consider whether the cloud program requires the entire .NET Framework to function. If not, then instead of packaging the entire .NET Framework, include only the libraries required to run your cloud program, and then compile your cloud program into a self‐contained application to support side‐by‐side execution. The cloud program can run alongside any other cloud program because it contains the needed dependencies within the binaries package itself. Finally, by using an open source version of Mono, .NET Core, or ASP.NET Core the cloud program can be packaged, compiled, and deployed onto operating systems other than Microsoft—for example Mac OS X, iOS or Linux.
CLOUD PATTERNS AND BEST PRACTICES
In the cloud, very brief moments of increased latency or downtime are expected, and your code must be prepared for this and include logic to successfully recover from these platform exceptions. This is a significant mind shift if you have historically been coding for onsite or on‐premise program executions. You need to unlearn a lot of what you know about managing exceptions and learn to embrace failure and create your code to recover from such failures.
In the previous section words like portability, scalability, and resiliency were touched upon in the context of integrating those concepts into your program slated to run in the cloud. But what does portability
specifically mean here? A program is portable if it can be moved or executed on multiple platforms, for example Windows, Linux, and Mac OS X. Take for example some ASP.NET Core features that sit on a new stack of open source technologies that provide the developer with options to compile code into binaries capable of running on any of those platforms. Traditionally, a developer who wrote a program using ASP.NET, with C# in the background, would run it on a Windows server using Internet Information Server (IIS). However, from a core cloud‐centric perspective, the ability of your program and all its dependencies to move from one virtual machine to another, without manual or programmatic intervention, is the most applicable form of portability in this context. Remember that failures in the cloud are expected, and the virtual machine (VM) on which your program is running can be wiped out at any given time and then be rebuilt fresh on another VM. Therefore, your program needs to be portable and able to recover from such an event.
Scalability
means that your code responds well when multiple customers use it. For example, if you have 1,500 requests per minute, that would be roughly 25 concurrent requests per second, if the request is completed and responded to in 1 second. However, if you have 15,000 requests per minute, that would mean 250 concurrent requests per second. Will the cloud program respond in the same manner with 25 or 250 concurrent requests? How about 2,550? The following are a few cloud programming patterns that are useful for managing scalability.
Command and Query Responsibility Segregation (CQRS) pattern
—This pattern concerns the separation of operations that read data from operations that modify or update the data.
Materialized View pattern
—This modifies the storage structure to reflect the data query pattern. For example, creating views for specific highly used queries can make for more efficient querying.
Sharding pattern
—This breaks your data into multiple horizontal shards that contain a distinct subset of the data as opposed to vertical scaling via the addition of hardware capacity.
Valet Key pattern
—This gives clients direct access to the data store for streaming of or uploading of large files. Instead of having a web client manage the gatekeeping to the data store, it provides a client with a Valet Key and direct access to the data store.
Resiliency
refers to how well your program responds and recovers from service faults and exceptions. Historically, IT infrastructures have been focused on failure prevention where the acceptance of downtime was minimal and 99.99% or 99.999% SLAs (service‐level agreements) were the expectation. Running a program in the cloud, however, requires a reliability mind shift, one which embraces failure and is clearly oriented toward recovery and not prevention. Having multiple dependencies such as database, storage, network, and third‐party services, some of which have no SLA, requires this shift in perspectives. User‐friendly reactions in response to outages or situations that are not considered normal operation make your cloud program resilient. Here are a few cloud programming patterns that are useful for embedding resiliency into your cloud program:
Circuit Breaker pattern
—This is a code design that is aware of the state of remote services and will only attempt to make the connection if the service is available. This avoids attempting a request and wasting CPU cycles when it is already known the remote service is unavailable via previous failures.
Health Endpoint Monitoring pattern
—This checks that cloud‐based applications are functionally available via the implementation of endpoint monitoring.
Retry pattern
—This retries the request after transient exceptions or failure. This pattern retries a number of times within a given timeframe and stops when the retry attempt threshold is breached.
Throttling pattern
—This manages the consumption of a cloud program so that SLAs can be met and the program remains functional under high load.
Using one or more of the patterns described in this section will help make your cloud migration more successful. The discussed patterns enhance usability of your program by improving the scalability and resiliency of it. This in turn makes for a more pleasant user or customer experience.
USING MICROSOFT AZURE C# LIBRARIES TO CREATE A STORAGE CONTAINER
Although there are numerous cloud providers, the cloud provider used for the examples in this and the next chapter is Microsoft. The cloud platform provided by Microsoft is called Azure. Azure has many different kinds of features. For example, the IaaS offering is called Azure VM, and the PaaS offering is called Azure Cloud Services. Additionally, Microsoft has SQL Azure for database, Azure Active Directory for user authentication, and Azure Storage for storing blobs, for example.
The following two exercises walk through the creation of an Azure storage account and an Azure storage container. Once created, images of 52 playing cards are stored in the container using the
Microsoft Azure Storage SDK for .NET. Then in the next section you will create an ASP.NET 4.7 Web Application, to access the images stored in the Azure storage container. Then, following along with the card game theme the book, the ASP.NET 4.7 Web Site will deal a hand of playing cards. The card images are the blobs stored in the Azure storage container.
Now that the Microsoft Azure storage account and container are created and loaded with the images of a 52‐card deck, you can create an ASP.NET Web Site to reference the Microsoft Azure storage container.
CREATING AN ASP.NET 4.7 WEB SITE THAT USES THE STORAGE CONTAINER
Up to now there has not been any in‐depth examination of what a web application is nor a discussion about the fundamental aspects of ASP.NET. This section provides some insight into these technical perspectives.
A web application causes a web server to send HTML code to a client. That code is displayed in a web browser such as Microsoft Edge or Google Chrome. When a user enters a URL string in the browser, an HTTP request is sent to the web server. The HTTP request contains the filename that is requested along with additional information such as a string identifying the application, the languages that the client supports, and additional data belonging to the request. The web server returns an HTTP response that contains HTML code, which is interpreted by the web browser to display text boxes, buttons, and lists to the user.
ASP.NET is a technology for dynamically creating web pages with server‐side code. These web pages can be developed with many similarities to client‐side Windows programs. Instead of dealing directly with the HTTP request and response and manually creating HTML code to send to the client, you can use controls such as TextBox
, Label
, ComboBox
, and Calendar
, which create HTML code.
Using ASP.NET for web applications on the client system requires only a simple web browser. You can use Internet Explorer, Edge, Chrome, Firefox, or any other web browser that supports HTML. The client system doesn’t require .NET to be installed.
On the server system, the ASP.NET runtime is needed. If you have Internet Information Services (IIS) on the system, the ASP.NET runtime is configured with the server when the .NET Framework is installed. During development, there’s no need to work with Internet Information Services because Visual Studio delivers its own ASP.NET Web Development server that you can use for testing and debugging the application.
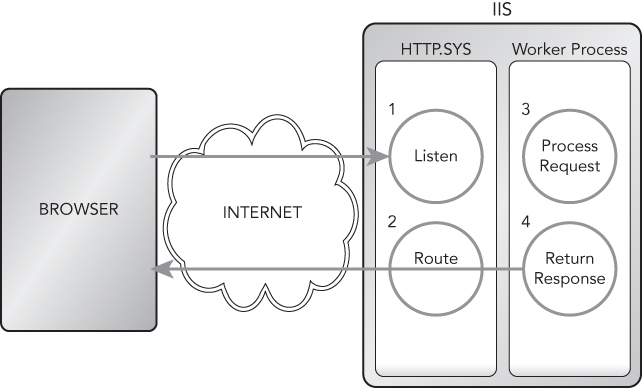
To understand how the ASP.NET runtime goes into action, consider a typical web request from a browser (see Figure 16‐11
). The client requests a file, such as default.aspx
or default.cshtml
, from the server. ASP.NET web form pages usually have the file extension .aspx
, (ASP.NET MVC has no specific file extension), and .cshtml
is used for Razor‐based Web Sites. Because these file extensions are registered with IIS or known by the ASP.NET Web Development Server, the ASP.
NET runtime and the ASP.NET worker process enter the picture. The IIS worker process is named w3wp.exe and is host to your application on the web server. With the first request to the default.cshtml
file, the ASP.NET parser starts, and the compiler compiles the file together with the C# code, which is associated with the .cshtml
file and creates an assembly. Then the assembly is compiled to native code by the JIT compiler of the .NET runtime. Then the Page object is destroyed. The assembly is kept for subsequent requests, though, so it is not necessary to compile the assembly again.
Now that you have a basic understanding of what web applications and ASP.NET are, perform the steps in the following Try It Out.
EXERCISES
16.1 What information would you need to pass between the browser and the server to play the card game?
16.2 As web applications are stateless, describe some ways to store this information so it can be included with a web request.
Answers to the exercises can be found in Appendix.
WHAT YOU LEARNED IN THIS CHAPTER
TOPIC
KEY CONCEPTS
Defining the cloud
The cloud is an elastic structure of commoditized computer hardware for running programs. These programs run on IaaS, PaaS, or SaaS service models in a Hybrid, Public, or Private Cloud type.
Defining the cloud optimized stack
The cloud optimized stack is a concept used to refer to code that can handle high throughput, makes a small footprint, can run side‐by‐side with other applications on the same server, and is cross‐platform enabled.
Creating a storage account
A storage account can contain an infinite number of containers. The storage account is the mechanism for controlling access to the containers created within it.
Creating a storage container with C#
A storage container exists within a storage account and contains the blobs, files, or data that are accessible from any place where an Internet connection exists.
Referencing the storage container from ASP.NET Razor
It is possible to reference a storage container from C# code. You use the storage account name, the container name, and the name of the blog, file, or data you need to access.
 WHAT YOU LEARNED IN THIS CHAPTER