Nothing makes me feel more at home in my space than surrounding myself with things I’ve made. A few handmade touches are all it takes to make your nest divine.
Will you believe me when I tell you that you don’t have to be an expert sewer to make it happen? That’s right—beautiful, handmade decor is as easy as a few straight seams.
If you’ve got a ho-hum room that needs some flair, the quickest and easiest way to bring it to life is to sew a few accessories. If you’re a beginner, I recommend starting with Customized Curtains, Two Ways, for a look at two great basic curtain styles. Or try your hand at the World’s Easiest Zippered Throw Pillow—you won’t believe how easy it is to install a zipper using my method. And for a super-quick dose of diy decor, don’t miss the 15-Minute Shams.
With a few simple skills under your belt, you can try the Clutter-Busting Bucket Tote to corral clutter, the Make-It-Your-Way Ottoman Cover to learn the basics of making slipcovers, or the DIY Duvet Cover to add some flair to your bed. To me, a quilt is the ultimate in homey style, and this chapter will walk you through the steps of sewing a patchwork masterpiece. Quilting may seem challenging, but you can make amazing quilts using only basic skills by choosing bold but simple designs, like the Pixelated Throw and the Wonky Diamonds On Point quilt. (The latter is not for the faint of heart, but the stunning results are worth the effort!)
Everything in this chapter is designed to be a statement piece, and you can personalize each project by customizing it with your fabric choices. Create a bold look by choosing a loud print, or go quieter with a range of coordinating solids. Try taking a risk and breaking out of matchy-matchy mode, by mixing groups of fabrics with similar color palettes or themes.
So don’t be afraid to experiment and try new looks with your decor. That’s the beauty of knowing how to make it yourself!
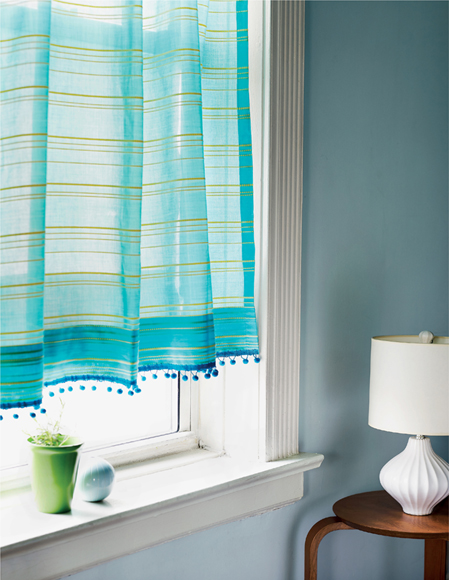
Need to wake up a boring room? It’s easy—whip up some curtains! Even complete beginners can tackle this project; these drapes take only an afternoon to sew and they truly transform a house into a home. In this pattern, I’ll show you how to make two types of curtains: a basic curtain panel with a ball-fringe trim and a lined tab curtain, both of which can be made to fit any window. Add a fabric you love, and you’ll have custom decor in a flash.
finished dimensions
Sized to fit your window of choice
supplies
* Curtain rod
* For basic curtain panel with ball fringe:
Fabric of your choice (determine the amount you’ll need in Step 1)
Length of ball fringe sufficient to cover the width of your curtain panels
* For lined tab curtain panel:
Fabric of your choice (determine the amount you’ll need in Step 1)
Lining fabric (determine the amount you’ll need in Step 1)
 note
noteThis pattern makes a rod pocket that fits a slim curtain rod (such as a tension rod). If you are using a thicker curtain rod, you may need to make a deeper pocket. Measure the diameter of your rod, and add that extra length to your fabric.
1. measure + cut
CURTAIN PANEL: Measure the width of your window (A). (If your curtain rod hangs outside the window, measure from the ends of the curtain rod.) Next, measure the distance from the curtain rod to the point where you’d like the bottom of the curtain to hang (B).
Determine how gathered you would like your curtain to be (C). (For a typical amount of gathering, double measurement A.)
Add 4" (10cm) to measurement C; this is the width you will need to cut your fabric.
Add 10½" (26.5cm) to measurement B; this is the length you will need to cut your fabric.
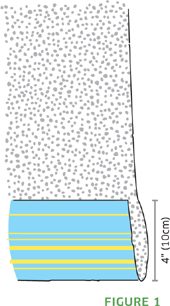
Cut your fabric to the above dimensions (see Cutting Large Fabric Pieces sidebar).
2. hem the bottom edge
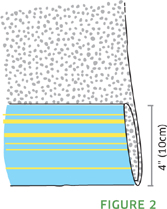
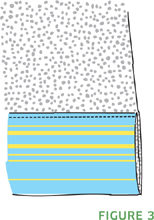
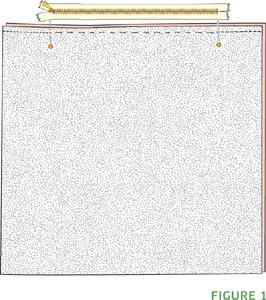
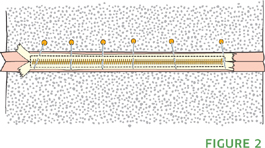
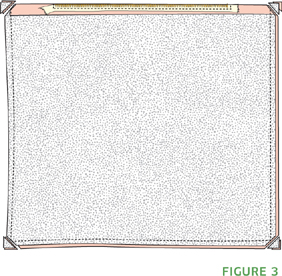
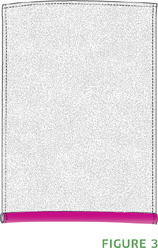
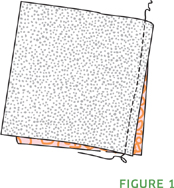
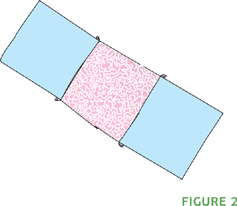
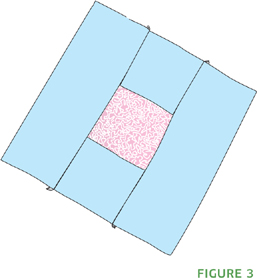
Turn under the bottom edge of the curtain 4" (10cm) and press. (FIGURE 1) Turn up another 4" (10cm) and press again. (FIGURE 2) Topstitch close to the upper folded edge. (FIGURE 3)
3. hem the sides
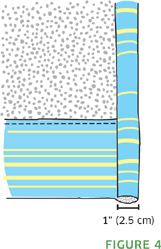
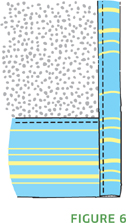
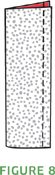
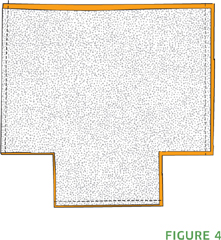
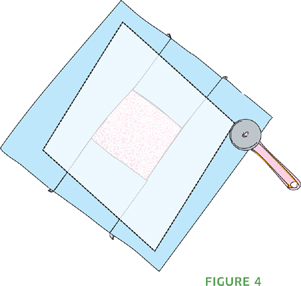
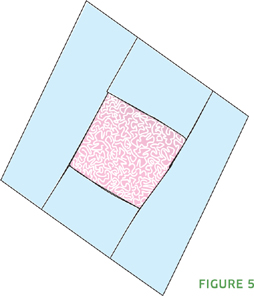
Turn under one side edge 1" (2.5cm) and press. (FIGURE 4) Turn it under another 1" (2.5cm) and press. (FIGURE 5) Topstitch close to the inner folded edge. (FIGURE 6) Repeat for the remaining side of the curtain.

4. make the pocket for the curtain rod
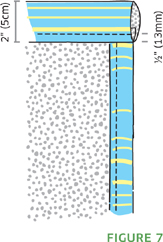
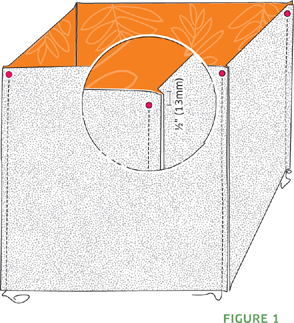
Turn under the remaining (top) raw edge ½" (13mm) and press. Turn it under another 2" (5cm) and press again. Topstitch close to the inner folded edge. (FIGURE 7)
5. attach trim
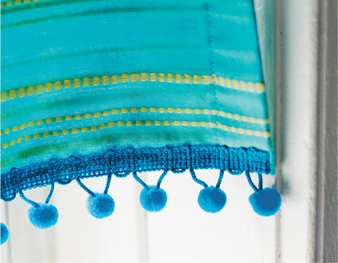
Pin the ball fringe along the hemmed edge of the curtain, turning under its raw edge ½" (13mm). Sew it in place using a zigzag stitch and thread to match the trim.

1. measure + cut
CURTAIN PANEL AND LINING: Measure following the directions in Step 1 for measurements A, B, and C.
Add 1" (2.5cm) to measurement C to determine the width you will need to cut your fabric.
Add 8½" (21.5cm) to measurement B to determine the length you will need to cut your fabric.
Cut one panel to these dimensions from your curtain fabric, and another panel the same size from your lining fabric.
FOR THE TABS: Determine how many tabs, spaced 10–12" (25.5–30.5cm) apart, will fit on your curtain panel. Cut this number of 9" × 6" (23cm × 15cm) tab pieces from your curtain fabric.
2. sew the tabs
Fold each tab piece in half lengthwise with right sides together, aligning the 9" (23cm) edges; pin in place. Sew along the raw 9" (23cm) edges using a ½" (13mm) seam allowance. (FIGURE 8)
Turn the tab right side out and press. Repeat to make all the tabs.
3. hem the bottom edges
Hem the bottom edges of the curtain and lining piece, following Step 2.
4. assemble the tabs, lining, and front
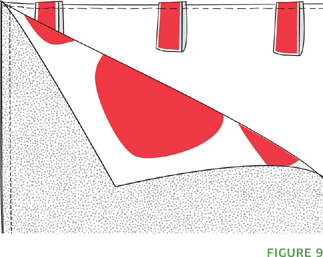
Place the lining on the floor or work surface with the right side facing up. Fold the tabs in half with short ends together, then position them on the top edge of the lining, spaced evenly apart, aligning the raw ends of the tabs with the raw edge of the lining. Place the curtain panel, right side down, on top of the tabs and lining, sandwiching the tabs between the curtain panel and the lining, aligning the raw edge of the curtain panel with the raw edges of the lining and tabs. (FIGURE 9) Pin all the layers together, but leave the hemmed edges (bottom) unpinned. Make sure all raw edges are perfectly aligned so the curtain will hang straight. Using a ½" (13mm) seam allowance, sew all the layers together around 3 sides, leaving the hemmed edges open.
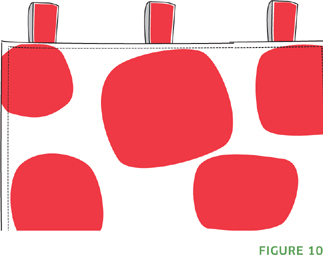
Trim the seam allowance at the corners and turn right side out. Use a pointy tool to gently poke out the corners. Press. Topstitch around 3 sides (again leaving the hemmed edge open), stitching close to the edge. (FIGURE 10)
World’s Easiest Zippered Throw Pillow
If you have a fear of installing zippers, this project is for you. Give it a try, and I promise you’ll soon be sewing a zipper into everything in sight! In fact, this pillow cover is so easy to make, you might find yourself re-covering your throw pillows every season, or every time you find yourself in the mood for a little decor change. It’s really that easy!
supplies
* Approximately 1 yard (91cm) fabric of your choice (see Step 1 to determine the exact amount of fabric you’ll need)
* Zipper, 4" (10cm) shorter than the width of your pillow
* Pillow form, desired size
1. measure + cut
Cut 2 fabric pieces the exact dimensions of your pillow form. (You do not need a seam allowance; this pillow cover is slightly smaller than your form, which will create a plump finished pillow.)
2. install the zipper
POSITION AND PIN THE ZIPPER: On a flat surface, place the 2 pieces of fabric right sides together with raw edges aligned. Center the zipper on one side edge. Mark the zipper placement by inserting a pin in the fabric at each end of the zipper, just inside the caps. Put the zipper aside for now.
Sew the 2 layers of fabric together from the first corner to the first pin with a ½" (13mm) seam allowance. Backstitch, and change to a basting stitch. Baste until you reach the next pin, then backstitch, change to a normal stitch length, and sew to the corner. (FIGURE 1)
SEW THE ZIPPER: Press the seam allowance open. With the wrong side of the fabric facing up, align the zipper over the basted portion of the seam. Pin it in place. (FIGURE 2)
Attach a zipper foot to your machine. Beginning at one end of the zipper, sew up one side of the zipper, pivot and sew across the zipper, pivot and sew back down the other side, then pivot to sew across the zipper again. (FIGURE 2) For more information on installing a zipper, see the Don’t Fear the Zipper sidebar.
Working on the right side of the pillow, use a seam ripper to gently remove the basting stitches and expose the zipper.
3. sew the pillow cover
Unzip the zipper, and fold the pillow in half, right sides together, at the zipper seam so that the remaining 3 raw edges are aligned; pin. Sew around all 3 sides with a ½" (13mm) seam allowance. (FIGURE 3)
Trim the corners (FIGURE 3), and turn the pillow cover right side out through the zipper opening. Using a pointy tool, gently push out each corner. Press the corners and seams. Insert your pillow form and close the zipper.
 DON’T FEAR THE ZIPPER
Installing zippers strikes terror into the hearts of many sewers, even those who aren’t beginners. But people, I’m here to tell you: The only thing you have to fear is fear itself.
Zippers really are easy to do. They’re quick, and they can be quite painless—especially using my favorite method, which works whenever you are installing a standard zipper on a seam, like in this pillow cover. (Make sure you’re using a standard zipper, not an “invisible” zipper, which requires a different installation method.) Here’s how to do it.
1. Determine where on your seam you will place your zipper, and baste this portion of the seam closed. Sew the remainder of the seam with a regular stitch.
2. Pin the zipper right side down on the wrong side of the seam, centering the zipper teeth over the basted portion of the seam.
3. Load your machine with a zipper foot. Beginning at the top of the zipper, sew down one side of the zipper. When you reach the end of the zipper (just below the metal cap holding the teeth), pivot and sew across the zipper width, then pivot and sew up the other side of the zipper. If you’re making a garment or other item where the top of the zipper will be open, stop here. If you’re making a pillow or other item where the fabric above the zipper is closed: When you reach the top of the zipper (just above the zipper pull), pivot to sew across the width of the zipper again, ending when you reach the point where you began stitching, creating a complete rectangle of stitching. Backstitch to secure.
4. Working on the right side of the fabric, carefully remove the basting stitches with a seam ripper, and you’re done! Enjoy your beautiful zipper, which is nearly invisible inside the seam.
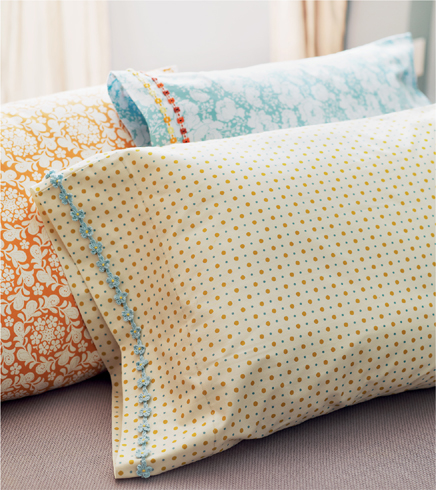
All it takes is one yard of fabric and some cute trim to whip up these quick and easy shams. French seams make them fully finished on the inside and outside, for super-professional results.
finished dimensions
LENGTH: 35" (89cm)
WIDTH: 17½" (44.5cm)
supplies
* For one sham:
1 yard (91cm) medium-weight cotton
1½ yard (1.4m) trim
1. measure + cut
For each pillow sham, cut a rectangle 36" × 41" (91cm × 104cm).
2. sew the hem
Turn under one of the 41" (104cm) edges ½" (2.5cm) and press. Turn that edge under again 5" (12.5cm) and press. Topstitch, sewing close to the inner folded edge.
3. sew the side seams
Fold the piece in half with wrong sides together, aligning the hemmed edge with itself and matching the 36" (91cm) raw edges. Sew the long side with a ¼" (6mm) French seam. Next, sew the remaining short edge with a ¼" (6mm) French seam.
Turn the case right side out and press.
4. attach trim
Using a hand-sewing needle, stitch the trim to the sham parallel to the hemmed edge of the sham, about 1" (2.5cm) from the edge.
Make-It-Your-Way Ottoman Cover
Add some pop to your living room and turn an outdated ottoman into something snazzy with a simple DIY slipcover. This pattern shows you how to make a custom cover that’s guaranteed to fit any ottoman like a glove. Not an ottoman person? You can also use this pattern to craft a cover for any boxy item, from a pet crate to an outdoor grill.
finished dimensions
Sized to fit any square or rectangular object
supplies
* Fabric (calculate yardage needed in Step 1)
fabric suggestions
Heavy decorator-weight cottons, canvas, duck cloth, microsuede, and upholstery fabrics are all great choices for this project. Oilcloth or outdoor fabrics are good choices for making an indoor-outdoor item like a grill cover. Lightweight fabrics are not recommended.
noteThis project is sewn with ½" (13mm) seam allowances throughout. Normally you would add 1" (2.5cm) to the total width to allow for the seam allowance on both sides of each panel, but I’ve designed this cover with a slight amount of negative ease to keep the fit snug, so I’m only calling for an additional ¾" (2cm).
1. measure + cut
TOP AND SIDE PANELS: Measure the top and sides of your ottoman. For the top panel: Add ¾" (2cm) to the length and width for seam allowances. For the side panels: Add ¾" (2cm) to the width of each side piece and add 2" (5cm) to the height of each piece for seam allowances and hem.
Cut 4 side panels and one top panel to the dimensions you calculated above.
2. sew the side seams of the side panels
Starting from the top of each side panel and with right sides together, pin then sew each of the 4 side panel pieces together using ½" (13mm) seam allowances, forming a tube (FIGURE 1). (Be sure you are joining the length-measurement sides). Begin each seam ½" (13mm) from each top corner, and backstitch to reinforce at the beginning and end of each seam. (FIGURE 1 INSET)
Turn the joined piece right side out and slip it over the ottoman to check for fit; it should fit snugly but not so tight that the fabric is pulling. If necessary, adjust by letting out or taking in the seams. Press the seams flat.
3. attach the top
Turn the joined side panels (made in Step 2) inside out. With right sides together, pin one side of the top panel to the edge of one side panel. Sew them together, beginning and ending the seam ½" (13mm) from each corner, backstitching to reinforce at the beginning and end of each seam. (FIGURE 2)

Repeat for the remaining 3 sides, sewing one side at a time, and taking care to smooth the top flat as you pin.
4. check the fit
Turn the cover right side out and slip it over the ottoman to check the fit, as you did in Step 2. Adjust any seams as necessary. While the cover is on the ottoman, turn under the bottom hem 1½" (3.8cm) and pin in place. If any shifting has occurred during sewing and the bottom edges are at all uneven, adjust for it now by pinning the hem so that the bottom edge is even and falls just above the floor.
5. clip the corners
Turn the cover inside out again and clip all the corner seam allowances. Using a pointy tool, gently push out each corner. Press all seams flat.
6. hem
Press the hem (which you turned under in Step 4), turning under the raw edge ½" (13mm) as you press. Topstitch along the upper folded edge. Press the topstitching.

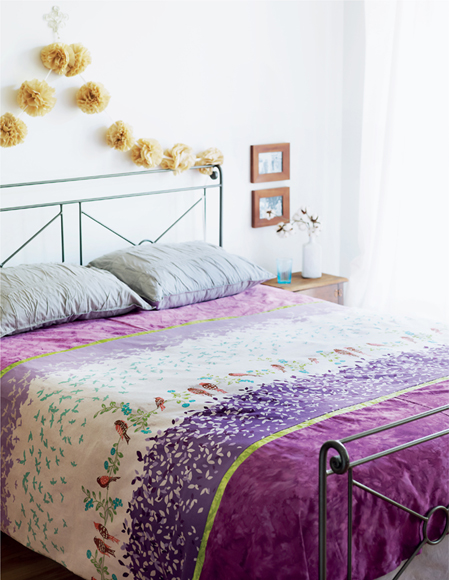
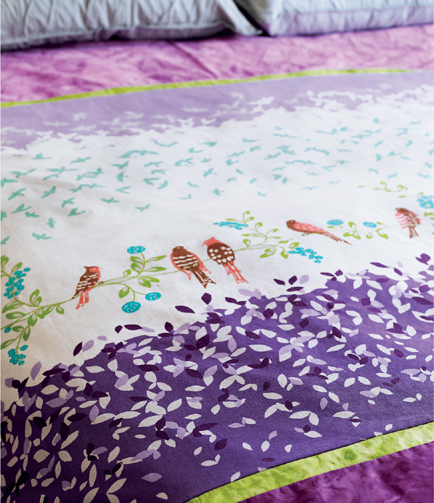
Why settle for a boring store-bought duvet when you can make one yourself that’s much cuter? In this design, I’ve highlighted a unique fabric panel, which looks great spanning the center of this piece. Scour the fabric shops for a panel print you love, or simply arrange horizontal strips of fabric in any combination for a result that’s all you.
finished dimensions
Sized to fit your duvet of choice
supplies
* 3 yards (2.7m) patterned fabric (for front center panel)
* 3 yards (2.7m) each: 2 coordinating fabric (for front top and bottom strips)
* 1 yard (91cm) contrasting fabric (for front thin accent strips)
* 6 yards (5.5m) coordinating fabric (for back)
* ¾" (2cm) buttons (determine how many you’ll need in Step 6)
fabric suggestions
Quilting cottons are perfect for this project. They are just the right weight, and come in a wide array of colors.
noteThe yardages listed are for a full/queen bed; for other sizes, calculate the exact amount of fabric you’ll need in Step 1.
1. measure + cut
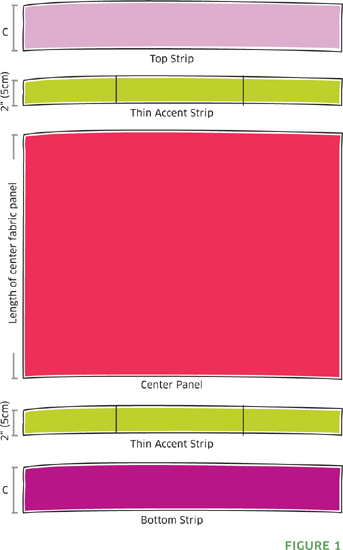
Refer to FIGURE 1.
Because the size of duvets varies by manufacturer, I’ve written this pattern so you can customize it to the exact size of your duvet. Measure your duvet before beginning: Measurement A is the width of your duvet plus 1" (2.5cm); measurement B is the length of your duvet.
CENTER PANEL: Cut 1 piece of patterned fabric the length of measurement A, and as wide as your fabric with the selvage edges cut off.
THIN ACCENT STRIPS: Cut 6 strips of fabric, each 36" (91cm) long and 2" (5cm) wide.
TOP AND BOTTOM STRIPS: Subtract the width of your center panel from measurement B and add 3½" (9cm). Divide this number in half for measurement C.
Cut 2 pieces of fabric that are as long as measurement A and as wide as measurement C.
BACK: Cut 2 strips of fabric that are as long as measurement B plus 3½" (9cm), and as wide as half measurement A.
2. assemble the thin accent strips
Pin then sew 3 of the thin accent strips together along the short edges using ¼" (6mm) French seams. Repeat to join the remaining 3 strips. Trim both strips so that they are as long as measurement A. (FIGURE 1)
3. assemble the front and back
Pin then sew together all of the strips for the front using ¼" (6mm) French seams. (Note that the seams will run horizontally on the front of the duvet.)
Pin then sew together the 2 strips for the back using ¼" (6mm) French seams. (Note that the seam will run vertically on the back of the duvet.)
4. hem the front and back
Hem the bottom edge of the front and the back as follows: Turn under the raw edge 1½" (3.8cm) and press. Turn under another 1½" (3.8cm) and press. Topstitch close to both folded edges. (FIGURE 2)

5. attach the front and back
Pin the front to the back with wrong sides together and all edges aligned. First sew the side seams with ¼" (6mm) French seams, then sew the top seam with a ¼" (6mm) French seam. (FIGURE 3)
Turn the piece right side out. Press.
6. make buttonholes and attach buttons
On the hem of the front of the duvet cover, mark the desired placement for your buttonholes, spacing them about 9" (23cm) apart and centered within the hem allowance. Make horizontal buttonholes, referring to your sewing machine manual for instructions. (FIGURE 4)

Close the duvet and mark the placement for buttons on the hem of the back of the duvet cover by marking through each buttonhole. Sew a button to each mark.
Clutter got you down? Corral household odds and ends with this roomy container. I use mine for yarn, but it’s also great for toys, magazines, and general junk. Once you understand the basic construction of this piece you’ll find it easy to customize this pattern to make a tote in any size, for anything you need!
finished dimensions
HEIGHT: 9½"(24cm) excluding handles
DIAMETER: 9½"(24cm)
supplies
* 1 yard (91cm) heavyweight fabric, such as canvas (for exterior)
* 1 yard (91cm) medium-weight fabric (for lining)
* 1 yard (91cm) heavy interfacing
* Corrugated plastic or plastic canvas, at least 6¾" × 7½" (17cm × 19cm)
* Hot glue gun
1. measure + cut
BODY AND LINING: Measure a rectangle that is 16" × 15" (40.5cm × 38cm). Cut 2 pieces from the exterior fabric, 2 from the lining fabric, and 4 from the interfacing.
Orient each piece so the 16" (40.5cm) edges are the top and bottom. Cut a 4" (10cm) square from the 2 bottom corners of each piece.
STRAPS: Measure a rectangle that is 11" × 2¼" (28cm × 5.5cm). Cut 2 from the exterior fabric and 2 from the lining fabric.
PLASTIC BOTTOM LINER (BASE): Measure and cut a 6¾" × 7½" (17cm × 19cm) rectangle from the corrugated plastic. (FIGURE 1)

2. make the straps
On each strap piece (2 exterior fabric, 2 lining), turn under one long (11" [28cm]) edge ½" (13mm), and press. Pin one exterior-fabric strap piece to one lining-fabric strap piece with right sides together and raw and folded edges aligned. Sew the pieces together along the unfolded 11" (28cm) edge, using a ½" (13mm) seam allowance. (FIGURE 2)

Fold the piece in half along the seam with wrong sides together and press on the fold (remember that the other 11" [28cm] edges were already folded and pressed). Topstitch along each 11" (28cm) side, stitching close to the edges. (FIGURE 3)

3. assemble the body and lining
Fuse a piece of interfacing to both of the exterior body fabric pieces and both lining pieces.
Pin the 2 exterior body pieces with right sides together and all edges even. Sew the 2 side seams and the bottom seam using a ½" (13mm) seam allowance. (FIGURE 4) Press the seam allowances open.
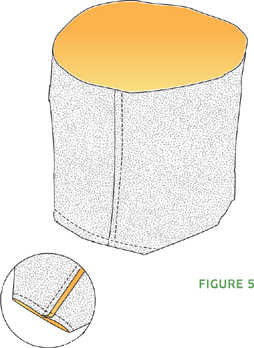
TO MAKE THE CORNERS on the exterior of the tote, fold the piece, right sides together, so that the side and bottom seams meet; pin. Sew with a ½" (13mm) seam allowance. (FIGURE 5) Trim the corners, turn right side out, and press the seams.
Repeat Step 3 to assemble the lining in the same way.
4. attach the bottom (base)
Place the 6¾" × 7½" (17cm × 19cm) plastic bottom liner inside the bottom of the tote body exterior, slipping it under the seam allowances. Using a hot glue gun, glue the seam allowances to the plastic (to keep the plastic from shifting later).
5. attach the straps
Position and pin the right sides of the straps to the right side of the tote body exterior, (the lining side of the straps will face out). Position each end of the straps 2" (5cm) from the side seams, and align the raw edges of the straps with the raw edges of the tote body. Sew the straps in place with a ¼" (6mm) seam allowance. (FIGURE 6)

6. finish the tote
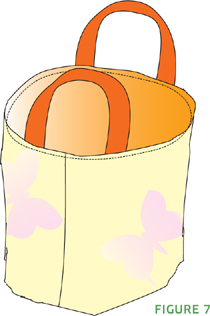
Turn under the raw edge of the exterior ½" (13mm) and press. Turn under the raw edge of the lining ½" (13mm) and press. With the body exterior right side out and the lining wrong side out, place the lining inside the exterior, aligning the folded top edges (the straps will be sticking up and sandwiched between the exterior and lining fabrics). Pin the pieces together. Load your machine with a heavy-duty needle and topstitch the exterior and lining together, stitching close to the folded top edges all the way around. (FIGURE 7)

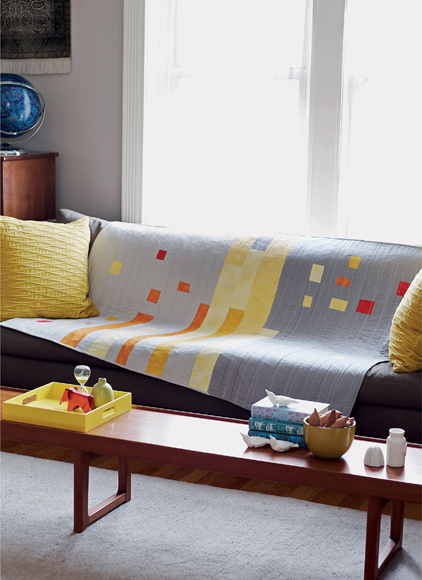
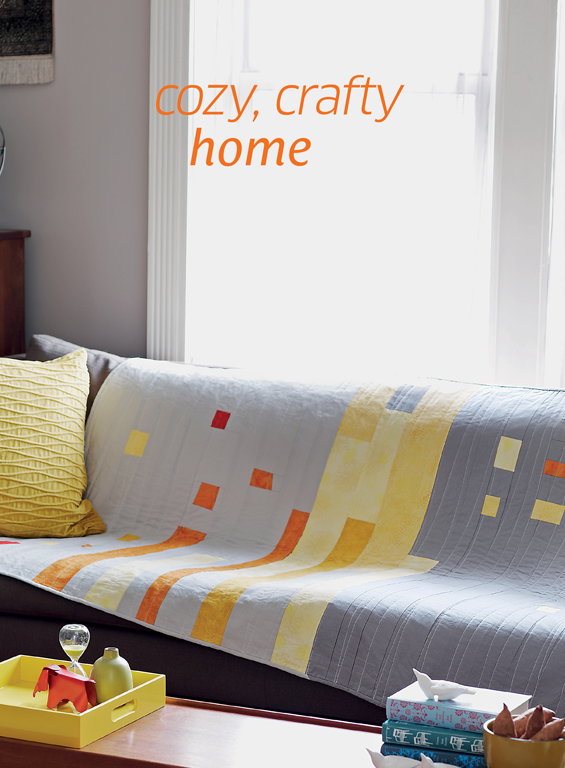
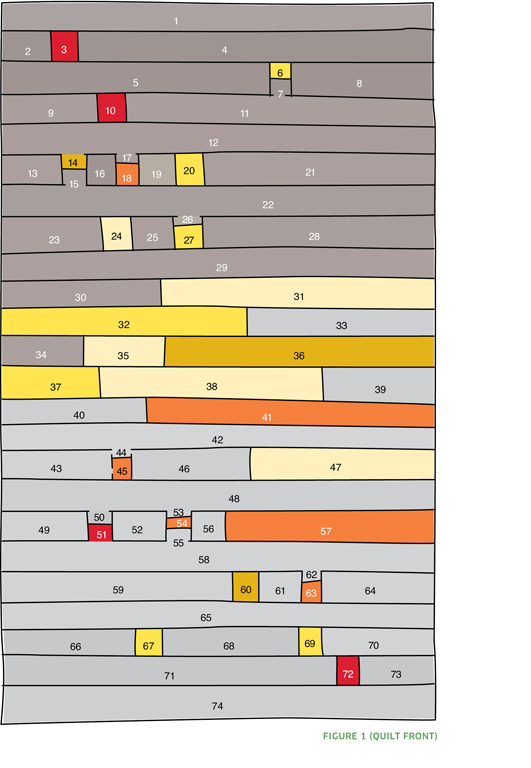
Staggered strips and wonky squares create a bold, graphic look in this quilt that reminds me of an eighties-era video game. I think that makes it a perfect choice for the geeks and guys in your life—who says quilts have to be girly? (Although, if you stitched this in a softer color palette, it would take on a much fairer look.) A patchwork back means it’s reversible too, so no matter which way you throw it, this quilt will look great!
finished dimensions
WIDTH: Approximately 42" (106.5cm)
LENGTH: Approximately 64" (163cm)
supplies
* 2½ yards (2.3m) medium-weight cotton of each color (for background and binding): light gray, dark gray
* 1 yard (91cm) orange medium-weight cotton
* ½ yard (46cm) medium yellow medium-weight cotton
* ¼ yard (23cm) medium-weight cotton of each color: red, light yellow, dark yellow
* 2 yards (1.8m) complementary gray print fabric for quilt back
* 70" × 50" (178cm × 127cm) piece medium-loft cotton batting
noteThe tiny squares on this quilt have an off-kilter, wonky construction. For technical ease, I give measurements that make perfect squares rather than wonky ones. For the wonky look, cut the small squares larger than the sizes given (about 1" [2.5cm] on all sides), then sew your seams off-kilter. Some pieces may end up larger than the dimensions given here; when assembling the strips, just trim any large pieces to the correct size for piecing to their neighbors. Because this quilt has an abstract quality, it won’t matter if your elements are slightly different from the pattern. Have fun with it!
1. measure + cut
Referring to FIGURE 1 and FIGURE 2, cut each numbered piece to the measurements given below (horizontal × vertical) from the indicated fabric color.
1. dark gray, 42" × 3" (106.5cm × 7.5cm)
2. dark gray, 6¾" × 3" (17cm × 7.5cm)
3. red, 3" × 3" (7.5cm × 7.5cm)
4. dark gray, 33½ × 3" (85cm × 7.5cm)
5. dark gray, 27" × 3½" (68.5cm × 9cm)
6. medium yellow, 2½" × 2" (6.5cm × 5cm)
7. dark gray, 2½" × 2" (6.5cm × 5cm)
8. dark gray, 13½" × 3½" (34.5cm × 9cm)
9. dark gray, 11" × 3" (28cm × 7.5cm)
10. red, 3" × 3" (7.5cm × 7.5cm)
11. dark gray, 29" × 3" (74cm × 7.5cm)
12. dark gray, 42" × 2½" (106.5cm × 6.5cm)
13. dark gray, 4½" × 3½" (11.5cm × 9cm)
14. dark yellow, 2½" × 2½" (6.5cm × 6.5cm)
15. dark gray, 2½" × 2" (6.5cm × 5cm)
16. dark gray, 2½" × 3½" (6.5cm × 9cm)
17. dark gray, 1" × 2" (2.5cm × 5cm)
18. orange, 3" × 2" (7.5cm × 5cm)
19. dark gray, 3½" × 3½" (9cm × 9cm)
20. medium yellow, 2½" × 3½" (6.5cm × 9cm)
21. dark gray, 27½" × 3½" (70cm × 9cm)
22. dark gray, 42" × 3" (106.5cm × 7.5cm)
23. dark gray, 7" × 2½" (18cm × 6.5cm)
24. light yellow, 3½" × 2½" (9cm × 6.5cm)
25. dark gray, 3" × 2½" (7.5cm × 6.5cm)
26. dark gray, 2" × 1" (5cm × 2.5cm)
27. medium yellow, 2½" × 2" (6.5cm × 5cm)
28. dark gray, 28½" × 2½" (72cm × 6.5cm)
29. dark gray, 42" × 2½" (106.5cm × 6.5cm)
30. dark gray, 19½" × 4½" (49.5cm × 11.5cm)
31. light yellow, 23" × 4½" (58.5cm × 11.5cm)
32. medium yellow, 25" × 5" (63.5cm × 12.5cm)
33. light gray, 17½" × 5" (44.5cm × 12.5cm)
34. dark gray, 6½" × 3½" (16.5cm × 9cm)
35. light yellow, 11" × 3½" (28cm × 9cm)
36. dark yellow, 25½" × 3½ ×" (65cm × 9cm)
37. medium yellow, 10" × 4" (25.5cm × 10cm)
38. light yellow, 24½" × 4" (62cm × 10cm)
39. light gray, 8½" × 4" (21.5cm × 10cm)
40. light gray, 17½" × 2½" (44.5cm × 6.5cm)
41. orange, 25" × 2½" (63.5cm × 6.5cm)
42. light gray, 42" × 2½" (106.5cm × 6.5cm)
43. light gray, 15" × 4" (38cm × 10cm)
44. light gray, 2" × 2" (5cm × 5cm)
45. orange, 2" × 2½" (5cm × 6.5cm)
46. light gray, 10" × 4" (25.5cm × 10cm)
47. light yellow, 16½" × 4" (42cm × 10cm)
48. light gray, 42" × 3" (106.5cm × 7.5cm)
49. light gray, 11" × 4" (28cm × 10cm)
50. light gray, 2" × 2" (5cm × 5cm)
51. red, 2" × 2½" (5cm × 6.5cm)
52. light gray, 6" × 4" (15cm × 10cm)
53. light gray, 3" × 1½" (7.5cm × 3.8cm)
54. orange, 3" × 2½" (7.5cm × 6.5cm)
55. light gray, 3" × 1" (7.5cm × 2.5cm)
56. light gray, 3" × 4" (7.5cm × 10cm)
57. orange, 20½" × 4" (52cm × 10cm)
58. light gray, 42" × 3" (106.5cm × 7.5cm)
59. light gray, 24½" × 2½" (62cm × 6.5cm)
60. dark yellow, 2½" × 2½" (6.5cm × 6.5cm)
61. light gray, 4" × 2½" (10cm × 6.5cm)
62. light gray, 2½" × 1" (6.5cm × 2.5cm)
63. orange, 2½" × 2" (6.5cm × 5cm)
64. light gray, 10½" × 2½" (26.5cm × 6.5cm)
65. light gray, 42" × 2" (106.5cm × 5cm)
66. light gray, 14½" × 2½" (37cm × 6.5cm)
67. medium yellow, 3" × 2½" (7.5cm × 6.5cm)
68. light gray, 15" × 2½" (38cm × 6.5cm)
69. medium yellow, 2½" × 2½" (6.5cm × 6.5cm)
70. light gray, 9" × 2½" (23cm × 6.5cm)
71. light gray, 34" × 3" (86cm × 7.5cm)
72. red, 3" × 3" (7.5cm × 7.5cm)
73. light gray, 6" × 3" (15cm × 7.5cm)
74. light gray, 42" × 3" (106.5cm × 7.5cm)

75. gray print, 20" × 70" (51cm × 178cm)
76. medium yellow, 10½" × 18" (26.5cm × 45.5cm)
77. orange, 10½" × 27½" (26.5cm × 70cm)
78. red, 10½" × 6" (26.5cm × 15cm)
79. orange, 10½" × 20" (26.5cm × 51cm)
80. gray print, 20" × 70" (51cm × 178cm)
2. assemble strips for the quilt front
Assemble each horizontal strip for the quilt front as shown in the Quilt Front diagram. (FIGURE 1) If the strip contains a pieced square, sew that first and then join it to its neighboring strips. Sew all the pieces with right sides together, using a ¼" (6mm) seam allowance. (If you are sewing wonky lines as described in the note, you will use larger seam allowances.) Press all the seam allowances to one side, facing the same direction.
Once all the horizontal strips are complete, join the strips to each other vertically. With right sides together, pin then sew with ¼" (6mm) seam allowances. Press all the seams to one side, facing in the same direction.
3. square the quilt top
If you decided to go the wonky route, your quilt’s sides may not be perfectly even. To square up your quilt top, use a straightedge and a rotary cutter or scissors to trim the sides of the quilt to make all sides even and all 4 corners right angles.
4. assemble strips for the quilt back
Refer to FIGURE 2. Assemble the vertical back center strip, pinning then sewing the pieces with right sides together and using ¼" (6mm) seam allowances. Press all the seam allowances to one side, facing in the same direction. Pin then sew one of the gray side strips to each long side of the center strip, using ¼" (6mm) seam allowances. Press the seam allowances to one side, facing in the same direction.
5. layer and baste the quilt
Place the assembled quilt back on a floor or work surface with the wrong side facing up. Layer the batting on top of it, being sure to smooth out any wrinkles. Center the quilt front over the batting, with the right side of quilt front facing up. The front will be smaller than the batting and quilt back).
Using a hand-sewing needle and thread, baste all 3 layers of the quilt together using long running stitches (approximately 3" [7.5cm] long), placed approximately 6" (15cm) apart. Alternatively, you can pin the layers together with safety pins.
6. quilt the quilt
With a neutral color thread (I used white), sew quilting lines horizontally across the quilt, slanting or crisscrossing the lines randomly.
7. finish
Trim the quilt back and batting so the edges are even with the quilt front.
8. bind the quilt
Refer to these instructions to make and attach the quilt binding to finish the raw edges.
Optional: If you like, make a 2-toned binding so that the light gray portion of the quilt gets a light gray binding, and the dark gray gets a dark gray binding. To do this, attach one color binding first, starting and stopping about 12" (30.5cm) inside the point where the colors change. Join the second color binding to the first, aligning the join with the point on the quilt top where the colors change, then continue attaching the binding.
 tip
tipFlip to here for lots more info on layering, basting, binding, and quilting your quilt.

When it comes to quilts, I love bright colors set on neutral backgrounds, with lots of crazy lines. In this design, I wanted to set diamonds on the diagonal, which calls for precision, yet I got my crazy fix by adding a wonky center to each diamond piece. The result is a quilt that combines a little bit of everything, and while it only requires straight-line sewing, the construction offers a bit of a challenge—for those who like that sort of thing!
finished dimensions
WIDTH: 81" (205.5cm)
LENGTH: 90" (229cm) (fits a double/
queen bed)
supplies
* ¼ yard (23cm) each:
10 patterned fabrics (for diamond centers)
20 coordinating solid fabrics (for diamonds)
* 6 yards (5.5m) white fabric
* 6 yards (5.5m) coordinating solid or patterned fabric (for quilt back)
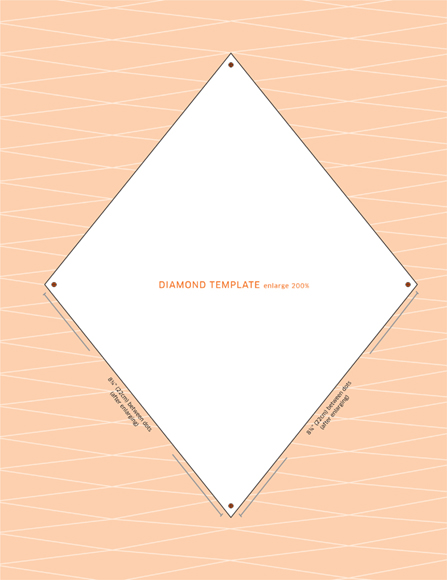
* 5 large sheets of card stock for templates, each measuring at least 15" × 12" (38cm × 30.5cm)
* 87" × 96" (221cm × 244cm) piece medium-loft cotton batting
fabric suggestions
Quilting cottons are perfect for this project. They are just the right weight, and come in a wide array of colors.
1. measure + cut
NOTE: To avoid confusion, label the fabric pieces as you cut them.
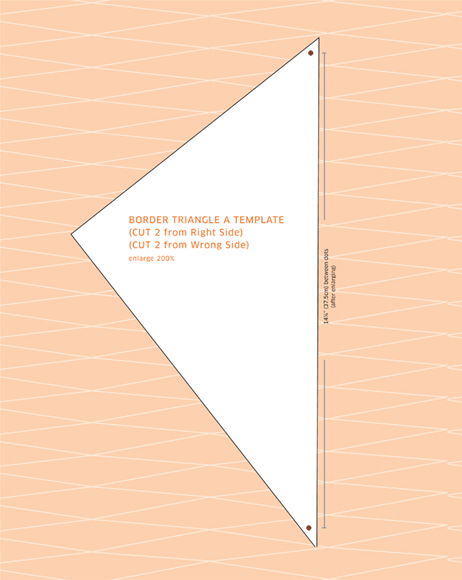
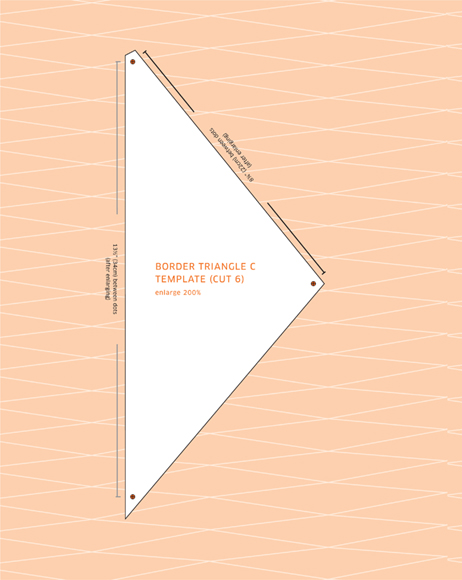
TEMPLATES: Using these templates, enlarge them 200% and transfer the enlarged templates onto card stock, and cut them out. Transfer all template markings to your card stock templates.
FABRIC: Be sure to cut your fabric in the order listed below. (This will ensure you’ll have enough fabric to cut the longest pieces.)
TOP/BOTTOM BORDERS: From the white fabric, cut two 8" × 81" (20.5cm × 205.5cm) rectangles.
SIDE BORDERS: From the white fabric, cut two 11" × 74" (28cm × 188cm) rectangles.
LONG SASHING (NO TEMPLATE): From the white fabric, cut the following strips:
Long Sashing X: Two 3½" × 40" (9cm × 101.5cm) strips
Long Sashing Y: Two 3½" × 65" (9cm × 165cm) strips
Long Sashing Z: Two 3½" × 85" (9cm × 216cm) strips
SHORT SASHING: From the white fabric, cut 30 pieces of short sashing, using the Short Sashing template.
BORDER TRIANGLES A: Cut 2 from the right side and 2 from the wrong side of the white fabric, using the Border Triangle A template.
BORDER TRIANGLES B: Cut 6 from the white fabric, using the Border Triangle B template.
BORDER TRIANGLES C: Cut 4 from the white fabric using the Border Triangle C template.
WONKY DIAMOND CENTERS (NO TEMPLATE): From the assorted patterned fabrics, cut 25 center squares, each measuring 5" × 5" (12.5cm × 12.5cm). These are the center of the diamonds, which will be attached to the solid diamond borders.
WONKY DIAMOND BORDERS D AND E (NO TEMPLATE): From the assorted solids, cut fifty 5" × 5" (12.5cm × 12.5cm) pieces (D) and fifty 5" × 10" (12.5cm × 25.5cm) pieces (E). These are the solid portion of the diamonds, which will be attached to the diamond centers.
QUILT BACK: Cut two 44" × 96" pieces (112cm × 244cm) from the quilt back fabric.
2. make 25 wonky diamond blocks
Since the diamonds are sewn with wonky seams, you don’t need to worry about sewing each one perfectly.
With right sides together, pin one raw edge of a Wonky Diamond Border D to one raw edge of a Wonky Diamond Center. To get the wonky effect, sew the pieces unevenly using one of these methods: 1) Place the raw edges slightly askew and then sew a straight, even seam (seam allowances will vary according to your wonkiness), or 2) Match the raw edges evenly but vary your seam allowance from wider to narrower as you sew. (FIGURE 1)
Repeat to attach another Wonky Diamond Border D to the opposite side of the Wonky Diamond Center. (FIGURE 2) Trim the seam allowances to ¼" (6mm), and press them to one side. (If one fabric is lighter in color, press the seam allowance toward the darker fabric to prevent the darker allowance showing through the lighter fabric.)
Sew a Wonky Diamond Border E to each of the long raw edges of the diamond piece you constructed above, again sewing a wonky seam. Trim the seam allowances to ¼" (6mm), and press them in one direction. (FIGURE 3)
Next, trim the resulting piece to the correct size using the Diamond template. Place the Diamond template over the joined diamond piece, situating the (fabric) diamond center approximately in the center of the template. Using a rotary cutter and straightedge, trim the diamond so that all edges are even with the template. (FIGURE 4) The resulting piece is one finished diamond. (FIGURE 5)
Transfer all corner dots from the Diamond Template to the finished diamond block. Repeat to create all 25 diamond blocks.
3. arrange diamond blocks
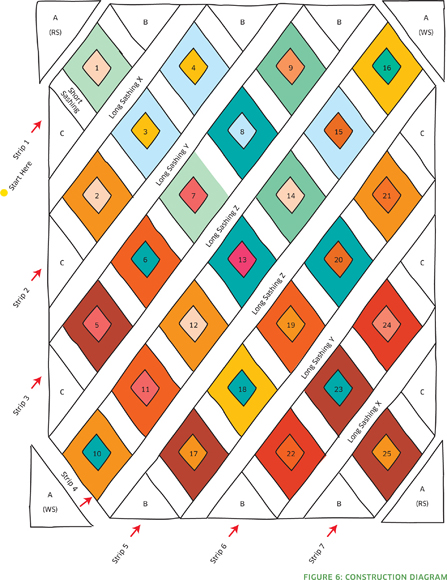
Arrange the 25 diamond blocks on a floor, bed, or work surface, placing colors as you desire. Referring to FIGURE 6, number each diamond according to its placement so you don’t lose track of the layout once you start sewing. (I find it easiest to write the number on a small scrap of paper and pin it to the diamond.)
4. assemble the 7 strips
NOTE: For the remainder of this quilt’s construction, the seams should be sewn straight and even, not wonky. Always sew fabrics right sides together with a ¼" (6mm) seam allowance.
Refer to FIGURE 6. Beginning where indicated for Strip 1, assemble the Diamonds, Short Sashing, and Border Triangles into 7 strips. Pin pieces together before sewing them, aligning the corner dots. For the angles to work out correctly, sew each strip in the order specified below.
SEW STRIP 1 IN THIS ORDER: Border Triangle C, Short Sashing, Diamond 1, Short Sashing, Border Triangle B.
SEW STRIP 2 IN THIS ORDER: Border Triangle C, Short Sashing, Diamond 2, Short Sashing, Diamond 3, Short Sashing, Diamond 4, Short Sashing, Border Triangle B.
Sew Strips 3–7 in the same manner, following the order specified above. Once the 7 strips are assembled, press all seam allowances in the same direction.
5. join the strips with long sashing
Once all 7 strips are assembled, join them with the Long Sashing pieces. Begin at the top left of the quilt. Situate Strip 1 facing right side up, and align and pin Long Sashing X along the longer edge of Strip 1. (The sashing will be longer than the strip; center it so that the overhang is equal on each end). Stitch the seam and press the seam allowance to one side.
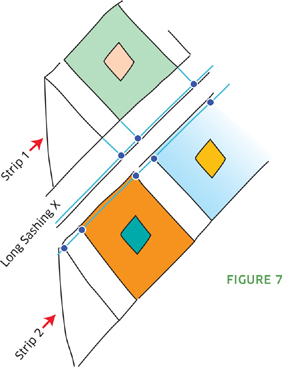
Next, place the joined strip and sashing right side up, and mark as follows: Refer to FIGURE 7. With chalk or a disappearing pen, draw a line from each short sashing seam across the long sashing. Mark a line ¼" (6mm) in from the long raw edge of the long sashing. Mark a dot at the spot where these lines intersect.
Along the neighboring edge of the next strip to be joined, mark a dot at each seam ¼" (6mm) in from the raw edge.
Place these two sections right sides together, aligning all dots. Pin, then sew; press the seam allowance to one side.
Continue to join all strips in this manner, using the length of long sashing indicated in FIGURE 6. The long sashing will overhang on the sides of the quilt. When all the strips are assembled, trim the sashing overhang so that it is flush with the rest of the quilt top.
6. add the corner triangles
Pin then sew the Border Triangle A pieces to the corners of the quilt, being sure to place the right side/wrong side pieces correctly according to FIGURE 6.
7. add the border
Pin then sew an 11" × 74" (28cm × 188cm) side border piece to each of the 2 side edges of the quilt top, using ¼" (6mm) seam allowances. Press the seam allowances to one side.
Pin then sew an 8" × 81" (20.5cm × 205.5cm) border piece to the top and bottom edges of the quilt, and press the seam allowances to one side.
8. assemble the quilt back
Arrange the two 44" × 96" (112cm × 244cm) pieces with right sides together and the long sides aligned; pin. Sew, and press the seam allowance to one side.
tipIt can be difficult to quilt large pieces like this on a home sewing machine. Many people choose to send their quilt out to be quilted professionally on a special quilting machine. Most local quilt shops offer this service or can recommend someone who does, so ask at your local shop!
9. layer and quilt
Place the quilt back on a floor or work surface with the wrong side facing up. Place the batting over this, smoothing to remove any wrinkles. Center the quilt top over this, with the right side facing up. (The quilt top will be smaller than the quilt back and batting.)
Using a hand-sewing needle and thread, baste all 3 layers of the quilt together using long running stitches (approximately 3" [7.5cm] long), placed approximately 6" (15cm) apart. Alternatively, you can pin the layers together with safety pins.
Quilt through all layers using this photograph as a guide, or in any pattern you desire. (Simple diagonal crisscrossing lines would look great, too!)
10. bind the quilt
Please see here for detailed instructions on making and attaching quilt binding. Make a 440" (11.2m) length of binding, and attach it as instructed.
tipVisit my website, www.brettbara.com, for more helpful tips and tricks.
To download printable copies of the templates, go to http://rhlink.com/ssl001.