Holidays, birthdays, and other gifting events mean only one thing to me: time to get crafty! I love to give handmade presents whenever possible.
You don’t need advanced skills or tons of time to sew a gift that’s truly special. Just about everything in this chapter can be made with basic skills and a free afternoon—all you need to create amazing gifts their recipients are sure to love.
In this section you’ll find sweet, quick projects for everyone in your life—men, ladies, and little ones, too. Some of the projects are crazy easy, like the Folded Flower Bowls and 60-Second Hello. Once you’ve mastered the basics, move on to the On-the-Go Jewelry Keeper or Staggering Strips Baby Quilt for presents that are just perfect.
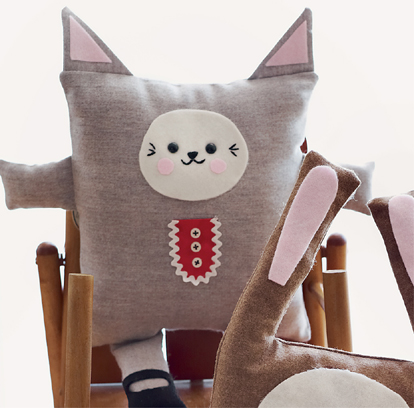
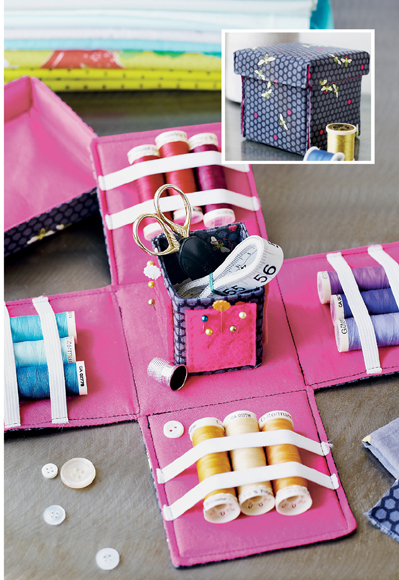
And if you like a bit of a challenge, Mister Bunny and Miss Kitty are a charming pair of softies for kids or kids at heart, while the Denim Dop Bag is just right for tough guys who can be tricky to craft for. The 9-to-5 Folder is great for work friends, and the Magic Sewing Kit just might get my vote for all-time favorite crafty gift.
Many of these projects can be made from fabric leftovers in your stash, or from very small amounts of purchased fabric. That means you don’t have to spend much money to give a gift that means a ton.
So for perfect presents that are fun to make and easy on your wallet too, look no further than the very next page. Let’s go!
Can you believe these round bowls are made with straight seams? A simple square turns into a flower-like vessel with a little nip-tuck at the corners. Best of all, each one takes mere minutes to make. Try it—I bet you can’t stitch just one!
finished dimensions
small bowl
WIDTH: 3¾" (9.5cm)
HEIGHT: 1¾" (4.5cm)
medium bowl:
WIDTH: 5" (13.5cm)
HEIGHT: 2" (5cm)
large bowl:
WIDTH: 6" (16cm)
HEIGHT: 2¼" (5.5cm)
supplies
* ¼ yard (23cm) each of 4 medium-weight fabrics, such as quilting cottons, in coordinating colors (for small and medium bowls)
* ⅓ yard (30cm) each of 2 medium-weight fabrics, such as quilting cottons, in coordinating colors (for large bowl)
* ½ yard (46cm) heavyweight fusible interfacing
1. measure + cut
SMALL BOWL: Cut a 6½" (16.5cm) square from each of 2 coordinating fabrics, and 2 squares of the same size from interfacing.
MEDIUM BOWL: Cut an 8½" (21.5cm) square from each of 2 remaining coordinating fabrics, and 2 squares of the same size from interfacing.
LARGE BOWL: Cut a 9½" (24cm) square from each of the 2 remaining coordinating fabrics, and 2 squares of the same size from interfacing. (FIGURE 1)

2. attach interfacing
Fuse one corresponding piece of interfacing to the wrong side of each piece of fabric.
3. sew the squares
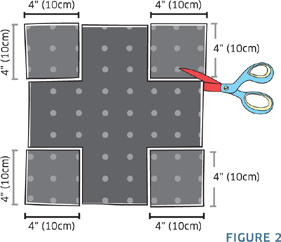
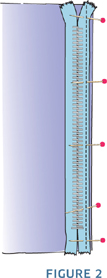
Pin both small bowl (6½" [16.5cm]) squares of fabric right sides together, aligning all raw edges. Sew around all 4 sides with a ¼" (6mm) seam allowance, leaving a 4" (10cm) opening on one side. (FIGURE 2)

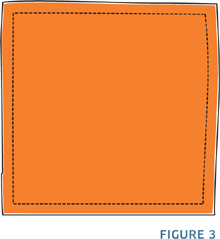
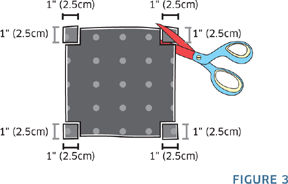
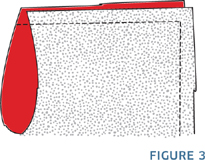
Trim the seam allowance from the corners and turn the piece right side out through the opening in the stitching. Use a pointy tool to carefully poke the corners out. Turn under the raw edge of the fabric at the opening ¼" (6mm) and press to the inside. Topstitch around all 4 sides, ½" from the edge. (FIGURE 3)
Repeat Step 3 using the remaining pieces of fabric to sew the medium and large squares.
4. make the corners
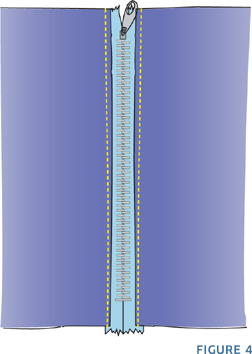
SMALL BOWL: Fold the square in half diagonally. Mark a point along the side edge 1" (2.5cm) in from the point of one folded corner, and sew a seam from the folded edge to this spot, perpendicular to the sides of the square. (FIGURE 4) Repeat for all remaining corners of the small bowl. As you sew each corner, the bowl will begin to take shape.
MEDIUM BOWL: Fold and sew the corners as you did for the small bowl, placing the seam 1½" (3.8cm) from the point of the corner. (FIGURE 4)

LARGE BOWL: Fold and sew the corners as you did for the small bowl, placing the seam 1¾" (4.5cm) from the point of the corner. (FIGURE 4)
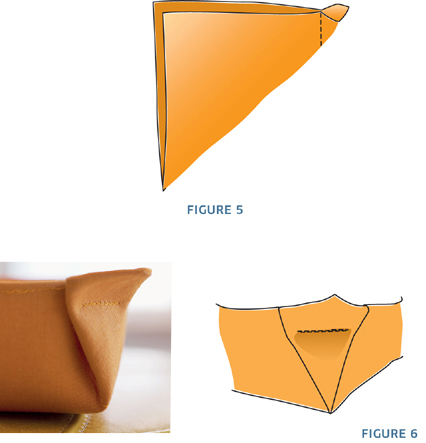
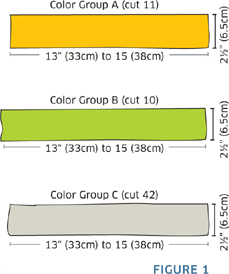
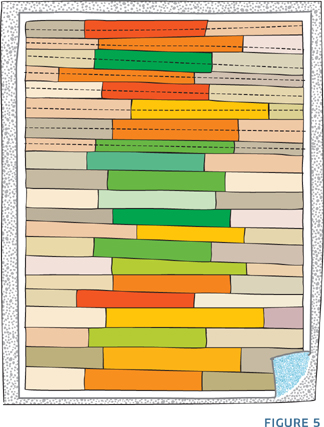
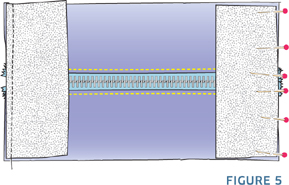
FOR ALL SIZES: Open the tuck between the corner seam and the point of each corner. (FIGURE 5) Flatten the tuck out against the corner seam so that the corner point is centered on the seam. Topstitch the fabric in place across the fold, sewing parallel to the top edge of the bowl, about ¼" (6mm) from the edge, and backstitch to reinforce the seam. Repeat for every corner on each bowl. (FIGURE 6)

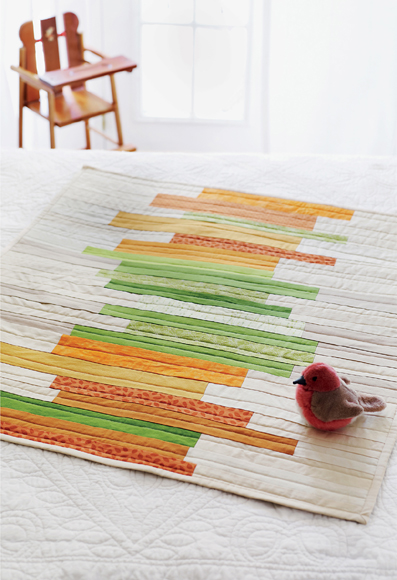
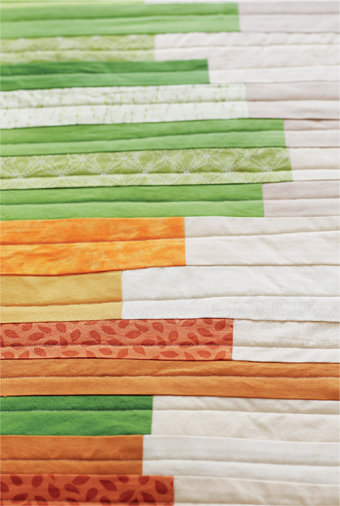
Thanks to their small scale, baby quilts are the perfect platform for experimenting with color and layout. In this quilt, uneven strips of fabric are stitched together at staggered intervals, making a very simple construction look high-design. No exact measuring or precise cutting is required for this project, so you get all the crafty fun without all the fuss. You can finish this quilt in about a weekend, so if you need a quick gift that looks like it stepped out of a modern boutique—baby, this one’s for you.
finished dimensions
WIDTH: Approximately 36" (91cm)
LENGTH: Approximately 30" (76cm) (Because this quilt is imprecise, exact finished measurements will vary.)
supplies
* ¼ yard (23cm) each of 6 different fabrics in color group A (here, orange was used)
* ¼ yard (23cm) each of 6 different fabrics in a contrasting color group B (here, green was used)
* ½ yard (46cm) each of 3 fabrics in neutral tones for color group C
* 1 yard (91cm) coordinating fabric for quilt back
* ½ yard (46cm) coordinating fabric for binding
* 1 yard (91cm) cotton quilt batting
fabric suggestions
Quilting cottons are ideal for this project. Cotton-linen blends work nicely for the quilt back, if you like.
 note
noteThis project involves a little bit of randomness—exact measurements aren’t necessary, so I encourage you to be free when cutting and stitching for a result that’s all you.
1. measure + cut
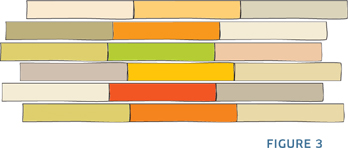
Cut the A, B, and C fabrics into strips 2½" (6.5cm) wide, and ranging in length from 13" to 15" (33cm–38cm). You will need 11 strips in color group A, 10 strips in color group B, and 42 strips in color group C to make a quilt just like this one—but of course you can vary the number of each color strips you use for a personalized design. (FIGURE 1)
2. sew the strips of the quilt front
Sew a C (neutral fabric) strip onto each short end of every A and B strip. Press all seam allowances toward the A and B sections so the colored seam allowances don’t show through the lighter fabrics. (FIGURE 2)

3. arrange the strips
Lay out all the strips on your work surface or floor. Arrange them, right side up, in the color order you prefer. (I clustered my strips in sections with orange at the top and bottom and green in the middle.)
Arrange the strips so that the center column is staggered. The ends of the strips won’t be square with each other; they’ll be trimmed later. (FIGURE 3)
4. join the strips
Once you are happy with the strip arrangement, pin then sew the strips together as follows: For the wonky look of this quilt, assemble the strips unevenly by arranging the raw edges of each strip so that they are slightly askew, and then sew a straight seam to join the pieces (seam allowances will vary according to your wonkiness). Alternatively, arrange the raw edges evenly but allow your seam allowance to become slightly wider or narrower as you sew across the length of the strip. You may also want to sew with an extra-large allowance on some strips (up to 1" [2.5cm]) so that some strips are narrower than others. (FIGURE 4)

Trim the seam allowances to about ¼" (6mm). Press all seam allowances in the same direction, toward one end of the quilt.
5. trim the edges of the top
When all the strips are joined together, the edges of the quilt top will be uneven and will need to be made square. Use a quilter’s ruler or yardstick and a rotary cutter or scissors to even all the edges and create right angles on all 4 corners.
Measure the finished size of the trimmed quilt top.
6. layer batting and back
Cut the batting and quilt back fabric 6" (15cm) longer and wider than the quilt top. Lay the quilt back on your work surface right side down, smoothing it to ensure there are no bumps or wrinkles. Lay the batting on top of this, aligning all edges and corners. Center the quilt top, right side up, on top of the batting, sandwiching the batting between the quilt front and quilt back. (FIGURE 5)
7. baste
Using a hand-sewing needle and thread, baste all 3 layers of the quilt together using long running stitches (approximately 3" [7.5cm] long) placed approximately 6" (15cm) apart. Alternatively, you can pin the layers together with safety pins.
8. quilt
You can now quilt the 3 layers together by hand or machine.
Using all-purpose thread in a neutral color, quilt all the layers together, making one line of horizontal quilting stitches across each horizontal strip. In keeping with the wonky look of this design, don’t worry about making the quilting lines perfectly even—it’s fine if they slant or go a bit crooked. (FIGURE 5)
9. bind + finish
Remove the basting stitches. Trim the batting and quilt back so that they are even with the raw edges of the quilt top.
Finish the quilt’s raw edges with quilt binding.
 personalize it!
It’s really easy to change up this design with different colors or a different layout. I think it would look great if the center column were shades of all one color, like blues or browns. It would also be fun to stagger the color sections in a different configuration, such as in a diagonal column instead of vertical.

Got a minute? Stitch up these cute greeting cards with your fabric scraps.
supplies
* Medium-weight fabric scraps
* Blank greeting cards
* Adhesive such as double-sided tape, glue, or double-sided fusible webbing
1. Randomly stitch together strips of scrap fabric to create a patchwork piece that is slightly larger than the front of your card, and press all seams to one side. Or, simply select a solid piece of fabric that is at least the size of your card.
2. Trim the fabric to just slightly smaller than the front of your card.
3. To prevent shifting while sewing, attach the fabric to the card with an adhesive of your choice. (If you are using glue, allow it to dry before proceeding.)
4. Topstitch all 4 sides of the fabric, making sure the card is open flat so you don’t sew it closed.
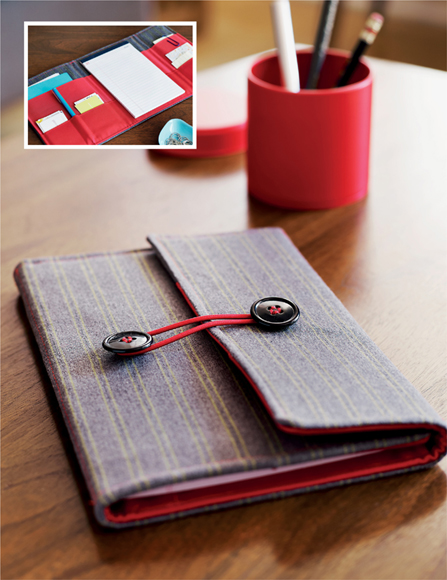
Tuck business cards, a pen, notes, and more into the pockets of this handy portfolio. I used suiting fabric for the exterior to give it an office-y touch, but this piece would look fantastic in a colorful print, too.
finished dimensions
WIDTH: 6" (15cm) closed, 16½" (42cm) open
LENGTH: 9" (23cm)
supplies
* ⅓ yard (30cm) medium-weight fabric for exterior
* ¼ yard (23cm) contrasting medium-weight fabric for pockets
* ⅓ yard (30cm) heavyweight fusible interfacing
* Two 1" (2.5cm) buttons
* 7" (18cm) length ⅛"- (3mm-) thick elastic cord
* Plastic folder from office supply store (see Note)
note
To stiffen this piece, flexible plastic inserts are placed in between the layers of fabric. I used a plastic office folder for this, which is the perfect weight and easy to cut with scissors.
1. measure + cut
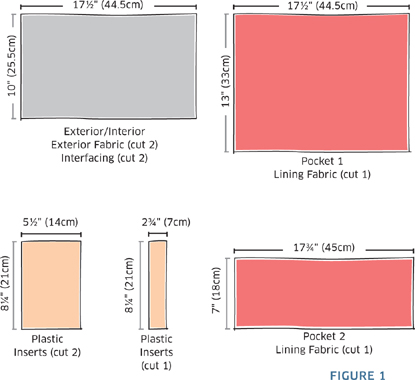
EXTERIOR, INTERIOR, AND INTERFACING: From the exterior fabric, cut 2 rectangles measuring 10" × 17½" (25.5cm × 44.5cm); cut 2 rectangles the same size from the interfacing.
POCKETS: From the pocket fabric, cut one rectangle 13" × 17½" (33cm × 44.5cm) and one rectangle 7" × 17¾" (18cm × 45cm).
PLASTIC INSERTS: From the plastic, cut 2 rectangles 8¼" × 5½" (21cm × 14cm) and one rectangle 8¼" × 2¾" (21cm × 7cm). (FIGURE 1)
2. attach interfacing
Fuse a piece of interfacing to both 10" × 17½" (25.5cm × 44.5cm) exterior and interior rectangles (this page).
3. assemble pocket piece
Fold each pocket piece in half lengthwise with wrong sides together and press. Topstitch each piece close to the fold.
MAKE THE PENCIL POCKET: Orient the shorter (7" [18cm]) pocket with the folded edge at the top. Mark the bottom raw edge as follows: Measure 3" (7.5cm) in from the left raw edge and mark point A. Measure 1" (2.5cm) to the right of A and mark point B. (FIGURE 2)
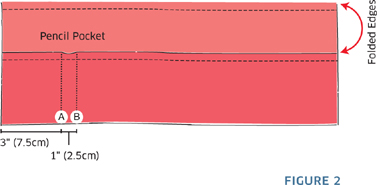
Position the shorter pocket on top of the taller (13" [33cm]) pocket, with raw edges aligned, making a small pleat between points A and B (on the shorter pocket), pleating just enough to align the raw side edges of both pockets. Pin together.
Topstitch the 2 pockets together at point A, stitching a vertical line from the bottom raw edge up to the folded top edge of the shorter pocket. Repeat at point B. (FIGURE 2)
ATTACH THE POCKETS TO THE INTERIOR OF THE FOLDER: Layer the joined pockets right side up on the right side of one of the 10" × 17½" (25.5cm × 44.5cm) rectangles, aligning the bottom and side edges; pin. Sew together along the sides and bottom, using a ¼" (6mm) seam allowance, leaving the top edge open. This is the interior.
4. attach the elastic cord and buttons
ELASTIC CORD AND RIGHT-HAND BUTTON: On the remaining 10" × 17½" (25.5cm × 44.5cm) rectangle (exterior), mark a spot on the right side of the fabric 2" (5cm) from the right-hand (shorter) side edge, centered between the top and bottom (longer) edges. Fold the elastic cord in half with raw ends aligned. Position the raw ends at the mark, and sew back and forth over them several times. Sew a button on at the same mark, directly over the raw ends of the elastic. (FIGURE 3)
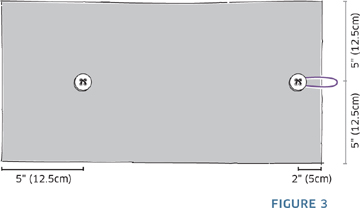
LEFT-HAND BUTTON: Mark another point 5" (12.5cm) from the left edge and centered between the top and bottom edges.
Sew a button at this mark with a thread shank: Place a wooded matchstick (or other object of the same diameter as the elastic) under the button as you sew. Remove the matchstick, pull the button away from the fabric, and wrap the sewing thread around the stitches attaching the button to the fabric 3 times, then bring the thread through the fabric to secure it on the wrong side. (FIGURE 3)
5. assemble the interior and exterior
Fold under the top edge of the exterior and interior (the edge opposite the pockets) ½" (13mm) and press. Unfold; the fold lines will be used later as a guide.
JOIN THE INTERIOR TO THE EXTERIOR: With right sides together, pin the exterior piece and interior/pocket piece together with all raw edges aligned. Using a heavy-duty needle (since you will be sewing through many layers of fabric), sew the sides and bottom together with a ½" (13mm) seam allowance, leaving the top edge open. Be careful not to catch the elastic loop in the stitching.
Trim the corners, turn the piece right side out, and use a pointy object to gently poke out the corners; press. Turn the top edges under at the fold lines created earlier, and press.
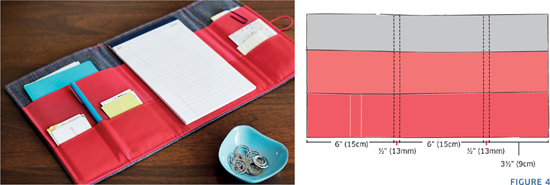
TOPSTITCH TO MAKE POCKETS: With the interior facing up, measure and mark a point 6" (15cm) from the left-hand side edge, and mark another point ½" (13mm) to the right of this. Measure 6" (15cm) to the right and mark another point, then measure ½" (13mm) to the right of this and mark another point. Topstitch through all layers at each of these 4 points, making a vertical line of stitching from the top edge to the bottom edge. (FIGURE 4).
FINISH: Insert the two 5½"- (14cm-) wide plastic pieces in the 6" (15cm) sections (between the topstitching), and insert the 2¾"- (7cm-) wide plastic piece in the remaining narrow section.
Topstitch around the perimeter of the entire piece, stitching close to the fold, closing the open top edge.
Insert a small notebook into the top pocket on the center panel, if desired. Fold the folder closed and loop the elastic over the other button to secure.
Remove the lid from this seemingly simple little box, and a hidden sewing kit springs to life! The sides of the box open outward to reveal spots for spools of thread or other notions, while the center container is perfect for scissors and more. Sewing on a missing button was never so much fun!
finished dimensions
WIDTH: 4½" (11.4cm) closed, 12" (30.5cm) open
LENGTH: 4½" (11.4cm) closed, 12" (30.5cm) open
HEIGHT: 4¼" (11.4cm)
supplies
* ½ yard (46cm) medium-weight cotton for exterior
* ½ yard (46cm) medium-weight cotton for interior
* ½ yard (46cm) heavyweight fusible interfacing
* Scraps of craft felt
* 1½ yards (1.4m) ¼"- (6mm-) wide elastic
* 1 large sheet of very heavy card stock or book board, at least 12"(30.5cm) × 15"(38cm)
* Hot glue gun
1. measure + cut
BASE: Cut one 13" × 13" (33cm × 33cm) square each from the interior and exterior fabrics. Cut 2 squares the same size from the interfacing.
LID: Cut one 7½" × 7½" (19cm × 19cm) square each from the interior and exterior fabrics. Cut 2 squares the same size from the interfacing.
CENTER CONTAINER: Cut two 3½" × 9" (9cm × 23cm) rectangles from the exterior fabric. Cut 2 rectangles the same size from the interfacing.
FELT PIN PADS: Cut eight 1½" × 2" (3.8cm × 5cm) rectangles from the felt.
CARD STOCK: Using a craft knife, straightedge, and cutting mat, cut five 3½" × 3½" (9cm × 9cm) squares. Cut one 4" × 4" (10cm × 10cm) square, and four 4" × ¾" (10cm × 2cm) rectangles. (FIGURE 1)

2. cut base and lid shapes
BASE: Fuse one piece of corresponding interfacing to the wrong side the base exterior and interior pieces. Cut 4 (10cm) square from each corner, creating a plus-sign shape. (FIGURE 2)
LID: Fuse one piece of corresponding interfacing to the wrong side of the lid exterior and interior pieces. Cut a 1 (2.5cm) square from each corner, creating a plus-sign shape. (FIGURE 3)
3. sew the base
Turn under ½" (13mm) along the outer edge of one “arm” of each base piece (exterior and interior) and press. Open the fold (the folded lines will be used in Step 4).
Pin the 2 base pieces right sides together, aligning all raw edges and the 2 prefolded edges. Leaving the prefolded ends open, sew around all other sides using a ½" (13mm) seam allowance. (FIGURE 4)

Clip the seam allowance from all the corners, taking special care to clip the interior corners as close as possible to the stitch line. Carefully turn the piece right side out and use a pointy tool to gently poke out the corners. Press.
4. add the card stock and elastic to the base
Cut the elastic into eight 5" (12.5cm) lengths. Set aside.
Slide one of the 3½" (9cm) squares of card stock through the folded-edge opening, sliding it into one of the other arms. With the lining fabric facing up, place 2 lengths of elastic across the arm, spacing them about 1" (2.5cm) from the outer edge of the arm and about 1" (2.5cm) apart from each other; pin in place. The elastic will overhang ½" (13mm) on each side of the arm. Topstitch around all 4 sides of the cardstock, close to the folded edges of the fabric but outside the edge of the card stock, stitching across the elastic to anchor it in place. Trim the elastic flush with the edges of the arm after stitching. (FIGURE 5)

Repeat for the 2 remaining stitched arms, but not the one with the open edge.
Next, slide a 3½" (9cm) square of card stock into the center area (no stitching is required to hold this piece in place) before sliding the final piece of card stock into the arm with the open edge. Turn under the open edges along the fold lines you made earlier, and press. Add elastic and topstitch around all edges of this arm as you did for the previous arms, closing up the opening.
5. sew the center container
Fuse the center container interfacing pieces to the wrong side of the corresponding fabric pieces.
Fold under ½" (13mm) on one short end of each center container piece, and press. Unfold (the folded lines will be used later). With right sides together, pin the 2 pieces together, aligning the prefolded edges and all raw edges. Sew the pieces together around 3 sides with a ½" (13mm) seam allowance, leaving the prefolded edges open.
Clip the seam allowance from the corners and turn the piece right side out. Use a pointy object to gently poke out the corners, and then fold under the prefolded edges. Press.
Topstitch around the perimeter of the piece. Mark the piece every 2" (5cm) along its length, and sew a vertical line of topstitching at each mark. (FIGURE 6)

Fold the piece at the topstitching lines and press. Unfold (the folded lines will be used in Step 6).
6. add the felt to the center container
Layer two pieces of felt together and center them on each 2" (5cm) section of the strip made in Step 5. By hand, stitch the felt to the strip with a running stitch (this page), sewing around all 4 edges of the felt, close to the edge. (Sewing these pieces by machine is not recommended, as the felt tends to shift and distort during machine sewing.)
Fold the strip at each topstitched/folded line from Step 5. By hand, whipstitch the 2 open edges together, making a 4-sided column.
Using a hot glue gun, glue one end of the column to the center of the base made in Step 2. (Refer to photo for placement.)
7. sew the lid
The lid is assembled the using the same basic construction as the base in Step 3 (FIGURE 4 AND FIGURE 5).
Turn under ½" (13mm) along the outer edge of one arm of each lid piece and press. Open the fold (this fold line will be used later).
Pin the 2 lid pieces right sides together, aligning the 2 prefolded edges and all raw edges. Leaving the prefolded section open, sew around all other sides using a ½" (13mm) seam allowance.
Clip the seam allowance from all the corners, taking special care to clip the interior corners as close as possible to the stitch line. Turn the piece right side out, using a pointy object to gently poke out the corners, and press.
8. add the card stock to the lid
Slide one of the 4" × ¾" (10cm × 2cm) rectangles of card stock through the open folded edges of the lid, sliding it into one of the other arms. Topstitch around all 4 sides of the card stock, in the space between the edge of the fabric and the card stock. (FIGURE 7)
Repeat for 2 more arms, and then slide the 4" (10cm) square of card stock into the center area (no stitching is required to hold this piece in place). Slide the final 4" × ¾" (10cm × 2cm) rectangle of card stock into the arm with the open side. Turn under the open area along the fold lines you made earlier, and press. Topstitch around all edges of this arm as you did for the previous arms.
After assembling, fold up each side of the lid so that the 1" (2.5cm) edges meet at the corners, and whipstitch the sides together at the corners to complete the lid.
9. finish
Fold up all 4 arms of the base and place the lid on top to keep the sewing kit closed. When the lid is off, the sides of the base will fall open and flat. The elastic can be used to hold spools of thread or other notions; fill the center container with small scissors, buttons, or other sewing tools.
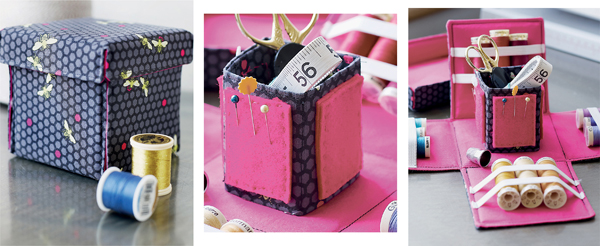
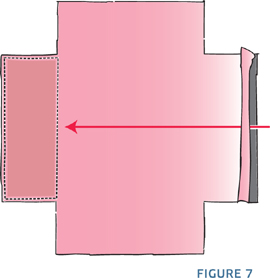
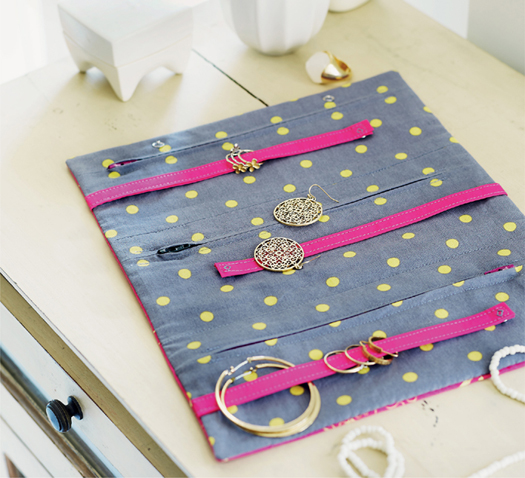
Travel in style and stay organized with this handy little case, which allows you store all your accessories in one place. Snap rings and hoop earrings securely onto the straps, and stash everything else in the zipper pockets. Neat!
finished dimensions
WIDTH: 10" (25.5cm)
LENGTH: 4" (10cm) closed, 12" (30.5cm) open
supplies
* ⅓ yard (30cm) heavyweight fabric such as canvas or cotton twill (for exterior)
* ⅓ yard (30cm) coordinating medium-weight fabric such as quilting cotton (for interior pockets and lining)
* ¼ yard (23cm) coordinating medium-weight fabric such as quilting cotton (for straps)
* Three 8" (20.5cm) zippers
* Five ¼" (6mm) snaps
1. measure + cut
EXTERIOR AND LINING: Cut one 13" × 11" (33cm × 28cm) rectangle from the exterior fabric (for the exterior) and one rectangle of the same size from the lining/pocket fabric.
POCKETS: Cut three 11" × 4" (28cm × 10cm) rectangles and three 11" × 2" (28cm × 5cm) rectangles from the lining/pocket fabric.
STRAPS: Cut three 2" × 8¾" (5cm × 22cm) strips from the strap fabric. (FIGURE 1)

2. install the zippers
With right sides together, align one 11" × 4" (28cm × 10cm) pocket piece with an 11" × 2" (28cm × 5cm) pocket piece, with raw edges aligned along the 11" (28cm) edges. Sew the fabrics together along this edge with a ½" (13mm) seam allowance as follows: Sew with a regular stitch for 1½" (3.8cm), backstitch to reinforce, then switch to a basting stitch length and baste for 8" (20.5cm). Switch back to a regular stitch length, backstitch to reinforce, and sew the remaining 1½" (3.8cm). Press the seam allowance open. Repeat for the 2 remaining interior pockets. (FIGURE 2)

Position a zipper right side down on the wrong side of the seam you just sewed, centering the zipper teeth over the basted portion of the seam. Pin it in place. (FIGURE 3) Attach the zipper foot to your machine. Topstitch along each side of the zipper, about ¼" (6mm) from the teeth, backstitching to reinforce at the beginning and end on each side of the zipper. (FIGURE 3) From the right side, carefully remove the basting stitches with a seam ripper.
Repeat to install the remaining zippers into each of the remaining 2 interior pocket pieces.

3. join the zipper panels
Sew the 3 zippered interior-pocket pieces together. With right sides together and the raw edges of the 11" (28cm) sides aligned, pin and sew the pockets together with a ½" (13mm) seam allowance. Press the seam allowances open. (FIGURE 4)

4. make and attach the straps
Using the strap pieces cut in Step 1, make 3 straps following these directions.
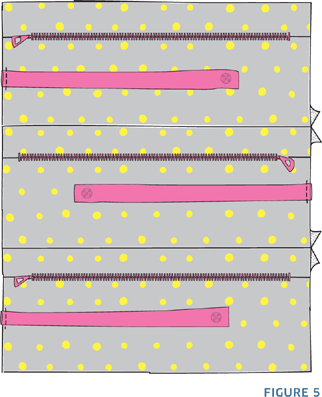
Orient the zipper pocket panel, right side up, with the zipper closest to the panel edge at the top. Position one strap 1" (2.5cm) below each zipper, aligning the raw ends of the top and bottom straps with the left-hand raw edge of the pocket panel, and the raw end of the middle strap with the right-hand raw edge of the pocket panel. Sew the straps in place with a ¼" (6mm) seam allowance. Hand-sew a snap to the end of each strap on the underside; sew the corresponding half of the snap to the zipper panel where the strap snap meets it. (FIGURE 5)
5. sew snaps for the wallet closure
AT THE INSIDE TOP OF THE WALLET: Orient the pocket panel as you did in Step 4. On the top panel, mark placement for the closure snaps 1" (2.5cm) from the top raw edge and 3" (7.5cm) in from each side. Sew a snap at each of these points. (FIGURE 6)
AT THE OUTSIDE BOTTOM OF THE WALLET: Mark placement for snaps on the 11" × 13" (28cm × 33cm) exterior panel of the wallet at the opposite end from the snaps you added to the pocket panel above. Mark as follows: Measure 3" (7.5cm) up from the bottom edge of the exterior panel, and 3" (7.5cm) in from each side; mark a point at both locations and sew a snap at each mark. (Be sure to position the snaps at what will be the bottom of the wallet since the corresponding interior snaps were placed at the top of the wallet.) (FIGURE 7)

6. join the zipper panel and lining
Place the solid lining panel you cut in Step 1 right side up on a flat surface. Layer the pocket panel right side up on top of the lining panel matching all raw edges—both pieces will be oriented with the right sides up; pin. Sew together on all 4 sides with a ¼" (6mm) seam allowance. Stitch in the ditch in the seams between each pocket panel to create 3 separate compartments. (Layering the fabrics as described here will ensure that you see the right side of the lining fabric when you open the pockets.)
7. join the interior and exterior
Pin the joined pocket/lining panel and exterior panel right sides together, aligning all raw edges. (Be sure to orient them so that the snaps are at the top edge of the lining and the bottom edge of the exterior.). Sew together on all 4 sides with a ½" (13mm) seam allowance, leaving a 5" (12.5cm) opening along the bottom edge for turning the wallet right side out.
Trim the seam allowance at the corners, and turn the piece right side out. Use a pointy tool to gently poke out corners. Press the seams and whipstitch the opening closed by hand.
Fold the wallet in thirds and close with the snaps.
It can be tricky to sew projects for guys that they will actually like. When it comes to stitching for men, stay away from flashy colors and patterns—basics are the best. This shave bag is an essential every man can use, inspired by a classic that never goes out of style: blue jeans.
finished dimensions
WIDTH: 4" (10cm)
HEIGHT: 4" (10cm)
LENGTH: 10" (25.5cm)
supplies
* ¼ yard (23cm) denim
* 9" (23cm) metal zipper
* Heavyweight thread
* Heavy-duty sewing machine needle
 tip
tipBefore beginning, load your machine with a heavy-duty needle and heavyweight thread in the bobbin and the needle.
1. measure + cut
Cut all pieces from the denim fabric, referring to FIGURE 1.

STRAP: Cut one rectangle that is 6" × 4" (15cm × 10cm).
BAG TOP: Cut 2 rectangles that are each 3" × 9" (7.5cm × 23cm) and 2 rectangles that are each 2" × 5" (5cm × 12.5cm).
BAG SIDES AND BOTTOM: Cut 3 rectangles that are each 11" × 5" (28cm × 12.5cm).
BAG ENDS: Cut 2 squares that are each 5" × 5" (12.5cm × 12.5cm).
When pressing seams near the zipper, be aware that after coming in contact with the iron, the metal zipper will become hot enough to burn you. Be careful!
2. make the strap
Make the strap following these instructions. Topstitch the strap close to each folded edge. Set the strap aside.
3. install the zipper on the bag top
With right sides together, pin the zipper to the long edge on one of the 3" × 9" (7.5cm × 23cm) (top) rectangles. Using a zipper foot, sew the zipper to the fabric close to the teeth. (FIGURE 2) Press the seam allowance away from the zipper. Repeat to sew the remaining 3" × 9" (7.5cm × 23cm) rectangle to the other side of the zipper. (FIGURE 3) Topstitch on each side of the zipper. (FIGURE 4)

The final top piece should be 5" × 9" (12.5cm × 23cm); if necessary, trim your piece to this size before proceeding.
4. finish sewing the bag top
With right sides together, pin a 2" × 5" (5cm × 12.5cm) rectangle to each short end of the zipper top piece. Using a standard presser foot, sew with ½" (13mm) seam allowances. (FIGURE 5) Press the seam allowance away from the zipper, and topstitch the seams close to the their edges.
5. add decorative topstitching
Topstitch around all 4 outside edges of the zipper top, sewing ⅝" (16mm) in from the raw edges. (FIGURE 6)

On all remaining fabric pieces (sides, bottom, and ends), topstitch around all 4 sides of each piece ⅝" (16mm) in from the raw edges.
6. add the strap to one end
Center and pin the strap on the right side of one end piece, aligning raw edges. Sew the strap to the top with a ¼" (6mm) seam allowance. (FIGURE 7)

7. assemble the sides
With right sides together and raw edges aligned, pin the end pieces to the 5" (12.5cm) edges of the side pieces. Sew one edge at a time with a ½" (13mm) seam allowance, beginning and ending each seam ½" (13mm) from the top and bottom edges. (This will produce sharp, 3-D corners.) Once all pieces are assembled they will form a rectangle. Press all seams open. (FIGURE 8)

8. attach the bottom
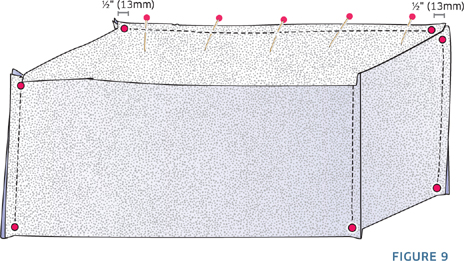
With right sides together and raw edges aligned, pin and sew the 11" (28cm) edges of the bottom to the 11" (28cm) edges of the sides, leaving ½" (13mm) unsewn at the beginning and end of each seam. Pin and sew the 5" (12.5cm) edges the same way. Press the seam allowances open. (FIGURE 9)
Trim the seam allowance at the corners. Turn the bag right side out and press the seams.
9. attach the top
Turn the bag inside out. With the zipper open and right sides together, pin then sew the top to the bag body the same way you did the bottom, leaving ½" (13mm) unsewn at the beginning and end of each seam. Trim the seam allowance at the corners. Turn the bag right side out through the zippered opening and press the seams.
GO HEAVYHeavyweight thread gives this bag its distinctive “jeans” look. If you’ve never used heavy thread before, give it a try—it makes a huge impact in the look of your finished project. Simply load it into your machine as you would all-purpose thread, and stitch away!

tipYou can cut all the pieces you need for this bag from a pair of old jeans!
This dapper duo is all dressed up for a night on the town! They’re stitched in soft wool flannel, making them irresistibly cuddly. You can purchase the flannel by the yard—or even better, cut up old flannel shirts from the thrift store or your dad’s closet.
finished dimensions
BUNNY: Width (across the arms): 14" (35.5cm); height: 20" (51cm)
KITTY: Width (across the arms): 14" (35.5cm); height: 16" (40.5cm)
supplies
* ⅓ yard (30cm) brown wool flannel (or one large adult flannel shirt)
* ⅛ yard (11cm) plaid wool flannel (or one small flannel shirt)
* ⅓ yard (30cm) gray wool flannel (or one large adult flannel shirt)
* ¼ yard (23cm) white craft felt
* ⅛ yard (11cm) pink craft felt
* ⅛ yard (11cm) black craft felt
* ⅛ yard (11cm) red cotton fabric
* Two 12mm safety eyes
* Two 8mm safety eyes
* Black embroidery floss
* ¼ yard (23cm) fusible web
* One 12-ounce (340g) bag fiberfill
* 7" (18cm) white rickrack
* Three ⅜" (1cm) white buttons
1. measure + cut
Cut the following pieces from the fabrics as indicated. (FIGURE 1)
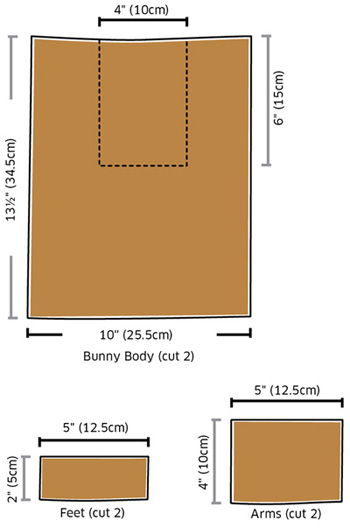
from brown wool flannel:
Bunny Body (cut 2): 13½" × 10" (34.5cm × 25.5cm). From one of the 10" (25.5cm) edges of these pieces, cut out a centered 6" × 4" (15cm × 10cm) rectangle, as shown (FIGURE 1), to form the ears.
Bunny Feet (cut 2): 5" × 2" (12.5cm × 5cm)
Bunny Arms (cut 2): 5" × 4" (12.5cm × 10cm)
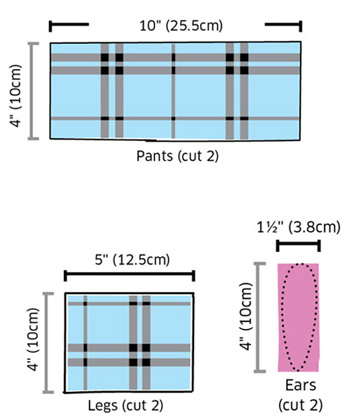
from plaid wool flannel:
Bunny Pants (cut 2): 10" × 4" (25.5cm × 10cm)
Bunny Legs (cut 2): 5" × 4" (12.5cm × 10cm)
from pink craft felt:
Inside Bunny Ears (cut 2): 4" × 1½" (10cm × 3.8cm). Cut each piece into a freehand oblong oval shape with a flat bottom (refer to photo).
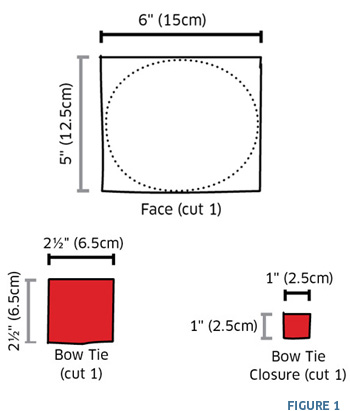
from white craft felt:
Bunny Face (cut one): 6" × 5" (15cm × 12.5cm). Cut this piece into a freehand oval shape.
from red cotton:
Bunny Tie (cut one): 2½" × 2½" (6.5cm × 6.5cm)
Bunny Tie Closure (cut one): 1" × 1" (2.5cm × 2.5cm)
FACE: On the center of the bunny face oval, sketch a simple nose and mouth, using the photo for guidance. (Don’t worry if it’s a little crooked or imperfect; that adds to the charm!) Using black embroidery floss, embroider the nose using a satin stitch and the mouth using a split stitch. (See Embroidery Stitches sidebar for instructions.)
Cut a piece of fusible web that is slightly smaller than the bunny’s face. Sandwich the fusible web between the felt oval and the right side of the body piece, and fuse the face to the body, following the instructions on the fusible web packaging. Refer to the photo for placement.
On the face, mark spots for the eyes on each side of the bunny’s nose. With a seam ripper, carefully pierce the fabric at the spots you want to place the eyes.
Following the manufacturer’s instructions, install a 12mm eye in each hole, placing the cap on the wrong side of the fabric. (The eyes will be installed through both the face and body layers.)
EARS: Using fusible web, fuse the pink inner ears to the right side of the bunny body front, centering them on the ear portions of the body.
3. make the bow tie
Fold the 2½" × 2½" (6.5cm × 6.5cm) piece of red cotton in half with right sides together and stitch around 2 sides using a ¼" (6mm) seam allowance, pinning if necesssary. (FIGURE 3) Trim corners, turn right side out, and use a pointy object to gently poke out the corners. Turn under the remaining raw edge ¼" (6mm) and press. Topstitch around all 4 sides. Gather into a bowtie shape by pleating at the center (refer to photo).
Fold the 1" (2.5cm) square of red cotton into thirds and wrap it around the gathered center. Using matching thread and a hand-sewing needle, secure the band at the back of the bowtie, and stitch the bowtie to the bunny’s body below his face. (FIGURE 4)

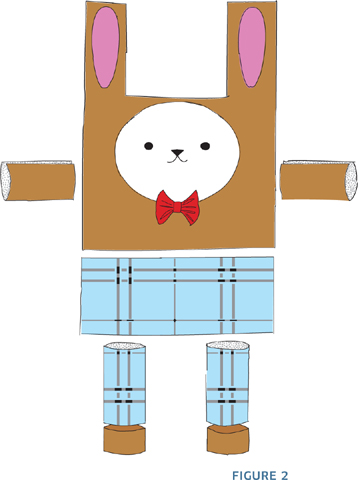
4. assemble the bunny
Refer to FIGURE 2.
PANTS: With right sides together, pin then sew a pants piece to the bottom of each body piece (front and back) with ½" (13mm) seam allowances. Press the seam allowances to one side.
ARMS: With right sides together, fold each arm piece in half so that the 5" (12.5cm) sides are aligned; pin. With a ½" (13mm) seam allowance, sew each arm together along the raw 5" (12.5cm) side and one short end, leaving the remaining short end open. Trim the seam allowance at the corners and turn right side out. Use a pointy tool to gently poke out the corners. Press the seams, and stuff the arms lightly with fiberfill.
LEGS AND FEET: With right sides together, align the 5" (12.5cm) edges of each leg and foot piece; pin. Sew together with a ½" (13mm) seam allowance. Press the seam allowances to one side.
Fold the legs in half lengthwise with right sides together; pin then sew with a ½" (13mm) seam allowance along the feet end and up the raw side of the legs. Trim the seam allowance at the corners and turn right side out. Press the seams, and stuff the legs lightly with fiberfill.
tipIf these toys will be given to a child, I suggest reinforcing the felt ears and face by hand-sewing them to the body. Using a whipstitch, matching thread, and a hand-sewing needle, simply stitch around the perimeter of the felt.
ATTACH THE ARMS AND LEGS: Pin the arms to the right side of the front of the body, aligning the raw ends of the arms with the raw edges of the sides of the body, and centering the arms near the bottom of the bunny’s face. Pin the legs to the bottom edge of the bunny’s body, aligning raw ends and positioning the legs 1½" (3.8cm) in from the corners. Sew the arms and legs in place using a ¼" (6mm) seam allowance.
JOIN THE FRONT AND BACK: Position the front and back together with right sides together and all raw edges aligned (the arms and legs should be facing inward, sandwiched between the body pieces). Pin well to avoid shifting, and sew the 2 pieces together on all sides using a ½" (13mm) seam allowance, and leaving an opening on the bottom edge between the legs. (Be sure to backstitch at the beginning and end of the opening to reinforce so the seam doesn’t unravel during stuffing.)
STUFF AND FINISH: Trim the seam allowance at the corners, including the interior corners at the base of the ears. Carefully turn the bunny right side out, using a pointy tool to gently poke out the corners, and stuff him with fiberfill. Whipstitch the opening closed.
EMBROIDERY STITCHESThread an embroidery needle with 3 strands of embroidery floss for each of these stitches.
* The split stitch creates a continual line of connected stitches that is easy to manipulate around curves, such as for the mouths of the kitty and bunny. Bring the needle up through the threads of the preceding stitch, then insert back into the fabric to complete the next stitch.

* The satin stitch is great for filling in solid areas, such as the kitty and bunny noses. Bring the needle up on one edge of the area you want to fill, and bring it down on the opposite edge. Repeat, making each stitch parallel to the previous, working the stitches very close together, until the entire area is filled in.

1. measure + cut
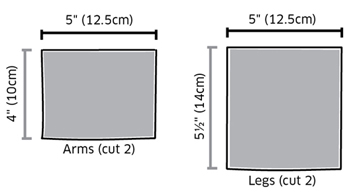
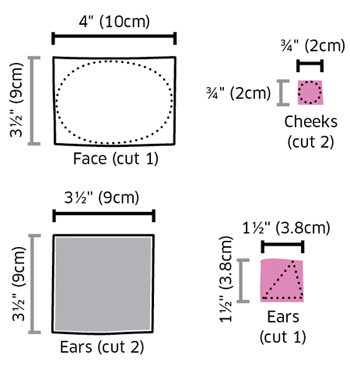
Cut the following pieces from the fabrics as indicated. (FIGURE 5)
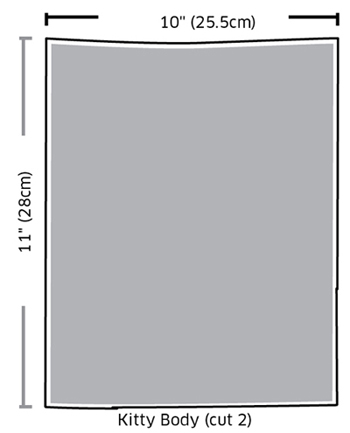

from gray wool flannel:
Kitty Body (cut 2): 11" × 10" (28cm × 25.5cm)
Kitty Arms (cut 2): 4" × 5" (10cm × 12.5cm)
Kitty Legs (cut 2): 5" × 5½" (12.5cm × 14cm)
Kitty Ears (cut 2): 3½" × 3½" (9cm × 9cm)
from pink craft felt:
Kitty Cheeks (cut 2): ¾" × ¾" (2cm × 2cm). Cut each piece into a freehand circle.
Inside Kitty Ears (cut one): 1½" × 1½" (3.8cm × 3.8cm)
from white craft felt:
Kitty Face (cut one): 4" × 3½" (10cm × 9cm). Cut this piece into a freehand oval shape.
from black craft felt:
Kitty Shoes (cut 2): 4½" × 2" (11.5cm × 5cm)
from red cotton:
Kitty Bib (cut one): 1½" × 2½" (3.8cm × 6.5cm). Trim one end of this piece into a curve, as shown.
2. make the kitty’s face and bib
FACE: In the center of the kitty’s face, sketch a nose and mouth. (Don’t worry if it’s a little crooked or imperfect, that adds to the charm!) Using black embroidery floss, embroider the nose using a satin stitch and the mouth using a split stitch (see sidebar).
EYES: Position the eyes on the face and mark their placement with a pen. Don’t attach the eyes yet; just mark their position so that you can plan the other facial features. (FIGURE 6)
Using fusible web, fuse the cheeks to the face below the eyes.
To the sides of the eyes, sketch lines for the whiskers. Embroider the whiskers using a split stitch.
FUSE THE FACE TO THE BODY: Using fusible web, fuse the face to the kitty’s body. Install the eyes at the marked points, carefully piercing through both the felt face and the fabric of the body, and placing the caps of the safety eyes on the wrong side.
Turn under the straight short edge of the bib piece ¼" (6mm). Press and Topstitch the turned edge. Using fusible web, fuse the bib to the body below the face. With black embroidery floss, sew the 3 buttons onto the bib.
3. make the kitty’s ears, arms, and legs
Refer to FIGURE 6.
EARS: With right sides together, fold each ear piece in half diagonally, and sew along one raw edge with a ½" (13mm) seam allowance. Clip the seam allowance at the corner. Turn the ears right side out and use a pointy tool to gently poke out the corners; press.
PINK OF EARS: Cut the 1½" (3.8cm) square of pink felt in half diagonally to form the 2 triangles for the pink of the ears. Using fusible web, fuse one triangle to the front of each ear. Be sure to flip the ears before fusing so that the slanted side will face to the interior for each ear, as shown.
ARMS: With right sides together, fold each arm piece in half so that the 5" (12.5cm) sides are aligned; pin. With a ½" (13mm) seam allowance, sew each arm together along the raw 5" (12.5cm) side and one short end, leaving the remaining short end open. Trim the seam allowance at the corners, turn right side out, and use a pointy tool to gently poke out the corners. Press the seams, and stuff the arms lightly with fiberfill.
LEGS: With right sides together, fold each leg in half lengthwise with raw edges aligned; pin. With a ½" (13mm) seam allowance, sew the legs together along the 5½" (14cm) side and one short end, leaving the remaining short end open. Trim the seam allowance at the corners and turn right side out and poke out the corners. Press the seams, and stuff the legs lightly with fiberfill.
4. make the kitty’s shoes
To make the opening in the shoes, fold each shoe piece in half with the 2" (5cm) ends aligned. On the fold, about ½" (13mm) in from one edge, make a half-oval cut about ½" (13mm) long and ½" (13mm) deep. Unfold the piece; you’ll have an oval opening about 1" (2.5cm) long and ½" (13mm) deep. (FIGURE 7)

For each shoe piece, bring the 2" (5cm) ends together to form a loop. Whipstitch the 2" (5cm) ends together. Slip the shoes onto the legs and whipstitch the bottom closed, catching the fabric of the legs in some of the stitches to anchor the shoes in place.
5. assemble miss kitty
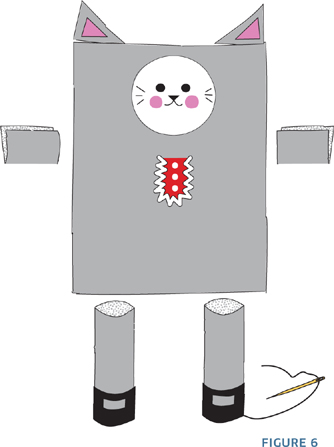
Refer to FIGURE 6.
ATTACH THE ARMS, LEGS, AND EARS: With right sides together, pin the arms to the body front, aligning the raw ends of the arms with the raw ends of the sides of the body, and centering the arms between the kitty’s face and bib. With right sides together, pin the legs to the bottom edge of the kitty’s body, aligning the raw ends and positioning the legs 1½" (3.8cm) in from the corners. Pin the ears to the top of the body, ½" (13mm) in from the corners, with the points of the ears on the outside.
Sew the arms, legs, and ears in place using a ¼" (6mm) seam allowance.
JOIN THE FRONT AND BACK: Position the front and back together with right sides together and all raw edges aligned (the arms, legs, and ears should be facing inward, sandwiched between the body pieces). Pin well to avoid shifting, and sew the front and back pieces together on all sides using a ½" (13mm) seam allowance, leaving an opening on the bottom edge between the legs for stuffing. Be sure to backstitch at the beginning and end of this seam to reinforce so the stitching doesn’t unravel during stuffing.
STUFF AND FINISH: Trim the seam allowance at the corners. Carefully turn the kitty right side out, use a pointy tool to gently poke out the corners, and stuff her with fiberfill. Whipstitch the opening closed.
Using fabric glue, glue the rickrack around the sides and curved edge of the bib.
GO GREEN!Old clothing is a fantastic source of fabric for new sewing projects. Scour the thrift store or your own closets for pieces to harvest. (The men’s section in thrift stores is a great place to start, as the garments are usually larger and sometimes the dressier pieces are barely worn.)
To get the most from your garments, wash and dry them after you bring them home. Cut apart the garment at the seams, being careful to preserve as much surface area as possible. Cut off all the buttons and add them to your button stash. Finally, sort your fabric pieces by color and fiber, and your collection of upcycled fabrics will be ready and waiting for the sewing machine!