

Every spring is the only spring—a perpetual astonishment.
—ELLIS PETERS
Dye Easter Eggs with Food Coloring
Sticker-Resist-and-Marker Eggs
DIY Papier-Mâché Easter Basket
SPRING IS BY FAR my favorite season. While I love aspects of each season and feel blessed to live in a climate that has all four, spring is the one I identify with and enjoy the most. Spring heralds the return of the sun’s warmth, the renewal of life (nature’s new year), and the reappearance of green and color everywhere. There’s more time spent outdoors enjoying the first flowers and fresh smells, with birdsong as soundtrack, seedlings reaching for the sun, and baby animals cavorting.
Easter is the big holiday of the season, combining the magical (the Easter bunny, the Resurrection) with egg decorating, bunny crafts, and sweet treats, all decked out in pastel colors and now with warmer weather in which to enjoy them.
Much of our spring crafting energy goes toward dyeing eggs, decorating for Easter, and thinking of different ways to celebrate in an artful way. As a family, we experiment with different methods of dyeing and decorating eggs. We try our hands at creating baskets and growing our own Easter grass. With some Greek blood in the family, we also make a spectacular Greek Easter bread (leftovers make the best French toast!) with a dyed egg baked on top. We draw bunnies galore and even try out being bunnies ourselves. (Homemade rabbit ears help with that.)
OUR FAVORITE BOOKS ABOUT EASTER
The Easter Egg by Jan Brett
The Easter Bunny That Overslept by Priscilla and Otto Friedrich
Happy Easter, Mouse! By Laura Numeroff
The Story of the Easter Bunny by Katherine Tegen
The Bunny Who Found Easter by Charlotte Zolotow
EASTER EGG SUNCATCHERS
Create suncatchers in the shape of Easter eggs from colorful tissue paper, ribbon, lace, and contact paper. You can also use this method to create flowers, bunnies, or any spring or Easter-themed image.
MATERIALS
Scissors
Transparent contact paper (also called sticky-back plastic)
Tape
Marker
Ribbon and lace (optional)
Washi tape (optional)
Colored tissue paper
Colored masking or printed tape (optional)
Hole punch (optional)
INSTRUCTIONS
1. Cut the contact paper to the size desired (we aim for approximately 8" x 10"). Tape the contact paper to the table, paper side up. Carefully pull off the paper backing.
2. Use the marker to draw an oval egg shape (on the sticky surface is fine), aiming to fill a large portion of the contact paper.
3. If you’re using ribbon and lace, cut sections to span the width of the egg. Then press them to the sticky contact paper, creating stripes. Washi tape may be used this way as well.
4. Fill in the remaining areas with colored tissue paper that’s been torn into pieces. Press them on flat or roll them into balls first.
5. Cut another sheet of contact paper the same size as the first, pull off the paper backing, and press this second sheet of contact paper on top of the one you decorated, sandwiching the Easter egg design between the two sheets. Cut out the Easter egg, preferably leaving about ½" beyond the marker line. An optional border can be added around the egg with masking tape.
6. Tape the suncatcher to a sunny window or punch a couple of holes in it and hang it with ribbon.

Do-it-yourself bunny ears for Easter and pretend play become extra colorful with the addition of crayon-resist painting.
MATERIALS
Scissors
Bunny ears template (see page 326 or draw your own)
Heavy watercolor paper or card stock, 12" x 18"
Pencil or marker
Oil pastels or crayons (light colors work great for crayon resist)
Paintbrush
Watercolor paints (liquid watercolors are especially nice, but any will work)
Stapler
INSTRUCTIONS
1. Cut out the bunny ears from the printed template. Place them on the watercolor paper and trace the ears with pencil. Extend the headband lines across the width of the sheet. Alternatively, draw your bunny ears freehand directly on the heavy paper, with the headband along the long side. (Don’t cut them out yet.)
2. Draw on the ears and headband with light-colored oil pastels or crayons. Paint over your drawing with watercolors. Let the painted bunny ears dry. (If the paper has buckled during the drying process, press it under heavy books overnight.)
3. Cut out the bunny ears, then staple the headband into a loop to fit over the head. (Be sure to test the fit before stapling.)
There are two basic ways to prepare eggs for making Easter eggs: by blowing out eggs or making hard-boiled eggs. For eggs to hang on an Easter egg tree (page 72)—or just eggs that you can keep year after year—you’ll want blown-out eggs. Hardboiled eggs will need to be refrigerated after being decorated if you plan to eat them or thrown out after their time on display is over.
MATERIALS
For Blowing Eggs
Eggs, raw
Small nail or pin
Bowl
Water
Distilled white vinegar
For Hard-Boiled Eggs
Eggs, raw
Large pot
Water
INSTRUCTIONS
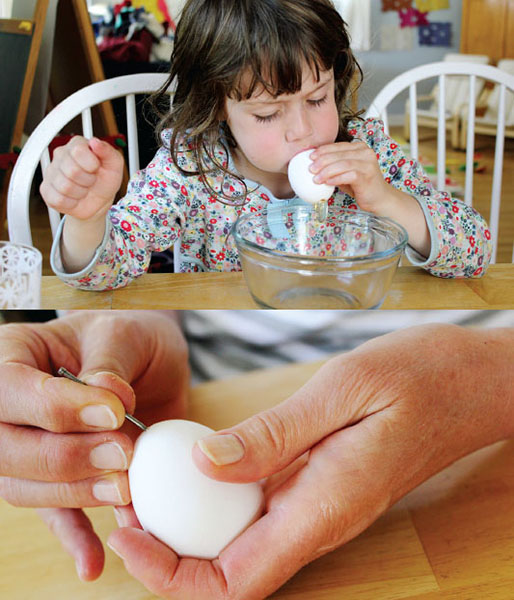
1. To blow out eggs, gently poke holes in each end of an egg using a small nail or pin. Make a smaller hole on the top and a slightly larger hole on the bottom. Poke the pin back in and, if possible, break the yolk.
2. Holding the egg over a bowl, press your lips over the smaller hole and blow (hard!) to expel the contents out the other hole. Continue with as many eggs as desired.
3. Wash the hollow eggs in warm water mixed with a generous splash of vinegar. Let them dry thoroughly before you decorate them.
4. To make hard-boiled eggs, place the eggs in a large pot of cold water. Bring the water to a boil. Cover the pan and turn off the burner. Set a timer and let the eggs sit for 15 minutes.
DYE EASTER EGGS WITH FOOD COLORING
There is no need to buy a commercial egg dyeing kit. You can get equally vivid results with materials in your kitchen cabinet. You can combine this egg dyeing technique with many of the other Easter egg decorating ideas in this chapter.
MATERIALS
Water
Teakettle or pot
Cups, 1 for each color
Tablespoon
Food coloring or liquid watercolors
Distilled white vinegar
Spoons, 1 for each color
White eggs, hard-boiled or blown (page 52)
Egg carton(s) or drying rack
INSTRUCTIONS
1. Bring the water to a boil. Pour it into the cups, making sure to include enough water to cover an egg.
2. Add the food coloring (several drops) or liquid watercolors (1–2 tablespoons) and 1–2 tablespoons of vinegar to each cup and mix.
3. Use the spoons to gently lower an egg into each cup (you can leave the spoons there). Lift the eggs periodically to see if they have reached the colors desired. Leave the eggs in the dye briefly for lighter colors and longer for darker colors.
4. Remove the eggs from the dye and let them dry in your egg carton or on a drying rack.
The melted-crayon procedure is hands-down our favorite Easter egg technique, both for the process and for the finished product. While we love experimenting with other ways to decorate eggs, we always do a big batch of melted-crayon Easter eggs.
MATERIALS
White eggs
Large pot
Water
Tongs
Egg carton(s) or egg cup
Crayons, all colors, but white and light colors are especially nice for the resist effect
Food coloring and distilled white vinegar or a commercial dye kit
INSTRUCTIONS
1. Boil the eggs in a large pot of water following the instructions on page 52. Gather your materials and prepare your work space. Be prepared to work as soon as the eggs are ready.
3. Use the tongs to transfer a hot egg to your egg carton or egg cup. Draw on the egg with crayons, letting the crayon melt as you draw.
4. Continue with the rest of the eggs, drawing on them one at a time and leaving the remainder in the hot water. (Alternatively, you can keep the eggs warm in a 250°F oven.)
5. Once your child has drawn on all the eggs, dye them using the food coloring technique on page 54 or with a commercial kit.
The combination of marker drawings with a shiny, translucent glue and paint mixture gives these eggs an attractive stained glass effect.
MATERIALS
White eggs, blown or hard-boiled (page 52)
Sharpies or other permanent markers
White glue, such as Elmer’s
Small cups
Tempera paint in an assortment of colors
Paintbrushes
INSTRUCTIONS
1. Draw pictures or designs on the white eggs with a Sharpie. Any color is fine, but a black marker will give a more realistic stained glass effect.
2. Squeeze a small amount of glue into each cup. Add an equal amount of paint, one color per cup, and mix.
3. Paint some of the glue-paint mixture on the Easter eggs, filling in the spaces between marker lines with color (or just painting all over, as younger children, especially, will do). To prevent the egg from sticking to the surface on which you dry it, paint only half of the egg and let it dry before turning it over and painting the other half.
Roll your eggs around in a little “nest” of paint-soaked yarn for a basketful of unique Easter eggs. This is a great tactile activity for young children!
MATERIALS
Scissors
Yarn or string
Small bowls
Acrylic paint (diluted half and half with water) or BioColor paint (see note below)
White eggs, blown or hard-boiled (page 52)
INSTRUCTIONS
1. Cut pieces of yarn and then pile it up in each bowl to create little nests.
2. Add the watered-down acrylic paint or BioColor paint to the yarn. Use your hands to mix the yarn and paint together thoroughly until the yarn is soaked with paint. Wash your hands.
3. Roll the eggs around in the paint-soaked yarn, printing them with the yarn designs. Let them dry.
Note: Acrylic paint is permanent and will stain clothes (though it will wash off hands). BioColor paint stays on the eggs well, but the paint will rub off the eggs if you use water and a scrubbing action.

Paint with glue and then add glitter for Easter eggs that pop—not to mention that are superpopular with the kids.
MATERIALS
Fine paintbrush
White or dyed eggs, blown or hard-boiled (page 52)
White glue
Glitter
INSTRUCTIONS
1. Use the paintbrush to paint a simple design on the egg with glue (such as stripes, zigzags, dots, a bunny, hearts, and so on).
2. Sprinkle glitter over the glue.
3. Add another glue design and a different color of glitter if desired. Let the eggs dry.

Washi tape, or a similar colorful, printed paper tape, is a simple and fun way for kids or adults to decorate Easter eggs.
MATERIALS
Scissors
Washi tape or other printed paper tape
White or dyed eggs (page 54), blown or hard-boiled (page 52)
INSTRUCTIONS
Cut washi tape into geometric or other shapes, or tear it into pieces. Adhere the tape to the egg in patterns, to form images, or randomly, as desired.

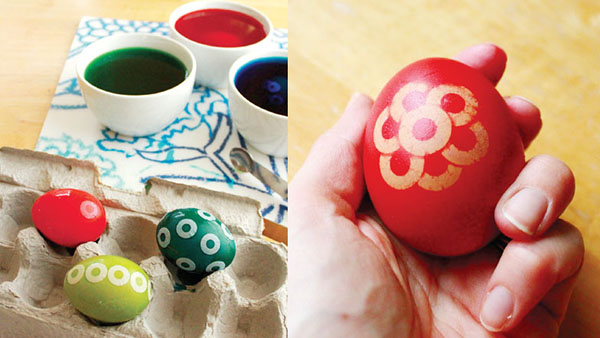
Trying a sticker-resist technique with hole-reinforcement stickers yields a unique Easter egg.
MATERIALS
Hole-reinforcement stickers
White eggs, blown or hard-boiled (page 52)
Food coloring and distilled white vinegar or a commercial dye kit
INSTRUCTIONS
1. Press hole-reinforcement stickers and/or other stickers all over the eggs as desired, either in patterns or randomly. Press the edges down firmly using your thumbnail.
2. Dye your sticker-covered eggs according to the instructions on page 54 or use a commercial kit.
3. Let the eggs dry. Peel off the stickers.
STICKER-RESIST-AND-MARKER EGGS
Combine a sticker-resist technique with permanent markers for a creative effect.
MATERIALS
Small stickers (see note below)
White eggs, blown or hard-boiled (page 52)
Sharpies or other permanent markers
Food coloring and distilled white vinegar
INSTRUCTIONS
1. Adhere the stickers to the eggs as desired, pressing the edges down firmly using the edge of your thumbnail.
2. Now draw on the sticker-covered egg with Sharpies.
3. Dye the eggs according to the instructions on page 54 or use a commercial kit.
4. Let the eggs dry. Peel off the stickers.
Note: Small stickers such as dot and price stickers from the office supply store are great for eggs. Some stickers are more resistant to removal than others. You may need to scrape them off with your thumbnail. Foil star stickers work especially well here and are easy to remove.

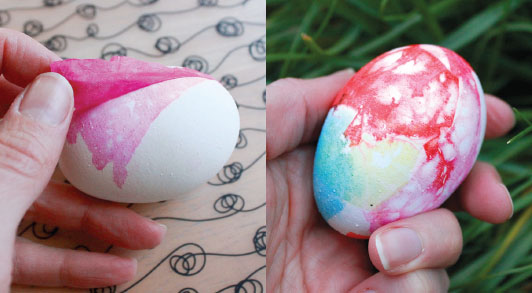
Using bleeding tissue paper to dye eggs is a fun technique for toddlers on up.
MATERIALS
Bleeding tissue paper (sometimes called art tissue) in multiple colors
Scissors (optional)
Water
Distilled white vinegar
Small bowl
Paintbrush
White eggs, blown or hard-boiled (page 52)
INSTRUCTIONS
1. Tear the colored tissue paper into small pieces. (Alternatively, use scissors to cut the tissue paper into geometric or other shapes.)
2. Mix the water with an equal amount of vinegar in a small bowl. Paint an egg with the water-vinegar mix. Press a piece of the bleeding tissue paper to the egg. Brush more of the water mixture over the tissue-paper piece. Repeat with more bleeding tissue paper until the egg is covered as desired. Continue with the remaining eggs.
3. Let the tissue paper dry. Remove the tissue-paper pieces and admire the colors left on the eggs.
The egg is your canvas. These Easter eggs combine decoupage (always popular with kids) with drawings for a unique result every time.
MATERIALS
Scissors
Printed tissue paper (usually sold with gift wrap rather than art supplies) and/or printed paper napkins
White glue, such as Elmer’s, or Mod Podge
Water
Small dish
Paintbrush or foam brush
White or dyed eggs (page 54), blown or hard-boiled (page 52)
Permanent markers, such as Sharpies
Glitter or sequins (optional)
INSTRUCTIONS
1. Cut images out of the printed tissue paper and/or paper napkins.
2. Thin the glue with an equal amount of water in a small dish and mix thoroughly or use Mod Podge on its own.
3. Use a brush to paint the glue mixture on the egg. Work on a section at a time rather than the entire egg. Press colored tissue paper or napkin shapes and images on the glue-covered egg. Brush more of the glue mixture over the tissue paper. Repeat the entire process until the egg is decorated to your satisfaction. Let the glue dry.
4. Draw pictures and designs on the eggs with permanent markers. Add glue and then glitter or sequins to your mixed-media eggs, if desired, for some extra sparkle.
DIY PAPIER-MÂCHÉ EASTER BASKET
What should you do with all of your decorated Easter eggs? Make your own colorful Easter baskets to showcase them. Creating with papier-mâché is a favorite craft activity for kids and allows them to make many different kinds of three-dimensional objects, both decorative and functional.
MATERIALS
Medium bowl in the desired size and shape of your Easter basket
Plastic wrap (the cling kind works especially well)
Plastic place mat or tray (optional)
White glue
Water
Shallow bowl
Paintbrush
Texas snowflakes (large coffee filters used for art), regular-size white basket coffee filters, or white paper towels
Colored tissue paper, cut or torn into squares or pieces
Scissors
Card stock or heavy watercolor paper
Stapler
Balloon
Shredded paper or grass
INSTRUCTIONS
1. Turn the medium bowl upside down and cover it with plastic wrap, tucking the excess inside the bowl. Set the plastic-covered bowl on another sheet of plastic wrap or on a nonstick surface such as a plastic place mat or tray.
2. Mix the glue with water (about equal parts) in a shallow bowl to create your paste mixture.
3. Use your hands or a paintbrush to cover the outer surface of the plastic wrap-covered bowl with a layer of the paste mixture. Press a Texas snowflake over the bowl, tucking the edges inside. Rub more paste over the top of the coffee filter just applied and add another Texas snowflake, again tucking the edges underneath. (If you’re using smaller coffee filters or paper towels, you may need to use more than one for each layer.)
4. Rub or brush another layer of paste over the covered bowl. Press colored tissue-paper pieces all over the bowl, layering them as desired. Let the bowl dry completely (1–2 days).
5. Turn the bowl over and use scissors to cut along the edge, pulling off the excess that was tucked inside. Gently remove the papier-mâché “basket” from the bowl.
6. Cut a strip of card stock approximately 2" x 18" to use for the basket handle. Staple to each side of the basket with two or three staples per side.
7. Blow up a balloon to fit inside the basket and under the handle, to support the handle as you cover it with wet papier-mâché. (Tip: Hold the balloon partially inside the basket as you blow it up.)
8. Rub or brush the handle with the glue mixture. Press colored tissue-paper pieces along the handle. Let the handle dry completely.
9. Pop and remove the balloon. If desired, you can add more colored-tissue-paper pieces to the interior of the basket and along the basket edge.
10. Fill the basket with shredded paper or real grass. (My daughters love to go outside with scissors and “trim” the lawn, gathering grass for their baskets.) Add Easter eggs.

Scrunching up colored tissue paper, dipping it in a glue mixture, then sticking it to your bowl form is a simple and effective way to craft a nest.
MATERIALS
Small bowl
Plastic wrap
Plastic place mat or tray (optional)
White glue, such as Elmer’s
Water
Bowl for glue
Colored tissue paper (facial tissue works as well)
INSTRUCTIONS
1. Turn the bowl upside down and cover it with plastic wrap, tucking the excess inside. Set the plastic-covered bowl on another sheet of plastic wrap or on a nonstick surface such as a plastic place mat or tray.
2. Mix the glue with water (about equal parts) in another bowl to create your paste mixture.
3. Tear off small- to medium-size pieces of colored tissue paper and scrunch them up into balls. Dip the end of each wad into the glue mixture and press it to the plastic-covered bowl. Repeat with tissue paper pieces until the bowl is entirely covered. Let the bowl dry, 1–2 days.
4. Gently pull the nest away from the bowl. Nestle a few Easter eggs inside and use it for your holiday decorating or for a spring nature table.
Our Easter egg tree was inspired by one in my much-loved childhood copy of the book A Time to Keep: The Tasha Tudor Book of Holidays.
MATERIALS
Bucket or pot
Pebbles or sand
Large branch
Scissors
¼" wide ribbon
Hot glue gun
Blown and decorated Easter eggs (see pages 52 and 56–67)
INSTRUCTIONS
1. Fill the bucket partway with pebbles or sand. Stick the branch in the center of the bucket and hold it in place while you add more pebbles to stabilize your small tree.
2. Cut the ribbon into 5" lengths. Working with one piece at a time, fold the ribbon in half and use the hot glue gun to glue both ends to the top of an Easter egg, creating a hanging loop for the egg. Continue with the rest of your eggs.
3. Hang the eggs on your new Easter tree.

Spring is baby carrots, bountiful greens, fresh-picked peas, asparagus, rhubarb, and tiny strawberries with cream. It’s the return of fresh, flavorful food to the more limited and heavy winter selection. Besides mixing salads with fresh greens and herbs and whipping up crepes, we try our hand at making birds’ nests out of cookies or pretzel sticks.
BIRD’S NEST COOKIES
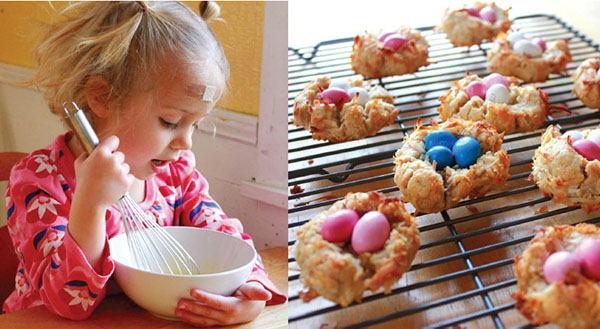
Bird’s nest cookies are an adorable spring-themed treat that is superfun for kids to help make. This recipe is adapted from Ina Garten’s Jam Thumbprint Cookies, substituting little candy eggs for the jam and making it a bit healthier with whole wheat flour and less sugar.
Makes 2 dozen
INGREDIENTS
1 cup (2 sticks) butter, at room temperature
½ cup sugar
1 teaspoon vanilla
2 cups white whole wheat flour
¼ teaspoon salt
1 egg
One bag sweetened, flaked coconut (about 7 oz.)
Small Easter egg candies or peanut M&M’s (you can also use dried raisins and/or almonds for the eggs)
INSTRUCTIONS
1. Preheat the oven to 350°F. Line two cookie sheets with baking parchment.
2. Use an electric mixer to cream the butter and sugar in a large bowl. Add the vanilla. Add the flour and salt and continue to mix until the dough forms.
3. Break off chunks of the cookie dough and, with your hands, roll them into medium-size balls (about 1½" in diameter).
4. In a small bowl, beat the egg with a tablespoon of water to use as an egg wash. Empty the bag of coconut flakes into a wide, shallow dish.
5. Dip the dough balls into the egg wash one by one, then transfer them to the dish of coconut and roll them around until they’re thoroughly coated.
6. Place the cookies on a cookie sheet. Press your thumb gently but firmly into the center of each cookie, creating the nest shape. Bake for 25 minutes.
7. Press the Easter egg candies into the nest while the cookies are still warm. Eat warm or at room temperature.
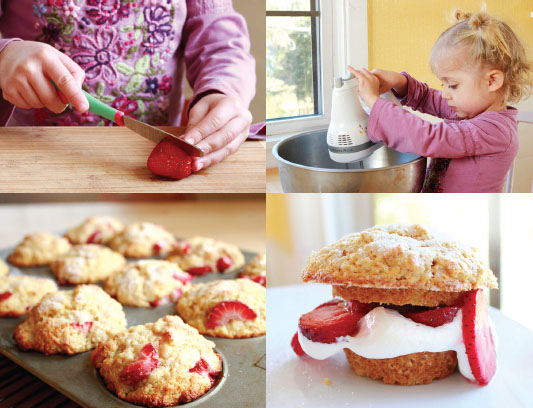
These muffins are a quick and easy alternative to traditional strawberry shortcake. Since they are low in sweetener, you can serve them for breakfast or a snack.
Makes 12 muffins
INGREDIENTS
For the Muffins
1 cup white whole wheat flour
1 cup all-purpose flour
½ cup sugar
½ teaspoon salt
½ cup (1 stick) butter, melted then cooled
2 large eggs
1 cup plain yogurt
1 teaspoon vanilla
1 cup diced strawberries
For the Filling
2 cups fresh strawberries
1–2 tablespoons sugar
1½ cups heavy whipping cream
1 teaspoon vanilla
INSTRUCTIONS
For the Muffins
1. Preheat the oven to 400°F and grease a 12-section muffin tin.
2. Whisk the dry ingredients together in a large bowl. Whisk the wet ingredients together in another bowl. Add wet mixture to dry mixture, stirring just enough to combine. Fold in strawberries.
3. Divide the muffin batter into muffin tin sections, sprinkle the tops with sugar if desired, and bake for 20 minutes.
To Assemble Your Strawberry Shortcakes
1. Slice the strawberries. Kids love to do this part. Even toddlers and preschoolers can cut strawberries with a butter knife. If desired, toss the strawberries with a sprinkle of the sugar before setting them aside.
2. Whip the heavy cream with an electric mixer until soft peaks form. Mix in 1 tablespoon or so of sugar and vanilla.
3. To assemble your shortcakes, slice the muffins in half horizontally, add a dollop of whipped cream to the bottom half and then a large spoonful of sliced strawberries. Set the top of the muffin over your goodies and enjoy.
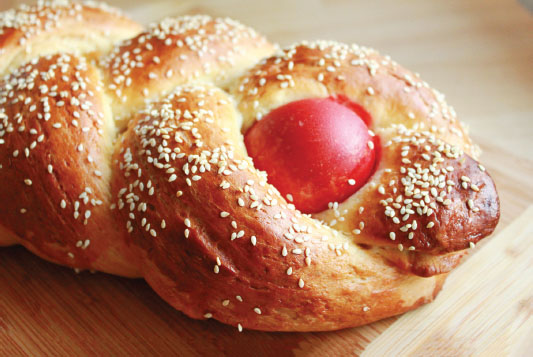
A tradition on my husband’s side of the family, Greek Easter bread is a special once-a-year production that the kids love to help with. The dyed egg on top is traditionally red, but we don’t always follow tradition. Harry, my husband, has adapted this tsoureki recipe slightly from the cookbook his father used regularly, The Complete Greek Cookbook by Theresa Karas Yianilos.
Makes 2 loaves
INGREDIENTS
½ teaspoon cinnamon
½ teaspoon anise seed
½ teaspoon finely chopped orange peel
1 bay leaf
½ cup water
2 packets active dry yeast (4½ teaspoons)
1⅛ cup milk
½ cup butter (1 stick)
7 cups all-purpose flour
1 cup + 1 tablespoon sugar
2 teaspoons vanilla
1 teaspoon salt
3 large eggs, beaten
Olive oil
Egg wash (1 egg yolk whisked with 1 tablespoon water)
¼ cup sesame seeds
1 more egg, hard-boiled and dyed dark red using food coloring (see pages 53, 54)
INSTRUCTIONS
1. In a small saucepan, mix the cinnamon, anise seed, orange peel, and bay leaf with the ½ cup water. Bring the water to a boil, then cover, turn off the burner, and allow the ingredients to steep and cool. When cooled, strain the liquid with a sieve or cheesecloth into a small bowl.
2. Heat the milk in a small saucepan until hot but not boiling, then turn off the burner. Add the butter and stir until melted.
3. Pour the milk-butter mixture into a large bowl and let cool to lukewarm. Whisk in yeast, 1 cup flour, and 1 tablespoon sugar. Cover and set aside for 30 minutes or until frothy.
4. Stir in the eggs, flavored water, vanilla, 1 cup sugar, and salt.
5. Add the remaining flour. Mix the batter with a wooden spoon, then turn it out onto a floured counter to knead for 10 minutes until smooth and elastic.
6. Form the dough into a ball and place it in an oiled bowl, turning the dough once so that the top is lightly oiled as well. Cover the bowl and set it in a warm spot until the dough has doubled, about 2 hours.
7. Punch the dough down and knead it lightly. Divide the dough into six equal pieces, rolling each into a long rope with your hands. Pinch the ends of three of the ropes together, then braid them. Tuck the ends under slightly and place the loaf on a parchment-covered baking sheet. Repeat with the other three ropes, placing the second loaf on a separate baking sheet. Let rise for 1 hour.
8. Brush the braided loaves with egg wash and sprinkle them with sesame seeds. Nestle the dyed eggs in the top of the braids.
9. Bake the loaves in a 350°F oven for 45 minutes.
10. Serve the bread warm or at room temperature. We usually use leftovers to make French toast the following day.
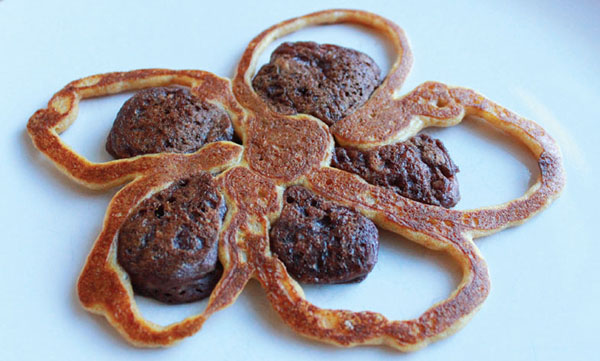
Create flowers, eggs in nests, and other shapes with pancake batter that’s been tinted with fresh fruit. My daughters get very excited when they see each new pancake design hot off the griddle.
INGREDIENTS
½ cup blueberries (thaw first if frozen)
½ cup strawberries (thaw first if frozen)
2 cups white whole wheat flour
2 teaspoons baking powder
1 teaspoon baking soda
2 tablespoons sugar
2–3 large eggs
4 tablespoons butter, melted and cooled slightly
2 cups milk
Butter, syrup, and fresh fruit for toppings
INSTRUCTIONS
1. Puree the blueberries and strawberries separately in a blender, rinsing out the blender between berries. Set purees aside in separate bowls.
2. Mix the dry ingredients together in a large bowl. In a medium bowl, whisk together the eggs and melted butter.
3. Add ⅓ of the flour mixture and ⅓ of the egg mixture to each of the fruit purees and stir the batter until just combined. Combine the remaining ⅓ each of the flour and egg mixtures together with the milk—this is your plain batter. (Note: If any batter is too thick, add a little milk.) Put each pancake batter into a separate squeeze bottle or a sandwich bag (if you’re using a plastic bag, cut a small hole in one corner).
4. Squeeze both the tinted and the plain batters onto a hot, greased griddle in the shape of flowers, eggs, nests, birds, and other creations. Cook until the edges of the pancake are dry. Flip the pancake and cook it on the other side.
5. Serve with butter, syrup, and fresh fruit.
VARIATIONS
If desired, create additional colors with other pureed fruits or vegetables or with food coloring. Add a dash of sprinkles for speckled eggs.
Have a hot, healthy breakfast ready when you wake up. Millet is a nutritious and delicious whole grain that makes a great breakfast porridge.
INGREDIENTS
1 cup millet
4 cups water
1 teaspoon vanilla
2 tablespoons butter
Toppings such as fresh or dried fruit, honey, shredded coconut, and/or nuts
Milk, kefir, or yogurt
INSTRUCTIONS
1. Mix the millet, water, vanilla, and butter in your Crock-Pot or slow cooker. Cook on low for 6–8 hours.
2. Serve the porridge with the desired toppings and milk, kefir, or yogurt.

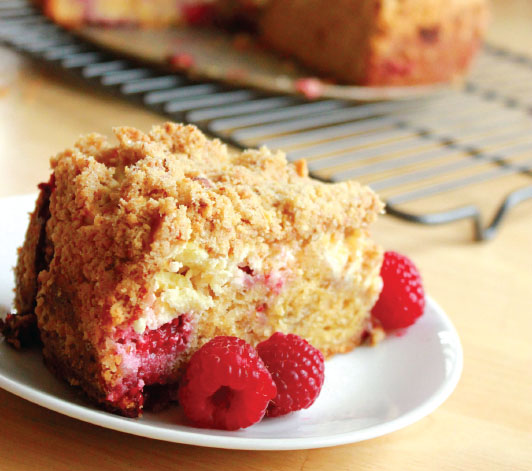
RASPBERRY-LEMON CREAM CHEESE COFFEE CAKE
As good for an afternoon snack as it is for breakfast.
INGREDIENTS
For the Coffee Cake
2¼ cups white whole wheat flour
¾ cup sugar
Zest from 2 lemons
¾ cup butter, cut into ½" pieces
½ cup ground or finely chopped almonds
1 teaspoon baking powder
½ teaspoon baking soda
¼ teaspoon salt
¾ cup plain yogurt
1 egg
1½ cups fresh or frozen raspberries
For the Filling
8 oz. softened cream cheese
¼ cup sugar
1 egg
Juice of 1 lemon
INSTRUCTIONS
1. Preheat the oven to 350°F. Grease and flour a 10" springform pan.
2. Mix the flour, sugar, and lemon zest in a food processor. Add the butter to the flour. Pulse the butter-flour mixture until it is crumbly.
3. Reserve 1 cup of the butter/flour crumbs for topping. Add the ground almonds to the reserved crumbs.
4. Place the remaining crumbs in a large bowl and add the baking powder, baking soda, salt, yogurt, and egg. Mix the batter until it’s mostly smooth. Gently stir in the raspberries. Use a spatula or your hands to spread the batter over the bottom of the springform pan.
5. To make the filling, process the softened cream cheese, sugar, 1 egg, and lemon juice in a food processor until smooth. Pour the filling over the batter in the pan. Sprinkle the reserved crumbs on top.
6. Bake for 1 hour. Test for doneness by inserting a toothpick in the center of the cake. If it comes out clean, the cake is done. Let it cool completely.
Build this edible bird’s nest out of a delicious peanut butter dough and pretzel sticks. Add candy eggs or a little marshmallow Peep once the nest is completed.
Makes 4 nests
INGREDIENTS
1 cup peanut butter or other nut butter
½ cup powdered sugar
2 tablespoons cocoa powder
1 cup powdered milk
¼ cup honey
Pretzel sticks
Candy eggs or marshmallows
INSTRUCTIONS
1. In a medium bowl, mix the peanut butter, powdered sugar, cocoa powder, honey, and powdered milk together with an electric mixer.
2. Divide the dough into four and give each child a dough section and some pretzels.
3. Create a “pinch pot” with the dough by first forming it into a ball, then putting your thumb in the center and working around the perimeter with your thumb and fingers. Widen the central indentation until you are satisfied with the nest.
4. Poke and place pretzel sticks and pretzel pieces in the peanut butter dough to create a more realistic nest. Note that younger children may just poke the pretzels into the dough ball for a more abstract sculpture effect.
5. Add a few marshmallows or candy eggs to the nest to serve as eggs. Or include a marshmallow Peep for a bird.
6. Once the nest is complete, admire it and then eat it.
Crepes are a favorite with kids and adults alike. Fill them with spring vegetables for a savory dish or with fruit for a sweet one.
INGREDIENTS
3 large eggs
1 cup milk
2 tablespoons butter, melted, plus more for the pan
1 cup white whole wheat flour
½ teaspoon salt
INSTRUCTIONS
1. Mix the eggs, milk, 2 tablespoons of butter, flour, and salt in a blender. Let the batter sit for 1 hour.
2. Pour ¼ cup of the batter onto a heated, nonstick pan. Tilt the pan in all directions to spread the batter thinly to about 6"–8" in diameter. Cook for 1–2 minutes before flipping the crepe and cooking it for 30–45 seconds on the reverse side. Remove the crepe from the pan and keep it warm in a 250°F oven. Repeat the process to cook more crepes.
3. Add your choice of savory or sweet toppings (see below) to your crepes and roll them up.
Fill with Spring Vegetables
Spring vegetables, such as spinach, peas, or baby carrots, lightly steamed or sautéed with butter
Chopped herbs, such as parsley or chives (optional)
Shredded cheese of choice (optional)
Berries or fruit, chopped or mashed
Mascarpone or cottage cheese (optional)
Sweetener, such as a drizzle of honey or a teaspoon of sugar (optional)
SPRING GREENS SALAD
Salads are an easy way for kids to be involved in making dinner—and they’re more likely to eat their vegetables if they’re involved in growing and preparing them.
INGREDIENTS
Lettuce, spinach, arugula, mizuna, or other spring greens
Edible flowers, such as pansies or chive blossoms (optional)
Fresh herbs, such as parsley, cilantro, basil, or chives (optional)
Spring vegetables, such as peas, radishes, and baby carrots
Olive oil
Vinegar, such as balsamic or the Herbal Vinegar on page 90
Salt and pepper
INSTRUCTIONS
1. Wash and dry the greens. Place them in a salad bowl. Add the edible flowers, herbs, and vegetables as desired. Toss the salad.
2. Drizzle the greens with olive oil and vinegar and toss again. Season with salt and pepper. Serve.
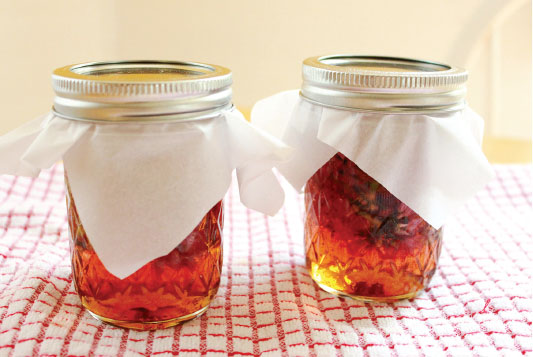
It’s so easy and satisfying to make your own herb-infused vinegar to use in salad dressings and cooking.
INGREDIENTS
Fresh herbs, such as basil or chive blossoms
White balsamic vinegar
INSTRUCTIONS
1. Wash and dry your herbs and roughly chop them. If you’re using chive blossoms, leave the blossoms intact.
2. Loosely pack jelly jars or other small glass jars (with lids) with the clean herbs. Pour the vinegar over the herbs, leaving a ½"–1" space at the top. Place a piece of parchment paper over the top, then screw the lid on.
3. Place the jars in a cool, dark place, such as a cupboard, for 1–2 weeks, or until the contents reach your desired flavor intensity.
4. Strain the herbal vinegar through a strainer or sieve to remove the herbs. Return the vinegar to the glass jars. Try it out on your next spring salad (page 88).
In spring our imagination is captured by the birds, their nesting and laying of eggs, and their chicks hatching. As a family of young learners, we do our best to observe, from a respectful distance, while helping when we can—by making birdhouses, filling the bird feeders, supplying nesting materials, and incorporating bird habitats into our garden. We treasure fragile robin’s egg fragments we find beneath trees, try to re-create eggs and nests ourselves, and read thought-provoking children’s picture books to learn as much as possible (books about birds are on page 335).
OUR FAVORITE BOOKS ABOUT SPRING
Waiting Out the Storm by JoAnn Early Macken
And Then It’s Spring by Julie Fogliano
How Mama Brought the Spring by Fran Manushkin
A New Beginning: Celebrating the Spring Equinox by Wendy Pfeffer
Mud by Mary Lyn Ray

Bring birds indoors with this artful paper chain. Perfect for spring or party decor!
MATERIALS
Scissors
Watercolor paper or other heavy paper, 12" x 18"
Bird template (see page 327 or draw your own)
Paintbrush
Paint: tempera or BioColor
Glitter (optional)
Stapler
Tape
INSTRUCTIONS
1. Cut the paper into three strips, 18" x 4". Fold each strip into thirds, end to end, accordion style.
2. Hold the bird template over the accordion-folded paper and cut through all layers, making sure to leave at least ¼" of folded paper between the birds (at the beaks and tails).
3. Paint the paper birds. Add glitter if desired. Let the paint dry.
4. Connect two or more paper bird chains together with staples or tape. Hang the chains with tape to decorate your home.
VARIATIONS
Make paper chains with any spring-themed image. Ideas include flowers (my daughter makes a lot of these), bunnies, eggs, lambs, and chicks.
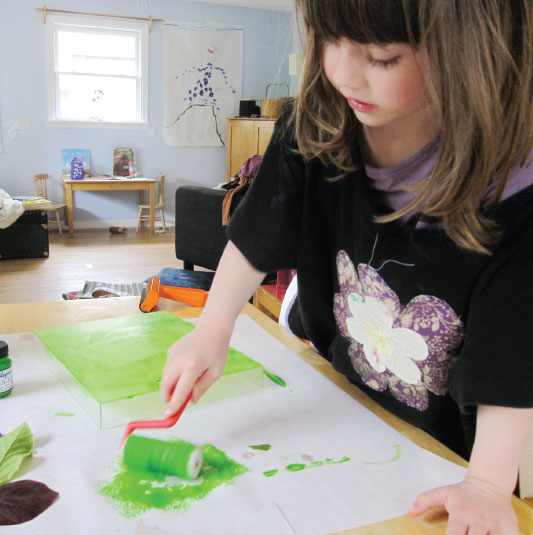
Make botanical art worth hanging by printing with leaves and flowers on canvas.
MATERIALS
Newspapers or splat mat
Paintbrush
Stretched canvas, any size
Acrylic or BioColor paint
Leaves and ferns
Water-based printing ink (acrylic paint works too)
Large plate or acrylic box frame, for rolling out the ink (see page 349)
Mini paint roller (from the hardware store, used for corners and trim in house painting)
Newspaper and scrap paper
Brayer (hard rubber roller, found at arts and crafts supply stores) or old rolling pin
Plain white or light-colored paper
Scissors
Mod Podge or glue
INSTRUCTIONS
1. Protect your work surface with newspapers or a splat mat.
2. Paint the front and sides of your plain canvas with acrylic paint or BioColor (a light color works best). Use all one color or a combination of colors. If you want a white surface, paint it white rather than leaving the canvas uncoated. Let the paint dry.
3. Go on a nature walk around your yard or neighborhood to collect leaves of various sizes and shapes. You can include leaves from houseplants as well.
4. Prepare for leaf printing by gathering all of your materials.
5. Squeeze a small amount of ink on the plate. Roll it around with the paint roller to coat the roller thinly.
6. Place a leaf, vein side up, on a sheet of newspaper or scrap paper. Roll the paint roller over the leaf to coat it evenly.
7. Set the leaf, paint side down, on the canvas you have prepared for the print. Place a clean piece of scrap paper over the leaf. Press down firmly with your hands or roll a clean brayer over the paper-covered leaf to press it down evenly. Carefully lift up the paper and leaf to reveal your print.
8. Continue to print leaves and ferns in one or more colors on the canvas until you are happy with your design. Make some leaf prints on paper as well. Let the prints dry.
9. Cut out the paper leaf prints and, using Mod Podge or glue, glue them to your canvas as desired for a more complex and layered botanical image. Let the prints dry, then hang them.
VARIATIONS
You can also use this method to decorate paper, including stationery (see page 98), wrapping paper, and journals, and to make your own stickers (see page 96). For leaf printing on fabric, see the activity on page 100.
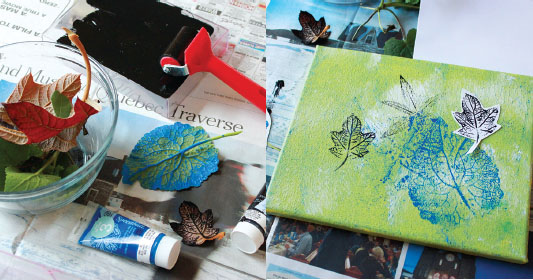
Print your own seasonal stickers with new spring leaves. Use for art or gifts or to decorate letters and cards.
MATERIALS
Newspapers or a splat mat
Small fresh leaves
Water-based printing ink or acrylic paint
Large plate or acrylic box frame, for rolling out the ink
Newspaper and scrap paper
Mini paint roller (from the hardware store, used for corners and trim in house painting)
Full sheet of sticker paper (sold as full-sheet address labels)
Brayer (hard rubber roller, found at arts and crafts supply stores) or rolling pin Pen (optional)
Scissors
INSTRUCTIONS
1. Protect your work surface with newspapers or a splat mat.
2. Follow steps 3–7 for Leafy Masterpiece (see page 94), making your leaf prints on full-size sticker sheets instead of on canvas. Let the stickers dry.
3. Use a pen to outline the leaf prints if desired.
4. Cut out the stickers, leaving a ⅛"–¼" margin around the pen line.
5. Pull off the paper backing and apply the stickers where desired, such as on envelopes or blank note cards.
Decorate blank cards and envelopes with botanical prints. Great for Mother’s Day.
MATERIALS
Newspapers or a splat mat
Leaves and ferns
Water-based printing ink (acrylic paint works too.)
Large plate or acrylic box frame, for rolling out the ink
Newspaper and scrap paper
Mini paint roller (from the hardware store, used for corners and trim in house painting)
Plain white or light-colored paper postcards, note cards, envelopes, or journals
Brayer (hard rubber roller, found at arts and crafts supply stores) or old rolling pin
INSTRUCTIONS
1. Protect your work surface with newspapers or a splat mat.
2. Follow steps 3–7 for Leafy Masterpiece (see page 94), making your leaf prints on note cards, postcards, and envelopes instead of on canvas. Let the prints dry.
3. Add a greeting or note and drop them in the mail. Or tie a set of cards together with a ribbon and present them as a gift with some homemade leaf stickers (page 96).
Decorate your own fabric with gorgeous prints of all the new spring leaves and ferns.
MATERIALS
Newspaper or a splat mat
Spoon
Fabric paint (I like Jacquard brand.)
Large plate or acrylic box frame, for rolling out the ink
Mini paint roller (from the hardware store, used for corners and trim in house painting)
Leaves and ferns
Newspaper and scrap paper
Plain white or light-colored cotton fabric (or white T-shirt, scarf, skirt, handkerchief, pillowcase, napkins, and so forth)
Brayer (hard rubber roller, found at arts and crafts supply stores) or old rolling pin
Iron
Ironing board
INSTRUCTIONS
1. Prepare for leaf printing by protecting your work surface with newspaper or a splat mat. Gather all of your materials.
2. Put a couple spoonfuls of fabric paint on the plate. Roll it around with the paint roller to coat the roller thinly.
3. Place a leaf, vein side up, on a sheet of newspaper or scrap paper. Roll the paint roller over the leaf to coat it evenly.
4. Set the leaf, paint side down, on the fabric where you want the print. Set a clean piece of paper over the leaf. Roll the brayer over the paper-covered leaf to press it down evenly. Carefully lift up the paper and leaf to reveal your print.
5. Continue to print leaves and ferns in one or more colors until you are happy with your fabric design.
6. Let the paint dry overnight, and then iron, following the instructions on the fabric paint bottle to set the paint. Once the fabric paint is “set,” you can wash and dry it as you would any fabric.
7. Use your new fabric to create a pillow, skirt, napkins, or flag. Or, if you printed directly on a clothing item, it’s ready to wear and enjoy!
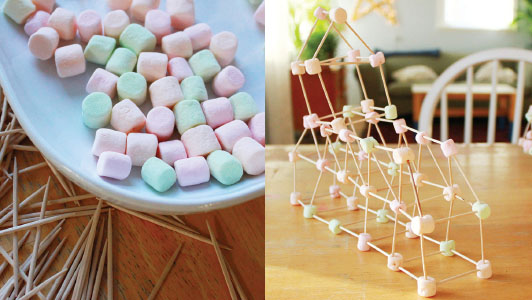
Pastel-colored marshmallows give a little spring twist to this childhood favorite. Perfect for rainy spring days that keep the family indoors.
MATERIALS
Marshmallows, pastel-colored or white (see note)
Toothpicks, round style is best
INSTRUCTIONS
Build structures with the marshmallows by connecting them with toothpicks.
Continue to add toothpicks and marshmallows until satisfied with your sculpture.
Note: It can be easier to work with stale marshmallows. Spread the marshmallows on a cookie sheet and leave them out for a week or two to make them firmer.
Learn about forest ecosystems and celebrate Earth Day or Arbor Day by creating your own tabletop forest.
MATERIALS
Branches, leaves, and flowers
Playdough (see page 16) or clay
Fabric or other additions, as desired
Drawing tools
Paper
Animal figurines (optional), drawings, or pictures
INSTRUCTIONS
1. First, go on a nature walk around your yard or local park, collecting branch tips, leaves, and flowers. (Note: Some public areas have rules against picking vegetation.)
2. Back home, create miniature trees and shrubs by sticking your nature items into balls of playdough so that they stand upright.
3. Arrange the trees and shrubs into a forest on a tabletop. (Preferably not the dining table, so the forest doesn’t have to be removed at dinnertime.)
4. Add additional features of the natural ecosystem such as a river or lake (perhaps a blue scarf or play silk), mountains, rocks, and a sun. Use playdough, fabric, magazine pictures, drawings on paper, or your own ideas to add to your landscape.
5. Now populate your new forest with animals, birds, and insects, using play figurines if desired and/or paper animals that are drawn (or found in magazines) and cut out.
6. Play with your new forest diorama and use it as a discussion starting point about local or world ecosystems.
I love spring anywhere, but if I could choose
I would always greet it in a garden.
—RUTH STOUT
Gardening with children is a way to connect them with the magic of the natural world (an unassuming seed springs to life with the addition of warmth and water), and it will help them gain a greater understanding and appreciation of where our food comes from.
Even if you don’t consider yourself a gardener, I recommend giving it a try, side by side with your kids. Planting seeds and seedlings, watering them, and watching them grow day by day is rewarding for gardeners of any age. Gardening is mostly easy, even for the novice. Fill a small garden or containers with kid-friendly flowers and vegetables such as peas, carrots, zinnias, and pumpkins and give them plenty of water and sunshine, following instructions on the seed packets.
A garden is like a miniature world where children can observe, up close and personal, and more regularly, some of the natural cycles of life. (Rumor has it that fairies live there too.)
OUR FAVORITE BOOKS ABOUT GARDENING
Roots, Shoots, Buckets, and Boots by Sharon Lovejoy
The Garden Classroom: Hands-on Activities in Math, Science, Literacy, and Art by Cathy James
A Seed Is Sleepy by Diana Hutts Aston
Flower Garden by Eve Bunting
Planting a Rainbow by Lois Ehlert
Isabella’s Garden by Glenda Millard
Our wish flags flutter in the breeze, carrying our hopes and dreams for the garden and the season.
MATERIALS
Paper or cardboard
White cotton fabric
Light-colored chalk
Pinking shears or regular fabric scissors
Tape, painter’s or masking
Pentel brand fabric crayons
Iron
Ironing board
Colorful fabric for backing (optional)
Sewing machine
¼"–½" wide ribbon
INSTRUCTIONS
1. Use the paper to create a triangle template in the size of your choosing. Trace the triangle onto the white fabric with chalk. Cut it out using the pinking shears (an adult job).
2. Tape the fabric triangles to your work surface with the painter’s tape, pulling the fabric taut while you tape it down.
3. Draw your garden wishes on the white fabric using the fabric crayons. Our wish flags often include sun, rain, butterflies, birds, bees for pollination, worms, and lots of flowers.
4. Remove the painter’s tape.
5. Iron the fabric to set the designs, following the instructions on the fabric crayons.
6. If you’d like to back each triangle with a brightly colored fabric, do so now. Sew the ribbon along the top of the wish flags, connecting them to form a banner.
7. Hang the wish flags in your garden where they can work their magic.
Decorate your garden with colorful beaded garden ornaments. Stringing beads is fun for children of all ages and especially great for honing fine motor skills in younger ones.
MATERIALS
Pipe cleaners
Small wooden dowels
Assortment of colorful beads
Hot glue gun
Thin, flexible wire (such as jewelry wire)
INSTRUCTIONS
1. Wrap and twist one end of a pipe cleaner around one end of a dowel. String beads onto the other end of the pipe cleaner and then twist the end of the pipe cleaner down, to hold the beads on. Add another pipe cleaner to the dowel and continue the process until you have five or six beaded pipe cleaners on your dowel.
2. Squeeze glue from the hot glue gun over the pipe cleaner ends that are wrapped around the top of the dowel (to secure them all in place). If desired, glue a large bead at the very top of the dowel.
3. Make as many beaded garden ornaments as desired and then wire them to stakes or poles in your garden. We use ours at the top of the poles that hold up our garden wish flags.
Colorful birdhouses brighten up the garden, add an inviting nesting spot for neighborhood birds, and are lots of fun to paint.
MATERIALS
Paintbrushes
Plain wood birdhouse (from craft or garden stores or your local bird club)
Liquid watercolor paints
Foam brush
Acrylic sealer or outdoor Mod Podge
Mounting hardware
INSTRUCTIONS
1. Paint your birdhouse with one or more colors of liquid watercolor paint. Let the paint dry thoroughly. Keep the bird perch, the entry hole, and the interior free of all paints and sealers. Birds, especially fledglings, need the rougher, more natural wood to climb in and out.
2. Use the foam brush to paint one or two coats of acrylic sealer over the outside of the birdhouses. Let the sealer dry.
3. Mount your colorful new birdhouses as desired on poles, fences, or other safe places. (Keep them high enough that cats and other animals can’t reach the nests.)
VARIATION
Instead of painting the birdhouses, consider decorating them with leaves, lichens, sticks, mosses, and bark for a more natural bird abode. Attach the nature items with wire or thumbtacks (pressed in firmly so birds can’t remove them when borrowing house decorations for nest making).
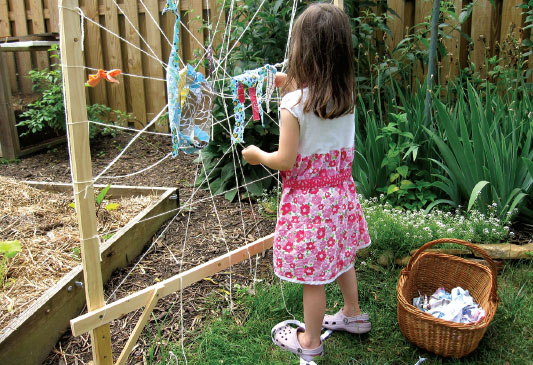
A simple wood frame can be built to use for garden weaving with a combination of nature materials, fabrics, and ribbons.
MATERIALS
Handsaw
1" x 1.5" wood strips, 24' total in length (4 pieces at 48" for the loom, 2 pieces at 24" for the ground posts, plus extra for braces)
Electric drill and screwdriver
Exterior coated wood screws, 1⅞" long
Small shovel
Concrete (optional)
Twine or yarn
Natural materials such as grasses, flowers, and twigs
Assorted fabric strips, ribbons, yarns
INSTRUCTIONS
1. Use the handsaw to cut four lengths of wood into 48" strips. Cut two lengths of wood into 24" strips.
2. To form the loom, make an open square out of three of the 48" wood lengths, placing the fourth 8" up the two side strips. Drill pilot holes on each corner and attach the wood strips to each other with screws.
3. Attach the ground posts to the square using four screws on each side and leaving 12"–16" for extending underground.
4. Dig two holes with a small shovel or trowel, about 4' apart (line them up with the loom posts as you’re measuring and digging).
5. Stick the two garden loom legs into the holes and tamp them down firmly with soil. (Alternatively, you can pour in a small amount of concrete to make the loom sturdier.)
6. Brace the bottom of the loom with extra wood extending at a 45-degree angle from the legs toward the center of the bottom of the square.
HOW TO WEAVE ON THE GARDEN LOOM
1. Tie the twine to the loom, either in the traditional vertical warp pattern or in a more free-form spiderweb design, as pictured here.
2. Weave flowers, grasses, and twigs through the twine as well as fabric strips, yarn, and ribbons. (Don’t be surprised if you see birds snagging a few items to line their nests.)
Note: If you used all-natural materials such as cotton and wool in your weaving, you can cut it all off and toss the whole thing in the compost when you’re ready to make a new weaving.
VARIATION
Use a hula hoop instead of building a frame for your loom. Lean it against a tree or hang it from a branch. The round shape is best suited to a spiderweb-type weaving.
We grow beans up a simple teepee frame almost every year. The teepee itself is fun for children to help erect, and the beans sprout and grow quickly, covering the frame with delicious fresh vegetables and forming a living, child-size fort.
MATERIALS
Shovel
6–8 bamboo or other poles, 8'–10' long
Garden twine
Assorted fabric strips, ribbons, yarns
Natural materials such as grasses, flowers, and twigs
Pole bean seeds, soaked overnight
INSTRUCTIONS
1. Prepare the ground for your beanpole teepee in an area that gets 6–8 hours of sun a day. If you’re building this on the lawn, dig up the turf in a horseshoe shape about 6'–8' in diameter (leaving space for a door) and amend the soil with compost.
2. Create the teepee frame with the bamboo poles evenly spaced, securing the bottom ends of the poles in the soil about 6" deep and tying the top ends together with twine.
3. Tie and wrap twine between the teepee poles from top to bottom, leaving a space open between two poles for the doorway. Tie on and weave in ribbons, fabrics, flowers, and the like.
4. Plant bean seeds around the base of the teepee and water thoroughly. Note: You can build your teepee anytime during the spring, but bean planting time varies according to your climate, so make sure to read the seed packet for guidance.
5. The beans will grow up the structure, creating a living teepee playhouse.
Artful stepping-stones can be created by pressing pebbles, shells, leaves, and treasures (marbles, sea glass, little toy figurines) into wet concrete.
MATERIALS
12" plastic flowerpot saucers (the inexpensive transparent kind)
Petroleum jelly
Plastic drop cloth or newspaper
1 bag of Quikrete
Disposable plastic gloves
Pebbles, shells, leaves, and other nature items
INSTRUCTIONS
1. Grease the inside of the plastic pot saucers with the petroleum jelly. Arrange them on the plastic drop cloth.
2. Adult job only: Mix the concrete according to the instructions on the bag. Use the gloves and refrain from breathing the concrete dust. Pour the concrete into the prepared molds and smooth the top.
3. Press pebbles and other nature items into the surface of the concrete in any design desired.
4. Let the stepping-stones dry for 2 days, then remove them from the molds. Place them in the garden.
