Chapter 21. Introduction to jQuery
Powerful and flexible as JavaScript is, with a plethora of built-in functions, you still need additional layers of code for simple things that cannot be achieved natively or with CSS, such as animations, event handling, and Ajax.
What’s more, as a consequence of the various browser wars over the years, frustrating and annoying browser incompatibilities have come and gone, rearing their heads at different times on different platforms and programs.
As a result, ensuring your web pages look the same on all devices can sometimes be achieved only through tedious JavaScript code that accounts for all the discrepancies across the range of browsers and versions released over recent years. In a word—nightmare.
As I write (in 2014), we seem to be in the midst of a quieter spell, because Microsoft’s Internet Explorer has caught up with the standards in many (but not all) areas, Opera has opted to use WebKit (the same technology used by Google) as the core of its browser, and Apple has bowed out of the PC browser marketplace.
Nevertheless, legacy inconsistencies remain, and plenty of people use older browsers. Plus there’s still the issue of needing to write a substantial amount of JavaScript when you want to create anything more than basic special effects.
To fill these gaps, a number of libraries of functions to minimize the differences between browsers have been developed, many of which also provide easy hooks into the DOM (Document Object Model), and for Ajax, and event and animation handling. These include the likes of AngularJS, jQuery, MooTools, Prototype, script.aculo.us, and YUI (among many others).
Why jQuery?
There’s room to cover only one library in this book, however, so I have opted for the most widely used, jQuery, which is now installed on over 60 percent of all websites, according to http://w3techs.com, and (as far as I can tell from their graphs) is more used than all its major competitors combined. Incidentally, if you ever want to see how the various libraries stack up at any point, search for javascript at similartech.com.
With jQuery, not only do you get a very high level of cross-browser compatibility (yes, even including Internet Explorer), you also have quick and easy access to HTML and DOM manipulation, special functions to interact directly with CSS, the ability to control events, powerful tools to create professional effects and animations, and functions for conducting Ajax communications with the web server. jQuery is also the base for a wide range of plug-ins and other utilities too.
You don’t need to use jQuery, though, and some programming purists would never touch a library, preferring to create their own bespoke collection of functions (and there can be good reasons for this, such as not having to wait on others to correct bugs you find, implementing your own security features, and so on). But jQuery has definitely stood the test of time, and if you would like to take advantage of its gentle learning curve, and be developing quality web pages as quickly as possible, this chapter will show how you can get started using it.
Including jQuery
There are two ways you can include jQuery in your web pages. You can go to the jQuery website, choose the version you need, download it to your website, and serve it up from there. Or, you can take advantage of a free content delivery network (CDN) and simply link to the version you require.
Note
jQuery is released under the terms of the MIT license, which places almost no restrictions on what you can do. You are free to use any jQuery project in any other project (even commercial projects) as long as the copyright header is left intact.
Choosing the Right Version
Before deciding whether to download and host jQuery directly, or to use a CDN, you also must pick a version of jQuery. In most cases this is straightforward because you’ll simply opt for the latest release. However, if you are targeting particular browsers, or if you are maintaining a legacy website that relies on a particular version of jQuery, then the latest one may not be right for you.
Unlike most software, for which you simply download and install the newest available, jQuery has evolved over time to take account of the changing dynamics in the market of differing browser versions, with different features and bugs.
At the same time, improvements to jQuery have been made that might make newer versions operate differently on sites that have been specially tailored to a particular version (and the quirks surrounding it), at the time it was released.
Of course, each newer version is an improvement over the previous one, and is more and more likely to cover all the bases. But where identical operation is critical for a website, until you have fully tested a new version, it is often best to stick with an earlier one.
To IE or Not to IE
Additionally, as well as the 1.x series of jQuery, there’s now a 2.x series, which no-longer supports versions of Internet Explorer lower than 9. Both of these are running in parallel development. If you are sure all your users will have IE 9 or higher (for example, because you are writing a mobile web app), then you can choose the latest 2.x version to benefit from tighter, faster, and more-efficient code. But if any of your users will be using older versions of IE, then you should use a 1.x release of jQuery.
Compressed or Editable
You also must decide if you wish to use a version of jQuery that has been minified (compressed) in size to minimize bandwidth and decrease loading time, or whether you want to use an uncompressed version (perhaps because you want to make an edit to it yourself—which you are fully entitled to do). Generally, a minified version is best, but most web servers support gzip for on-the-fly compression and decompression, so this is becoming less important (although minification does remove comments too).
Downloading
Every released version of jQuery is listed in both compressed and minified forms at jquery.com/download.
All you need to do is choose the one you need, right-click the link displayed alongside, and save it to your hard disk. From there, you can upload it to your web server and then include it within <script> tags, like this (for the minified version of release 1.11.1):
<script src='http://myserver.com/jquery-1.11.1.min.js'></script>
Note
If you have never used jQuery before (and have no special requirements), then just download the latest minified version, or link to it via a CDN, as described following.
Using a Content Delivery Network
Several CDNs support jQuery. If you use one of them, you can save yourself the hassle of having to download new versions and then upload them to your server, by simply linking directly to the URLs supplied by these networks.
Not only that, but they provide this service free of charge, and usually on high-capacity backbones that are probably the fastest in the world. Additionally, CDNs usually hold their content in a number of different geographic locations, and then supply a file from the server closest to a surfer, ensuring the quickest possible delivery.
Overall, if you don’t need to modify the jQuery source code (requiring you to host it on your own web servers), and your users are certain to have a live Internet connection, CDNs are probably the way to go. And it’s very easy. All you need to know is the filename you wish to access and the root folder the CDN is using. For example, all current and previous versions can be accessed though the CDN that jQuery uses, like this:
<script src='http://code.jquery.com/jquery-1.11.1.min.js'></script>
The base directory is at http://code.jquery.com/ and you simply follow this with the name of the file you need to include (in this case, jquery-1.11.1.min.js).
Both Microsoft and Google offer jQuery on their networks, and so you can also include it in either of the following ways:
<script src='http://ajax.aspnetcdn.com/ajax/jQuery/jquery-1.11.1.min.js'></script>
<script src='http://ajax.googleapis.com/ajax/libs/jquery/1.11.1/jquery.min.js'>
 </script>
In the case of the Microsoft CDN (aspnetcdn.com), you should begin the URL with the base directory of ajax.aspnetcdn.com/ajax/jQuery/, and then follow that with the filename you require.
For Google, however, you must split the filename (for example, jquery-1.11.1.min.js) into a folder and filename (like this: 1.11.1/jquery.min.js). Then precede that with ajax.googleapis.com/ajax/libs/jquery/.
Note
An added benefit of using a CDN is that most other websites also do this, so that jQuery may well already be cached in the user’s browser, and might not even require re-delivering. With 60 percent or more of websites using jQuery, this can be a lot of valuable bandwidth and time saved.
Always Using the Latest Version
Another advantage of CDNs is that you can choose to always use the latest version of jQuery, so that you can save a web page and forget all about ever having to update it for a newer release.
To include the latest version (of release 1.x) from the jQuery or Google CDNs, use one of the following forms of the <script> tag:
<script src='http://code.jquery.com/jquery-latest.min.js'></script>
<script src='http://ajax.googleapis.com/ajax/libs/jquery/1/jquery.min.js'></script>
Be careful if you do this, though, because something on your web page could possibly break with a future update, so be prepared to consider this possibility if any web pages start to misbehave.
Note
It’s worth knowing that both the jQuery and Google CDNs support accessing the jQuery files by either HTTP or HTTPS, using http:// or https:// prefixes. In the examples for this chapter (available to download at lpmj.net), though, I have opted to download and serve up jQuery locally so that you can test all the example files, even if you are offline on a train or plane, for example.
Customizing jQuery
If it’s absolutely critical that you must keep the amount of data downloaded by a web page to the minimum, then you may still be able to use jQuery by making a special build of it that includes only the features your website will be using. You won’t be able to rely on a CDN to deliver it, though, but in this circumstance you probably weren’t planning on using one anyway.
To create your own custom build of jQuery, visit projects.jga.me/jquery-builder and simply check the boxes you want and uncheck those that you don’t. The bespoke version of jQuery will then be loaded into a separate tab or window, from where you can copy and paste it as required.
jQuery Syntax
The most striking thing about jQuery to people who are new to it is the $ symbol, which acts as the jQuery factory method. It was chosen because the symbol is legal in JavaScript, is short, and is different from customary variable, object, or function/method names.
It takes the place of making a call to the jQuery function (which you can also do if you wish). The idea is to keep your code short and sweet, and to save on unnecessary extra typing each time you access jQuery. It also immediately shows other developers new to your code that jQuery (or a similar library) is in use.
A Simple Example
At its simplest, you access jQuery by typing a $ symbol, followed by a selector in parentheses, and then a period and a method to apply to the selected element(s).
For example, to change the font family of all paragraphs to monospace, you could use this statement:
$('p').css('font-family', 'monospace')
Or to add a border to a <code> element, you could use this:
$('code').css('border', '1px solid #aaa')
Let’s look at that as part of a complete example (see Example 21-1, where the jQuery parts are highlighted in bold):
Example 21-1. A simple jQuery example
<!DOCTYPE html>
<html>
  <head>
    <title>First jQuery Example</title>
    <script src='jquery-1.11.1.min.js'></script>
  </head>
  <body>
    The jQuery library uses either the <code>$()</code>
      or <code>jQuery()</code> function names.
    <script>
      $('code').css('border', '1px solid #aaa')
    </script>
  </body>
</html>
When you load this example into a browser, the result will be similar to Figure 21-1. Of course, this particular instruction simply replicates what you can do with normal CSS, but the idea is to illustrate jQuery syntax, so I’m keeping things simple, for now.
Note
Another way of issuing this command is by calling the jQuery function (which works in the same way as $), like this:
jQuery('code').css('border', '1px solid #aaa')
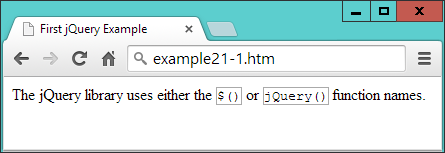
Figure 21-1. Modifying elements with jQuery
Avoiding Library Conflict
If you use other libraries alongside jQuery, you may find that they define their own $ function. To resolve this issue, you can call the noConflict method on the symbol, which releases control so that the other library can take over, like this:
$.noConflict()
Once you do this, to access jQuery thereafter, you must call the jQuery function. Or, you can replace use of the $ symbol with an object name of your choice, like this:
jq = $.noConflict()
Now you can use the keyword jq, wherever you had previously used $.
Note
To distinguish and keep track of jQuery objects separately from standard element objects, some developers prefix a $ to the front of any object created with jQuery (so that they end up looking like PHP variables!).
Selectors
Now that you’ve seen how easy it is to include jQuery in a web page and access its features, let’s move on to looking at its selectors, which (I’m sure you’ll be pleased to learn) work in exactly the same way as CSS. In fact, it’s at the heart of how most of jQuery operates.
All you have to do is think about how you would style one or more elements using CSS, and then you can use the same selector(s) to apply jQuery operations on these selected elements. This means you can make use of element selectors, ID selectors, class selectors, and any combinations.
The css Method
To explain jQuery’s use of selectors, let’s first look at one of the more fundamental jQuery methods, css, with which you can dynamically alter any CSS property. It takes two arguments: the property name to be accessed, and a value to be applied, like this:
css('font-family', 'Arial')
As you will see in the following sections, you cannot use this method on its own, because you must append it to a jQuery selector, which will select one or more elements whose properties should be changed by the method. The following, which sets the content of all <p> elements to display with full justification, is an example:
$('p').css('text-align', 'justify')
You can also use the css method to return (rather than set) a computed value by supplying only a property name (and no second argument). In this case, the value of the first element that matches the selector is returned. For example, the following will return the text color of the element with the ID of elem, as an rgb method:
color = $('#elem').css('color')
Remember that the value returned is the computed value. In other words, jQuery will compute and return the value as used by the browser at the moment the method is called, not the original value that may have been assigned to the property via a style sheet or in any other way.
So, if the text color is blue (for example), the value assigned to the variable color in the preceding statement will be rgb(0, 0, 255), even if the color was originally set using the color name blue, or the hex strings #00f or #0000ff. This computed value, though, will always be in a form that can be assigned back to the element (or any other element) via the second argument of the css method.
Warning
Be wary with any computed dimensions returned by this method because, depending on the current box-sizing setting (see Chapter 19), they may or may not necessarily be what you expect. When you need to get or set widths and heights without consideration for box-sizing, you should use the width and height methods (and their siblings), as described in the section “Modifying Dimensions”.
The Element Selector
To select an element to be manipulated by jQuery, just list its name within the parentheses following the $ symbol (or jQuery function name). For example, if you wish to change the background color of all <blockquote> elements, you could use a statement such as the following:
$('blockquote').css('background', 'lime')
Combining Selectors
Just as with CSS, you may combine selectors into a single jQuery selection using commas, as with the following example:
$('blockquote, #advert, .new').css('font-weight', 'bold')
Example 21-2 brings all these types of selectors together into a single example (with the jQuery statements shown in bold), the result of which you can see in Figure 21-2.
Example 21-2. Using jQuery with different selectors
<!DOCTYPE html>
<html>
  <head>
    <title>Second jQuery Example</title>
    <script src='jquery-1.11.1.min.js'></script>
  </head>
  <body>
    <blockquote>Powerful and flexible as JavaScript is, with a plethora of
      built-in functions, it is still necessary to use additional code for
      simple things that cannot be achieved natively or with CSS, such as
      animations, event handling, and Ajax.</blockquote>
    <div id='advert'>This is an ad</div>
    <p>This is my <span class='new'>new</span> website</p>
    <script>
      $('blockquote').css('background', 'lime')
      $('#advert').css('border', '3px dashed red')
      $('.new').css('text-decoration', 'underline')
      $('blockquote, #advert, .new').css('font-weight', 'bold')
    </script>
  </body>
</html>
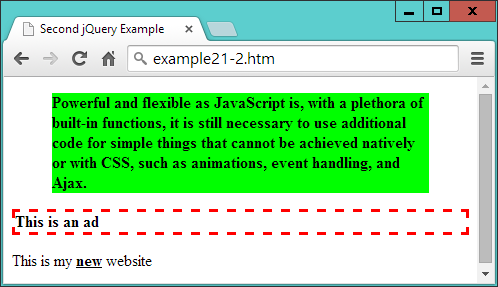
Figure 21-2. Manipulating multiple elements
Handling Events
If all jQuery could do was alter CSS styles, it wouldn’t be a great deal of help—but of course it can do far more than that. So let’s further investigate by seeing how it handles events.
As you will recall, most events are triggered by user interaction: when a mouse passes over an element, the mouse button is clicked, or a key is pressed. But there are also other events that can be triggered, such as when a document completes loading.
With jQuery, it’s a simple matter to attach your own code to these events in a safe way that doesn’t block other code from also gaining access to these events. For example, here’s how to get jQuery to respond to an element being clicked:
$('#clickme').click(function()
{
  $('#result').html('You clicked the button!')
})
When the element with the ID of clickme is clicked, the innerHTML property of the element with the ID of result is updated using the jQuery html function.
Warning
jQuery objects (created with either the $ or jQuery methods) are not the same as JavaScript objects created with getElementById. In plain JavaScript, you can use a statement like object = document.getElementById('result') followed by (for example) object.innerHTML = 'something'. But in the preceding example, $('#result').innerHTML would not work, because innerHTML is not a property of a jQuery object. Hence the use of the jQuery method html to achieve the required result.
Example 21-3 fleshes out the idea (which you can see running in Figure 21-3).
Example 21-3. Processing an event
<!DOCTYPE html>
<html>
  <head>
    <title>jQuery Events</title>
    <script src='jquery-1.11.1.min.js'></script>
  </head>
  <body>
    <button id='clickme'>Click Me</button>
    <p id='result'>I am a paragraph</p>
    <script>
      $('#clickme').click(function()
      {
        $('#result').html('You clicked the button!')
      })
    </script>
  </body>
</html>
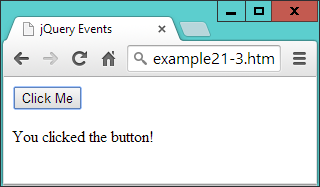
Figure 21-3. Processing a click event
Note
When accessing an event with jQuery, omit the on prefix that you would use in standard JavaScript. So, for example, the onmouseover event name becomes the mouseover function in jQuery, onclick becomes click, and so on.
Waiting Until the Document Is Ready
Since jQuery is so closely related to the DOM in what it lets you achieve, more often than not you will need to wait until a web page has loaded before manipulating parts of it. Without jQuery, this can be achieved with the onload event, but there’s a more efficient, cross-browser jQuery method called ready, which you can call to enable it at the earliest possible moment, even sooner than onload. This means jQuery can get working on a page that much more quickly, and un-user-friendly delays are minimized.
To make use of this feature, place your jQuery code within the following structure:
$('document').ready(function()
{
  // Your code goes here
})
Now the code will wait there until the document is ready, and only then will it be called by the ready method. In fact, there’s a shorter version you can use that takes even less typing, as shown in Example 21-4.
Example 21-4. The smallest jQuery ‘ready’ code encapsulation function
$(function()
{
  // Your code goes here
})
If you get used to encapsulating your jQuery statements in one of these two structures, you won’t encounter the types of errors that can be generated by trying to access the DOM too soon.
Note
Alternatively, another approach is to always place your JavaScript at the end of every HTML page, so that it is executed only after the entire document has loaded. There is a secondary advantage too, in that this ensures the web page contents gets priority with loading—and so you may well see improvements in user experience.
The only time end-of-page scripts may not be a good idea is if a document could appear to be ready when it isn’t, or if all external style sheets have not yet loaded (which can really be identified only by testing), causing users to think they can interact with it before your script is ready. In such cases, implement the ready function and all will be well. In fact, if in doubt, place your script at the page end and use the ready function and you’ll get the best of both worlds.
Event Functions and Properties
You’ve just seen the ready event method, but there are several dozen jQuery event methods and associated properties you can access (far too many to detail here). However, the following are some of the more commonly used and they’ll get you started for most projects. For a comprehensive summary of all available events, though, please check out api.jquery.com/category/events.
The blur and focus Events
The blur event triggers when focus is removed from an element, causing it to blur, and is a good partner for the focus event. Both can be used to add a handler to the event, or they will trigger the event if you omit any arguments from the method’s parentheses.
In Example 21-5, there are four input fields, and the first is given immediate focus with a quick call to the focus method, applying it to the element with the ID of first. Then a pair of handlers are added to all input elements. The focus handler sets their background to yellow when focus is given, and the blur handler sets their background to light gray when focus is removed (or blurred).
Example 21-5. Using the focus and blur events
<!DOCTYPE html>
<html>
  <head>
    <title>Events: blur</title>
    <script src='jquery-1.11.1.min.js'></script>
  </head>
  <body>
    <h2>Click in and out of these fields</h2>
    <input id='first'> <input> <input> <input>
    <script>
      $('#first').focus()
      $('input').focus(function() { $(this).css('background', '#ff0') } )
      $('input') .blur(function() { $(this).css('background', '#aaa') } )
    </script>
  </body>
</html>
Note
You are allowed to include whitespace characters between the closing parenthesis of a method, and the period operator used to attach another method to it (and even after the period too if you like), as in the previous example where I have right-aligned the focus and blur event names under each other, to help the rest of the statements also line up in columns.
In Figure 21-4, you can see how this code gives any input fields that have ever had focus a light gray background color. If one currently has focus, its background color is set to yellow, while unvisited fields remain with a white background color.

Figure 21-4. Attaching to blur and focus events
The this Keyword
This example also serves to illustrate the use of the this keyword. When an event is called, the element on which it was triggered is passed in the object this, which can then be given to the $ method for processing. Or, since this is a standard JavaScript object (and not a jQuery object), it can be used as such. So, if you prefer, you could replace this:
$(this).css('background', '#ff0')
with this:
this.style.background = '#ff0'
The click and dblclick Events
You saw the click event a little earlier, but there’s an event for handling double-clicks too. To use either, attach the event’s method to a jQuery selection, and for its argument place a jQuery method to invoke when the event triggers, like this:
$('.myclass')   .click( function() { $(this).slideUp() })
$('.myclass').dblclick( function() { $(this).hide()    })
Here I have opted to use in-line anonymous functions, but you can use named ones instead if you like (but remember to supply only the name of the function without parentheses, or it will be called at the wrong time). The this object will pass through as expected and be made available to the named function, like this:
$('.myclass').click(doslide)

function doslide()
{
  $(this).slideUp()
}
The slideUp and hide methods are detailed in the section, “Special Effects”. For now, though, just try running Example 21-6, and either click or double-click the buttons to see how some disappear with an animation (using slideUp), and some just vanish (using hide), as shown in Figure 21-5.
Example 21-6. Attaching to the click and dblclick events
<!DOCTYPE html>
<html>
  <head>
    <title>Events: click & dblclick</title>
    <script src='jquery-1.11.1.min.js'></script>
  </head>
  <body>
    <h2>Click and double click the buttons</h2>
    <button class='myclass'>Button 1</button>
    <button class='myclass'>Button 2</button>
    <button class='myclass'>Button 3</button>
    <button class='myclass'>Button 4</button>
    <button class='myclass'>Button 5</button>
    <script>
      $('.myclass').click(    function() { $(this).slideUp() })
      $('.myclass').dblclick( function() { $(this).hide()    })
    </script>
  </body>
</html>
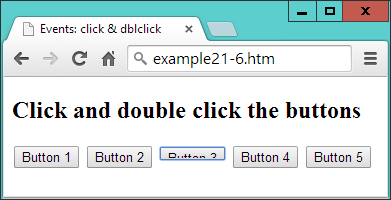
Figure 21-5. Button 3 has been clicked once and is sliding up
The keypress Event
From time to time, you need better control over user keyboard interaction, particularly when processing complex forms or when writing games. For cases such as these, you can use the keypress method, which can be attached to anything that accepts keyboard input, such as an input field, or even the document itself.
In Example 21-7, the method has been attached to the document in order to intercept all key presses, and the result of running it can be seen in Figure 21-6.
Example 21-7. Intercepting key presses
<!DOCTYPE html>
<html>
  <head>
    <title>Events: keypress</title>
    <script src='jquery-1.11.1.min.js'></script>
  </head>
  <body>
    <h2>Press some keys</h2>
    <div id='result'></div>
    <script>
      $(document).keypress(function(event)
      {
        key = String.fromCharCode(event.which)

        if (key >= 'a' && key <= 'z' ||
            key >= 'A' && key <= 'Z' ||
            key >= '0' && key <= '9')
        {
          $('#result').html('You pressed: ' + key)
          event.preventDefault()
        }
      })
    </script>
  </body>
</html>
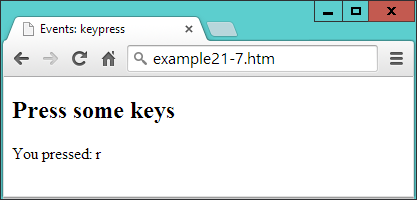
Figure 21-6. Processing key presses from the keyboard
There are a few things of note in this example that you will need to bear in mind when writing your own keyboard handlers. For example, because browsers return differing values for this event, the which property of the event object is normalized by jQuery to return the same character codes across all browsers. So this is where to look for which key was pressed.
Being a character code, though, the value in which is a number, which you can turn into a single letter string by passing it through String.fromCharCode. You don’t have to do this because you can easily respond to ASCII values in your code. But this method is useful when you need to work with characters.
When a key press is recognized, a simple statement to that effect is inserted into the innerHTML property of the div element with the ID of result.
Warning
This is a good example of where the document.write function should not be used, because the document will have already fully loaded by the time the user presses a key. If document.write were called to display the information at this time, it would erase the current document. So this is where writing into the HTML of an element is the perfect, nondestructive means of supplying user feedback, as explained in “About document.write” in Chapter 13.
Considerate Programming
When you are anticipating user input, you should decide which values you will respond to, and then ignore all others, just in case another event handler needs access to them. This is considerate practice for any other utilities (and the main browser itself) that may also be running. For example, in the preceding example I have chosen to accept only the characters a–z, A–Z and 0–9, ignoring all others.
There are two ways you can pass keyboard interrupts onto (or deny them from) other handlers. First, do nothing, and when your code exits, other handlers will also see and be able to react to the same key presses. This can cause confusion, though, if multiple actions occur from a single key press.
Alternatively, when you don’t want the event to trigger any other handlers, you can make a call to the preventDefault method of event, which then keeps the event from “bubbling” up to other handlers.
Warning
Be careful where you place your call to preventDefault because if it’s outside the part of code in which you process the key presses, then it will prevent all other keyboard events from bubbling, and you may lock the user out of the browser (or at least out of using certain features).
The mousemove Event
Some of the most commonly intercepted events are for mouse handling. I’ve already covered mouse button clicks, but now let’s take a look at attaching to mouse movement events.
It’s time, I think, for a slightly more interesting example, so in Example 21-8 I have put together a rudimentary drawing program using jQuery in conjunction with an HTML5 canvas. Although the canvas is not fully explained until Chapter 23, don’t worry because the code is very simple.
Example 21-8. Intercepting mouse movement and mouse key events
<!DOCTYPE html>
<html>
  <head>
    <title>Events: Mouse Handling</title>
    <script src='jquery-1.11.1.min.js'></script>
    <style>
      #pad {
        background:#def;
        border    :1px solid #aaa;
      }
    </style>
  </head>
  <body>
    <canvas id='pad' width='480' height='320'></canvas>
    <script>
      canvas  = $('#pad')[0]
      context = canvas.getContext("2d")
      pendown = false

      $('#pad').mousemove(function(event)
      {
        var xpos = event.pageX - canvas.offsetLeft
        var ypos = event.pageY - canvas.offsetTop

        if (pendown) context.lineTo(xpos, ypos)
        else         context.moveTo(xpos, ypos)

        context.stroke()
      })

      $('#pad').mousedown(function() { pendown = true  } )
      $('#pad')  .mouseup(function() { pendown = false } )
    </script>
  </body>
</html>
In Figure 21-7, you can see how this very simple set of instructions can be used to create line drawings (well, if you have artistic ability, that is :). Here’s how it works. First, a canvas object is created by referencing the first (or zeroth) element of the jQuery selector, like this:
canvas = $('#pad')[0]
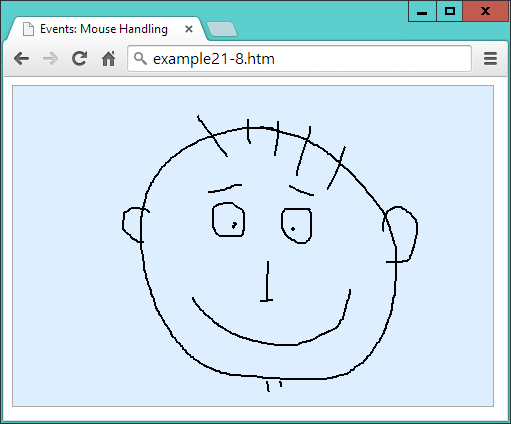
Figure 21-7. Capturing mouse movement and mouse key events
This is one way you can quickly take a jQuery object and extract a standard JavaScript element object. Another would be to use the get method, like this:
canvas = $('#pad').get(0)
The two are interchangeable with each other, but get has the edge because, without any argument passed, it will return all the element node objects from a jQuery object as an array.
Anyway, as you’ll learn in Chapter 23, the canvas will be written to using a special context object, which is now created:
context = canvas.getContext("2d")
There’s one more thing to initialize, which is to create a Boolean variable called pendown to track the status of the mouse button (initially false because the pen is up):
pendown = false
After this, the canvas (with the ID of pad) has its mousemove event intercepted by the anonymous function shown following, within which three sets of things happen:
$('#pad').mousemove(function(event)
{
  ...
})
First, the xpos and ypos local variables (local because of the var keywords) are assigned values representing the position of the mouse within the canvas area.
These values are taken from the jQuery properties pageX and pageY, which refer to the mouse pointer’s offset from the top lefthand corner of the containing document. Therefore, since the canvas is itself offset slightly from that location, the canvas offset values (in offsetLeft and offsetTop) are subtracted from both pageX and pageY:
var xpos = event.pageX - canvas.offsetLeft
var ypos = event.pageY - canvas.offsetTop
Now that we know where the mouse pointer is in relation to the canvas, the next pair of lines test the value of pendown. If it is true, then the mouse button is being pressed, and so a lineTo call is made to draw a line to the current location. Otherwise, the pen is up, and so moveTo is called to simply update the current location:
if (pendown) context.lineTo(xpos, ypos)
else         context.moveTo(xpos, ypos)
Then, the stroke method is called to apply whichever drawing command was just made to the canvas. These five lines are all that is responsible for handling the drawing, but it’s still necessary to track the mouse button state, and so the final two lines of code intercept the mousedown and mouseup events, setting pendown to true when the mouse button is pressed, and false when it’s released:
$('#pad').mousedown(function() { pendown = true  } )
$('#pad')  .mouseup(function() { pendown = false } )
In this example, you see the combination of three different event handlers working together to create a simple utility, using both local variables for internal expressions, and global variables where an object or the state of something must be made available across multiple functions.
Other Mouse Events
The mouseenter and mouseleave events trigger whenever the mouse passes into an element or leaves it. No position values are supplied because you are simply assumed to want to make a Boolean decision about what to do regarding these events.
In Example 21-9, a pair of anonymous functions are attached to these events, altering the HTML of an element accordingly, as shown in Figure 21-8.
Example 21-9. Detecting the mouse entering and leaving an element
<!DOCTYPE html>
<html>
  <head>
    <title>Events: Further Mouse Handling</title>
    <script src='jquery-1.11.1.min.js'></script>
  </head>
  <body>
    <h2 id='test'>Pass the mouse over me</h2>
    <script>
      $('#test').mouseenter(function() { $(this).html('Hey, stop tickling!') } )
      $('#test').mouseleave(function() { $(this).html('Where did you go?')   } )
    </script>
  </body>
</html>
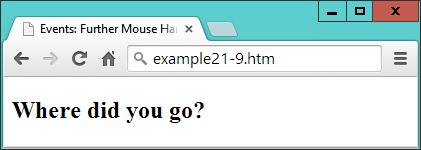
Figure 21-8. Detecting when the mouse enters and leaves an element
When the mouse enters the bounds of the selected element, that element’s innerHTML property is updated (with a call to html). Then when the mouse leaves again, a further update is made to the element’s HTML.
Alternative Mouse Methods
A number of other jQuery mouse event functions are available to cover a wide range of circumstances, all of which are detailed at api.jquery.com/category/events/mouse-events.
For example, you can use the following alternative mouseover and mouseout methods to achieve similar results:
$('#test').mouseover(function() { $(this).html('Cut it out!')         } )
$('#test') .mouseout(function() { $(this).html('Try it this time...') } )
Or you could use the hover method to bind two handlers with a single function call, like this:
$('#test').hover(function() { $(this).html('Cut it out!')         },
                 function() { $(this).html('Try it this time...') } )
If you are planning on creating mouseover and mouseout combined effects, clearly the hover method is the logical function to choose, but there’s also another way you can achieve the same result, which is chaining (explained later on in the section “Method chaining”), using code like this:
$('#test').mouseover(function() { $(this).html('Cut it out!')         } )
           .mouseout(function() { $(this).html('Try it this time...') } )
Here the period operator at the start of the second statement attaches it to the first, so that it creates a chain of methods.
Note
The preceding examples show how to capture mouse click, mouse movement, and keyboard events, and therefore they are mostly suitable for desktop environments—which is what jQuery is primarily targeted at. However, there is a version of jQuery for mobile devices that provides all the touch-handling event control you could wish for (and much more), available at jquerymobile.com.
The submit Event
When a form is submitted, you may often want to perform some error checking on the data entered, before it gets submitted to the server. One way to do this is to intercept the submit event of the form as in Example 21-10. Figure 21-9 shows the result of loading this document and then submitting the form with one or more fields left empty:
Example 21-10. Intercepting the submit event of a form
<!DOCTYPE html>
<html>
  <head>
    <title>Events: submit</title>
    <script src='jquery-1.11.1.min.js'></script>
  </head>
  <body>
    <form id='form'>
      First name: <input id='fname' type='text' name='fname'><br>
      Last name:  <input id='lname' type='text' name='lname'><br>
      <input type='submit'>
    </form>
    <script>
      $('#form').submit(function()
      {
        if ($('#fname').val() == '' ||
            $('#lname').val() == '')
        {
          alert('Please enter both names')
          return false
        }
      })
    </script>
  </body>
</html>
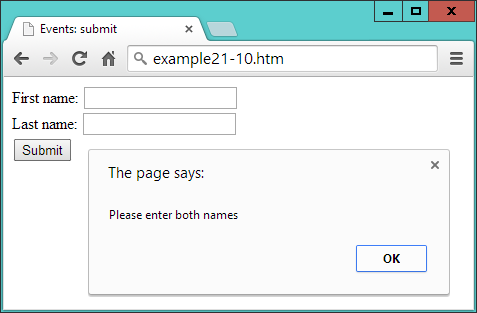
Figure 21-9. Checking user input upon submission
The key parts of this example are where the event is attached to an anonymous function, like this:
$('#form').submit(function()
And where the values of the two input fields are tested for being empty:
if ($('#fname').val() == '' ||
    $('#lname').val() == '')
Here the jQuery val method is used to retrieve the value in the value property of each field. This is neater than using $('#fname')[0] (as in Example 21-8) to get access to the DOM object, and then appending value to it to read the field’s value, like this: $('#fname')[0].value.
In this example, by returning the value false if one or more fields is empty, the normal submission process is cancelled. To enable the submission to proceed, you can return true, or just not return anything.
Special Effects
jQuery really begins to come into its own when processing special effects. Although you can use CSS3 transitions, they are not so easy to manage dynamically from JavaScript, but with jQuery it really is as simple as selecting one or more elements and then applying one or more effects to them.
The core effects available are hiding and showing, fading in and out, sliding, and animations, and these can be used singly, together in synchronization, or in sequence. They also support the use of callbacks, which are functions or methods that get called only once an operation has completed.
The following section lists some of the more useful jQuery effects, each of which supports up to three arguments, as follows:
- No Arguments
- When no arguments are given, the method is called immediately without being placed in the animation queue.
- Duration
- When a duration value is supplied, the effect will take place over the assigned time, which can be a value in milliseconds, or the strings
fastorslow. - Easing
- There are only two easing options in the jQuery library,
swingandlinear. The default isswingand it gives a more natural effect thanlinear. For more easing options, you can check out plug-ins like the jQuery UI easing options at jqueryui.com/easing. - Callback
- If you supply a callback function, it will be called after the effect method completes.
So, for example, you can call the hide method in a variety of ways, such as these:
$('#object').hide()
$('#object').hide(1000)
$('#object').hide('fast')
$('#object').hide('linear')
$('#object').hide('slow', 'linear')
$('#object').hide(myfunction)
$('#object').hide(333, myfunction)
$('#object').hide(200, 'linear', function() { alert('Finished!') } )
As you’ll see in the section “Method chaining”, you can attach function calls (that supply arguments) to each other and they will then be animated in turn, like the following, which will hide and then reveal an element:
$('#object').hide(1000).show(1000)
Other less commonly used arguments are also supported by many of these methods, and you can get full details on them (and all the other supported effects methods) by visiting api.jquery.com/category/effects.
Hiding and Showing
Probably the simplest effect is to hide and show elements in response to user interaction. As shown in the previous section, you can provide no, or a variety of arguments to the hide and show methods and, by default, when none are supplied, the result is just like instantly hiding or revealing an element.
The way these two methods work when arguments are supplied is to modify the width, height, and opacity properties of an element simultaneously, until they reach 0 for hide, or reach their original values for show. When hiding, the display property of the element is set to none when fully hidden, and after calling show, its previous value is reassigned once the element is fully restored.
Example 21-11 lets you try hide and show for yourself (as shown in Figure 21-10).
Example 21-11. Hiding and showing an element
<!DOCTYPE html>
<html>
  <head>
    <title>Effects: hide & show</title>
    <script src='jquery-1.11.1.min.js'></script>
  </head>
  <body>
    <button id='hide'>Hide</button>
    <button id='show'>Show</button>
    <p id='text'>Click the Hide and Show buttons</p>
    <script>
      $('#hide').click(function() { $('#text').hide('slow', 'linear') })
      $('#show').click(function() { $('#text').show('slow', 'linear') })
    </script>
  </body>
</html>
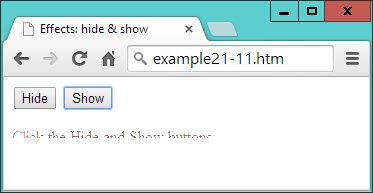
Figure 21-10. The element is in the process of being revealed
The toggle Method
As an alternative to calling both the hide and show methods, you can use the toggle method instead, which enables you to replace the previous example with Example 21-12.
Example 21-12. Using the toggle method
<!DOCTYPE html>
<html>
  <head>
    <title>Effects: toggle</title>
    <script src='jquery-1.11.1.min.js'></script>
  </head>
  <body>
    <button id='toggle'>Toggle</button>
    <p id='text'>Click the Toggle button</p>
    <script>
      $('#toggle').click(function() { $('#text').toggle('slow', 'linear') })
    </script>
  </body>
</html>
The toggle method takes the same arguments as hide and show but keeps internal track of the state of the element so that it knows whether to hide or show it.
Note
There are four main jQuery methods that set either one state or another, and which offer toggling versions to simplify coding. In addition to toggle, there’s fadeToggle, slideToggle, and toggleClass, all described in this chapter.
Fading In and Out
There are four methods for managing fades: fadeIn, fadeOut, fadeToggle, and fadeTo. You should be getting the idea of how jQuery works by now, and realize that the first three are similar to show, hide, and toggle. The last one, though, is a little different in that it lets you specify an opacity value to which an element (or elements) should be faded, between 0 and 1.
Example 21-13 provides four buttons with which to try out each of these methods, as shown in Figure 21-11.
Example 21-13. The four fade methods
<!DOCTYPE html>
<html>
  <head>
    <title>Effects: Fading</title>
    <script src='jquery-1.11.1.min.js'></script>
  </head>
  <body>
    <button id='fadeout'>fadeOut</button>
    <button id='fadein'>fadeIn</button>
    <button id='fadetoggle'>fadeToggle</button>
    <button id='fadeto'>fadeTo</button>
    <p id='text'>Click the buttons above</p>
    <script>
      $('#fadeout')   .click(function() { $('#text').fadeOut(   'slow'     ) })
      $('#fadein')    .click(function() { $('#text').fadeIn(    'slow'     ) })
      $('#fadetoggle').click(function() { $('#text').fadeToggle('slow'     ) })
      $('#fadeto')    .click(function() { $('#text').fadeTo(    'slow', 0.5) })
    </script>
  </body>
</html>
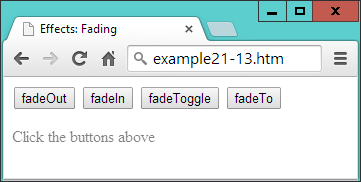
Figure 21-11. The text has been faded to 50 percent opacity
Sliding Elements Up and Down
Another way to make elements disappear and reappear is to alter their height over time to make them appear to slide up and down. There are three methods available to do this: slideDown, slideUp, and slideToggle. They work in a similar way to the previous functions, as coded in Example 21-14, and shown in Figure 21-12.
Example 21-14. Using the slide methods
<!DOCTYPE html>
<html>
  <head>
    <title>Effects: Sliding</title>
    <script src='jquery-1.11.1.min.js'></script>
  </head>
  <body>
    <button id='slideup'>slideUp</button>
    <button id='slidedown'>slideDown</button>
    <button id='slidetoggle'>slideToggle</button>
    <div id='para' style='background:#def'>
      <h2>From A Tale of Two Cities - By Charles Dickens</h2>
      <p>It was the best of times, it was the worst of times, it was the age of
      wisdom, it was the age of foolishness, it was the epoch of belief, it was
      the epoch of incredulity, it was the season of Light, it was the season of
      Darkness, it was the spring of hope, it was the winter of despair, we had
      everything before us, we had nothing before us, we were all going direct to
      Heaven, we were all going direct the other way - in short, the period was so
      far like the present period, that some of its noisiest authorities insisted
      on its being received, for good or for evil, in the superlative degree of
      comparison only</p>
    </div>
    <script>
      $('#slideup')    .click(function() { $('#para').slideUp(    'slow') })
      $('#slidedown')  .click(function() { $('#para').slideDown(  'slow') })
      $('#slidetoggle').click(function() { $('#para').slideToggle('slow') })
    </script>
  </body>
</html>
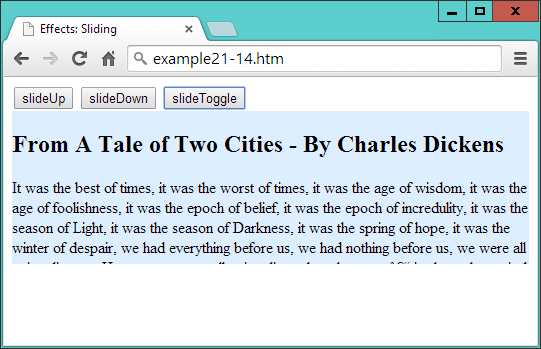
Figure 21-12. The paragraph is sliding up
These methods work well when you have menus and submenus that you want to open up or close dynamically, according to the sections clicked by the user.
Animations
Now we can really start to have some fun by actually moving elements around in the browser. To do this, though, because the default value of static will not allow them to move, you must remember to first give your elements’ position properties, values of relative, fixed, or absolute.
To animate an element, all you do is supply a list of CSS properties (excluding colors) to the animate method. Unlike the previous effects methods, animate requires this list of properties first, and then you can supply any duration, easing, and callback arguments you need.
So, for example, to animate a bouncing ball, you could use code such as Example 21-15 (which displays like Figure 21-13).
Example 21-15. Creating a bouncing ball animation
<!DOCTYPE html>
<html>
  <head>
    <title>Effects: Animation</title>
    <script src='jquery-1.11.1.min.js'></script>
    <style>
      #ball {
        position  :relative;
      }
      #box {
        width     :640px;
        height    :480px;
        background:green;
        border    :1px solid #444;
      }
    </style>
  </head>
  <body>
    <div id='box'>
      <img id='ball' src='ball.png'>
    </div>
    <script>
      bounce()

      function bounce()
      {
        $('#ball')
          .animate( { left:'270px', top :'380px' }, 'slow', 'linear')
          .animate( { left:'540px', top :'190px' }, 'slow', 'linear')
          .animate( { left:'270px', top :'0px'   }, 'slow', 'linear')
          .animate( { left:'0px',   top :'190px' }, 'slow', 'linear')
      }
    </script>
  </body>
</html>
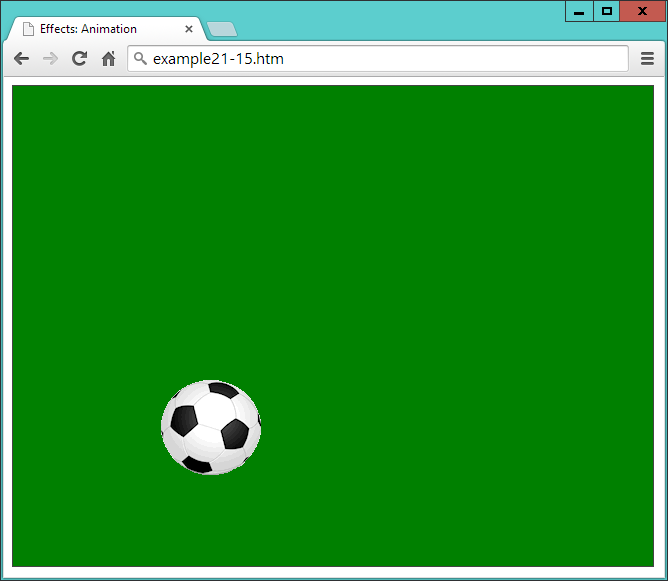
Figure 21-13. The ball is bouncing around in the browser
In the <style> section of this example, the position property of the ball is set relative to its container, which is a <div> element that has been given a border and green background.
Then the <script> section features a function called bounce, in which there are four calls to animate placed one after the other.
Notice how the names of the properties to animate are supplied without quotation marks and are separated from the values to which they should be changed with colons—in other words, in the form of associative arrays.
You can also supply relative values in place of absolute ones by using the += and -= operators. So, for example, the following will animate the ball to the right and up by 50 pixels relative to its current position:
.animate( { left:'+=50px', top:'-=50px' }, 'slow', 'linear')
And you can even use the string values of hide, show, and toggle to update a property, like this:
.animate( { height:'hide', width:'toggle' }, 'slow', 'linear')
Warning
If you wish to modify any hyphenated CSS properties and they’re not being passed within quotation marks (as with height and width in this example), you must convert their names to camelCase first, by removing the hyphens and capitalizing the letter following. For example, to animate the left-margin property of an element, you would supply the name of leftMargin. However, when supplying a hyphenated property name within a string (for example: css('font-weight', 'bold'), you shouldn’t convert it to camelCase.
Method chaining
Because of the way that method chaining works, when jQuery methods have been given arguments, they will run sequentially. So each of these methods is called only after the previous one has finished animating. Any methods you call without arguments, however, will run immediately and quickly, without animation.
When you load this example into a web browser, the animation is kicked off (so to speak) with a single call to bounce, causing the ball to bounce off the bottom, right, and top edges of its container, and then come to rest back at the middle of the left-hand edge.
Using callbacks
As it stands, the preceding example stops after four animations, but you can use a callback function to make the animation start over again every time it completes. This is why I chose to place the animation in a named function.
You see, now that the animation is in a function named bounce, it is only necessary to add that name as a callback to the fourth animation in the group in order to make the animation repeat forever, as shown in bold here:
.animate( { left:'0px', top :'190px' }, 'slow', 'linear', bounce)
Using the animate method, you can animate many CSS properties with the notable exception of colors. However, even color animation is possible with the addition of the jQuery UI add-in, which adds the facility to create very eye-pleasing color-changing effects (plus many more goodies). Please refer to jqueryui.com for details.
Stopping Animations
There are several methods available for cutting off animations midway through, or ending a chain of animations. For example, with clearQueue you can empty all stored animations that are queued up, with stop you can immediately stop any animation currently in progress, or the finish method will stop the currently running animation, and remove any that are queued.
So let’s turn the previous example into a sort of game by making the ball clickable, such that when the click event triggers, the animation will cease. To do this, all that’s required is to add the following single line of code underneath the bounce function:
$('#ball').click(function() { $(this).finish() })
If you successfully manage to click the ball, the finish method will stop the current animation, empty the queue, and ignore any callbacks—in other words, the ball will come to rest.
For more information on managing jQuery queues, check out api.jquery.com/queue, where you’ll also learn how to directly manipulate the contents of queues to get exactly the effects you need.
Manipulating the DOM
Because jQuery is so tightly linked with the DOM, of necessity the examples in this chapter have already utilized some of its DOM-accessing methods, such as html and val. But let’s now look at all the DOM methods in detail to discover exactly what you can get access to with jQuery, and how.
In Example 21-3, you saw how to use the html method to change the innerHTML property of an element. This method can be used either to set the HTML or retrieve it from an HTML document. Example 21-16 (with the jQuery highlighted in bold) shows how to retrieve the HTML content of an element (as shown in Figure 21-14).
Example 21-16. Displaying the HTML of an element using an alert window
<!DOCTYPE html>
<html>
  <head>
    <title>The DOM: html & text</title>
    <script src='jquery-1.11.1.min.js'></script>
  </head>
  <body>
    <h2>Example Document</h2>
    <p id='intro'>This is an example document</p>
    <script>
      alert($('#intro').html())
    </script>
  </body>
</html>
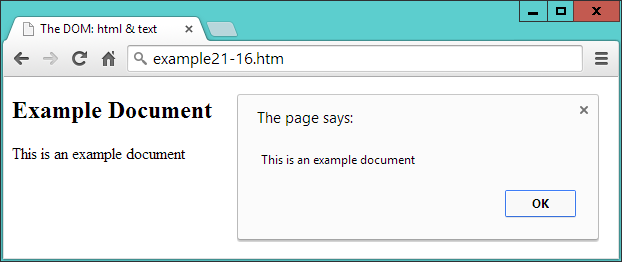
Figure 21-14. Retrieving and displaying the HTML of an element
When you omit any argument from a call to this method the result is to read rather than set the HTML of the element.
The Difference Between The text and html Methods
When you are working with XML documents, you cannot use the html method because it simply won’t work (it’s designed for use only with HTML). But you can use the text method to achieve a similar result (in XML or HTML documents), like this:
text = $('#intro').text()
The difference between the two is quite simply that html treats the content as HTML and text treats it as text. So, for example, let’s assume you wish to assign the following string to an element:
<a href='http://google.com'>Visit Google</a>
If you assign it to an HTML element using the html method, the DOM will be updated with the new <a> element and the link will become clickable. But if you do so to either an XML or HTML document using the text method, then that string will first be escaped into text (for example, by converting HTML characters such as < into the < entity, and so on), and then inserted into the element—no element is added to the DOM.
The val and attr Methods
There are a couple more methods for interacting with the content of elements. First, you can set and get the value of an input element with the val method, as illustrated in Example 21-10, in which the first and last name fields are read. To set a value, simply provide it as an argument to the method, like this:
$('#password').val('mypass123')
With the attr method, you can get and set the attributes of elements, as shown in Example 21-17, in which a link to the Google website has been completely replaced with one to Yahoo!
Example 21-17. Modifying attributes with the attr method
<!DOCTYPE html>
<html>
  <head>
    <title>The DOM: attr</title>
    <script src='jquery-1.11.1.min.js'></script>
  </head>
  <body>
    <h2>Example Document</h2>
    <p><a id='link' href='http://google.com' title='Google'>Visit Google</a></p>
    <script>
      $('#link').text('Visit Yahoo!')
      $('#link').attr( { href :'http://yahoo.com', title:'Yahoo!' } )
      alert('The new HTML is:\n' + $('p').html())
    </script>
  </body>
</html>
The first jQuery statement uses the text method to change the text inside the <a> element, and the second one changes the href and title attribute values to match, by supplying the data in the form of an associative array. The third statement displays the changed element contents in an alert window, by first retrieving it with the html method, as shown in Figure 21-15.
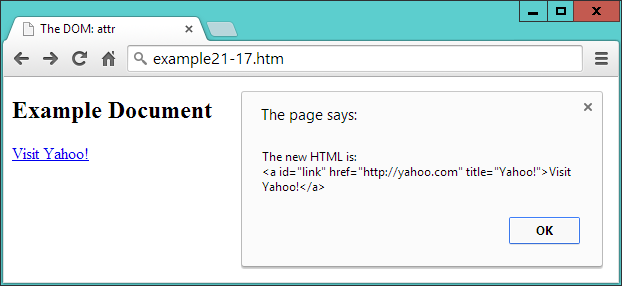
Figure 21-15. The link has now been completely modified
You can also read the value of an attribute like this:
url = $('#link').attr('href')
Adding and Removing Elements
While it is possible to insert elements into the DOM using the html method, this is suitable only for creating child elements of a particular element. Therefore, jQuery provides a number of methods for manipulating any part of the DOM.
These methods are append, prepend, after, before, remove, and empty, and an example of each is included in Example 21-18.
Example 21-18. Adding and removing elements
<!DOCTYPE html>
<html>
  <head>
    <title>Modifying The DOM</title>
    <script src='jquery-1.11.1.min.js'></script>
  </head>
  <body>
    <h2>Example Document</h2>
    <a href='http://google.com' title='Google'>Visit Google</a>
    <code>
      This is a code section
    </code>
    <p>
      <button id='a'>Remove the image</button>
      <button id='b'>Empty the quote</button>
    </p>
    <img id='ball' src='ball.png'>
    <blockquote id='quote' style='border:1px dotted #444; height:20px;'>
      test
    </blockquote>
    <script>
      $('a').prepend('Link: ')
      $("[href^='http']").append(" <img src='link.png'>")
      $('code').before('<hr>').after('<hr>')
      $('#a').click(function() { $('#ball').remove() } )
      $('#b').click(function() { $('#quote').empty() } )
    </script>
  </body>
</html>
In Figure 21-16, you can see the result of applying the prepend, append, before, and after methods to some elements.

Figure 21-16. A document with a variety of different elements
The prepend method has been used to insert the string Link: before the inner text or HTML of all <a> elements, like this:
$('a').prepend('Link: ')
Then an attribute selector is used to select all elements that have an href attribute starting with http. The string http denotes links that are not relative (and therefore are absolute), in which case an external link icon is appended to the end of the inner text or HTML of all matching elements, like this:
$("[href^='http']").append(" <img src='link.png'>")
Note
The ^= operator is how only the start of the string is matched. If just the = operator were used, only entire strings that matched would be selected. CSS selectors are covered in detail in Chapter 18 and Chapter 19.
Next, using chained methods, the before and after methods are employed to place sibling elements either before or after another one. In this instance, I have chosen to place an <hr> element both before and after <code> elements, like this:
$('code').before('<hr>').after('<hr>')
Then I added a little user-interaction with a couple of buttons. When clicked, using the remove method, the first button removes the <img> element containing the ball, like this:
$('#a').click(function() { $('#ball').remove() } )
Note
The image is now no longer in the DOM, which you can verify if you highlight the browser contents, right-click it, and use Inspect Element in most major desktop browsers, or press F12 in Internet Explorer.
Finally, the empty method is applied to the <blockquote> element when the second button is clicked, which simply empties out the element’s contents, but leaves the element in the DOM, like this:
$('#b').click(function() { $('#quote').empty() } )
Dynamically Applying Classes
Sometimes it can be convenient to change the class an element employs, or maybe just add a class to an element or remove it from one. For example, suppose you have a class called read that you use to style blog posts that have been read. Using the addClass method, it’s a simple matter to add a class to that post, like this:
$('#post23').addClass('read')
You can add more than one class at a time by separating them with spaces, like this:
$('#post23').addClass('read liked')
But what if a reader chooses to mark a post as unread again, perhaps to be reminded to read it again later? In this case, all you need to do is use removeClass, like this:
$('#post23').removeClass('read')
All other classes that the post uses remain unaffected when you do this.
Where you are supporting the ability of a class to be continuously added or removed, you might, however, find it simpler to use the toggleClass method, like this:
$('#post23').toggleClass('read')
Now, if the post doesn’t use the class, it is added; otherwise, it is removed.
Modifying Dimensions
Working with dimensions is always a tricky web development task because different browsers tend to utilize slightly differing values. One of jQuery’s big strengths, though, is that it does a great job of normalizing these types of values, so that your pages will look how you intend them to appear in all major browsers.
There are three types of dimensions: element width and height, inner width and height, and outer width and height. Let’s look at these in turn.
The width and height Methods
Both the width and height methods can get the width or height of the first element that matches a selector, or set the width or height of all matching elements. For example, to get the width of an element with the ID of elem, you could use this statement:
width = $('#elem').width()
The value returned to the variable width is a numeric value, which is different than returning the CSS value from a call to the css method, such as the following, which would return (for example) 230px, rather than just the number 230.
width = $('#elem').css('width')
You can also obtain the width of either the current window or the document, like this:
width = $(window).width()
width = $(document).width()
Warning
When you pass the window or document objects to jQuery, you cannot fetch their width or height with the css method. Instead you must use the width or height methods.
The value returned is independent of the box-sizing setting (see Chapter 19). If you need to take box-sizing into account, use the css method with an argument of width instead, like this (but remember to remove the px that will be added after the numeric part if you intend to work with the values returned):
width = $('#elem').css('width')
Setting values is just as easy. For example, to set all elements that use the class box to 100 × 100 pixels, you could use this statement:
$('.box').width(100).height(100)
Example 21-19 combines these actions into a single program that displays as Figure 21-17.
Example 21-19. Getting and setting element dimensions
<!DOCTYPE html>
<html>
  <head>
    <title>Dimensions</title>
    <script src='jquery-1.11.1.min.js'></script>
  </head>
  <body>
    <p>
      <button id='getdoc'>Get document width</button>
      <button id='getwin'>Get window width</button>
      <button id='getdiv'>Get div width</button>
      <button id='setdiv'>Set div width to 150 pixels</button>
    </p>
    <div id='result' style='width:300px; height:50px; background:#def;'></div>
    <script>
      $('#getdoc').click(function()
      {
        $('#result').html('Document width: ' + $(document).width())
      } )

      $('#getwin').click(function()
      {
        $('#result').html('Window width: ' + $(window).width())
      } )

      $('#getdiv').click(function()
      {
        $('#result').html('Div width: ' + $('#result').width())
      } )

      $('#setdiv').click(function()
      {
        $('#result').width(150)
        $('#result').html('Div width: ' + $('#result').width())
      } )
    </script>
  </body>
</html>
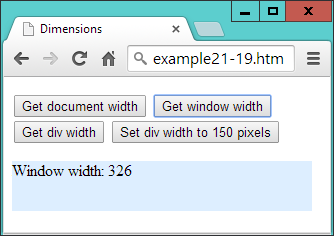
Figure 21-17. Getting and setting element dimensions
At the start of the body, there are four buttons: three for reporting the widths of the document, window, and a <div> element that appears just below the buttons, and one to set the div’s width to a new value. In the script section, there are four jQuery statements, of which the first three simply fetch the widths of the objects given, and then report these values by writing into the HTML of the div.
The final statement has two parts: the first reduces the width of the <div> element to 150 pixels, and then the second displays the new width value within the div, by fetching it using the width method, to ensure the computed value is displayed.
Warning
When the page has been zoomed (either in or out) by the user, this event is not noted in any major browser, in any way that JavaScript can reliably detect. Therefore, jQuery cannot take zooming into account when it applies or returns dimensional values. So it is therefore possible to get unexpected results in this circumstance.
The innerWidth and innerHeight Methods
It’s often necessary to also take borders, padding, and other properties into account when working with dimensions, and therefore you can use the innerWidth and innerHeight methods to return the width and height of the first element that matches the selector, including the padding but not including any border.
For example, the following returns the innerWidth of the element with an ID of elem including padding:
iwidth = $('#elem').innerWidth()
The outerWidth and OuterHeight Methods
To return the dimensions of an element including both padding and border, you can call the outerWidth and outerHeight methods, like this:
owidth = $('#elem').outerWidth()
If you wish to also include any margin in the returned value, you can pass the value of true when you call either of these methods, like this:
owidth = $('#elem').outerWidth(true)
Warning
The values returned for any of the inner... or outer... methods are not necessarily integers and may be fractional in some cases. User page zooming is not detected by these methods, and you cannot use these methods on window or document objects—for these, use the width or height methods instead.
DOM Traversal
If you refer back to the section on the Document Object Model (DOM) in Chapter 13, you’ll recall that all web pages are constructed in much the same way as extended families. There are parent and child objects, siblings, grandparents and grandchildren, and even element relationships that could be referred to as cousins, aunts, and so forth. For example, in the following snippet, the <li> elements are children of the <ul> element which, in turn, is parent to the <li> elements:
<ul>
  <li>Item 1</li>
  <li>Item 2</li>
  <li>Item 3</li>
</ul>
And, like families, there are multiple ways you can refer to HTML elements, such as absolutely, starting at the window level and moving on down, also known as traversing the DOM. Or you can use the relationship between one element and another to refer to elements. Really it’s a matter of what makes sense to your particular project.
For example, if you want a web page to be as self-contained as possible so that you have a better chance of cutting and pasting elements into other web documents, it makes a lot of sense to refer to elements near each other by relative addressing. Whatever you choose, though, jQuery offers a wide range of functions to help you accurately address elements.
Parent Elements
To refer to an element’s direct parent, you use the parent method, like this:
my_parent = $('#elem').parent()
Whatever type of element elem may be, the my_parent object now contains a jQuery object that refers to its parent element. In fact, since selectors can refer to multiple elements, this call actually returns an object that refers to a list of parent elements (although the list can have only one item), one for each matching element.
Since a parent may have many children, you might wonder whether more elements can be returned by this method than there are parents. Take the preceding snippet with three <li> elements. In this case, will three parent elements be returned (because three matches will be made), even though there is just a single <ul> parent?
my_parent = $('li').parent()
The answer is no, because jQuery is smart enough to recognize all duplicates and filter them out. To verify this, if you ask for the number of elements returned like this, the result will be 1:
alert($('li').parent().length)
Let’s now make something happen when the selector matches, such as changing the font-weight property of the parent element in the previous snippet to bold, like this:
$('li').parent().css('font-weight', 'bold')
Using a filter
Optionally, a selector can be passed to parent, to filter out which of the parents the desired changes should apply to. To illustrate, Example 21-20 has three small lists and a couple of jQuery statements.
Example 21-20. Accessing parent elements
<!DOCTYPE html>
<html>
  <head>
    <title>DOM Traversal: Parent</title>
    <script src='jquery-1.11.1.min.js'></script>
  </head>
  <body>
    <ul>
      <li>Item 1</li>
      <li>Item 2</li>
      <li>Item 3</li>
    </ul>
    <ul class='memo'>
      <li>Item 1</li>
      <li>Item 2</li>
      <li>Item 3</li>
    </ul>
    <ul>
      <li>Item 1</li>
      <li>Item 2</li>
      <li>Item 3</li>
    </ul>
    <script>
      $('li').parent()       .css('font-weight',     'bold')
      $('li').parent('.memo').css('list-style-type', 'circle')
    </script>
  </body>
</html>
The three lists are all the same, except that the middle one’s <ul> element uses a class of memo. In the script section, the first statement applies a value of bold to the font-weight property of all parents of <li> elements. In this instance, it causes all the <ul> elements to display in bold.
The second statement is similar, but also passes the class name memo to the parent method, so that only that parent will be selected. Then the css method is called to set the list-style-type property of the selected list to circle. Figure 21-18 shows these two statements in effect.
Figure 21-18. Accessing parent elements with and without filters
Selecting all ancestor elements
We’ve just seen how to select direct parents of elements, but you can also select ancestors, all the way back to the <html> root element by using the parents method. But why might you want to do this? Well, how about wanting to access the first <div> element up the ancestry chain in order to style it according to something dynamic that has gone on further down the chain?
This type of selection may be slightly more advanced than you can think of a reason for right now, but you’ll be pleased it’s there when you need it, and here’s how you might proceed:
$('#elem').parents('div').css('background', 'yellow')
Actually, that may not be exactly what you want, because it will select all <div> elements in the ancestry chain, and there may be others further up that you don’t want to style. So, for this type of eventuality, you can further filter the selection by using the parentsUntil method instead.
The parentsUntil method traverses up the ancestry chain in the same way as parents, but stops at the first element that matches the selection filter (in this case, it’s a <div> element), so you can use it in the same way as the preceding statement, certain in the knowledge that you will select only exactly the element you want:
$('#elem').parentsUntil('div').css('background', 'yellow')
To illustrate the difference between these two methods, take a look at Example 21-21, which contains two sets of nested elements, both of which are within one parent <div> element. Then, in the script section, there is one example each of the parents and parentsUntil methods being called.
Example 21-21. Using the parents and parentsUntil methods
<!DOCTYPE html>
<html>
  <head>
    <title>DOM Traversal: Parents</title>
    <script src='jquery-1.11.1.min.js'></script>
  </head>
  <body>
    <div>
      <div>
        <section>
          <blockquote>
            <ul>
              <li>Item 1</li>
              <li id='elem'>Item 2</li>
              <li>Item 3</li>
            </ul>
          </blockquote>
        </section>
      </div>
      <div>
        <section>
          <blockquote>
            <ul>
              <li>Item 1</li>
              <li>Item 2</li>
              <li>Item 3</li>
            </ul>
          </blockquote>
        </section>
      </div>
    </div>
    <script>
      $('#elem').parents('div')     .css('background',      'yellow')
      $('#elem').parentsUntil('div').css('text-decoration', 'underline')
    </script>
  </body>
</html>
If you take a look at Figure 21-19, you’ll see that the first jQuery statement has set the background color of all the contents to yellow. This is because the ancestry tree has been traversed all the way up to the <html> element using the parents method, and both <div> elements encountered on the way up the tree have been selected (the one containing the list with the <li> element—highlighted in bold—with the ID of elem, and its parent <div>, which contains both sets of nested elements).
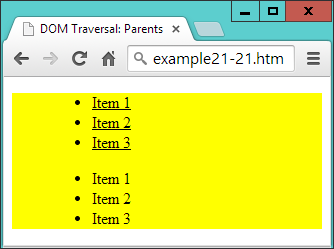
Figure 21-19. Comparing the parents and parentsUntil methods
However, the second statement uses parentsUntil so that the selection stops at the first <div> element encountered. This means that when the underline styling is applied, it is applied only to the closest parent <div> that contains the <li> element with the ID of elem. The outer <div> is not reached, and because it doesn’t get styled, the second list doesn’t display underlined.
Child Elements
To access the children of an element, you use the children method, like this:
my_children = $('#elem').children()
Just like the parent method, this goes only one level and returns a list of none, one, or more matching selections. You can also pass a filter argument to it to select between the children, like this:
li_children = $('#elem').children('li')
Here only children that are <li> elements will be selected.
To delve deeper down the generations, you need to use the find method, which is the inverse of parents, like this:
li_descendants = $('#elem').find('li')
However, unlike parents, you must provide a filter selector to the find method, but if you need to select all descendants, you can use the universal selector, like this:
all_descendants = $('#elem').find('*')
Sibling Elements
When it comes to selecting siblings, there’s an even wider range of methods available, starting with siblings.
The siblings method will return all the matching elements that are children of the same parent, except for the element used for selecting. So, taking the example of the following snippet, if you look up the siblings of the <li> element with the ID of two, it will return only the first and third <li> elements.
<ul>
  <li>Item 1</li>
  <li id='two'>Item 2</li>
  <li>Item 3</li>
</ul>
Here is such a statement that will cause the sibling elements to be bold:
$('#two').siblings().css('font-weight', 'bold')
You can also use a filter in the siblings method to further narrow down the siblings returned. For example, to select only those siblings that use the class new, you might use a statement such as this:
$('#two').siblings('.new').css('font-weight', 'bold')
Example 21-22 (liberally whitespaced to line up the attributes in columns) displays an unordered list of seven items, of which four of them use the class new, and the second item also has the ID of two:
Example 21-22. Selecting and filtering sibling elements
<!DOCTYPE html>
<html>
  <head>
    <title>DOM Traversal: Siblings</title>
    <script src='jquery-1.11.1.min.js'></script>
  </head>
  <body>
    <ul>
      <li          class='new'>Item 1</li>
      <li id='two' class='new'>Item 2</li>
      <li                     >Item 3</li>
      <li          class='new'>Item 4</li>
      <li          class='new'>Item 5</li>
      <li                     >Item 6</li>
      <li                     >Item 7</li>
    </ul>
    <script>
      $('#two').siblings('.new').css('font-weight', 'bold')
    </script>
  </body>
</html>
When loaded into a browser, the result of issuing the jQuery statement is Figure 21-20, in which only Item 1, Item 4, and Item 5 have been bold, even though Item 2 also uses the class new (because the method is called on that element, and so it is excluded from the selection).
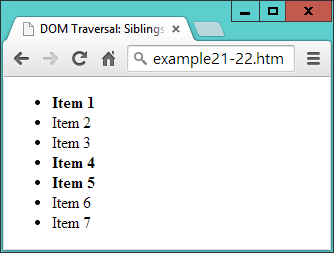
Figure 21-20. Selecting sibling elements
Note
Since the siblings method omits the element on which it is called (which I will refer to as the callee), it cannot be used to select from all children of a parent element. However, to achieve that with the preceding example, you could use a statement such as the following, which will, for example, return all siblings (including the callee) that use the class new:
$('#two').parent().children('.new').css('font-
weight', 'bold')
Or you can add the andSelf method to the selection to achieve the same result, like this:
$('#two').siblings('.new').andSelf().css('font-
weight', 'bold')
Selecting the Next and Previous Elements
When you need finer control over the selection of siblings, you can further narrow down the elements returned using the next and prev methods, and their extended versions. For example, to refer to the element immediately following a selector, you can use a statement such as this (which sets the matched element(s) to display in bold):
$('#new').next().css('font-weight', 'bold')
In the case of the following liberally whitespaced snippet, for example, the third item has the ID new, and therefore the fourth item is returned:
<ul>
  <li         >Item 1</li>
  <li         >Item 2</li>
  <li id='new'>Item 3</li>
  <li         >Item 4</li>
  <li         >Item 5</li>
</ul>
So far, so simple. But what if you would like to reference all the siblings following a particular element? Well, you can do that with nextAll method, like this (which in the preceding snippet would style the last two items):
$('#new').nextAll().css('font-weight', 'bold')
When calling nextAll, you can also supply a filter to select from the elements that are matched, such as the following, which will style only the following siblings that use the class info: (in this snippet, however, there are no elements that use that class, so the statement will do nothing):
$('#new').nextAll('.info').css('font-weight', 'bold')
Or, consider the case of this snippet, in which one item has the ID new and another has the ID old.
<ul>
  <li         >Item 1</li>
  <li id='new'>Item 2</li>
  <li         >Item 3</li>
  <li id='old'>Item 4</li>
  <li         >Item 5</li>
</ul>
Now it’s possible to select only those siblings following the one with the ID of new, up to (but not including) the one with the ID of old, like this (in which just the third item will be styled):
$('#new').nextUntil('#old').css('font-weight', 'bold')
If no argument is supplied to nextUntil, it behaves exactly like nextAll, returning all following siblings. You can also supply a second argument to nextUntil to act as a filter for selecting from the elements that are matched by it, like this:
$('#new').nextUntil('#old', '.info').css('font-weight', 'bold')
In this statement, only those elements that use the class info will be styled, which in the case of the preceding snippet is none of them, so no action will be taken.
You can do exactly the same working backward through groups of siblings by using the prev, prevAll, and prevUntil methods.
Traversing jQuery Selections
As well as traversing throughout the DOM, once you have returned a set of elements as a jQuery selection, you can also traverse those elements, choosing which ones to act on.
For example, to style just the first element returned by a selection, you can use the first method, like this (to set the first list item in the first unordered list to display underlined):
$('ul>li').first().css('text-decoration', 'underline')
Or you can choose to style only the last item by using the last method, like this:
$('ul>li').last().css('font-style', 'italic')
Or, to access an element by index (starting from 0), you can use the eq method, like this (which styles the second item in the list due to starting at 0):
$('ul>li').eq(1).css('font-weight', 'bold')
You can also apply a filter to a selection using the filtert method, like this (which changes the background color of every other element starting at the first, element 0):
$('ul>li').filter(':even').css('background', 'cyan')
Warning
Remember that when indexing into jQuery selections, the first element is the zeroth. So, for example, when you use the selector :even in this manner, elements 1, 3, 5, and so on will be selected (not 2, 4, 6...).
To exclude one or more elements you can apply the not method, like this (where elements that don’t use the ID new are styled in blue):
$('ul>li').not('#new').css('color', 'blue')
And you can also select an element depending on what descendants it has. To select only elements that have descendant <ol> elements, for example, you could use this statement, to place a line through those that match:
$('ul>li').has('ol').css('text-decoration', 'line-through')
Example 21-23 brings all these together to style an unordered list, one of whose elements also contains an ordered list:
Example 21-23. Traversing a jQuery selection
<!DOCTYPE html>
<html>
  <head>
    <title>Selection Traversal</title>
    <script src='jquery-1.11.1.min.js'></script>
  </head>
  <body>
    <ul>
      <li>Item 1</li>
      <li>Item 2</li>
      <li id='new'>Item 3</li>
      <li>Item 4
        <ol type='a'>
          <li>Item 4a</li>
          <li>Item 4b</li>
        </ol></li>
      <li>Item 5</li>
    </ul>
    <script>
      $('ul>li').first()        .css('text-decoration', 'underline')
      $('ul>li').last()         .css('font-style',      'italic')
      $('ul>li').eq(1)          .css('font-weight',     'bold')
      $('ul>li').filter(':even').css('background',      'cyan')
      $('ul>li').not('#new')    .css('color',           'blue')
      $('ul>li').has('ol')      .css('text-decoration', 'line-through')
    </script>
  </body>
</html>
As you will see from studying Figure 21-21, every element in each list has been styled by one or more of the jQuery statements.
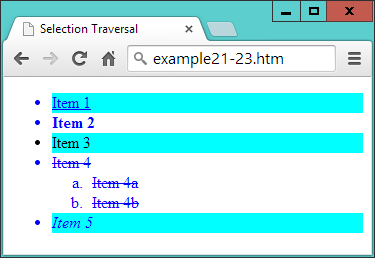
Figure 21-21. Uniquely addressing elements in a jQuery selection
The is Method
There is also a way you can query a jQuery selector to return a Boolean value for use in plain JavaScript, which is the is method. Unlike other jQuery filtering methods, this function doesn’t create a new jQuery object that can then have other methods appended to it, or that can then be further filtered.
Instead it returns just true or false, making the method most suitable for using in conditional statements. Example 21-24 uses the is method attached to a call to parent in an event handler for a set of buttons. When any button is clicked, the handler is called, and the is method is able to return a value of true or false, when asked whether the parent element is a <div>, as shown in Figure 21-22.
Example 21-24. Reporting the parent element with is
<!DOCTYPE html>
<html>
  <head>
    <title>Using is</title>
    <script src='jquery-1.11.1.min.js'></script>
  </head>
  <body>
    <div><button>Button in a div</button></div>
    <div><button>Button in a div</button></div>
    <span><button>Button in a span</button></span>
    <div><button>Button in a div</button></div>
    <span><button>Button in a span</button></span>
    <p id='info'></p>
    <script>
      $('button').click(function()
      {
        var elem = ''

        if ($(this).parent().is('div')) elem = 'div'
        else                            elem = 'span'

        $('#info').html('You clicked a ' + elem)
      })
    </script>
  </body>
</html>
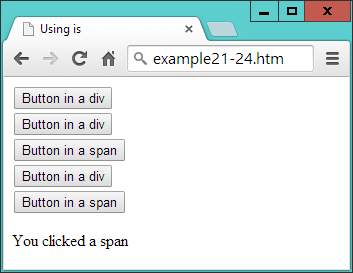
Figure 21-22. Using the is method to report the parent element
Using jQuery Without Selectors
There are also a couple of jQuery methods that are for use with standard JavaScript objects, and which make handling them a lot simpler. These are $.each, and $.map, which are similar but have subtle differences.
The $.each Method
Using $.each, you can iterate through arrays or array-like objects by simply attaching a function to be called for each iteration. Example 21-25 shows an array of pet names and types (called pets), from which another array (called guineapigs) needs to be extracted, containing only the names of the guinea pigs.
Example 21-25. Calling the each method
<!DOCTYPE html>
<html>
  <head>
    <title>Using each</title>
    <script src='jquery-1.11.1.min.js'></script>
  </head>
  <body>
    <div id='info'></div>
    <script>
      pets =
      {
        Scratchy : 'Guinea Pig',
        Squeeky  : 'Guinea Pig',
        Fluffy   : 'Rabbit',
        Thumper  : 'Rabbit',
        Snoopy   : 'Dog',
        Tiddles  : 'Cat'
      }

      guineapigs = []

      $.each(pets, function(name, type)
      {
        if (type == 'Guinea Pig') guineapigs.push(name)
      })

      $('#info').html('The guinea pig names are: ' + guineapigs.join(' & '))
    </script>
  </body>
</html>
To do this, the $.each method is passed the array, along with an anonymous function to process it. The function takes two arguments, the index into the array (called name), and the contents of each element (called type).
The value in type is then tested to see if it is Guinea Pig, and if so, the value in name is pushed onto the guineapigs array. Upon completion, the contents of guineapigs is displayed by writing into the <div> element with the ID of info. To separate the items in the array, the JavaScript join method is used with the & symbol as a separator. The result of loading this example into a browser is simply to display the text “The guinea pig names are: Scratchy & Squeeky.”
The $.map Method
Another way to achieve this is with the $.map method, which returns all the values that your function returns in an array, saving you from having to create an array, and then push matches onto it—as we had to in the preceding example.
Instead you can create and populate the array at the same time, by assigning the array returned by $.map to it, like this (the end result being the same but with less code):
guineapigs = $.map(pets, function(type, name)
{
  if (type == 'Guinea Pig') return name
})
Warning
Watch out when you change between using the $.each and $.map methods, because $.each passes arguments to the function in the order index, value, but map uses the order value, index. This is why the two arguments are swapped in the preceding $.map example.
Using Ajax
In Chapter 17, I showed in detail how to implement Ajax communications between JavaScript in a browser, and PHP running on a web server. I also provided some handy and compact functions you can call to simplify the process.
But if you have jQuery loaded, you can use its Ajax functionality instead if you prefer—it works in a very similar way, in that you choose whether to make a Post or a Get request, and then take it from there.
Using the Post Method
Example 21-26 is the direct jQuery equivalent to Example 17-2 (which loads the Amazon Mobile website into a <div> element), but since all the Ajax-handling code is tidied away in the jQuery library file, it’s much shorter—using just a single call to the $.post method, passing it the following three items:
- The URL of a PHP program on the server to access.
- The data to pass to that URL.
- An anonymous function to process the returned data.
Example 21-26. Sending a Post Ajax request
<!DOCTYPE html>
<html> <!-- jqueryajaxpost.htm -->
  <head>
    <title>jQuery Ajax Post</title>
    <script src='jquery-1.11.1.min.js'></script>
  </head>
  <body style='text-align:center'>
    <h1>Loading a web page into a DIV</h1>
    <div id='info'>This sentence will be replaced</div>

    <script>
      $.post('urlpost.php', { url : 'amazon.com/gp/aw' }, function(data)
      {
        $('#info').html(data)
      } )
    </script>
  </body>
</html>
The urlpost.php program remains unchanged from Example 17-3, because this example and Example 17-2 are interchangeable.
Using the Get Method
Communicating with Ajax by using the Get method is just as easy, requiring only the following two arguments—so Example 21-27 is therefore the jQuery equivalent to Example 17-4:
- The URL of a PHP program on the server to access (including a query string containing the data to pass to it)
- An anonymous function to process the returned data
Example 21-27. Sending a Get Ajax request
<!DOCTYPE html>
<html> <!-- jqueryajaxget.htm -->
  <head>
    <title>jQuery Ajax Get</title>
    <script src='jquery-1.11.1.min.js'></script>
  </head>
  <body style='text-align:center'>
    <h1>Loading a web page into a DIV</h1>
    <div id='info'>This sentence will be replaced</div>

    <script>
      $.get('urlget.php?url=amazon.com/gp/aw', function(data)
      {
        $('#info').html(data)
      } )
    </script>
  </body>
</html>
The urlget.php program remains unchanged from Example 17-5, because this example and Example 17-4 are interchangeable.
Warning
Remember that the security restrictions of Ajax require that the communication takes place with the same server that supplied the main web document. You must also use a web server for Ajax communication, not a local file system. These examples are therefore best tested using a production or development server, as described in Chapter 2.
Plug-Ins
There’s room in this chapter to cover only the core jQuery library, and while that’s more than enough for a beginner to be getting on with, the time will come when you’ll find you need even more features and functionality. Thankfully, other jQuery projects can help you there, because a range of official and third-party plug-ins are now available to provide just about any features you can imagine.
The jQuery User Interface
First, there’s the jQuery User Interface (known as jQuery UI), which takes off directly where jQuery leaves off. With it you can add dragging and dropping, resizing, and sorting methods to your web pages, as well as more animations and effects, animated color transitions, more easing effects, and a bunch of widgets to create menus and other features such as accordions, buttons, pickers, progress bars, sliders, spinners, tabs, tool tips, and much more.
If you want to see some demos before deciding whether to download, check out jqueryui.com/demos.
The whole package is under 400 KB zipped and is freely downloadable and usable with almost no restrictions (just the very generous MIT license), from jqueryui.com.
Other Plug-Ins
You can also add a wide variety of free, ready-made plug-ins to jQuery from numerous developers, all brought together at plugins.jquery.com.
Some of the plug-ins include extensive form handling and verification, slideshows, user responsiveness, image manipulation, even more animations, and much more.
jQuery Mobile
If you are developing for mobile browsers, you will also want to take a look at jQuery mobile, which is more of a framework than a library, offering sophisticated, touch-optimized ways to navigate the wide range of different types of mobile hard and software, to provide the best possible user experience.
The jQuery Mobile download is fully customizable and can be tailored exactly to your requirements, as shown in Figure 21-23, where the ThemeRoller app is being used.
Figure 21-23. Creating a mobile theme with the ThemeRoller app
You’ll find jQuery mobile especially useful if you are writing web apps, and can find out more and download it from jquerymobile.com.
You’ve come a long way in this chapter, learning material that sometimes takes up entire books. I hope you’ve found everything clear, though, because jQuery is very easy to learn and use. Please take a moment now to peruse Appendix E, which lists all the main jQuery objects, events, and methods, and should serve as a handy reference. If you need any other information, please check out jquery.com.
For the remaining chapters, we’ll turn our gaze to all the new goodies available in HTML5, and then bring everything we’ve learned together into a mini social networking project.
Questions
- What is the symbol commonly used as the factory method for creating jQuery objects, and what is the alternative method name?
- How would you link to the minified release 1.11.1 of jQuery from the Google CDN?
- What types of argument does the jQuery factory method accept?
- With which jQuery method can you get or set a CSS property value?
- What statement would you use to attach a method to the click event of an element with the ID of
elem, to make it slowly hide? - What element property must you modify in order to allow it to be animated, and what are the acceptable values?
- How can you cause several methods to run at once (or sequentially, in the case of animations)?
- How can you retrieve an element node object from a jQuery selection object?
- What statement would set the sibling element immediately preceding one with the ID of
newsto display in bold? - With which method can you make a jQuery Ajax Get request?
See Chapter 21 Answers in Appendix A for the answers to these questions.