Chapter 10. RAM and Storage
This chapter covers the following A+ 220-1001 exam objectives:
• 3.3 – Given a scenario, install RAM types.
• 3.4 – Given a scenario, select, install and configure storage devices.
This chapter is all about how data is accessed and stored—over the short term, and the long term. We use random access memory (RAM) for the short term, and storage drives, such as hard drives and optical drives, over the long term. There are different levels of performance for the different types of RAM and hard drives available. A weak component can act as a bottleneck when it comes to processing data, opening and running programs, and saving and rendering information. This ultimately can lead to decreased performance of the entire system. So, pay careful attention to the selection of RAM and hard drives when building or upgrading computers. This is a big chapter so be sure to take breaks as you go!
3.3 – Given a scenario, install RAM types.
ExamAlert
Objective 3.3 concentrates on the following concepts: RAM types (DDR2, DDR3, DDR4, SODIMM), single channel, dual channel, triple channel, error correcting, parity vs. non-parity.
When people talk about the RAM in their computer, they are almost always referring to the “sticks” of memory that are installed into the motherboard. This is known as Dynamic Random Access Memory (DRAM), or main memory, and often comes in capacities of 4, 8, 16, or 32 GB, or more. This type of RAM has its own speed and must be compatible with the motherboard’s RAM slots. It’s not the only type of RAM, but it’s the one you should be most concerned with for the exam. For all practical purposes, the terms stick, DIMM, and memory module mean the same thing; they refer to the RAM installed into a motherboard’s RAM slots.
The most important concept in this chapter is compatibility. There are a lot of RAM technologies to know, but the bottom line is, “Will it be compatible with my motherboard?” The best way to find out is to go to the RAM manufacturer’s website and search for your motherboard. They usually list the matching RAM. Let’s discuss the types of RAM you should know.
RAM Types
There are many types of RAM, but for the exam you need to know about two types: desktop RAM and laptop RAM. Generally, desktops use dual-inline memory modules (DIMMs), and laptops use small-outline DIMMs (SODIMMs). They both use RAM that is based on Double Data Rate (DDR) technology. The original DDR got its name because it doubles the data per cycle as compared to older types of RAM. A typical data transfer rate for DDR version 1 was 1,600 MB/s. This is not nearly enough for today’s computers, so let’s move onto DDR2, DDR3, and the more common DDR4.
DDR2
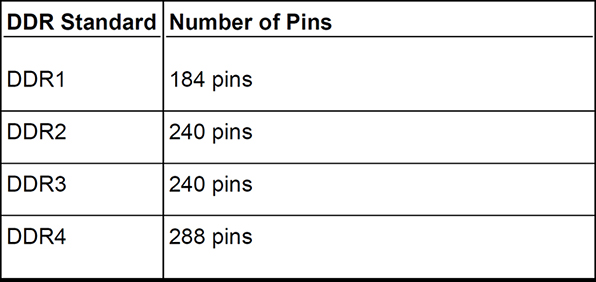
DDR2 builds on the original DDR specification by decreasing voltage (to 1.8 V) and by increasing speed. It increases speed through faster signaling, which requires additional pins. Standard DDR2 DIMMs have 240 pins and cannot be used in other DDR memory slots.
ExamAlert
Know the number of pins in the various DDR memory modules.
A typical stick of DDR2 RAM is called DDR2-800 (also known as PC2-6400). This can perform 800 million transfers per second, amounting to 6,400 MB/s. All the numbers you need to know are in the names!
Note
Millions of transfers per second is usually expressed as megatransfers per second or MT/s.
DDR3
DDR3 was designed for lower power consumption and higher reliability while enabling higher levels of performance. 240-pin DDR3 DIMMs are similar to DDR2 DIMMs but are not backward compatible. Compared to DDR2, it has the capability to transfer twice as much data, use less voltage (1.2 to 1.5 V), and ultimately work faster and more efficiently.
Figure 10.1 shows a typical DDR3-1333 memory module. It is also known as PC3-10600. That means that it can do 1333 MT/s and has a total data transfer rate of 10,600 MB/s.
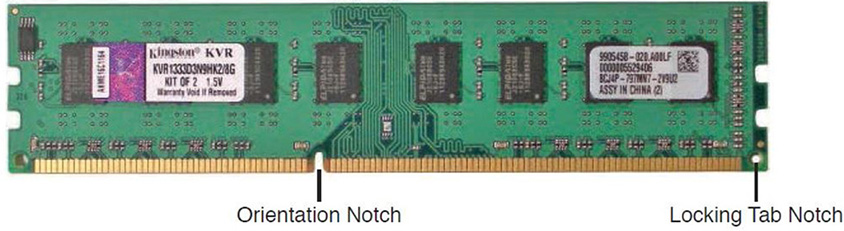
Figure 10.1 A 240-pin PC3-10600 4 GB DIMM (DDR3-1333)
The DDR3 module in Figure 10.1 has a sticker on the left that shows an identification code. You might not be able to read it, but it says KVR1333D3N9HK2/8G and Kit of 2, 1.5 V. The 1333 and D3 in the code tell you that this is DDR3-1333 RAM. The 8G tells you the capacity (8 GB) but only when installed as a kit of two memory modules—as the label goes on to say. Finally, it tells you that the memory runs at 1.5 volts. Leave the sticker on the memory module. This way, the warranty will not be voided, and you can find out important characteristics of the RAM later. Often you will come across sticks of RAM just lying about and you might not remember what they are—the code on the sticker tells you everything you need to know.
DDR4
At 1.2 to 1.35 V, DDR4 has a lower voltage range than most DDR3. It also has a higher module density and a higher data transfer rate. Of course, like previous versions of DDR, it is not backward-compatible—this type of RAM has 288 pins and has a different physical configuration. Table 10.1 compares some typical DDR4 types, and Figure 10.2 shows an example of DDR4.
Table 10.1 Comparison of DDR4 Types

Note
The standards listed in Table 10.1 are based on the JEDEC standards (www.jedec.org). JEDEC develops various open standards for the microelectronics industry.
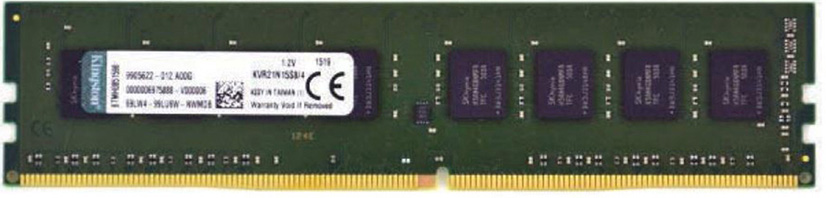
Figure 10.2 A 288-pin PC4-17000 4 GB DIMM (DDR4-2133)
As you have probably guessed, the RAM in Figure 10.2 can perform 2,133 MT/s and has a maximum data transfer rate of 17,066 MB/s. I actually used the memory module in Figure 10.2 within my AV-Editor computer. Or more accurately, I used four of them in a quad-channel configuration that we will speak of more later. Note how both connectors are slightly angled. This, and the number of pins (among other things), make it incompatible with DDR3 slots.
As of the writing of this book, DDR4 is the fastest type of RAM module you can get for your motherboard, but DDR5 is fast on its heels. Technology is constantly changing—be ready.
Installing RAM
Installing DRAM is fun and easy. Simply stated, it can be broken down into these steps:
1. Orient the RAM properly
2. Insert the RAM into the slot
3. Press down with both thumbs until the ears lock.
4. Test.
Easy! But let’s take it a little further. Remember that some people refer to memory modules as DIMMs, DRAM, RAM sticks, or just plain RAM, and you could get any of these terms on the exam as well. Once you have selected the correct memory module for your motherboard, and employed ESD prevention (anti-static strap), you can install the RAM.
Be careful with the RAM and the RAM slot! They are delicate! Hold the RAM by the edges and do not touch any pins or other circuitry on the memory module. If you need to put it down, put it down on an antistatic mat or in the container it shipped in.
Take a look at the slot; there should be a break in the slot somewhere near the middle (but not the exact middle). This is where the notch in the memory module will go. Gently place the memory module in the slot, pins down. If the notch does not line up with the break in the slot, you might need to turn the module around. When it appears that the RAM is oriented correctly, press down with both thumbs on the top of the memory module. Keep your thumbs as close to the edge as you can so that you can distribute even pressure to the memory module. Press down with both thumbs at the same time until the tab(s) on the edge of the RAM slot close and lock on to the memory module. (The tabs are also called “ears”, for DDR4, look for a single ear.). You might hear a click or two when it is done. You might need a bit of force to fully insert the RAM, but don’t go overboard! If the motherboard is bending excessively, you are using too much force. If this is the case, make sure that the RAM is oriented correctly; the notches should match up and the RAM should be straight within the slot. Figure 10.3 shows a bank of DDR4 memory modules installed into the gray DIMM slots in a quad-channel configuration. Each of these is 4 GB, giving us a total of 16 GB of RAM.

Figure 10.3 Installed bank of DDR4 memory modules
Now, the most important thing to do with any installation is to test. With the case still open, boot the computer, access the UEFI/BIOS and make sure that the system recognizes the new RAM as the right type and speed. The amount is often on the main page, but you might need to look deeper for the exact configuration, depending on the motherboard. Next, access the operating system (after it is installed) and make sure it boots correctly. Complete several full cycles and warm boots. Also, at some point, you should view the RAM within the operating system. For example, in Windows use the System Window or the Task Manager to verify that the operating system sees the correct capacity of RAM:
• System Window: Go to Control Panel > All Control Panel Items > System. The total RAM should be listed within this window.
• Task Manager: You can view the Task Manager by right-clicking the taskbar and selecting Task Manager. There are several other ways to open this; I like this one: Press Windows+R to bring up the Run prompt and type taskmgr. When it is open, go to the Performance tab and view the memory section. It should show the total physical memory as well as the memory that is in use. Figure 10.4 shows my AV Editor computer running Windows 10 Pro, displaying 32 GB of RAM in the Task Manager, or more accurately, 31.9 GB, as circled toward the upper-left of the figure. The in-use amount is 6.1 GB.

Figure 10.4 Task Manager showing 32 GB of RAM
Note
There are plenty of good third-party tools for analyzing RAM as well, such as CPU-Z.
Another good test of RAM is to make sure that you can open several applications at once without any issues or delays. Finally, if everything looks okay, close up the case, and if all went well, congratulate yourself on another job well done!
ExamAlert
Know how to select, install, and verify RAM for the exam.
There are a couple of other important things to mention here.
First, if you were for some reason to install two different speeds of RAM, then generally the system would run at the lower of the two speeds. This is an example of underclocking, and you won’t get the most out of the computer. However, this could also cause the system to fail, because some motherboards insist that the modules be identical.
Second, if you install the very latest type of RAM that is supposed to be compatible with a motherboard, be prepared to update the UEFI/BIOS so that the system can recognize the new RAM. The firmware update (also known as a “flash”) is one of the most important jobs a PC technician will perform.
RAM Technologies
Once you have chosen the type of RAM to use, you must then decide on more technical details; for example, the configuration of channels, which will be dictated in part by the motherboard. Your particular solution might also require the use of parity and/or error correcting RAM, which is uncommon for desktop PCs and laptops, but might be necessary for more customized computers. Let’s begin with memory channels.
Single-Channel Versus Multichannel Architectures
Single-channel is the original RAM architecture. It means that there is a 64-bit address bus (or data channel) between the memory and the memory controller (usually within the CPU). One or more sticks of RAM can be installed into the motherboard, but they share the same channel.
Dual-channel is a technology that essentially doubles the data throughput. Two separate 64-bit channels are employed together, resulting in a 128-bit bus. To incorporate this, the proper motherboard will have color-coded matching banks divided into Channel A and Channel B. Triple-channel architecture accesses three memory modules at the same time, in effect a 192-bit bus.
Quadruple-channel (or simply quad-channel) architecture takes this idea to the next level. It works only when four identical memory modules are placed in the correct slots. Quad-channel is common in computers that use DDR4. Now we have four 64-bit wide buses working together, but for it to work properly, a module of RAM must be installed to each of the four banks. If only three modules are installed (thus only three banks used), the architecture downgrades to triple-channel automatically. Likewise, if only two are used, the motherboard scales back to dual-channel architecture. However, in some cases, the reduction in performance will be negligible.
Figure 10.5 shows an example of a motherboard’s RAM slots making use of quad-channel technology. As you can see in the figure, there are four banks, each with two slots (one of which is black and one of which is gray). By installing a memory module into each of the gray slots (known as A1, B1, C1, and D1), we can harness the collective power of the quad-channel technology.
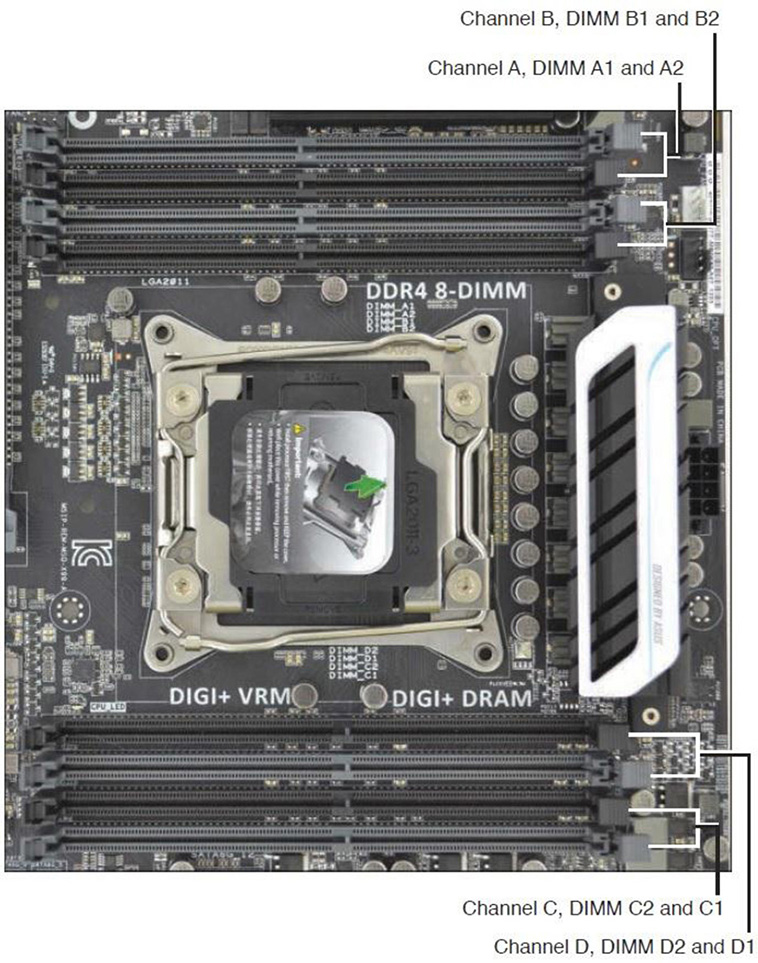
Figure 10.5 A motherboard with quad-channel capable RAM slots
This is the configuration used in AV Editor computer, which we’ll discuss more as we progress throughout the book. Of course, we have the ability to add another four memory modules if we wish (those would be added to the black slots). The ASUS X99-A motherboard used in this computer can handle 64 GB of RAM total.
ExamAlert
Know the difference between single, dual, triple, and quad-channel for the exam.
Parity Versus Non-parity
There are several types of parity in computing; RAM parity is when memory stores an extra bit (known as a parity bit) used for error detection. This means that the memory module can store 9 bits instead of 8 bits for every byte of data. So, parity RAM includes this extra bit and the more common non-parity RAM does not. Parity RAM might be required when data integrity is a necessity, for example with servers or special workstations.
ECC Versus Non-ECC
Error Correction Code (ECC) in RAM can detect and correct errors. Real-time applications might use ECC RAM. Like parity RAM, additional information needs to be stored, and more resources are used in general. This RAM is the slowest and most expensive of RAM types. DDR ECC modules are identified with either the letter E or as ECC (for example, PC3-10600E).
Cram Quiz
Answer these questions. The answers follow the last question. If you cannot answer these questions correctly, consider reading this section again until you can.
1. What is the transfer rate of DDR4-2133?
![]() A. 17,066 MB/s
A. 17,066 MB/s
![]() B. 19,200 MB/s
B. 19,200 MB/s
![]() C. 21,333 MB/s
C. 21,333 MB/s
![]() D. 25,600 MB/s
D. 25,600 MB/s
2. How many pins are on a DDR3 memory module?
![]() A. 288
A. 288
![]() B. 184
B. 184
![]() C. 240
C. 240
![]() D. 200
D. 200
3. Which of the following allows for a 256-bit wide bus?
![]() A. ECC
A. ECC
![]() B. Quad-channel
B. Quad-channel
![]() C. Parity
C. Parity
![]() D. DDR2
D. DDR2
Cram Quiz Answers
1. A. The transfer rate of DDR4-2133 is 17,066 MB/s. It is also known as PC4-17000. 19,200 MB/s is the speed of DDR4-2400 (PC4-19200). 21,333 MB/s is the speed of DDR4-2666 (PC4-21333). 25,600 MB/s is the speed of DDR4-3200 (PC4-25600).
2. C. DDR3 is a 240-pin architecture. 288-pin is DDR4, 184-pin is the first version of DDR (DDR1), and you can find 200-pin architectures in laptops; they are known as SODIMMs. To review, Table 10.2 shows the pin configurations for PC-based DDR 1 through 4.
Table 10.2 Comparison of DDR Pinouts
3. B. The quad-channel memory architecture can allow for a 256-bit wide bus (64-bit per channel). However, this will only be the case if all four channels have memory installed to them. ECC stands for error correction code which can detect and correct errors in RAM. Parity is when the RAM stores an extra bit used for error detection. DDR2 is a type of DRAM that for the most part was used in either single-channel or dual-channel environments.
3.4 – Given a scenario, select, install and configure storage devices.
ExamAlert
Objective 3.4 focuses on the following: optical drives, solid-state drives, magnetic hard drives, hybrid drives, flash drives, and configurations such as RAID 0, 1, 5, and 10.
Everyone needs a place to store data. Whether it’s business documents, audio/video files, or data backups, users must decide on the right storage medium. This can be magnetic media, solid-state media, or optical media. Devices include hard drives, DVD/CD-ROM drives, and flash-based drives among others. It all depends on what is stored and how often and where it is needed. This section concentrates on those three categories of media and how to identify, install, and troubleshoot them. We begin with the most typical storage place—the hard drive.
The hard drive is where the operating system is normally stored. Users also store frequently accessed data on the hard drive as well, such as Word documents, music, pictures, and so on. The two main types of hard drives are: solid-state (which contains no disk), and magnetic (the hard disk drive). We’ll discuss both of these, but first, a common standard for hard drive storage—SATA.
SATA
Serial AT Attachment (also known as Serial ATA, or just SATA) is a serial bus used to move data to and from hard drives and optical drives. To transmit that data, the drive has a 7-pin data port, as shown in Figure 10.6. Use an SATA cable to connect that to the motherboard or SATA adapter card of the computer.
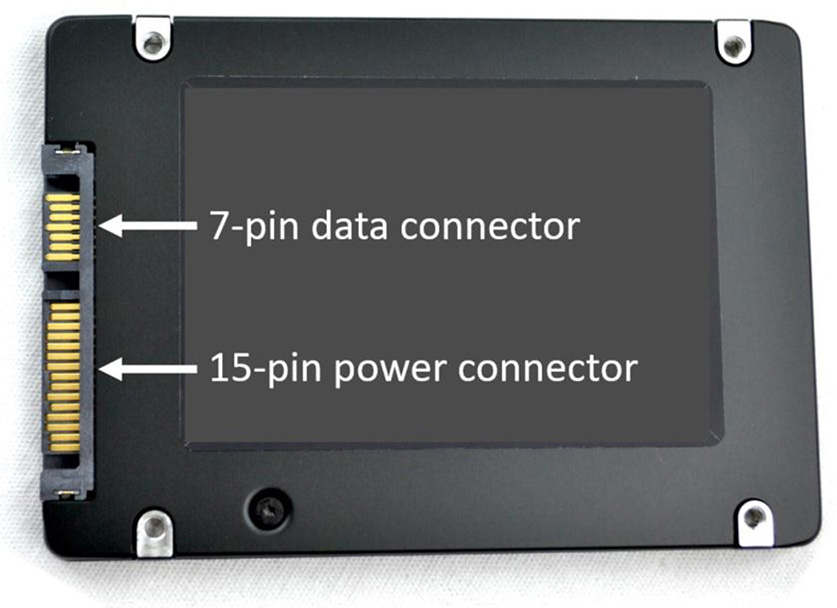
Figure 10.6 SATA data and power connectors on a 2.5” SSD
For power, the SATA drive utilizes a 15-pin power connector, as shown in Figure 10.6. The hard drive’s connectors have vertical tabs in the center, making for easier orientation when connecting the cables. Power supplies send 3.3 V, 5 V, and 12 V to the SATA drive.
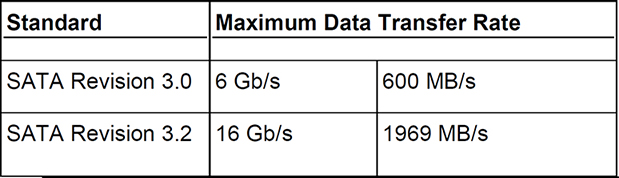
SATA technology is used by magnetic hard drives and solid-state drives. What has been described so far is SATA revision 3.0. However, there is also SATA 3.2. It is less common than 3.0 and requires either an SATA Express port or an M.2 slot to operate. SATA Express ports are like triple-connectors with 18 pins (7 pins +7 pins +4 pins). SATA Express isn’t very common. Many people and technicians prefer other technologies over it, such as NVMe-based M.2 cards which we’ll discuss in a little bit. Table 10.3 shows these two SATA revisions.
Table 10.3 Comparison of SATA 3.0 and 3.2
ExamAlert
Know the maximum data transfer rates for SATA Revisions 3 and 3.2.
Note
You might also see some organizations refer to SATA measurements as Gbit/s or Gbps, instead of Gb/s, but they mean the same thing.
SATA 3.0 was released in 2009. However, if you come across older systems with older versions of SATA, these can be easily upgraded to a newer hard drive technology with the use of an PCI Express adapter card. If the system is so old that it does not have a PCI Express slot, then it might be wise to upgrade the entire system!
Magnetic Hard Drives
Magnetic hard drives, or hard disk drives (HDDs) are the most common form of magnetic media. A hard disk drive contains one or more platters with a magnetic surface. As the platters rotate at high speed, read/write heads store and read information to and from the disk.
HDDs come in two main widths: 3.5” and 2.5”. The 3.5” drive is used in desktop computers, network-attached storage and other larger devices. The 2.5” drive is used in laptops and other smaller devices. Generally, HDDs use SATA, though less commonly you will find SCSI and IDE versions. They are typically sold with data storage capacities of 500 GB, 1 TB, 2 TB, 4 TB, and beyond.
Note
A typical operating system such as Windows will display a 500 GB drive as 476 GB (or 465 GB or a similar number). This is due to a difference in numbering systems used to measure the drive. A hard drive manufacturer will use the base10 system, whereas Windows will use the base2 system, resulting in a slightly lower number. No actual space was lost during the conversion!
I describe this phenomenon further at my website: https://dprocomputer.com/blog/?p=1239
HDDs are very common because they have been available for a long time and are generally cheaper than solid-state drives. However, there are a couple of things that set them apart such as these specifications:
• Rotational speed: The platters in an HDD rotate at a certain speed, for example 7,200 revolutions per minute (RPM), which is common; other typical speeds for hard drives include 5,400 RPM (slower access time) and 10,000 RPM and 15,000 RPM (faster access time).
• Latency: After a track has been reached by the read head, latency is the delay in time before a particular sector on the platter can be read. It is directly related to rotational speed and is usually half the time it takes for the disk to rotate once. For example, a 7,200 RPM drive has an average latency of 4.2 ms (milliseconds), but a 10,000 RPM drive has an average latency of 3.0 ms.
Solid-State Drives
A solid-state drive (SSD) is used to store operating systems and files, similar to a magnetic hard disk drive. However, SSDs don’t use spinning disks or read/write heads; they instead write data to non-volatile microchips. Because of this, they are silent, more resistant to physical shock, and have lower access time and less latency then magnetic hard drives. Because there are no moving parts, you are not concerned with rotation speed.
SATA-based SSDs normally measure 2.5 inches in width. Installation requires either a 2.5-inch internal bay, special screw holes drilled directly into the computer case, or an adapter kit to install it to a 3.5-inch internal bay.
However, there are other types of SSDs; for example, the M.2-based SSD. These are small form factor cards that are installed directly into a motherboard or to an adapter card if the motherboard doesn’t have an M.2 slot. Either way, the M.2 card is installed at slight angle, then pressed flat against the board, and screwed in. There are a variety of different M.2 card sizes. A common example is 2280 which means it is 22 mm wide by 80 mm long. M.2 cards are known to offer as much as 6 times the data transfer rate of a typical 2.5” SATA 3.0 SSD. While the M.2 slot can be used with different types of technologies, the most common and fastest (as of the writing of this book) is Non-Volatile Memory Express (NVMe) which is a specification for accessing storage while using PCI Express. Essentially, the M.2 slot on a motherboard taps into the PCI Express bus (x4) and uses a portion of the total bandwidth associated with that bus. This usually results in the loss of one PCI Express version 3 slot, and depending on the type of CPU and motherboard, it could also mean a battle for bandwidth between the video card and the M.2 card (and possibly other devices). In addition, NVMe-based M.2 cards tend to run hot. So, careful planning is required before installing an M.2 card.
Note
I have an in-depth video/article on my website that demonstrates the installation of an NVMe M.2 SSD drive: https://dprocomputer.com/blog/?p=2112
Note
SSD drive technology can be combined with magnetic disk technology—this is known as a hybrid drive. This could be accomplished in a drive that incorporates NAND flash memory (for caching of data and speed) and a magnetic disk (for increased capacity). There are also M.2-based caching cards that can be used in combination with a magnetic disk to increase performance.
RAID
Redundant Array of Independent Disks (RAID) technologies are designed to increase the speed of reading and writing data, to create one of several types of fault-tolerant volumes, or both. Fault tolerance is the capability of the hard drive system to continue working after there is a problem with one of the drives.
To create a RAID array, you need two or more hard drives. Then, you either need to set it up through software or hardware. Some operating systems support the software option, but it is not usually recommended. Generally, in the field we utilize hardware-based RAID, which means one of three things: either the motherboard of a system should have built-in RAID support, or we use a RAID adapter card, or we use an external device such as network-attached storage (NAS) that has RAID capability.
The exam requires you to know RAID levels 0, 1, 5, and 10. Table 10.4 describes each of these.
Table 10.4 RAID 0, 1, 5, and 10 Descriptions

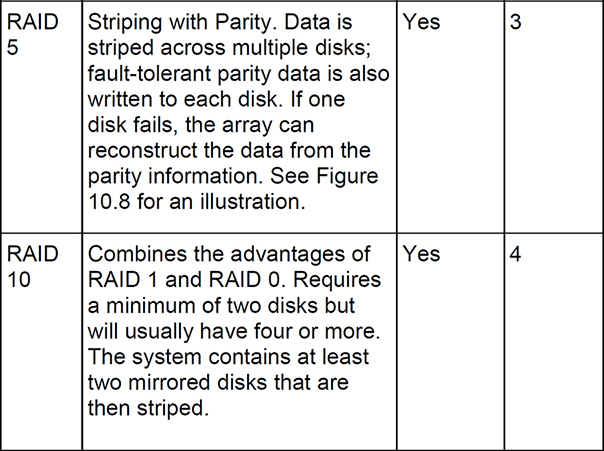
Figure 10.7 shows an illustration of RAID 1—mirroring. You can see that data is written to both disks and that both disks collectively are known as the M: drive or M: volume. So, even though we have two 2 TB drives, this volume only has a total capacity of 2 TB.
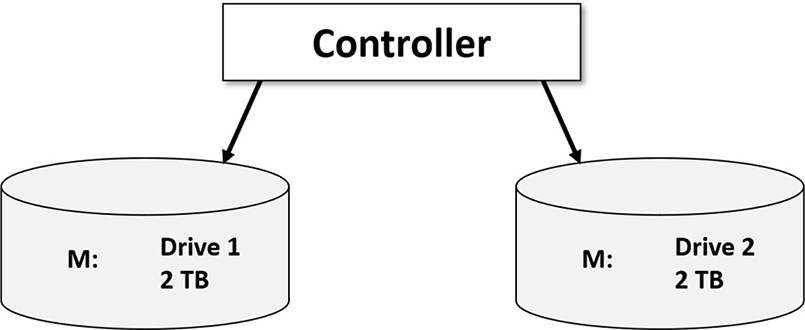
Figure 10.7 RAID 1 illustration
Figure 10.8 displays an illustration of RAID 5—striping with parity. In a RAID 5 array, blocks of data are distributed to the disks (A1 and A2 are a block, B1 and B2 are a block, and so on) and parity information is written for each block of data. This is written to each disk in an alternating fashion (Ap, Bp, and such) so that the parity is also distributed. If one disk fails, the parity information from the other disks will reconstruct the data. Some organizations prefer RAID 6 which requires 4 drives minimum, and writes two sets of parity. This can work well for larger arrays—meaning, ones with more hard drives. In larger environments, hot-swappable capability is a must—this is when drives can be removed and inserted while the system is on.
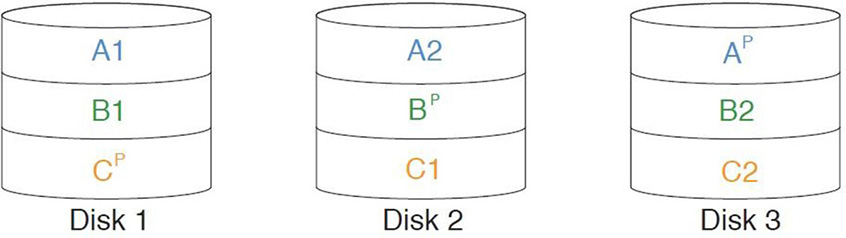
Figure 10.8 RAID 5 illustration
Remember that hard drive arrays should be built using identical drives. That means using a group of the same magnetic disk drives or a group of the same solid-state drives. Deviate from this suggestion at your own risk!
We mentioned that RAID can be a type of fault tolerance. It is important to make the distinction between fault tolerance and backup. Fault tolerance means that the hard drives can continue to function (with little or no downtime) even if there is a problem with one of the drives. For example, RAID 1 or RAID 5. Backup means that you are copying the data (and possibly compressing it) to another location for archival in the event of a disaster. An example of a disaster would be if two drives in a RAID 5 array were to fail.
ExamAlert
Know the differences between the various types of RAID, for example RAID 1 (mirroring) and RAID 5 (striping with parity).
Flash
Flash memory is used in all kinds of solid-state technologies. Most of these technologies use NAND-based flash memory. For this section we’ll focus on USB flash drives and Secure Digital cards.
USB Flash Drives
The USB flash drive is probably the most familiar of all flash media. Also known as USB thumb drives, they are often retractable and can be carried on a keychain.
When you plug in a USB flash drive, the drive shows up as a volume within File Explorer (or Windows Explorer). Connecting the drive is easy; just find an open USB port. But remember that you should eject the flash drive in the operating system before disconnecting the drive physically. If you don’t, it can cause electrical irregularities that can damage the data on the drive. In Windows, right-click the Safely Remove Hardware and Eject Media icon in the Notification Area, and then click Eject to shut down power to the selected USB device. Then it can be safely removed from the physical USB port. The icon appears as a USB cable with a check mark. If your USB device has a light, make sure that light is off before physically removing the device. You can also “eject” optical drives and virtual drives in this manner.
ExamAlert
Remember to safely remove USB flash drives in the operating system before physically disconnecting them.
Tip
Sometimes a USB or other flash-based, solid-state device can’t be removed with the Safely Remove Hardware option in Windows. If this happens, consider shutting down the computer before physically disconnecting the device to avoid data corruption or loss.
The advantages of a USB flash drive are obvious. Quick and efficient moving of data—and a lot of data at that. However, it is not meant for long-term storage in the way that a magnetic or solid-state hard drive is—it is meant for transfer of data from one system to another. It can also be used to boot systems for installation purposes or for troubleshooting.
Let’s talk about the type of memory used in this solid-state device: NAND flash memory is the core of a USB flash drive. This memory is divided into blocks that are generally between 16 KB and 512 KB. Know that a USB flash drive’s blocks can be written to only so many times before failures occur. With some flash drives, manufacturers estimate this limit is 1 million write/erase cycles or 10 years of use. However, just like hard drives will never attain their maximum data transfer rate, it is doubtful that a flash drive will ever attain that maximum number of write/erase cycles. In addition, the number of years is subjective; it all depends on how often a user works with the flash drive. Basically, if you take the number given by the manufacturer and cut it in half, you should be in good shape, unless you are an extreme power user. Now back to NAND flash failures: Because this type of memory incurs a small number of faults over time (as opposed to NOR flash, which should remain free of faults), a method known as Bad Block Management is implemented. Bad Block Management maintains a table of the faulty blocks within the USB flash device, making sure not to save data to those blocks. Blocks are divided into pages, which can be between 512 bytes and 4 KB. Each page has error detection and correction information associated with it. All this is done to prolong the lifespan of devices that use NAND memory.
Normally, USB flash drives are shipped in a formatted state, for example FAT32. This enables the drive to be accessed by just about any computer on the market and makes for easy repair of corrupted files with Windows utilities. If the user so chooses, these drives can also be formatted as NTFS or other file systems which may be necessary to interface with certain systems or perform particular installations. Sometimes NAND flash devices (such as USB flash drives) act up intermittently. Unless the device has failed completely, a quick reformat usually cures the flash drive of its woes. Just be sure to back up your data first! This method applies to other forms of solid-state, NAND-based media. After reformatting, test the drive by moving files to it and then opening them. Of course, after a certain point, the drive will fail and will need to be replaced. Periodically check USB flash drives for stability.
Some USB flash drives are preloaded with software that can restore data and possibly secure transferred data.
One problem with USB flash drives is that although they are small, they can’t fit inside most digital cameras, smartphones, and other handheld devices. For that, you need something even smaller: Enter the SD card.
Secure Digital Cards
SD cards, for the most part, are technically the same type of device as a USB flash drive. They are solid-state, they use NAND memory, and they have most of the same pros and cons as a USB flash drive. However, SD technology can write and transfer data much faster. The other main difference is the form factor of the SD device; because of this, SDs are used differently. Instead of connecting an SD card to a USB port of a computer, it slides into a memory card reader. There are specialized readers for SD cards only and other readers that can read multiple formats of cards. Like USB flash drives, be sure to use the Safely Remove Hardware icon in Windows before physically removing the SD card. There are three sizes of SD cards, each smaller than the last: standard (32 mm × 24 mm), miniSD (21.5 mm × 20 mm), and microSD (15 mm × 11 mm). You can still find many standard-sized SD cards used in cameras and some other devices but note that most cell phones and smartphones use microSD cards for additional memory. Figure 10.9 shows a full-size SD card and a microSD card.
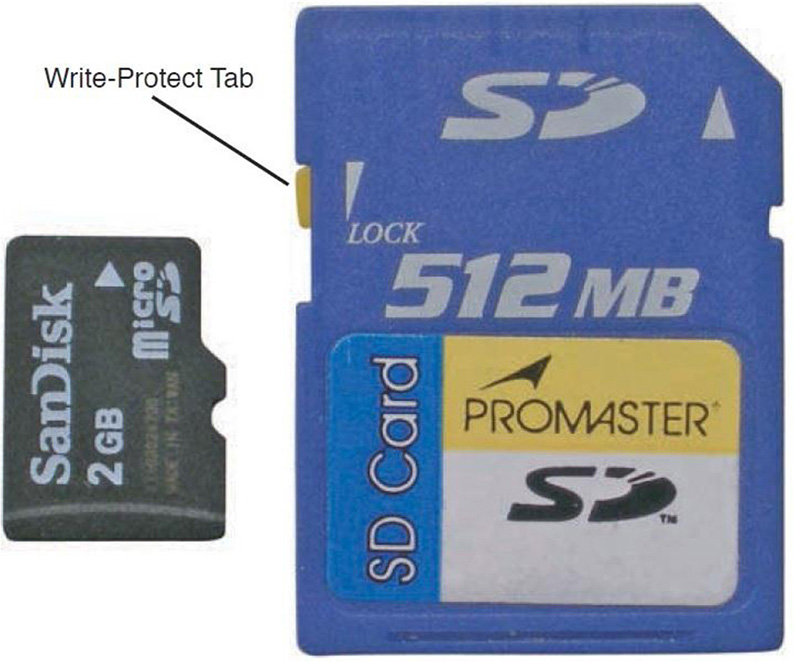
Figure 10.9 A typical microSD card (left) and a standard SD card (right)
Note
You might run across an xD-Picture Card. This is a flash memory technology similar to SD that is used in some older digital cameras.
Standard SD cards have capacities up to 4 GB. High-capacity (SDHC) cards range up to 32 GB. eXtended Capacity (SDXC) has a maximum capacity of 2 TB and supports up to 90 MB/s. Secure Digital Ultra Capacity (SDUC) supports up to 128 TB and 985 MB/s data transfer over the SD Express bus.
When it comes to data transfer rate, SD cards are divided into a variety of classes: SD Class 2, 4, 6, and 10 as well as UHS 1 through 3, and SD Express bus, each with a different range of speeds. For example, Class 10, required for Full HD video recording (1080p), has a minimum data writing speed of 10 MB/s. To record 4K video, you would need at least UHS 3, which has a minimum data writing speed of 30 MB/s. To simplify things a bit, SD cards are labeled with a video speed class rating. For example, V30 means that the card can write 30 MB/s minimum, but today’s SD cards will often display their maximum transfer rate as well.
ExamAlert
Know the different capacities of standard SD, SDHC, SDXC, and SDUC.
Note
CompactFlash (CF) is another kind of solid-state memory categorized as either Type I cards (3.3 mm thick) or Type II cards (5 mm). These cards are larger than SD cards and are used in older devices, high-end cameras (Type I), and microdrives (Type II). Their maximum capacity is generally 32 GB with a typical data transfer rate of 133 MB/s.
Optical Drives
The three main types of optical media in use today are compact discs (CDs), digital versatile discs (DVDs), and Blu-ray discs. These discs have a variety of functions, including audio, video, application, data, and so on. Some discs can be read from and some can also be written to. Finally, some discs can be rewritten to as well. It all depends on which media you use. Now there are a lot of different versions of optical media; let’s try to organize them so that they will be easier to remember. We start with the most familiar: the compact disc.
ExamAlert
You’ve probably noticed by now that most magnetic media is known as “disk” and optical media is known as “disc.” Keep this in mind for the exam.
Compact Disc (CD)
A CD is a flat, round, optical disc used to store music, sounds, or other data. It can be read from a compact disc player. For example, audio CDs can be played on a compact disc player that is part of a stereo or a computer. However, data CDs can be read only from CD-ROM drives that are part of, or externally connected to, a computer. The A+ exam focuses on data CDs, so let’s talk about some of the different data CD technologies.
The most common acronym that comes to mind is the compact disc-read-only memory (CD-ROM). Data is written to a CD-ROM in a similar way that audio is written to a music CD; a laser shines on the reflective surface of the CD and stores data as a plethora of microscopic indentations known as lands and pits. These are the types of CDs you get when you purchase a computer program or game. They can be read from but not written to and can be read only from a compatible CD-ROM drive. CD-ROM drives are rated in read speeds (for example, 48x). The x equals 150 KB/s. So, to calculate a CD-ROM drive’s maximum read speed, you multiply the number preceding the x by 150 KB. In this example, this would be 48 × 150 KB = 7.2 MB/s. A typical CD can hold up to 700 MB of data. Table 10.5 describes the two most common recordable technologies.
Table 10.5 Comparison of CD Recording Technologies

Most optical drives that you can purchase for a computer today have all three compact disc functions. They can read from CD-ROMs, write to CD-Rs, and write/rewrite to CD-RWs. Usually, the read speed and CD-R speed are the same.
ExamAlert
Know the difference between CD-ROM, CD-R, and CD-RW.
CD-ROM discs are known as removable media; however, the drive is normally fixed in the computer. It installs much like a SATA hard drive. One notable exception is that most CD-ROM drives are 5.25 inches wide (instead of 3.5 or 2.5 inches). So, they must be installed to one of the larger bays in a case that has an opening on the front; this way, the drive tray is accessible. The same goes for all optical drives. Most CD-ROM drives can also play audio CDs and they have a volume knob on the front. In addition, many drives have a pinhole near the volume knob. This small hole is for when a CD (or the tray) gets jammed. Insert a paper clip into the hole to attempt to free the tray and CD. Most other optical drives have this feature as well.
ExamAlert
The paper clip should be added to your toolkit; it dislodges jammed optical trays. A mobile device tray pin also works.
Digital Versatile Disc (DVD)
For data, Digital Versatile Discs, also known as Digital Video Discs, are the successor to CDs for a variety of reasons. First, they can be used to play and record video. Second, they have a much greater capacity than CDs. This is because the pits etched into the surface of the DVD are smaller than CD pits (.74 micrometers compared to 1.6 micrometers). Also, DVDs can be written to faster than CDs. There are read-only DVDs and writable DVDs; however, there are a lot more variations of DVDs than there are CDs. Table 10.6 describes some of the DVD-ROM (Digital Versatile Disc-Read-Only Memory) versions, specifications, and differences starting with the common DVD-5 version.
Table 10.6 Comparison of DVD Technologies

The most common DVD is currently the single-sided, single-layer (SS, SL) DVD-5 technology that can store 4.7 GB of data. But some DVDs can be written to two sides (known as dual-sided or DS); simply flip the DVD to access the information on the other side. Layers however work differently. A DVD with two layers (known as dual layer or DL) incorporates both layers onto a single side of the disc. The second layer is actually underneath the first one; the DVD laser reads this second layer by shining through the first semitransparent layer. By combining dual-sided and dual-layer technologies, you end up with a DVD that can store up to 17 GB of data (known as DVD-18) at 8.5 GB per side.
ExamAlert
Know the capacity of common DVD technologies such as DVD-5 and DVD-18 for the exam.
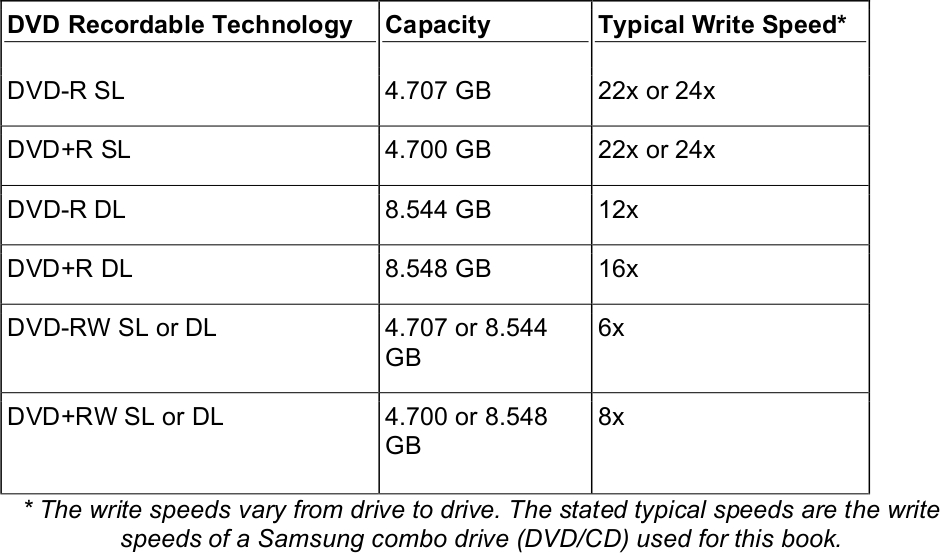
Once again, for DVD-ROMs and recordable DVDs (DVDR), the most common is DVD-5. Typically, a DVD drive reads these discs at 16x. However, the x in DVD speeds is different than the x in CD-ROM speeds. For DVDs, the x means approximately 1.32 MB/s or about nine times the core CD speed. So a typical 16x DVD is equal to 21 MB/s. Typically, a DVD drive reads at 16x, records once at 22x or 24x, and rewrites at 6x or 8x. Table 10.7 provides a description of the different types of recordable DVDs.
Table 10.7 Comparison of DVD Recordable Technologies
Blu-ray
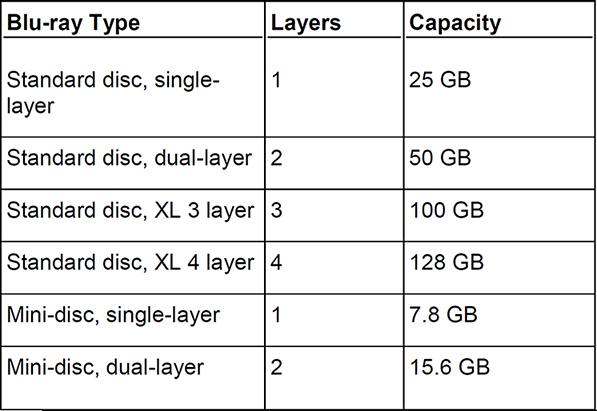
Currently, Blu-ray is the standard for high-definition video. It is used by high-def movies, console games, and for storing data (up to 50 GB per disc, 10 times the amount of a typical DVD-5 disc). The standard disc is 12 cm (the same size as a standard DVD or CD) and the mini-disc is 8 cm. Table 10.8 shows some of the Blu-ray specs.
Table 10.8 Comparison of Blu-ray Specifications
Note
Triple- and quadruple-layer discs can be accessed by BD-XL drives.
Drive speeds range from 1x to 16x (with more undoubtedly on the way). 1x is equal to 36 Mb/s or 4.5 MB/s. A 16x would be 16 times that core amount, which is 576 Mb/s or 72 MB/s, which is superior to DVD write speeds. Single-layer discs, though their capacity is half, can be written to in half the time of dual-layer discs.
Want to record to Blu-ray discs? There are two methods of “burning” Blu-ray discs: Blu-ray Disc Recordable (BD-R), which can write to a disc once, and Blu-ray Disc Recordable Erasable (BD-RE), which can be erased and re-recorded multiple times. Burning speed depends on the drive, but as of the writing of this book, there are some that can go as high as 16x. To burn discs in Blu-ray format, you must either install the drivers and software that came with the drive or utilize a third-party program. Generally, you will see a typical maximum of 50 MB/s when writing data to Blu-ray.
ExamAlert
Know the differences between BD-R and BD-RE for the exam.
Cram Quiz
Answer these questions. The answers follow the last question. If you cannot answer these questions correctly, consider reading this section again until you can.
1. How much data can a SATA revision 3.0 drive transfer per second?
![]() A. 50 MB/s
A. 50 MB/s
![]() B. 90 MB/s
B. 90 MB/s
![]() C. 1969 MB/s
C. 1969 MB/s
![]() D. 6 Gb/s
D. 6 Gb/s
![]() E. 16 Gb/s
E. 16 Gb/s
2. Which level of RAID stripes data and parity across three or more disks?
![]() A. RAID 0
A. RAID 0
![]() B. RAID 1
B. RAID 1
![]() C. RAID 5
C. RAID 5
![]() D. Striping
D. Striping
![]() E. RAID 10
E. RAID 10
3. Which of the following has the largest potential for storage capacity?
![]() A. CD-R
A. CD-R
![]() B. CD-RW
B. CD-RW
![]() C. DVD-RW
C. DVD-RW
![]() D. Blu-ray
D. Blu-ray
4. A customer complains that an important disc is stuck in the computer’s DVD-ROM drive. What should you recommend to the customer?
![]() A. To get a screwdriver and disassemble the drive
A. To get a screwdriver and disassemble the drive
![]() B. To format the disc
B. To format the disc
![]() C. To use a paper clip to eject the tray
C. To use a paper clip to eject the tray
![]() D. To dispose of the drive and replace the media
D. To dispose of the drive and replace the media
5. Which of the following best describes a specification for accessing storage while using PCI Express?
![]() A. NVMe
A. NVMe
![]() B. 7,200 RPM
B. 7,200 RPM
![]() C. Hot-swappable
C. Hot-swappable
![]() D. 3.5” and 2.5”
D. 3.5” and 2.5”
Cram Quiz Answers
1. D. SATA Revision 3.0 drives can transfer 6.0 Gb/s, which after encoding amounts to 600 MB/s. SATA Revision 3.2 is 16 Gb/s (1969 MB/s) but requires SATA Express or M.2. 50 MB/s is a typical write speed for Blu-ray discs and some flash media. 90 MB/s is a typical write speed for an SD card.
2. C. RAID 5 stripes data and parity across three or more disks. RAID 0 does not stripe parity; it stripes data only and can use two disks or more. RAID 1 uses two disks only. Striping is another name for RAID 0. RAID 10 contains two sets of mirrored disks that are then striped.
3. D. Blu-ray, at a typical maximum of 50 GB, has the largest storage capacity. CDs top out just under 1 GB. DVDs have a maximum of 17 GB.
4. C. Tell the customer to use a paper clip to eject the DVD-ROM tray. Disassembling the drive is not necessary; the customer shouldn’t be told to do this. If the disc is rewritable, formatting it would erase the contents, even if you could format in this scenario. Never tell a customer to dispose of a DVD-ROM drive; they rarely fail.
5. A. Non-Volatile Memory Express (NVMe) is a specification for accessing storage while using PCI Express. Essentially, the M.2 slot on a motherboard taps into the PCI Express bus (x4) and uses a portion of the total bandwidth associated with that bus. The platters in a hard disk drive (HDD) rotate at a certain speed, for example 7,200 RPM, which is common; other typical speeds include 5,400 RPM and 10,000 RPM. Hot-swappable capability is when drives can be removed and inserted while the system is on. SATA-based hard drives come in two main widths: 3.5” and 2.5”. The 3.5” drive is used in desktop computers, network-attached storage and other larger devices. The 2.5” drive is used in laptops and other smaller devices.