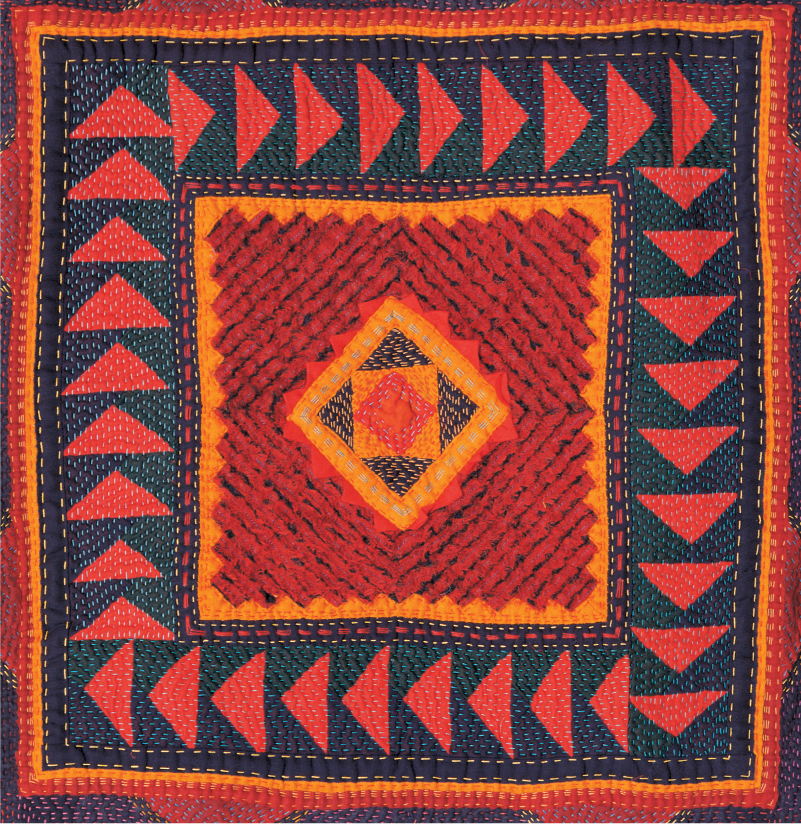
Detail of a quilted hanging (1x1m) inspired by Indian quilt methods. This piece was hand stitched except for the textured central square made by fraying layers of fine cotton. This piece demonstrates borders built around a centre, which creates a very balanced and stable design.
‘Art is the means by which a culture describes itself to itself.’
Kit White (American artist, b.1951)
Eloquent patterns from all parts of the ancient world can be seen on fragments of pottery, in cave and rock art and in textiles. The symbolism inherent in these patterns is usually connected with survival, nature and the changing seasons, rituals and belief. In some cultures, forms of these antique patterns, possibly modified, can still be seen today in their artefacts and other forms of decoration where pattern-making continues as a valued heritage tradition. Although it may no longer have quite the same significance as it did during the time of their ancestors, it may still embody some of the original important symbols that have been handed down over time.
Through travel I have been fortunate enough to see a variety of pattern in different parts of the world. Sometimes I have been able to learn about regional pattern-making by observing and speaking to people directly, but mostly I have gained information by extensive study in museums dedicated to certain peoples in particular environments. These museums, where the history, customs and way of life of a people is told and defined through physical objects – material evidence of their culture – have become my favourite places to visit, draw and absorb information. Constantly seeing and recording examples of inventive and exciting pattern of all kinds has enabled me to develop my own pattern-making skills and has taught me to be more adventurous with colour and stitchery in other aspects of my work too. The mastery of shape, space and density of elements in pattern, as practised by different cultures, continually surprises and inspires me to respond in my own manner.

This exquisitely woven small rug is made by a member of the Navajo Native American tribe. It is made from very fine hand-spun wool that has been dyed using natural plant dyes in subtle colours. The three wider bands repeat the same design motifs, but there is a colour change on the central one.
Drawings and collaged studies inspired by the patterns of various cultures. 1) Typical woven and stitched raffia cloth from the Shoowa people from the Kingdom of Kuba, Zaire. 2) Designs from the paintings of Mbuti women living in the Ituri Forest in Zaire. 3) Coloured sketch of a detail from a Punjabi phulkari stitched in silk on a cotton ground. The designs are generally marked and stitched from the back of the cloth in long, floating running stitches, so accurate that the work could be mistaken for a weaving. 4) Study from a Gee’s Bend quilt, Alabama, USA. 5) Detail of a boldly hand-stitched cover from India.
As those of us in the West become more accustomed to think of regular patterns reproduced by mechanical means, it is important to recognize how much we can learn from the vitality and sheer joy of intuitive pattern-making as practised by other peoples. Sometimes stitched and woven textiles, such as richly patterned rugs and clothing have generated ideas, but my research is by no means limited to textiles alone. I learn and am stimulated by decoration of all kinds, such as patterned baskets, pottery, jewellery, weapons and much more.
Our personal response and the way that we interpret what we have learned from other cultures is a sensitive issue. As I have mentioned several times, many of the patterns we see in the work of different peoples are specifically meaningful to them, sacred even, and they are rightly very protective of their cultural heritage. It is important therefore that we respect these sensitivities and that we do not misappropriate another culture by attempting to copy it.
If we concentrate on learning from others, some of the ways we can do this are to:
• Analyze the use of colour, perhaps very vibrant, then try in our own work to use colour in ways that perhaps we haven’t previously dared.
• Analyze how sometimes quite complex patterns are made from simple shapes that are used ingeniously by repeating and overlapping and through alteration of scale and spacing.
• Recognize how different weights of line give more power to a design.
• Practice in our own work measurement ‘by eye’ rather than with a ruler, seeing how this can energize work.
• Learn a technique that interests or intrigues us, then develop it for ourselves by trying it out in different ways, with different materials.
• Make subtle and respectful reference to the work that has inspired us, perhaps in the use of certain materials and/or decorative elements.

This Navajo basket is woven in natural, plant-dyed fibres. The geometric border has a stylised pattern symbolising the earth, mountains and clouds. The Navajo always leave a space in the border which they think of as the Ceremonial Pathway for the release of the spirits.
Small decorative bag by Hilary Bower, composed of lively bands of geometric patterns built from richly coloured scraps of fabric, and enhanced with machine and hand stitching and small beads. At this point, Hilary was extending her knowledge of pattern by studying other cultures (in this case Native American design), but it can be seen how, from these studies, she developed her own style.
Two contemporary pieces from the Zulu tribe in Southern Africa, purchased in galleries in the UK. The baskets began to emerge in the 1980s when Zulu workers migrated to the cities and began making this version of their traditional coiled ‘Imbenge’ baskets that were used as covers for clay beer brewing pots. These new tightly woven baskets were made from discarded plastic-covered telephone wire in the most amazing woven designs like these above. The baskets have become rare now because the people who made them are said to have damaged their hands manipulating the hard wire and also, in telecommunications, fibre optics have replaced telephone wire. Note how the dynamic zigzag patterns grow from the central spiral motif.

Wire was used, together with brightly coloured glass beads and fabric to make this tightly stuffed member of the cat family that is decorated with geometric shapes. I believe this to be a ‘tourist’ piece rather than traditional.
Bands and borders are an important element in decorative pattern-making and occur in many forms throughout the ancient and modern world. Seen in ceramics, costume and textiles, baskets, jewellery, ritual objects, woodwork, sculpture and architecture, the methods used to create them are as varied as the patterns themselves and largely depend on the materials used.
Band and border patterns of different scale and weight can be combined to compile effective all-over designs with various degrees of density. Widely spaced bands usually have an open, tranquil quality, whilst closely grouped ones can have a stronger effect on each other and seem to give a more complex, dynamic result, as in the Kente cloth described on here.


Two views of a small basket typical of those made since earliest times by the native women from the rain forests on the Panama/Colombia border. This tightly woven basket, made from wild palm-tree fibres that have been dyed with extracts of plant leaves, bark and mud, is technically perfect in its construction. The geometric patterns, thought to be pre-Colombian in origin, show some of the symbols discussed earlier, including the sun motif on the base.
Janet Read intuitively hand stitched this design composed of stripes of different widths on a base of applied fabrics. There are more stripes, both horizontal and vertical, within the main ones, along with zigzag patterns and solidly darned blocks. Additional interest results from the irregular placement of a few oversized blocks that break the flow of the vertical movement of the piece.
Throughout history some textile methods have readily lent themselves to pattern-making by utilizing bands and borders. For example long lengths of narrow strips of fabric woven on small, often portable looms (such as back-strap looms) have traditionally, in many parts of the world, been assembled to form garments or perhaps very large textiles. Dazzling examples of this kind of woven pattern-making are the traditional strip-woven cloths made by the Ashanti and Ewe tribes of West Africa, often referred to as Kente cloths. Made from joined, highly decorative strips, patterned with inventive stripes and often in very bright colours, these textiles are famous for their richness.
Drawing of Kente cloth (above left) showing how the joining of narrow strips of striped weaving results in very decorative textiles. It shows similarities in design to the drawing of a 1980 quilt made in Alabama (above right), home of the Gee’s Bend quilt (see illustration here).
In stitching as in other methods, borders and banded patterns are often used:
• As edges or frames to finish off plain or decorative objects.
• To divide parts of a design into panels or sections, usually allowing a change of scale and creating space.
• As a common link or inception to integrate diverse elements in a design.
• As a way of making large decorative cloths from recycled or small scraps of fabric.
Fine examples of ingenuity and improvisation in the use of recycled and other simple fabrics may be seen in the work of women of African American descent in parts of the USA. The example illustrated above right is a detail of a quilt made in Alabama in 1980, clearly showing a connection, in design, to the Kente cloth above left. In Gee’s Bend, also in Alabama, a group of women have in recent years, become famous for their distinctive quilts, many of which have been favourably compared to abstract paintings. Now much sought after, they are often made from old work clothes and employ great freedom in the use of geometric shapes, bands and stripes.
The Seminole are a group of Native American people, who came from different tribes, including the Creek Nation. Originally from Georgia and Alabama, they were driven south by white colonists and eventually settled in Florida, although later they were forced out of here too. The Seminole are particularly known for their unmistakable style of clothing composed of many ingenious patterns made from strip patchwork. The method involves joining long, narrow pieces of fabric that are then cut and rejoined to make a variety of bands of geometric patterns, some of which are very complex. Many different bands were joined together to make the long skirts traditionally worn by the women of the tribe.

Joined fabric strips from four black-and-white commercial cotton patchwork fabrics.
1 Gather an assortment of different fabrics; mine were all cottons in black, white, neutral and red.
2 Cut long strips from selected fabrics, with seam allowances.
3 Placing right sides together, join the long edges on the sewing machine.
4 Press seams open.
5 Mark and cut strips, as shown below, again with seam allowances.
6 Place the strips together, with alternate strips turned upside down.

The very simple sample on the opposite page illustrates the basic method of making Seminole patterns. Essentially the method could be described as ‘construct, deconstruct, reconstruct’. Very many patterns are possible, and can involve quite complex construction and cutting. A few of the simplest ones are shown below. Although surface embellishment is not part of the traditional Seminole method, there is huge potential for the development of very exciting work if either hand or machine stitching is added to the ‘new’ fabric.
1 Fabric constructed from three strips of fabric. Cutting lines are shown.
2 Cut sections shifted vertically to produce a stepped pattern.
3 The strip construction and cutting in step 1 is repeated. The sections each are stepped down vertically then turned by 45 degrees to produce a square on point in the centre of the design. This ‘new’ band could be joined to others. The dotted line indicates the seam position.
1 Two fabrics are constructed from three strips of fabric as before. The first constructed fabric is cut into sections. The cutting lines are at an angle of 45 degrees to the edges of the fabric.
2 The second constructed fabric is also cut into sections at an angle of 45 degrees but at the opposite diagonal.
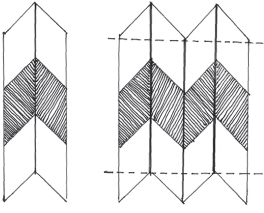
3 The chevron pattern is made by using and joining the sections from step 1 and step 2. The dotted line indicates the seam position.
An experimental sample in which zigzag bands made from Indian turban cotton were applied to a firmer cotton background and then decorated with surface hand stitches.
It would be impossible to survey the richness and variety of pattern made and used by all, or even a few, of the very many cultures known throughout the world for their pattern making. I have chosen, therefore, to focus mainly (but not exclusively) on some of the traditions of Indian stitched decoration that I have experienced at close hand.
Indian stitched textiles cover a huge range of styles and demonstrate great contrasts between those who are affluent and those who are not. While I appreciate fully the skills, refinement and delicacy of the fabrics and decoration found in the richest pieces, on an emotional level I respond very strongly to tribal stitched textiles. The latter group can also be very beautifully stitched and intricate in its patterns, but these textiles often have a very spontaneous and lively quality that seems to have been judged ‘by eye’. Village women, working with very limited resources, have always seemed to possess an instinctive and zestful approach to pattern-making with stitches, colour and fabric. While many of the patterns used are traditional ones that are distinct to a particular tribe or group, nevertheless each woman seems able to put her own creative signature or personality into her stitching.
‘Strip is part of the whole that has been taken away or has to be turned back to the source.’
Kamaladevi Chattopadhyay
(Indian social reformer and freedom fighter, 1903–88)

A border design made in a similar manner to the one on the left with circle motifs set against the curved edge. Stitched with couching, split stitch, chain stitch, straight stitches and French knots and the piped edge decorated with folded fabric points.
For many peoples throughout history, cloth was highly valued and held a symbolic meaning. In India, as in other places in different parts of the world, strips of fabric have been traditionally hung in trees, or on gates and poles as offerings or prayers. More and more strips are added over time until the place becomes a shrine of moving intensity.
Chattopadhyay, quoted above, has also suggested that when strips are rejoined, as in various stitched textile methods, this symbolizes unification.
A stitched method often employed by extremely poor people for whom every scrap is precious because their access to materials is very limited, might be begun by joining small pieces of fabric into a band that is decorated with stitches and other small elements. Other strips are continually added on each side until a larger patterned piece is achieved.
Choose from the methods below to make bands and borders, or combine the techniques to create your own individual work. Soft pure cotton fabrics are advised as those with a percentage of polyester, or other different fabrics, are springy and not easily finger pressed during working to make sharp edges and points. My preferred fabrics are Indian Turban cottons and cotton lawn.

1 Cut out squares of fabric. Fold in half diagonally and finger press, then fold in half again.
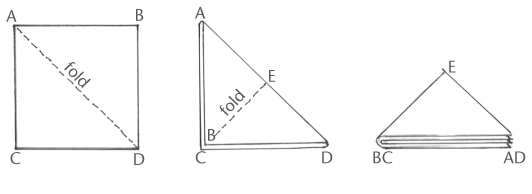
2 Stitch in place in a row beneath the folded under edge of work. A neater look is obtained if all the open folds are placed on the same side of each triangle.
An alternative design is obtained if one side of each triangle is placed inside the fold of the previous one.

1 Lay a band of cotton on a background. Pin firmly in place.
2 Mark equidistant horizontal sections on the band, then mark and cut curves in each section allowing turnings.
3 One section at a time, carefully snip the turnings towards the finishing line with small sharp scissors. Turn under the snipped turnings to produce a nice curve, then finger press.
4 Hemstitch the curved edge before starting work on the next section.

1 On the back a 6cm (2in) wide strip of fabric, mark 3cm (1in) horizontal sections. On alternate horizontal markings, make a 3cm (1in) cut towards the centre of the strip and fold.
2 Flip the strip over so that the right side is upwards and pin firmly in place on a background fabric.
3 Working one section at a time, away from the cut, firmly hold under first one side then the other to produce a sharp point. Make sure that the second fold tucks away the raw edges on the point.
4 Finger press and hem each point making sure that a stitch is carefully worked to hold the point and the ‘v’.
A wider strip can be used to make a double-sided band of points with a space in the centre. This can be used to apply an additional layer of decoration if wished.
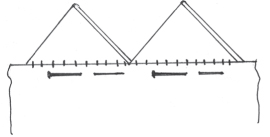
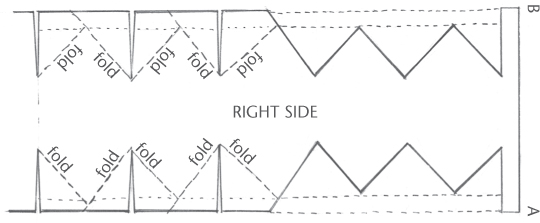
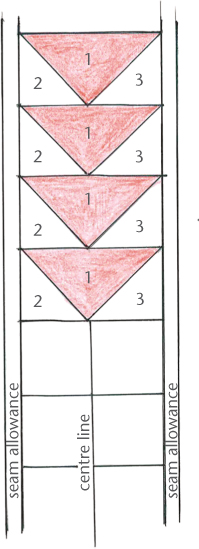
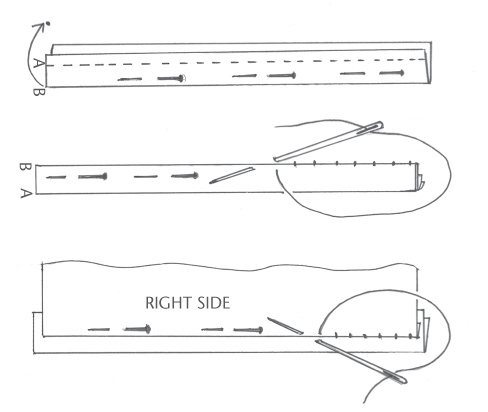
1 You will need a background strip of fabric 6cm (2in) wide, plus turnings. Cut out squares. Cut each in half on the diagonal to make two right-angled triangles. Two colours and three triangles (1, 2 and 3) are required for each repeat of the pattern. The long side of the triangles should be 6cm (2in), plus turnings. Mark out background strip into 6cm (1in) horizontal sections and mark the central vertical line of the strip. Also mark the turnings on each of the cut triangles.
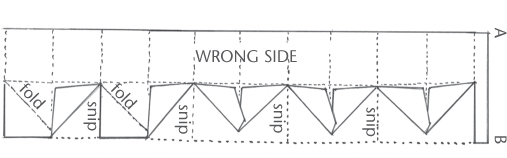
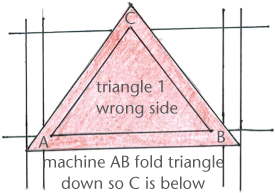
2 Beginning at the top of the strip. Place triangle 1 on the marked strip with wrong side upwards, matching the horizontal line on the background and the fitting line on the long side of the triangle. The right angle is pointing upwards. Machine along this line AB. Fold the triangle downwards and finger press. The right angle is now pointing downwards. Pin into position.
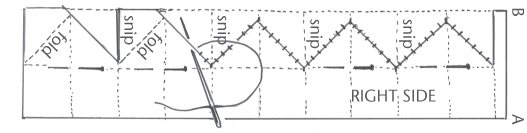
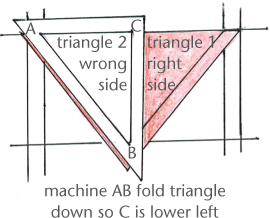
3 Place triangle 2 wrong side upwards, on the left of the strip and matching turnings with the left side of triangle 1. The right angle is to the right. Machine the line CD. Fold triangle downwards, finger press and pin into position.
4 With triangle 3, follow the same procedure as in step 3, but on the right of the strip.

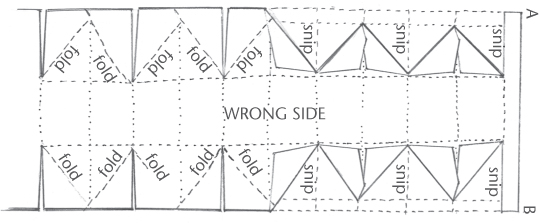
These stages complete one repeat of the design. Repeat, working downwards, until the strip of triangles is complete.
1 To produce a slightly padded applied line, fold a long narrow strip of fabric in half lengthways. Pin in position or on a background. Stitch through the double layer on to background.
2 Fold strip back over stitching, finger press and hem along the fold. The turnings inside create the padding.
A piped edge can be made by placing a similar long doubled strip beneath the folded under edge of a background fabric then hemming it into position. Make sure that the stitches go through both layers of the strip.
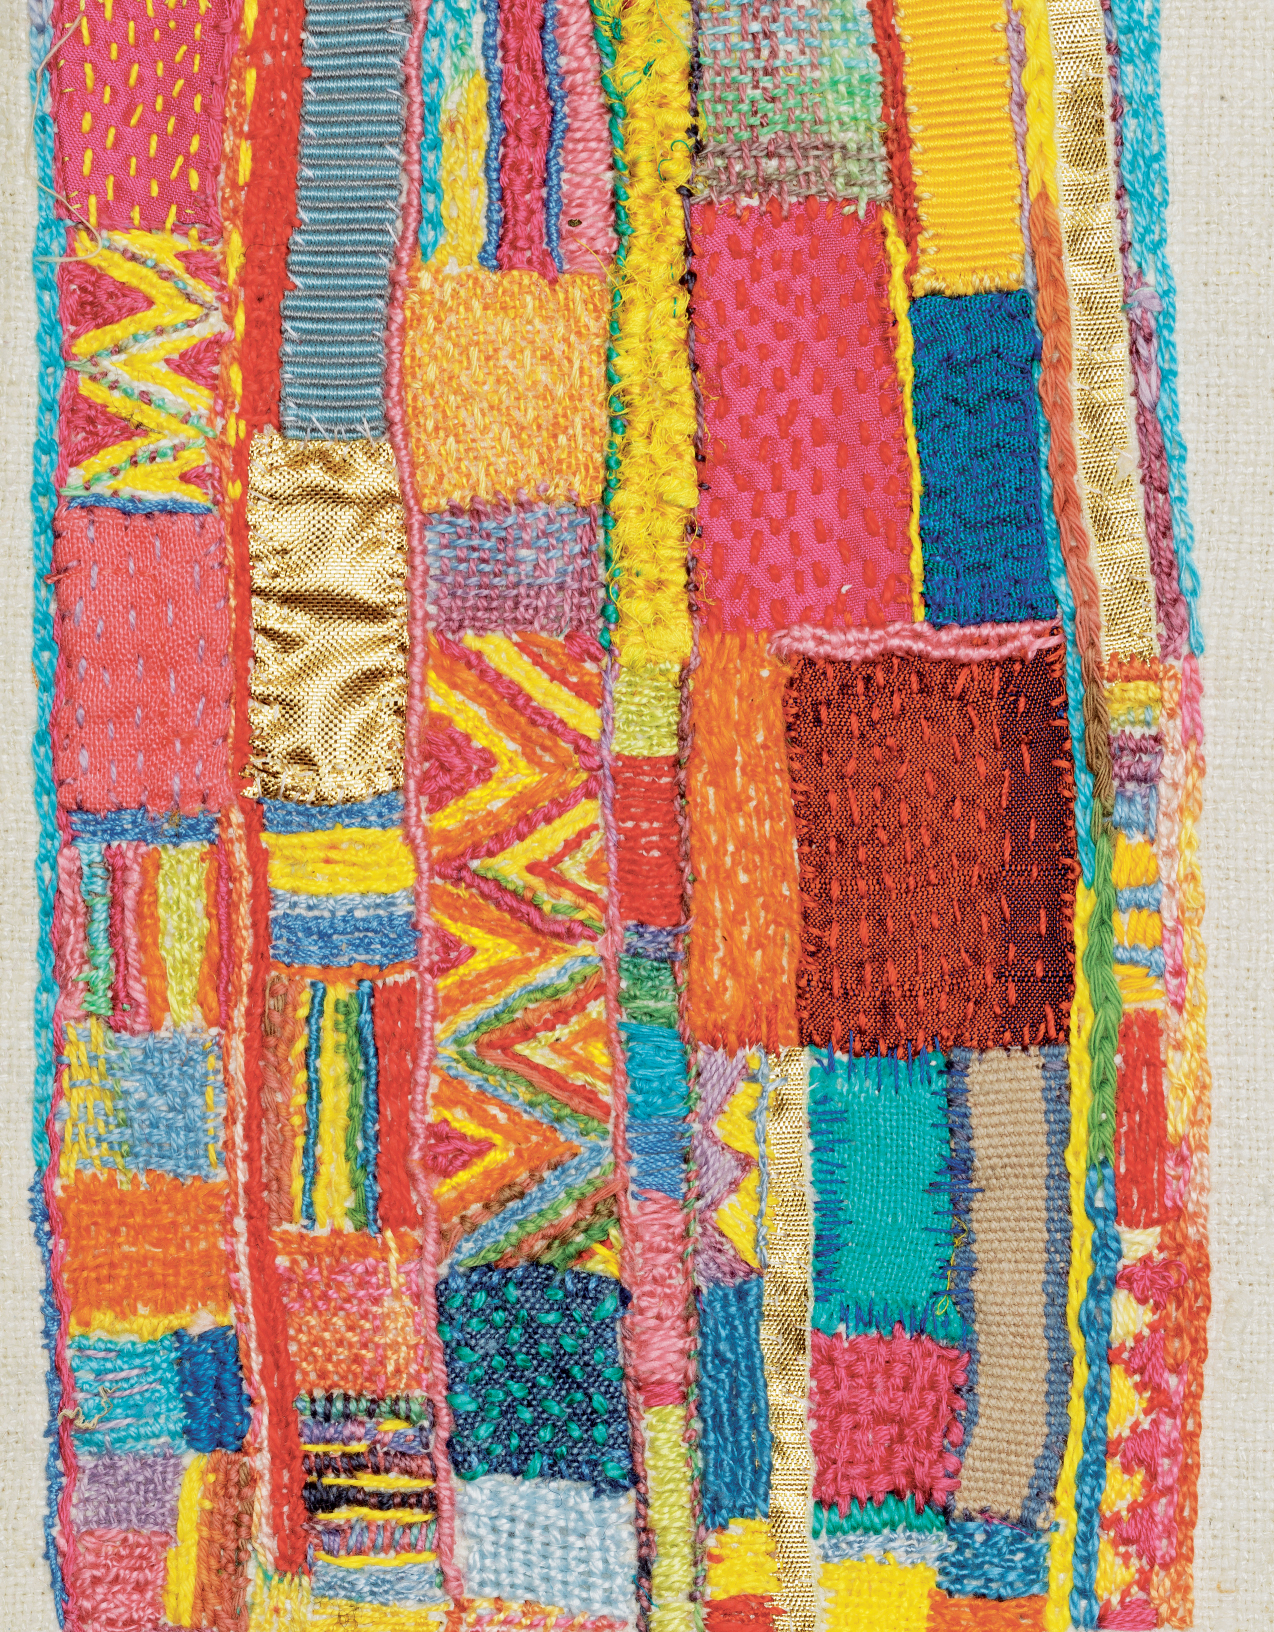
I find it very difficult to throw fabric away and have a large and varied collection, including very small fragments, stitched scraps, perhaps samples or offcuts from the edges of finished work. The hand-embroidered strip (shown right) was assembled intuitively band by band from some of these oddments, using the techniques described on the previous pages. Had I wished, increasing numbers of bands could have been made and added to the first.
A second example (far right) shows how contrasting bands, made separately, can be joined to make a very decorative piece of work. In this piece, horizontal and vertical lines together with squares (both flat and on point) are prominent, giving a sense of cohesion to the design. Notice the importance of negative spaces to the design.
Sometimes a cloth or quilt is assembled starting from a decorative centre to which, working round and round, diverse strips of cloth are joined, thus gradually increasing the size of the square or rectangle to produce a large textile, as in log-cabin patchwork. In India, a cloth made in this manner may then be intensely decorated with intricate hand-stitching that visually amalgamates, or unifies, the whole piece. An example of this construction method is shown in the Indian-inspired quilt (see pages here).

Hand-stitched decorative strip. This sample was stitched intuitively ‘by eye’, gradually adding bands both above and below as suitable scraps were found. A variety of stitched, plain and ruched fabric off-cuts were used together with painted hand-made paper, shisha mirrors, scraps of leather and different sizes of beads and cords. It became apparent, as the strip was made, that an area of vertical stripes was required to contrast with all the horizontal ones.
Made in a similar manner to the strip on the left, this piece was then assembled strip by strip. Three solid strips were offset with an open area composed of individually made squares that were stitched in place ‘on point’. They echo the strip of squares on the left of the piece. Materials used were scraps of plain and mono-printed silks, bright plain cotton fabrics, cotton, rayon and silk threads. Stitches used were raised whip stitch, couching and seeding. The striped vertical joining strip on the left is important as are the firm, piped and stitched edges.
The Banjara are a large, distinctive, semi-nomadic community originating in Northern India, who can now be found in most parts of the subcontinent. The name, derived from Sanskrit, means ‘trader’, denoting a particular community and their hereditary occupation of transporting goods, such as grain, salt and other foodstuffs from one part of the country to another on the backs of bullocks. Traditionally they have maintained their autonomy through their colourful, highly decorative and unique style of dress, by prohibiting marriage with outsiders and often settling in temporary villages outside and separate from towns, cities and other communities.

Waiting for Louis by Janet Read. A lively piece made while the artist was staying with her daughter before the birth of a new grandson. Taking a small damaged piece of genuine Banjara embroidery, placed on a background, as a starting point, the work grew intuitively as scraps of fabric and stitched patterns, related to the original, were gradually added. Stitches used were mainly couching and darning.
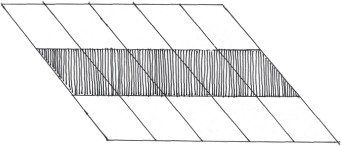
A large experimental sample developed from the Banjara technique. Worked on fine Indigo-dyed felt, zigzag and chevron patterns were made by threading the running stitches with a variety of bold ‘threads’ such as soft string, and torn strips of cotton fabrics.
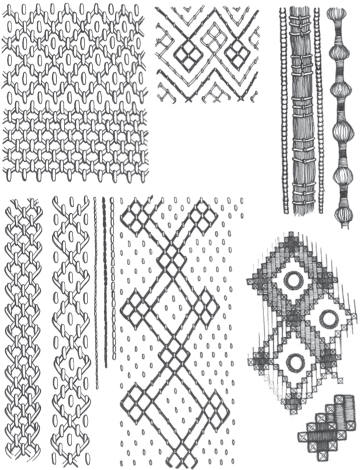
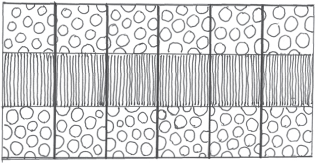
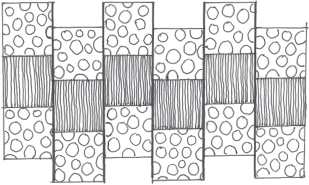
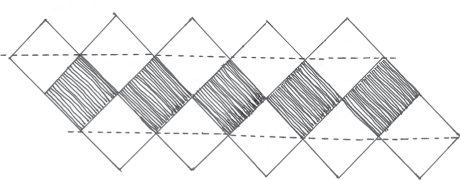
Diagrams of different patterns found in the Banjara threaded running-stitch method (see here). Note the variety possible from the same beginning. It is essential that the running stitches are accurately and correctly placed.
The Banjara are physically strong and hard-working, proud of earning their living through their hard labour. Although their traditional way of trading has diminished with the building of railways and modern commercial practice, some continue to live by selling things and also by cultivation. Others, women included, are often employed in road building and repair as well as general construction work. Early in the morning, wearing their wealth on their bodies, Banjara women can be seen dressed in traditional clothing working on the roads with picks and shovels. Typically they could be wearing red head shawls, full skirts decorated with appliqué embroidery and blouses richly stitched with mirrors. Their arms, legs and feet are usually adorned with heavy and spectacular jewellery.
Renowned for their lyricism, song, poetry and dance, they are especially famed for their unique embroidery. In its detail Banjara embroidery differs from area to area, but the predominant characteristic is geometric pattern. Cowrie shells, for these people a form of money and a trade item of great value, often decorate the edges of work, perhaps in single rows or as heavy tassels. The Banjara use their embroidery for a wide range of purposes, including clothing, ceremonial items and various sized square cloths called rumals. These highly decorative squares are used extensively as covers for wrapping possessions and can also be stitched into envelope-style bags used for the storage and transportation of belongings. Whilst their embroidery incorporating mirrors is wonderfully rich and exciting, I am especially drawn to two other styles: the pieces covered solidly in flat stitches and the quilted work.
Quilted work, often made from layers of recycled fabric to create a substantial background, is covered all over with intricate patterns made from row upon row of precisely worked running stitches that hold the layers together. These are then interlaced on the surface with another thread. The running stitches are smaller than the spaces between each stitch, allowing the innovative interlacing to give a varied and rhythmically linear patterned surface to the whole cloth.

A small sample resulting from studies of Banjara embroideries. Patterns made from shapes solidly stitched with chain stitch and close herringbone stitch.
The solidly stitched embroideries incorporate closely worked chain stitch, closed herringbone stitch, running-stitch patterns and various types of couching. The background fabric, usually hand-woven or other soft cotton, (perhaps recycled) is invariably covered in geometric designs closely stitched in cotton thread in very bright, sometimes clashing, colours. Some of the designs are exact in their symmetry, while others display more freedom and intuition in the approach to geometry. The shapes seem to have been stitched ‘by eye’ and they are used in an irregular manner. Sometimes an odd colour is used to complete a shape where perhaps the worker ran out of the main colour. These pieces are totally innovative and joyful in their management of shape and colour and could be said to resemble some forms of contemporary abstract painting. The surface, in places, can have a manipulated appearance, particularly in the areas covered in chain stitch worked in a spiral manner. For the Banjara, this spiral format has the same symbolic significance as the mirror – that of protection and blessing.

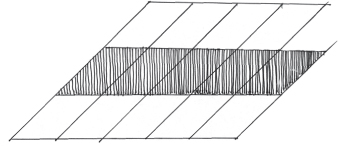
Sample on space-dyed cotton fabric in which chevron patterns were made using different densities and weights of couching and, on the left, closely placed vertical lines of running stitch.
A small abstract embroidery with tasselled edges. It was hand-stitched in the spirit of Banjara embroideries, filling shapes with solid, spirally stitched chain stitch, close herringbone stitch and threaded running stitch. Bright plain and space-dyed cotton threads were used.
FURTHER WORK
• Try to find examples of pattern-making from cultures other than your own. Draw these and make notes about the patterns and the colours used. Find out more about the people who made the work.
• Try sampling some of the border patterns shown in this chapter, putting them together to make wider borders.
• Try assembling, bit by bit, a long strip similar to the one shown on here. Work ‘by eye’ to practice and test your judgment.