CHAPTER SIX
Stand Out on the Playground
This chapter is all about standing out! Get your artwork noticed by using different forms of dimension. These techniques bring focus to the foreground of the collage by moving it forward, literally.
Pop-up images are usually comprised of only one to two pieces; they are basically Shape Cut Outs taking center stage. I love to use foam pop-ups, which can be found in a variety of sizes, shapes and widths, making them ideal to work with in collage. Think about using pop-ups in different depths, layering and stacking images.
Shape collage emphasizes a particular shape within the overall collage. You'll learn how to define an image by piecing it as an individual collage and then applying it to a background. By creating the separate collage shape, you have the opportunity to look at a variety of backgrounds before permanently committing to them.
But don't get hemmed into creating art within a frame — try using the frame to make the art! Wood boxes and shadow frames are great supports in collage art, don't be afraid to collage on all sides. You'll start looking at all sorts of objects as players in your game: window frames, coasters, cutting boards — they all have potential!
The projects in this chapter will stretch the techniques you've already learned by combining materials in unexpected ways to add more details and depth to your artwork. Take this opportunity to keep building your Collage Elements stash with new shapes, colors and subjects.
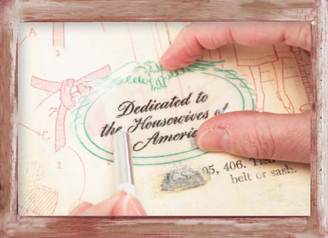
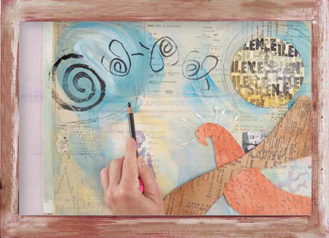
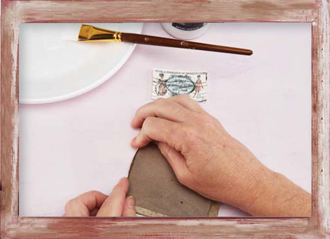
Bandana
Look closely at this piece. Do you see the image on the glass? Isn't it a nice surprise? Shadow frames are the perfect platform to use transparency sheets. Repeated images across the inside of the box and out on the edge give the piece rhythm.
MATERIALS

sandpaper
wood-frame shadow box
acrylic paint in rose, orange, yellow, yellow oxide and white
palette
paintbrushes
matte medium
pages from vintage math book
scissors
craft knife
cutting mat
putty knife
images of women
images of flowers
pencil
color copier
copy paper
window cleaner
paper towels
COLLAGE ELEMENTS
Transparency Art or image of woman's profile on transparency sheet with adhesive back
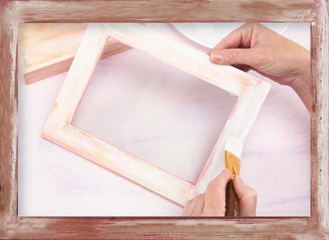
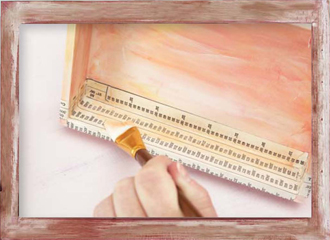
1. Paint shadow box
Using the sandpaper, smooth the surface of the frame.
Pour the acrylic paints onto the palette. Paint the box and frame with the rose acrylic paint and allow to dry. Using a clean, dry brush, paint the box and frame with the orange, yellow and yellow oxide paints, blending them as desired. Allow the paints to dry.
Thin down some white acrylic paint with an equal amount of the matte medium. Using a clean brush, lightly brush the mixture over the frame.
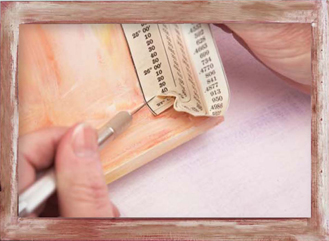
2. Collage paper to inside of box
Using a page from a vintage math book, cut a strip large enough to cover the bottom inside of the box (this example is approximately 3″ × 8″ [8cm × 20cm]).
Apply matte medium to the inside of the box and position the strip, wrapping it around the edges on the inside walls. Use the craft knife to trim any excess paper.
Tip
If you find it difficult to get the paper to lay neatly in the corners and edges, use a putty knife to get into those tight spaces.
3. Blend paper with paint
Using the paintbrush, apply a light coat of paint and matte medium mixture over the collage paper. Allow the paint to dry.
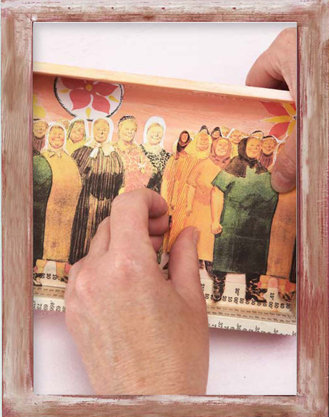
4. Add images of flowers and women
Apply matte medium to the inside of the box to adhere the images of the flowers and women as desired, making sure to wrap the edges on the inside of the box. Use the pencil to outline the women and flowers, if desired.
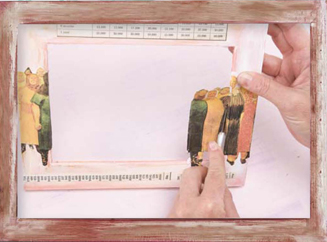
5. Collage frame
Use matte medium to add strips of math pages to the frame and layer on any desired images. Use the craft knife to trim as needed.
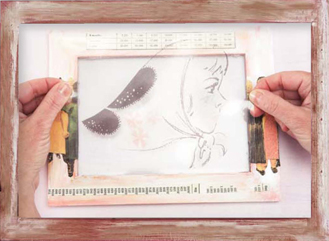
6. Apply transparency art on glass
Search your Collage Elements to see if you have transparency art you'd like to use on the glass. If not, copy an image of a woman's profile on the clear adhesive sheet. Cut the sheet to the size of the glass.
Clean the glass with some window cleaner and a paper towel (spray the window cleaner on the paper towel, not directly on the glass). Allow the glass to dry.
Apply the transparency image to the glass. Smooth down by laying a piece of paper over the transparency for protection and gently pressing with your fingers.
Reassemble the shadow-box frame.
Tip
You may want to consider using color copies of women or try using multiple copies of the same woman repeated as the background for a different look.
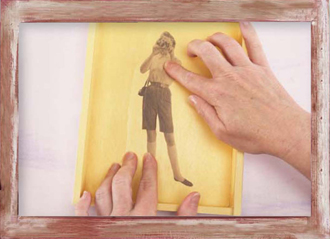
Figure #407
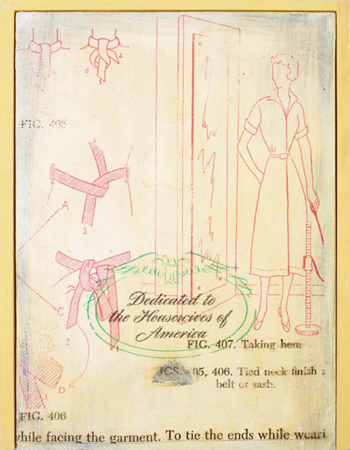
I consider this piece a hybrid interactive with dimension. Slide the door open and view the image within. I loved pulling from the Collage Elements — using Rub-On Transfers, Sticker Paper art and Vellum Elements to create this piece of art. Take a look at your stash and find something that speaks to you.
MATERIALS
sandpaper
small unfinished wood box with lid
acrylic paint in yellow, gray and white
palette
paintbrushes
graphic images of sewing instructions
tracing paper
scissors
matte medium
putty knife
craft knife
Double Tack Mounting Film
image of woman printed on Kodak Premium Photo Paper for the inside of box
embroidery scissors
COLLAGE ELEMENTS
Rub-on Transfers
Sticker Paper art (optional)
Vellum Elements (optional)
1. Prepare box
Using the sandpaper, smooth all sides, inside and out, of the box and all sides of the lid.
Pour the acrylic paints onto the palette. Paint the box and lid with the yellow paint. Let the paint dry. Using a clean, dry brush, paint selected areas of the box with gray and white paint, using quick brushstrokes.
Copy the graphic images of sewing instructions onto the tracing paper. Cut strips to fit the sides and back of the box and the top of the lid. Using the matte medium, adhere the tracing paper to the bottom of the box.
2. Smooth tracing paper
Use the putty knife to smooth down any wrinkles or bubbles. Allow the matte medium to dry.
Apply the remaining pieces of tracing paper in this fashion until all sides of the box are covered. Use the craft knife to trim excess paper as needed.
3. Apply rub-on transfer
Choose a rub-on transfer from your Collage Elements and add it to the lid of the box. Do you feel your art needs more? Pull some stickers or images printed on vellum from your stash of Collage Elements to complete the look you desire.
Using the sandpaper, lightly rub the transfers to give them a distressed look.
4. Adhere woman's image to inside of box
Apply Double Tack Mounting Film to the photograph of the woman. Use the embroidery scissors to cut out the image. Apply the image to the inside of the box.
Tip
If you plan on handling the box, I recommend spraying it with a matte seal spray for protection.
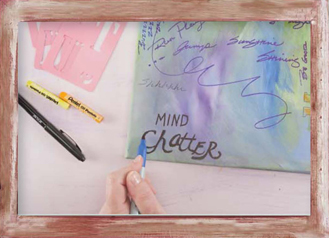
Small Talk

“Mind Chatter” is what I call the nonstop thoughts that can run through my mind as I try to sleep. You know what I am referring to — the never-ending list of things to do.
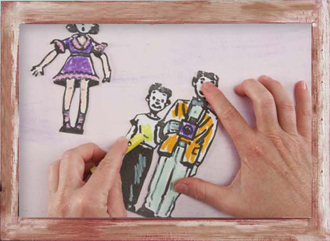
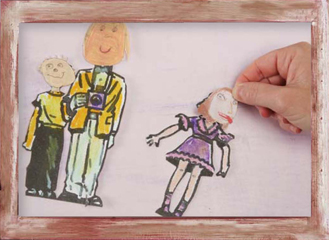
Small Talk is my visual representation of this thought process. This piece was fun to create — the background is comprised of graffiti and random thoughts. Give it a try; let this art release your thoughts and turn them into art! How are you going to fit everything in your head onto this small canvas? I say be selective and choose only two or three topics. Working in smaller sizes can sometimes help eliminate being overwhelmed by big ideas.
If you want to put your spin on this idea, pull out your stash of Collage Elements and spontaneously add them to the background: stickers, Rub-On Transfers, transparency sheets — whatever floats your boat! Express yourself without editing and reflect your “mind chatter.”
MATERIALS
vintage illustrations of children (for the bodies)
color copier
copy paper
proportion wheel
Double Tack Mounting Film
white cover stock paper
scissors
oil pastels
original drawings by children (for the heads)
acrylic paints in blue, green, purple and white
palette
paintbrushes
8″ × 10″ (20cm × 25cm) gallery wrapped canvas
fine-tip markers in black and blue
alphabet stencil with 1″ (3cm) letters (optional)
sandpaper
self-adhesive foam pop-ups
Tip
Have fun with your version of this artwork! Write down the silly and crazy things that float through your head. Use your creativity and incorporate shapes and styles of letters. Explore different ways to position the letters, including a mix of handwriting and stenciling.
1. Prepare images
Make black-and-white copies of the vintage illustrations. Reduce or enlarge as needed to fit the canvas.
Add Double Tack Mounting Film to the back of the images and adhere them to a sheet of cover stock. Using the scissors, cut the images out.
With the oil pastels, color in the body of your images as desired.
2. Add heads
Make color copies of the children's drawings. You will only be using the head on each of the figures. The size of the head and the body need to complement one another, so reduce or enlarge the images as needed. Use the proportion wheel to aid in these calculations.
Add Double Tack Mounting Film to the backs of the heads. Using the scissors, cut the images out.
Peel the backing of the Double Tack Mounting Film and adhere each head on top of the existing head of each figure.
3. Add graffiti and stencil
Paint the canvas blue, green, purple and white, blending the colors to your desired look. Allow the paint to dry.
Using markers, and stencils if desired, write thoughts and phrases on the canvas. Fill in any stencil letters with oil pastels.
When all your graffiti is complete, scribble lines over the entire canvas with the oil pastels. Use the sandpaper to blend the oil pastels into the background. With a clean brush, remove grit from the canvas.
If desired, add more items from your Collage Elements stash to make the piece your own.
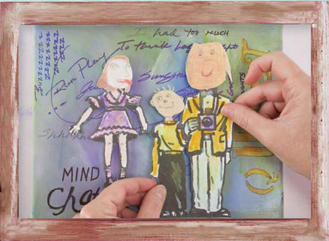
4. Add pop-up images
Adhere the foam pop-ups to the back sides of the images. Position the images on the canvas as desired.
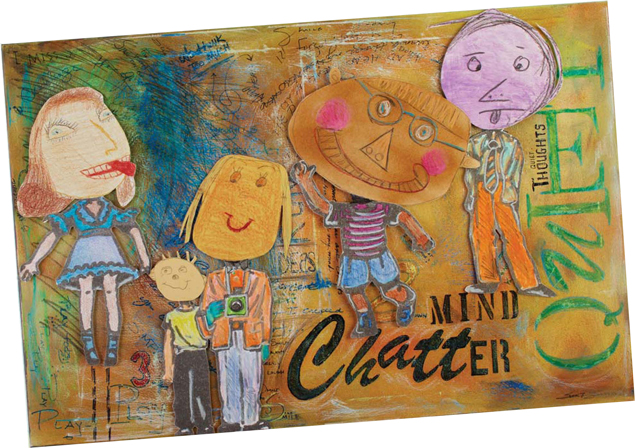
Mind Chatter
While I love the intimate feel of Small Talk, this larger piece definitely has great impact. The size alone forces the viewer to smile at the whimsy of each character, while encouraging to come closer to read the background graffiti.
Sounds of Silence
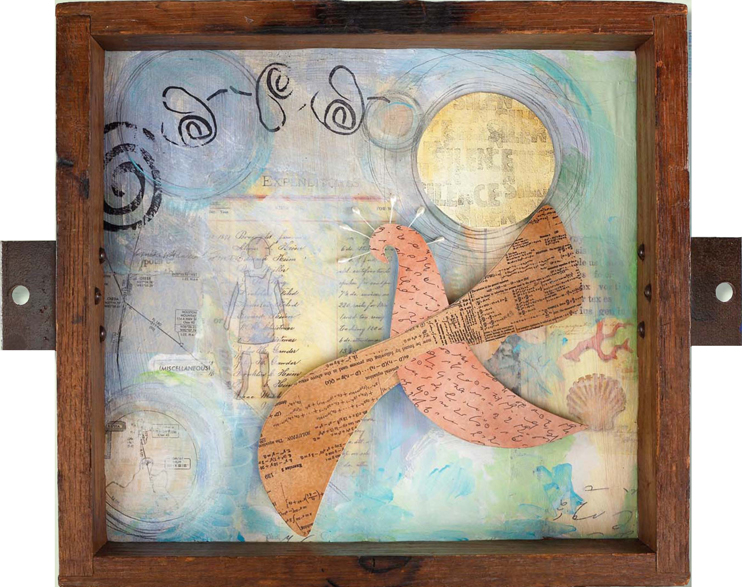
Some days I crave the sounds of silence. No radio, no television, nothing — just the sound of my studio, breathing in and out. Turn off all noisemakers, even the phone, look around your studio and start to make art. Gather a combination of Collage Elements, vintage papers, paint, stencils and rubber stamps to help create a soothing piece of art.
MATERIALS
2 pieces of 16″ × 20″ (41cm × 51cm) 100-lb. vellum finish bristol paper
vintage imagery and illustrations
vintage book pages of shorthand, maps, math and ledgers
matte medium
stencil template (I used a stencil from Fun with Family Stencils by Dover Books)
colored pencils
putty knife
palette
acrylic paint in yellow oxide, yellow, blue, green and white
paintbrushes
sandpaper
pencil
sketch paper
Double Tack Mounting Film
craft knife
cutting mat
two-sided tape
pearl embellishments
self-adhesive foam pop-ups
canvas paper
scissors
rubber stamps of your choice
black ink pad
7″ × 16″ (18cm × 41cm) shadow-box frame
staple gun
COLLAGE ELEMENTS
Altered Book Pages
Tip
Adding matte medium to acrylic paint will make the paint transparent. The more matte medium you add to the paint, the more transparent it becomes.
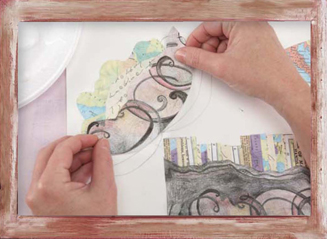
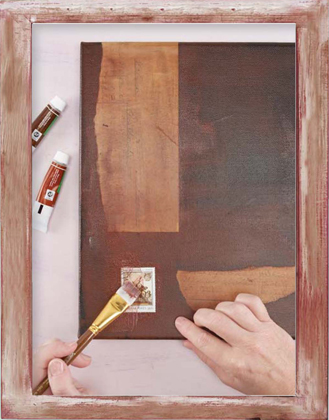
1. Collage background
Create a collage background on a piece of bristol paper. Tear different sized strips of papers and apply to the sheet of bristol paper with matte medium. Allow the matte medium to dry. For added interest, use a stencil and trace with a pencil into the background. Use colored pencils to color in the stencil. Smooth down the collage paper with the putty knife if needed.
Prepare your paint palette with small amounts of both yellows, blue, green, white and matte medium. Mix the matte medium into each color before applying to the background. Brush strokes of paint randomly throughout the background, allow the paint to dry. Distress the painted surface with sand-paper.
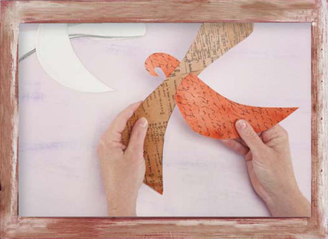
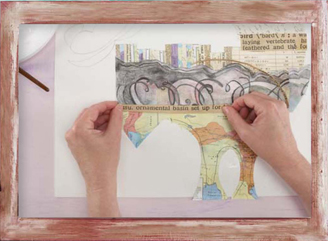
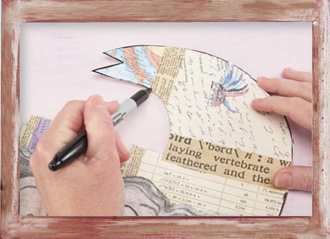
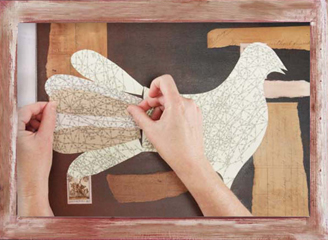
2. Create and assemble bird
Using the sketch paper and pencil, draw an abstract image of a bird. The bird is composed of two separate pieces — the wing and the body. Use the sketch to make two separate Shape Cut Outs of the wings and the body on the second piece of bristol paper.
Fit an Altered Book Page to the body of the bird and the wings, using two different page designs to give them contrast. Apply Double Tack Mounting Film to the Altered Book Page and adhere them to the bird body and wing. Place the pieces facedown and trim the excess paper with a craft knife.
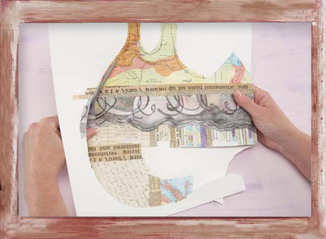
Cut a single slit in the middle section of the wings and slide the wings down the body of the bird, securing the back of the wings with a small piece of two-sided tape.
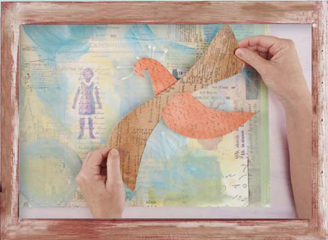
3. Add bird to canvas
To add the pearls to the head of the bird, adhere two-sided tape to the back of the head and gently press the pearls into place.
Add the pop-up adhesive dots or squares to the back of the bird. Position the bird on the background and press gently to adhere it to the background.
Tip
Position the sticky dots on the bird at different points — such as the head, wings, body and tail — to ensure the stability of the bird on the canvas.
Tip
For this project, I chose to reinforce the theme by adding the word “silence,” but you can use any stamp. This particular stamp is made up of adhesive rubber sheets and separate wood blocks. There are so many types and styles of rubber stamps out there; the options for your own artwork are virtually endless!
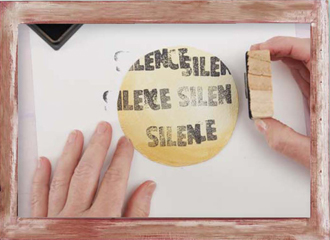
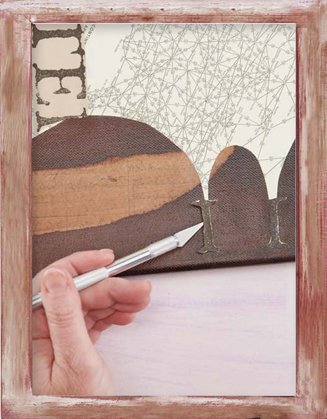
4. Embellish sun
Trace a 4″ (10cm) circle on the canvas paper. Paint inside the circle with yellow paint. Allow the paint to dry, and cut out the circle.
Place the sun shape on a piece of scrap paper. Using a rubber stamp of your choice and black ink, stamp across the painted canvas circle. Let the ink dry.
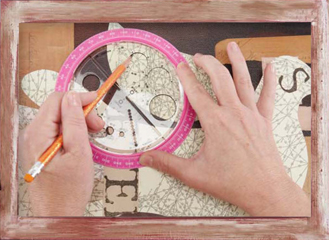
5. Embellish background
Use the pop-up adhesive to adhere the canvas circle piece to the background.
Embellish the background further by adding more rubber-stamp designs. Using the pencil, draw lines and circles to enhance your art.

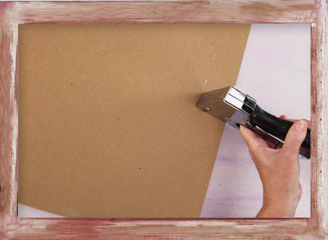
6. Mount art to a shadow frame
Pick up the shadow frame and determine the front and back of the frame. Position the art facedown on the back of the frame. Using the staple gun, secure the artwork to the frame. Trim away any excess paper from the frame with the craft knife.
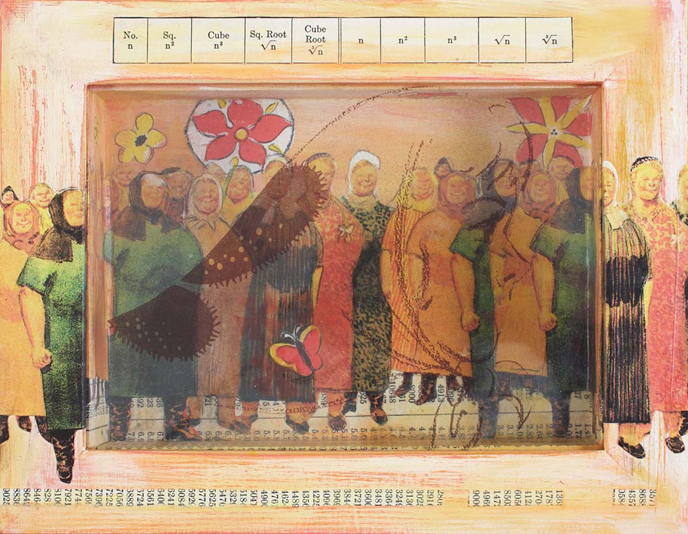
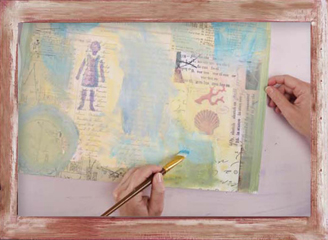
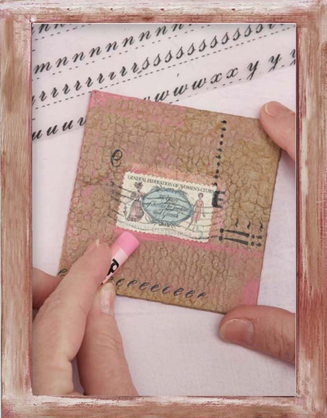
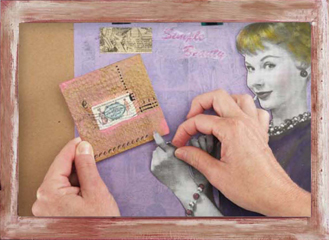
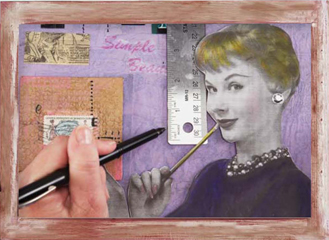
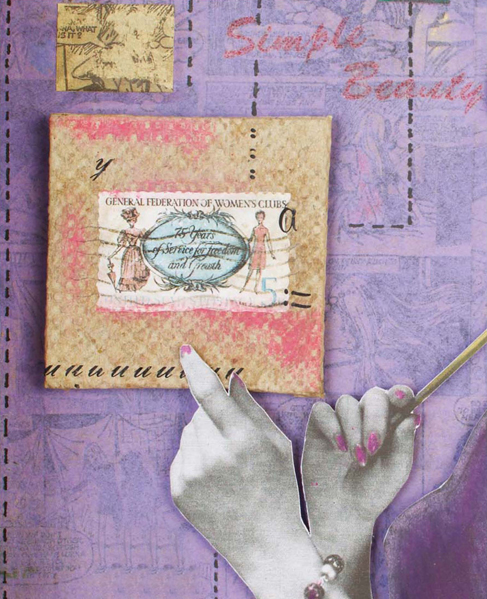
Join the Women's Club
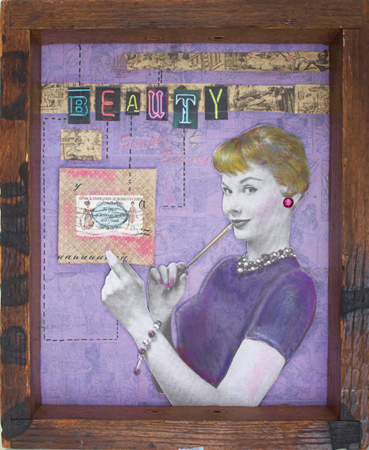
When I came across the image of this woman, her look was so intriguing that my first thought was, “a retro Mona Lisa.” Postwar life for women in the 1950s was considered modern, with new and fancy appliances, gadgets and, especially, the influence of Hollywood.
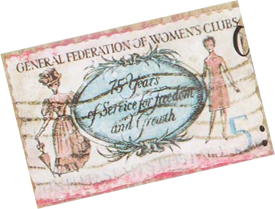
My intent was to showcase the mystery of this young woman, along with the unity women were feeling at this time through women's clubs and other social groups. This is emphasized in the vintage postage stamp sitting above her hand. The juxta-position of the piece is the subtle background of graphics with scenes of a woman clearly in distress, contradicted by the line “simple beauty.”
Tip
The use of pop-up foam adhesives in your artwork is a great technique to bring the viewer into your piece. Creating dimension within a two-dimensional surface allows you to showcase a particular image and idea.
MATERIALS
comic or graphic illustration
color copier
3 sheets of manila drawing paper 8½″ × 11″ (22cm × 28cm) (to print comics for background)
iron
fusible webbing
12″ × 17″ (30cm × 43cm) piece of chipboard
colored tissue paper
scissors
matte medium
putty knife
purchased rub-on letters (the word “beauty”)
burnisher
sandpaper
paintbrushes
image of retro woman
8½″ × 11″ (22cm × 28cm) sheet of sticker paper
8½″ × 11″ (22cm × 28cm) sheet of white cover stock
oil pastels
paper towels
2″ × 2″ (5cm × 5cm) piece of chipboard
textured kraft paper
wax paper
heavy book
vintage postage stamp
self-adhesive foam pop-ups
small flat-backed crystal
fine-tip black marker
metal ruler
14″ × 19″ (36cm × 48cm) shadow box frame
staple gun
craft knife
cutting mat
COLLAGE ELEMENTS
Rub-On Transfers of text (the phrase “simple beauty”)
1. Prepare background
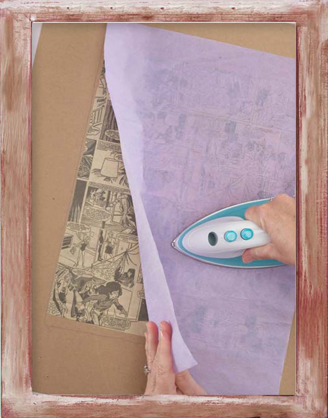
Make three copies of the comics or graphic illustrations on the manila drawing paper. Iron the fusible webbing onto the back of two of the copies. Fuse these two pages onto the piece of 12″ × 17″ (30cm × 43cm) chipboard.
Iron the fusible webbing onto the colored tissue paper. Lay the tissue paper on the background and use the iron to fuse it to the background.
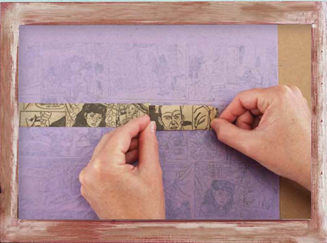
2. Apply comic strips to background
With the third copied sheet of manila paper, cut out strips of the comics. Use matte medium to adhere the strips of the comics or graphics across the top of the background. Smooth down with a putty knife, if needed.
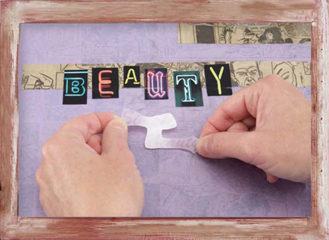
3. Add Rub-On Transfers
Use Rub-On Transfers, either purchased or from your Collage Elements, to enhance the theme. If using purchased transfers, follow the manufacturer's instructions.
(For this piece, I used letters from the set Urban Letters by Letraset to spell out the word “beauty.” The phrase “simple beauty” came from my Collage Elements stash.)
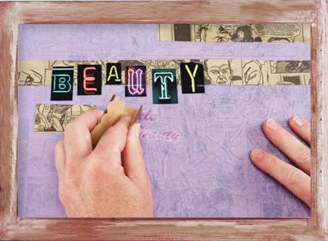
4. Distress background
Using the sandpaper, gently distress the background, including the Rub-On Transfers. When you are satisfied with the look, brush off any grit with a clean brush.
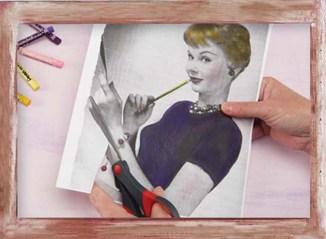
5. Create sticker paper image
Make a Sticker Paper image of the woman. Adhere the sticker paper to a sheet of the white cover stock paper.
Color in and embellish the image with the oil pastels. Use the paper towels to blend the oil pastels. Use the scissors to cut out the image.
6. Create vintage stamp piece
Using the matte medium as the adhesive, cover the 2″ × 2″ (5cm × 5cm) piece of chipboard with the textured kraft paper. Fold edges of the craft paper to the back of the chipboard for a neater look. Allow the matte medium to dry.
Tip
To keep the chipboard from curling or warping after the matte medium has been applied, place the chipboard faceup on a hard surface, cover it with wax paper and put a heavy book on top. This will weigh the chipboard down while it is drying, preventing it from warping.
7. Embellish vintage-stamp piece
Use the matte medium to adhere the vintage postage stamp to the front of the piece created in step 6. Allow the matte medium to dry.
Use Rub-On Transfers, either purchased or from your Collage Elements, to enhance the theme. Repeating a letter, alternating letters or turning them upside down or sideways creates a cool design.
Embellish the piece with oil pastels.
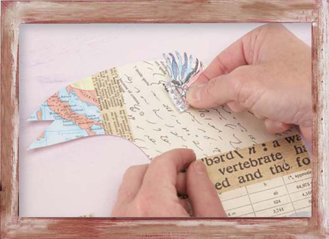
8. Adhere images to background
Add the pop-up adhesives to the back of the woman and place the image on the background. Use matte medium to adhere the flat-backed crystal as an earring.
Add the pop-up adhesives to the back of the vintage-stamp piece. Slide the small square under the woman's finger and adhere it to the background.
9. Embellish with black marker
Using the black marker and ruler, plan your lines, linking the images within the composition to one another.
Tip
Because of the rarity of vintage postage stamps, you may want to make a color copy of the original stamp.
10. Affix art to shadow-box frame
Pick up the shadow frame and determine the front and back. Position the art facedown on the back of the frame. Using the staple gun, affix the artwork to the frame. Trim any excess paper or chipboard away from the frame with the craft knife.
Detail of Join the Women's Club
Contemplate Bird
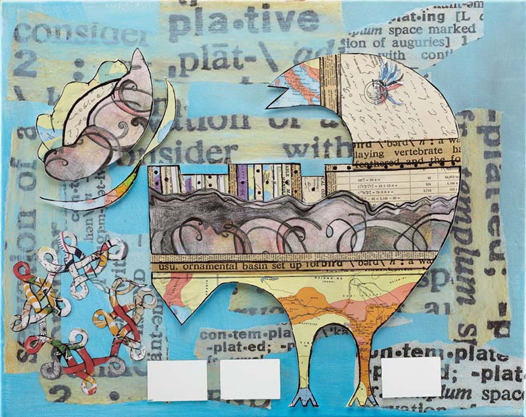
I have an old paperback dictionary I like to use for collage projects because the slightly aged pages add wonderful qualities to my art. The design the words make on the page are art in themselves. When developing this piece, the word “contemplate” jumped out at me. I am forever contemplating art; what about you?
Take a look at the symbol in the lower left corner of the artwork. I pulled it from my stash of Collage Elements: It was appropriate for this project because it is derived from an ancient symbol meaning “to contemplate.” See what unique imagery you can come up with while digging around in your stash of Collage Elements.
MATERIALS
acrylic paint in blue and white
palette
paintbrushes
12″ × 16″ (30cm × 41cm) gallery wrapped canvas
dictionary page “contemplate” entry
color copier
proportion wheel
copy paper
matte medium
putty knife
pencil
11″ × 14″ (28cm × 36cm) piece of 100-lb. bristol paper, with a vellum finish
11″ × 14″ (28cm × 36cm) sheet of Double Tack Mounting Film
fine-tip black marker
vintage book pages from shorthand and math books
pieces of unfinished artwork, sketches or drawings
vintage maps
scissors
craft knife
cutting mat
vintage postage stamp
3 mirrors 1″ × 2″ (3cm × 5cm)
COLLAGE ELEMENTS
Altered Book Pages
Textile featuring a symbol
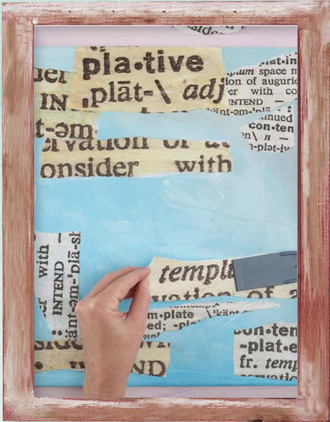
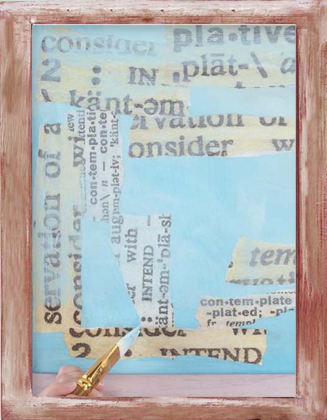
1. Prepare background
Pour the acrylic paints onto the palette. Using the paint-brush, paint the canvas light blue, including all four sides. Allow the paint to dry.
Find the word “contemplate” in the dictionary; cut out and manipulate it at different sizes on a copier. You will need several copies.
Tear strips of the copies of the word “contemplate” and layer the paper using matte medium. Use the putty knife to smooth down the paper and eliminate bubbles.
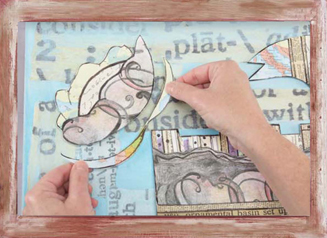
2. Collage bird image
Sketch a simple shape of a bird on a piece of bristol paper. Trace over the final design with the fine-tip black marker. Adhere Double Tack Mounting Film to the back.
Take a look at your bird sketch and decide which areas you want to define.
Layer the assorted papers onto the sketch, cutting where needed to fit. For those areas that are hard to fit (in this case, the bird's legs), add more paper than is needed and sketch the original lines onto the added paper. You will use these lines later to cut out the shape.
Use a clean paintbrush and matte medium to adhere the papers onto the sketch. Use the putty knife to smooth the papers.
Tip
Select a variety of papers and don't forget to use your own artwork. Incorporating fragments such as unfinished drawings or sketches gives the collage a degree of personality.
3. Layer to create bird's tail
Continue layering paper on the sketch until you have completed the collage. Allow the matte medium to dry.
4. Cut cut bird collage
Using the scissors and craft knife (for detailed areas), cut out the bird and tail.
6. Embellish details
Enhance the bird by adding details. I have selected a vintage postage stamp for the eye.
7. Outline with black marker
Using a fine-tip black marker, outline the bird's shape and embellish within the bird's body. I drew lines and circles to define areas.
8. Blend collage paper with paint
Using a mixture of the light blue acrylic paint and matte medium, brush a layer over the paper to help blend the paper with the background. Allow to dry.
9. Adhere bird to background
Peel the backing off the Double Tack Mounting Film, position the bird on the canvas and adhere. Once you have completed all collage applications, flip the canvas over and apply weight to the back. Allow to set for an hour.
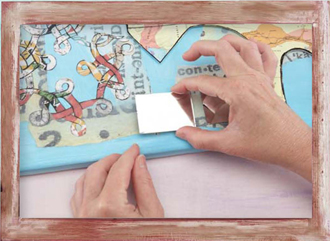
10. Add symbol and mirrors
Embellish the artwork with a symbol from your Collage Elements stash. Add the mirrors by brushing a coat of matte medium to the back of the mirror and gently pressing down on the canvas. Once all the mirrors are applied, allow the art to set flat, undisturbed, for one hour.
Head in the Clouds
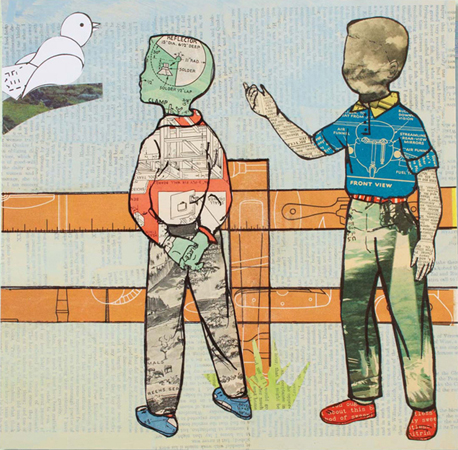
Using a vintage boys' magazine seemed ideal to collage this graphic illustration of two boys. The diagrams and charts convert easily to shirts and pants. Look for compatible materials when you are developing your collage. Think about how collage pieces can translate into images.
MATERIALS
acrylic paint in blue and white
matte medium
palette
vintage book pages
11″ × 14″ (28cm × 36cm) bristol paper
putty knife
paintbrushes
graphic image
medium-tip black marker
images of two boys
vintage boys' magazine illustrations, graphs and diagrams
color copier
scissors
Double Tack Mounting Film
pencil
craft knife
cutting mat
vintage magazine illustration (for tree branch)
image of bird
COLLAGE ELEMENTS
Altered Book Page

1. Collage and paint background
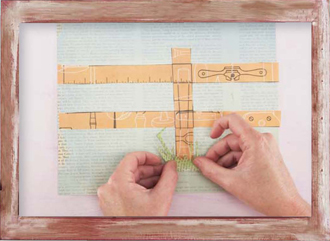
Adhere book pages to the bristol paper using matte medium; use the putty knife to smooth out and remove bubbles. Pour the matte medium and acrylic paints onto the palette. Cover the entire surface. Allow the matte medium to dry. Paint background with light blue acrylic paint, set aside to dry.
To make a fence, cut three strips from an illustration and adhere them with matte medium. Cut grass out of an Altered Book Page. Using the matte medium, adhere to the fence post at the bottom. Use the putty knife to smooth down paper, if needed. Allow the matte medium to dry.
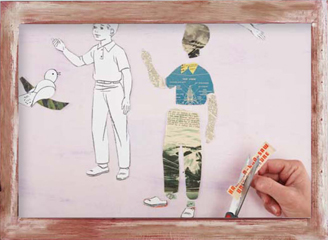
2. Cut shapes for boys' images
Make two to three black-and-white copies of the two figures and cut figures into sections (head, shirt, arms, pants, shoes, etc.). You may divide the figures into as many sections as you desire.
Look at the magazine pages and decide which will be the head, shirt, arms, pants, shoes, etc. Apply Double Tack Mounting Film to the back of the magazine selections. Trace their corresponding shapes and use the scissors to cut them out.
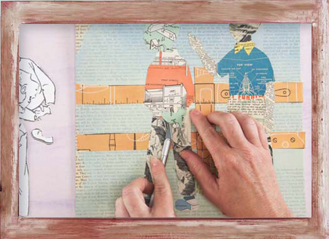
3. Assemble figures on background
Adhere the figures to the background. Remember to work from back to front when assembling the figure (for example, the shoes will be adhered before the pants). Use the craft knife to help peel backing from the Double Tack Mounting Film.
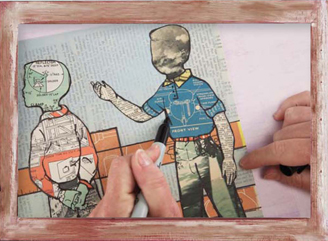
4. Embellish shapes
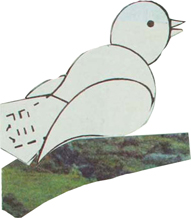
Adhere Double Tack Mounting Film to the back of a small rectangle of a vintage magazine illustration. Using the scissors, cut a branch shape out and adhere it to upper left corner of the background. Place Double Tack Mounting Film on the back of the bird. Cut out the bird and adhere it on top of branch.
Using the medium-tip black marker, outline the shapes, draw in lines and define areas of the figures. Make the figures as personable as you desire.

Typecast
People often ask me how I select a particular book or book page for my collage work. What is it I'm looking for? Usually it is the graphics or quality of print within the book, but sometimes, like in reference to this project, it is an emotional connection to the material.
I came across a vintage typing manual and immediately laughed out loud. Why? Oh, the many, many hours spent in typing class, trying endlessly to type (with accuracy) as fast as I could. Therefore, I couldn't resist the book and using the cover image for a collage piece. The bright orange and flowing line of the words felt perfect for an evening dress on my retro woman. When something engages your emotion, go with it, trust it and make it a part of your collage!
Royal Bird
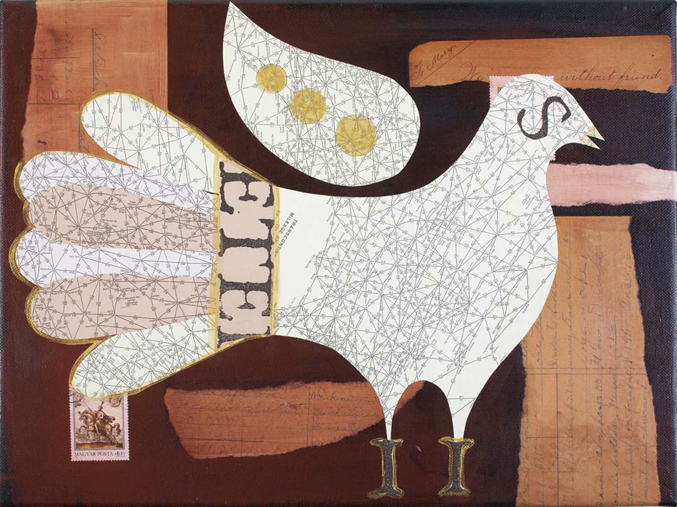
Peacocks are such regal birds with their beautiful colors and spanning feathers. I wanted to create a piece of art that was similar but more understated than Contemplate Bird. I found a map with intricate graphics to use for my bird and used pastel paper to introduce color. Bringing in metallic gold pushed the bird into a royal state. What colors, images or texture emphasize royalty to you? Look at the shape of your bird; how can you express elegance?
MATERIALS
acrylic paint in black, burnt sienna, burnt umber, gold metallic
matte medium
palette
12″ × 16″ (30cm × 41cm) gallery wrapped canvas
paintbrushes
torn pieces of vintage letters
putty knife
2 vintage postage stamps
pastel paper in assorted colors
vintage maps
scissors
color copier
pencil
sketch paper
text (for eye, legs and band)
proportion wheel
craft knife
cutting mat
circle template
1. Layer paper on canvas
Pour the acrylic paints and matte medium onto the palette. Paint the canvas black, including all four sides. Set aside to dry. Once the canvas has dried, tear strips of paper and begin layering the paper using matte medium. Use the putty knife to smooth down the paper and eliminate bubbles. Add vintage stamps as embellishments. To help blend the starkness of the paper and stamps onto the black background, add a small amount of matte medium to a neutral-colored paint (I used burnt umber and burnt sienna) and brush over the entire canvas.
2. Add bird shape
Cut three sheets of yellow pastel paper, one sheet of tan, and one sheet of buff to 8½″ × 11″ (22cm × 28cm). Make copies of the map onto these sheets of paper.
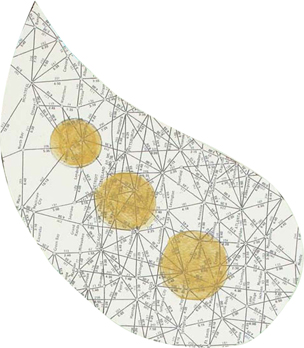
Sketch a simple shape of a bird and use this sketch to make a template. Use the template and trace the bird's body and wing onto the yellow paper, and cut out. With the remaining papers, trace and cut out the feathers, making the feathers slightly different shapes and sizes. You will need approximately four feathers from each color of paper.
Using the matte medium and a clean brush, assemble the bird on the background (it is important you use a clean brush because you do not want to get paint on the bird). When adding the feathers, alternate different colors and shapes.
3. Add letters and text
With the copier, enlarge a band of text and letters for the bird's legs (I) and eye (S), and copy them onto a sheet of tan pastel paper. Cut out the band. The size should cover where the feathers meet the bird's body. Cut out the letters for the legs and eye.
Use the matte medium to adhere the band of text over the area where the bird's body and feathers meet, hiding the seam lines. Adhere the individual letters to their appropriate spots. If needed, use the blade of the craft knife to gently position the letters. If you desire, continue to embellish with more text and letters.
4. Draw circles
On the bird's wing, use a circle template to trace three circles (each one a different size).
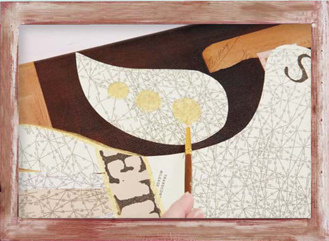
5. Embellish with metallic paint
Enhance the bird with gold metallic paint. Fill in the circles on the wing and outline the feathers and legs.