Chapter 13
Embellishments
There are numerous flourishes you can add to your knitting: beads, cords, braids, and tassels are just a few. Don’t assume that these additions are superfluous. Embellishments can be used to secure loose ends of yarn and to cover mistakes. Fringes neaten up uneven edges and can be used to join two layers of a scarf or a seam together. The weight of a tassel can effectively hold the flap of a purse closed or keep the point of a shawl stretched.
Beads
Q:
Can I add beads to my knitting?
A: Yes. You can string them on your yarn in advance and then position them on the surface of the fabric as you knit; you can hook each one onto the stitch as you knit it; or you can sew the beads on later. Here’s how to accomplish each method:
Prestringing Beads
This is a good choice if you know beforehand exactly how many beads you will need, and if it’s easy to string the beads on your yarn. Use a smooth, tightly spun yarn. If the yarn is textured, fragile, or loosely spun, the simple act of stringing may damage it. Be sure to choose beads with holes large enough for the yarn to fit through comfortably. You may need to use a small round file to smooth the inside of the beads.
How to do it:
- 1. String all your beads onto one ball of your yarn, but don’t use this ball until you get to the point where you actually need the beads.
- 2. At the beginning of the first beaded row, switch to the yarn with the beads on it. Knit to the point where you want a bead. Bring the yarn forward, and slip the bead along the yarn close to your knitting.
- 3. Slip the next stitch purlwise, bring the yarn to the back of the fabric, and knit the next stitch. This places the bead on a strand of yarn in front of the fabric, with the yarn going through it horizontally.
As you knit, you’ll probably need to slide all the unused beads down the yarn to keep them out of your way. When you’ve finished a beaded area and are ready to knit a section with no beads, change back to one of the balls of yarn without beads. (For more on bead knitting, check Durant’s Knit One, Bead Too; Hershberg’s Betsy Beads; and Morris’s The Beading Answer Book; see Resources.)
The instructions above assume that you’re just placing one bead at a time, but you can also effectively place groups of beads on the surface of the knitting by slipping several stitches in a row with the yarn in front, and then slipping a group of beads onto the loose strand to form a swag.
See also: The Slipped Stitch.
Beading Your Knits
Regardless of the method you use to attach the beads to your knitting, beware of placing them too densely. Beads can make the fabric very heavy and cause most knitted fabrics to stretch. You may want to place them only in borders or scatter them lightly across the fabric. In most cases, place the beads no closer than every other stitch and every other row. A good effect can be achieved by placing them farther apart.
Q:
Can I add beads at the cast on?
A: Yes. Prestring the beads and use the Lace Cast On. Immediately before you wrap the yarn around the needle in step 1, slip 1 or more beads up close to the needle. This will place beads every other stitch along the edge of the knitting. To figure out how many beads you’ll need, subtract 2 from the total stitches to be cast on, divide this by 2, and then multiply by the number of beads you’ll place each time. For example, if you plan to cast on 44 stitches and place 3 beads at a time, (44 – 2) ÷ 2 × 3 = 63 beads.
You can also use the Knitted Cast On, slipping a bead up to the needle as often as you like (every stitch, every other stitch, and so on). To make loops of beads dangling from the edge, slip a group of beads up to the needle between stitches, then work the next stitch firmly.
Hooking Beads as You Knit
This technique is an excellent choice if you aren’t sure where you want the beads, how many you’ll need, or don’t want to spend time stringing beads before you begin. Check to make sure the holes in your beads are large enough to accept a double strand of the yarn and a crochet hook. You may be able to use a small standard crochet hook, or you may need to invest in a tiny hook designed for working with beads. Lacis has long inline crochet hooks with no indent in small sizes that are perfect for this purpose. (see Resources.) You can place a group of beads on the hook, then place them on the yarn in a group or one at a time.
How to do it:
- 1. Work to the point where you want to add a bead. Using a tiny crochet hook, put the bead on the hook, hook the first stitch on the left needle, pull it through the bead, and return the beaded stitch to the left needle.
- 2. Knit or purl this stitch. Purling this stitch on both previous and current rows frames the bead with the characteristic bump created by a purl stitch and prevents it from slipping around.
Sewing the Beads on Later
If your beads have holes too small to be strung easily on your yarn, simply sew them on after the knitting is done, using a fine matching yarn or beading thread. To make precise placement easier in plain Stockinette Stitch, purl the stitches where you’ll later sew on a bead.
Making a Stringing Tool
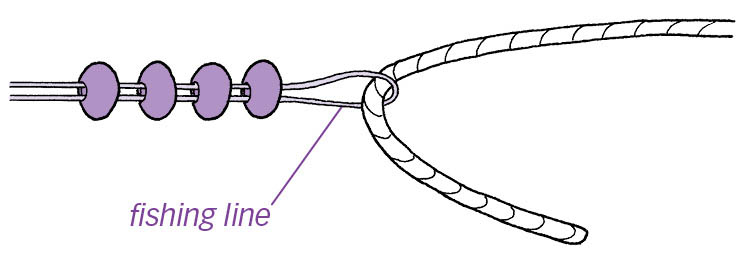
Beading suppliers carry bead spinners (which greatly speed the process of stringing small beads), bead-stringing hooks, and giant needle threaders (also available from fishing tackle suppliers), but here’s how you can make your own:
- Fishing line. Fold an 8"–12" piece of monofilament fishing line in half. Push the two ends through as many beads as will fit comfortably. Put the end of the yarn through the loop at the opposite end of the fishing line and slide the beads onto the yarn.
- Dental floss threader. Use this threader, available from your local drugstore, in the same way as the folded fishing line.
- Sewing needle and thread. Thread the needle, and knot the doubled thread so it won’t pull out. Push the needle through as many beads as fit comfortably on it. Put the yarn through the loop formed by the thread where it meets the eye, and slip the beads onto the yarn.
Bobbles
Q: My bobbles are flat, lopsided, and ugly. Is there a better way to make a bobble?
A: The best one I have found is on a child’s hat in Gladys Thompson’s Patterns for Guernseys, Jerseys & Arans (see Resources). It holds its shape and is nicely symmetrical. Note that you need to start working this bobble one stitch earlier than you might think.
Gladys Thompson’s Bobble
How to do it:
- 1. Knit into the front, back, front, back, front of the stitch where you want the bobble (making 5 stitches in 1), K1.
- 2. Turn, P5.
- 3. Turn, K5.
- 4. Turn, P5, then pass, one at a time, the second, third, fourth, and fifth stitches on the right needle over the first stitch and off the needle (decreasing 5 stitches back to 1).
- 5. Turn once more, and knit into the back of the bobble stitch to twist it. Continue across the row.
Cords
Q:
How can I make cords for my knitting?
A: If you need a drawstring for a bag, ties for a hat, or a cord for a purse, you have lots of choices.
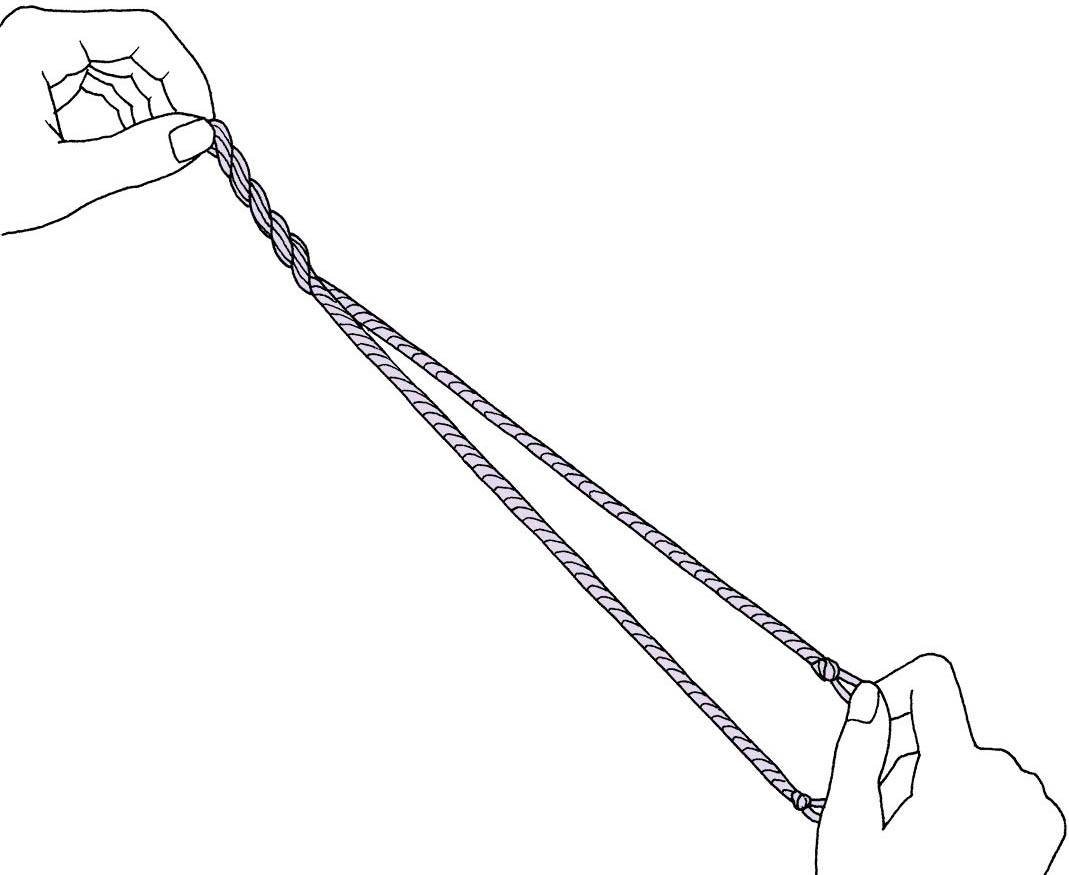
- Twisted cord. Figure out how long you want your cord to be. Add about one-third to this measurement, then cut a piece of yarn four times this long. Fold the yarn in half and make a knot at each end. Have a friend hold the folded end or hook the end over a doorknob. Twist until the yarn is very tightly twisted, keeping it stretched taut at all times. Pinch the yarn at the center, then fold it in half, keeping it stretched out as you do so. (For long cords, you’ll need help doing this.) Slowly release a few inches at a time, starting from the folded end and allowing the cord to twist back on itself, resulting in a sturdy four-strand cord.
- Braided cord. Figure out how long you want the cord to be, then add about half again as much to that measurement. You’ll need at least three strands this length, but the yarn can be doubled or tripled for a thicker cord. Make an overhand knot at one end and secure the knot on a hook, pin it to a board, or clip it to a clipboard. Work a three-strand braid by alternately bringing the right strand over the middle, then the left strand over the middle, and so on. Knot the other end together when the braid is complete.
- I-cord. Using two double-pointed needles, cast on three or four stitches. *Knit across. Slide the stitches back to the other end of the needle without turning. Move the needle to your other hand. Pull the yarn firmly across the back. Repeat from * until the cord measures the desired length. This cord is identical to that produced by knitting nancies or knitting spools. Working it on double-pointed needles is substantially faster. Elizabeth Zimmermann dubbed this knitted cord “Idiot’s Delight,” which has been shortened by popular use to “I-cord.” You can purchase an I-cord knitter that rapidly produces knitted cord at the turn of a crank.
- Cast-on/bind-off cord. Cast on enough stitches for the length of your cord, then bind off immediately on the next row. Be careful of your tension when binding off, or your cord will spiral.
Straps
Q:
How do I make a strap that won’t stretch or curl?
A: Knitted straps always stretch at least a little, but the stretch can be controlled with a firm cast on and bind off, or with I-cord.
Cast On–Bind Off Strap
By working this strap sideways, you can use the cast on and bind off to prevent too much stretching. Using needles three to four sizes smaller than you’d usually choose for the yarn, firmly cast on enough stitches for the length of your strap. Good choices are the Cable Cast On or the Crocheted Cast On (which will match the bind off). Work in a simple, non-curling pattern like K1, P1 ribbing or Garter Stitch until the strap is as wide as you like. Bind off firmly. If the tension of your cast on and your bind off don’t match, the strap will curve. Cast on a short section to practice on before you commit to working the full-sized strap.
Corded Strap
This strap is really two I-cords joined by a single stitch. Use needles about two sizes smaller than usual for the yarn to reduce stretching. Cast on 7 stitches. Knit 4, bring the yarn forward, slip 3 purlwise (A). Repeat this one row to make the strap as long as you like. When you work the first few stitches of each row, be sure to pull the yarn firmly across the back of the slipped stitches and to knit firmly (B). For a few rows, it won’t look like anything is happening, but persevere!
Pom-Poms, Tassels, and Fringe
Q:
How do I make a pom-pom?
A: You can purchase a pom-pom-making tool or you can make one out of a piece of cardboard. Of the many ways to make pom-poms, I find this method the easiest:
Pom Pom
How to do it:
- 1. Cut a square of stiff cardboard a little larger than the diameter of the pom-pom you want to make.
- 2. Cut a slit down the center of the cardboard, stopping just past the center point.
- 3. Cut a 12" length of yarn and insert it into the slit so both ends hang down equally.
- 4. Wrap additional yarn around the cardboard perpendicular to the slit, changing colors if desired. Make about 100 wraps for a 21⁄2" pom-pom. Use more wraps for a larger one, fewer for a smaller one. Cut the yarn.
- 5. Tie the piece of yarn hanging in the slit tightly around the wrapped yarn.
- 6. Cut the wrapped yarn along both edges of the cardboard.
- 7. Remove the cardboard, shake out the pom-pom, and trim any uneven ends.
Note: If you have a fork that is wide enough, you can use it in place of the cardboard. Tie the pom-pom between the center tines.
Q:
How do I make a tassel?
A:
Tassels are even easier to make than pom-poms.
Tassels
How to do it:
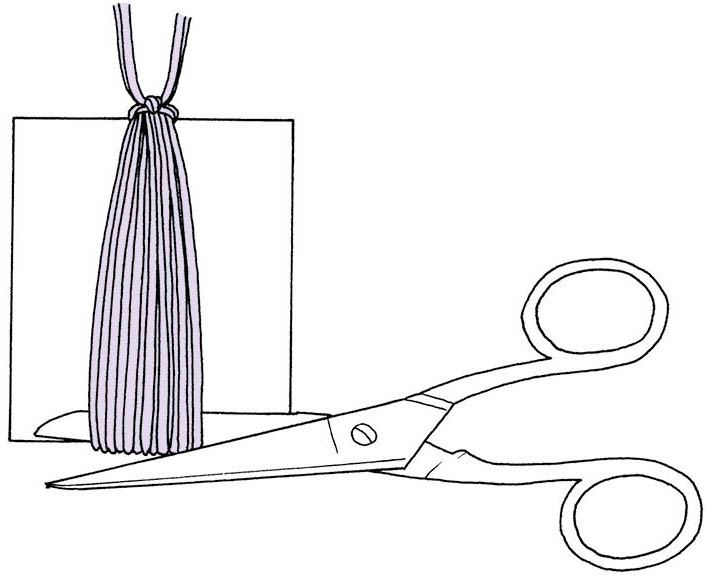
- 1. Cut a stiff piece of cardboard into a rectangle a little longer than you want the tassel and about 4" wide. Wrap the yarn lengthwise around the cardboard 20 to 50 times. Cut the end of the yarn even with the edge of the cardboard.
- 2. Cut a piece of yarn 24" long. Fold this piece of yarn in half, insert it between the cardboard and the wrapped yarn, and slide it up to one edge of the cardboard. With half of the yarn extending on either side, tie the two ends tightly around the wrapped yarn.
- 3. With a pair of sharp scissors, cut through the wrapped yarn at the end opposite the tie.
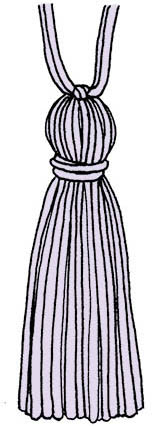
- 4. Cut a 12" length of yarn. Wrap it tightly around the tassel two or three times, about 1" from the top. Tie it securely. Using a yarn needle, pull the ends of this tie through to the inside of the tassel so that they hang down inside. Shake out the tassel and trim off any uneven ends.
Note: You can use any stiff flat object to make a tassel. A CD or DVD case works well for a 5" or 6" tassel.
Q:
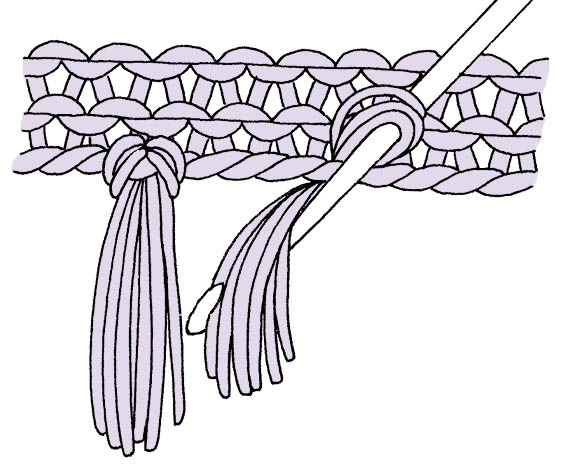
How do I add fringe?
A: Cut lengths of yarn twice the desired length of the fringe. To make cutting the lengths of fringe easier, wrap yarn around a book or piece of cardboard as wide as the desired fringe, then cut along one side. Fold the lengths of yarn in half, draw the folded ends through the edge of the fabric using your fingers or a crochet hook, and then pull the cut ends through the loop at the fold. If you wish, add beads or knot the fringes together after they are attached.
Duplicate Stitch
Q:
What is Duplicate Stitch, and how do I do it?
A: Duplicate Stitch, also called Swiss Darning, is embroidery where yarn is sewn into the knitted fabric, exactly duplicating the structure of stitches that are already there. Duplicate Stitch is worked on the right side of the fabric to cover individual stitches, either as an embellishment or to disguise an error. It’s also useful for weaving in ends on items like scarves that are reversible, and for neatly hiding color changes on the purl side in circular knitting.
Horizontal on the Knit Side
Use this method to work across a row of stitches on the knit side that you want to cover up. It’s good for hiding mistakes or adding embellishments, such as monograms.
How to do it:
- 1. Bring the point of the yarn needle up through the bottom of the stitch.
- 2. Sew behind two strands along the top of the stitch.
- 3. Sew back through the bottom of the stitch and under two strands to the bottom of the next stitch.
- Repeat steps 2 and 3 to make a horizontal row of stitches. Right-handed knitters may prefer to work from right to left; left-handed knitters from left to right.
Vertical on the Knit Side
Use this technique to work a column of stitches on the knit side. This is used to hide mistakes or to add embellishments.
Get Ready:
- 1. Starting with the top stitch, bring the point of the yarn needle up through the bottom of the stitch.
- 2. Sew behind two strands along the top of the stitch.
- 3. Sew back through the bottom of the stitch and pull the yarn through to the back of the fabric.
How to do it:
- 1. Bring the needle up through the center of the next stitch below.
- 2. Sew behind the legs of the stitch above, under just the two strands of duplicate stitch.
- 3. Sew back through the bottom of the stitch and pull the yarn through to the back of the fabric.
- Repeat these 3 steps until the column has been completed.
Horizontal on the Purl Side
Duplicate Stitch on the purl side is not supposed to show on the knit side of the fabric. It’s used only for working in ends invisibly. This assumes that the purl side is the wrong side of the fabric.
How to do it:
- 1. Sew under two purl bumps diagonally from bottom to top.
- 2. Sew under the next two purl bumps on the opposite diagonal, from top to bottom. You may work right to left or left to right, whichever is most comfortable for you.
- Repeat steps 1 and 2 to work a horizontal row of stitches.