Chapter 2
The Basics
Knitting is made of just two stitches, knits and purls, which are combined to create unlimited patterns. This chapter details two of the most common knitting techniques used in North America and Europe, but around the world people use a multiplicity of methods to form the two basic stitches. Suggestions in this chapter will help you become a more comfortable and efficient knitter, so that you can discover your own “right” way to knit.
The Knit Stitch
Q:
What is a knit stitch, and how do I make one?
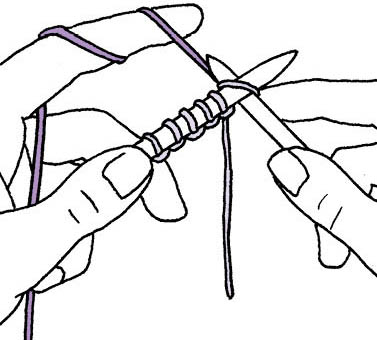
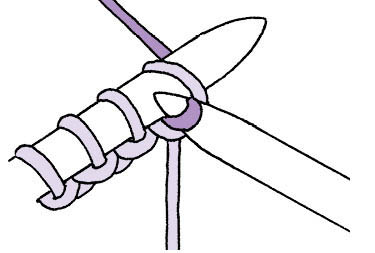
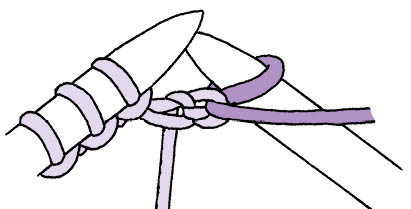
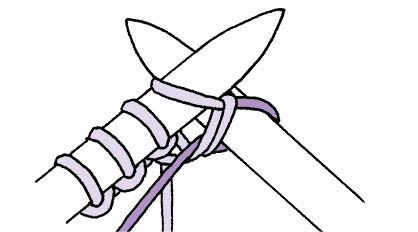
A: The knit stitch (K) is the basic building block of knitted fabrics, and it is used constantly. There are two prevalent methods of making a knit stitch: the English Method and the continental Method. They both accomplish the same thing.
English Method
This is also known as the American or right-handed method.
- 1. Hold the needle with stitches on it in your left hand. Hold the yarn and the empty needle in your right hand. Insert the right-hand needle into the front of the stitch with the working yarn behind the needles. Wrap the yarn around the right needle counterclockwise.
- 2. Pull the yarn through the stitch with the tip of the right needle.
- 3. Slip the original stitch off the left needle.
After you become used to this, you will be able to work faster, and it will become a smooth in-around-and-out motion, rather than three separate steps.
Continental Method
This is also known as the German or left-handed method.
- 1. Hold the needle with stitches on it in your left hand and the empty needle in your right hand. Hold the yarn in your left hand, pulled taut behind the needle. Insert the right needle into the stitch and behind the yarn.
- 2. Hook the yarn with the tip of the right needle.
- 3. Pull the yarn back through the stitch with a twist of the right needle.
- 4. Slip the original stitch off the left needle.
After you’ve practiced this for a while, the four separate steps will merge into a smooth in-hook-and-out motion.
The Purl Stitch
Q:
What is a purl stitch, and how do I make one?
A: A purl stitch (P) is simply a knit stitch in reverse. Knit stitches make a smooth V shape on the fabric facing you as you knit. Purled stitches make a small horizontal bump or bead on the side facing you. If you look at the back of a knit stitch, you’ll see the telltale bump of a purl. If you look at the back of a purl, you’ll find the V of a knit.
When to use it: Use the purl stitch in combination with the knit stitch to create everything from the ubiquitous Stockinette Stitch to ribbing to textured patterns.
See also: Chapter 7, Pattern Stitches
English Method
- 1. Hold the needle with stitches on it in your left hand. In your right hand, hold the empty needle and the yarn, with the yarn in front of the needles. Insert the right-hand needle into the stitch from right to left.
- 2. Wrap the yarn around the needle counterclockwise.
- 3. Pull the yarn through the stitch with the tip of the right needle.
- 4. Slip the original stitch off the left needle.
Continental Method
- 1. Hold the needle with stitches on it in your left hand and the empty needle in your right hand. Hold the yarn in your left hand, pulled taut in front of the left needle. Insert the right-hand needle into the stitch from right to left. (Make sure the needle passes behind the working yarn stretching up to your index finger.)
- 2. Move your left index finger down and to the front so that the yarn is taut over the tip of the right needle.
- 3. Hook the yarn back through the stitch with the right needle.
- 4. Slip the original stitch off the left needle.
Hows and Whys of Knits and Purls
Q: I have trouble holding the yarn — it’s always too tight or too loose. Is there a better way to hold it?
A: The simplest method is to pass the yarn over the index finger and then across the palm, providing tension by holding it gently with the last two or three fingers of your hand against your palm or against the needle. If you feel the tension on the working yarn is too loose, wrap it around your index finger once more, or wrap it around the base of your little finger so you don’t have to worry about holding on to it. You can also weave it in and out between your fingers.
Q: I understand how to make a knit stitch, but how do I string them together?
A: Regardless of whether you use the English or the Continental method, knit stitch-by-stitch across the needle until all the stitches are on the right needle (one row), then turn the needle, put it in your left hand, and knit another row. If you repeat the knit stitch in this manner, row after row, you are doing what is known as Garter Stitch.
See also: The Standard Stitches, Garter Stitch
Q:
Why would I use a purl stitch?
A: Whether you use the English or Continental method, if you alternate knit rows with purl rows, you get Stockinette Stitch. You can also combine knits and purls to make ribbing and more complex pattern stitches.
Q: When I’m beginning a row in Stockinette Stitch, how do I know whether I should knit across or purl across?
A: Look carefully at both sides of the fabric. The knit side is made up of smooth, V-shaped stitches. The purl side is made up of lots of horizontal bumps. Hold the needle with the stitches in your left hand with the knitting hanging down from it. If the purl bumps are facing you, then purl. If the knit Vs are facing you, then knit.
Q: I’ve heard that Continental knitting is better than English. Is this true? Should I change the way I knit?
A: Many people insist that the way they knit is the only proper way, better than any other method. The fact is that no one method is better than any other. Some Continental knitters insist that their method is most efficient because less movement of the right hand is involved. But they have to hold the yarn under tension with the left index finger all the time and use the right hand to manipulate the needle, creating stitches. While this is less work than the English method when there isn’t much knitted fabric hanging from the needle, it’s a different story if the whole back of a sweater is hanging from the right needle. In that case, Continental knitters must lift the full weight of the piece every time they make a new stitch, whereas English knitters simply move a strand of yarn around the needle. On the other hand, English knitters are at a disadvantage doing K1, P1 ribbing, or Seed Stitch, because they must pass the yarn from front to back between the needles for every stitch by moving the whole right hand. Continental knitters can move the yarn into the correct position with a slight adjustment of the index finger.
If you’re knitting comfortably and are happy with the fabric you’re making, then there’s absolutely no need to change the way you knit. Keep in mind that the styles of knitting detailed in this book are only two of many used around the world. There are advantages to learning to hold your yarn several different ways and being able to knit in either the Continental or the English manner:
- Holding one strand of yarn in each hand when working with two colors allows you to knit color patterns more efficiently.
- If you have problems with pain or fatigue caused by knitting, you can switch hands to alleviate the problem.
- If you’re working with a slippery yarn, you may want to be able to hold it under more tension. (For more ways to knit, check Brown-Reinsel’s “Beyond the Basics: Different Ways to Knit” in Interweave Knits; see Resources.)
See also: The Standard Stitches, Knit 1, Purl 1 Ribbing; and How do I work Seed Stitch? for seed stitch.
Stitches, Rows, and Counting
Q:
What are stitches and rows?
A: Knit stitches are made up of two legs that form a small V. Purl stitches make tiny horizontal bumps in your knitting. Rows are made up of stitches. All the stitches across your needle make one row, as does each horizontal line of stitches below the needle.
Q:
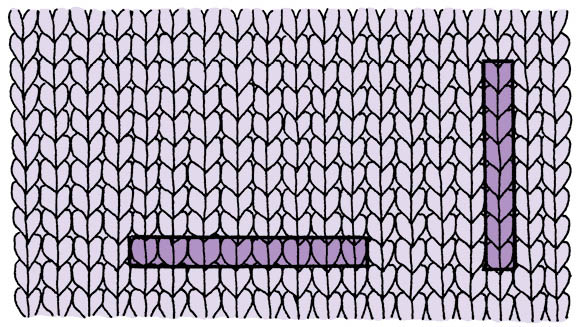
How do I count stitches?
A: To count stitches on your needle, spread them out and count each loop on the needle as one stitch. To count stitches farther down in the knit fabric, work horizontally across a row, counting the Vs or bumps. There are eight stitches within the horizontal shaded area in the illustration of Stockinette Stitch (below). If you look closely at Garter Stitch you’ll see that the ridges are made up of curved interlocking strands that look like smiles and frowns. To count stitches in Garter Stitch, hold your knitting right-side up (that is, with the needle at the top and the fabric hanging down), and count all the frowns across the top of one ridge. Each frown is a stitch.
See also: The Standard Stitches, Stockinette Stitch
Q:
How do I count rows?
A: To count rows, work vertically up or down a column of stitches. There are eight rows within the vertical shaded area in the illustration of Stockinette Stitch (above). In Garter Stitch, every two rows make a noticeable ridge, so it’s easier to count each ridge as two rows. To find the exact number of completed rows in Garter Stitch, count all the ridges on both sides and add those numbers together.
Q:
Do I need to count my stitches after every row?
A: When you are learning to knit, this is a very good idea. Unless you intentionally work increases or decreases in the course of a row, or cast on or bind off stitches, you should always have the same number of stitches at the end of the row as you did when you started. If the number changes, then look back across the row for inconsistencies. This is how you’ll begin to recognize mistakes. When your knitting becomes more consistent, you need to count only if you think there’s a problem or if you just want to make sure everything is correct.
Tips for Lefties
Q: I’m left-handed, and I’ve been told I need to learn to knit backward, sitting opposite someone who knits and doing a mirror image of what that person does. Is this really true?
A: No. Knitters knit with both hands and there are many ways to hold and manipulate the needles and yarn. There isn’t a left-handed versus a right-handed way of knitting. If you learn to knit backward you’ll be working in the opposite direction from most of the knitting world. Whenever you follow written instructions, you’ll have to reverse references for “right” and “left.” If you are already knitting this way, there’s no need to change. But if you are just beginning, all the books, patterns, and technical information will make more sense if you work in the same direction as the vast majority of the world’s knitters.
On the other hand, if you have tried working in the standard direction and continue to find it uncomfortable, you may want to try Mirror Knitting, in which you work in the opposite direction across the needle in an exact mirror image of the standard method.
Q: Is the Continental or the English method better suited to left-handed knitters?
A: Many people who are left-handed hold the yarn in the right hand, and many people who are right-handed hold the yarn in the left hand. Some people who know how to crochet feel more comfortable holding the yarn in the left hand, as they do when crocheting. For some, it’s just the reverse. There are many correct ways to knit, and you should experiment to find one that allows you to work comfortably and consistently.
Mirror Knitting and Knitting Backwards
Mirror Knitting is a method of knitting in the opposite direction from standard knitting, so the knitting is actually a mirror image of standard knitting. This difference is not noticeable in the finished project. Everything is reversed, even the position of the stitches on the needle. They normally sit in the opposite direction from standard knitting.
Knitting Backwards is also worked in the opposite direction from standard knitting. The stitches sit in the standard position. Knitting Backwards is employed by alternating rows with standard knitting, to avoid turning and purling the wrong-side rows, especially when working across just a few stitches (for example, when working bobbles, short rows, or entrelac). When one alternately knits a normal row and then knits backwards, this is sometimes called “Knitting Back and Forth” or “Knitting To and Fro.”
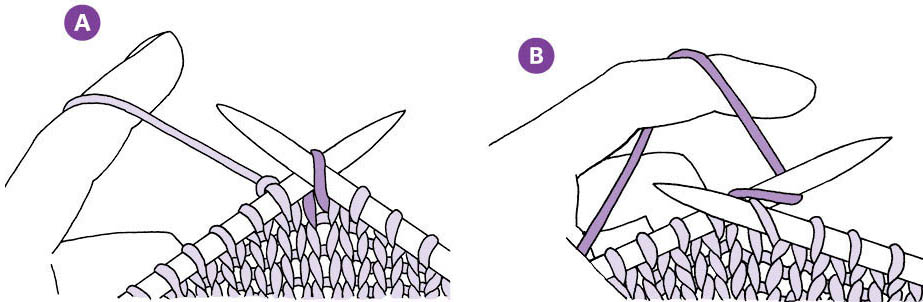
How to Knit Backwards
With yarn in your left hand. With the knit side facing you, the stitches to be worked on the right needle, and the yarn in back, insert the left needle knitwise into the first stitch from the front (A). Bring the yarn over the left (back) needle tip to the front, then under it to the back (B). You may need to let go of the left needle in order to wrap the yarn. Lift the loop of the old stitch over the tip of the left needle with the right needle, or pull it through with the left needle. Slide the right needle out of the loop.
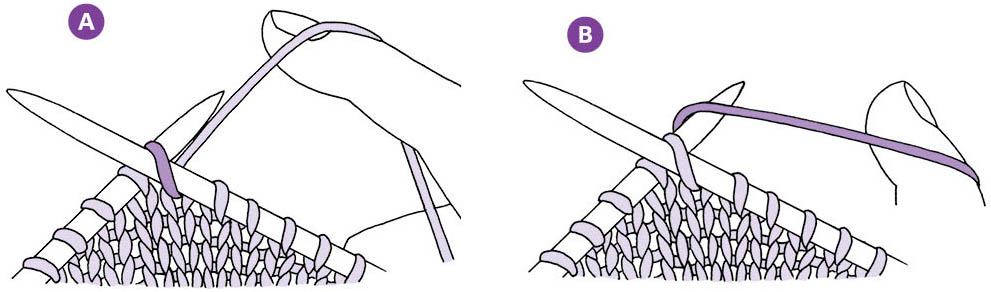
With yarn in your right hand. With the knit side facing you and the yarn in back, insert the left needle through the front of the stitch on the right needle (A). Bring the yarn around the left (back) needle tip from back to front (B). Lift the loop of the old stitch over the tip of the left needle with the right needle, or pull it through with the left needle. Slide the right needle out of the loop.
Discovering Your Personal Knitting Style
Q: I find it difficult to hold both needles and wrap the yarn at the same time. Is there an easier way?
A: Assuming you are knitting with the yarn in your right hand, using a long straight needle, you can prop the right needle against your leg or tuck it under your arm to stabilize it. This means you don’t need to hold the right needle in your hand at all. Instead of moving the right needle, move the left needle, pushing the stitch onto the right needle. Wrap the yarn, then move the left needle over the tip of the right needle to pull the new stitch through.
Q: I find it difficult to hold onto the yarn. What’s the secret?
A: If you currently drop the yarn or re-tension it between each stitch, try to find a comfortable way to hold on to the yarn consistently. You can maintain even tension by wrapping the yarn around your index finger, your pinky, or any other finger, or by weaving the yarn in and out between your fingers. If you generally knit English style, try Continental style, or vice versa. Holding the yarn in your other hand may make things easier for you.
Q: I want to learn Continental style, but I find it difficult to pick up the yarn with the right needle point and pull it through to make a new stitch. Is there a way to make this easier?
A: You may find it easier to move your left hand or index finger to wrap the yarn around the needle, rather than moving the needle tip around to catch the yarn. There are also some knitting needles available that have a hook like a crochet hook on the end. While these aren’t appropriate for all knitting projects, they may work well for yours.
Q: Is there an easy way to pull the new stitch through the old one? It keeps slipping off my needle.
A: Use a fingertip to push the point of the needle back through the old stitch.
Twists and Turns
Q: I’ve been told that my stitches are on the needle the wrong way. How can I tell?
A: The so-called right way, for English-style knitters at least, is with the right leg of the stitch in front of the needle. The so-called wrong way is with the right leg of the stitch behind the needle. It probably would be better to call these orientations standard and nonstandard, or to come up with another name for them entirely. More than a few knitters place some or all of their stitches on the needle in the nonstandard orientation. Continental knitters often have standard knit stitches and nonstandard purl stitches, because it’s easier to purl this way; this is called Combination Knitting. Some English knitters wrap their purl stitches in the opposite direction from their knit stitches. Most of these knitters automatically adapt to the position of each stitch by working into either the front or the back to ensure they are not twisted. In this book, unless it states otherwise, the assumption is that your stitches are on the needle in the standard English-style stitch position.
Q: Does it matter that my stitches are on the needle the wrong (nonstandard) way?
A: It matters only if you are twisting your stitches inadvertently. It’s important to recognize the position of each stitch and work it properly to avoid twisted stitches (unless, of course, your pattern stitch calls for a twisted stitch). If you have standard stitches, work into the front of them to prevent them from twisting. If you have nonstandard stitches, work into the back of them to prevent them from twisting.
Q: Is there any difference in the way stitches are positioned on the needle when you’re knitting circularly, as opposed to flat knitting on straight needles?
A: If your customary knitting style is to work standard knits and nonstandard purls when making Stockinette Stitch flat, then the position of your stitches will be different when you work circularly. For example, if you’re working Stockinette Stitch flat, you’d normally knit into the back of each stitch on the right-side rows to prevent the stitches from twisting, because you just created these stitches by purling across on the wrong side and they are in nonstandard position. When working circularly in Stockinette Stitch, you’ll always be knitting, never purling, so all the stitches will be in standard position. You’ll need to knit into the front of each stitch to prevent it from twisting.
Q: I’m one of those knitters who knits into the back of my knit stitches and purls into the front of my purl stitches. What should I do if my pattern instructions say to “knit into the back loop?”
A: You can substitute knitting into the front of the stitch to twist it intentionally. Although this will twist it in the opposite direction, the change of direction may not matter. On the other hand, if the twist is part of a pattern, you may end up with stitches that don’t all slant in the same direction. As you work, be aware of how the stitch you just worked looks. If it’s twisted and shouldn’t be, or if it’s twisted the wrong way, unravel it and rework it to correct the problem.
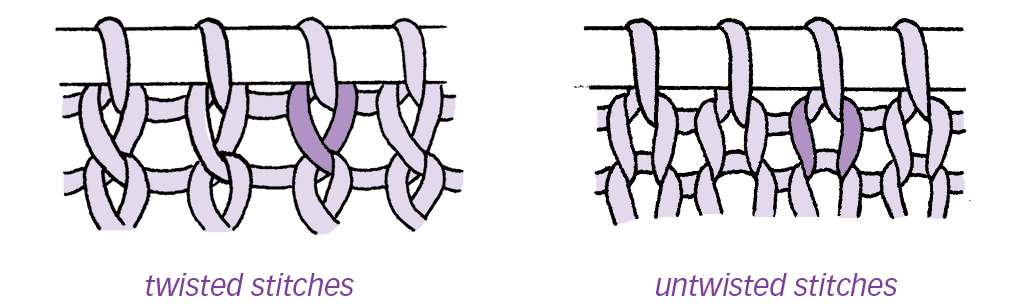
Q: I’ve been told that I twist my stitches. How can I tell if they’re twisted?
A: Twisted stitches cross at the bottom. Untwisted stitches have a little space between their two legs. Twisted stitches are sometimes used intentionally to tighten the knit fabric, especially in ribbings, or for decorative purposes.
Q: Why are my stitches twisted, and how do I prevent this from happening?
A:
Here are a couple of suggestions that may help.
Which way are you inserting the needle? Knitting or purling into the back of a stitch in standard position will cause the stitch to twist. Look at the stitch waiting on your left needle to be worked. Is it in standard position? If so, work into the front of it so it doesn’t twist.
Which way are you wrapping the yarn when you create a new stitch? The standard is to wrap the yarn counterclockwise around the needle on both knits and purls. If you knit with the yarn in your left hand, you may be bringing the right needle up under the yarn (instead of over it) to form a knit stitch or bringing the needle over the yarn (instead of under it) to form a purl stitch. Knit a stitch. Look carefully at the new stitch on your right needle. Try the same thing with a purl stitch. If the yarn exits a stitch in front of the needle, it’s in the nonstandard position. Work into the back of these stitches on the following row or round to prevent twisting, or wrap the yarn in the opposite direction to form your stitches in the standard way, described earlier in this chapter.
See also: The Knit Stitch, The Purl Stitch, The Standard Stitches.
Q: How do I fix a twisted stitch if I come across one while knitting?
A: Simply work into the back of it to untwist it, then check the results. If it was twisted more than halfway or was twisted in the opposite direction, knitting or purling into the back may not solve the problem. In that case, take the stitch off the needle and pull on the working yarn to unravel the new stitch you just made, then untwist the original stitch and put it back on the left needle in the standard orientation.
Q: For knitters like me who take the nonstandard approach, decreases can be very confusing. How do I handle a K2tog if I knit into the back of my knit stitches?
A: If the stitches are in nonstandard position, working K2tog results in a left-slanting decrease, the opposite of the result with standard-position stitches. In order to work a right-slanting decrease, the stitches must be rearranged before the K2tog is worked.
- 1. Slip the first stitch, inserting the needle from the back, changing its orientation.
- 2. Slip the second stitch the same way.
- 3. Pass both stitches back to the left needle without changing their orientation, by inserting the needle from the front.
- 4. Knit 2 together, inserting the needle from the front.
(For more on other knitting orientations, check Zilboorg’s Knitting for Anarchists and Modesitt’s Confessions of a Knitting Heretic; see Resources.)
See also: Decreases
Solving Problems with Knitting and Purling
Q: I set my knitting down in the middle of a row. How can I tell in which direction I was going?
A: The working yarn (that’s the yarn connected to your ball) will be hanging from the last stitch you worked. Make sure this is dangling from the right-hand needle when you begin again. Unless, of course, you are a mirror-image knitter, in which case you’ll need to make sure the working yarn is attached at the left-hand needle tip when you begin.
Q: My knitting looks fine, but my stitches are so tight I can hardly move them across the needles. How can I make them looser?
A:
Here are a few hints:
- Don’t stop short. You may be forming new stitches on the tapered tips of your needles. Make sure that you’re sliding the stitches all the way onto the wider, straight part of the needle each time you make a new stitch.
- Change your tension. If you are wrapping your yarn around any of your fingers, stop doing this and just hold it gently against the palm of your hand.
- Ease up. You may have gotten into the habit of tightening each stitch after you work it by tugging on the yarn. Stop doing this! Instead, after you make a new stitch, lift up gently on the working needle to make the stitch just a little bigger. Make sure you are holding the yarn loosely while you do this.
- Let it slide. If you are using wood needles, switch to metal, which allows the yarn to slide more easily.
Q: My knitting looks messy. How can I knit more evenly?
A: If some stitches are loose and some are tight, it’s because you’re not tensioning your yarn consistently. If you’re a new knitter, your technique will improve with practice. Here are a few suggestions:
- Try different ways of holding your yarn until you find one you can use comfortably and consistently.
- Be aware of how you feed the stitches from one needle to the other as you work. Don’t bunch them up tightly or stretch them far apart; feeding them consistently will help keep your tension consistent.
- Always complete a whole row before setting down your knitting; stopping in the middle and then beginning again later can result in uneven tension where you left off.
- Remember that no one’s knitting is completely even. If there are just a couple of rebellious stitches that are looser or tighter than their neighbors, take the tip of a knitting needle and coax the yarn across the row on either side to even out the tension.
- Washing and blocking your work will also improve its appearance.
See also: Blocking
Fixing Mistakes
Q: I worked all the way across the row, and now I’m ready to start the next one, but the yarn’s attached to the second stitch, not the first one. How do I fix this?
A: When you worked the last stitch of the row, the yarn you wrapped around the needle somehow slipped off, so it never got pulled through to make a new stitch. Turn your knitting around so that the problem stitch is on the left end of the right-hand needle. Take your empty needle and slip the stitch onto it. Now knit (or purl) it as usual.
Q:
How do I pick up a dropped knit stitch?
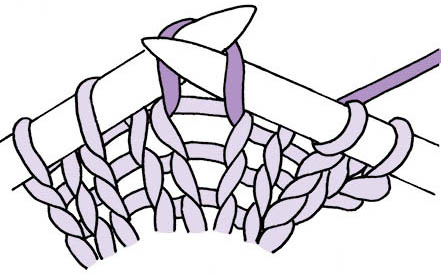
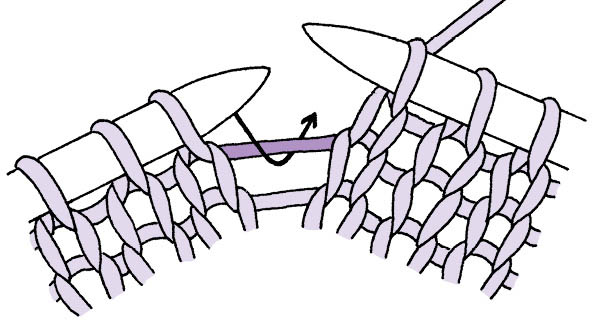
A: Pinch the fabric just below the dropped stitch so it won’t unravel, and insert the left needle into the stitch from the front. If it has already unraveled, there will be a loose strand above the stitch. Knit up the loose strand before putting the stitch back on the needle. You can do this with the tip of your knitting needle, but it’s easier to use a crochet hook. Lay your knitting down on a flat surface, being careful not to stretch it (which may cause further unraveling). Insert the crochet hook through the stitch from the front, hook it under the loose strand, pull the strand through, and put it on your left needle. (See illustration below.)
Q:
How do I pick up a dropped purl stitch?
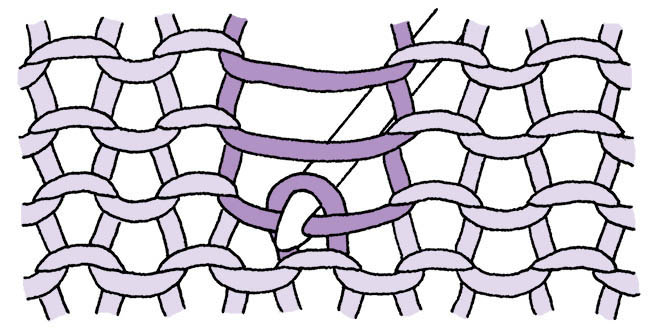
A: As with a dropped knit stitch, pinch the fabric below the stitch and insert the left needle into it from the front. If the stitch has unraveled, turn the fabric over so the knit side is facing you and use a crochet hook to pull the loose strand back into the stitch (as shown below). Then turn your knitting back to face you properly. If the renegade stitch is on the right needle, pass it to the left so you’re positioned to begin purling again.
Q: How can I fix a mistake several rows below? Do I have to rip it all out back to that point?
A: If the mistake involves just one stitch, work to the point in the row where the stitch directly above the mistake is at the tip of a needle and slip it off the needle. Unravel just this one stitch down to the mistake. Now you must work the stitch back up in pattern.
- Stockinette Stitch. Turn your knitting so that the knit side is facing you. Insert a crochet hook into the stitch from the front and hook the lowest unraveled strand through to the front. Don’t remove the crochet hook. Instead, continue to work your way up from the lowest strand to the highest, hooking each one out to the front to reknit another stitch. At the top, put the stitch back on the needle.
- Ribbing. Turn your knitting so that the knit side of the stitches to be corrected is facing you and hook the strands back up, as described for Stockinette Stitch.
- Garter Stitch or other pattern stitches. Where there is a combination of knits and purls facing you, you will need to hook up the knit stitches from the front and the purled stitches from the back. If you find it difficult to insert the crochet hook from the back, simply turn your knitting over and hook up the stitch from the other side, then return to the front to capture the next knit stitch. Take care to pick up the strands in the correct order from bottom to top.
A handy tool called Fix-a-Stitch is particularly useful for working columns of stitches in Garter or other knit-purl pattern stitches. It has a hook on both ends, so that it can be pushed through the fabric to switch from knitting to purling. (See Tools, and Resources)
Q: Is there any way I can work back a few stitches to fix a mistake without taking the knitting off the needles?
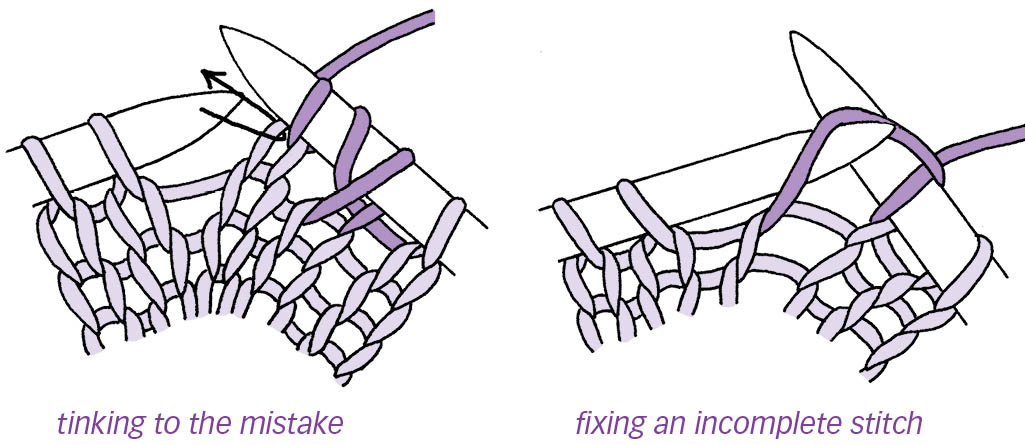
A: Yes. Insert the left needle tip into the stitch directly below the one on the right needle. Slip the right needle out of this stitch and pull on the yarn. The newest stitch will unravel, and the stitch from the row below will be secure on the left needle. Continue doing this across your knitting until you reach the mistake. If you are a mirror-image knitter, you’ll need to reverse these directions, substituting left for right and right for left. Unknitting stitch by stitch like this has come to be called tinking in knitting parlance, because “tink” is “knit” spelled backward.
Q: My needle accidentally came out of my knitting. What should I do?
A: Gather the knitting up into a bunch to prevent stretching in width, which may unravel your stitches. If you are right-handed, work from right to left with the needle in your right hand and insert the tip into the stitches from the back, one at a time. Gradually ease them farther up the needle as you work. If you are left-handed, work from left to right, inserting the tip of the needle into the front of the stitches. Careful attention to inserting the needle into each stitch from the correct direction may still not result in all the stitches being placed consistently on the needle. Some may have unraveled; some may be twisted. You can correct the problems as you work across the next row, or you can slip each stitch to another needle and make corrections as you replace them on the working needle.
Easy Does It
Here are a few tips that make it easier to replace stitches on your needles:
- A needle several sizes smaller is easy to slip into the stitches. Either slip the stitches back to the correct-size needle after you pick them all up, or just work across using the correct-size needle.
- If you use a circular needle to pick up the stitches, you won’t have to worry about ending up with the working yarn hanging from the wrong end of the needle. For a narrow piece of knitting, you may want to use a double-pointed needle. Simply slide the stitches to the other end of the needle, if necessary, and knit them onto whatever needle you were using.
- As you insert the needle into each stitch, pinch the base of the stitch to keep it from unraveling.
Q: If I need to rip out a sizable chunk of my knitting, how do I do it?
A: Slide your needle out of the knitting and pull on the yarn to unravel it. If you are a bold, brave knitter, unravel as far as you like and then slip your needle back into the stitches as described above. If you are not quite so fearless, especially if you are working with slippery yarn, or fine yarn and tiny needles, stop unraveling one row above the desired point. Take the needle in one hand and the knitting in the other and insert the needle into each stitch as you unravel the final row. If you have a knitting needle much thinner than your working needle, you may be able to slide it into the whole row of stitches you want to secure before you rip out the section.
Q:
What is frogging?
A: In current knitting slang, ripping out a section of knitting is called frogging, because you “rip it, rip it, rip it.”
Q: I keep ending up with extra stitches. Why is this happening?
A: This is a common problem, with a variety of causes. Take a good look at your knitting, checking for sloppy stitches, a steadily increasing width, or holes in the fabric. These issues are addressed in the next three questions. You may have just one of these problems, or you may be making several different mistakes.
Q: I have some sloppy stitches on my needle that cross other stitches. What is happening?
A:
Any of the following problems could cause this:
- Incomplete stitch. You inserted your needle into the stitch and wrapped the yarn around the needle, but you slipped the old stitch off the left needle without pulling the new stitch through it. Both the old stitch and the new one are now on your right needle. To fix this, slip the intervening stitches back to the left needle or unknit the intervening stitches and put them on the left needle. Then, simply lift the old stitch from the row below over the incomplete stitch on the current row.
- Inserting incorrectly. You inserted the needle into the stitch a little lower than you should have, catching the stitch on the row below. When you pulled the new stitch through, you exited in the correct place, leaving the stitch from the row below on your needle along with the new stitch. To fix this, work across your needle to the mistake. Slip the double stitch off and unravel the stitch. You’ll need to hook two rows back up with a crochet hook and put it back on the needle.
- Exiting incorrectly. You began the stitch correctly, but when you pulled the new stitch through the old one, you accidentally went too low and picked up the stitch from the row below. Now the new stitch and the one from the row below are both on your right needle. Fix this as described for inserting incorrectly.
Q: Why does my knitting get wider at the edges when I’m just trying to knit straight?
A: You are probably adding a stitch each time you begin a row. This can be caused in two ways:
- Pulling too hard. Many knitters feel that the first stitch of the row is too loose, so they pull on the yarn to tighten it before they begin. They pull so hard that the stitch one row below is pulled up over the needle. If you look closely at a knit (or purl) stitch, you’ll see that it has two legs. Pulling that first stitch causes both legs of the stitch below to slide up over the needle, making two stitches where there was only one.
- Starting off wrong. The yarn may be in the wrong position when you begin the row. Make sure that the yarn is behind both needles when you begin to knit and in front of both needles when you begin to purl.
Making these mistakes consistently at the beginning of every row adds one new stitch per row and makes a diagonal edge rather than a straight one. To fix a piece of knitting with this problem, unravel back to the point where your knitting started getting wider. When you desire a diagonal edge, you can intentionally position the yarn “incorrectly” at the beginning of the row to make a yarnover. This is one way that triangular shawls and other diagonal edges are shaped.
See also: The Yarnover
Q:
Why does my knitting have holes in it?
A: Holes are caused by accidentally wrapping the yarn around the right needle between stitches. This can happen if the yarn is in the wrong position before working a stitch. When this is done intentionally, it’s called a yarnover and is used to create lace or eyelets. To avoid unwanted holes, make sure the yarn is in back before knitting and in front before purling. To fix the hole, unravel the whole column of stitches down to the hole. Don’t worry; it can’t go any farther than this. Use the tip of a needle to coax the slack in the yarn into the stitches on either side. If your knitting is too loose or there are too many holes, you may need to unravel the whole piece back to the point where the hole was formed.
See also: Solving Problems during Finishing
The Slipped Stitch
Q:
What is a slipped stitch?
A: A slipped stitch (sl) is one that is simply moved from one needle to the other without wrapping the yarn to create a new stitch above it.
When to use it: Use slipped stitches to create decorative patterns or to make a denser, more substantial fabric; on the heels of socks, for example.
How to do it: Insert the working needle into the stitch on the non-working needle, then slide it off the non-working needle.
Q: When I slip a stitch, should I insert the needle as if I’m knitting or as if I’m purling?
A: If your pattern doesn’t specify, then slip as if you are purling (also called purlwise). If you slip knitwise, you change the orientation of the stitch, and working into the front of it on the next row will cause it to twist, changing the appearance of the stitch and making the fabric even tighter. Of course, you can decide for yourself which effect you prefer.
If your stitches are on the needle in the nonstandard position, check your slipped stitches carefully after slipping to make sure they are on the needle the same way as all the other stitches. Turn them around if necessary.
Q: Where should the yarn be when I’m slipping — in front or in back?
A: If your pattern doesn’t specify, then leave the yarn wherever it already is. This is in back if you are knitting and in front if you are purling. Take a look at the effect. The yarn makes a longer horizontal strand across whichever side it’s on when you slip the stitch. If it doesn’t look right, then hold it in the other position. In general, if the horizontal strand in front of the slipped stitch is not part of a decorative effect on the right side of the fabric, then slip the stitch with the yarn held on the wrong side of the fabric.
Q:
If I forget to slip a stitch, how do I fix it?
A: If you discover the mistake within a few stitches, “tink” back to it, then slip it properly and continue to work across the row. If you discover it on the next row, simply unravel that one stitch and put it on your left needle ready to be worked. Make sure the loose strand of yarn you unraveled is in the proper position (either in front of the fabric or in back). Use the tip of your knitting needle to work the slack from this strand into the stitches on either side. They will be a little loose but should even out once the item is finished. If the stitches are too loose (for example, if you unraveled several slipped stitches in the same area), you’ll need to take out the whole row and do it again. Or you can pull out all the slack into a loop on the wrong side, cut the loop, and weave in the ends to secure them.
See also: At Loose Ends
Q: I’ve been working a slipped stitch pattern, but the rows are so tight I can hardly go on. Why?
A: Instead of slipping purlwise, you may be slipping knitwise, which makes the fabric much tighter when the stitches are twisted on the next row. If this isn’t the problem, then it’s simply that slipped stitch patterns characteristically make a tighter fabric. Some knitters slip stitches firmly, placing the stitches close together on the working needle and working the following stitch very tightly. If you think this may be your problem, consciously make your stitches a little looser as you work and spread them apart on the right needle. Another solution is to simply use a larger needle, making all the stitches a little larger and the fabric looser.
Edge Stitches
Q:
What are edge stitches?
A: Edge stitches are the stitches at either end of the row of knitting. These are always uneven, alternating long and short, tight and loose up both sides. Some knitting patterns call these selvages (US) or selvedges (UK) and give instructions for special treatment. (For more check Radcliffe, The Knowledgeable Knitter; see Resources.)
Q:
Should I knit the first stitch of every row?
A: There are a few situations where you might want to knit the first stitch of every row, but there are lots of times when this isn’t the best choice.
If you knit the first stitch of every row, then that edge stitch will be in Garter Stitch, rather than in Stockinette or whatever pattern stitch you are working. It will also leave a little bump in every other row. If this is the finished edge of your knitting and you like the look, then by all means knit the first stitch of every row. You can easily sew a seam between two pieces of knitting by simply zigzagging back and forth between the bumps on the edges of the two pieces to be joined. This makes a very flat seam, but it is not substantial enough to stand up to a lot of wear.
If you’re working in Garter Stitch or Seed Stitch (How do I work Seed Stitch?), then knitting the first stitch of every row will make the edges completely consistent with the rest of the fabric, which may be what you want. On the other hand, if this is the finished edge of the fabric, it may look messy, so you might want to do something different, like slipping the first stitch of each row.
If you’ll be picking up stitches along the edges to add a border or you want to make a more substantial Mattress Stitch seam (see Side Seams), knit the first and last stitch on the right-side rows and purl the first and last stitch on the wrong-side rows, to make a single column of Stockinette Stitch along each edge. The Stockinette Stitch selvage will make it easier to pick up or seam consistently.
See also: The Standard Stitches, Garter and Stockinette.
Q:
Should I slip the first stitch of every row?
A: I find that plain Stockinette Stitch is the best choice for edges that will be seamed or where a border will be added. When you’re making the heel flap of a sock, however, always slip the first stitch of the row because it contributes to the shape of the flap. I also like to slip the first stitch knitwise and purl the last stitch of each row when working in Garter Stitch, because it creates a very pleasing chain effect along the edge. Slipped stitch edges are also desirable when you plan to crochet your seams together (see Crochet the two pieces together). Many knitters prefer a slipped-stitch edge on all their knitting.
Q: The edges of my knitting are uneven and loose. How can I fix this?
A: All knit edges are uneven, with alternating loose and tight stitches. If some of your edge stitches are way too loose, however, try this: Knit the first stitch of the row, then place your index finger on top of the stitch to hold the yarn in place and lift up on the right needle, gently pulling the slack out of the stitch below. Then pull on the working yarn to remove the slack. Work normally across the rest of the row. Don’t pull on the yarn before making the first stitch of the row, because it may cause you to add an extra stitch.
The Yarnover
Q:
What is a yarnover, and how do I do it?
A: A yarnover (yo) is simply a wrap of the yarn around the right needle between two stitches. A yarnover adds a stitch.
When to use it: Each yarnover makes a hole in the knitting, so it is used individually for buttonholes, spaced across a row for eyelets, or combined with decreases to make knitted lace.
How to do it: If the yarn is in your right hand, simply wrap it counterclockwise once around the working needle. If the yarn is in your left hand, either wrap it around the needle with your index finger, or take the right needle over the yarn and around the back.
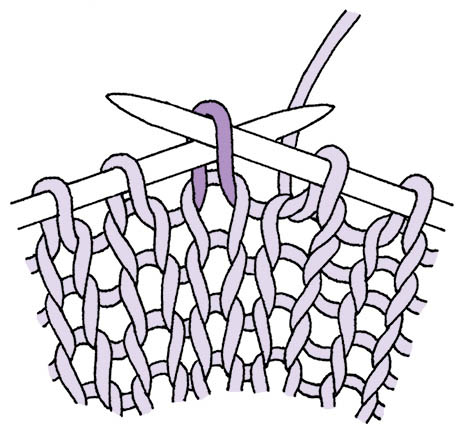
Q: How do I pick up a dropped yarnover?
A: Insert the left needle from the front, under the top strand that stretches between the two needles.
Q: I forgot to do a yarnover on the last row. Is there a way to fix this without ripping out?
A: Yes. When you come to that point in the row, pick up the top strand, as described in the previous answer.
Q: The yarnovers in my current project make huge holes. Is there a way to make them smaller?
A: Yes. You can work all the yarnovers as described (above) for fixing a forgotten yarnover. Each yarnover will then steal yarn from the stitches on either side, which will be smaller than the hole formed by a complete wrap around the needle.
Q: My pattern calls for working P1, yo, K1, yo. The yarnovers before the knit stitch are smaller than yarnovers that follow the knit stitch. Why, and can I fix it?
A: Yarnovers formed between a knit and a following purl tend to be longer than yarnovers between a purl and a following knit, because of the position of the yarn to work the stitches. After a purl, the yarn is in front of the needle. To make the yarnover, the yarn goes from the front over the top to the back — a little less than a full wrap around the needle. After the knit is complete, the yarn is behind the needle. To make the yarnover, the yarn is brought under the needle to the front, then up and over the needle to the back. Finally, to prepare for the purl stitch that will follow, the yarn is brought under the needle again to the front. This is a little more than a full wrap around the needle, so the resulting yarnover is larger. To even up the two yarnovers, after knitting, bring the yarn over the needle to the front. This places the yarnover on the needle in the opposite direction, but it will be smaller. When you come to it on the following row or round, work into the back of it to prevent it from twisting.
See also: Twists and Turns
Q:
How do I make a yarnover at the beginning of a row?
A: Put your yarn in the “wrong” position before you begin the row. If you plan to knit the first stitch, bring the yarn to the front and then to the back over the right needle when you knit the first stitch. If you plan to purl the first stitch, bring the yarn to the back and then to the front over the right needle as you purl the first stitch. Either way, when you work the first stitch, the yarn will make an extra loop over the needle; that’s your yarnover. If you are about to purl, the yarnover will be on the needle in the nonstandard position. When you come to it at the end of the next row, work into the back of it to untwist it.
See also: Twists and Turns
Q:
How do I do a yarnover at the end of a row?
A: You can’t. Turn your work, and make the yarnover at the beginning of the next row.
Q:
How do I make a double yarnover?
A: Just the same as a regular yarnover, but wrap the yarn around the needle a second time. This makes a bigger hole. On the next row, the instructions may say to work into the yarnover, letting the extra loop fall off the needle. In this case, knit or purl into it as usual, then slip the extra loop off when you slip the stitch off the needle.
Q: My instructions say to K1, P1 into the yarnover from the previous row. How do I do this?
A: Knit into the yarnover as usual, but don’t slip it off the needle. Instead, bring the yarn between the needles to the front, insert the working needle again as if to purl, purl a stitch, and then slip the yarnover off the needle. If this was originally a double yarnover, let the first loop slip off the needle before making the purl stitch. If the instructions say to P1, K1 into the yarnover, work the purl stitch first, then take the yarn to the back before making the knit stitch.
Personal Factors
Q: My shoulders, hands, and elbows hurt. Is there something I’m doing wrong?
A: Avid knitters often fall prey to repetitive stress injuries by overdoing it. Carpal tunnel syndrome and tennis elbow are among the most persistent and debilitating, but a host of other aches and pains can plague knitters. The good news is, you can prevent such injuries. Follow these guidelines:
- Practice good posture. Sit up straight!
- Practice moderation. Don’t knit for hours in one position.
- Stay in shape. Exercise to build up strength in your arms and shoulders; put down your knitting and stretch frequently.
- Vary your knitting. Move between several projects using different size needles, with different levels of difficulty.
- Check your glasses. If your near-distance prescription needs to be adjusted, you may be holding your work in an awkward position in order to see it better.
- Avoid pain. If it hurts, stop! If pain persists, see your doctor.
Step Away from the Knitting
Take the time to stop what you’re doing and check your work.
- Are there mistakes? Hold up your knitting periodically and glance at the fabric. Dropped stitches, holes, and cables twisted the wrong way will all pop out at you. You’ll be amazed you didn’t notice them before. If you’re working with dark yarn that’s hard to see, occasionally take it outside into natural light so you can get a good look at it. The more often you step back and check your work, the sooner you’ll find errors and the easier they’ll be to correct. There’s nothing more disheartening than finishing a sweater, sewing it up, adding the borders, weaving in all those ends, putting it on, and only then catching sight of an obvious error the first time you walk past a mirror.
- Is it the right size? If you’re making something that is supposed to fit a certain way, stop and measure it or hold it up against yourself to see if it’s shaping up properly. You may be reassured that it’s perfect, or you may discover you’ve chosen the wrong size or misinterpreted the instructions and it can’t possibly fit. If it looks like it won’t fit, you can take action to fix it right away.