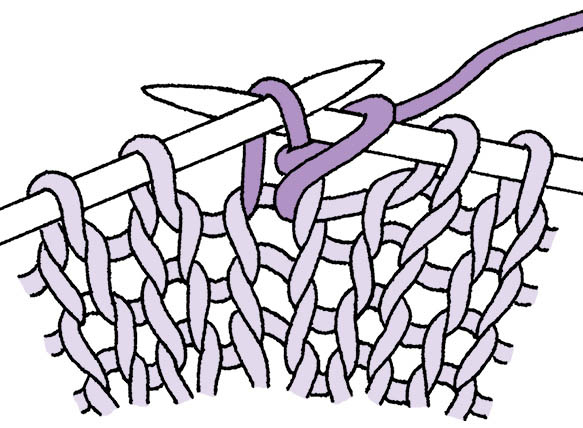
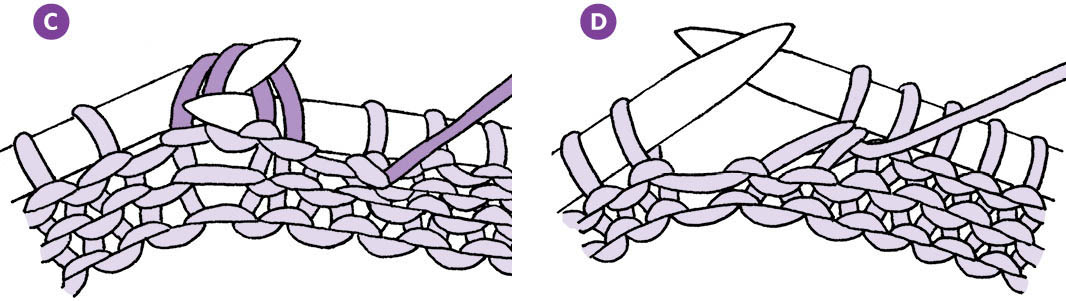
knit into front and back

Knit and purl stitches are the basic building blocks of knitting. Increases and decreases let you stretch, compress, and shape these building blocks to create everything from lace shawls to tailored garments.
Q: What is an increase, and how do I do one?
A: Increases (inc) make your knitting wider by adding stitches. For example, sleeves fit better if they are tapered so that the wrist is narrower than the upper sleeve. Sleeves are usually begun from the bottom, with increases worked periodically along the seam line.
There are many ways to increase. Here are the ones that I find most useful:
knit into front and back
See also: knitting or purling into the back loop


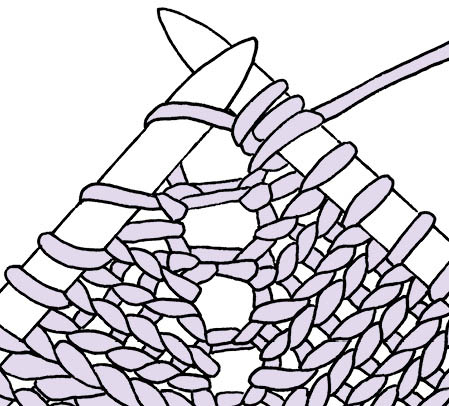
lifted increase, left slant

lifted increase, right slant

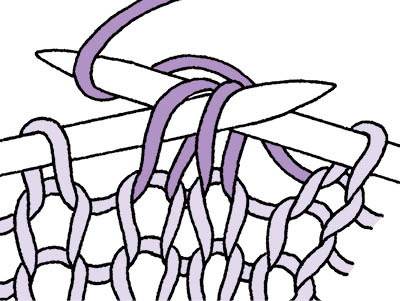
eyelet
See also: The Yarnover
Q: What are paired increases? Why do you do them and how?
A: These are increases done two at a time mirroring each other. They are used to create decorative effects within pattern stitches or to make two edges of a knitted piece symmetrical, such as the two sides of a V-neck. To work them, use an increase that can slant in either of two directions, such as the Make 1, or the Lifted increase. Work the first increase in the pair in one direction and the second in the opposite, reversing the twist of the Make 1 increases or the order of the steps in the Lifted increase.

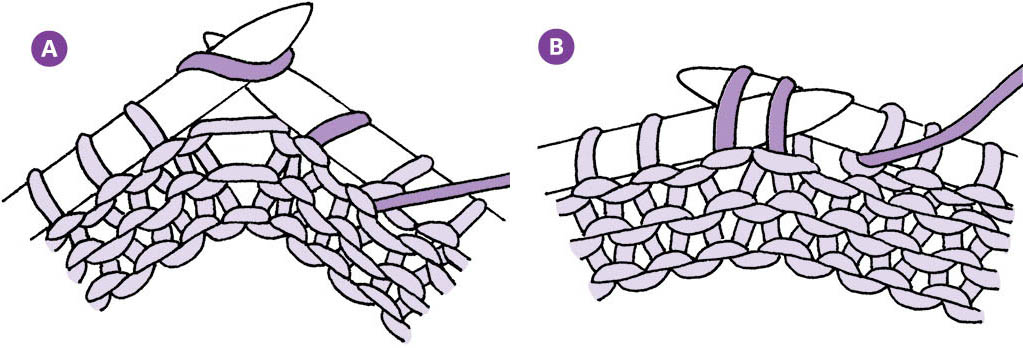
right-slanting M1 and left-slanting M1 with three stitches between
Yarnovers don’t slant in either direction, so they can be used in pairs and will always look symmetrical. Just put at least one stitch between them.

two yarnovers with a single stitch between
The Knit-Front-and-Back increase cannot be reversed, but two of them worked next to each other will look symmetrical, with a stitch apparently separating them. To make them symmetrical at the outer edges, work the Kfb at the end of the row one stitch farther away than the Kfb at the beginning of the row. For example, at the beginning of the row, work K1, Kfb; and at the end of the row, when 3 stitches remain, work Kfb, K2. At both edges, the characteristic bump or bar will appear two stitches away from the edge.

two Kfbs with no stitch between
Q: What are double increases? How do you do them and why?
A: The increases described previously are all single increases; they add just one stitch at a time. A double increase adds two stitches each time you work it. Like the single increase, there are many ways to work a double increase:

knit-purl-knit double increase
knit-yo-knit double increase
Q: Is there a way to work more than two increases in a single stitch?
A: Yes. You can knit into the front and back of a stitch as many times as you like. You can also alternately knit and purl into a stitch multiple times or alternate knits or purls with yarnovers multiple times. These multiple increases are frequently used in bobble or popcorn patterns.
Q: I know there are different ways to work a Make 1. Is one better than the others?
A: The Lifted Make 1 “steals” a little bit of yarn from the two stitches on either side when it is lifted and twisted to form the new stitch. If you are a loose knitter, this may be a benefit because it prevents a hole from appearing when you increase. If you are a tight knitter, are using a yarn that doesn’t stretch, or find that the Lifted Make 1 noticeably distorts the stitches on either side, it’s better to use the Make 1 with the working yarn.
Q: When I use paired Make 1 increases, one twists more than the other. Why does this happen?
A: When you knit or purl a Make 1 Left, it doesn’t add any more twist; but when you work a Make 1 Right, it adds another half turn. In order to make them identical, you can twist the Make 1 Right less by working into the back of it when you knit (or purl) it. Or you can add more twist to the Make 1 Left by working into the back of it.
Q: My pattern says to increase. How do I know which increase to use?
A: Check the introduction and any explanatory material, such as the abbreviations, to see if the pattern explains which increase to use. If you can’t find it, you’ll need to do a little math to see whether to use the type of increase in which you work twice into a stitch (Knit-Front-and-Back), or one of the increases that is done between stitches (Make 1, or Lifted).
See also: What Does It Mean When It Says . . . ?
Q: Why are most increases worked on the knit side?
A: It’s easy to see how they’ll look in the finished knitting when worked on the knit side.
Q: Is it possible to increase on the purl side?
A: Yes. All of the increases described earlier can be easily done on the wrong side. Knitting and purling into one stitch results in what looks like two purl stitches on the right side of the fabric, but you can mimic the same increase from the wrong side by purling and then knitting. When working Lifted increase from the purl side, be careful to lift up the correct strand of the stitch.
Q: Why would I increase rather than cast on?
A: Increases are worked when only one or two stitches at a time need to be added or when they must be done in the center of the knitting. Casting on is done at the beginning of a row and is used to add more than one stitch at the edge of the fabric.
Q: What is a decrease, and how do I do one?
A: Decreases (dec) make your knitting narrower by removing stitches. They are done as part of a pattern stitch or to shape a piece of knitting. Here are various ways to decrease:

knit 2 together

purl 2 together

slip 1-knit 1-pass slipped stitch over
slip-slip-knit

knit 2 together through back loops

purl 2 together through back loops
slip-slip-purl
If your stitches don’t face the standard way on the needle, then you’ll need to adjust for this when working decreases.
See also: The Slipped Stitch and Twists and Turns
Q: I followed the directions for the ssk decrease, but my stitches are twisted. Why did this happen?
A: This happens if you slip the stitches purlwise. In the first step, you must slip the two stitches individually knitwise. This makes them change position on the needle so each stitch is facing in the opposite direction. Then, when you knit them together, they won’t be twisted.
Q: What is a double decrease? When would I use it?
A: The decreases just described are all single decreases, eliminating just one stitch at a time. Double decreases (DD) remove two stitches at a time. Use them to decrease more rapidly than is possible using single decreases (such as when making a ruffle), to work decreases in a pattern stitch with a two-stitch repeat (such as K1, P1 ribbing), or as part of a decorative pattern stitch. They are frequently used where decreases for shaping are done in pairs, such as at the shoulders of a raglan-sleeved sweater or the top of a beret.

knit 3 together
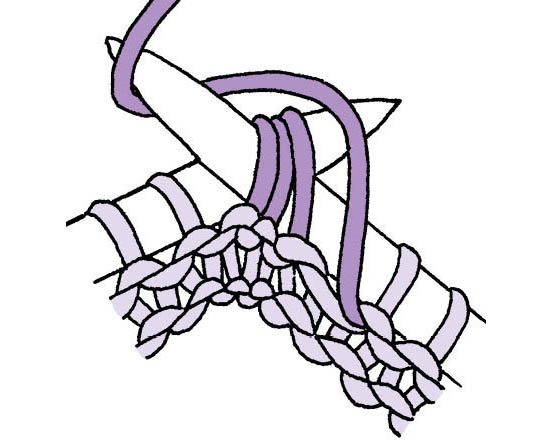
purl 3 together

slip 1-knit 2 together-pass slipped stitch over

centered double decrease

two fronts of a cardigan form a mirror image
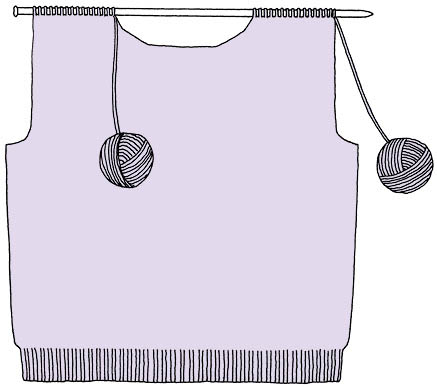
work both shoulders at the same time
Starting from the armhole edge on a right-side row, work across until 3 stitches remain before the neck opening, K2tog, then knit the last stitch. Leave the yarn dangling, and pick up the yarn for the other side of the neck. Knit 1, ssk, then work to the end of the row. Turn, and work the next row back to the neck edge. Leave this yarn dangling and pick up the other yarn. Work to the end of the row. You’ve completed 2 rows, and you’ve decreased 1 stitch at each neck edge. Repeat all of this twice more. For this example, the decreases are worked 1 stitch in from the edge, which makes it easier to pick up stitches for the border later. The reason for using the K2tog decrease on one side of the neck and the ssk decrease on the other is that they are mirror images of each other, and this detail makes the two neck edges look symmetrical. You may prefer to reverse their positions for a slightly different effect.
See also: Decreases Chapter 3, Binding Off, and Increases
Q: If a pattern says to increase or decrease at the beginning or end of the row, should I do it at the very edge of my knitting?
A: It’s best to do all increases and decreases at least 1 or 2 stitches away from the edge because these procedures tend to make the edge uneven. They can also make it very confusing to pick up stitches or to seam along the edge later. For example, to work decreases two stitches in from both edges of a sleeve, knit the first two stitches, ssk, and then work across the row until there are four stitches left. Next, K2tog and then knit the final two stitches. The two decreases mirror each other, and there are two stitches in Stockinette at each end of the row. Repeating this procedure for the length of the sleeve edges ensures a neat, even, easy-to-see edge when you sew it up.
The exception to this rule is when a yarnover is to be worked at the beginning of the row, before the first stitch. The resulting row of loops along the edge may be used decoratively, or it may be used later for joining.
Q: The instructions say to work “in pattern as established” while shaping the armholes and neck, but I’m having trouble doing this because of increases and decreases in the pattern stitch. I keep ending up with the wrong number of stitches. What should I do?
A: Shaping can be very confusing when you’re working a pattern stitch that already involves increases and decreases. As the piece becomes narrower or wider, one option is simply to work the incomplete pattern repeat at the edge in Stockinette or a very simple pattern stitch like Seed Stitch. Markers between pattern repeats make it easy to see where the pattern stitch begins and ends. Whenever you have enough stitches at the edge, work a full pattern repeat. This works well if the pattern repeat is narrow, but it can look terrible if it is wide. For wider patterns, you’ll need to maintain the pattern stitch as close to the edge as you can. One solution is to work half a pattern repeat in pattern and the remaining stitches in Stockinette.
When you are working a pattern stitch with increases and decreases, it’s important to understand how they interact. For each increase there is a corresponding decrease; otherwise, the total number of stitches would change. In some pattern stitches, corresponding increases and decreases are worked on the same row, so that you always have the same number of stitches in a row. The rule of thumb when doing shaping in these stitches is to work the corresponding increase and decrease only if there are enough stitches for both of them. In cases where there is a double decrease at the center of a pattern, you may need to substitute a single decrease when one of the corresponding increases falls beyond the edge of the fabric. You may encounter situations where the corresponding increase falls beyond the edge of the fabric, but you need to work a shaping decrease on that row anyway. In this case, work the pattern as written all the way to the edge; the missing increase in the pattern stitch takes the place of the decrease you would have worked.
In other patterns, the corresponding increases and decreases may be several rows apart, so you’ll have more stitches on some rows and fewer on others. In these cases, you’ll need to keep track of the corresponding increases and decreases over several rows.
Another helpful exercise is to graph the pattern stitch in relation to the shaping. It’s not necessary to graph the whole garment, just the section where the shaping takes place. For instance, chart a sweater from the armhole up to the shoulder and over to the center to include neck shaping.
See also: Chapter 7, Pattern Stitches
Q: I’m working a pattern with a two-stitch repeat. When I do increases or decreases, it messes up the pattern. Is there a way to avoid this?
A: Yes. Work double increases or double decreases instead of single ones. For example, if you are supposed to increase eight stitches evenly spaced, work four double increases instead. This way, you’ll add a full repeat of the pattern stitch at each increase point.
Q: Is there a good way to work an increase when I’m working with two colors in stranded knitting?
A: Yes. When it comes time to increase, knit a stitch with both strands held together. On the next row or round, treat the two strands as separate stitches.
Test the shaping on a swatch before you begin the garment. Once you have knit a swatch big enough to measure, bind off about 2" of stitches at the edge, then decrease one stitch on each right-side row for about 2". Work straight for another 3" or 4" before binding off. This produces the same shaping as an armhole and is very similar to one side of a neck opening. It gives you a chance to practice integrating shaping with your pattern stitch, and it’s extremely useful for picking up stitches and testing the border along the shaped edge.
