Chapter 1
Casting On
The foundation of your knitting is the cast on. Finding the right cast on for a particular project is essential. Firm cast ons support shawls and necklines. Hats and socks fit comfortably thanks to stretchy ones. Decorative cast ons add a special edge to dressy garments. Many knitters remain loyal to just one cast on, which will be perfect for some projects but may be too loose or too tight, or just won’t look right, on others.
Basic Cast Ons
Q: I know how to do only one cast on, but I know there are others. Should I learn them?
A: You’ll find it very helpful to know several of the basic cast ons (often abbreviated “CO” in knitting instructions) so you can choose among them depending on the situation. You should probably be familiar with the Loop and Backward Loop Cast Ons, the Knitted Cast On, the Cable Cast On, and the Long-Tail Cast On.
Loop Cast On
Many knitters start out using the Loop Cast On as beginners and continue to use it for the rest of their lives. It is not the best cast on, but it is the easiest to learn, can be tightened or loosened later, and is thin and unobtrusive. On the other hand, it can be loose or uneven, is difficult to work into on the first row, and has a tendency to spiral around the needle (only a problem for circular knitting); in addition, the loose single strand at the edge of the fabric does not wear well.
When to use it: Good all-around cast on for sweaters, hats, socks, scarves, shawls, or anything for which you want the edge to stretch. Particularly useful when you want very little bulk or might need to adjust the tension of the cast on later (for example, when starting i-cord, a top-down hat, a tip-down mitten, or a shawl from the center out).
Get ready: Use one needle and a single strand of yarn. Hold the cut end of the yarn in the left hand with the needle and the working yarn (attached to the ball; see How much yarn do I need?) in your right hand.
How to do it:
- 1. Point your thumb toward yourself, under the yarn. Turn your thumb away from you.
- 2. Slip the needle up into the loop on your thumb.
- 3. Slip your thumb out and tighten the loop.
Repeat steps 1 through 3 until there are enough stitches on your needle. (A stitch is one loop around the needle.)
Variations
- Use your index finger instead of your thumb.
- The Backward Loop Cast On twists the loops in the opposite direction. Hold the needle and cut tail of yarn in your left hand exactly as described for the Loop Cast On. In step 1, point your thumb away from you, then turn it toward you in step 2. When you knit the first row, it will further twist the cast-on stitches, tightening them and making the edge more elastic.
- Switch hands. Hold the needle and cut tail of yarn in your right hand. If you follow the directions for the Loop Cast On, you’ll make a Backward Loop Cast On. To duplicate the Loop Cast On exactly, point your thumb away from you in step 1, then turn it toward you in step 2.
Plan Ahead
If there will be a seam beginning at the cast-on edge, leave a long tail and use it to sew the seam. When you finish, there will be fewer ends to weave in.
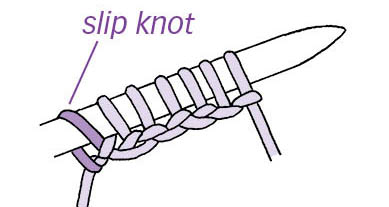
Knitted Cast On
Because the cast-on stitches are made just like regular knit stitches, this is an excellent cast on for beginners. It is easier to work into on the first row, its twisted bottom edge is more resilient, and it wears better than the Loop Cast On. It can look a little holey if worked too loosely, however, and can be difficult for beginners to tension evenly.
When to use it: Good all-around cast on for sweaters, hats, socks, scarves, shawls, or anything where you want the edge to stretch.
Get ready: Use two needles and a single strand of yarn. Make a slip knot as shown below, leaving a short tail, and place it on your left needle.
How to do it:
- 1. Knit a stitch, leaving the original stitch on the needle (see The Knit Stitch). Hint: Work the new stitch a little more loosely than usual.
- 2. Insert the left needle up into the new stitch from the front.
- 3. Pull on the yarn to tighten the stitch.
Repeat these three steps until you have enough stitches. The original slip knot counts as the first stitch.
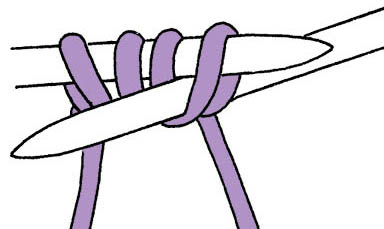
Cable Cast On
A version of the Knitted Cast On, this method creates an even, cablelike edge that wears well. It is not stretchy, however, and produces a pronounced, horizontal edge that some knitters dislike. On the other hand, the ribbed variation is excellent for garments that begin with K1, P1 (knit 1, purl 1) ribbing (see The Ribbed Cable Cast On).
When to use it: Perfect for edges that need to be firm. Can be used for sweaters, but take care to work loosely. Consider the ribbed variation when more stretch is required (for example, the bottom of a hat or the top of a sock).
Get ready: Use two needles and a single strand of yarn. Begin with a slip knot, then cast on one more stitch, using the Knitted Cast On. Hint: Work the second stitch a little more loosely than usual.
How to do it:
- 1. Insert the right needle between the two stitches. Knit up a stitch, leaving the two original stitches on the left needle.
- 2. Insert the left needle up into the new stitch from the front and slip it off the right needle.
Repeat these three steps, always knitting the new stitch up between the last two stitches on the needle, until you have enough stitches.
Tip: The Cable Cast On is easier if you work step 1, inserting the needle between the last two stitches, before you tighten the newest stitch. If you tighten it first, you’ll just have to loosen it again before you can insert the needle.
The Ribbed Cable Cast On is a variation on the Cable Cast On that stretches more and is a good general purpose cast on, especially for K1, P1 ribbing. Make it by alternately knitting and purling between the last two stitches. To purl, insert the needle between the two stitches from the back (bottom left).
See also: The Standard Stitches, Knit 1, Purl 1, Ribbing; The Purl Stitch.
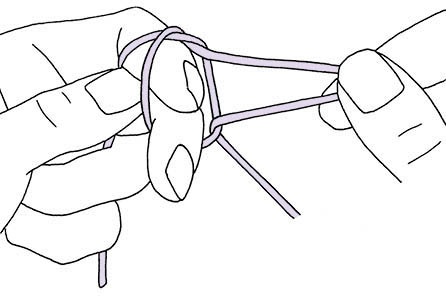
Tying a Slip Knot
How to do it:
- 1. Hold the end of the yarn in your hand. Wrap the yarn one and a half times around two fingers to end at the back.
- 2. Poke a loop of the yarn through between your fingers.
- 3. Slip your fingers out and tighten by pulling on the cut end and the loop.
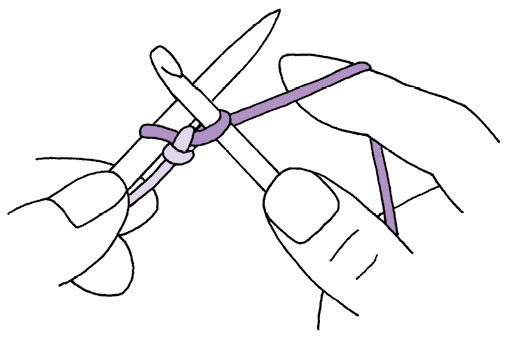
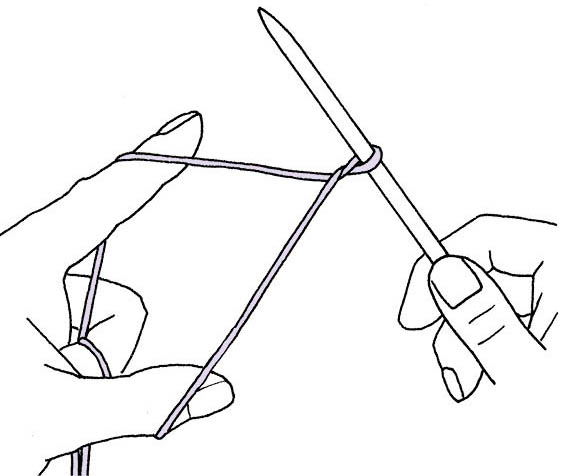
Long-Tail Cast On
Also known as the Continental Cast On, this is probably the best of the basic cast ons. Once learned, it can be executed very quickly. It is stretchy but not loose and creates a neat, even edge that’s not too thick. Its two sides are noticeably different; you can decide which you prefer for the outside of your garment.
When to use it: Can be used for almost anything that requires a medium amount of stretch.
Get ready:
- 1. Use one needle and a single strand of yarn. Pull out a length of yarn for the “long tail.” Make a slip knot at this point and place it on the needle. Hold the needle in your right hand with your index finger on top of the slip knot to keep it from sliding. The long tail should hang from the front of the stitch, and the working yarn from the back.
See also: Estimating the Length of the Tail.
- 2. Pinch your thumb and index finger together and insert them between the two strands of yarn.
- 3. Spread your thumb and finger apart so that the long tail hangs over your thumb and the working yarn hangs over your index finger.
- 4. Catch both strands of yarn against the palm of your hand with your other fingers. Hint: Don’t let these go!
How to do it:
- 1. Insert the needle up through the loop around your thumb.
- 2. Bring the needle over and around the strand in front of your index finger.
- 3. Bring the needle back out through the thumb loop.
- 4. Let the loop slide off your thumb.
- 5. Put your thumb behind the long tail and use it to tighten the loop.
Repeat these five steps until there are enough stitches. The slip knot counts as the first stitch.
Note: As with many knitting techniques, it takes far longer to describe this than to do it. Practice until you can consistently control the tension of both strands by holding them against your palm. Then you’ll be able to knit up the stitches very smoothly and rapidly.
This cast on accomplishes exactly the same thing as if you had used the Loop Cast On and then knit 1 row. Keep this in mind if your instructions say to cast on and then knit 1 row.
Variations
If you find it difficult to hold the yarn in your left hand, then switch. Hold the needle in your left hand and the yarn in your right hand. If you find it difficult to hold both strands of yarn in your left hand, move the working yarn to your right hand. Use a long straight needle and prop it against your leg or hold it under your arm so that you can let it go from time to time. The needle stays still while you do this; only your hands move.
Instructions
- 1. Point your thumb up at the ceiling and slip the loop onto the point of the needle.
- 2. Wrap the yarn around the needle with your right hand. If you like, you can hold the needle with your left thumb and index finger while you do this.
- 3. Take the thumb loop back off the needle by bringing your thumb straight over the top of the needle and down the back.
- 4. Slide your thumb out of the loop and pull the yarn with your left hand to tighten.
- 5. Point your thumb straight down behind the yarn, then twist it toward you to put the loop back on.
- Repeat these five steps until there are enough stitches.
Q: The yarn for the tail gets untwisted as I work the Long-Tail Cast On. Why does this happen and what can I do about it?
A: Each time you slip the loop off your thumb, you put a half-twist in the yarn. When this twist is in the opposite direction from the twist in the yarn, the yarn gradually untwists as you work. Let go of the yarn occasionally and let it twist back to its original state before continuing. You can roll it between your fingers to help it along. You may not want to use this cast on if your yarn is a bulky one with almost no twist to begin with.
Estimating the Length of the Tail
There are several ways to estimate how long the tail should be before you begin casting on:
- Make the tail about three times as long as the width of whatever you are casting on. If it’s the bottom of a sweater that is 40", then pull out about 120". This is 31⁄3 yards.
- Wrap the yarn around the needle once for each stitch you need to cast on. Unwrap this length of yarn and allow about 6" extra to hold onto as you cast on the last few stitches. You can allow more than 6" as insurance against running short, if you like.
- Allow about 1" for each stitch, plus about 6". This will provide a long enough tail for needles up to about size US 11. Thinner needles will require less, while thicker needles will require more.
Q: When I complete the Long-Tail Cast On, turn, and begin to work the first row, the purled side of the cast on is facing me. Is there a way for the knit side to be facing me on that first row?
A:
Yes, there’s a purled variation on the Long-Tail Cast On.
Purled Long-Tail Cast On
While you’re working this cast on, the purl side will be facing you. When you turn to work the first row after the cast on, the knit side will be facing you.
Get Ready: Prepare exactly as for the standard Long-Tail Cast On, but put the long tail over your index finger instead of your thumb.
How to do it:
- 1. Insert the needle up through the loop around your index finger from the back.
- 2. Bring the needle under the strand on your thumb and wrap the yarn.
- 3. Bring the needle back out through the index finger loop.
- 4. Let the loop slide off your finger.
- 5. Tighten the strand on your index finger.
Repeat these five steps until there are enough stitches. The slip knot counts as the first stitch.
All about Casting On
Q:
What’s the easiest cast on?
A: Most people consider the Loop Cast On the easiest to learn; however, once you’re comfortable with other cast ons, they are just as easy to use.
Q:
What’s the fastest cast on?
A: The Long-Tail Cast On beats all the rest. Not only can you do it very quickly, but when you’re done, you’ve already knit the first row.
Q: Is there a way to cast on without measuring out a long tail?
A: You can always use one of the methods that doesn’t require the tail. If you prefer the Long-Tail Cast On, however, try this option: Hold the beginning of two balls of yarn together when you make your slip knot. Use one strand for the working yarn and the other for the long tail. Don’t include the slip knot in your stitch count. After you finish casting on, cut off the ball you used for the long tail, leaving an end to weave in later. When you’ve knit to the end of the first row, unravel the double slip knot.
Q: After casting on, am I now on the right side or the wrong side?
A: It depends! The “right” side is simply the side that you like the best. The “wrong” side is the side you don’t like as well. Even if you always use the same cast on, your decision may change depending on what you’re making and what pattern stitch you’re using. Also keep in mind that the Long-Tail Cast On is the equivalent of casting on using the Loop Cast On and then knitting the first row. If you are working in a pattern where the right-side rows are knit and the wrong-side rows are purled, you will probably want to treat the Long-Tail Cast On as a knitted row, so the following row is the “wrong” side.
Q: My pattern instructions say to cast on stitches at the beginning of the next row. How do I do this?
A: Hold the knitting in your left hand, ready to begin the next row. The working yarn will be hanging ready at the beginning of the row. Use it to work one of the single-strand cast ons. Choose the Loop Cast On or the Knitted Cast On if you want the edge to be stretchy. The Cable Cast On is a better choice if you want a firm edge. To prevent curling, use the Ribbed Cable Cast On.
Q:
What is the best cast on for sweaters?
A: For the bottom edge of sweater bodies and sleeves, use the Long-Tail Cast On because it stretches, keeps its shape, and wears well. The Cable Cast On wears well but is not as stretchy. If you like the way it looks, you can use it for sweaters, as long as you work loosely or use a larger needle while casting on. If you plan on working in K1, P1 ribbing, the stretchier Ribbed Cable Cast On is a good choice.
For cardigans that begin at the neck and are worked down, use the firmer Cable Cast On. It will support the neck edge and prevent stretching. For a neck-down pullover, use the Long-Tail Cast On or the Ribbed Cable Cast On. The upper edge should stretch just enough to go easily over the wearer’s head but be firm enough that the neckline doesn’t sag.
Q:
What is the best cast on for shawls?
A: Shawls vary a great deal in fabric and construction, so there are several answers to this question. If it is a lace shawl, you may want to try the Lace Cast On. If it’s made from a solid fabric, then it will need a flexible cast on — one that drapes nicely and doesn’t pull the fabric in. A good choice is the Long-Tail Cast On.
Q:
What is the best cast on for scarves?
A: Almost any cast on that is flexible and stretchy is good for scarves. Avoid the Cable Cast On, which tends to be too tight.
Q:
What’s the best cast on for K1, P1 ribbing?
A: For a firmer edge, use the Ribbed Cable Cast On. For a looser edge, use the Tubular Cast On.
Q:
What’s the best cast on for wider ribbing?
A: For a cast on that matches K2, P2; K3, P3, or any other ribbed combination of knits and purls, work a variation of the Long-Tail Cast On by alternating the standard knitted Long-Tail Cast On with the Purled Long-Tail Cast On to match the pattern of your ribbing. For example, if you are beginning a piece of K3, P3 ribbing, cast on 3 using the Long-Tail Cast On, then (without making any changes to the position of the working yarn or the tail in your left hand) cast on 3 using the Purled Long-Tail Cast On. Continue alternating between the two until you have the required number of stitches. You will need to allow a longer tail because the purled stitches will use up more of the tail than the knitted stitches.
Q: Is there a more durable cast on I can use for children’s clothes?
A: Using extra strands of yarn at the edges of children’s clothing can help the garments wear better. If you choose the Loop or Backward Loop Cast On, use two or more strands of yarn while casting on, then switch to one strand. If you use a Long-Tail Cast On, add a second long tail, as follows.
Doubled Long-Tail Cast On
Get ready: Measure out your long tail using two balls of yarn. Tie both strands of yarn into a slip knot and place it on the needle. Cut the yarn going to the second ball, leaving a tail 6" long.
How to do it: Cast on as described for Long-Tail Cast On with two strands around your thumb, but the usual one strand around your index finger.
Variations: For more durability or a decorative effect, you can use several strands of yarn for the long tail. To avoid wasting yarn, use a separate ball for each strand and cut them off when the cast on is completed.
Note: Don’t include the slip knot in your stitch count. When you get to the end of the first row, unravel the slip knot.
Special Cast Ons
Q:
What is the best cast on for socks?
A: The tops of socks have to stretch a long way to be pulled over the heel. Once they are on, they need to stretch enough to be comfortable on the wearer’s calf. Of all the cast ons discussed so far, the Long-Tail Cast On stretches the most while maintaining a neat edge. There are other cast ons that stretch even more. If you plan to work in K1, P1 ribbing, try the Tubular Cast On, which follows.
Tubular Cast On
This cast on is very stretchy, with no noticeable ridge at the edge, making it excellent for any edge that must be stretched and comfortable against the skin. It’s especially suited to K1, P1 ribbing. It can be a bit bulky when worked in thick yarn and may look loose when relaxed.
How to do it:
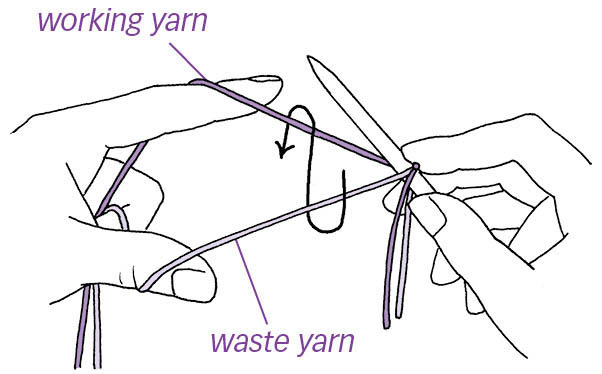
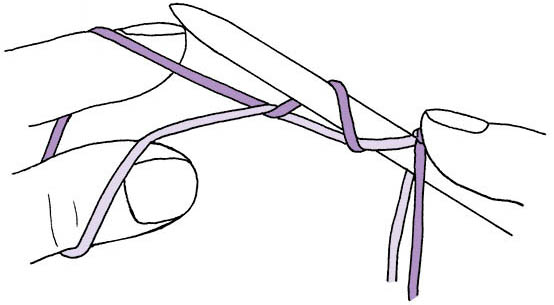
- 1. Use two needles, contrasting waste yarn, and a single strand of the working yarn. With waste yarn and using the Loop Cast On, cast on half the stitches you need. If you need an odd number of stitches, add an extra stitch.
- 2. Cut the waste yarn, leaving a tail about 6" long (A). With the working yarn, *K1, yarnover; repeat from * to end of row (B). Knit the last stitch, but don’t work a yarnover at the end of the row. You have now almost doubled the number of stitches.
See also: waste yarn.
- 3. Work Tubular Knitting as follows: On the next row, *bring yarn to front (as if you are going to purl), slip 1 stitch purlwise, bring yarn to back, K1; repeat from * until 1 stitch remains, slip 1. On the following row, *K1, bring yarn to front, slip 1 purlwise, bring yarn to back; repeat from * until 1 stitch remains, K1. Repeat these 2 rows once more.
- 4. Work in K1, P1 ribbing. On the first row, knit the knit stitches and purl the slipped stitches.
- 5. After you’ve worked a couple of rows of ribbing, pick out (remove; see Removing Waste Yarn) the waste yarn.
Note: This cast on always produces an odd number of stitches. If you need an even number of stitches, adjust for it when the ribbing is completed by increasing or decreasing a stitch in an unobtrusive spot. If your instructions call for increasing at the top of the ribbing, simply work one fewer or one additional increase so that you end up with the correct number of stitches.
See also: The Yarnover, The Slipped Stitch, Decreases, and Increases.
Removing Waste Yarn
- 1. Cut the waste yarn close to the edge of your knitting.
- 2. Insert the tip of your knitting needle into the first loose loop of waste yarn at the bottom edge. Gently pull it free.
- 3. Move to the next loop of waste yarn and pull it free. Continue across.
If you are working across a long edge, cut the waste yarn frequently to make the job easier.
Q: The edge of my Tubular Cast On looks loose and messy. How can I fix this?
A: Work the first row with the working yarn using a needle one or two sizes smaller, and it will tighten up; however, this will also reduce the amount it can stretch.
Q:
What is the best cast on for lace?
A: Lace demands a cast on that will not detract from the lace itself or create a stiff, nonstretchy edge. The optimum choice is the Loop Cast On, which can be adjusted to make the edge looser or tighter. For a more decorative lacy edge, try the Lace Cast On.
Lace Cast On
This is a very stretchy cast on with decorative loops every other stitch, which I invented to use with lacy fabrics. The loops are also useful for picking up stitches later or for adding fringe.
Get ready: Use two needles and your working yarn. Make a slip knot and place it on the left needle. Hold the slip knot in place with your index finger.
How to do it:
- 1. Wrap the yarn behind the left needle to make a yarnover.
- 2. Insert the right needle between the slip knot and the yarnover.
- 3. Wrap the yarn around the right needle and knit a stitch.
- 4. Slip the new stitch onto the left needle knitwise.
Repeat these four steps, inserting the needle between the yarnover and the previous stitch in step 2.
Note: This cast on always results in an odd number of stitches. If you need an even number of stitches, cast on one more than you need, then unravel the slip knot when you reach the end of the first row.
Q:
What’s the best cast on for fringe?
A: The Knitted Cast On worked loosely and the Lace Cast On leave a loose strand between each stitch that is useful when adding fringe. You may also want to try the Twisted Loop Cast On, as follows.
Twisted Loop Cast On
Similar to the Loop Cast On, this one has an extra twist in each loop for an entirely different effect.
Get ready: Use one needle and a single strand of yarn. Hold the tail of yarn against the needle in your left hand.
How to do it:
- 1. Put your index finger under the working yarn, and rotate your finger around twice, twisting the yarn.
- 2. Slip the loop onto the needle.
- 3. Pull the yarn to tighten.
- Repeat these 3 steps until there are enough stitches.
Q: Are there decorative cast ons for multicolor knitting?
A: Yes, there are several variations on the Long-Tail and Cable Cast Ons that use two or more colors. Instructions for these are in chapter 9.
Provisional Cast Ons
Q: What is a provisional cast on, and when would I use it?
A: Provisional cast ons, also known as open cast ons, will be removed either while the knitting is in progress or as part of a finishing step. To make removal easier, use a contrasting color for the waste yarn. The Loop Cast On is used as a provisional cast on in the Tubular Cast On.
Provisional cast ons are extremely helpful in a number of situations. When you want to add a border or another section seamlessly at the beginning of the knitting, you simply remove the waste yarn, slip a needle into the stitches, and then work the new section from this point. To create a hem at the beginning of the knitting, you’d remove the waste yarn, slip the stitches onto a needle, and then fold the knitting to allow you to join the two layers by knitting the stitches on the front needle together with stitches on the back needle. When starting a scarf or shawl at the center point, so that the two ends match, a provisional cast on allows you to avoid making a noticeable seam at the center. To create a seamless tube, you can remove the provisional cast on and use Kitchener Stitch to join the top and bottom of the knitting. Here are three provisional cast ons that are easier to remove than the Loop Cast On. Choose between them based on which you find easiest.
Crocheted Cast On
This provisional cast on creates a crocheted chain of the waste yarn, which is then easily unraveled when you want to remove it and begin working with the stitches at the bottom edge of your knitting.
Get ready: Use one knitting needle, one crochet hook (about the same size as your needle), a ball of contrasting waste yarn, and the yarn for your project. With the waste yarn, make a slip knot and place it on the crochet hook. Hold the needle in your left hand, with the crochet hook in front of it in your right hand. Make sure the yarn is behind the needle. You can hold the yarn in either hand, whichever is most comfortable for you. To secure the tail, hold it against the needle.
How to do it:
- 1. Put the waste yarn behind the needle and hook it with the crochet hook.
- 2. Use the hook to pull a new loop through the loop already on the hook.
Repeat these two steps until there are enough stitches on the needle. (Remember to keep the yarn behind the needle and the crochet hook in front of it.) Enlarge the last loop on the crochet hook until it’s about 4" tall, then cut the yarn at the top of the loop and pull out the yarn attached to the ball. Avoid pulling on the remaining tail; keep the last chained stitch loose so it will be easier to remove later.
Using your working yarn, knit across, leaving a tail 6" long, then begin working your project. When you are ready to remove the cast on, start at the corner where there are two tails: one of the waste yarn and one of the project yarn. Insert a knitting needle into the stitch where the tail of waste yarn emerges, loosen it up, and then pull the tail out. Pull on the tail to unravel the crocheted chain. If any fibers are tangled and prevent it from unraveling, use a small pair of sharp scissors to snip the offending fibers. Slip a knitting needle into the loose stitches. If you are a careful sort of person, you may wish to do this every few stitches so they can’t unravel before you get them on the needle.
Invisible Cast On
This provisional cast on leaves a single strand of the waste yarn across the bottom of the first row, which is easily removed simply by pulling on one end.
Get ready: Use one needle, a strand of waste yarn, and a ball of your working yarn. Tie the waste yarn around the end of the working yarn. Arrange the yarn with the waste yarn around your thumb, the working yarn over your index finger, both strands held taut against your palm, and the point of the needle under the knot. Keep the knot from sliding off the needle with your index finger.
How to do it:
- 1. Point your thumb up and insert the needle under the waste yarn from front to back, scoop up a strand of the working yarn, and bring the needle back to the front under the waste yarn.
- 2. Point your thumb down and use the needle to scoop up a strand of the working yarn. (Again, go behind it, then under it.)
Repeat these two steps until there are enough stitches. Cut the waste yarn, leaving a tail, and continue with the working yarn.
Note: Space the stitches out along the needle to keep them loose. If they are too close together, it will be hard to pick up the stitches when the waste yarn is removed. Try to keep the waste yarn taut so that it runs along the bottom of the needle.
When the time comes to remove the waste yarn, untie the knot. (If this is difficult, simply slide the working yarn out of the knot.) Cut the waste yarn close to the edge of the knitting. Holding its other end, pull the waste yarn straight to the side to remove it. Slip a needle into the stitches.
Go Easy on Yourself
Choose your waste yarn with care. Using a firmly twisted, smooth, or slippery waste yarn (for example, smooth cotton, rayon, or silk) minimizes tangles and helps the waste yarn to slide right out of the knitting when the time comes. Avoid fuzzy yarns, such as brushed mohair, because they leave noticeable bits of fluff on your project when removed. Choose a strong yarn; weak yarns tend to break as they are pulled out. Dental floss can also be used in place of waste yarn — avoid using fine floss because it could cut the working yarn when pulled out.
Ravel Cord Method
Ravel cord is a very strong, slippery nylon cord used by machine knitters. Ravel cord can be easily removed to leave live stitches at the beginning of your knitting without working any special provisional cast-on technique. The fact that it’s slippery makes it easier to remove than a fuzzy yarn. Its strength means that you can pull ravel cord across a large number of stitches to remove it without worrying about it breaking. Good substitutes are dental floss or fine, soft nylon cord from your hardware or craft-supply store. Avoid fine dental floss because it could cut through the working yarn when removed. Smooth, slippery, unbreakable knitting yarns, such as a multi-ply silk, may also work, if strong enough.
Get ready: Use two needles, waste yarn, working yarn, and ravel cord.
How to do it:
- 1. With waste yarn, cast on as many stitches as you need, any way you like.
- 2. Knit 1 row. Cut the waste yarn.
- 3. With ravel cord, knit 1 row. Cut the ravel cord.
- 4. With working yarn, knit 1 row, then begin working the project.
Note: Ravel cord can be very slippery, so leave long tails or tie it loosely to the other yarns at both ends. If it doesn’t bother you, don’t cut the ravel cord. Just leave it dangling, and it can be reused many times.
When the time comes to remove the ravel cord, remove any tangles or knots. Pull the ravel cord firmly, straight out to the side. When all the slack is pulled tight, the ravel cord will slide out of the fabric. Slip the stitches onto a needle.
Q: Is there some way to make my cast on match my bind off?
A: Yes, work the Crocheted Cast On using the working yarn, rather than the waste yarn. When you have one fewer stitch than you need, slip the loop off the crochet hook and onto the needle. Don’t cut the yarn; just start knitting. This makes a chain stitch along the cast-on edge that matches the chain of the Basic Bind Off.
See also: Basic Bind Off.
Q:
Can I make a hem when I cast on?
A: Yes. You can begin with a provisional cast on, work both the inner and outer layer of the hem, join the two layers, and then continue with your project.
Cast On Hem
Get ready: Cast on the stitches needed using a provisional cast on.
How to do it:
- 1. Work in Stockinette Stitch for the length of the hem. This will be the inner layer of fabric. End after completing a wrong-side row.
- 2. Decide what kind of edge you want. For a rolled edge, do nothing. For a straight, flat edge, work one or two rows in Reverse Stockinette (two rows will make a squarer edge). For a picot edge, repeat K2tog and yarnover across the row, knitting rather than decreasing on the final stitch(es) of the row, if necessary, to end up with the correct total stitch count.
- 3. Work the outer layer of the hem in Stockinette until it is the same length as the inner layer worked in step 1.
- 4. Remove the provisional cast on and place those stitches on an extra needle.
- 5. Fold the fabric so the two needles with live stitches are next to each other. Use a third needle to knit the stitches on the two layers together to join them.
- 6. Continue with the body of your garment.
Q:
How can I avoid bulky hems?
A: Work the inner layer of hems with thinner yarn. If none is available, use fewer stitches on the inside section of the hem or work this section on smaller needles.
Solving Cast-On Problems
Q:
My cast on is too tight. How can I fix it?
A:
There are several solutions to this problem:
- Use a needle one or two sizes larger for casting on, then switch to the correct size needle on the first row. If you end up with a too-loose edge or stitches that are too tall, try the next solution.
- Space your stitches farther apart on the needle as you cast on. Stitches that are compressed as tightly as possible have a little less yarn in them than stitches that are spaced about 1⁄4" apart on the needle. If your needle is too short, so that it compresses the cast-on stitches, use a longer needle.
- Adjust your tension. If you are using the Long-Tail Cast On, tighten the thumb loop a little less when you complete each stitch.
- Change to a different cast on. If you use the Cable Cast On, which is characteristically firm, learn the Long-Tail Cast On.
Q: My cast on is too loose. How can I fix it?
A:
Try one of these solutions to the problem:
- Use a needle one or two sizes smaller for casting on, then switch to the correct size needle on the first row. Sometimes this results in an edge that is too tight and stitches too tight to knit easily on the first row. If you have these problems, try the following suggestion.
- Space your stitches a little more closely on the needle as you cast on. Stitches that are compressed tightly have a little less yarn in them than stitches that are spaced farther apart.
- Adjust your tension. If you are using the Long-Tail Cast On, tighten the thumb loop a little more when you complete each stitch.
- Change to a different cast on. If you are using the Loop Cast On or the Knitted Cast On, both of which tend to be loose, learn the Long-Tail Cast On or the Cable Cast On.
Q: My cast on is uneven. How can I fix it?
A: Make sure you are spacing the stitches consistently on the needle as you create them. If some are squeezed tightly together and others are farther apart, the results will look uneven.
Q:
Why are my cast-on stitches so tall?
A: This usually happens with the Long-Tail Cast On when you use a larger needle to prevent the edge from being too tight. The stitches are larger, but when you knit the first row at normal tension, they squeeze together, becoming narrower and taller. To fix this problem, switch back to the normal size needle and space your stitches slightly farther apart as you cast on.
Q: One of my cast-on stitches fell off and unraveled. What do I do?
A:
The answer depends on which cast on you used:
Loop or Backward Loop Cast On
- 1. Insert the right needle under the loose strand of yarn (from the back as shown for the Loop Cast On, or from the front for the Backward Loop Cast On).
- 2. Pass it back to the left needle, twisting it to match the stitches on either side (insert the left needle into the front, as shown for the Loop Cast On, or from the back for the Backward Loop Cast On).
See technique: Loop Cast On.
Long-Tail Cast On
- 1. Pick up the loose strand at the very bottom, as described in the previous solution.
See technique: Long-Tail Cast On.
- 2. When it is on the left needle correctly, insert the right needle into it, as if you are going to purl.
- 3. Insert the tip of the needle under the loose strand. Pull it through to the back.
- 4. Slip the stitch off the left needle. Finally, pass the newly remade stitch back to the left needle, being careful not to change its orientation.
See technique: The Slipped Stitch.
Knitted Cast On
The dropped cast-on stitch is the strand that now lies in front of the next stitch on the needle.
See technique: Knitted Cast On
- 1. Insert the right needle under the front of this strand.
- 2. Insert the left needle into the front of it and slip it off.
Cable Cast On
It is nearly impossible to put this cast on back together if it unravels. The good news is that if one of the stitches slips off the needle, it is held tightly in the twisted strands at the bottom edge. Just slip the left needle back into the stitch.
See technique: Cable Cast On
Q: The slip knot leaves a bump at the corner of the knitting. Is there a way to get rid of it?
A: The slip knot is usually hidden in a seam or by a border, but if it’s in a position where it bothers you, simply untie it. Insert the tip of your knitting needle into the knot and loosen it. Finally, pull the end out of the knot and gently tighten the stitch by pulling on the tail.
This won’t work for the Long-Tail Cast On, where the slip knot isn’t at the beginning of the yarn. To get rid of that slip knot, measure out the tail and position your yarn in your hand, as shown below.
- 1. Put the tip of the needle under the yarn.
- 2. Lift the needle a little and twist it in a full circle. When you have worked to the end of the first row, if your loop seems a bit loose, work into the back of the stitch to tighten it up.
See also: knitting or purling into the back loop
Q: When I make cables, my cast on flares out below them and the bottom edge ripples. How can I prevent this?
A: Cast on one or two fewer stitches below each cable. Then, on the row before you cross the cables for the first time, increase in each cable section to get the correct number of stitches. If you place the increases at the center, where the cable crosses, they won’t be noticeable.
See also: Increases