Color
Color plays a major role in your knitting, whether it’s the creamy natural wool in a cabled sweater; the vibrant stripes in a scarf; hand-painted novelty yarn in a shawl; the fine gradation of patterns in a Fair Isle sweater; or the intricate tapestries produced by intarsia. Color is highly personal. Choose the colors you like and then combine them using one of the many color knitting techniques.
Q: I don’t know where to start when it comes to choosing colors. Do you have any suggestions?
A: Use a fabric, a photograph, a painting, or a poster for inspiration. Choose yarns that match it, and use them in the same proportions as in the original. Pay attention to the amount of contrast between colors. Consciously evaluate the way color is used in knitted garments that you like, including hue, value, and proportion. Note what works and what doesn’t and keep these preferences in mind.
Q:
How can I pick colors that work well together?
A: Remember that there are no bad color combinations. If it looks good to you, then it is good. Different people perceive colors differently. If others don’t agree with your color choices, remember that it’s not their knitting; it’s your knitting and you get to make the decisions. There are, however, several concepts that can help you predict how the colors will interact. These are hue (what the color is), value (how dark it is), and proportion (how much of it there is).
Hue is what we call a color. Red, orange, blue, purple, etc., are all hues. When different hues are adjacent to each other, because of the way our eyes and brains work, the colors interact. Each hue imposes its complement on the color next to it. The basic complementary pairs are red and green, yellow and purple, and blue and orange.
When you place red next to another hue, it will make it appear greenish. Blue next to a hue will make it appear more orange. Use this optical color blending to your advantage. To make a group of colors pop, add a little bit of their complement. However, this can also make colors appear duller. If you put orange next to purple, it will make the purple appear bluer and the orange appear more yellow.
Value is the gradation from light to dark that provides contrast. Any hue can be a full range of tints or shades, from almost white to almost black.
The greater the difference in value between your yarns, the more noticeable color changes will be. If you want the colors to be seen distinctly, use yarns with light, medium, and dark values. If you want the colors to blend together to ensure that lace or textured patterns are visible in spite of color changes, choose colors that share the same value (that is, all light, all medium, or all dark).
Take a photo of your yarns and use photoediting software to change it to a grayscale image. You’ll easily see the variation in values. You can also get an idea of how much the colors will blend by twisting all of them together and looking at them in dim light. If each strand is still distinct, then there is good variation in value.
Proportion describes how much of each hue is used. Equal amounts will look very different from using just a little of one as a highlight. Experiment to see what works best.
Another consideration is how you integrate the colors with each other. You could make the left half of a sweater black and the right half red, or you could use the same amount of each color in wide stripes, narrow stripes, a large checkerboard, or a tiny checkered pattern. The effect of each will be very different from all the others.
Q:
My colors look dull. What’s the problem?
A: You may need to add a little bit of a complementary color as a highlight. Or perhaps one color is interacting with the others, making them appear duller — remove one color at a time and see if the look improves. Try introducing a dark background such as black, charcoal gray, or navy blue to make the others appear brighter.
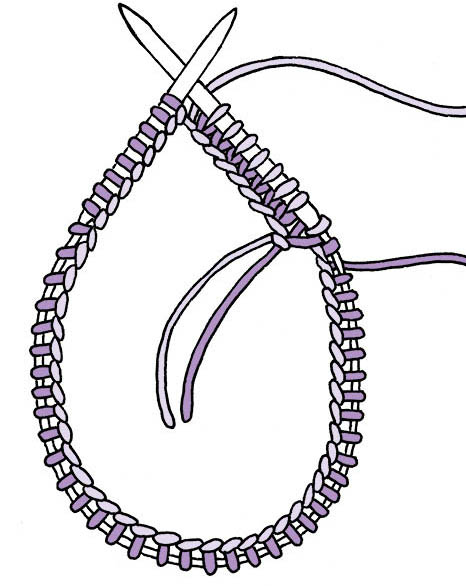
Q: Is there a way to make a decorative cast on using more than one color?
A: Yes, there are several variations on the standard cast ons that are easy to work and look beautiful.
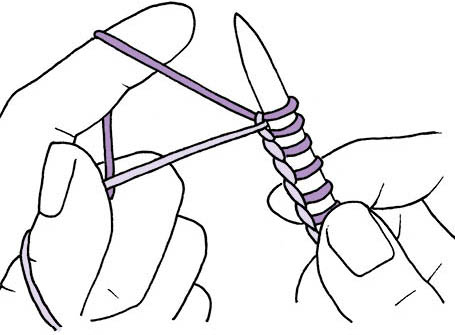
Alternating-Color Long-Tail Cast On
The colors alternate across the needle and there’s a twisted two-color edge, like a candy cane, along the bottom.
Get ready: Using two colors of yarn held together, make a slip knot and put it on the needle. Place one color around the thumb and the other around the index finger.
How to do it:
Work the Long-Tail Cast On, but after each stitch, twist the two yarns and swap their positions on your finger and thumb. Always twist in the same direction. Do not include the slip knot in your stitch count. At the end of the first row, unravel the slip knot.
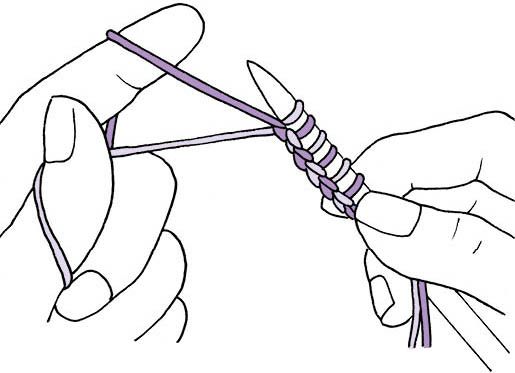
Multicolor Long-Tail Cast On
For a more substantial bottom edge in more than two colors, try this cast on.
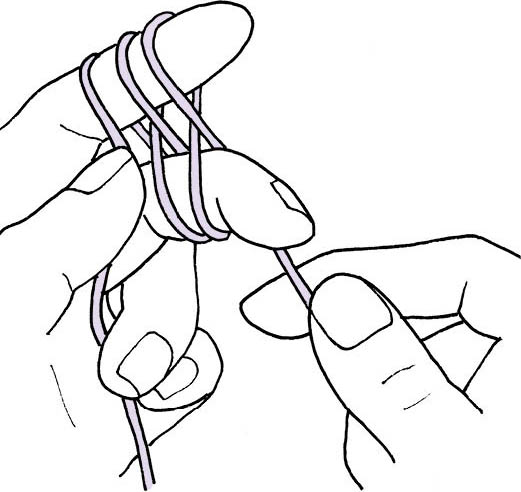
Get ready: Use as many colors of yarn as you like, from 2 or 3 up to 6 or even more. Holding all the ends together, make a slip knot and put it on the needle. Place one color around the index finger and the rest around the thumb.
How to do it:
Work the Long-Tail Cast On as usual. Be careful to tension the thumb strands evenly and smooth them out to make a scalloped edge. Do not include the slip knot in your stitch count. After casting on, cut all the thumb strands. The thickness of the bottom edge can cause the stitches to be spaced out too far on the needle, so work the first few rows firmly. When you get to the end of the first row, take the slip knot off the needle and unravel it. The bunch of ends that remains can be a challenge when finishing. You can braid them and leave them as a decorative element, or you can hide them on the back of the fabric by weaving each end in at a slightly different angle to prevent too much bulk from building up in one place.
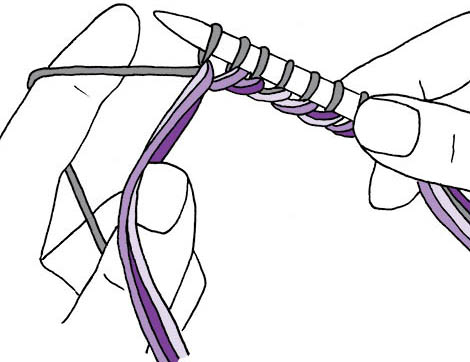
Alternating-Color Cable Cast On
This is a variation on the Cable Cast On that makes the stitches on the needle alternate colors and produces an edge with a double twist of the two colors.
Get ready: Using two colors of yarn held together, make a slip knot and put it on the needle. These are your first 2 stitches.
How to do it:
- 1. Using the yarn that matches the 2nd stitch from the end of the needle (A), knit up a stitch in this color between the last 2 stitches (B) and slip it onto the left needle.
- 2. Twist the two yarns to change colors.
Repeat steps 1 and 2 until there are enough stitches. Be careful to always twist in the same direction when changing colors.
Q:
How do I make stripes?
A: At a minimum, you need two balls of yarn in different colors. The two yarns should be the same thickness, but they don’t need to be the same yarn. When you’re knitting back and forth, let go of one yarn at the end of the row and knit the next row with the other yarn. When you’re knitting circularly, begin knitting with the new color at the beginning of the round. There’s no need to tie on the new yarn; just leave a 6"-long tail dangling to be woven in later. If the fabric gets annoyingly slack at the edge, temporarily knot the ends together loosely. Untie the knot before weaving in the ends when you finish the item.
Q: Should I cut the yarn every time I end a stripe, or should I just pick up the yarn again when I need it?
A: That depends on how far the yarn must travel between stripes. If you are using the yarn again in the next row or two, then you don’t need to cut it. When you begin to use it again, carry it up to where it’s needed loosely enough so that the knitting doesn’t pucker. If the distance is longer, cut it. The behavior of your knitting should be your guide. For example, if you’re making a long, narrow scarf, then carrying the yarns up the edge may make one edge less stretchy than the other so that the scarf curves instead of hanging straight. If you decide to carry the yarn up more than a few rows, prevent loose loops by knitting it together with the working color occasionally on the first stitch of the row or twisting the unused yarn together with the working yarn between rows.
See also: Changing Colors in Circular Knitting and At Loose Ends
Three Is the Magic Number
If you use three balls of yarn, you can work single-row stripes without cutting the yarn or using any special techniques. Cast on with Color 1. Work the first row with Color 2. Work the following row with Color 3. Color 1 will be waiting for you at the edge of the knitting, so pick it up and work one row with it. When you get to the end of the row, Color 2 will be waiting for you. In fact, whenever you get to the end of the row, the next color you need will be waiting there — just pick it up and use it. If you set down your knitting, when you begin again, always begin with the color that’s attached two rows down, not the color that’s attached to the row you just completed.
Q: Can I make one-row stripes without cutting the yarn?
A: Yes. If you use needles with points at both ends (either a pair of double-pointed needles for a narrow piece of knitting or a circular needle for a wider project), you can begin each row from wherever the yarn is attached.
Single-Row Stripes in Stockinette Stitch
Get ready: Using the first color and double-pointed needles or a circular needle, cast on. Beginning with the first stitch you cast on, knit across with the second color. Both yarns will be attached at the end of a knit row.
How to do it:
- 1. Turn and purl across with the first color yarn (the one at the bottom edge of the knitting).
- 2. Do not turn. Go back to the beginning of the needle and purl across with the second color. Both strands of yarn will be attached at the same edge.
- 3. Turn and knit across with the first color.
- 4. Do not turn. Go back to the beginning of the needle and knit across with the second color. Once again, both yarns will be attached at the same edge.
- Repeat steps 1–4.
Q: Is there a way to work single-round stripes on circular knitting without cutting the yarn?
A: Yes. You can use Helix Knitting. This is a method of circular knitting with more than one ball of yarn, where all the yarns are used continuously in the same order. The directions below are for the simplest version of Helix Knitting with just two colors, but you can use more colors, as long as you always repeat them in the same order.
Using Helix Knitting to Work Single-Round Stripes
Get Ready:
- The easiest way to start is to work the Two-Color Long-Tail Cast On.
- Alternative cast on: If you’re not comfortable with the Long-Tail Cast On, then cast on with the first color any way you like. Using the second color and, beginning with the first stitch you cast on, knit across the cast on. Both yarns will be attached at the same edge of the knitting.
- Do not do anything special to join the beginning and end of round; just make sure that the cast on isn’t twisted as you begin working circularly.
How to do it:
- 1. Working circularly, knit one round using the first color (this is the color along the bottom edge). At the end of the round, drop the first color to the right of the second color, which is attached at the end of the previous round.
- 2. Pick up the second color, being careful not to twist it around or cross the first color. Tension the yarn carefully when working the first stitch so that the last stitch you worked in this color is the same size as its neighbors. (It’s easy to pull too hard and collapse the stitch — be gentle!) Knit one round. Drop the current color to the right of the first color, which is attached at the end of the round.
- Repeat steps 1 and 2. To bind off Helix Knitting in two colors, bind off using whichever color comes next in the sequence.
See also: for more about Helix Knitting, see Radcliffe’s The Essential Guide to Color Knitting Techniques and Circular Knitting Workshop (Resources).
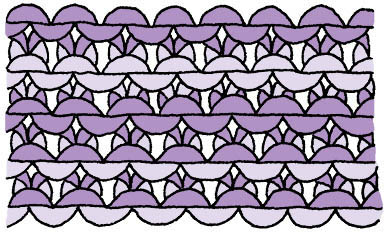
Q: When I change colors in Garter Stitch, I get little bumps of the old color on the first row. Is there a way to avoid this?
A: If you don’t want the color from the previous row to show, then you must do two rows in each color before changing. This creates an obvious right and wrong side to the fabric, and you change colors only on right-side rows. The illustration shows changing colors every row (bottom) and every second row (top).
Q: When I put stripes in ribbing, how can I avoid having the old color show through on the purled part?
A: The old color shows only when you purl, so knit the entire first row of the new color, then go back to ribbing as usual. Your ribbing will still look like ribbing as long as you aren’t changing colors too often. Changing color every row creates a right and wrong side to the fabric, so it’s not reversible.
Q:
Can I add stripes to pattern stitches, besides ribbing?
A: Yes, but there are no strict rules. To avoid bumps of the old color when you change colors, start the new color on a right-side row in plain knitting or a wrong-side row in plain purling. Change colors at a logical point in the pattern stitch, such as at the end of a repeat. Using several colors may work well. Make a swatch and try all the possibilities.
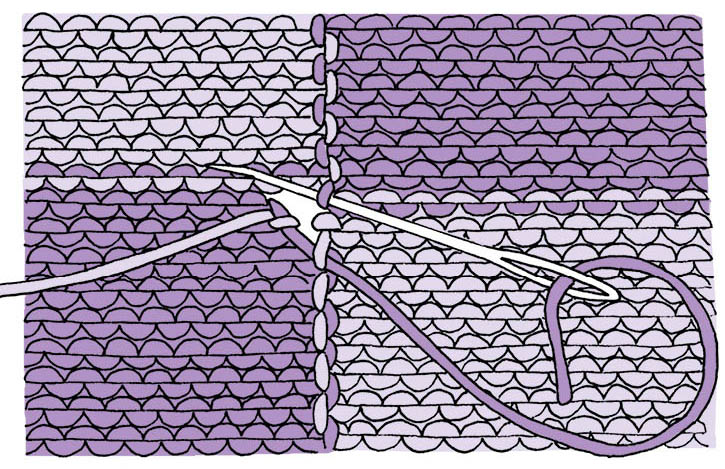
Q: If I knit a garment in stripes, is there a way to make them match exactly at the seams?
A: Knit the garment pieces so the number of rows and the arrangement of stripes are exactly the same on corresponding pieces. Join them using Mattress Stitch, matching the stripes as you work the seam.
See also: Side Seams
Q: What’s the difference between stranded and Fair Isle knitting?
A: In stranded knitting, yarns of different colors are carried continuously across the row as you knit, allowing you to work patterns using any color at any point in the row. Fair Isle knitting is a form of stranded knitting in which just two colors per row are used in traditional patterns. The color patterns in stranded knitting are usually represented in charts, with a different symbol for each color.
See also: Abbreviations and Charts and Changing Colors in Circular Knitting
Q: Stranded knitting looks very complicated. What’s a good way to get started?
A: You can begin very simply with just two colors of yarn that are the same thickness. It will be easier to see what you’re doing on the knit side of the fabric, so work circularly.
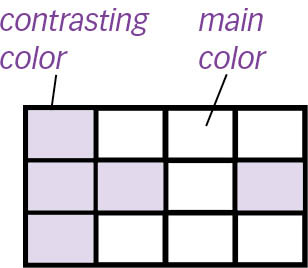
Stranded Knitting
How to do it:
- 1. Cast on a multiple of four stitches with the main color and knit a few rounds.
- 2. Now begin working with both colors. Knit three stitches with the main color, then one with the contrasting color. Repeat this all the way around. When you change colors, spread the stitches out on the right-hand needle and carry the yarn loosely across the back.
- 3. Try another round, centering three contrasting color stitches over the one stitch in this color from the previous round. Then work one more round just like the first one, and you’ll have created diamonds. A chart for this color pattern is shown at right.
Now make up your own patterns. If you want to use a third color, simply swap it for one of the other colors for the entire round. You can also change both colors at the beginning of the round. If you’ll be using the original colors again soon, leave them hanging behind the knitting until wanted.
See also: Chapter 10 for working an increase in two colors.
Q: My pattern requires that I carry one color a long way before it is used again. Is it okay to leave the long strand on the back?
A: No, you need to weave it in every few stitches when it’s not in use, in the same way that you weave in tails of yarn as you knit.
See also: Is there a way to weave in the ends as I knit?
Q: What should I do if I need to work stranding on the purl side?
A: Work across, purling every stitch and making sure you keep the unused yarn in front of the work (that is, on the side closest to you).
Q: I don’t like the way the yarns twist when I work stranded knitting. How can I prevent this?
A: When you drop one yarn and pick up the next, make sure you don’t twist them. Some knitters and knitting instructions tell you to twist the yarns when you change colors or there will be holes in your knitting. While this is necessary for some color techniques, it doesn’t apply to stranded knitting.
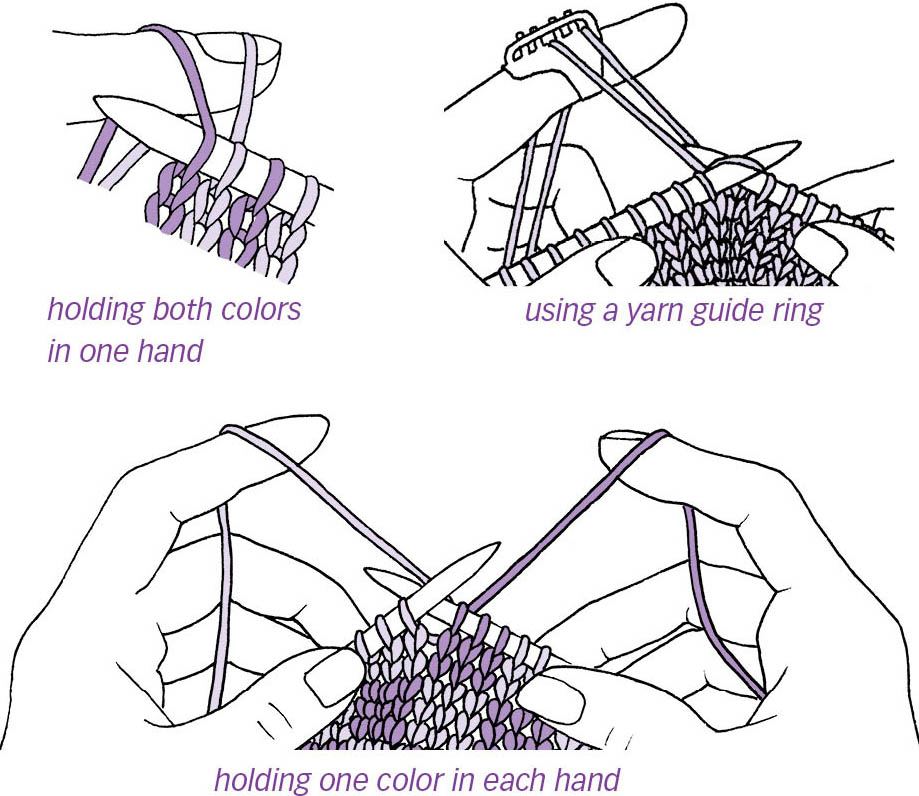
Q: I find it tedious to keep changing yarns. Is there a more efficient way to do this?
A: You can hold both yarns in the same hand and just knit the strand you need. This also prevents you from twisting the yarn unnecessarily, and it usually results in a more even tension. Some people like to hold one yarn over the index finger and a second over the middle finger. There are also tools called yarn guides, worn on your finger like a ring or a thimble, with channels or rings in the top for two or more yarns to run through. This may make it easier for you to keep the strands of yarn in position on your finger. Or you can hold one or more strands of yarn in each hand.
Solving Problems in Stranded Knitting
Q: The pattern stitches look much bigger in some sections than in others. Why does this happen?
A: The stitches made with yarn carried below the other color are taller. If you switch the position of the two yarns in the course of your knitting, the change may be noticeable. Also, if you are holding one yarn in each hand, you may be knitting more tightly with one hand than the other. In this case, when you switch hands, the difference is even more noticeable because the looser stitches are larger and puffier.
Q: Why is my stranded knitting puckered, and what can I do about it?
A: Pulling the yarn snugly when you change colors causes the strands on the back of the fabric to be too tight, gathering the knitting. To prevent this, spread your knitting out on the right needle just before you knit the first stitch of a new color. If your needle is too short, making it difficult to spread out, change to a longer needle. If you are working circularly, turn the knitting inside out so that the purl side is on the outside of the tube. Continue knitting in the same direction as before. Because the strands of yarn now run around the outside of the tube, their path will be just a bit longer.
Q: My stranded knitting is too loose. Individual stitches puff out. How can I fix this?
A: Use smaller needles or increase tension on the yarn by wrapping it an extra time around your index or little finger. Don’t stretch the knitting too much: Smooth it out just enough to lie flat as you knit the first stitch of the new color. If you’re working in the round on a circular needle, make sure the needle is short enough. It should be a little shorter than the circumference of the knitting so that the knitting is relaxed, not stretched around the needle.
Q: The stitches in my stranded knitting aren’t even. Is there a way to fix them?
A: Some unevenness is natural in stranded knitting. When you’re finished, block the piece under tension to create a smooth surface and more even stitches.
See also: Blocking
Special Situations in Stranded Knitting
Q:
What is corrugated ribbing, and how is it done?
A: This is ribbing in which the knit stitches are one color and the purl stitches are another. If you change colors on subsequent rows, you can achieve very complex-looking ribbing. Work corrugated ribbing the same way you would work any stranded knitting, but be especially careful to keep the yarn that’s not in use on the wrong side of the fabric. Note that corrugated ribbing doesn’t behave like single-color ribbing. The stranding prevents it from being as elastic or resilient as regular ribbing. (For examples of color placement in corrugated ribbings, check Feitelson’s The Art of Fair Isle Knitting; see Resources.)
Q: I’ve been told that I need to work “steeks” when I do stranded knitting. What are steeks?
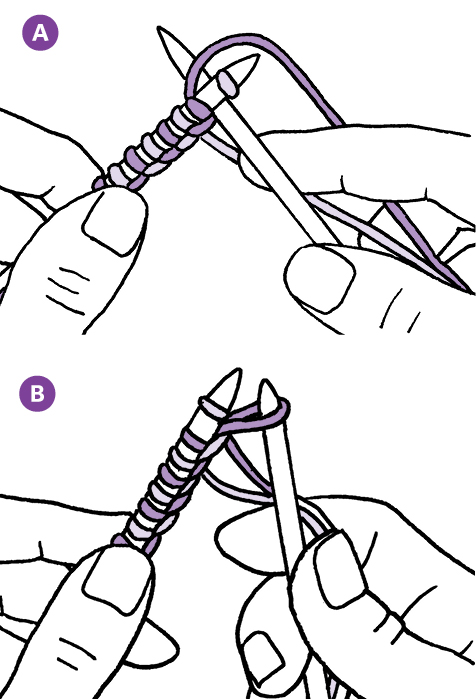
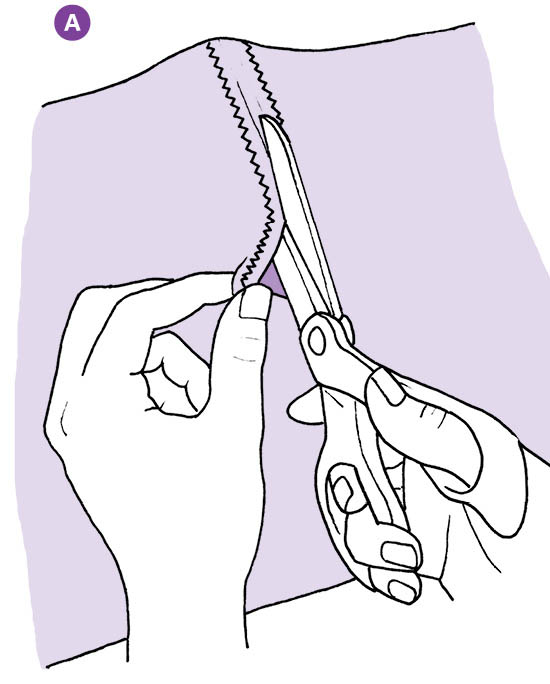
A: Steeks are extra stitches added in areas that will be cut open later, such as armholes, neck openings, and the fronts of cardigans. If you have some sewing experience, you’ll recognize these as seam allowances. Steeks allow you to make the entire garment circularly, so that you can work the color pattern from the knit side throughout. Steek stitches are usually knit in stripes or a tiny checkerboard rather than the pattern stitch of the garment, making it easy to distinguish them.
After knitting is completed, join the shoulder seams and block the body. Before cutting, secure the stitches with machine- or hand-stitching along each side of the cutting line (this is optional in wool but required in other, more slippery fibers). Cut the steeks down the center between the lines of stitching (A). Pick up and knit the borders or sleeves. Trim the cut edges and whip stitch them on the inside of the garment to prevent them from unraveling (B). Steeks work best in garments of natural wool, because the cut ends will felt, preventing eventual unraveling.
See also: Radcliffe’s The Essential Guide to Color Knitting Techniques, Circular Knitting Workshop, and The Knowledgeable Knitter (Resources).
Q:
What is mosaic knitting, and how do you do it?
A: Mosaic knitting is a method of working with multiple colors, in which only one color is used at a time. Work a right-side row and then a wrong-side row, knitting the stitches in one color while slipping the stitches that will be worked in the other color. Then work two rows in the second color, knitting the stitches in the second color and slipping the ones already knit in the first color. Mosaic knitting does not have the long strands across the back of the fabric that characterize stranded knitting. Because only one yarn is used at a time, more complicated textures combining knit and purl stitches are easier to execute. (For more on mosaic knitting, check Walker’s Mosaic Knitting; see Resources.)
Q:
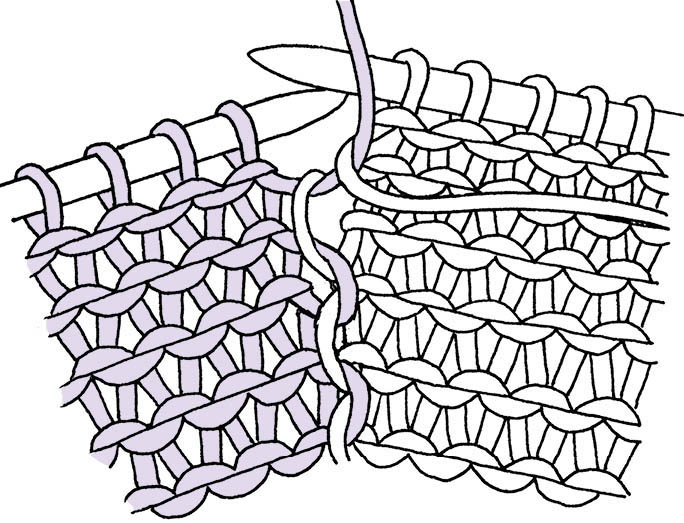
What is intarsia, and how is it done?
A: Intarsia knitting features multiple colors, but the colors are never carried across the back of the fabric to be used elsewhere in the row. The difference between stranded knitting and intarsia is clear when you look at the wrong side. You must have a separate yarn supply for each occurrence of a color. When working intarsia, knit as many stitches as are needed in one color, then drop the yarn on the purl side of the knitting, to the left of the stitch just completed. Pick up the next color to be used under and to the right of the dropped strand. For inspiration, turn to any books by the master of intarsia design, Kaffe Fassett; for inspiration and instruction in techniques, see Lucy Neatby’s DVDs Intarsia Untangled 1 and 2 (Resources).
Q: When I work intarsia, how can I keep the balls of yarn from getting tangled?
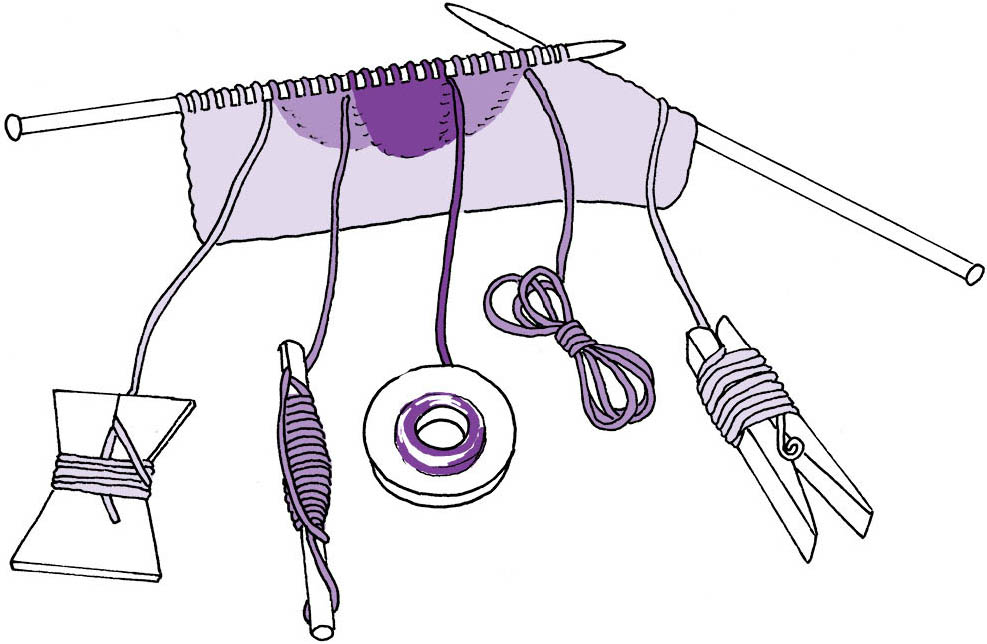
A: Wind a small amount of each yarn into a butterfly or onto a bobbin. When the butterflies and bobbins are not in use, leave them dangling by short strands so they can’t tangle around each other. Another approach to “multiple yarn management” is to break off an arm’s length of yarn and simply leave it hanging. When you need to use a strand, pull it free from the other yarns. When a strand runs out, break off another arm’s length of that color, splice the ends together, and continue knitting. Splicing minimizes the number of ends to be woven in later.
See also: Splicing
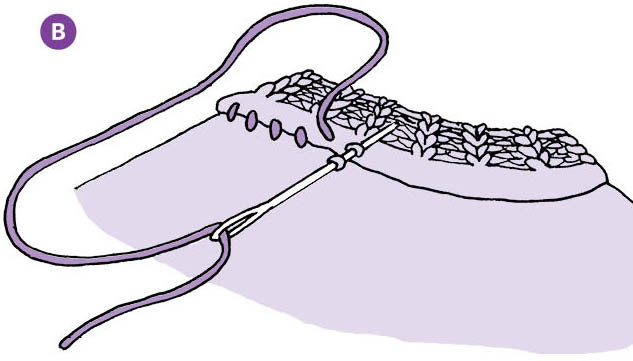
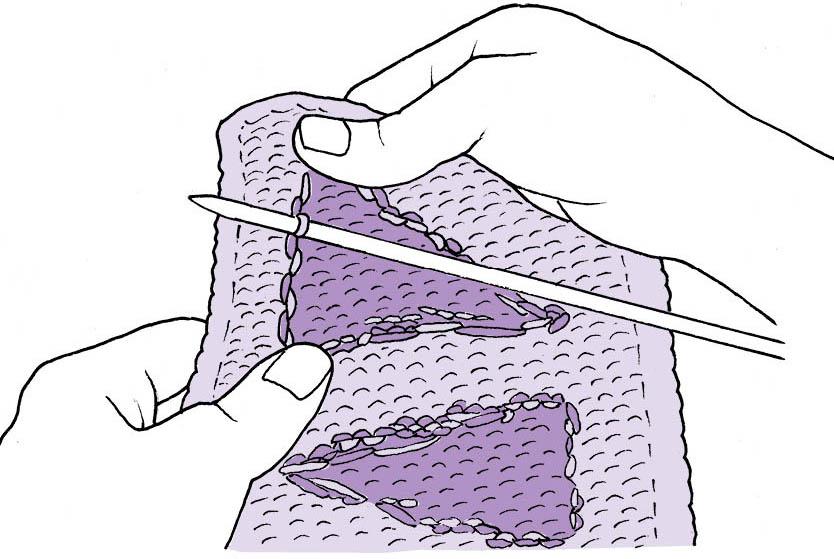
Q: I have holes in my intarsia where I start or end a color. What am I doing wrong?
A: At the point where you begin or end a color, you must first wrap the yarn around the adjacent color to lock the two together, then weave in the end on the wrong side of the fabric to close up the hole, as shown below.
Q: My knitting is normally smooth and even, but when I work intarsia there are uneven, lopsided stitches. How can I correct this?
A: Here are some tips for making your color work more even:
- Check as you go. Check the stitches for consistency at each color change. When you pick up the new color, pull on the yarn gently to correct any looseness in the last stitch worked with this strand before working the first stitch on the current row.
- Think ahead. If you are working an irregular area of the color or a diagonal, the first and last stitches may be distorted because the yarn is coming to the stitch at an angle rather than straight across the row. You can adjust this angle by wrapping the working yarn around the yarn in the adjacent color block a stitch or two before you begin using it.
- Weave in. Adjust the first and last stitch of an area during finishing by weaving the ends in diagonally so that they don’t distort the stitches on the right side of the fabric.
- Fix tension. When the knitting is complete, adjust the tension by inserting a knitting needle into the interlock on the back of the fabric. Stretch the knitting from top to bottom to even out the stitches along a vertical color change.
- Block the pieces. To a certain extent, inconsistencies can be smoothed out by blocking. When working intarsia, it’s best to block all the pieces to the proper size and shape before sewing together.
For detailed information on perfectly executing and finishing intarsia, check the Stuevers’ Intarsia and Lucy Neatby’s DVDs Intarsia Untangled 1 and 2 (Resources).
Q: I love hand-painted and multicolor yarns. How can I make them look as good knit up as they do in the ball or skein?
A: The lovely interplay of colors in the ball or skein is very difficult to reproduce in the final knitted product. Hand-painted, multicolor, or variegated yarns have such a wide range of characteristics that generalizations are impossible. Some yarns have very long sections of each color, long enough to make solid stripes of color in the body of a sweater. Other yarns have short lengths of color that change after just one or two stitches. The range of hue and value in each yarn varies a great deal, too. Some have gradations of a single color; others combine multiple colors and values. The key to success is to experiment. Remember that the length of the color repeats in your yarn works in conjunction with the number of stitches and needle size to create stripes and pools of color. Experiment with swatches of different widths to see what effect you like best. Incorporate the characteristics of the swatches into your garment by knitting it in narrow blocks or strips. Here are some ideas for getting the best from these yarns:
- Use textured stitches. Slipped stitches, knitting into the row below, increases, and decreases all help to prevent the striping that is so often a problem with variegated yarns. Using bands or blocks of several different textured stitches in a garment can keep it interesting, masking obvious color repeats and highlighting the various qualities of the yarn.
- Try lace. Lace is made up of holes and decreases, both of which break up stripes.
- Use two strands of yarn. Knit with a double strand of yarn, using two balls of the same variegated yarn or working with both ends of the skein or ball at the same time. You can also use one strand of solid yarn and one strand of variegated.
- Alternate two strands of yarn. Using a circular needle, knit one round with each yarn or, using straight needles, knit two rows of each yarn. Use two balls of variegated, both ends of the same skein or ball, or use a strand of solid alternately with the variegated.
- Add several solid yarns. Pick coordinating and contrasting colors. Consider working the variegated in a different textured stitch than the solids.
- Emphasize or de-emphasize a color. When you come to a stitch in a particular color, or when it appears in your working yarn, purl or slip the next stitch. Decide whether you prefer the effect when you slip with the yarn in front or in back. If the lengths of color are long enough, work a textured stitch on a Stockinette background whenever you come to this color. Seed Stitch is effective when used this way.
- Consider flat versus circular. Flat knitting tends to create repeating pools of color, alternating diagonally, left-right-left-right up the fabric. Circular knitting tends to create spirals that change angle as the knitting becomes wider or narrower.
- Use geometry. Knitting triangular, circular, or diamond-shaped modules makes each row a different length, preventing repetitive striping or pooling of colors. Knitting in small or large squares or rectangles turned at right angles to each other breaks up striping, as does working with small motifs.
See also: here and here for information about dye lots; The Standard Stitches for Stockinette; How do I work Seed Stitch? for Seed Stitch.
For more information on working with hand-painted yarns, see Bryant’s Artful Color, Mindful Knits; Radcliffe’s Essential Guide to Color Knitting Techniques; and Sulcoski’s Knitting Socks with Handpainted Yarn; see Resources.