Chapter 8
Circular Knitting
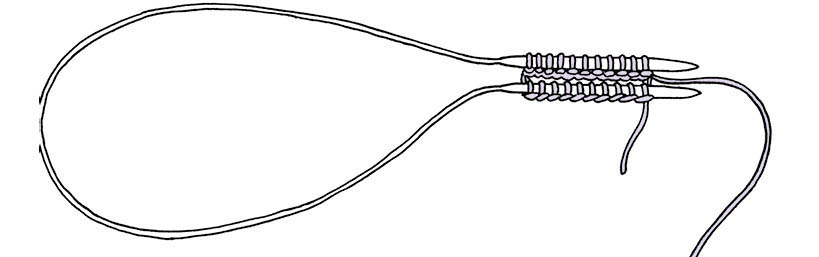
Circular knitting is knitting constructed in a tube. Larger tubes, such as sweaters, can be made on a single circular needle. Smaller tubes, such as socks and mittens, are made on sets of double-pointed needles, two circulars, or one very long circular needle using a method called Magic Loop. Almost anything that can be knit flat and sewn together can also be made circularly without seams.
Getting Started with Circular Knitting
Q:
Why would I use circular knitting?
A: Circular knitting allows you to make seamless garments. A seamless sock or mitten is far more comfortable to wear, and a seamless sweater requires no sewing up. Techniques like stranded knitting are simpler to work in circular knitting because the right side of the fabric is always facing you, allowing you to see the pattern develop and to follow charts more easily.
Q:
Which is better, circular or flat knitting?
A: Both are equally good. Flat knitting is preferable when you are making a shawl, scarf, afghan, or place mat in a pattern stitch that doesn’t curl. However, circular knitting is useful when you want to make a double-thickness place mat, pot holder, or scarf. Flat knitting is better for more tailored garments because the seams help the garment to keep its shape. For the same reason, it is also preferred for sweaters made in cotton, silk, or any other fiber that tends to stretch out of shape. But if you want a garment, such as a skirt, to stretch and drape, circular knitting is a good choice. Some knitting techniques, such as intarsia, are more easily performed in flat knitting. You may also find it easier to count the rows between cable crossings when working flat, because you know that the cables are crossed only on right-side rows.
See also: Intarsia
Q:
What length needles do I need?
A: A circular needle should be, at most, a little shorter than the circumference of the tube you’ll be knitting, so the stitches stretch easily around. You can fit knitting twice as wide on the needle, but it’s hard to see if the knitting is twisted when you join the round. If your knitting is three times the length of the needle, you can knit comfortably, but it will be more difficult to move the stitches and to see your pattern stitch as you work.
If you’ll be working a small tube, like socks or mittens, with two circular needles, the needles should be about 16" or 24" long, whichever you find most comfortable. You can use longer needles, but the dangling ends can be annoying.
If you’ll be working a small tube using Magic Loop, you’ll need a long circular needle with a very flexible cable. Depending on the length of the needle tips, the flexibility of the cable, and your personal preference, you’ll need a needle 30" to 48" long. The longer the tips and the less flexible the cable, the longer the needle will need to be for you to work comfortably.
Double-pointed needles can be any length, as long as they are not so short that the stitches fall off the ends. Short double-pointed needles, 5"–6", are good for socks and mittens or other narrow tubes. For hats and sweater sleeves, choose double-pointeds that are at least 7"–8".
See also: Knitting Needles
Q
How do you use circular needles?
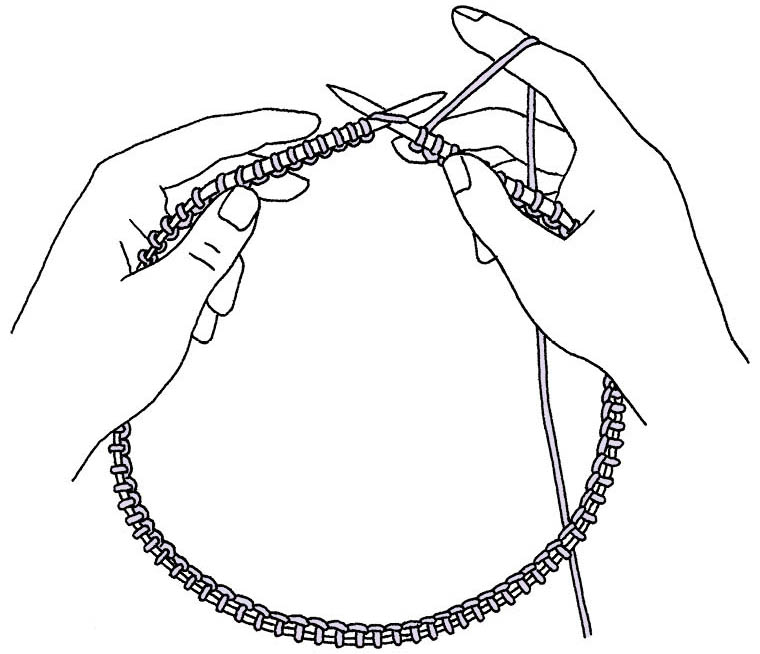
A: Cast on as you normally would, then spread the stitches from point to point on the needle. If they don’t reach easily around, you need either to use a shorter needle or to cast on more loosely. Take a good look at your cast-on row and make sure it doesn’t spiral around the needle at any point — you don’t want a twist in your knitting. Make sure that the right side of your cast on (the side you like best) is facing you. Join the beginning and end of the cast-on row using one of the methods given later in this chapter. Knit all the way around, or work in whatever pattern you like. When you get back to the beginning of the round, simply continue to work on the right side, so the knitting grows upward in a spiral. It’s as easy as that. You never turn and work back as you do in flat knitting, so you never work on the wrong side of your knitting.
Do You Knit into the Back of Stitches?
When you do flat knitting, if your purl stitches normally sit on the needle in the opposite direction from your knit stitches and you knit into the back of these stitches on the following row to prevent them from twisting, you’ll need to make adjustments to your style of knitting when you work circularly. Pay close attention to each stitch as you come to it on the following round to ensure you don’t twist it unintentionally. When you are working Stockinette Stitch in the round, you’ll never purl any stitches, so you’ll never knit into the back of the stitches. If you’re working a knit-purl pattern in the round, you’ll knit into the front of stitches that were knit on the previous round and into the back of those that were purled on the previous round.
See also: Twists and Turns
Q: Why would I use two circular needles instead of just one?
A: If you need to knit a tube that is either too small or too large for a single circular needle, you can divide your stitches between two circular needles.
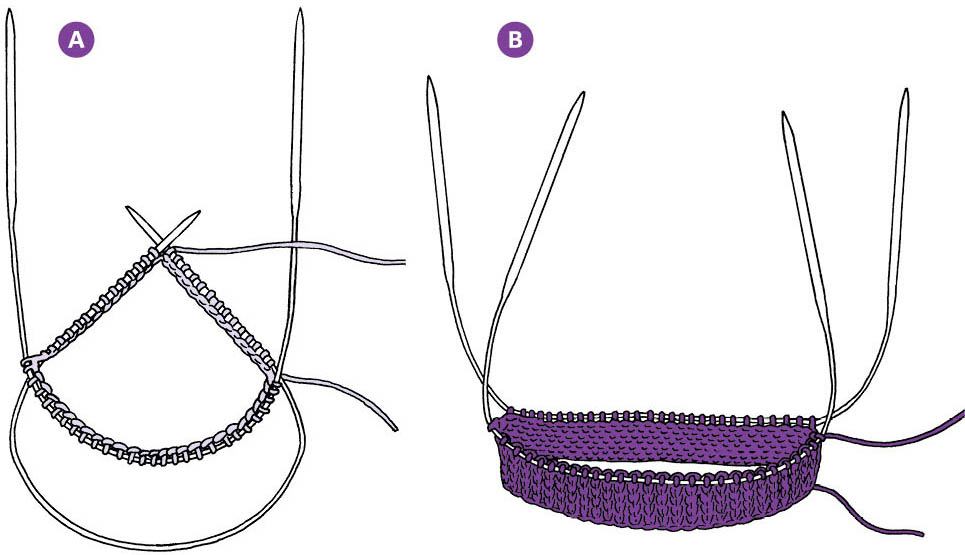
Two Circular Needles
How to do it:
- 1. Begin by casting all of your stitches onto one of the needles.
- 2. Slip half of the stitches onto the second needle.
- 3. Bring the needle points with the first and last cast-on stitches together, being careful not to twist or untwist the cast on at the halfway point. Check to make sure that the cast on doesn’t spiral around either needle at any point.
- 4. Join the beginning and end of the round in one of the ways described later in this chapter. The easiest way is to work the first stitch or two using both the cast-on tail and the working yarn.
- 5. Holding both ends of the first needle, work all of the stitches on the first needle onto that same needle (A). Put down the first needle and pick up both ends of the second needle. Work all of the stitches on the second needle onto itself. Continue around, alternating needles (B).
Q:
What is Magic Loop, and when would I use it?
A: Use the Magic Loop technique to knit any tube that’s too small to fit comfortably on a single circular needle. Many people who dislike working on double-pointed needles adore working the Magic Loop.
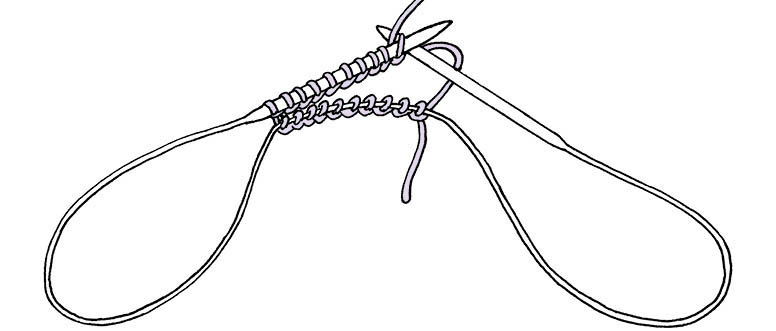
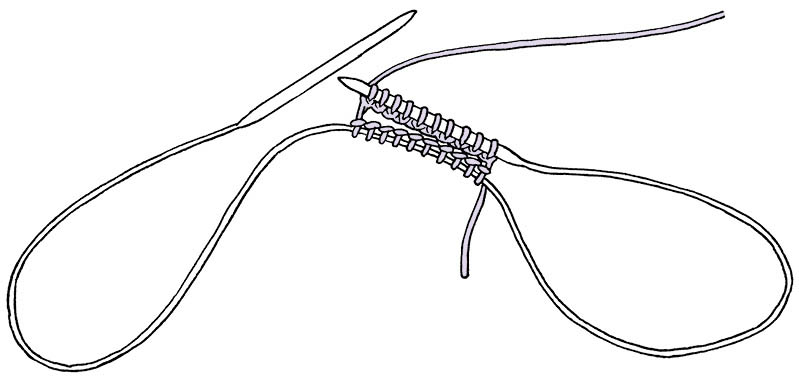
Magic Loop
How to do it:
- 1. Using a long (30" or more) circular needle with a very flexible cable, cast on the required number of stitches.
- 2. Slide the stitches to the center of the cable. Divide the stitches in half and gently pull the cable through them at the halfway point, making a loop of the cable.
- 3. Slide the stitches up onto the two needle points and make sure the cast on doesn’t spiral around the needles. Note where the working yarn is attached to the end of the cast on; this is the end of the round, and the stitches connected to it are the second half of the round. This needle point should be in back.
- 4. Slide the stitches on the back needle down onto the cable, leaving a loop of the cable at the halfway point and the tip of the needle free to work with.
- 5. Knit across the first half of the round using the working yarn. The first time you do this, it will join the knitting into a round.
- 6. Push the second half of the stitches up onto the point of the needle, turn the knitting.
- Repeat steps 4–6 to continue working in the round.
Q
When and how do you use double-pointed needles?
A: Use double-pointed needles to knit any tube that’s too small to fit comfortably on a circular needle.
Double-Pointed Needles
How to do it:
- 1. Begin by casting all of your stitches onto one of the needles.
- 2. Slip about one-third of the stitches onto a second double-pointed needle, and another third onto a third double-pointed needle.
- 3. Lay them on a table or a pillow in your lap and arrange the needles into a triangle, as shown in the illustration. Make sure the cast-on row doesn’t spiral around any needle at any point. Take a moment at this stage to orient yourself. The needle to the left is Needle #1. Across the bottom is Needle #2. The needle to the right, with the working yarn attached to it, is Needle #3.
- 4. Join the beginning and end of the round using one of the methods described below.
- 5. Using an empty needle, knit across Needle #1. When you are done, you’ll have another empty needle in your hand. Use it to knit across Needle #2, which will then be empty. Use the empty needle to knit across Needle #3. You’ve now completed one round.
- 6. Continue knitting each needle in succession, using the needle you just emptied as the new working needle.
Note: If you are using a set of five needles, you can divide your stitches among three needles and knit with a fourth, keeping the fifth needle as a spare. Or you can put about one-fourth of the stitches onto each of four needles, arrange them in a square rather than a triangle, and knit with the fifth needle.
Q: Which is better, a set of four or five double-pointed needles?
A: It is really a matter of personal preference. Try knitting with the stitches divided among three needles and four needles to see which you like better. If your stitches are on four, they will be less likely to fall off the ends. If you are working something that calls for a multiple of four stitches, for pattern repeats, increases, or decreases, you may find your work easier to keep track of on four needles. When working a sock with a set of four, place the front stitches on one needle, divide the stitches for the back evenly between two needles, and work with the fourth needle. When working with a set of five, place one-quarter of the stitches on each of four needles and work with the fifth.
Q: Which is the best way to work a small tube? With double-pointed needles, two circular needles, or Magic Loop?
A: They are all equally good methods, but each has its own special benefits. Once you’ve tried them all, you’ll discover which you prefer. It’s good to be familiar with all three, because it gives you greater flexibility. Sometimes you’ll choose simply based on which needles you already own:
- Double-pointed needles can help you keep track of pattern stitches or increases and decreases. For example, place enough stitches on each needle so that there’s a full repeat of your pattern stitch; you’ll know that each needle starts with the first stitch of a repeat. When making a hat with 6 decreases worked on each decrease round, divide the stitches among 3 needles and you’ll know that there will always be 2 decreases per needle; for hats with 8 decreases, divide the stitches evenly among 4 needles.
- Two circular needles allow you to work very small tubes and very large tubes on the same needles. If you’re working a top-down raglan or circular yoked sweater, you can start the smaller neck opening on the two 24" circular needles and then, as the yoke grows in size, there will be no need to change needles or rearrange your stitches because the full yoke will fit easily onto the same two needles. You can easily check the fit of anything made on two circular needles because socks, mittens, or even sweaters can stretch along the cable while you try them on.
- Magic Loop has all the same advantages as working with two circulars, plus the added benefit that the cost of a single long needle is usually less than the cost of two medium-length needles. If the dangling tips of the second circular needle annoy you, Magic Loop is preferable because there are only the two tips, which are always in use.
Casting On and Joining
Q:
What’s the best cast on for circular knitting?
A: All cast ons can be used for circular knitting. However, those that tend to spiral around the needle, such as the Cable, Loop, and Backward Loop cast ons, may twist when you try to join the beginning and end of the cast on. Additionally, the Loop and Backward Loop cast ons are difficult to work with on circular needles. The stitches become very tight around the thin cable of the needle and then are difficult to push up onto the tips of the needles when working the first round.
See also: Chapter 1, Casting On
Q: What do I do if my cast-on stitches won’t all fit on one double-pointed needle?
A: Use regular needles or a circular needle the same size as your double-pointed needles to cast on, then slip the stitches onto the double-pointed needles.
Q: What’s the best way to join the beginning and end of a round?
A: Each knitter has his or her own preference, but below are three ways to join the beginning and end of a round after you’ve cast on, listed in my order of preference. First cast on and arrange the stitches on the needles as described for one circular needle, two circular needles, Magic Loop, or double-pointed needles. Make sure that the cast-on row doesn’t spiral around the needle.
- Double up. Hold the working yarn and the cast-on tail together and work the first stitch or two, then continue with the working yarn only. When you come to the stitches made with the double strand of yarn at the beginning of the next round, be sure to treat them as single stitches. If the join seems to separate, just pull on the cast-on tail to tighten it up.
- Knit first and last stitches together. Cast on one extra stitch. The last stitch you cast on should be on the right needle point. Slip it to the left point. Holding the working yarn and the cast-on tail together, knit the first two stitches on the left needle together. This joins the beginning and end of the round and gets rid of the extra stitch. Continue with the working yarn only. When you come to the stitch made with the double strand of yarn at the beginning of the next round, be sure to treat it as a single stitch.
- Trade places. The first stitch you cast on should be on the tip of the left needle. Slip it to the right needle. Use the left needle to pick up the second stitch on the right needle (this would be the last stitch you cast on, with the working yarn attached to it), and lift it up over the stitch you just slipped, as if you were binding off. Don’t drop this stitch, though; keep it on the left needle. The two stitches have simply traded places, and your round is now joined.
Tighten Up!
The last stitch you cast on (and sometimes the first one as well) will often loosen up while you are working. Pull firmly on your working yarn and the cast-on tail before knitting the first stitch.
Solving Circular Knitting Problems
Q: I always get a little bump at the bottom edge of my knitting where I joined the beginning and end of the round after I cast on. Is there a way to join smoothly?
A: Use one of the methods described above to minimize the bump, then use the cast-on tail to sew a figure eight across the bump to disguise it.
See also: Solving Seaming Problems
Q: How can I get started on double-pointed needles without them falling out and flopping all over?
A: Here are some hints for frustration-free use of double-pointed needles:
- Use wood or bamboo needles rather than metal; they’re less slippery.
- Place a pillow on your lap to support the needles until you get going. This prevents them from swinging around and from sliding out of the stitches.
- Balance the stitches on the needle. Whenever you finish working the stitches on a needle, slide the stitches to the center of the needle and then spread them out evenly. Centering the stitches balances the needle so it doesn’t flop to one side and spreading them out makes them grip the needle more tightly.
- Take care of your work. When you set the knitting down, neatly lay it flat on the pillow so you can pick it up again easily.
Once you have a couple of inches of knitting on the needles, the fabric supports the needles and the whole assemblage is less floppy.
Casting On in Special Situations
Q: What’s the best cast on for a sock worked from the toe up?
A: Your pattern will sometimes suggest a cast on. If it doesn’t, the one described here is my favorite.
Increase Cast On
How to do it:
- 1. Cast on half as many stitches as you need, using the Long-Tail Cast On (or you can use the Loop Cast On, then knit one row). On the next row, knit into the front and the back of each stitch, doubling the number of stitches.
See also: Basic Cast Ons and Increases.
- 2. Pinch and hold the knitting just below the needle and slide the needle out. The stitches will spring out to the front and the back alternately.
- 3. Slip one needle into the back stitches.
- 4. Slip a second needle into the front stitches.
Note: If working on double-pointed needles, rearrange the stitches onto three needles or as instructed in your pattern. If working Magic Loop, be sure to insert your needle tips in steps 3 and 4 starting from the edge where the working yarn is not attached.
Q: How should I cast on for the center of something, like the top of a hat?
A: Use the Loop Cast On because other cast ons are bulkier and can leave a little bump at the center of the crown. The Loop Cast On also is easily tightened, if necessary. There will be a tiny hole at the top of the hat. To close the hole, use a yarn needle to run the cast-on tail around through all the cast-on stitches on the inside and draw them up snugly.
You can also start the top of a hat with an I-cord of any length. Then increase to the number of stitches needed to begin the hat, and begin working the crown of your hat using a set of double-pointed needles, two circulars, or Magic Loop.
See also: I-cord
Gauge in Circular Knitting
Q: I knit a gauge swatch, but my gauge in the garment was different. Why?
A: You may have a different tension when you knit from when you purl. When you work flat in Stockinette, you knit half the rows (on the right side) and purl half the rows (on the wrong side). When you work circularly, you knit all the rows. If your purl stitches are a little tighter or looser than your knit stitches, then your swatch will be smaller or larger than the knitting in your project. Make an accurate gauge swatch by working it circularly rather than flat.
Two Ways to Make a Circular Swatch
Try either of these methods:
- Swatch only on the right side. Work on two double-pointed needles or a circular needle. Always work across on the right side. At the end of each row, slide the knitting back to the other end of the needle, bring the yarn very loosely across the back, and begin knitting again at the first stitch. The stitches at both ends of the needle will be loose. Take the swatch off the needles and measure it. Cut the strands in the middle, if necessary, so the knitting lies flat.
- Swatch in a small circle. Work circularly on a set of double-pointed needles or a short circular (11"–16"). Take the swatch off the needles and flatten it before measuring. If you made a very slim tube, cut it from bottom to top at the beginning of the round so that it lies flat. To prevent unraveling before you can measure it, block it first.
Working Circularly
Q: I twisted my knitting when I joined the beginning and end of the round. What do I do now?
A: If you are just a few rows up from the cast on, stop at the end of the round and work the twist around to the point between the two needle tips. Allow the cast on and the rows already worked to twist at that point. Make sure the rest of the knitting is untwisted and continue knitting around.
If you are too far along to twist the first few rounds this way, you can cut your knitting, untwist it, and continue working circularly. When the garment is complete, seam the cut area.
If neither of these solutions is practical, you’ll have to unravel your knitting and begin again.
See also: What are steeks? for information about cutting your knitting
Q: When I pick up my circular knitting to work on it again, how can I tell which direction to go?
A: Look for the working yarn. The stitch where the working yarn connects to your knitting is the last stitch you completed. The tip with that stitch belongs in your right hand when you begin knitting, unless you are a mirror image knitter. In that case, the tip with the yarn attached should be in your left hand.
Q:
My knitting is inside out. Can I fix it?
A: Simply push it back through the center of the needle(s) to turn it right side out again. Some people feel more comfortable working with the wrong side out. Experiment to see which you prefer.
Q: I find it really hard to knit around on circular needles. I’m constantly fighting to get the stitches up to the needle point. What am I doing wrong?
A: This can be caused by stitches that are too tight or by the needle itself. Check the following possibilities:
- If you’re working conventionally on just one circular needle, the needle is probably too long for the tube you’re knitting. This forces you to stretch the knitting to get it all the way around the needle, making all the stitches tighter. Get a shorter needle or switch to double-points, two circulars, or Magic Loop.
- If your needle is not too long, then you may need a different style of needle. There may be a bump at the point where the cable joins the needle or the cable may be too thick to suit you. Look for needles with a smooth, tapered join and a thin cable. If you knit very firmly, you may not find any type of circular needle comfortable.
- If you’re working on two circulars or Magic Loop, you may be inadvertently tightening the last stitch of each half when you begin the other half of the round. This stitch is on the thin cable of the needle as you begin to work the first stitch of each half-round. If you pull firmly on the working yarn as you work that first stitch, the previous stitch will be tightened firmly around the cable and will be too small to slide from the cable up onto the tip of the needle as you work around. Avoid this problem by being careful to not tighten this stitch when working the following stitch — it should be the same size as its neighbors. When working on two circulars, you can leave that stitch up on the tip of the needle until after you’ve begun working across the other needle; pulling firmly will tension it around the wider needle tip, preventing the problem.
Q: I have trouble keeping track of the beginning and end of the round. What’s the best way to mark it?
A:
Here are three options:
- Use a marker. If you are using a circular needle, place a marker on your needle at the beginning of the round. For double-pointed needles, where the beginning of the round is usually at the beginning of a needle, use a split marker, locking marker, or safety pin in the first stitch.
- Watch the tail. With double-pointed needles, you know that the beginning of the round is at the beginning of a needle. If the tail of yarn from the cast on is hanging directly below your knitting, then you are at the beginning of the round.
- Weave the tail. Use the tail of yarn from your cast on to mark your end of round. Weave the tail through your knitting as it grows, draping the tail first to the inside of the tube as you complete a round, then to the outside of the tube after the next round. For better visibility, tie a piece of contrasting yarn to the cast-on tail, and weave it in and out to mark the beginning/end of round.
Q: I have a lot of trouble keeping track of pattern repeats in circular knitting. What’s the best way to mark them?
A:
Any of these methods will help you:
- Use your double-pointed needles to mark sections of your pattern stitch. For example, if you are working in K2, P2 ribbing, set up your needles with a multiple of four stitches on each, with a K2 at the beginning of each needle and a P2 at the end of each needle. You’ll know that when you start each needle you’ll be knitting two stitches, and when you end you’ll be purling two stitches.
- Place markers between pattern repeats on your needles (but not at the ends of the needles).
- Use split markers, locking markers, or safety pins in your knitting to mark the pattern repeats. Move these up closer to the needles as your knitting grows.
Q: When I use double-pointed needles, there are loose stitches anywhere two needles come together. How do I avoid this?
A:
Here are several things you can try:
- Be firm. Keep a firm tension on the yarn as you knit the first few stitches of each needle.
- Move the gap. Work two to four additional stitches from the next needle each time you reach the end of the needle. This will move the places where the needles come together around the knitting and make the loose stitches less noticeable.
- Change position. If you usually start a new needle with the empty needle behind the needle you just finished, try putting the new needle in front instead. If you are purling the first stitch of a needle, put the new needle behind.
- Stay close. When you start a new needle, don’t push the old one out of the way. Instead, keep it as close as possible to the next needle you’re just starting.
- Wrap counterclockwise. On the first stitch of a new needle, wrap or pick the yarn in the opposite direction from usual, pulling firmly. This will place the stitch on the needle in the nonstandard orientation. When you come to this stitch on the following round, work into the back of it to prevent twisting (see illustrations in chapter 7). Wrapping in the opposite direction shortens the distance the yarn must travel between stitches, making them just a little tighter. If you find that this makes the problem worse — leaving the loose stitch loose but making the following stitch tighter — work the last stitch of each needle this way instead of the first stitch.
- Loosen up. If all else fails, use a needle tip to loosen the stitches on either side of the loose stitches after the knitting is finished. Each will “steal” a little yarn from the problem area, making the knitting look more even overall.
Changing Colors in Circular Knitting
Q: You can see where I changed colors at the beginning and end of a round. Is there a way to hide this?
A: There are several solutions, depending on how often you change colors:
- For one-row stripes, break off the yarn at the end of each round and leave a 4"–6" tail. When you are finished, turn the piece inside out and use Duplicate Stitch on the purl side to sew these ends across the end of the round, directly behind the stitches of the same color.
- For wider stripes, knit all the way around in the new color. When you come to the first stitch of the next round, slip it purlwise and then continue knitting the rest of the stripe as usual. When you weave in the ends, use the tails to adjust the tension of the first and last stitch of each color, and use Duplicate Stitch on the purl side to sew them in across the beginning of the round behind the same color.
- For stranded patterns, hide the beginning of the round at a side seam. If the pattern has solid areas between the motifs, shift the beginning of the round to the solid area by starting a motif either a little before or a little after the beginning of the round. When there are continuous motifs, slip the first stitch of the round, if necessary, to prevent breaks in the motifs. When the background color changes, use the method described for wider stripes, if possible.
- Make the pattern continuous, if you can, by adjusting the total number of stitches. For example, if you are working vertical stripes in two colors, use an even number of stitches so the colors always line up, with the correct color on the stitch below when you start a new round. If you are working “salt and pepper” (a checkerboard of two colors), do it on an odd number of stitches, so that the colors alternate from round to round.
See also: Helix Knitting, Horizontal on the Purl Side, Duplicate Stitch, and The Slipped Stitch.
Pattern Stitches in Circular Knitting
Q: You can see where I changed rows in my pattern stitch at the beginning and end of the round. Is there a way to hide this?
A:
Here are ways to make the changes inconspicuous:
- For Garter Stitch, use two balls of your yarn and a circular needle. Cast on using yarn from one ball. Do not join the beginning and end of the round. Instead, slip the stitches back to the other end of the needle and purl across using the second ball of yarn. Your two strands of working yarn should now be dangling at the same edge of the knitting. Make sure your knitting is not twisted, pick up the lower strand of yarn, and knit around with it. This joins the beginning and end of the round. At the end of this round, pick up the other strand of yarn and purl one round. When you change yarns, be sure that you don’t twist the yarns and that you don’t pull the new yarn too tight. All the stitches at the beginning and end of each round should be the same tension. The knit rounds and the purled rounds will be continuous. This is called Helix Knitting. It can also be used with two contrasting yarns to make continuous single-round stripes.
- For cables and ribs (and other strongly vertical patterns), center a group of plain purl or knit stitches at the beginning of the round.
- To make patterns continuous, adjust the number of stitches. For example, if working K1, P1 ribbing, use an even number of stitches. If working K2, P2 ribbing, use a multiple of four stitches. If working Seed Stitch, use an odd number of stitches. At the beginning of each round, a knit stitch will naturally occur above the purl on the previous round, and vice versa.
Binding Off in Circular Knitting
Q:
Is there a way to make the bind off look continuous?
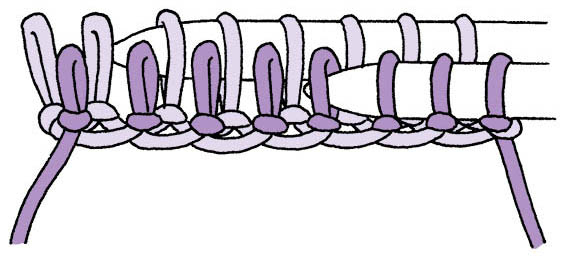
A: Bind off all the way around. When you get to the end of the round and the final stitch remains on your right needle, enlarge this stitch so it’s about 6" tall and cut it at the top of the loop (see here). Pull the working yarn out. Thread the tail onto a yarn needle and run it around the base of the first bound-off stitch (A), then back into the last stitch (B). Adjust the tension to match the stitches on either side before weaving the end in on the wrong side.
Q: What’s the best bind off for the center of a piece of circular knitting, like the top of a hat?
A: After you have done the final decreases, break off the yarn and use a yarn needle to run the tail through all the remaining stitches, sliding them off the knitting needle. Pull the tail firmly to draw the stitches together, then take the tail to the wrong side and weave it in. Finish the tip or thumb of a mitten in the same way. To prevent looseness, work the final round on a smaller needle or pull the tail around through them a second time to fill up the stitches.
See also: At Loose Ends
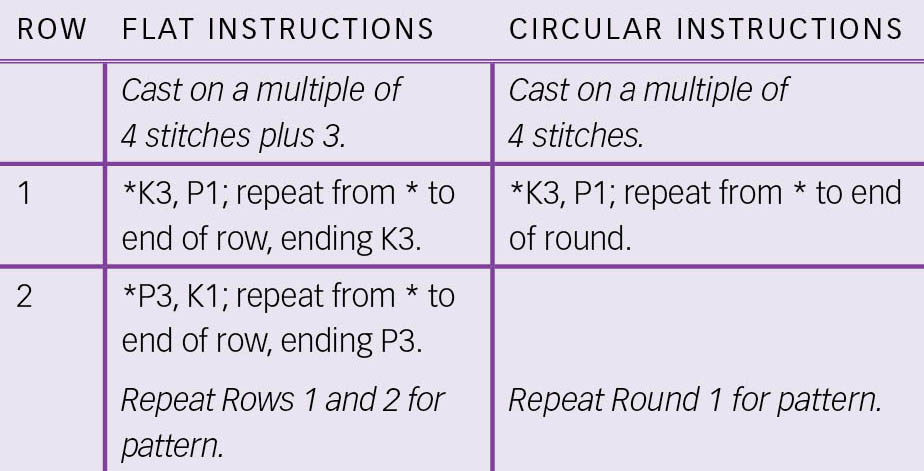
Converting Flat Knitting to Circular Knitting
Q: Can I change a pattern from flat knitting to circular knitting?
A: First, consider whether the project will suffer from the change. If it is knit in wool and the pattern stitch is easy to execute circularly, then it’s a good candidate for circular knitting. Follow these steps:
- 1. Rewrite any pattern stitches, reversing the wrong-side rows (knits become purls and vice versa; all rows are worked from right to left). If the stitch pattern is not already charted, chart the pattern. If necessary, delete edge stitches so that the pattern repeats seamlessly around the circular garment.
See also: Abbreviations and Charts and Basic Pattern Stitches
- 2. Decide where the beginning of the round will be.
- 3. Determine the order of construction: bottom up or top down? Sleeves sewn in later, picked up and knit down, or knit from the bottom up and joined at a yoke?
- 4. Decide finishing details: Shoulder seams sewn or bound off together? Ribbing knit as part of the body, or added afterward?
- 5. Rewrite instructions in rounds. A round includes the front plus the back. If a close fit is important or the yarn is bulky, decide whether you need to delete seam stitches.