Chapter 3
Binding Off
Binding off serves two purposes: It removes your stitches from the needles and prevents them from unraveling. Binding off is one of those seemingly simple finishing touches that can make or break a garment. Sometimes the bind off should be tight, and other times it should be loose. For instance, at the top of a garment the bind off needs to be tight to support the neckline; if it’s too tight, the sweater won’t go over your head. The top edge of a triangular shawl requires a loose bind off, or the drape will be distorted.
Q: What’s the difference between casting off and binding off?
A: They are just two different terms for the same thing. Bind off (BO) is often used instead of cast off to prevent confusion with the abbreviation for cast on (CO).
Standard Bind Offs
When you end a piece of knitting, you’ll usually use the Basic Bind Off. However, you can always choose one of the other standard bind offs explained below, either because you like the way it looks or because you find it easier to work.
Basic Bind Off
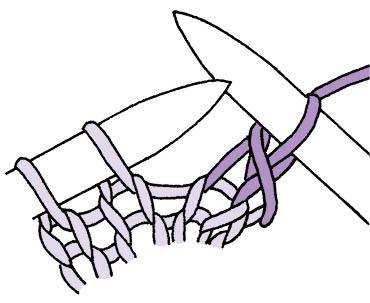
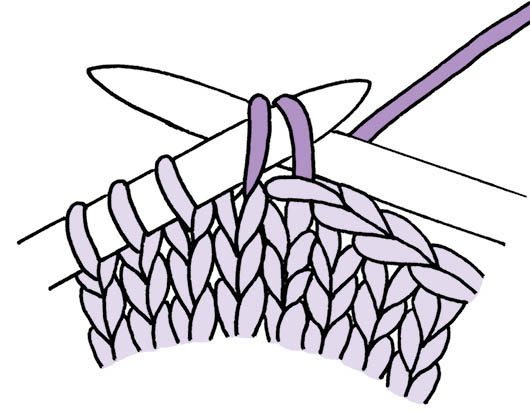
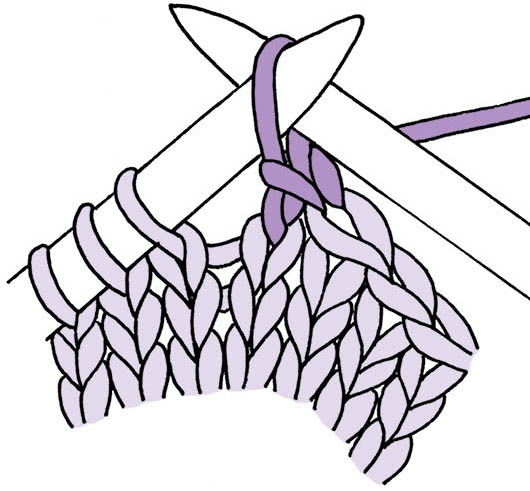
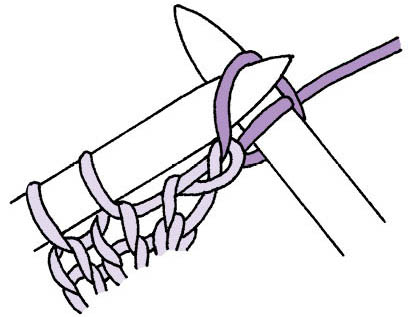
The Basic Bind Off (BO) is easy to learn and makes a neat, firm edge. It creates a chain along the edge that attracts attention.
When to use it: Most of the time. If you have a special situation where it just doesn’t look right or behave properly, try one of the other methods described in this chapter.
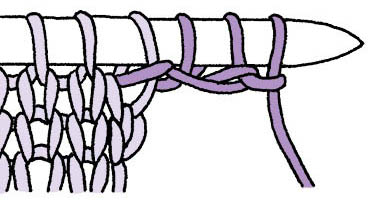
Get ready: Knit the first two stitches.
How to do it:
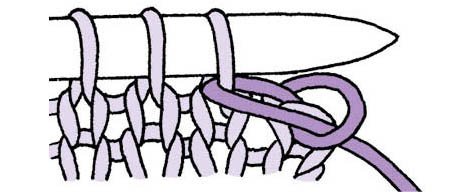
- 1. Insert the left needle into the right-hand stitch on the right needle and lift the stitch up.
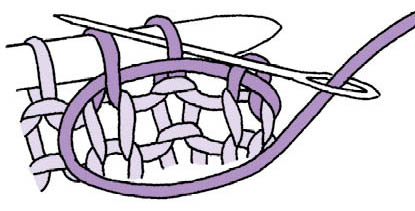
- 2. Pull the other stitch through it with the right needle.
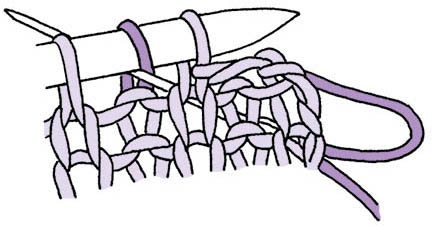
- 3. Drop the stitch off the left needle.
- 4. Knit the next stitch.
- Repeat these four steps until all the stitches have been bound off. A stitch will remain on the working needle. Cut the yarn and pull it through the last stitch to secure it.
Hint: Substitute a crochet hook the same size as your needle for the working needle to make binding off easier. You can tell what hook size is the same as your needle using a needle gauge that includes hook sizing.
Knitting without End(s)
If there’ll be a seam at the end of the bind off, leave a long tail and use it to sew the seam. You’ll have fewer ends to weave in when you’re done.
Decrease Bind Offs
Each of the following bind offs employs a decrease (such as K2tog, ssk, or P2tog) instead of passing a stitch over. They are useful when you’re dealing with an inelastic or slippery yarn, or when you want to ensure that the bind off isn’t too tight.
Ssk Version
Get ready: Knit one stitch.
How to do it:
- 1. Slip one stitch knitwise. Insert the left needle into the two stitches on the right needle.
- 2. Knit these two stitches together.
- Repeat these two steps until all the stitches have been bound off. Cut the yarn and pull it through the last stitch. The result is the same as binding off in knitting.
See also: The Slipped Stitch.
Purl Version
How to do it:
- 1. P2tog.
- 2. Pass the stitch back to the left needle, being careful not to change its orientation.
- Repeat these two steps until all stitches have been bound off. Cut the yarn and fasten off the last stitch. The result is the same as binding off “in purl.”
Russian Bind Off
How to do it:
- 1. K2tog through the back loops.
- 2. Pass the stitch back to the left needle, being careful not to change its orientation.
- Repeat these two steps until all stitches have been bound off. Cut the yarn and pull it through the last stitch. The result is the same as the basic bind off, except that if your stitches are on the needle in the standard orientation, the row of stitches immediately below the bind off will be twisted. On the other hand, if your stitches are on the needle in the nonstandard orientation, it will untwist them.
See also: Knit 2 Together through the Back Loops
All about Binding Off
Q: When a pattern says to bind off a certain number of stitches, I find it very confusing to know how many I’ve actually bound off. Is it the number of stitches I’ve knit, or the number I’ve passed over them?
A: It’s the number of stitches you’ve passed over, because these are the ones that have actually been bound off. The question logically arises because you always have to work one additional stitch in order to pass the previous one over it. This stitch remains on your needle, however, and will be worked on subsequent rows, so it’s not included in the count of bound-off stitches.
Q: My pattern says to bind off in knitting on the wrong side. What does this mean?
A: Work across a right-side row as usual. At the end of the row, turn your knitting so that the wrong side is facing you. Now, work the bind off as usual, knitting each stitch and passing the previous stitch over it and off the needle. To bind off in purl, purl all the stitches as you work the bind off; this makes the characteristic chain along the edge form on the side away from you.
See also: Decrease Bind Offs
Q: My pattern says to bind off in ribbing. How do I do this?
A: As you bind off, follow the rib pattern you’ve established, knitting the knit stitches and purling the purl stitches. For example, in K1, P1 ribbing: Knit the first stitch, purl the next stitch, then pass the knit stitch off over the purled stitch. The next stitch is a knit stitch, so knit it, then pass the purled stitch over it. Continue across, alternately knitting and purling stitches as you go. Working the bind off in ribbing makes the chain of bound-off stitches sit along the edge of the fabric rather than lie prominently along the knit side.
See also: The Standard Stitches, Knit 1, Purl 1 Ribbing.
Q: At the end of my bind off, there’s a stitch that hangs out over the edge. Is there a way to get rid of this?
A: Instead of cutting the end and pulling it through the final stitch, enlarge that last stitch so that it’s about 6" tall, then cut the yarn at the top of the stitch. Pull out the yarn still connected to the ball.
Q: I don’t like the chain that forms across the edge when I bind off. Is there a way to get rid of it?
A: The Basic Bind Off always forms a chain, but it doesn’t need to be on the right side. You can bind off in purl (or from the other side of the fabric), and the chain will form on the back. Or you can bind off in ribbing, and the chain will form along the edge instead of across the front. You can also use one of the other techniques, such as the Sewn Bind Off or the Tubular Bind Off.
See also: Sewn Bind Off and Tubular Bind Off
Q:
Should I bind off on the knit side or the purl side?
A: That depends on how you want the bound-off edge to look. If you knit each stitch while you bind off, the chain of bound-off stitches will appear on the side facing you. If you prefer that this chain be on the knit side, then bind off with the knit side facing you. If you prefer that the chain be on the purl side, then bind off with the purl side facing you. Keep in mind that if the edge will be sewn into a seam or is the base for a border, it will be hidden and the appearance of the bind off won’t matter.
Q: After binding off, what do I do with the yarn that I cut off?
A: If you will be sewing a seam there, leave a long tail and use it to sew the seam. Otherwise, when you are done, weave the end in on the wrong side.
See also: At Loose Ends
Q:
Is there a way to take out the bind off?
A: Yes. Ease the cut end out through the last stitch with the tip of your needle. Pull on the tail, and the bound-off edge will unravel. If the yarn is a little felted (matted or meshed together) and does not pull freely, use a sharp, pointed pair of scissors to carefully snip just the tangled fibers.
Solving Bind-Off Problems
Q:
My bound-off edge is too tight. What should I do?
A: This happens because the stitches need to lie sideways across the edge of the knitting, but knit stitches are wider than they are tall, so the bound-off stitches naturally pull in a little compared to the stitches below them. Here are some tips that may help:
- Use a larger needle (or crochet hook) while binding off. It automatically makes the stitches a tiny bit bigger, allowing them to stretch a bit more across the edge. Be sure to form each stitch on the wider/straight part of the needle, instead of on the needle tip.
- Loosen up. Each time you bind off a stitch, lift the right needle up a bit, pulling the stitch looser, before you knit the next stitch. If you are a firm knitter, stifle the urge to tighten each stitch as you go.
- Try a different bind off. Decrease Bind Offs are easier to keep loose than other methods. The Yarnover Bind Off (below), Sewn Bind Off, and Tubular Bind Off are all looser and stretch more than the Basic Bind Off.
Yarnover Bind Off
This bind off produces a very stretchy edge that’s not too bulky. It can look a little ruffled when it’s relaxed, and it does not support the edge. While the instructions here are given for knitting, you can achieve the identical results by working a row of single crochet instead of binding off.
When to use it: Perfect for any edge that needs to be very loose, such as for lace (especially shawls), around the outer edge of a curve, at the edge of a ruffle, or at the top of a sock.
Get ready: Knit the first stitch.
How to do it:
- 1. Yarnover.
- 2. Lift the knitted stitch up over the yarnover and off the needle.
- 3. Knit the next stitch.
- 4. Lift the yarnover up over the knit stitch and off the needle.
- Repeat these four steps until all the stitches have been bound off. Cut the yarn and pull it through the last stitch to secure.
Variations
You can fine-tune the width of this bind off by making a yarnover after every two or three stitches, instead of after every stitch. If the yarnovers make the edge look a little holey, work a Lifted Make 1 instead of a yarnover.
See also: Yarnover Bind Off and Make 1, Lifted
Special Situations
Q:
Is there a way to add cording as I bind off?
A:
Yes, you can bind off and add I-cord at the same time.
See also: I-cord
I-cord Bind Off
Get ready: Cast on 3 stitches at the beginning of the row, using the Knitted Cast On or the Loop Cast On.
How to do it:
- 1. Knit two stitches.
- 2. Slip the next stitch knitwise.
- 3. Knit one more stitch.
- 4. Pass the slipped stitch over the knitted stitch and off the needle.
- 5. Pass three stitches back to the left needle without changing their orientation. Do not turn. Pull the yarn firmly across the back of the three I-cord stitches.
- Repeat these five steps until all stitches across the row have been bound off. Cut your yarn and pull the end through the three I-cord stitches.
Variations:
- Cast on two stitches for a very narrow edging, or more stitches for a wider cord. This bind off is usually most successful with three to five stitches.
- For a quicker version, substitute K2tog-tbl (knit 2 together through the back loop) for steps 2 through 4. This will result in the decrease stitches being twisted, but it won’t show in dark or textured yarns.
- I-cord Bind Off can be worked with either the right side or the wrong side facing you. If you use contrasting yarn for the cord, the results will be better if you work it with the wrong side facing you, because there is a tendency for the color of the base fabric to peep through at the top of the stitches being bound off. If worked with the wrong side facing you, this won’t be apparent from the right side.
See also: Knit 2 Together through the Back Loops
Q: Is there a bind off I can use that doesn’t leave a noticeable ridge?
A: Yes, you can use the Tubular Bind Off. This is most successful used with K1, P1 ribbing or Stockinette Stitch.
Tubular Bind Off
Get ready: Cut the working yarn, leaving a tail about three times the width of your knitting and thread it through a yarn needle.
How to do it:
- 1. Insert the tip of the threaded yarn needle knitwise into the first stitch and slip it off the needle.
- 2. Insert the yarn needle purlwise into the third stitch and pull the yarn through.
- 3. Insert the yarn needle purlwise into the second stitch and slip it off the needle.
- 4. Bring the needle and yarn around to the back of the knitting, and insert the yarn needle knitwise into the fourth stitch. Pull the yarn through.
- Notice that you’ve dropped two stitches off the needle and already worked into the first two stitches that remain. These will be the first and second stitches as you work through the instructions again. Repeat these four steps until all stitches have been secured. As you become familiar with the process, you’ll be able to merge these steps into two movements, working steps 1 and 2 together and steps 3 and 4 together.
Variations:
- If you are binding off K1, P1 rib fabric, divide the stitches alternately, with the knit stitches on the front needle and the purl stitches on the back needle. You can do this most easily by slipping the needle out of the stitches completely. The knit stitches naturally spring out to the front and the purl stitches to the back. Slip one needle back into the knit stitches and a second needle into the purl stitches. To make replacing the stitches on the needle easier, use a pair of thinner needles. Make sure both needles point the same way, with the yarn hanging at the point of one needle. Follow instructions for Kitchener Stitch.
- If you have been working in K1, P1 ribbing, before cutting the yarn and starting the Tubular Bind Off, work four rows of Tubular Knitting: Knit the knit stitches and slip the purl stitches purlwise with the yarn in front on each of these rows. This will produce a hollow channel (a tube, thus “tubular” knitting). This makes a bind off identical to the tubular cast on.
See also: The Slipped Stitch and Kitchener Stitch
Q
What’s the best bind off for lace?
A: For a plain but very loose bind off, use the Yarnover Bind Off. You can also crochet a decorative border, working one stitch at a time or working groups of stitches and decorative loops. (For more on crocheted borders, check Eckman’s The Crochet Answer Book and Around the Corner Crocheted Borders; see Resources.)
Q:
Which bind off is the most stretchy?
A: The Tubular Bind Off is, if you are careful to work it loosely, although it tends to stretch out of shape. The Yarnover Bind Off is stretchy and retains its shape better. The Sewn Bind Off can be as loose or as firm as you like — you control the tension as you sew.
Q:
Can I make my bind off match my cast on?
A: The Sewn Bind Off is a good match for most cast ons, and you can control the tension to make it looser or tighter. The chain formed by the Crocheted Cast On, when worked in the yarn for your project rather than waste yarn, matches the Basic Bind Off.
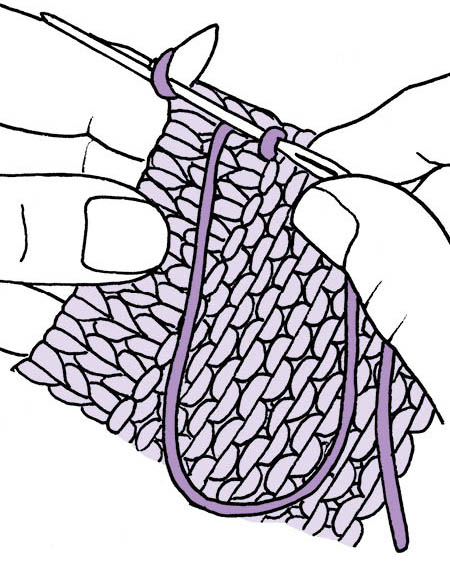
Sewn Bind Off
Get ready: Cut the working yarn, leaving a tail about twice as long as the width of your knitting. Thread it through a yarn needle and use it to sew through the stitches. Hold the knitting in your left hand, and sew with your right.
How to do it:
- 1. Sew through two stitches from right to left.
- 2. Sew back through the first stitch from left to right.
- 3. Slip that stitch off the needle.
- Repeat these three steps until you have only one stitch left on the needle. Sew once more through this last stitch, and slip it off the knitting needle. You’ll need to decide which side of this bind off you prefer. If you are left-handed, you may hold the knitting needle in your right hand and reverse the directions. In step 1, sew through two stitches from left to right, and in step 2, sew through one stitch from right to left.
Q: I’ve heard of a way to join two pieces of knitting when you bind off. How do you do this?
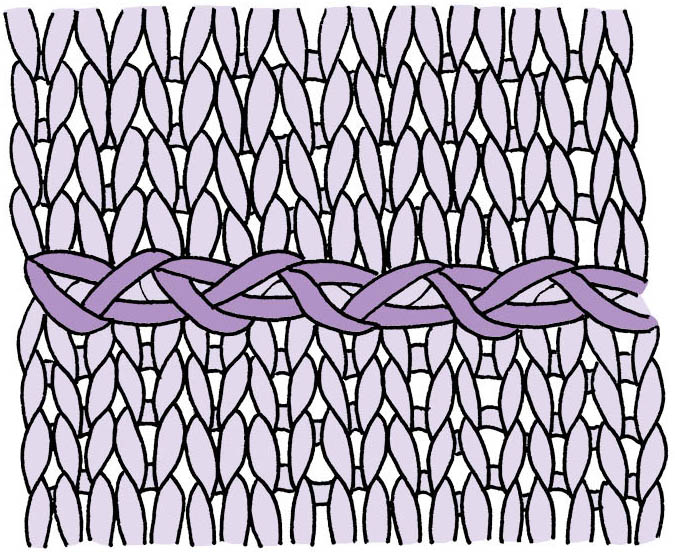
A: This is known as the Three-Needle Bind Off. It’s an excellent way to join the top of two pieces of knitting, such as the shoulder seams of a sweater. It supports the fabric with just a slight stretch and makes a very neat join. Binding off with the right sides of the knitting held together hides the seam on the wrong side. Or you can hold the wrong sides of the knitting together so that the seam forms a decorative ridge on the outside of the knitting.
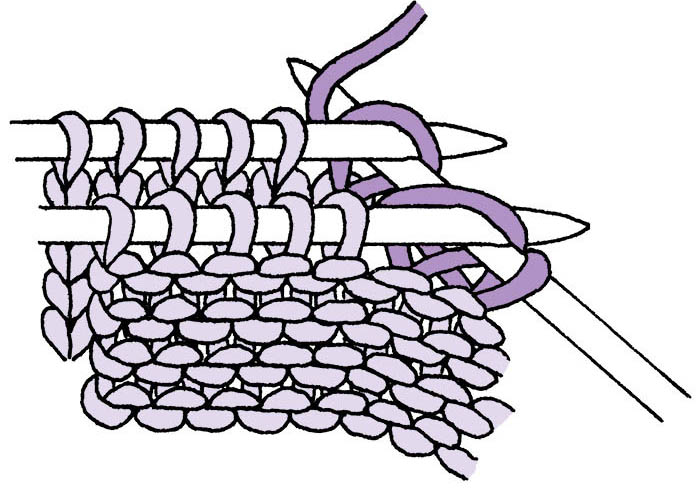
Three-Needle Bind Off
Get ready: Hold the two pieces to be joined, with either right sides or wrong sides together. The two needles should be next to each other, pointing in the same direction, with the working yarn hanging from one point.
How to do it:
- 1. Using a third needle (or a crochet hook), knit together one stitch from the front needle and one from the back needle.
- 2. Repeat for the next stitch on both needles.
- 3. Pass the first stitch on the right needle over the second to bind it off.
- Repeat steps 2 and 3 until all stitches are bound off. Cut the yarn and pull it through the last stitch.
Variations:
- Three-Needle Bind Off is usually worked with the right sides of the fabric together, with the chain forming a noticeable seam on the wrong side, but it can be used decoratively by placing the right sides together. It will look best if it forms one of a series of textured rows (for example, after a few rows of Garter Stitch or Reverse Stockinette).
- Three-Needle Bind Off, when placed on the right side of the fabric, can also be worked in K1, P1 ribbing, alternately knitting a pair of stitches together, then purling a pair together while binding off. The results are a zigzag chain, like rickrack.
See also: The Standard Stitches for illustrations of standard pattern stitches.
Q: I’ve been working in a pattern stitch with cables. How do I bind it off so that the edge doesn’t ripple and flare?
A: Cables pull in the fabric substantially. To prevent the bound-off edge from fanning out, work one or two decreases at the top of each cable, either as you bind off or on the row before. You can experiment with decreasing just the right amount when you bind off your swatch.
Q:
Can I make a hem when I bind off?
A: Yes. Work in Stockinette to the edge of the garment. For a rolled edge, continue in Stockinette. For a crisp folded edge, work one or two rows in Reverse Stockinette. For a picot edge, repeat [yarnover, K2tog] across the row. Work in Stockinette again until the length above the fold is the depth you want for your hem. Cut the yarn, leaving as long a length as is comfortable to sew with. To join the two layers, fold the hem to the inside of the garment and use a yarn needle to sew through each stitch on the needle, then through one stitch on the garment. You may bind off very loosely and then sew the hem, but the result will be bulkier.
See also: Cast On Hem for drawings of the three hem treatments.
For a Slimmer Hem
For less bulk, work the inside layer of the hem with thinner yarn, use fewer stitches, or switch to smaller needles.
Q: I’ve been working in a pattern stitch that has increases and decreases. How do I bind off so it looks good?
A: You need to bind off “in pattern.” As you work across the row, instead of knitting each stitch, work the stitches to correspond to a normal pattern row. For example, if you are working a lace pattern, continue knitting, working decreases and yarnovers in pattern across the row while you bind off.
Let’s use the example of a chevron pattern. On the wrong side, you purl across. On the right side, your pattern calls for you to work yarnovers and decreases. Each time you have two stitches on your right needle, pass the right stitch over the left stitch, even when the left stitch is a yarnover. When it is time to work a decrease, such as K2tog, work the decrease, then pass the right stitch off the needle over it. Although the difference between binding off in pattern and binding off normally may be subtle, your stitches are less likely to become distorted if you bind off in pattern.
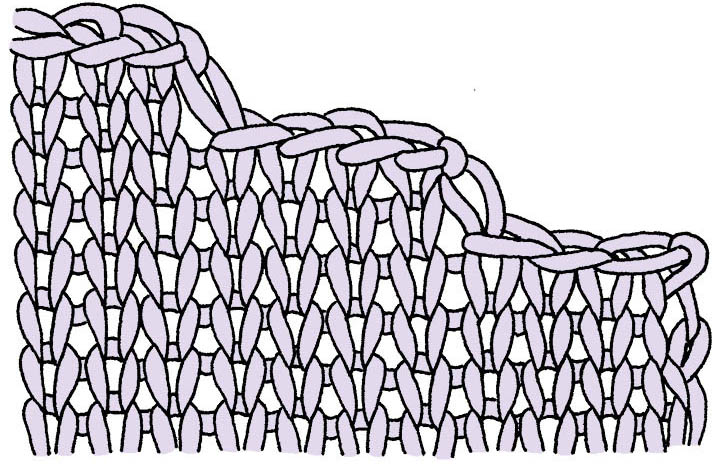
Q: How do I get rid of “stair steps” when I bind off over several rows?
A: When shaping armholes, shoulders, and necklines, you frequently need to work several groups of bound-off stitches, resulting in “stair steps” going up the sloped edge of your knitting. If you can create a smooth diagonal edge, on the other hand, it will be easier to seam or to pick up stitches.
Smooth the edge by slipping the first stitch of each group before you bind it off. To do this, bind off the first group as you normally would. When it is time to bind off the next group, slip the first stitch knitwise. Knit the next stitch. Pass the slipped stitch over the knitted stitch and off the needle. Continue binding off the rest of the stitches as usual.
Variations
- If you find the idea of slipping the first stitch of each group confusing, think of it as working the first bind off of each group as a decrease instead. Bind off the first group as usual. When it’s time to bind off each of the other groups of stitches, begin with ssk, then bind off the rest of the group.
- On the wrong side you may want to bind off in purl. This isn’t really necessary if the edge will be hidden in seam, but if you’d like to do so, use the P2tog bind off (Purl Version).
For more ways of achieving an even smoother slope, check Radcliffe, The Knowledgeable Knitter (see Resources).