Chapter 5
Places for Everything
Ask Frank Gehry for a museum . . . don’t expect the Met. Ask some designers for storage pieces . . . don’t expect pegboard and spice racks.
Revue Magazine Table
Designed by Beth Blair
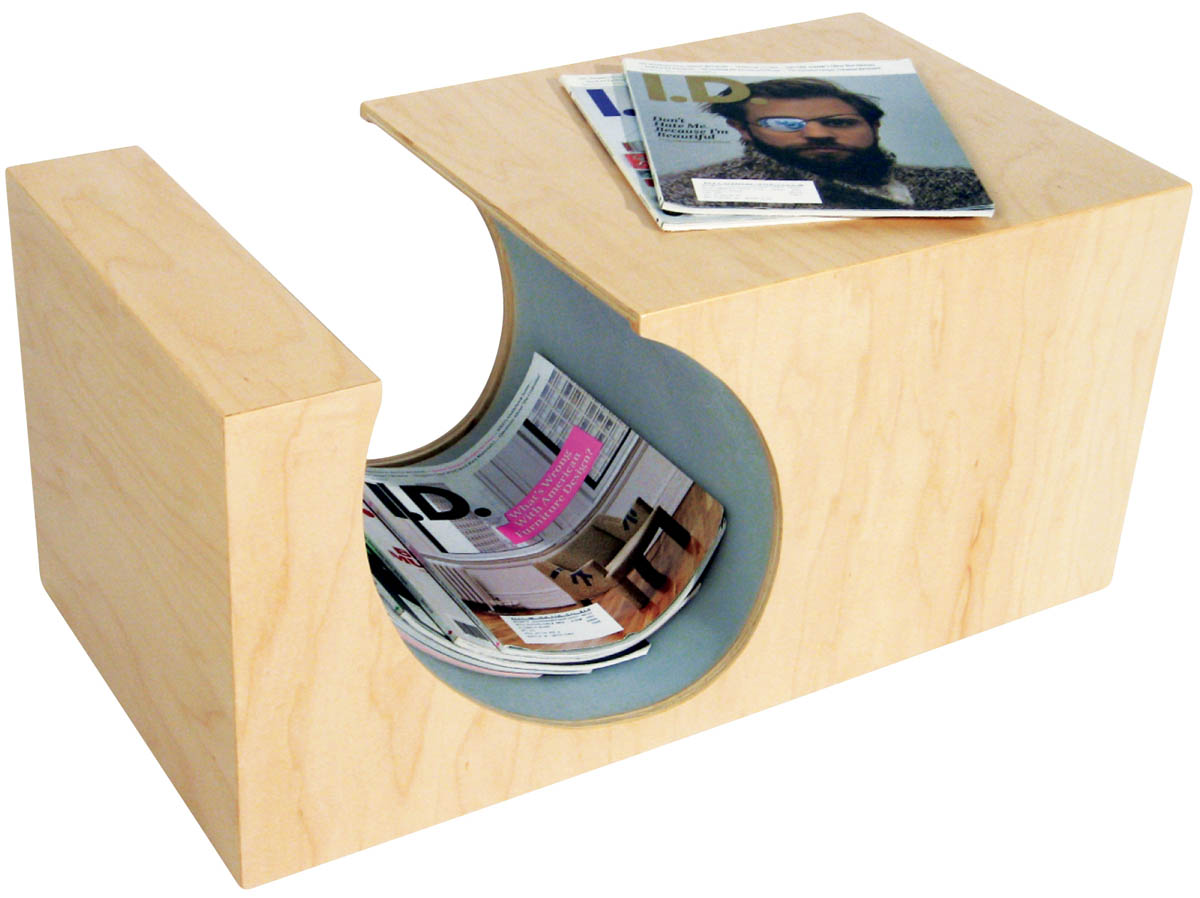
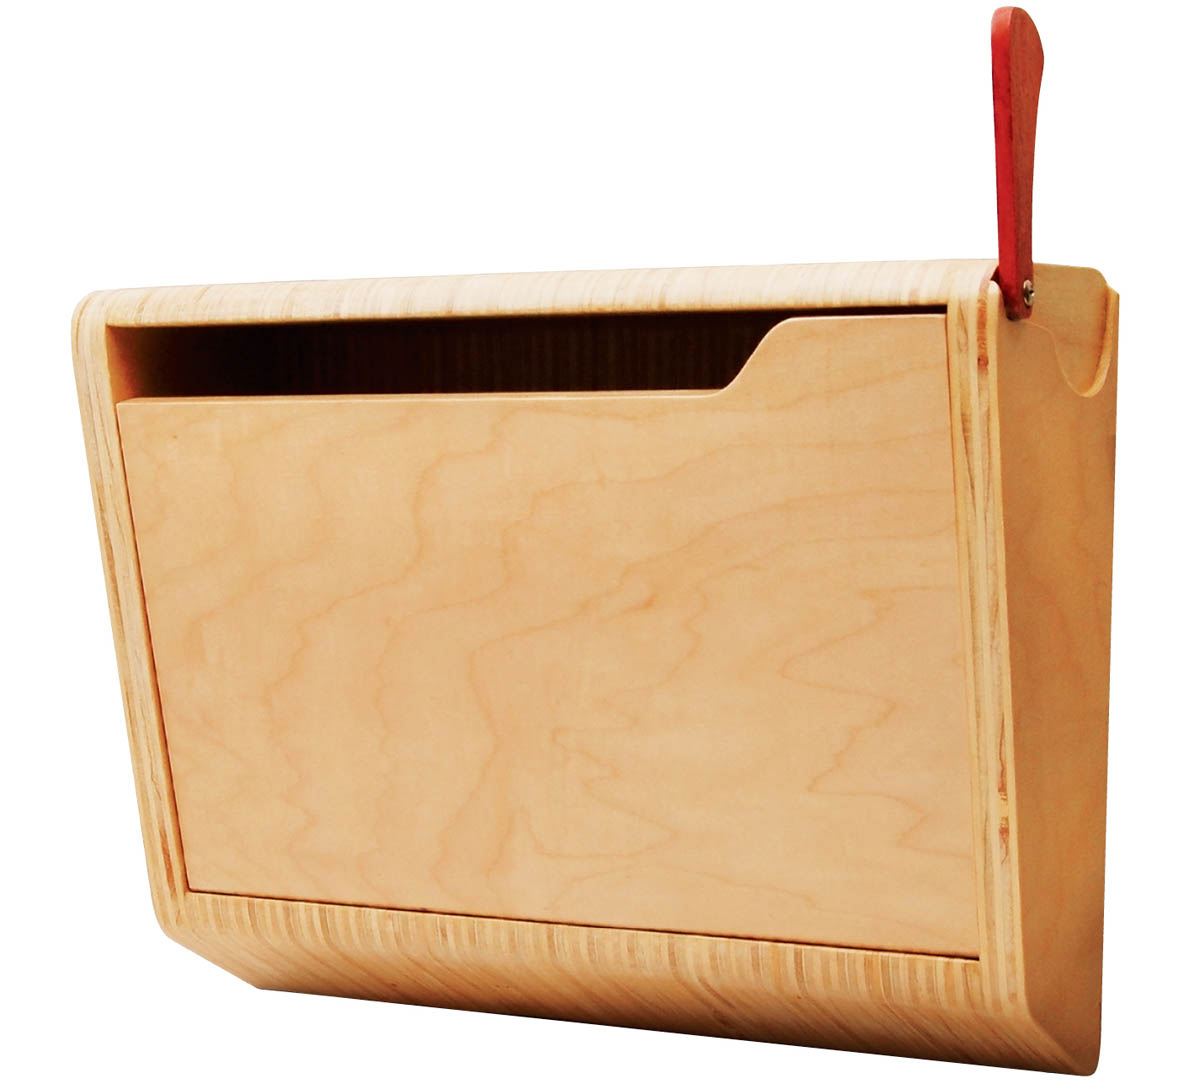
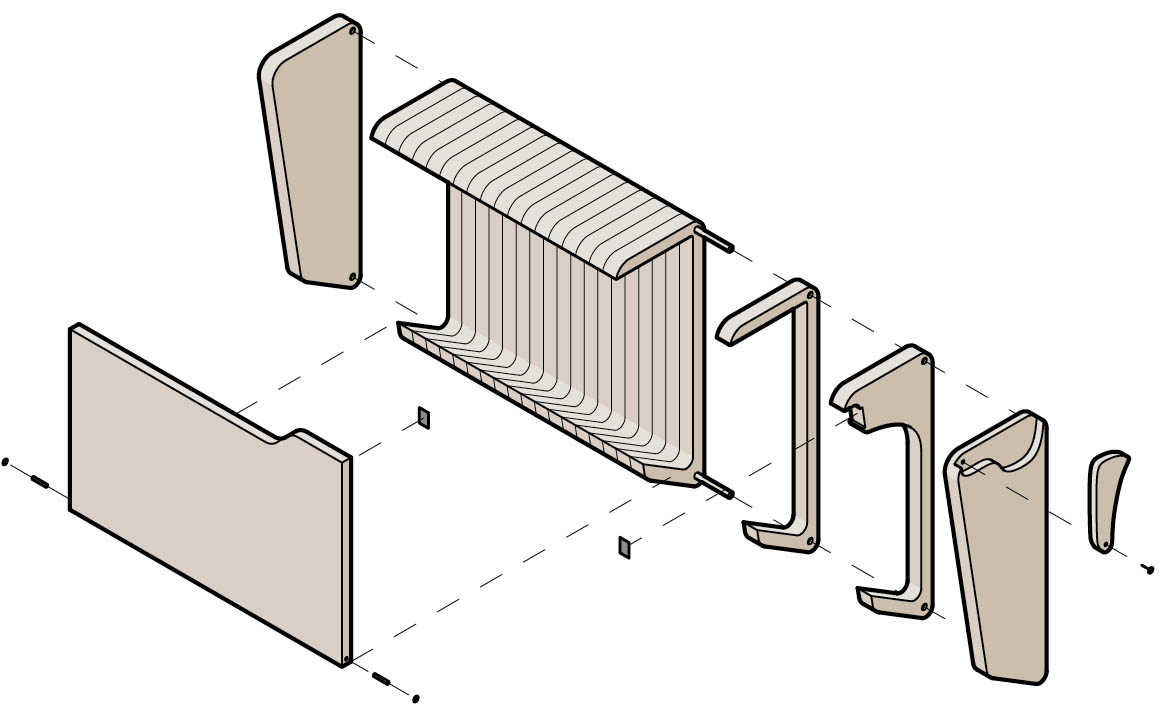
Combining clean lines, a sculptural form, and a clever hidden storage compartment, this elegant table has the makings of a modernist classic. Its designer clearly wanted to keep things simple as well as sustainable: the case is made with a half sheet of FSC plywood and uses no hardware. Aside from glue and finishes, the only other material is a flexible panel of recyclable polyurethane. For a striking decorative touch that adds depth and contrast, you can color the interior of the case–a bright blue stain was used for this model–and keep the exterior natural with a clear finish.
MATERIALS
- One 4 × 4-foot sheet 3⁄4" hardwood plywood
- Finish materials (as desired)
- Wood glue
- Four cabinet door bumpers (clear, self-adhesive)
- One 341⁄2" × 141⁄2" panel 3⁄8" polyurethane
TOOLS
- Table saw (recommended) or circular saw with straightedge guide
- Jigsaw
- Wood file
- Sandpaper
- Router with:
- Flush-trimming bit
- 1⁄8" rabbeting bit
- 1⁄4" straight bit
- Ratcheting band clamps
- Machinist’s square
- Utility knife
- Quarter or similar coin (as template for finger tab)
Note: All the plywood parts making up the case are joined with glued miter joints. This means that you cut all the pieces with a 45-degree bevel, except for the two top edges at either side of the curved cutout. It’s difficult (though possible) to make clean bevels with a circular saw and straightedge, so it’s recommended that you use a table saw for the initial parts cuts. As shown in the cutting diagram, you can cut all the plywood parts from a 4 × 4-foot sheet, but you might prefer to have the margin of error afforded by a 5 × 5-foot sheet of Baltic birch or a full 4 × 8 sheet of other plywood.
Instructions
- 1. Cut the plywood parts.
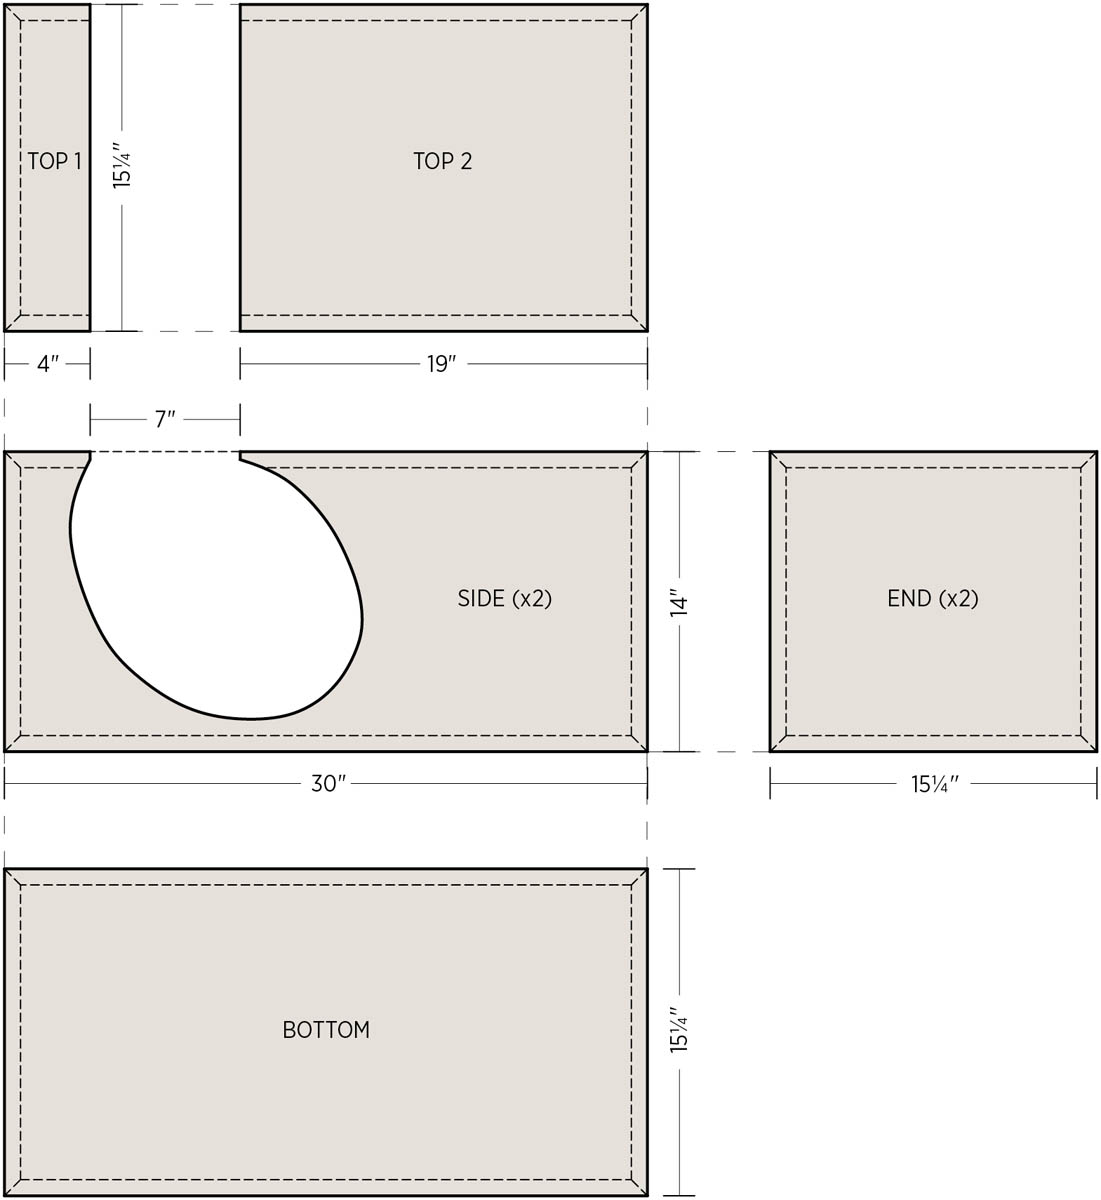
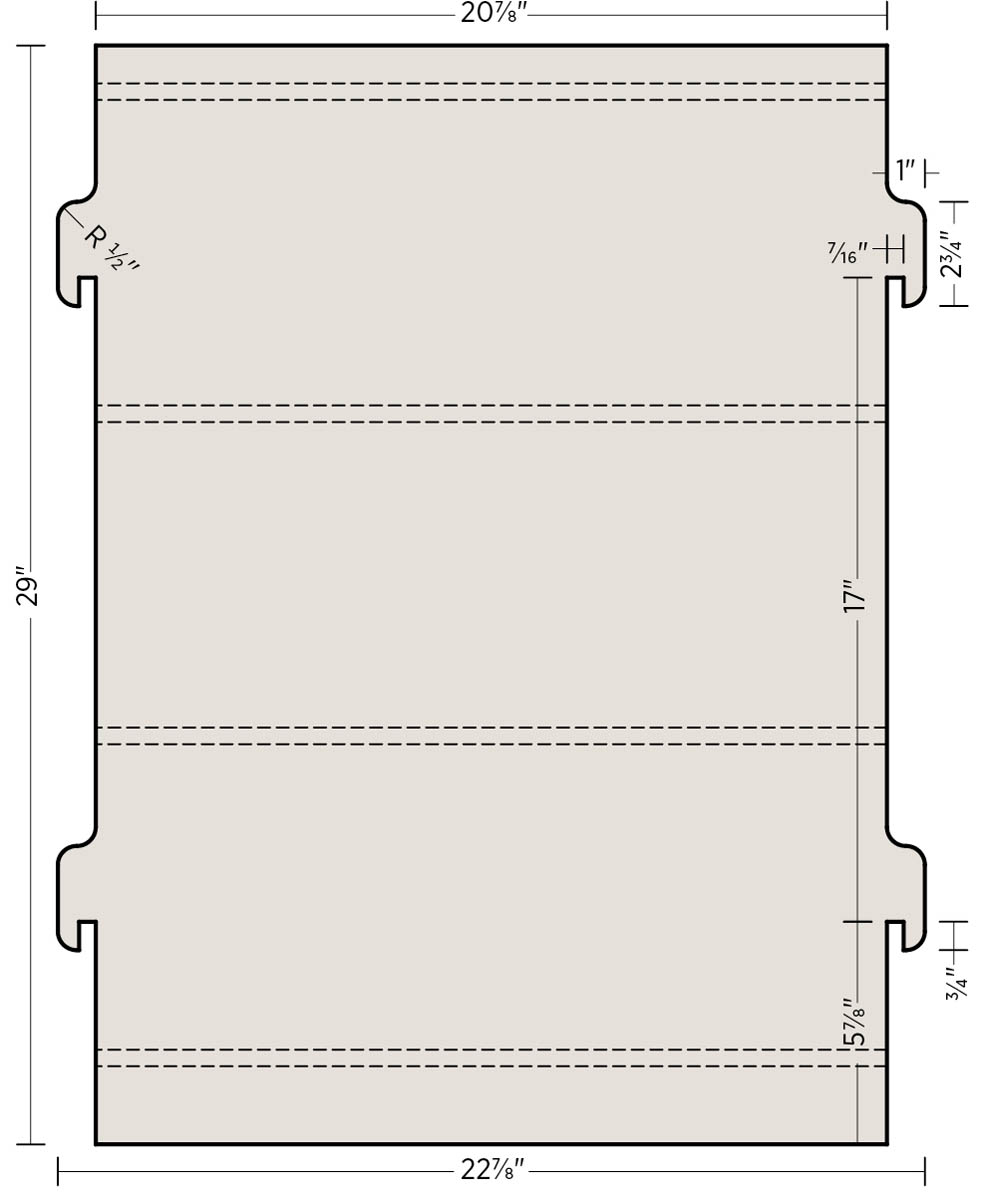
Lay out and cut the case parts as shown in the cutting diagram. As noted above, the inner 151⁄4" side of each top piece gets a straight edge; make all other cuts with a 45-degree bevel, with the long points on the outside (exposed) faces of every piece.
- 2. Make the side cutouts.
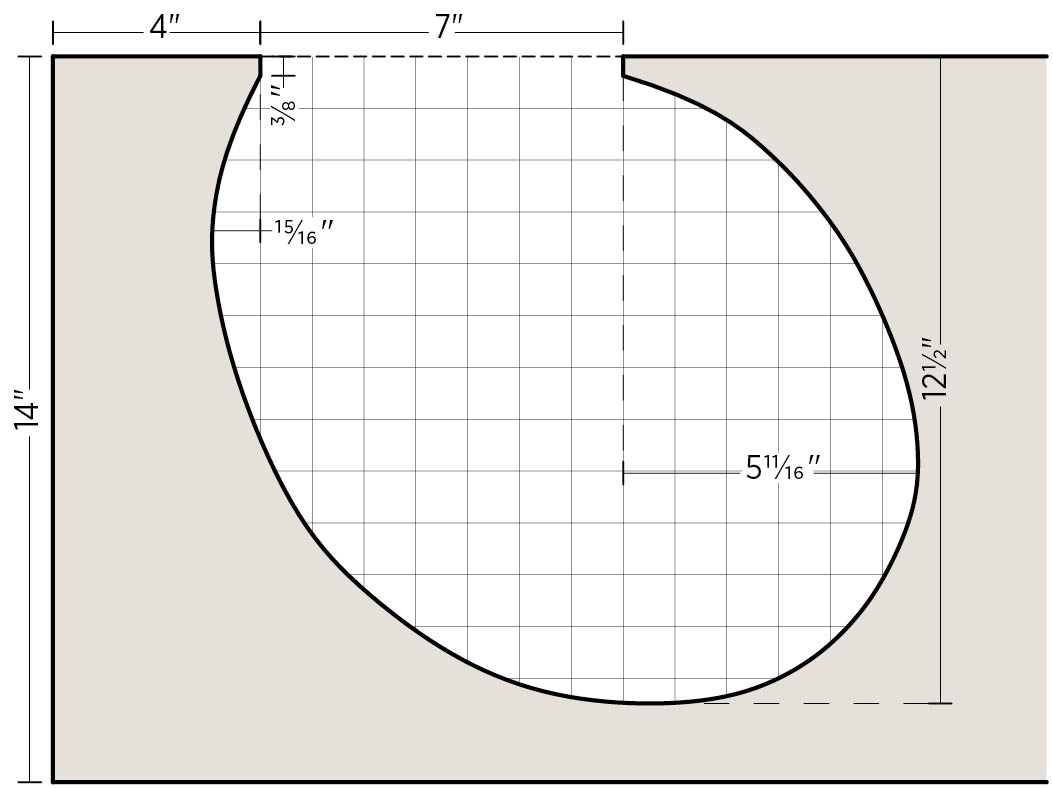
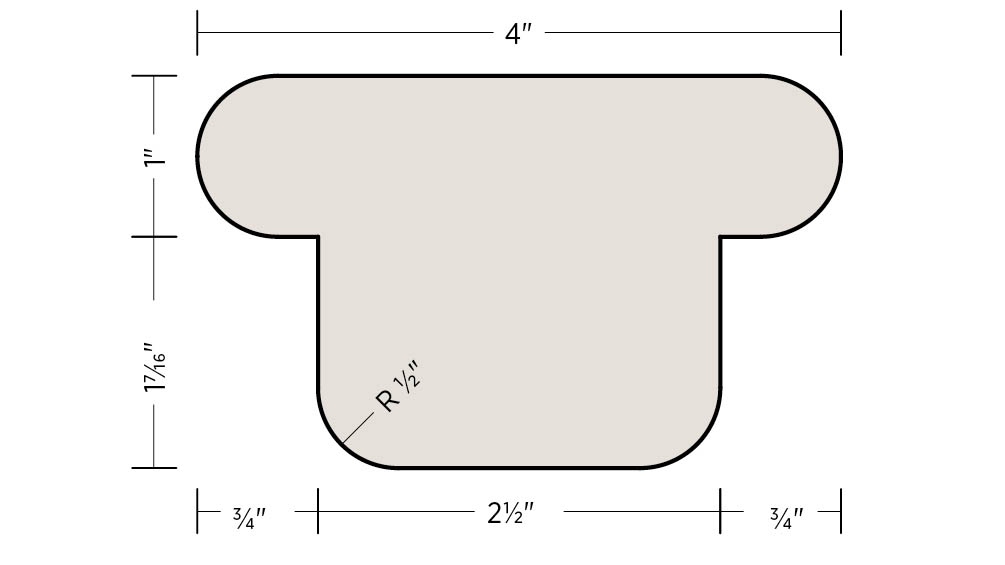
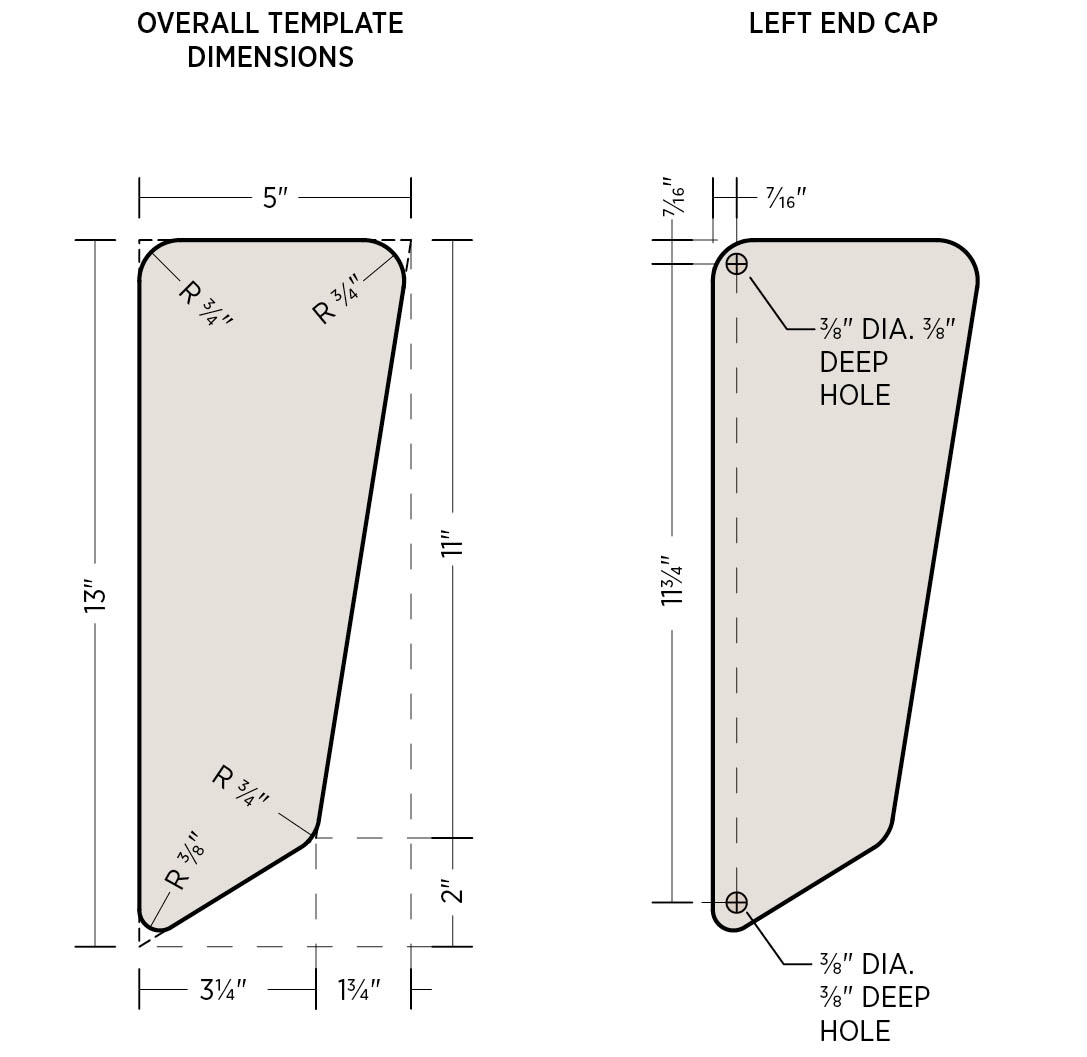
Draw or trace the side cutout on the inside face of one of the side panels, following the cutting diagram and side cutout template. Use a jigsaw to cut out the bulk of the waste inside the cutout, staying about 1⁄4" inside the cut line. Then make a second pass, cutting precisely to the line. Use a wood file and sandpaper to smooth the cut edge and perfect the curve, as needed. (Any bumps or dips in the edge will be transferred to the other side cutout, so you want the edge to be as smooth as possible.)
Use the first side piece as a template to trace the cutout on the remaining side piece. Remove the bulk of the waste from the second cutout, again using a jigsaw and staying about 1⁄4" inside the line. Clamp the two sides together and use a router and flush-trimming bit to complete the second cutout (the bit’s bearing follows the first cutout to make an identical cut in the second piece).
- 3. Mill the access panel side grooves.
Using the router and a 1⁄8" rabbeting bit, mill a 1⁄8"-wide, 1⁄8"-deep groove along the inside edge of each side cutout. A rabbeting bit is a bearing-guided bit that cuts at a set side-to-side depth, while the vertical depth is adjustable and is determined by the router’s depth setting. In this operation, the bit’s bearing rides along the edge of the cutout (not the panel’s surface).
- 4.Mill the access panel end grooves.
Each top piece gets a 1⁄8"-deep straight groove underneath and just behind its square edge, to accommodate the ends of the polyurethane panel. Mill this groove with a 1⁄4" straight router bit. Set up the router with a guide fence (parallel to the square edge of the top) so the inside edge of the groove is 1⁄4" away from the straight edge of the top piece. The groove will not be visible on the finished piece and can be adjusted before gluing to ensure a proper fit for the polyurethane panel.
- 5. Prepare the case interior.
Lay out all of the case pieces, interior side up, as in an exploded view, with the bottom piece in the center. Use sandpaper to smooth any imperfections on the interior surfaces. Apply wood stain or other finish, if desired. As shown, the case interior is stained with Daly’s Semi-Transparent Exterior Stain, which comes in 30 colors and requires only one coat. It soaks into the wood, allowing the beauty of the grain to remain visible while providing bright, vibrant color. To ensure a strong glue bond, do not apply stain to the beveled edges of the panels.
- 6. Complete the glue-up.
To ensure that all the miter joints fit well, you have to glue up the entire case in one go. This step is fast and furious, and you’ll definitely want at least one helper. Starting with the bottom and one end panel, apply glue to both mating edges, and set the end panel in place. Follow with the side pieces, the other end panel, and the two top pieces, one at a time. Clamp the entire assembly with several ratcheting band clamps running in both directions. As you clamp, check to make sure the miters are closed and the panel edges are flush, and use a machinist’s square to ensure the case is square on all sides. Finally, wipe off excess glue from the exterior and interior surfaces with damp paper towels. Let the glue dry.
- 7. Prepare the access panel.
Cut a rounded finger tab at the center of each end of the polyurethane panel using a sharp utility knife and a quarter or similar coin as a template.
Note: You can use other types of 1⁄8"-thick material for the panel, but they must be flexible enough for the application.
- 8. Finish the case.
Sand and finish the case exterior, as desired (see Sanding for a Superior Finish, below). The finish used here is Daly’s CrystalFin Acrylic Polyurethane in satin. This water-based, low-toxicity, quick-drying formula provides a beautiful finish. When the finish has dried, apply cabinet door bumpers at each corner of the bottom panel. Insert the polyurethane panel into its grooves.
Shop Tip
Sanding for a Superior Finish
For superior finishes on wood pieces, sanding is key. Once the wood is smooth and flat, you can start moving up the grit scale (the higher the number, the finer the grit). A good starting point for a high-quality finish is in the 300- to 400-grit range. Always sand in the same linear direction, following the grain of the wood. Move incrementally from lower grits to higher grits until you have a surface finish that is smooth to the lightest touch. The more time spent sanding, the better the surface will look in the end.
Stacked Box
Designed by Rachel Gant
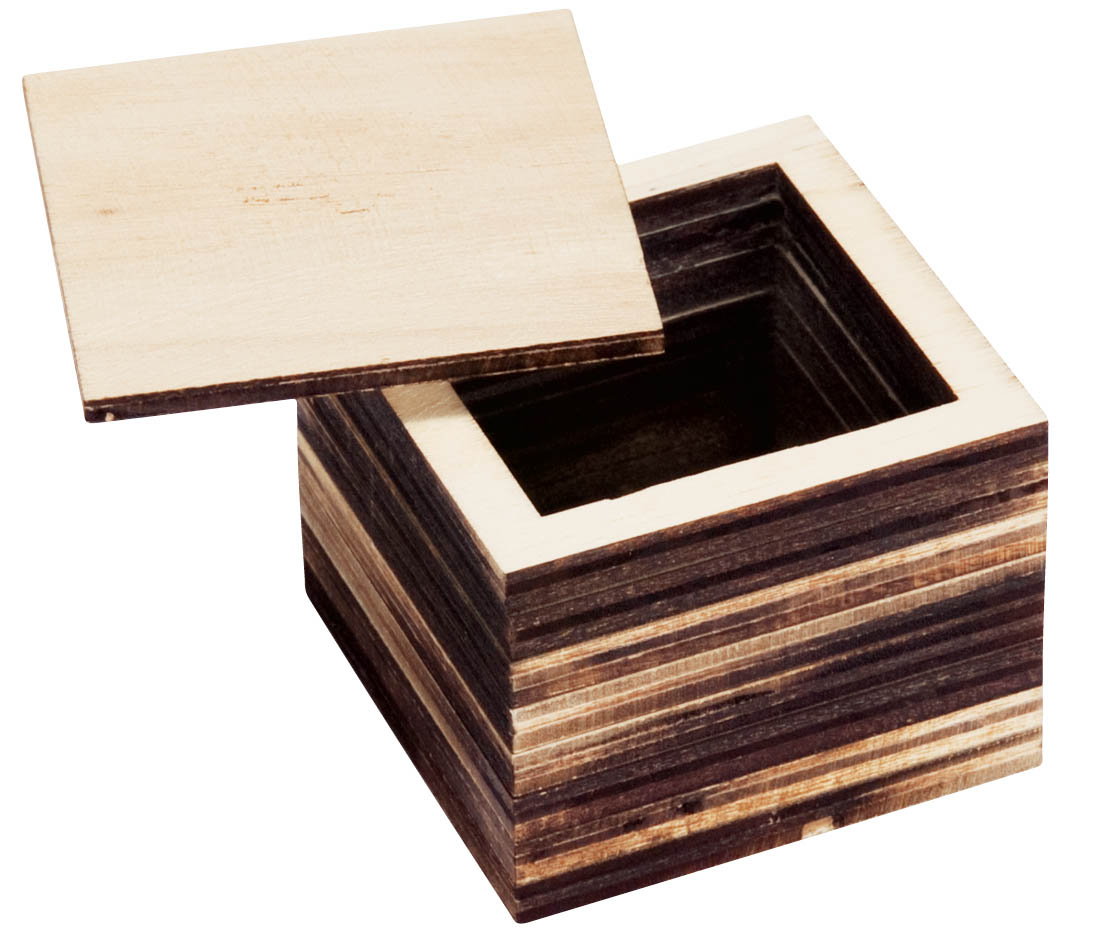
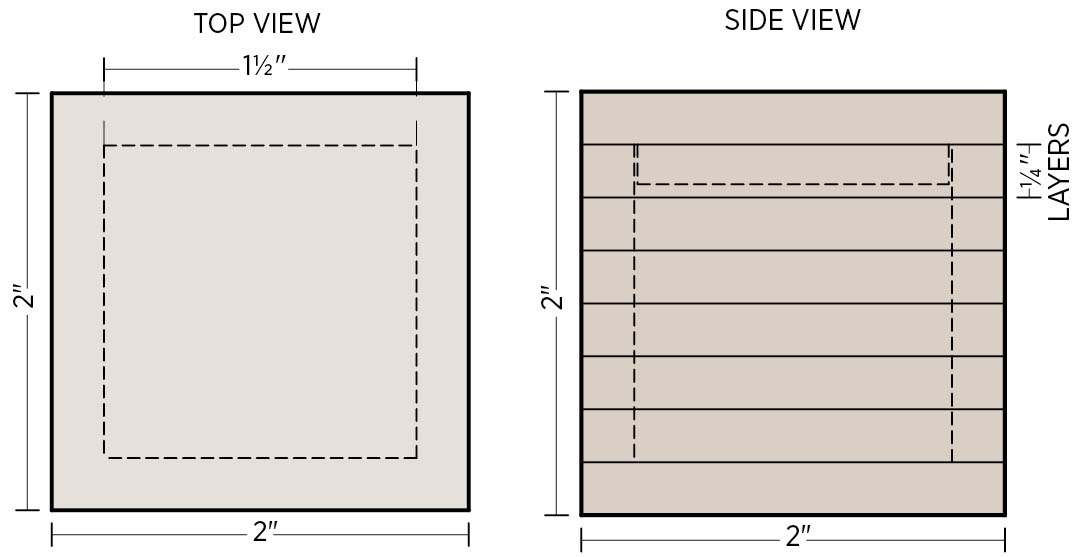
As its name implies, this pretty little box is made with a layering, or lamination, of plywood. Its diminutive size makes the box all the more satisfying to create. Each layer of the box has a square window cut out of its center, so that the piece resembles a miniature picture frame. When the frames are stacked, the cutouts create the vessel’s interior space, while the solid top and bottom layers provide secure enclosure. Stacked Box happens to be the smallest piece in this book, and yet it’s one of the best examples of, in the designer’s own words, “celebrating the layers within the plywood and using them to aesthetic advantage.” And that, in a nutshell, is why we’re here.
See Laptop Stand for another work by Rachel Gant.
MATERIALS
- One 12" × 12" piece 1⁄4" plywood (or 2" × 20" min.)
- Wood glue
- Finish materials (as desired)
TOOLS
- Circular saw with straightedge guide or table saw
- Miter saw or miter box and backsaw
- Drill with 3⁄8" straight bit
- Jigsaw and fine wood blade
- Sandpaper (up to 220 or 300 grit)
- Clamps
- Square-edged file (optional)
- Measuring calipers (if available) or measuring tape
- Portable power sander (if available) or sanding block
Note: The project shown here is made with eight layers of 1⁄4" plywood, resulting in a 2" cube. To create a box with different dimensions, you can use thicker or thinner plywood, change the number of layers, and/or modify the shape as desired. The following instructions are for the box as shown.
Instructions
- 1. Cut the blank layers.
Rip a 2"-wide strip from the factory edge of a piece of 1⁄4" plywood. One 20"-long strip is enough for the whole box; otherwise, rip more than one strip. Use a circular saw with a straightedge guide or a table saw to ensure a very straight, clean cut.
Crosscut the strip into eight 2" squares. The best tool for this is a miter saw set up with a stop block (to cut at 2" each time). If you’re making several boxes and you don’t have a miter saw, it’s worth borrowing or renting one for a couple of hours. Otherwise, you can make the crosscuts with a miter box and backsaw (also set up with a stop block), a jigsaw, or even a circular saw. Make the cuts as straight as possible.
- 2. Cut the frames.
On one face of one of the blanks (the 2" squares), draw a 1⁄4" margin along the piece’s perimeter, as shown in the plan drawing. Drill a 3⁄8" starter hole for a jigsaw blade just inside the marked margin. Then carefully cut along the lines with a jigsaw. Sand the inside edges of the cutout flat and smooth.
Use the cut frame as a template to mark the window cutout on one of the uncut blanks. Clamp five uncut blanks together, with the marked one on top, so all of their edges are perfectly flush. Drill a starter hole through all five clamped blanks, being careful to stay well within the cutout area. Make the cutouts with the jigsaw. The remaining two uncut blanks will remain solid for use as the top and bottom of the box.
Sand any loose fibers from the inside edges of the frames. If necessary, use a square-edged file to clean up any of the inside corners of the cutouts.
- 3. Glue up the box.
Apply a very thin layer of glue to the bottom edges of each frame. Stack the frames, one on top of the other, and add the bottom (solid blank) to the bottom of the assembly. Carefully align each layer, making sure the box is square (90 degrees) to a flat work surface. Clamp the assembly with clamps or a heavy, flat weight, and let the glue dry overnight. Lightly sand the interior of the box so all surfaces are flat and smooth.
- 4. Fit the lid.
Measure the dimensions of your top frame cutout using calipers (if available) or a measuring tape. Transfer the dimensions to a leftover piece of plywood stock, marking a square that will fit inside the top frame. Cut the square with a miter (or other) saw, cutting it just a hair large in both directions.
Test-fit the square in the box, and sand the edges of the square as needed for a snug fit–the slightest bit of resistance is nice so that the lid feels attached. Glue and clamp the square to the underside of the lid blank so it is precisely centered in both directions. Let the glue dry.
- 5. Sand the box.
Using a power sander or a flat sanding block (made from scrap wood), sand the exterior faces of the box (including the lid, which you should hold in place by hand or with clamps) until they are perfectly smooth. To flatten a face, it helps to sand diagonally across the layers. Start with medium-grit paper and work up to fine-grit (at least 220 or 300 grit).
- 6. Finish the box.
You can finish your box with any appropriate product. Just keep in mind that a thick finish may affect the fit of the lid. Here’s how to create the aged effect of the box shown: Carefully apply very thin layers of dark wood stain, using a small brush. Be careful not to get stain on the top or bottom of the box, unless desired. Apply two or three layers, and let them dry overnight. Once dry, roughly sand the stained surfaces by hand, without a block, using 220-grit sandpaper. This results in a mottled look, as some of the light-blonde layers are exposed among the darker stained layers.
Capsa
Designed by Bryce Moulton
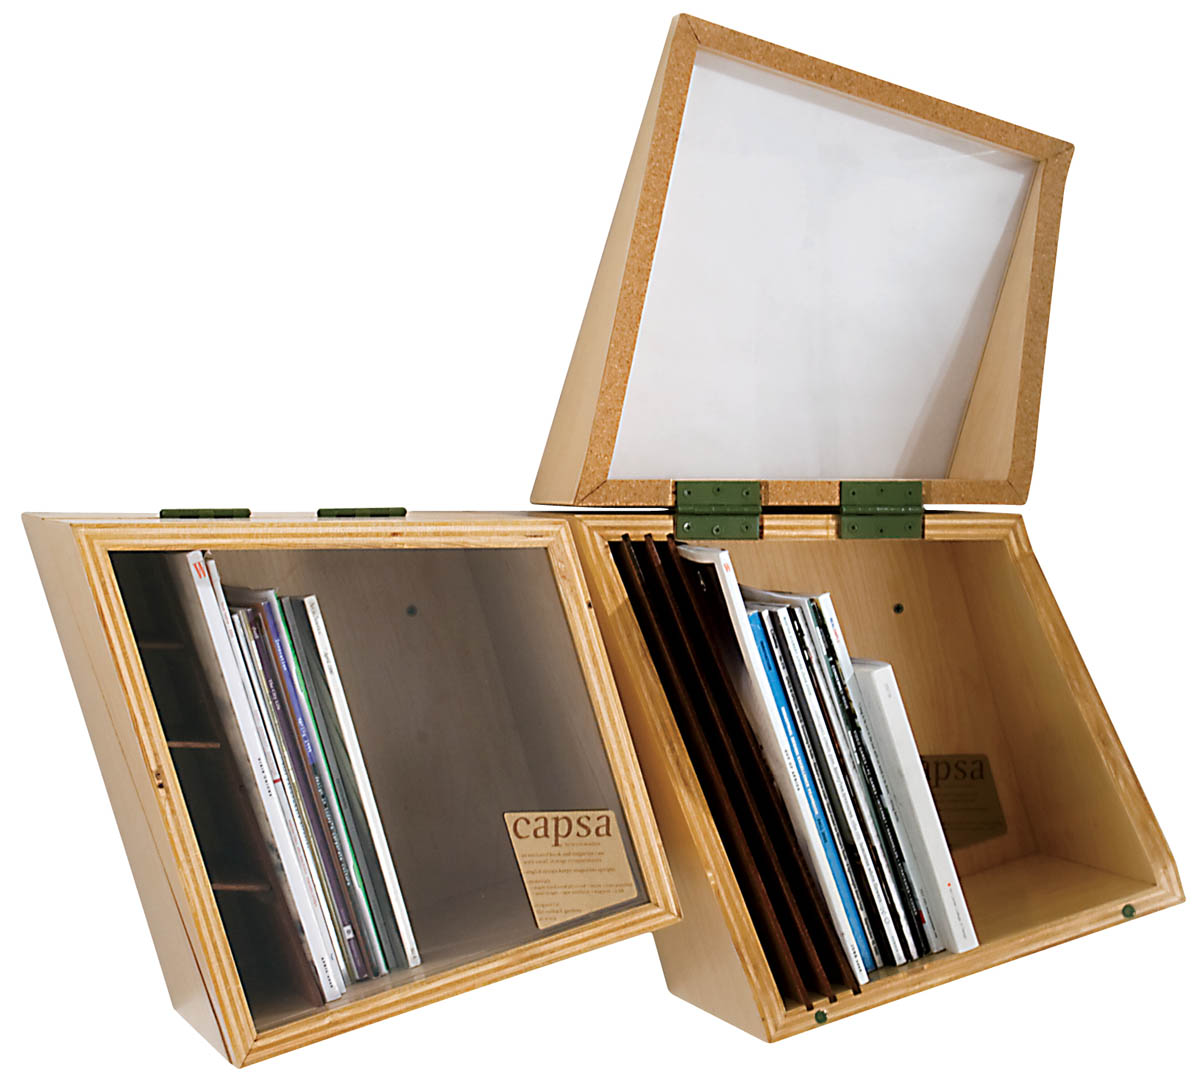
Capsa is a modular, wall-mounted, fully enclosed bookcase/storage unit made with 3⁄4" plywood and clear plastic. Its dynamic shape isn’t only for looks–it also keeps books or magazines from tipping over. When the lid is closed, the stored contents are protected from dust and moisture by a cork lining, while the shatterproof and scratch-resistant Lexan window provides a full view of the case interior. All of these features make Capsa a fitting piece for any room in the house, including the garage and outdoor areas. And, as you can see here, Capsa also looks great in pairs.
MATERIALS
- One 2 × 4-foot piece 3⁄4" hardwood plywood
- Wood glue
- One 2 × 2-foot piece 1⁄8" Lexan (or Plexiglas or glass)
- One 2 × 4-foot piece 3⁄16" lauan paneling (optional)
- Two 11⁄2" × 2" butt hinges (each leaf measures 3⁄4" wide)
- One roll 3⁄16"-thick cork (available at hardware and auto parts stores)
- Finish materials (as desired)
- Four neodymium magnets
- Two-part epoxy
- Screws for mounting
- Heavy-duty hollow-wall anchors (as needed)
TOOLS
- Table saw
- Router or router table with:
- 1⁄4" straight bit
- 3⁄4" straight bit
- Jigsaw with straightedge guide
- Ratcheting band clamps
- Drill with:
- 3⁄8" spade bit (must be slightly larger than magnet diameter)
- Combination pilot-countersink bit
- Sandpaper (up to 600 grit)
Instructions
- 1. Cut the full panels.
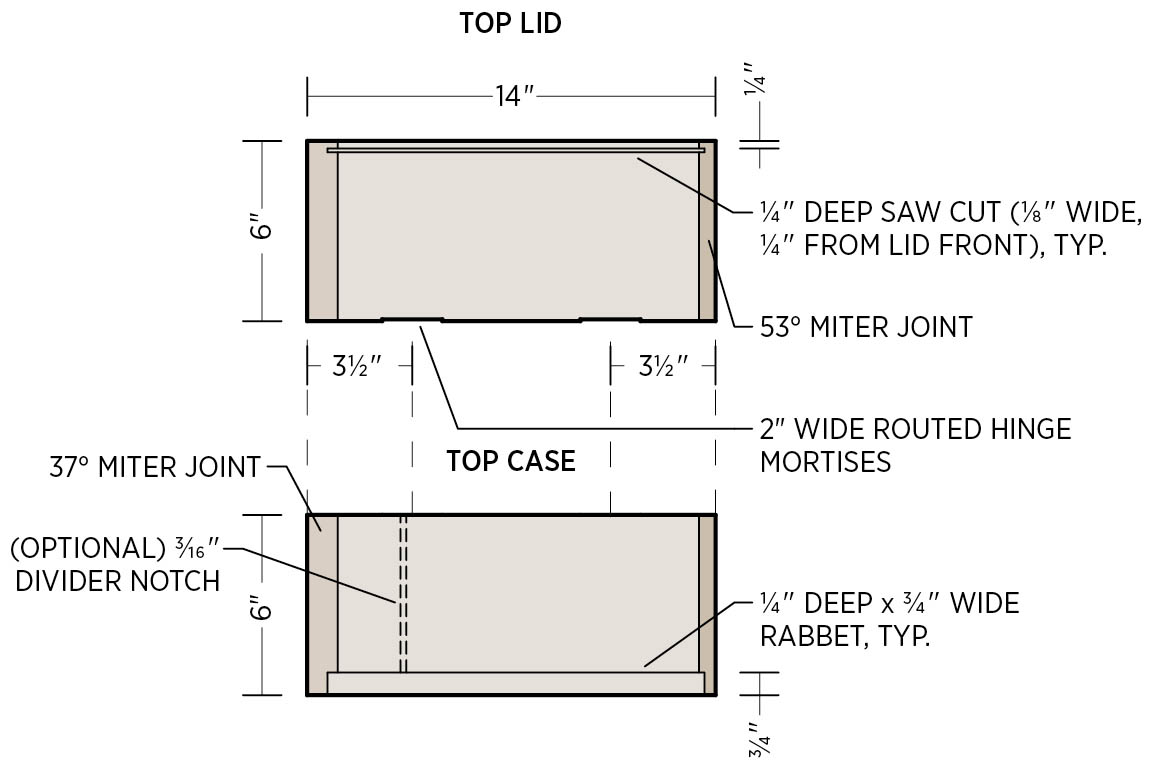
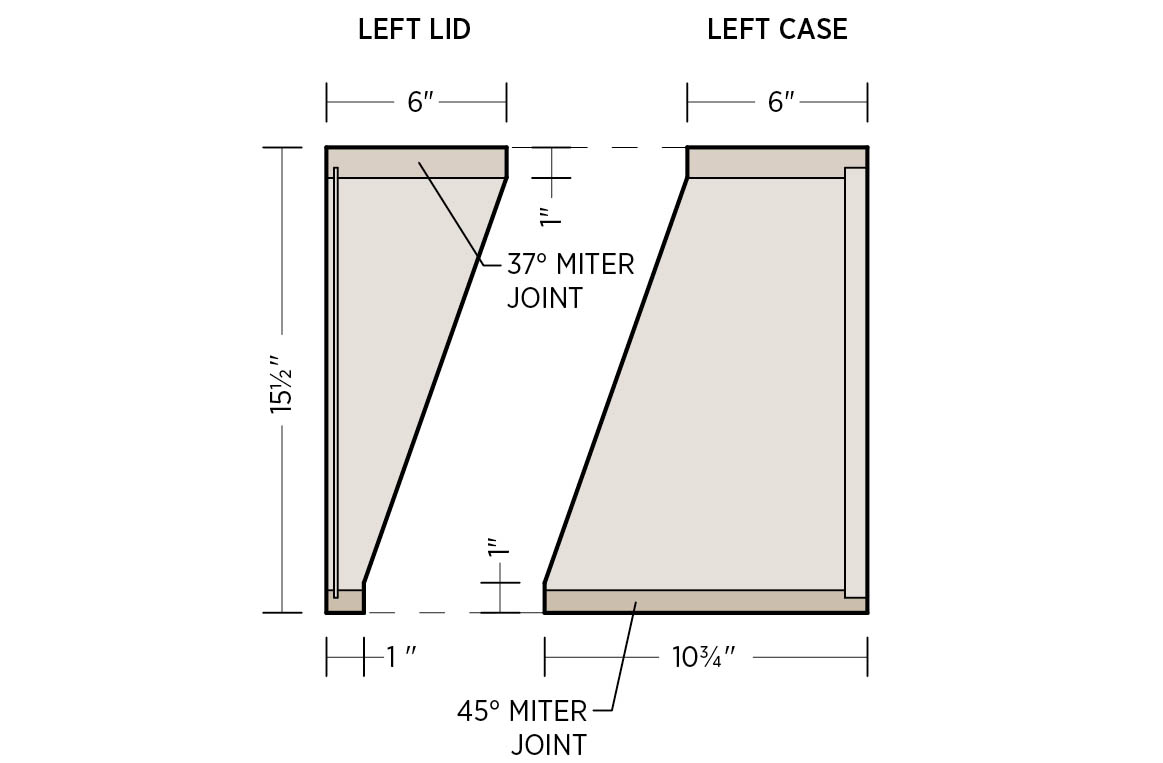
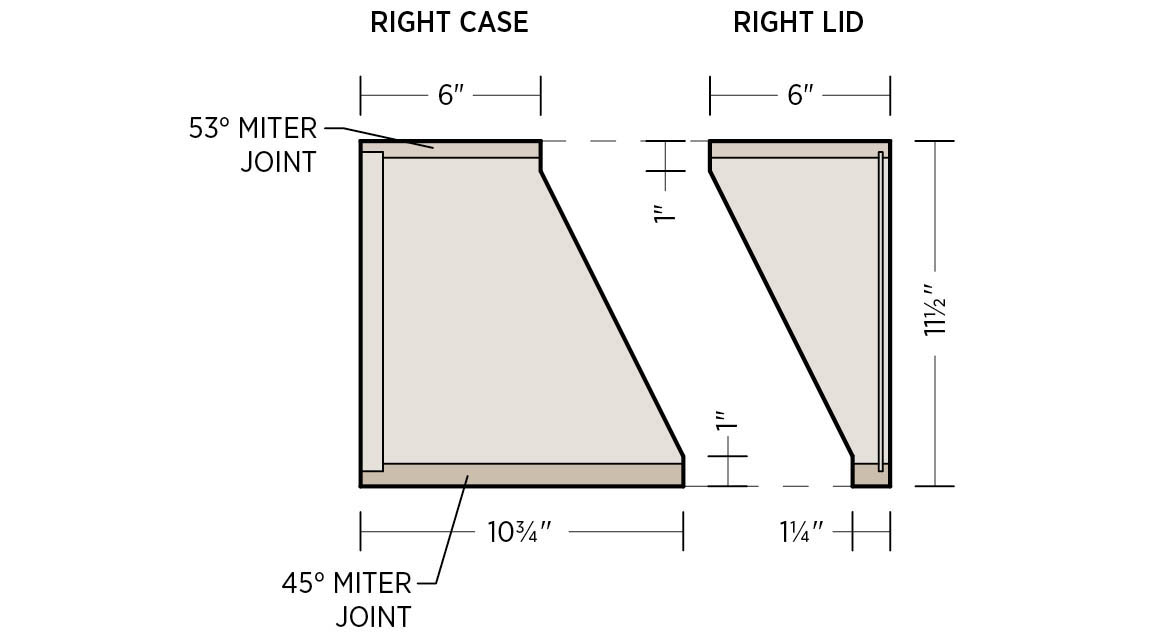
Lay out the cuts for all the full panels on a 2 × 4-foot piece of hardwood plywood, as shown in the cutting diagram above. The dimensions are as follows:
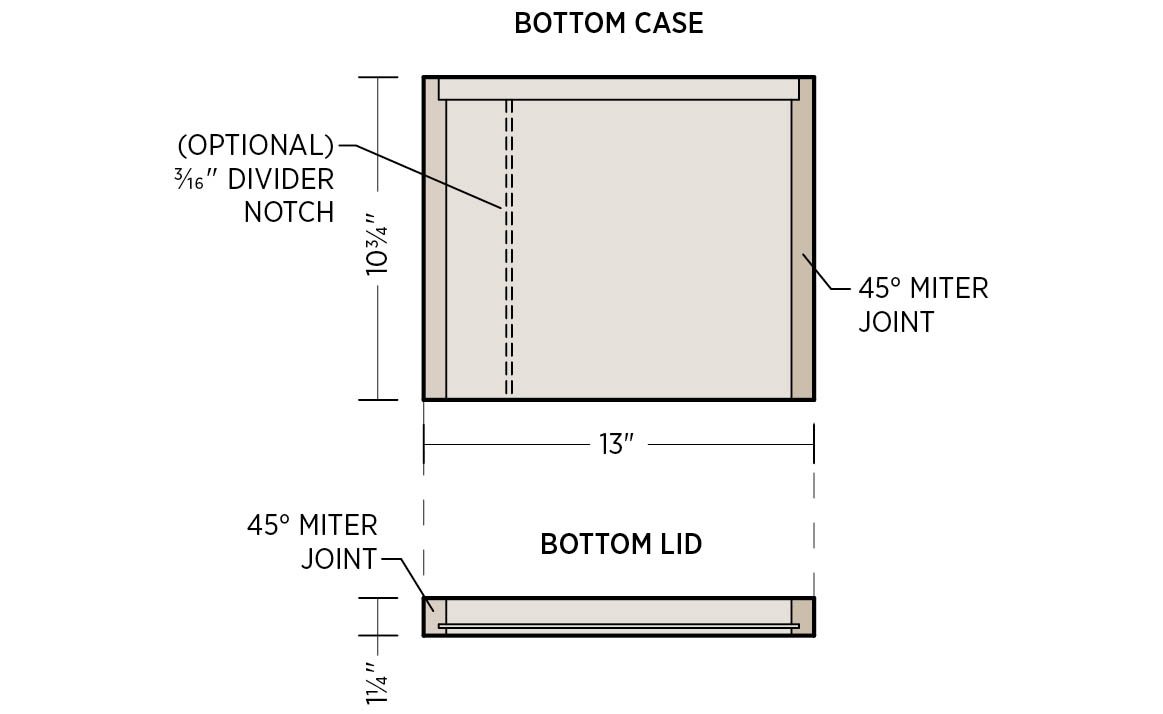
- Top = 12" × 14"
- Right = 12" × 111⁄2"
- Left = 12" × 151⁄2"
- Bottom = 12" × 13"
Cut the panels on a table saw, with the blade at 90 degrees (or 0 angle). Later, you will bevel some of these edges and cut the top, right, left, and bottom panels into two pieces (for creating the case and the lid). Remember to mark and cut from what will be the inside face of the piece when installed (to minimize any visible tearout), and be mindful of the grain patterns for best appearance.
- 2. Cut the miter-joint bevels.
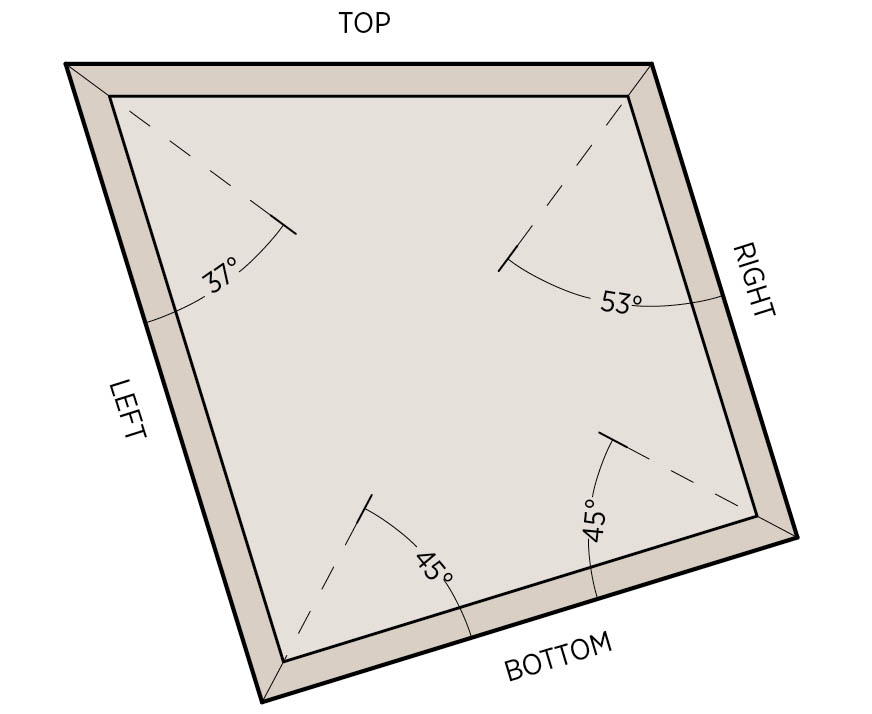
Bevel all the 12"-long edges of the panels, following the cutting diagram and miter detail drawing. For the 45-degree bevels, tilt the table saw blade to 45 degrees, and run the panels through on the flat. For the 53-degree bevels, tilt the blade to 37 degrees and run the panels on the flat. To make the 37-degree bevels, keep the blade at 37 degrees, but run each panel through vertically, on its edge. For safety and improved stability, clamp some scrap material around the workpiece for the vertical cuts.
- 3.Rout the sides.
As insets for the back panel, cut a 1⁄4"-wide, 3⁄4"-deep rabbet into the rear inside edges (not beveled) of the top, side, and bottom panels (note that here the width is measured across the panel edge; depth is measured along the panel face). You can use a handheld router or a router table for this operation.
- 4. Cut the grooves for the window.
The inside faces of the side, top, and bottom panels receive a 1⁄8"-wide (the width of the saw cut, or kerf) groove to accept the Lexan window (the window goes into what will become the lid). These grooves are directly opposite the rabbeted edges. Set up the table saw with the fence 1⁄4" from the blade, set the blade to cut 1⁄4" deep, and cut each groove with a single pass.
- 5. Divide the panels into case and lid pieces.
Following the cutting diagram, mark the lines as shown to divide each side panel. Make these cuts with a jigsaw in a single pass per piece–this means that the turns will be slightly rounded, but that is desirable. Mark the straight cuts for the top and bottom panels, and make these cuts on the table saw.
Note: With all panels, cut to the same side of your marked lines, so that the corresponding widths of the different pieces will match.
- 6. Cut grooves for the dividers (optional).
The grooves for the dividers are cut into the case pieces only. Do not tilt (angle) the blade for the grooves on the bottom piece, but tilt it at 12 degrees for the top piece. The paneling going into these slots is 3⁄16" thick, so two overlapping passes is just the right width. You’ll have to experiment with blade depths for the top-piece grooves, and they should be no deeper than 1⁄4".
The number and locations of the dividers are optional, and you can opt to omit them altogether. In any case, it’s best to configure the dividers based on the items you want to store. Using your items as a guide, dry-assemble the case, and measure from a side panel to mark layout lines for the grooves. Measuring from the same side panel ensures the grooves will line up from top to bottom.
- 7. Rout the hinge mortises.
On the rear edge of the top piece of the lid, use a router and straight bit to cut mortises (recesses) for the two hinges. Mark each mortise so its center is about 31⁄2" in from the long point (toe) of each mitered end of the top piece (make sure the hinges don’t interfere with the divider grooves). Cut the mortises to match the length and thickness of the hinge leaves.
- 8. Glue up the case and lid.
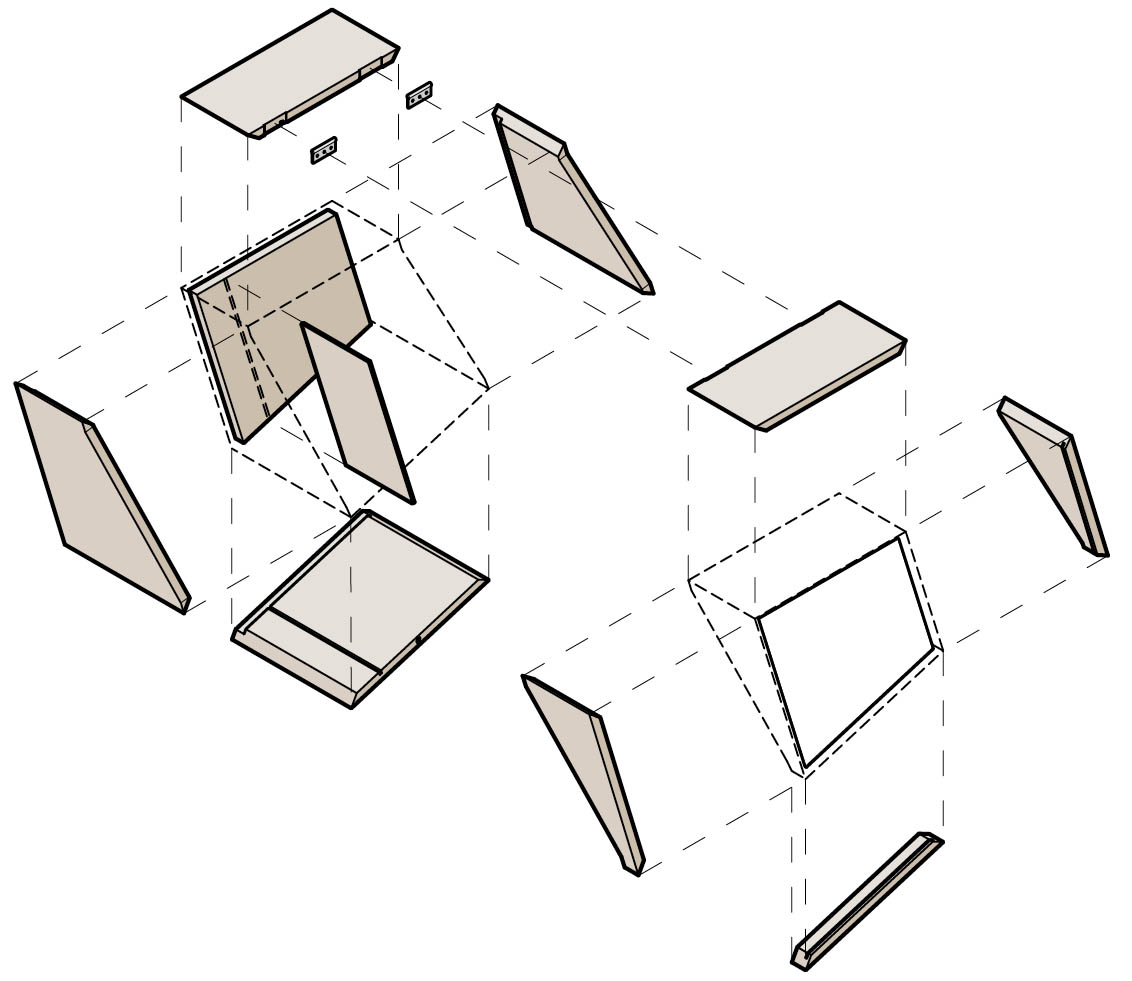
Apply glue to the beveled edges of the case pieces, fit the pieces together so the miters are closed and the front and back edges of the pieces are aligned, then clamp around the entire assembly with ratcheting band clamps.
With the lid pieces, apply glue to only the left, top, and right pieces. Assemble all of these, along with the bottom piece (without glue), and clamp the assembly with a band clamp. You’re leaving the bottom piece loose so that you can add the window later.
- 9.Cut and install the back panel.
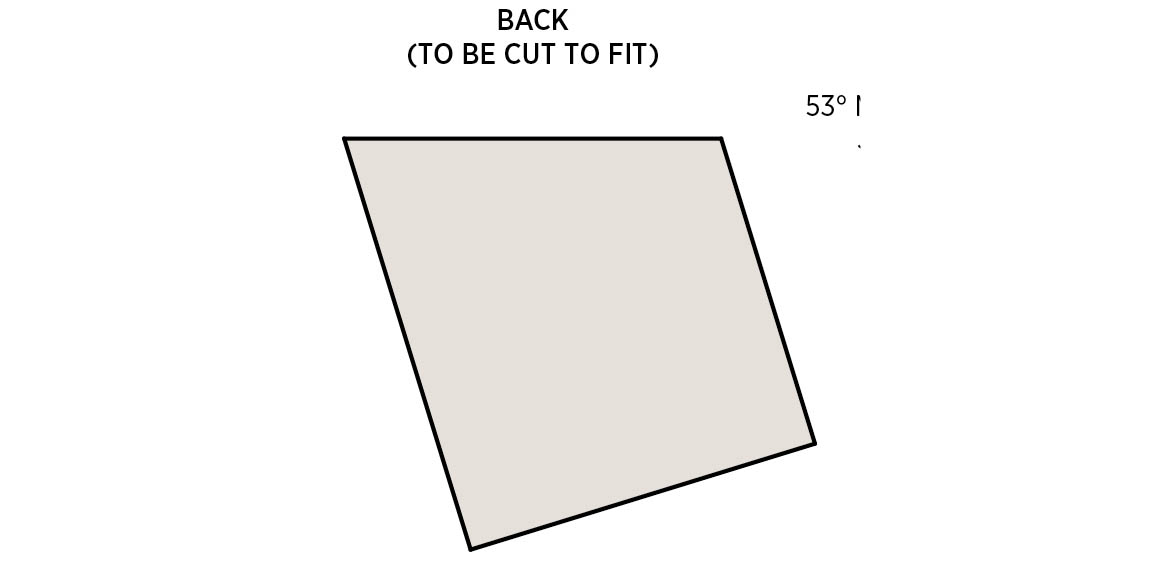
Position the assembled case over a leftover piece of 3⁄4" plywood. Trace along the inside faces of the sides, top, and bottom of the case to transfer the precise shape to the plywood. Use a straightedge to mark cutting lines 3⁄16" outside each traced line. Cut the back piece along the cutting lines. Test-fit the back panel to make sure it fits well into the rabbets, and then install the back with glue.
- 10. Cut the window.
Measure the inside dimensions (width and height) of the lid assembly. Add 7⁄16" to each of these dimensions, and cut the Lexan sheet to this size, using a jigsaw with a fine-tooth blade and a straightedge guide.
Note: If you’re using Plexiglas or glass instead of Lexan, cut by scoring and breaking the material.
- 11. Cut the dividers (optional).
Measure between each set of slots for your dividers, and cut a strip of lauan paneling to fit. Where horizontal “shelves” meet vertical dividers, support the shelf ends with lauan strips or pieces of small molding glued to the vertical divider.
- 12. Adjust the case and lid.
Install the hinges into their mortises in the lid, using the provided screws driven into pilot holes. Align the lid and case, and screw the loose hinge leaves to the edge of the top case piece (no mortises here). Slide in the window and temporarily fit the bottom lid piece into place. Close the lid: It won’t fit properly yet because the curved section on the case will not quite match the curve of the lid, due to the hinge-leaf thickness. Now you must sand (or use a hand planer, if available) the case edges to create a consistent 1⁄8" gap all the way around, using a piece of cork as a spacer. Test your progress by placing the cork on the bottom edge of the case and closing the lid, and continue sanding as needed.
- 13. Finish the wood.
Remove the hinges and window. Sand all the wood parts (moving from lower grits of paper up to 600 grit is recommended). Finish the wood as desired. The units shown here are finished with spar urethane. Do not finish the mating edges for the bottom lid piece.
- 14. Complete the lid.
Remove any protective covering on the Lexan window and slide the Lexan into the lid assembly. Glue on the bottom lid piece, clamp it, and let the glue dry.
- 15. Install the magnets and lid.
Drill 3⁄8" holes in corresponding locations on the bottom edges of the lid and case (or size the holes based on the diameter and thickness of your magnets). Glue the magnets in place with general-purpose two-part epoxy. Reattach the hinges and lid.
- 16. Add the cork.
Cut the cork roll into 3⁄4"-wide strips, then cut the strips to length, using one full strip for each edge of the lid. You can miter the ends of the strips at the corners, if desired. Depending on the thickness of the cork, you may need to run it just up to the edges of the hinge leaves. Secure the cork to the lid edges with wood glue.
- 17. Install the unit.
To install the unit, drill three mounting holes in a straight, level line along the back panel. Countersink the holes so the screw heads will be flush to the back panel. Mount the unit with screws driven into wall studs, as applicable, or heavy-duty hollow-wall anchors.
Dyed MDF Storage Cabinet
Designed by Camden Whitehead
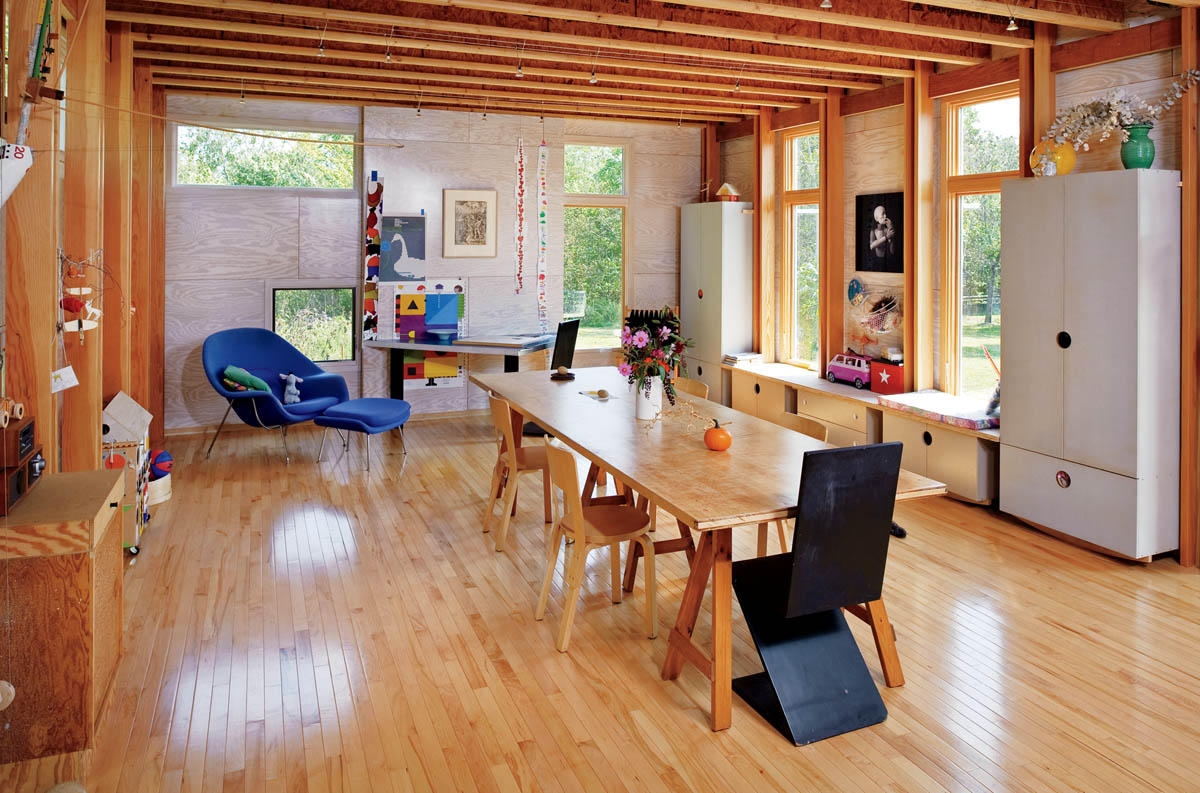
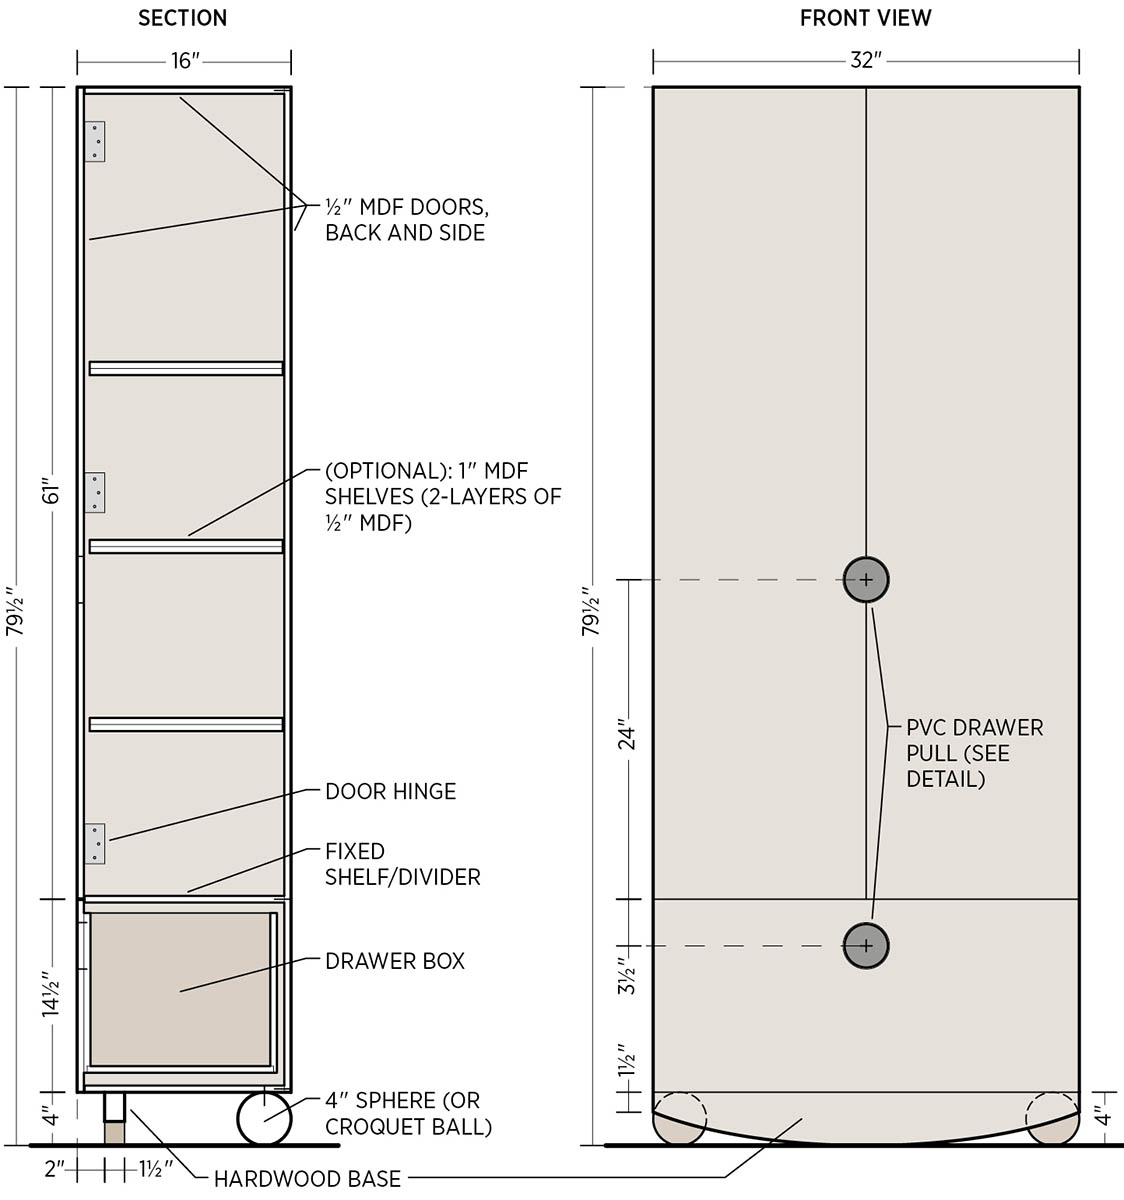
This piece, shown here in a pair as part of a wall unit, comes from an architect who clearly has a Midas touch with off-the-shelf materials (his other design in the book transforms AC-grade plywood into beautiful wall panels). Here, MDF, conventionally labeled as merely paint worthy, is completely made over with a fabulous dye job and a few select pieces of builder’s bling: custom pulls made with PVC pipe, a rocker-shaped hardwood foot, and (what else?) croquet balls. Now you have a use for that old set with the three broken mallets.
MATERIALS
- Three 4 × 8-foot sheets 1⁄2" MDF or AC-grade plywood
- Wood dye (in desired color)
- Water-based polyurethane
- #10 biscuits (for joinery; optional)
- Glue (suitable for prefinished panels)
- 15⁄8" coarse-thread drywall screws (if not using biscuits)
- Wood putty or homemade filler (sawdust and white glue)
- Four to six cabinet hinges (depending on load rating)
- One pair drawer slides
- 7⁄8" coarse-thread drywall screws
- One 4" × 8" (or larger) piece 1⁄8"-thick sheet PVC
- One 6" (or longer) length 3"-diameter PVC pipe
- PVC solvent welding cement
- 1⁄2" #8 pan-head screws
- One 4" × 32" (or larger) piece 11⁄2"-thick rock maple or other hardwood
- Two 4"-diam. croquet balls or wood spheres and fasteners (see step 8)
TOOLS
- Medium-nap paint roller
- Sandpaper (up to 220 grit)
- Table saw, panel saw, or circular saw with straightedge guide
- Biscuit joiner (optional)
- Bar clamps
- Square
- Drill with:
- Combination pilot-countersink bit
- 3⁄4" bit (for PVC)
- 31⁄2" hole saw
- Router with:
- Flush-trimming (laminate) bit
- 1⁄2" straight bit
- Double-sided tape
- Jigsaw or band saw
Instructions
- 1. Prefinish the panels.
If you’re using MDF, coat both faces of each panel with wood dye, using a paint roller. If you’re using AC-grade plywood, first sand the good (“A”) face of each panel with 120-grit sandpaper. Experiment with different dilutions of the wood dye, testing each sample on scrap material, to find the desired coloring. Then use a roller to apply the dye to the sanded surfaces of the panel.
After the surface is dry, apply a generous coat of polyurethane, again using a roller. Sand with 220-grit paper after the first coat is dry. Apply two or more coats of poly, sanding between coats but not after the last coat.
Note: The project as designed calls for prefinishing the pieces before cutting them, but you could opt to finish the entire cabinet after assembly. Prefinishing leaves you with unfinished edges that express the parts and construction of the cabinet, while finishing after assembly results in a more monolithic piece whose parts are subordinate to the whole.
- 2. Cut the cabinet parts.
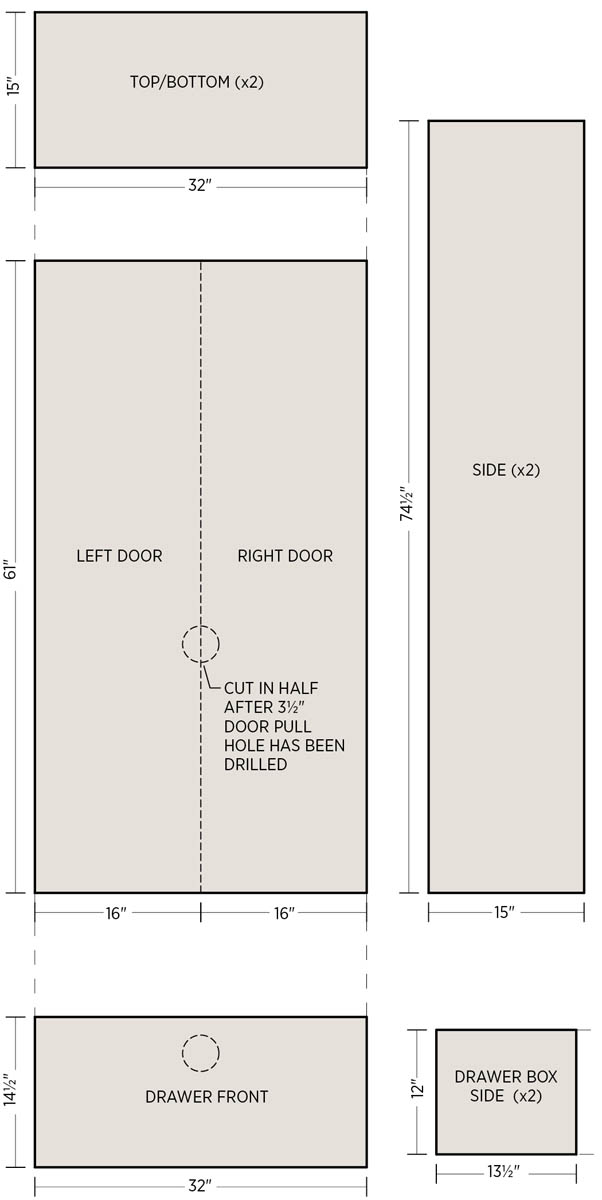
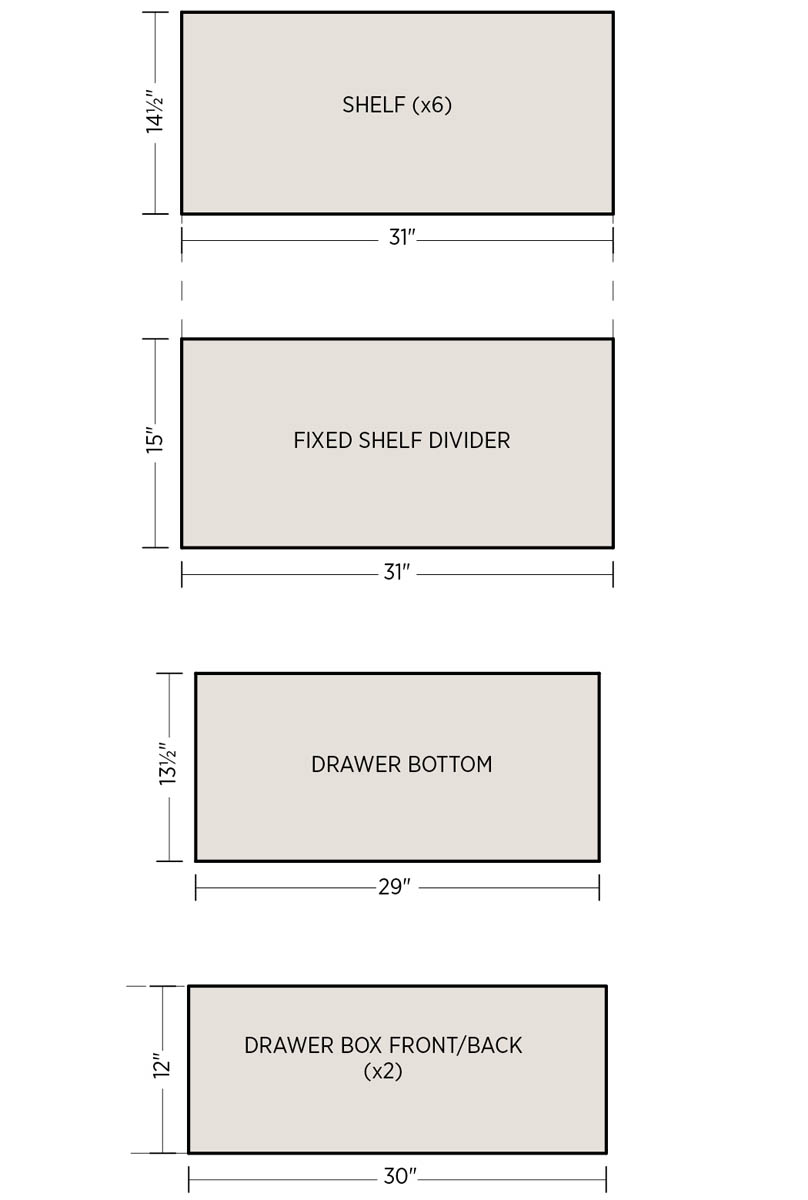
Using a table saw, panel saw, or circular saw (with a straightedge guide), cut the parts as shown in the cutting diagram. Note that the layouts shown in the diagram are designed for standard 4 × 8 MDF panels, which have actual dimensions of 49" × 97".
- 3. Prepare the joints.
You can assemble the cabinet with biscuit joints or 15⁄8" drywall screws. Biscuits will be hidden from view, of course. With screws, you can either fill the countersink holes with putty or a homemade filler (sawdust and white glue), or leave the screw heads exposed as part of the “construction” aesthetic.
Arrange the cabinet parts roughly in the form in which they will be assembled–with the back panel in the center and the sides, top, and bottom positioned around the back accordingly; see the section drawing below. Note that the back panel covers the rear edges of the sides, top, and bottom.
If you’re using biscuits, mark the adjoining edges every 3" for the biscuit joints. Cut the biscuit slots for #10 biscuits. If you’re using drywall screws, simply mark the joints.
- 4. Assemble the cabinet case.
Using a minimal amount of glue and your preferred fastener (biscuits or screws), assemble the sides, back, and top in one operation. First glue the sides to the back, then glue the top and bottom to the sides and back. Use bar clamps to secure the assembly. Check the case for square (if the panels are cut and fastened properly, the parts should true themselves to square). Adjust for square, as needed, and let the glue dry overnight.
- 5.Complete the doors.
Mark a centerline down the length of the door panel, then mark the location for the door-pull cutout, as shown in the front view of the plan. Use a hole saw to cut a 31⁄2"-diameter hole through the door panel. Rip the panel down the centerline to create the two identical doors. Hang the doors with the cabinet hinges of your choice.
- 6. Build the drawer.
The drawer box is constructed in a similar way to the cabinet box, but the bottom panel is set into 1⁄2" dadoes in the front, back, and sides of the box.
Cut the dadoes with a router and 1⁄2" bit so the bottoms of the grooves are 1⁄4" from the bottom edges of the panels. Assemble the box with glue and biscuits or screws, as with the cabinet case.
The outside width of the drawer box is 1" narrower than the inside width of the cabinet case, allowing for the drawer slides. Install the drawer slides as directed by the manufacturer. Slide the drawer box into the cabinet. Set the cabinet on its back and align the drawer front, attaching the front to the drawer box temporarily with double-sided tape (or as desired). Remove the drawer, and fasten the front to the box with 7⁄8" screws driven through the box and into the back side of the front. Locate and drill the 31⁄2" hole for the drawer pull on the drawer front, as with the door.
- 7. Create the pulls for the doors and drawer.
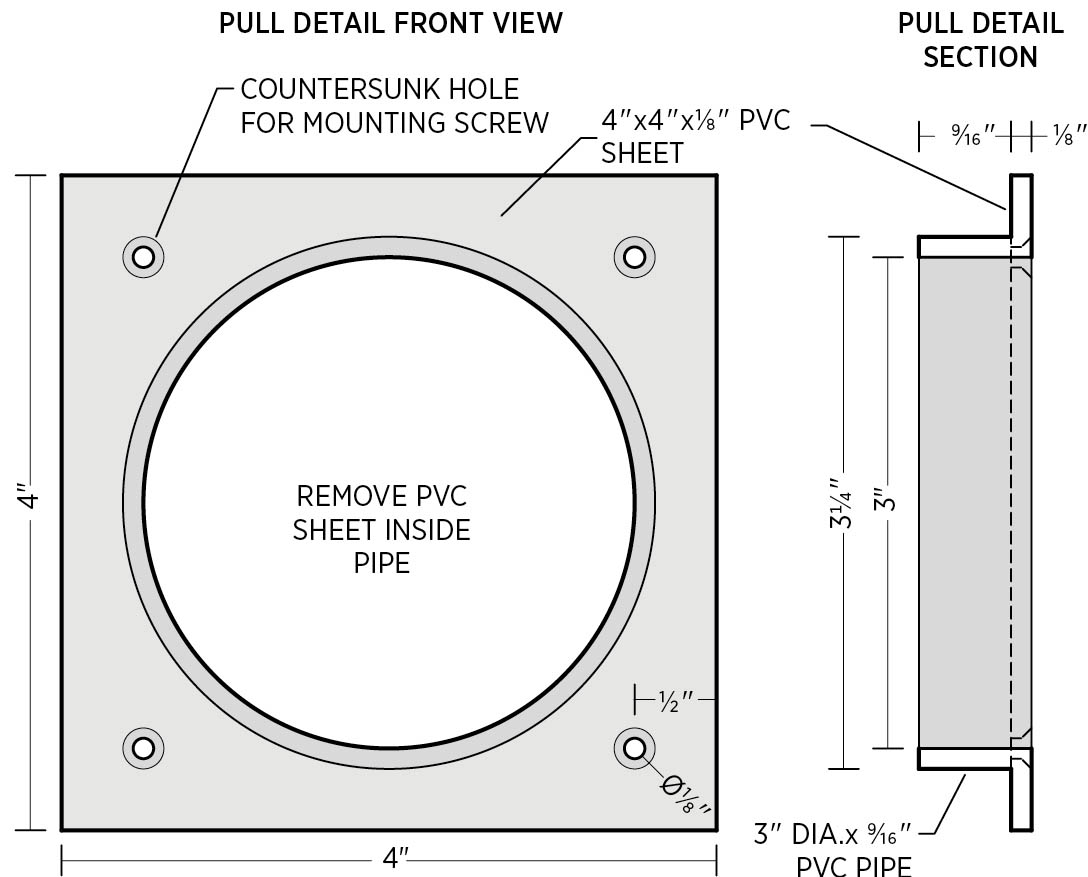
Though you could install standard manufactured pulls, these custom pulls are easy to make; see the pull detail drawings. Start by cutting two 4"-square pieces of 1⁄8" sheet PVC (available at plastics supply houses), using a jigsaw or band saw; these are the mounting plates that will secure the pulls to the back sides of the cabinet doors and drawer box. Then cut one 1⁄2" length of 3" PVC pipe for the door and one 1" length for the drawer.
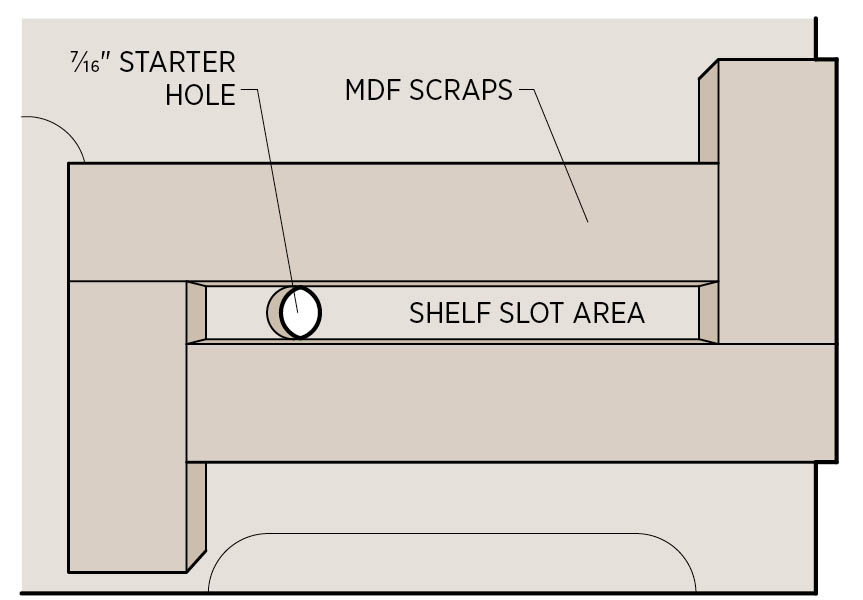
Glue each pipe to the center of a mounting plate with PVC solvent welding cement. Drill a 3⁄4" starter hole through the plate material, inside the pipes. Use a router and a flush-trimming bit to cut out the plate material inside the pipes, leaving two open tubes with a square flange glued to their rear edge. Drill a countersunk pilot hole at each corner of the mounting plates, as shown in the detail drawing; the countersink is on the back side of the plates.
Fit the drawer pull through the back side of the hole in the drawer, and center it in the hole. Fasten the plate to the drawer box front with 1⁄2" #8 pan-head screws.
For the doors, cut the pull in half on a table saw (preferably) or a band saw, running the flat edge of the mounting plate along the saw fence. Mount the two halves to the back sides of the door panels so the pull pieces are perfectly aligned when the doors are closed.
- 8. Add the feet.
The project shown here was installed as a built-in that’s supported at the back by the wall and at the front by a curved foot of rock maple. To make the cabinet freestanding, cut, finish, and install the maple foot at the front of the cabinet, as shown in the plan drawing, and add two 4"-diameter spheres or cubes at the back. (Wooden or polyethylene croquet balls work well for the spheres.) Fasten the feet to the cabinet bottom with screws driven through the inside of the cabinet case.
Pinstriped Console
Designed by Chad Kelly
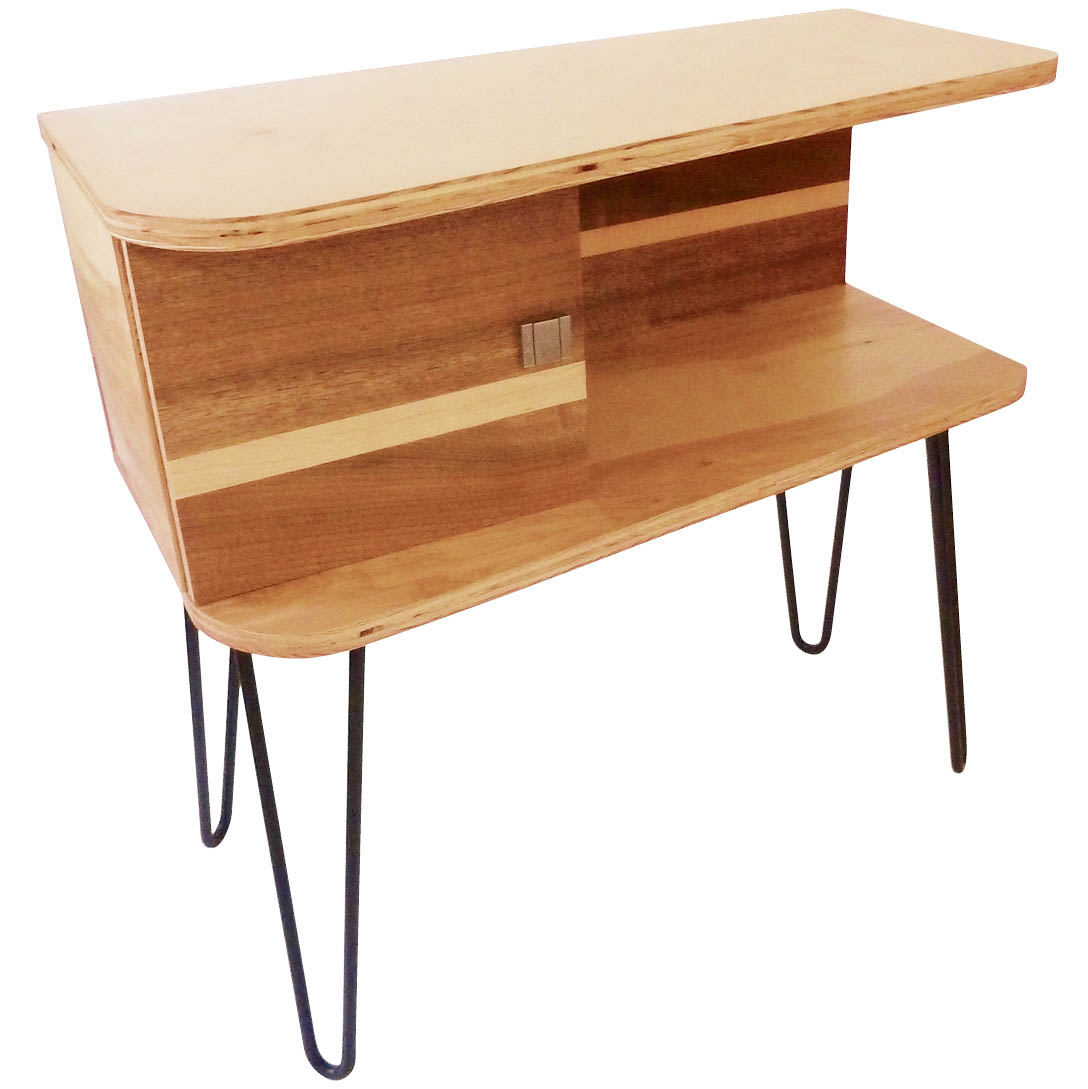
Always impeccably dressed, the Pinstriped Console mixes well in any company. In other words, it’s versatile. As its designer suggests, the piece works equally well as an occasional table, entryway console, side table, and nightstand. The cabinet between the two table surfaces helps keep the look neat and clean, even if the inside happens to be crammed with mail, books, or a mess of remote controls.
MATERIALS
- One 2 × 4-foot piece 1⁄4" MDF
- One 5 × 5-foot sheet 3⁄4" Baltic birch plywood (24" × 60" min.)
- One 9" × 40" piece walnut veneer
- One 2" × 40" piece maple veneer
- Distilled water in spray bottle
- Wood glue
- Polyurethane finish
- Two full-overlay cabinet hinges (see step 5)
- Thirteen 15⁄8" coarse-thread drywall screws
- #10 biscuits (for joinery; see step 6)
- Door pull
- Four 14" wrought iron hairpin table legs
- 5⁄8" wood screws (for table legs)
TOOLS
- Carpenter’s square
- Compass
- Jigsaw
- Sandpaper (up to 440 grit)
- Circular saw
- Straightedge
- Router with flush-trimming bit (top-bearing)
- Utility knife
- Trim roller
- Clothes iron
- Masking tape
- Biscuit joiner
- Corner clamps
- Drill with #8 combination pilot-countersink bit
- Small foam brush
- Bar clamps
Note: You can glue veneer to a plywood surface in a variety of ways. If the process described here seems too labor-intensive, try using contact cement. You could also use preglued veneer that can be ironed on or pressure-sensitive veneer that is simply pressed on with a veneer-smoothing blade.
Instructions
- 1. Create the tabletop template.
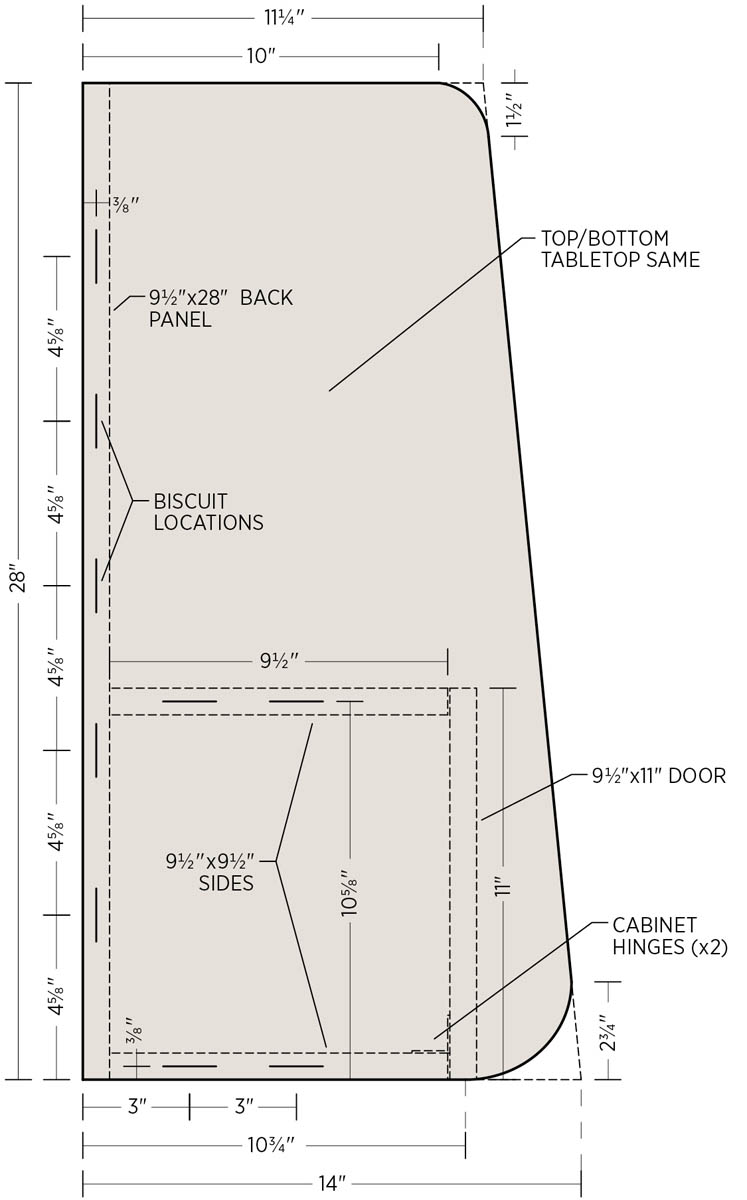
Draw the shape of the tabletop on 1⁄4" MDF stock, following the tabletop template above. Use two of the factory edges for one right-angle corner, and use a carpenter’s square to lay out the adjacent right-angle corner. The outside corner on the 14"-wide end is rounded with a 23⁄4" radius; the outside corner on the 111⁄4" side gets a 11⁄2" radius.
Carefully cut out the template with a jigsaw, then sand the edges, working up to 220-grit sandpaper, so they are smooth and flat.
- 2. Cut the tabletops and cabinet pieces.
On the bottom face of the 3⁄4" plywood stock, mark a cut line 141⁄4" from one factory edge, along the length of the stock. Make this cut with a circular saw and a straightedge guide. On the opposite factory edge of the panel, mark a cut line 91⁄2" wide along the length of the stock, and make the cut.
On the 141⁄4" strip, place the tabletop template in the corner of one end, lining up the factory edges of the template with those of the plywood. Trace around the template. Flip the template, and repeat the process in the other factory corner of the strip. Rough-cut both pieces with the jigsaw, cutting 1⁄8" outside the lines.
Position the template over one of the rough-cut tops so their factory edges are aligned, and clamp both pieces down. Using a router and a top-bearing, flush-trimming bit, clean up the edges of the tabletop to match the template. Do the same with the other tabletop piece.
On the 91⁄2" plywood strip, mark a line 39" from one end. From the opposite end, mark a line at 91⁄2" and another at 19". Crosscut the strip at the center of all three lines, using the circular saw and straightedge guide. These pieces will become the back panel and the cabinet sides and door.
- 3. Veneer the cabinet pieces.
Cut one piece of walnut veneer to size at 81⁄2" wide and 39" long, using a sharp utility knife and a straightedge. (Tip: Putting painter’s tape on all cut lines can help keep the fibers of the veneer intact and the lines straight as you cut.) Mark a line 53⁄8" from the top of the piece along its entire length, then cut along this line. Finally, cut one piece of maple veneer to size at 1" wide and 39" long.
On the 39" piece of plywood, mark a straight line 53⁄8" from the top edge, along the length of the piece. Make another line 1" below and parallel to the first line.
Spritz the faces of the three pieces of veneer with distilled water; this helps prevent the veneer from rolling up when the glue is applied to the back side. Using a small trim roller (small paint roller), spread wood glue over the face of the plywood and the back side of the three pieces of veneer, and let the glue dry completely.
Align each piece of veneer along the marked lines on the plywood. With a clothes iron set to medium heat, apply firm pressure on the exposed (unglued) faces of the veneers, causing the glue to melt and bonding the veneers to the plywood. Let the piece sit for a couple of hours until the glue has cooled.
Mark a crosscut line 11" from one end of the piece, and make the cut with a circular saw. The resulting 11" piece is for the cabinet door. In order for the door to open freely, use a straightedge and the router and flush-trimming bit to shorten the piece lengthwise by 1⁄8".
- 4. Finish the wood parts.
Finishing the wood before assembling the table is much easier than doing it afterward. Mask off all mating edges and faces of the plywood pieces; you don’t want to finish the glue-joint areas. Apply three coats of clear polyurethane (Minwax Polycrylic in satin was used for the console shown) to both sides of each piece of wood. After the first coat, lightly sand all sides with 220-grit sandpaper, and wipe them down with a tack cloth. After the second coat, repeat with 440-grit paper. Do not sand after the final coat.
- 5. Preinstall the door hinges.
Lay the door and one of the 91⁄2" cabinet sides facedown beside each other, and center the door along the side. Install the two cabinet hinges on both pieces, following the manufacturer’s directions. When closed, the door should cover the front edge of the cabinet side (full-overlay configuration). Remove the hinges in preparation for the next two steps.
Note: You can use standard European “cup”hinges or surface-mount hinges, which are much easier to install.
- 6. Cut the biscuit slots.
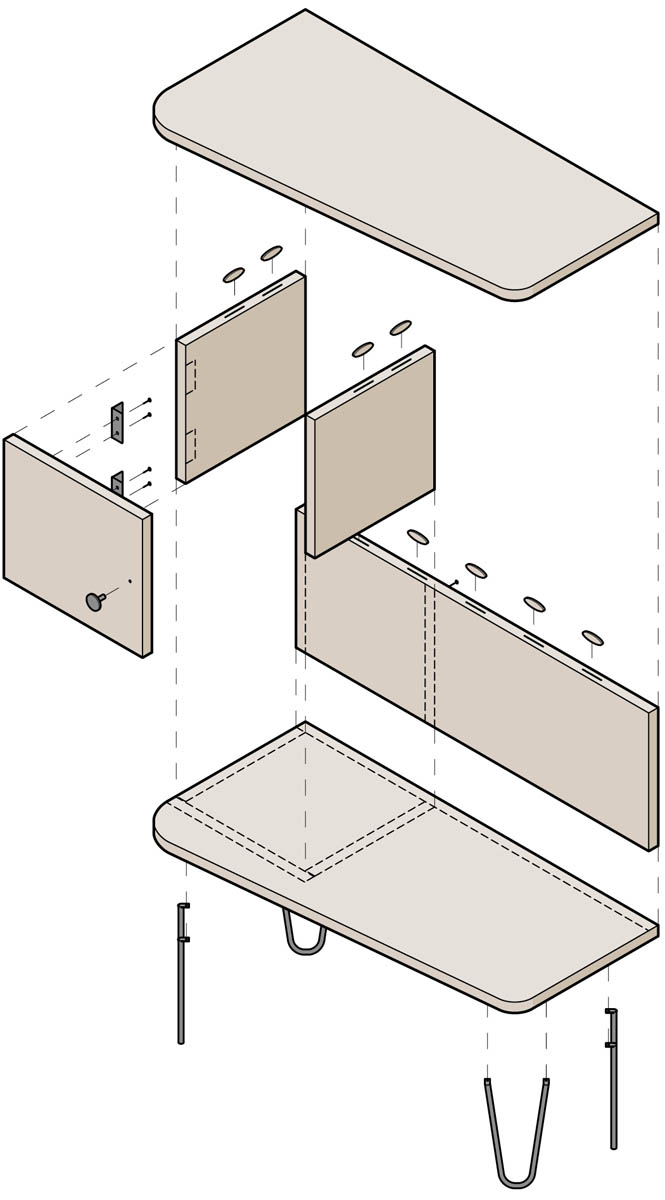
You’ll join the upper tabletop, the back panel, and the cabinet side pieces with biscuit slots. (The lower tabletop will be attached with screws in the next step.) To begin, align the back panel with the underside of the upper tabletop, marking both pieces five times, every 45⁄8", as shown in the tabletop template. Cut the biscuit slots in the top edge of the back panel and the bottom face of the tabletop using a biscuit joiner.
With the bottom face of the lower tabletop faceup, set the back panel on top of the tabletop, with the biscuit slots aligned and the back side of the back panel flush with the edge of the tabletop. Mark the front edge of the back panel down the length of the tabletop. Starting at the wider edge of the tabletop, make a tick mark on this line at 3⁄8" and again at 105⁄8". Using a carpenter’s square, and beginning at the line marking the edge of the back panel, draw a line perpendicular to the back-panel line at each tick mark location. Make a mark at 3" and again at 6" along each perpendicular line, and cut a biscuit slot at these locations; see the tabletop template.
Starting from the edge that will butt against the back panel, mark a spot in the top edge of both cabinet sides at 3" and 6", and cut these four slots in the middle of each piece.
Note: In the table shown, the cabinet pieces and top tabletop are assembled with biscuit joints, so that no fasteners are visible. If you’re not equipped for biscuits, you can use glued dowels for the joints. To use dowels, dry-assemble the parts, and clamp them securely. Mark the dowel locations with 3- to 4" spacing, and drill through the tabletops and into the edges of the cabinet sides and back. Glue up the pieces (as in step 7), then drive glued dowel pieces into the holes. After the glue dries, sand the dowels flush to the plywood surfaces.
- 7. Glue up the cabinet and tabletops.
Apply glue along the bottom edge of the back panel, and use two corner clamps to hold the lower tabletop and back panel together. Using a pilot-countersink bit, drill five holes 45⁄8" apart through the underside of the lower tabletop and into the back panel. Secure the two pieces with 15⁄8" drywall screws.
Make a tick mark 105⁄8" from the wide edge on the face of the lower tabletop, along the back edge. Apply glue to the bottom and rear edges of the cabinet sides. Clamp the hinged side piece to the outside edge of the bottom tabletop. Drill two holes through the bottom face of the lower tabletop and into the cabinet side, at 3" and 6" from the rear edge, and screw the two pieces together.
Line up the center of the remaining cabinet side with the tick mark at 105⁄8", clamp it, and drill and screw the pieces together in the same fashion. Drill pilot holes through the back panel and into both cabinet sides at 3" and 6" from the top of each side, and attach them with screws.
Apply glue to nine biscuits and their slots, using a small foam brush. Place the biscuits in the top of the back panel and the tops of both cabinet sides, and position the top tabletop in place, aligning the slots and biscuits. Use bar clamps to clamp the top down until the glue dries.
- 8. Complete the assembly.
Reinstall the door hinges, and fine-tune the hinge adjustments as directed by the manufacturer. Install the door pull following the manufacturer’s directions, positioning it approximately 1" above the maple veneer and 11⁄4" from the edge of the door.
Turn the table upside down, and arrange the table legs 3⁄4" away from each corner. Mark the mounting holes, drill pilot holes, and fasten the legs with 5⁄8" wood screws.
Note: You can order authentic reproductions of 1950s-style hairpin table legs in custom lengths from Hairpinlegs.com (see Resources).
Angle Shelf
Designed by Gavin Engel
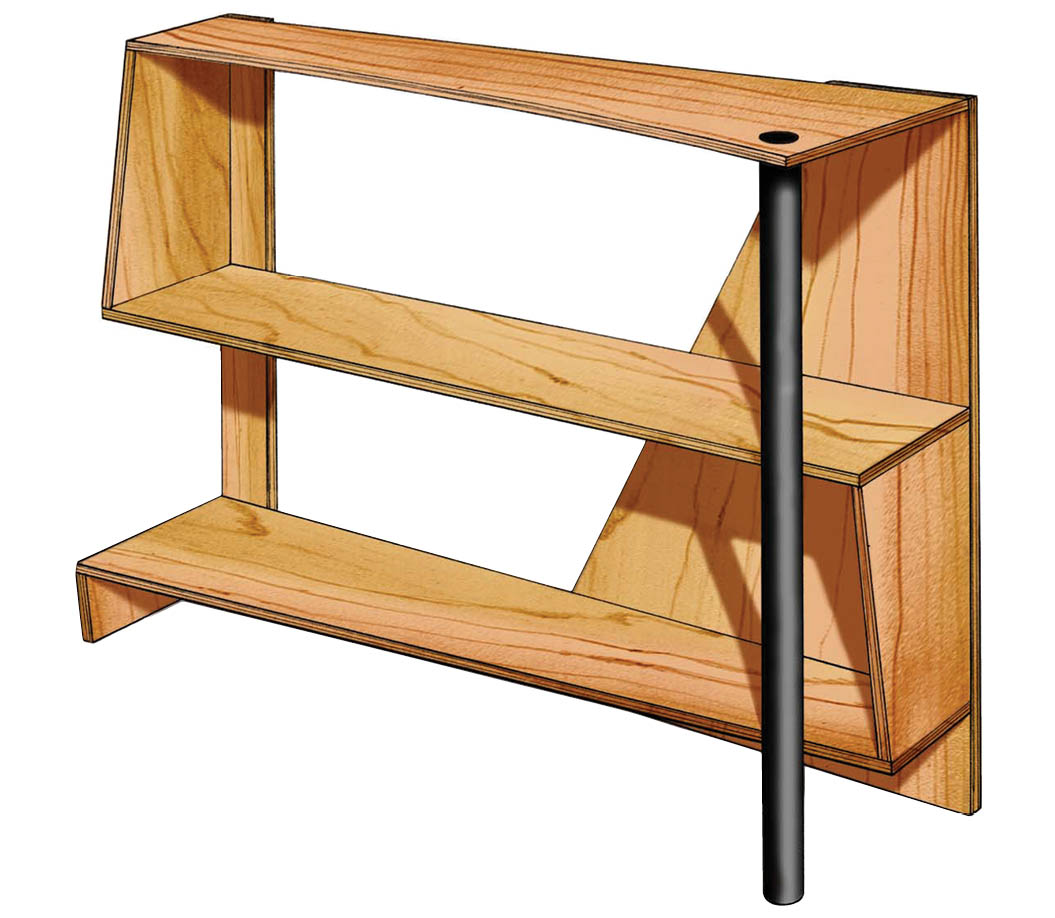
Angle Shelf is a perfectly useful set of bookshelves with an uncommon architectural design. In the words of the designer, “The rectangularity of the common bookshelf is not essential to its function. By giving this shelf pronounced angular geometry it has an aesthetic purpose as well as a functional purpose. The angular and cantilevered shelves define a more open, dynamic space, while still providing plenty of storage area. The black pipe, in its simplicity, complements the energy of the angular form and busy texture of the wood grain.” Indeed, why have a bookshelf when you can have Angle Shelf?
MATERIALS
- One 4 × 4-foot sheet 1⁄2" plywood
- Twenty-seven 1" #10 brass wood screws
- Finish materials (as desired)
- One 32" length steel pipe with 2" outside diam.
- Spray paint (black, or as desired)
- Clear spray-on enamel
TOOLS
- Circular saw with thin blade and straightedge guide
- Drill with:
- 1⁄8" straight bit
- 17⁄8" hole saw
- Clamps
- Sandpaper
- 2-foot level
- Hacksaw or reciprocating saw
- Metal file
Instructions
- 1. Cut the wood parts.
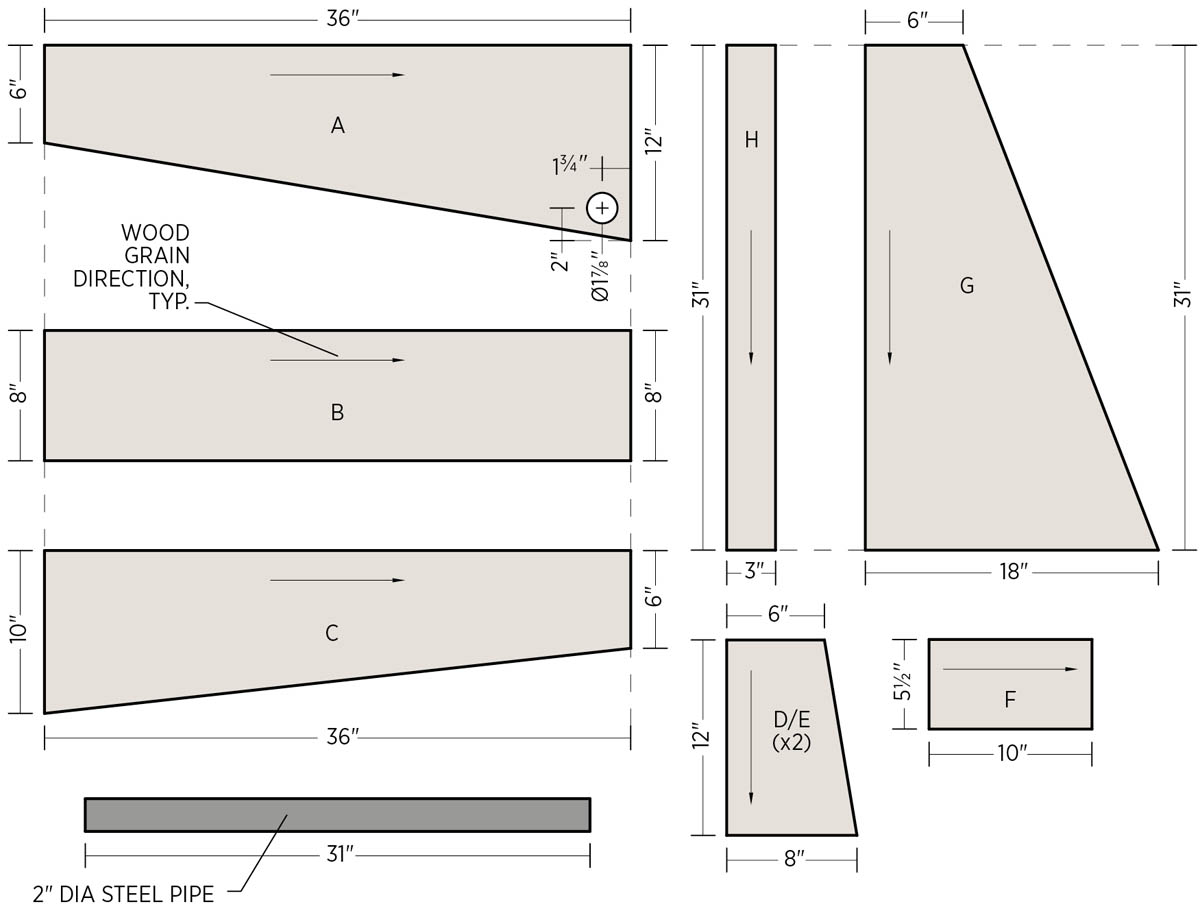
Lay out pieces A through H on a 4 × 4-foot sheet of 1⁄2" plywood, as shown in the cutting diagram. For best appearance, the long dimensions of the parts should parallel the grain direction of the panel faces.
Cut the parts with a circular saw and straightedge guide to ensure straight cuts. Because the layout is a tight fit, use a thin (“panel” or “plywood”) blade, and cut along the center of your cut lines to remove the same amount of material from all neighboring parts.
- 2.Drill the pipe hole.
On piece A, measure and mark a centerpoint for the pipe hole, 2" up from the front right corner and 13⁄4" in from the right side edge; see the cutting diagram. Drill the hole down through the top face of the panel, using a 17⁄8" hole saw.
- 3. Assemble the wood parts.
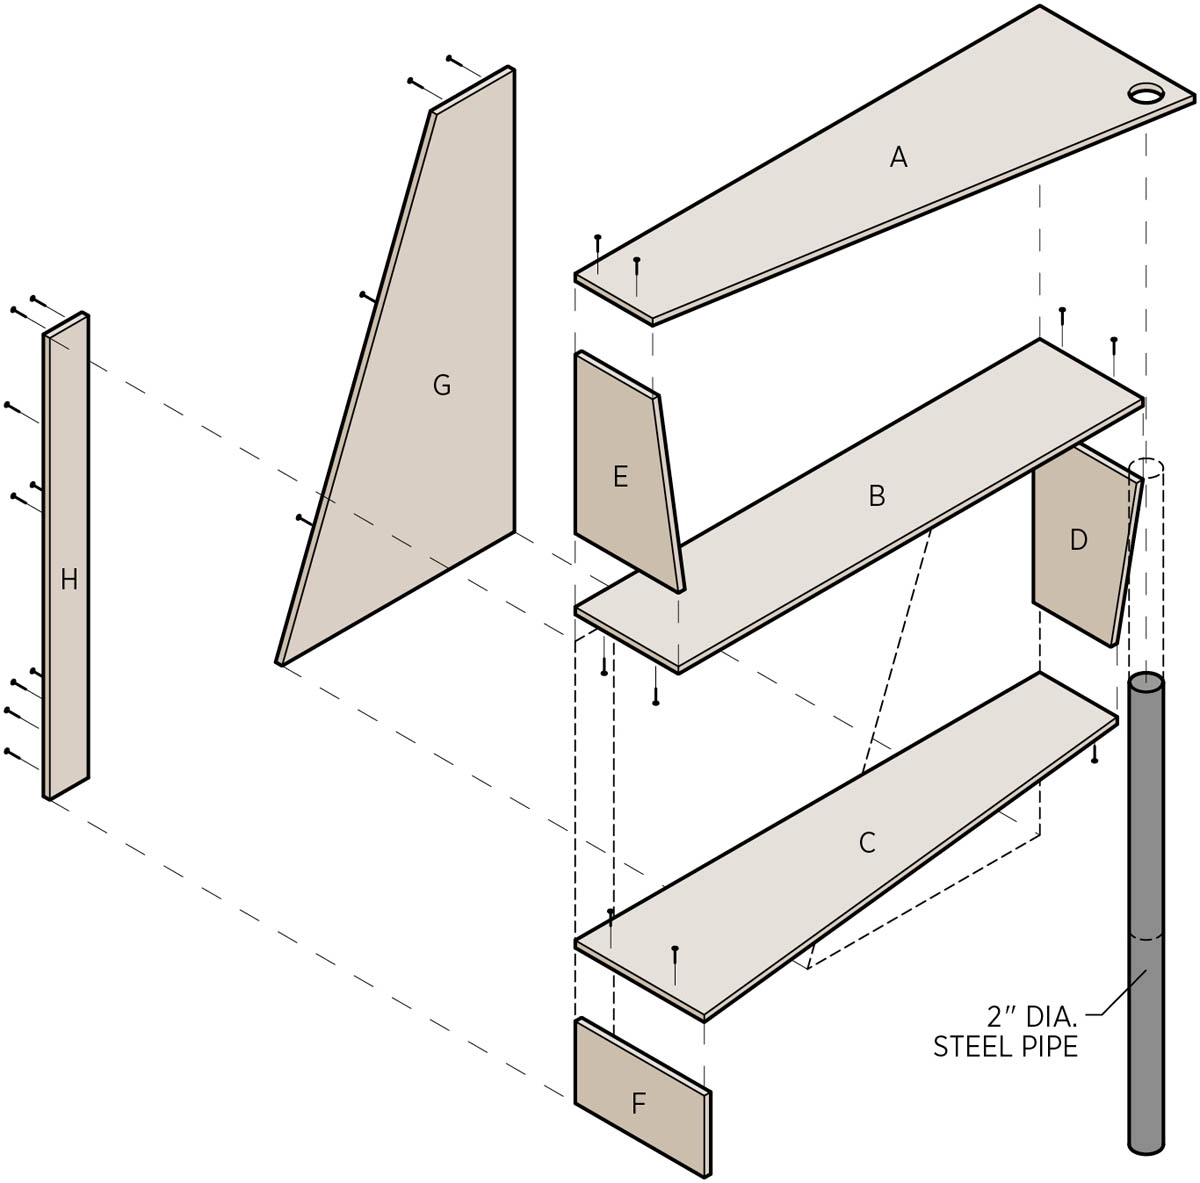
Make the connections listed below as shown in the assembly diagram. You’ll use two 1" #10 brass wood screws for each joint (unless otherwise noted). Clamp the boards together at right angles and drill 1⁄8"-diameter pilot holes, locating the holes 1⁄4" from the side edges and 2" from the front and back edges of the boards. Join the parts in the following order:
- A to E, C to F, and C to D (drive the screws through the faces of the longer boards and into the edges of the shorter boards)
- B to E
- G to back of A
- G to back of B (use 3 screws; make sure top surface of B is 12" from bottom surface of A)
- H to back of A, B, and E (use 2 screws each)
- B to D
- G to D
- H to back of C (make sure top surface of C is 12" from bottom surface of B)
- G to back of C (use 3 screws)
- H to back of F
- 4.Finish the shelves.
Finish-sand the shelf assembly and apply the finish of your choice. As shown, the project was finished with clear polyurethane in satin.
- 5. Prepare and install the pipe.
Stand the shelf assembly upright on a level surface. Place a 2-foot level on top of shelf A. With a helper, hold shelf A so it is level, then measure up from the floor to the top surface of shelf A. Add about 1⁄4" to this dimension to find the length for the steel pipe.
Cut the pipe to length, using a hacksaw or reciprocating saw, being very careful to make a straight cut. File the cut end to remove any burrs or rough spots. If necessary, sand the outside of the pipe with 220-grit sandpaper so the surface is smooth.
Paint the pipe with black spray paint (the project as shown used a Rust-Oleum paint in matte black), then apply a clear protective enamel, as directed by the manufacturer. Let the finish dry thoroughly.
Carefully twist the top end of the pipe into the hole in shelf A until the shelf is level. This is a very tight fit, so no fasteners are required; however, you may have to sand the inside of the hole a bit to fit the pipe.
Paint Chip Modular Bookshelf
Designed by Matt Kennedy of port rhombus design
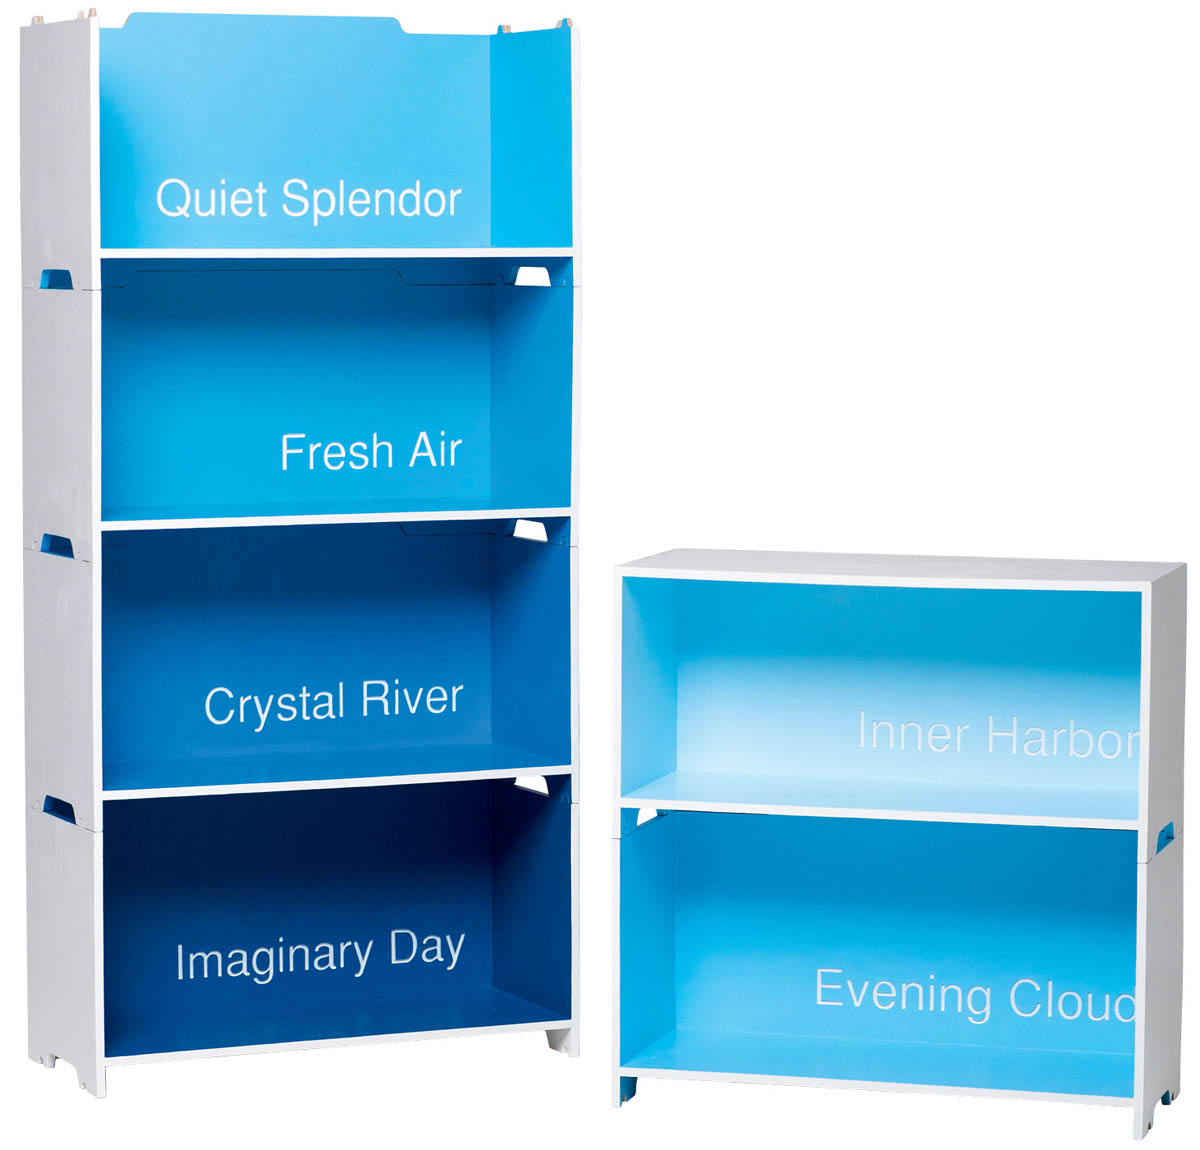
The familiar paint chip is more than just a clever idea for the finish of this piece; it’s the central design concept. For just as the colors on a chip are complementary to one another, like the shelves of a bookcase, they are also individual and distinct–in a sense, modular. Each color, or shelf, in this assembly is a self-contained unit that can be lifted from the stack and transported with all of its contents. The modularity also allows you to build as many units as you need and to mix things up with different shelf arrangements or color schemes. By building multiples of the top unit, which has a top panel, you can arrange pieces side by side under a window or cap a grouping of shelves to create a work surface with storage below. And perhaps best of all, you never have to settle on just one color.
MATERIALS
- One 4 × 4-foot piece 1⁄2" hardwood plywood (for top unit)
- One 4 × 8-foot sheet 1⁄2" hardwood plywood (for three side/bottom units)
- Card stock or thin cardboard
- Wood putty or auto-body filler (as needed)
- Finish materials (see step 5)
- Wood glue
- Wood veneer edge tape (optional; see step 7)
- 1⁄4" × 11⁄2" wood dowel pins
TOOLS
- Circular saw with straightedge guide or table saw
- Drill with 1⁄4" straight bit
- Self-centering doweling jig (see the shop tip below)
- Router with straightedge and:
- 1⁄2" straight bit
- Flush-trimming bit
- Scissors
- Jigsaw or band saw
- Sandpaper
- Masking tape
- Small paint roller
- Stenciling tools (see step 5)
- Square
- Mallet
- Clamps
- Utility knife, razor blade, or veneer trimmer (if using veneer edge tape)
- Clothes iron (if using veneer edge tape)
Instructions
- 1. Cut the panels.
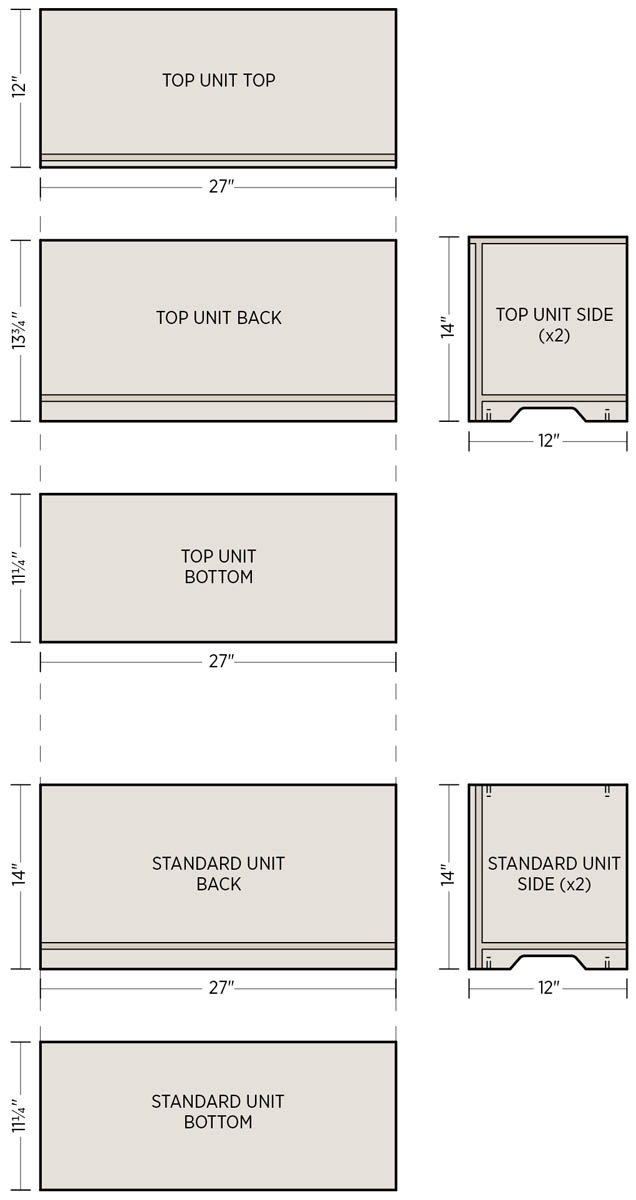
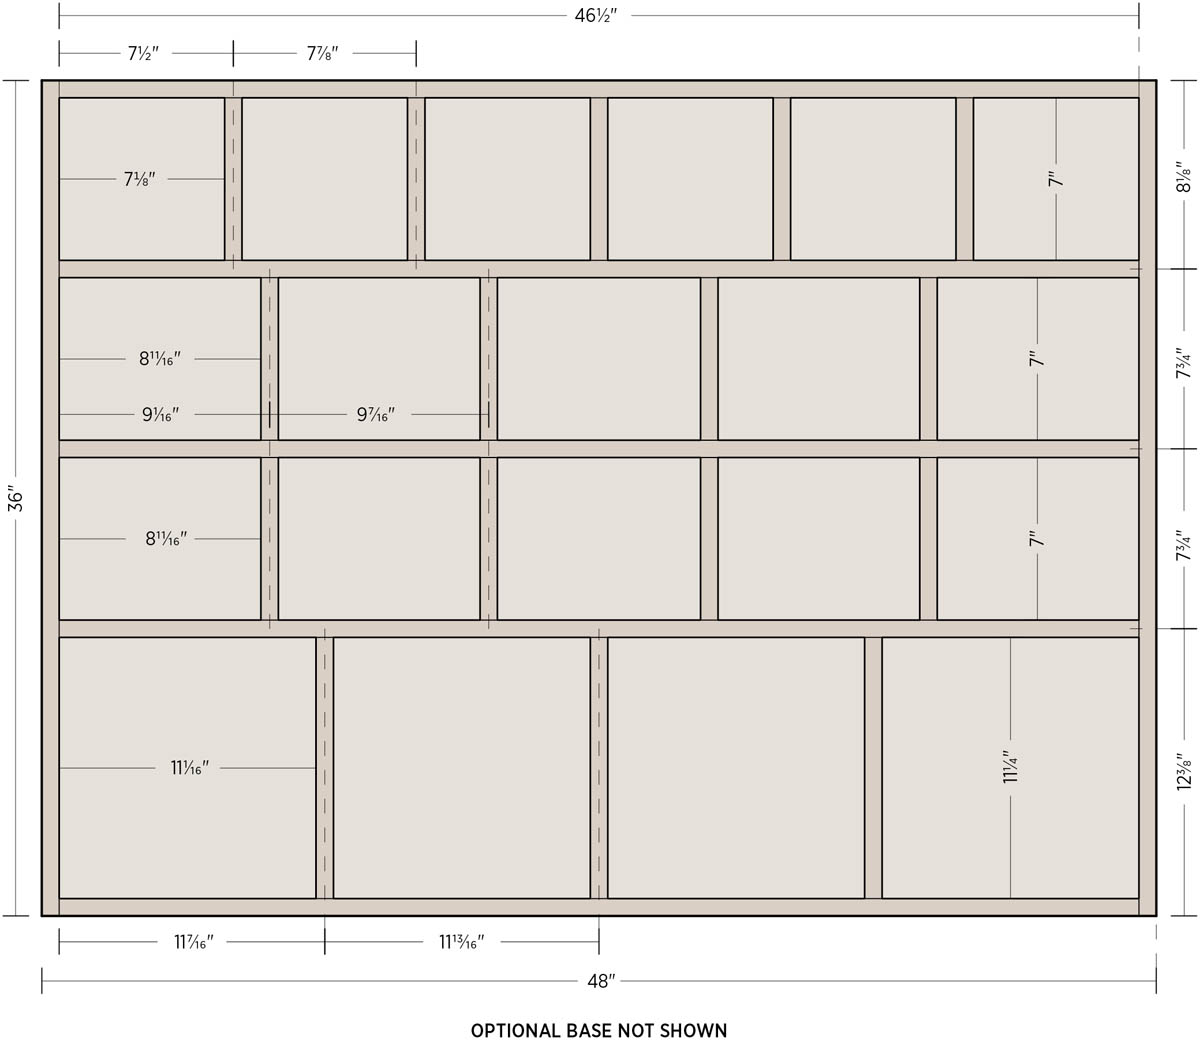
Following the cutting diagram, cut the plywood panels for each unit, using a circular saw with a straightedge guide or a table saw to ensure clean, straight cuts. Because this bookshelf is modular, consistency and accuracy in the pieces are essential for proper alignment.
For each standard unit you’ll need:
- 2 side panels at 14" × 12"
- 1 bottom panel at 111⁄4" × 27"
- 1 back panel at 14" × 27"
For each top unit you’ll need:
- 2 side panels at 14" × 12"
- 1 bottom panel at 111⁄4" × 27"
- 1 back panel at 133⁄4" × 27"
- 1 top panel at 12" × 27"
Also cut one extra side panel to use as a routing template.
- 2. Drill the dowel holes.
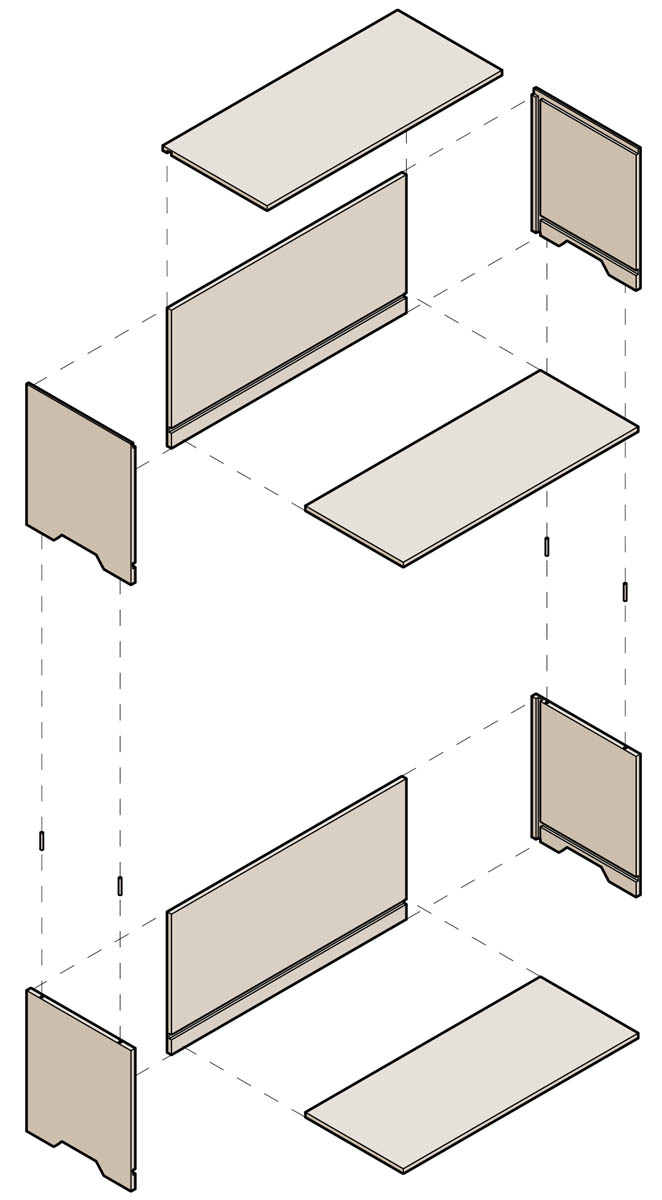
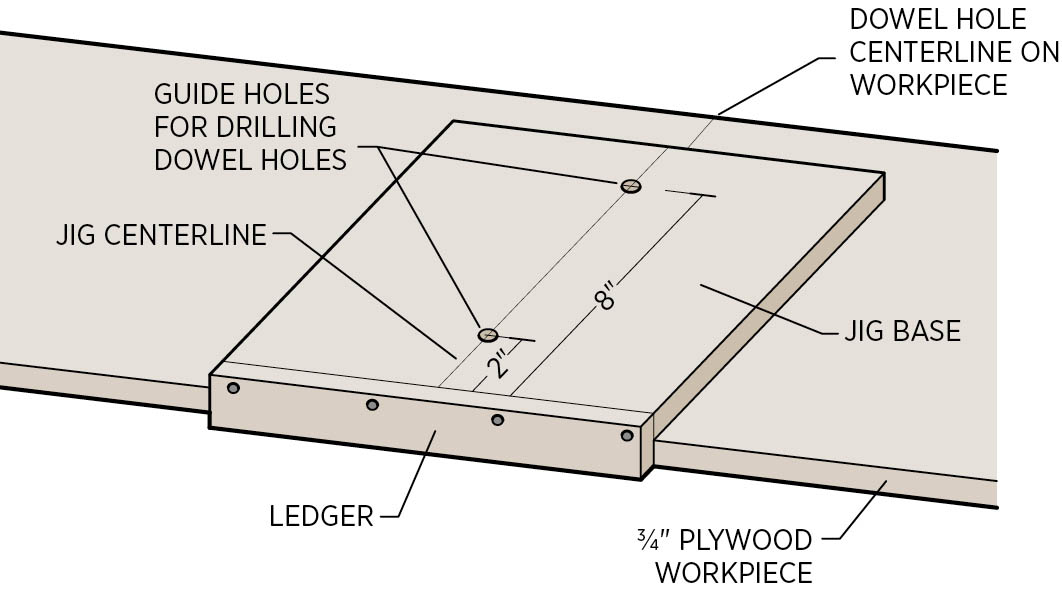
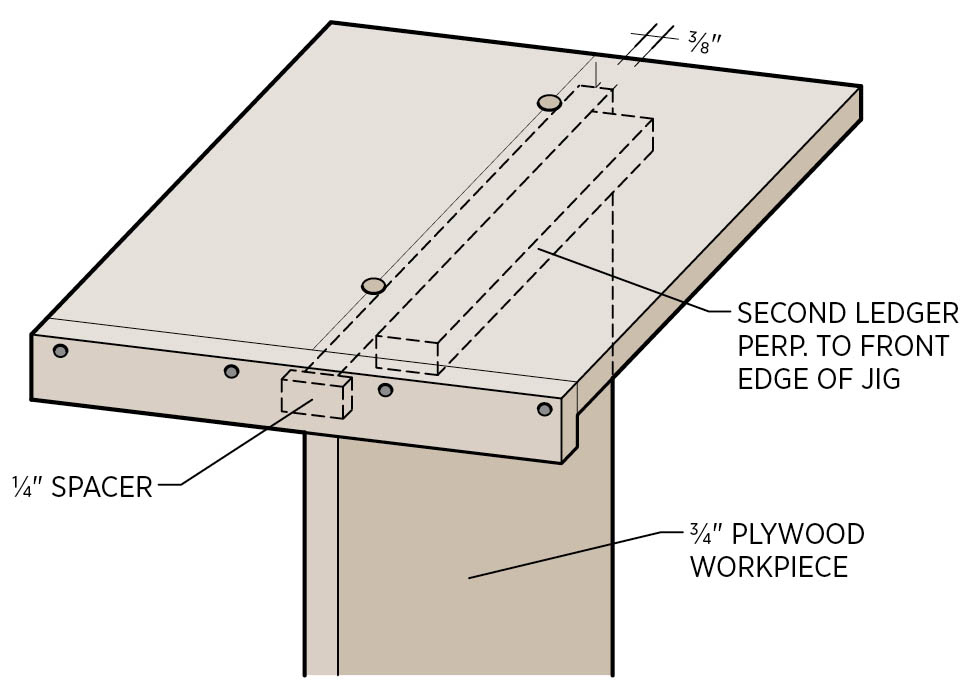
When stacked, the units are aligned and secured with dowel pins (precut dowels) set into holes in the top and bottom edges of the side panels. On the top unit, only the bottom edges of the side panels get dowel holes. It is imperative that these holes are placed accurately and drilled straight, so measure, mark, and drill with care, and use a self-centering doweling jig (see the Shop Tip) to keep the holes straight and aligned between units.
Using a doweling jig and a drill with a 1⁄4" bit, make two 7⁄8"-deep holes in the top and bottom edges of each side panel. All the holes are 11⁄2" from the corners and centered on the edge of the stock. Use a drill stop or a piece of masking tape to mark the bit at the proper depth, taking into account the jig thickness. Remember, for all top units, drill holes only in the bottom edges of the side panels.
- 3.Rout the dadoes.
The panels of each unit are held together with glued dado joints. All of the dadoes (continuous grooves) are 1⁄2" wide and 1⁄4" deep. Following the cutting diagram, mill the dadoes with a router and 1⁄2" straight bit, using a straightedge or an edge guide on the router to guide the cut. Before you start, make a test cut in scrap material and test the fit of the plywood in the dado. It should fit snugly; if it’s loose at all, use a smaller bit (you may have to sand the mating panels slightly for a good fit).
For each standard unit:
- Mill the back-panel dado at 11⁄2" from one of the long edges.
- Mill two dadoes in each side panel: one at 1⁄2" from the long (rear) edge of the panel and one at 11⁄2" from the bottom edge.
For each top unit, do the same as above, plus:
- Mill one dado flush with the top edge of each side panel (technically, this is a rabbet–a continuous notch at the edge of a piece).
- Mill one dado on the inside of the top panel, 1⁄2" from the rear edge.
- 4. Make the handle cutouts.
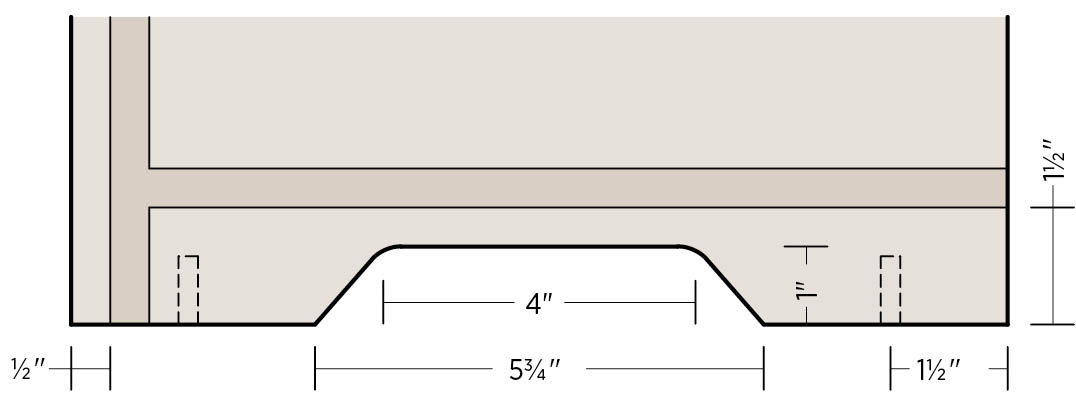
Draw the handle profile on a piece of card stock or thin cardboard, following the handle detail drawing, and cut out the shape with scissors. Place this cardboard template on the extra side panel you cut in step 1, with the handle centered along the bottom edge. Trace the profile onto the panel. Cut out the profile with a jigsaw or band saw, then sand the cut edge so it is smooth and free of saw marks.
Position the side-panel template on a side panel so all edges are flush and the cutout in the template is underneath the bottom dado in the side panel. Trace the cutout onto the side panel. Rough-cut the handle with a jigsaw, staying about 1⁄8" away from the line.
Clamp the side panel over the plywood template so all edges are aligned. Use the router and a flush-trimming bit to clean up the handle cut. The bearing on the bit follows the template for a perfectly matching cutout.
Repeat the tracing, cutting, and routing for all the side panels.
- 5. Paint the panels.
To create a natural-looking gradient of paint colors, it’s best to use the colors from an actual paint chip. Instead of buying a quart of paint in each color, see if you can find 2.5- or 3-ounce samples, which should cost about $3 each. Just make sure the paint sheen is gloss (preferably) or semigloss; eggshell, satin, and flat sheens just aren’t slick or durable enough for furniture.
You can paint the plywood edges (first fill any voids with wood putty or auto-body filler), or you can apply veneer edge tape, which doesn’t go on until the project is assembled (step 7).
Finish-sand the panels, being careful not to round over any of the dado edges. Remove all dust from the panels. Tape over the dadoes with masking tape; you don’t want paint in them. Also tape any edges that will get veneer tape, if you’re using it.
Coat all surfaces with a primer, using a small paint roller. Add two or three coats of paint in the desired base colors.
To add the names of the colors (as shown in the project here), you can use a vinyl cutter to make transfer stickers (preferred method), or you can create your own stencils with a computer: Choose a font style and size in a graphics or word processing application, and print out the names on your own printer or at a local printing service. (Adding crop marks in the lower right- and left-hand corners is a great way to register your text to the lower corners of the board so that all the text will be at the same height.)
Simply cut out the printed letters to make your stencil. You can choose to attach floating items with bridges, such as the center of a P, or secure it in place to be painted over. Paint the lettering onto the back panels of each unit, as desired, being careful to keep the paint from bleeding under the stencils.
If desired, you can add a protective finish of polyurethane or poly-acrylic over the paint. This is especially advisable for the insides of the units.
- 6. Glue up the units.
When gluing and clamping, always check that the mating pieces are square (90 degrees) before letting the glue set.
Arrange all the pieces for each unit. It’s a good idea to check that all pieces fit and align well before gluing.
Start by laying one side piece down on a perfectly flat surface. Apply glue to the side panel’s dadoes. Insert the back panel into its dado, making sure the edges are flush and the dadoes are perfectly aligned. Tap softly with a mallet (use a scrap block to protect the panel’s edge, if necessary). Glue the bottom panel into its dadoes in the side and back panels. Instead of hammering, use clamps to pull these pieces together. Protect all edges with scrap blocks when clamping, and check for square as you work.
Add the other side piece and tap it into place, keeping all the dadoes aligned. Once this assembly is complete, set the unit upright, and add clamps to bring the sides in toward each other. Three to five clamps should be sufficient. It may help to use a scrap board to span over the open side of the unit, to keep everything square.
When gluing up the top unit, assemble and clamp all but the top panel, and let the glue set. Then add the top panel and clamp it in place.
Let the glue dry for 24 hours.
- 7. Apply edge veneer tape (optional).
If desired, apply veneer tape to the front edges of each unit: Starting with the side panels, cut pieces of the tape 1⁄2" longer than each edge. Hold the tape flush to the inside face so it overhangs on the outside face of the panel. Apply a hot iron to the exposed side of the tape to activate the adhesive, as directed by the manufacturer. After the tape cools, trim the excess with a utility knife, razor blade, or veneer trimmer.
To cover the units’ longer edges, cut the tape a little long. Iron down one end, then move toward the opposite end, stopping just a few inches from the other side edge. Lay the tape flat (without ironing), and make a small cut with a utility knife on each side of the tape at the exact point it needs to terminate. Then carefully cut between those notches with scissors. The remaining portion can now be ironed down and should be perfectly flush.
- 8. Assemble the shelves.
Stack the units by placing a dowel pin in each hole on top of the bottom unit. Carefully set the next unit on top so that each dowel is aligned with its bottom hole. Repeat this process to stack the rest of your shelf.
Note: Because the units are not permanently fastened, never try to move your shelf without disassembling it first.
Shop Tip
Self-Centering Doweling Jigs
Doweling jigs (or dowel jigs) come in a range of prices and capabilities. For a one-off project or occasional use, you can probably get by with a simple plastic self-centering jig. These start at about $12. Better-constructed metal jigs start at about $30 and go up from there.
To use a self-centering jig, outfit the jig with the appropriate size of bushing for your drill bit (as applicable; some jigs have only a few different hole sizes bored into the jig itself). The bushing helps guide the bit for a clean, straight hole. Next, align the jig with your marked line, and clamp the jig to the workpiece. As its name indicates, a self-centering jig automatically centers the hole/bushing over the stock. Then all you have to do is drill the hole.
Jigs that aren’t self-centering simply have a flange that registers against one side/face of the workpiece, and the jig’s holes set the spacing, which will be roughly centered if you’re using standard stock. The key to accuracy with these is to mark all of the sides/faces you will register the jig against before drilling, so even if the holes aren’t precisely centered they will all be the same distance from the marked points.
Laptop Stand
Designed by Rachel Gant
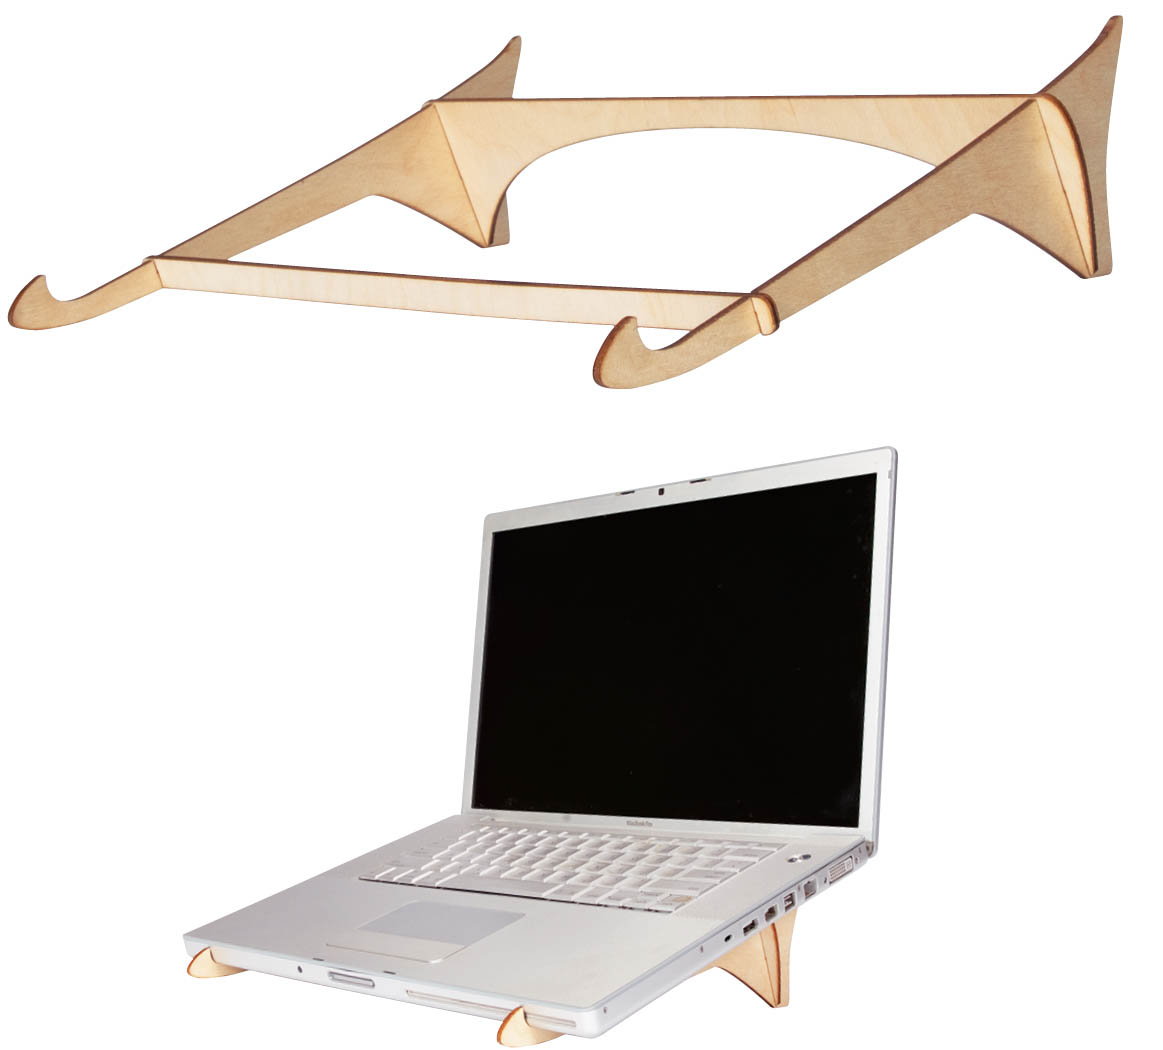
The poor ergonomics of a flat laptop keyboard make a stand essential equipment for anyone who does a lot of typing on a laptop, particularly when sitting at a desk. Laptop stands are commercially available in countless iterations, but for those who value beauty and good design in everyday objects, cheap plastic and institutional forms just won’t do–not if they have an alternative like this design. It’s simple, it’s elegant, and it knocks down into four slender pieces that easily slip into a case alongside the laptop itself. (Looking for a good designer, Apple?)
MATERIALS
- One 12" × 12" piece 1⁄8" plywood
- Finish materials (see step 4)
TOOLS
- Jigsaw (with fine wood blade) or band saw
- Double-sided tape or hot glue gun
- Sandpaper (up to 300 grit)
- Rotary tool with cylindrical sanding attachments (optional)
Note: This project is sized for 13" laptops, but it can accommodate some larger sizes, or can be scaled for a custom fit.
Instructions
- 1. Lay out the parts.
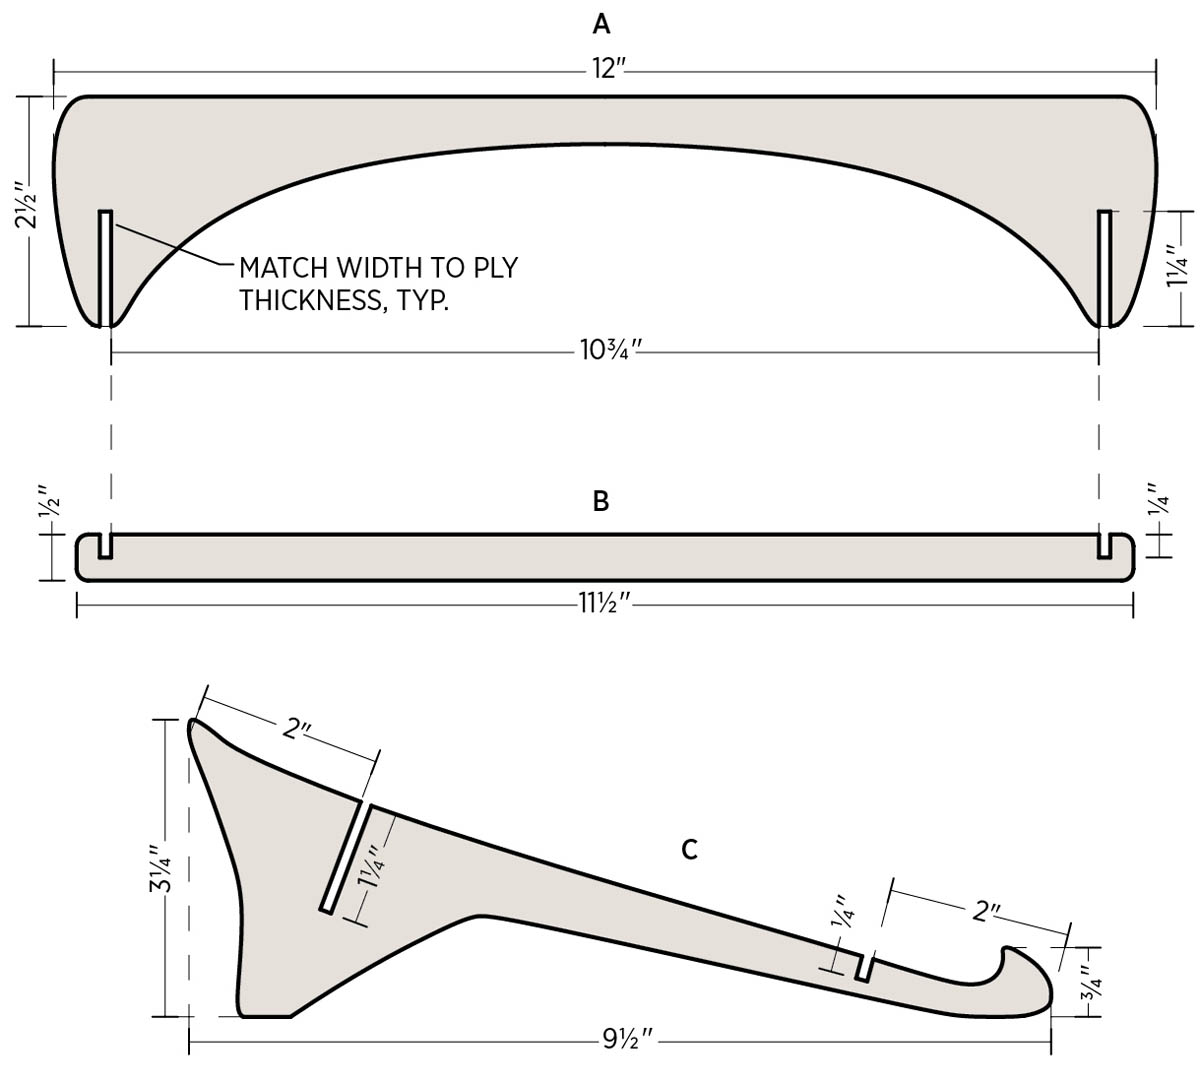
Draw the four parts on the plywood stock, following the cutting templates. The critical elements of the layouts are the overall dimensions, the slots, and the slot spacing. For the curves, you can follow the plans precisely or create your own design (a French curve tool helps for marking smooth curves in almost any shape).
There are four pieces total: one each of A and B, and two C pieces; however, draw only one C piece now, and leave enough space for a second C piece in the layout. Be sure to allow for plenty of space between all pieces in the layout, to provide access for a saw.
- 2.Cut the parts.
Using a jigsaw or band saw, cut out the profile of each piece, staying on the outside edges of your cutting lines. Do not cut the slots at this time. To cut the C pieces, rough-cut the marked C piece, staying well outside the lines. Then stick the cut piece over the reserved area of the stock for the second C piece, using double-sided tape or small dabs of hot glue. Cut out both C pieces at once so they are identical, and leave the pieces joined.
Measure the precise thickness of your plywood, then cut the slots so they are just a hair narrower than the plywood. Make the cuts with a jigsaw or band saw, first cutting at each side of the slot, then making additional passes in between to remove any waste material, if necessary.
- 3. Sand the parts.
Test-fit the slot joints by fitting the pieces together (see the photo of the finished piece as reference). If necessary, carefully sand the sides of the slots for a good, snug fit.
Sand the edges of the pieces to smooth the curves and remove any saw marks. Keep the C pieces stuck together for this step. You can also use a rotary tool (such as a Dremel) with cylindrical sanding attachments for the curves.
Sand the faces smooth with fine sandpaper, and sand a very slight roundover on the edge corners to prevent splintering.
- 4. Finish and/or assemble the stand.
Since a laptop is more vulnerable to moisture damage than plywood, it’s probably safe to leave your stand unfinished. However, a protective topcoat will prevent discoloration from fingerprints and will make the surfaces washable. A good finish to use here is something thin, like a penetrating-type oil or wipe-on polyurethane. For a nice detail, carefully stain just the edges of the pieces with dark stain, then clear-coat everything with a thin protective finish (like wipe-on poly).
Note: If you would like to glue the stand together permanently, add a small amount of glue to the edges of the slots, assemble the stand and make sure it’s square, then weight it down and let the glue dry. Do this before applying a protective finish.
Drunken Monkey
Designed by Paolo Korre
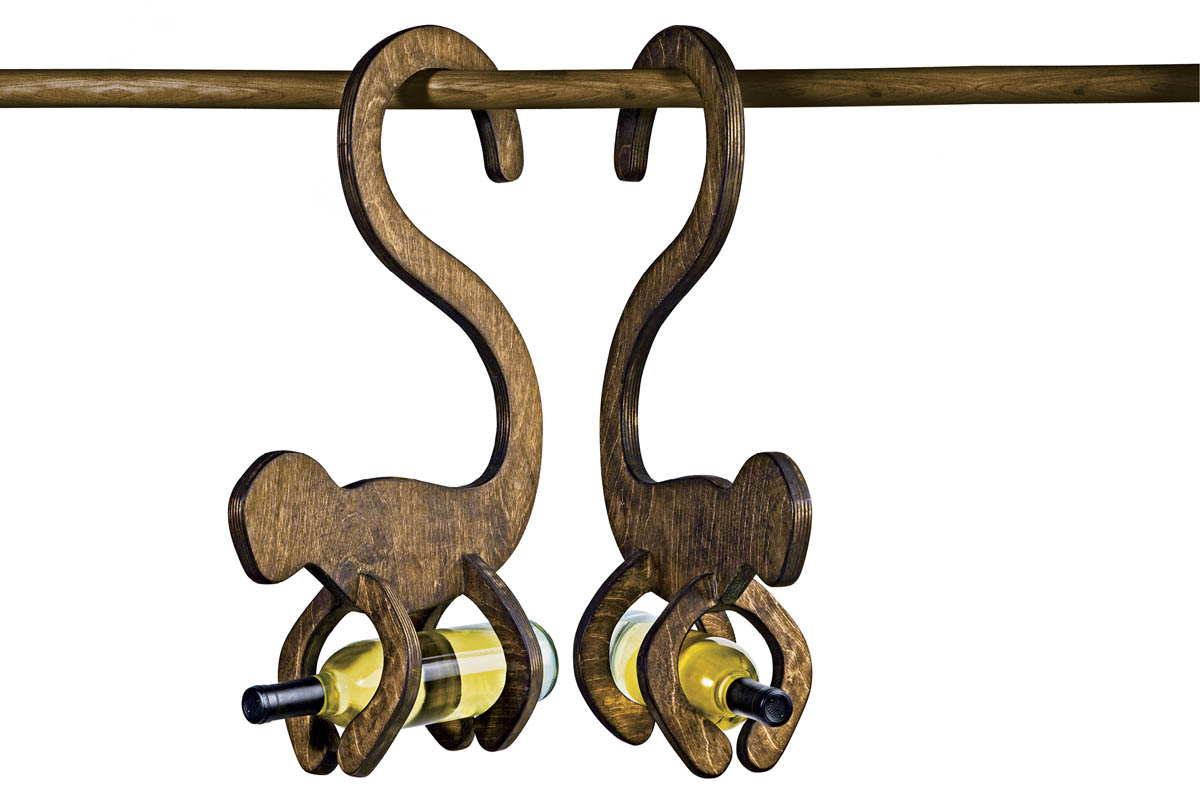
The Drunken Monkey speaks for itself, if perhaps with some slurring. But rest assured, this monkey knows how to take care of wine. It will hold your bottle securely whether it’s hanging from a rod or resting on a flat surface. And it always keeps the neck pointing down to prevent the cork from drying out. The Monkey works well as a solo novelty piece and is even better as a group. After all, monkeys, like (most) humans, prefer not to drink alone.
MATERIALS
- One 15" × 24" (or larger) piece 3⁄4" hardwood plywood
- Wood glue
- Two 1" flat-head wood screws
- Wood filler (optional)
- Finish materials (as desired)
TOOLS
- Jigsaw
- File
- Sandpaper
- Clamps
- Drill with combination pilot-countersink bit
Instructions
- 1. Cut the parts.
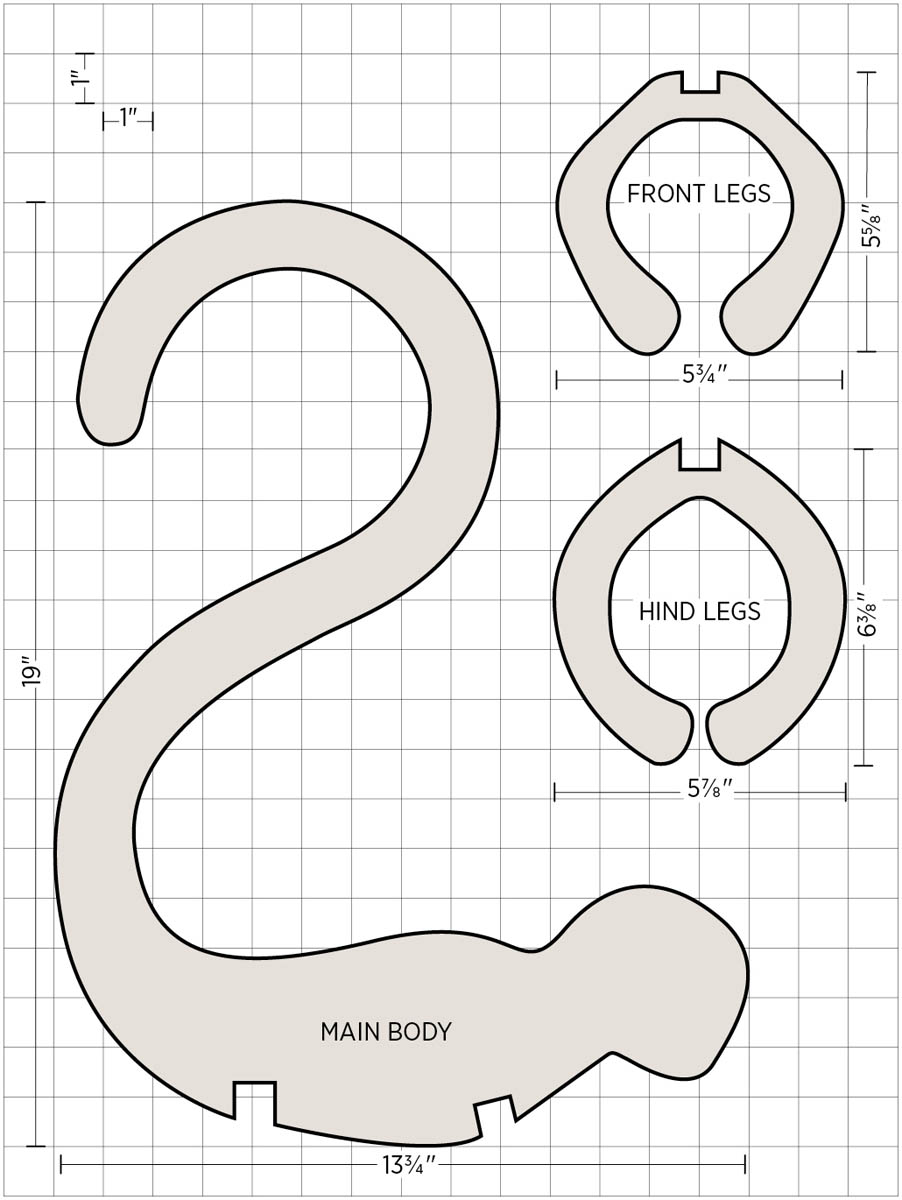
Using the cutting templates, lay out the profiles of the main body and two leg parts on the plywood stock. Cut out the parts with a jigsaw. It’s a good idea to cut just outside the lines for the notches, then file the sides as needed for a tight fit.
- 2. Assemble the monkey.
Finish-sand the parts, being careful not to round over the edges of the notches. Apply glue to the notches of the main body, covering all three sides. Fit the legs into the notches, and gently clamp the parts together. Let the glue dry.
Drill a single countersunk pilot hole through the center of each notch joint, from underneath, and reinforce the joint with a wood screw. Drive the screws to just below the surface of the wood.
- 3. Finish the monkey.
If desired, cover the screw heads with color-matched wood putty, let it dry, and sand it flush. Finish the monkey as desired.
Toolboxes
Designed by Paul Steiner
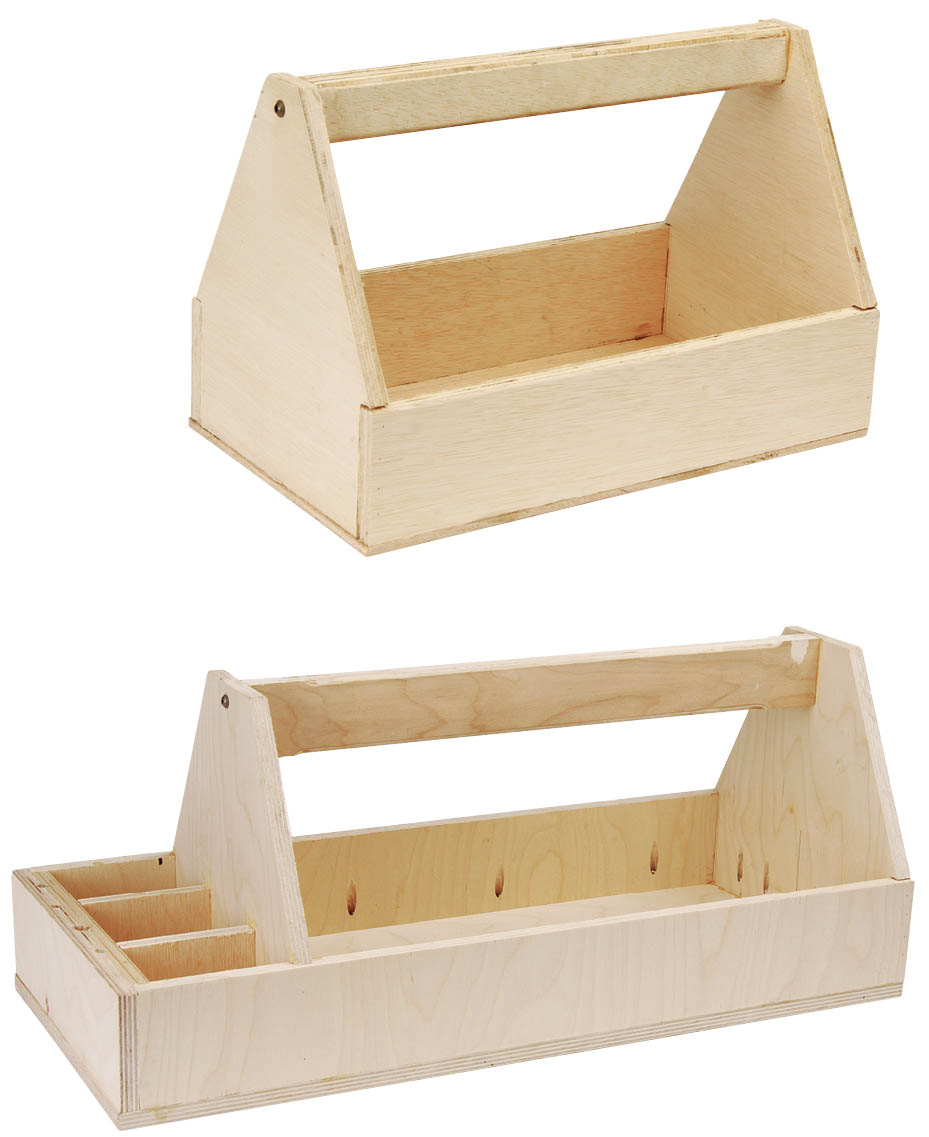
These projects were designed by a high school instructor for the purpose of offering students a choice (novel idea). The kids decide which version to build based on their personal interests and storage needs. The large box is a traditional builder’s design, perfect for carpentry and woodworking tools. The small box is a handy little tote for art supplies or specific tool accessories. Whichever one you choose, you’ll have a classic workshop sidekick and the best kind of heirloom piece–the heavily patinated kind. Sure beats the heck out of a shop-class cutting board or wooden bookends.
MATERIALS
- 24" × 24" (or larger) piece 1⁄2" or 3⁄4" plywood
- Wood glue
- Fasteners (2" finish nails, 11⁄2" coarse-thread drywall or wood screws, or wood dowels; see Choosing Fasteners)
- Finish materials (optional)
TOOLS
- Circular saw with straightedge guide
- Framing square
- Jigsaw (optional)
- Handsaw (optional)
- Sandpaper (80 to 150 grit)
- Clamps
- Combination square
- Drill with pilot bits
- Miter saw or miter box and backsaw
- Router with 1⁄4" roundover bit (optional)
Note: For either toolbox, you can easily modify the length of the main compartment by lengthening or shortening the sides, bottom, and handle pieces by the same amount.
To Build the Small Toolbox
- 1. Cut the sides and bottom.
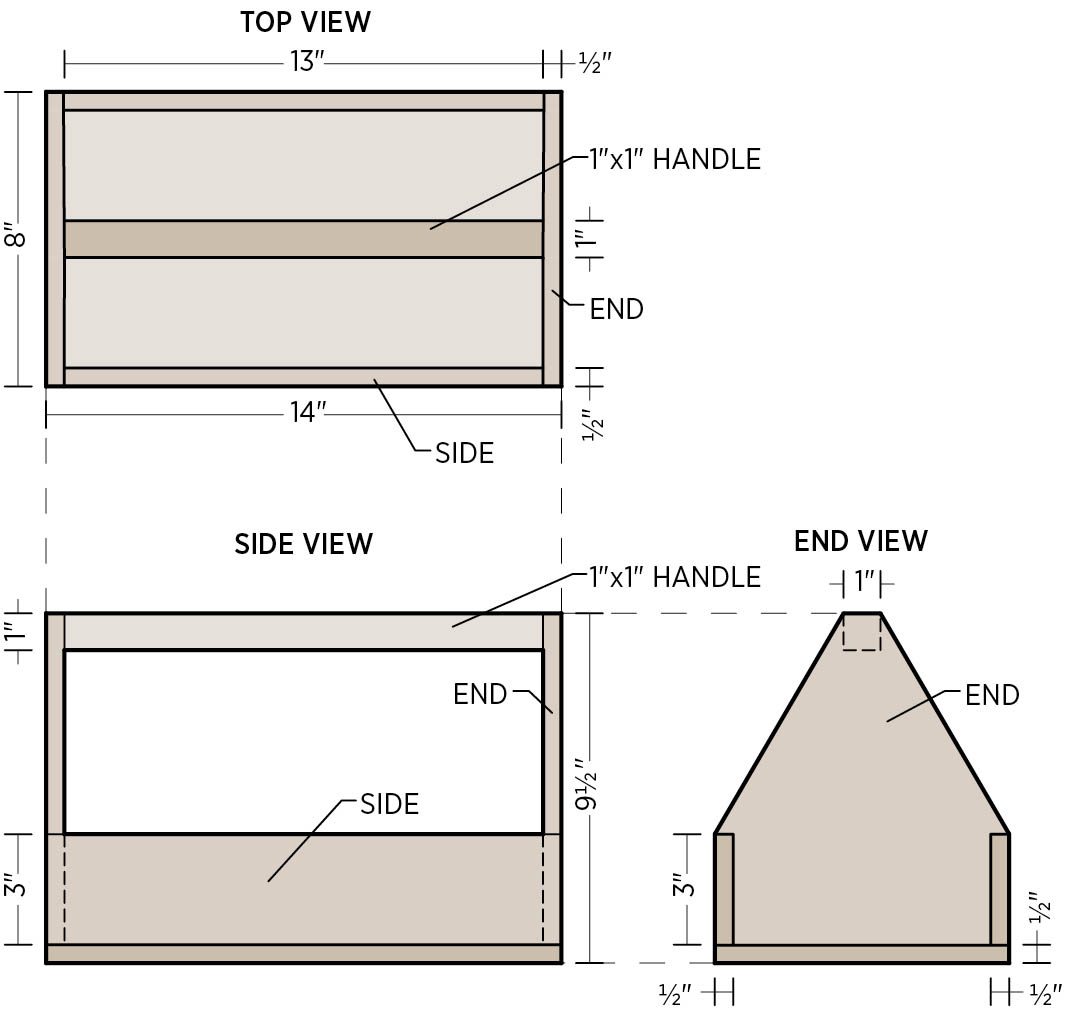
Lay out and cut the two sides and bottom from 1⁄2" plywood, using a circular saw and a straightedge guide for clean, straight cuts. The sides are 3" × 14", and the bottom is 8" × 14".
- 2. Cut the ends.
Draw the shape of the end piece on 1⁄2" plywood stock, following the small toolbox plan. Use a framing square to make the perpendicular lines and as a straightedge. The 1⁄2" × 3" side cutouts are to accept the ends of the side pieces.
Cut out the overall shape with a circular saw, then make the side cutouts with a jigsaw, circular saw, or handsaw. Sand the cut edges smooth and free of saw marks. Then use the cut piece as a template to trace the shape for the second end piece. Cut out and sand the second end piece.
- 3. Glue up the box frame.
Dry-assemble and clamp the sides and ends to make sure everything fits properly. Use a combination square to check the inside corners of the frame for squareness. Make any necessary adjustments. Drill pilot holes for the fasteners you’re using (see Choosing Fasteners).
Apply glue to the edges of the cutouts in the end pieces, and assemble and clamp the frame. Add fasteners to the joints. Let the glue dry overnight.
- 4. Create the handle.
Cut two 1"-wide strips of 1⁄2" plywood to length at about 14". Glue and clamp the strips together face-to-face, with their edges and ends aligned. Let the glue dry overnight.
Measure between the inside faces of the box ends and cut the handle to length for a snug fit in between the ends; use a miter saw or a miter box and backsaw for a straight cut. Sand the corners and edges of the handle for a comfortable feel, as desired. You can also round over the corners with a router and 1⁄4" roundover bit, if available. Don’t sand or round over the ends of the handle.
- 5. Install the handle and bottom.
Dry-fit and clamp the handle and bottom to the frame assembly. The top edge of the handle should be flush with the top edges of the end pieces, and the bottom should be flush with the frame on all sides. Drill pilot holes through the bottom and into the sides and ends. Also drill pilot holes through the end pieces and into the ends of the handle.
Disassemble the parts. Apply glue to the ends of the handle, and clamp and fasten it in place. Glue the bottom edges of the sides and end pieces, and clamp and fasten the bottom panel in place. Let the glue dry overnight.
- 6. Sand and finish the piece.
Sand all surfaces of the box, working up to 150-grit or finer sandpaper. Slightly round over all edge corners to prevent splintering. If desired, apply a finish of your choice. Finishes such as penetrating oils and paste wax retain the natural look and feel of the wood and can be refreshed when they get worn.
Shop Tip
Choosing Fasteners
You can use almost any fastener to reinforce the glued joints of your toolbox, including finish nails or screws driven in the standard fashion or through pocket holes (which would require a pocket-hole jig and bits).
Another option, which adds a nice decorative effect, is to use glued wood dowels as fasteners: With the joint dry-assembled and clamped together, drill holes along the centerline of the joint, going through the first piece and into the mating piece. Cut a short length of dowel for each hole. Glue up the project, then add a thin layer of glue to the dowels and drive them into the holes until they are flush with or just above the surface. When the glue dries, sand the dowel ends flush with the surface. For 1⁄2" plywood, drill 1⁄4"-diameter holes a total of 11⁄8" deep and fill them with 1⁄4"-diameter, 1"-long dowels; for 3⁄4" plywood, drill 3⁄8"-diameter holes 15⁄8" deep and fill them with 3⁄8", 11⁄2"-long dowels.
Instead of dowels alone, you can also use screws driven through counterbored pilot holes (made with a combination pilot-countersink bit), then hide the screw heads with precut dowel plugs glued into the counterbores and sanded flush.
To Build the Large Toolbox
- 1. Cut the box parts.
All the parts are cut from 1⁄2" plywood. For a heavy-duty box, substitute 3⁄4" plywood and adjust the dimensions accordingly.
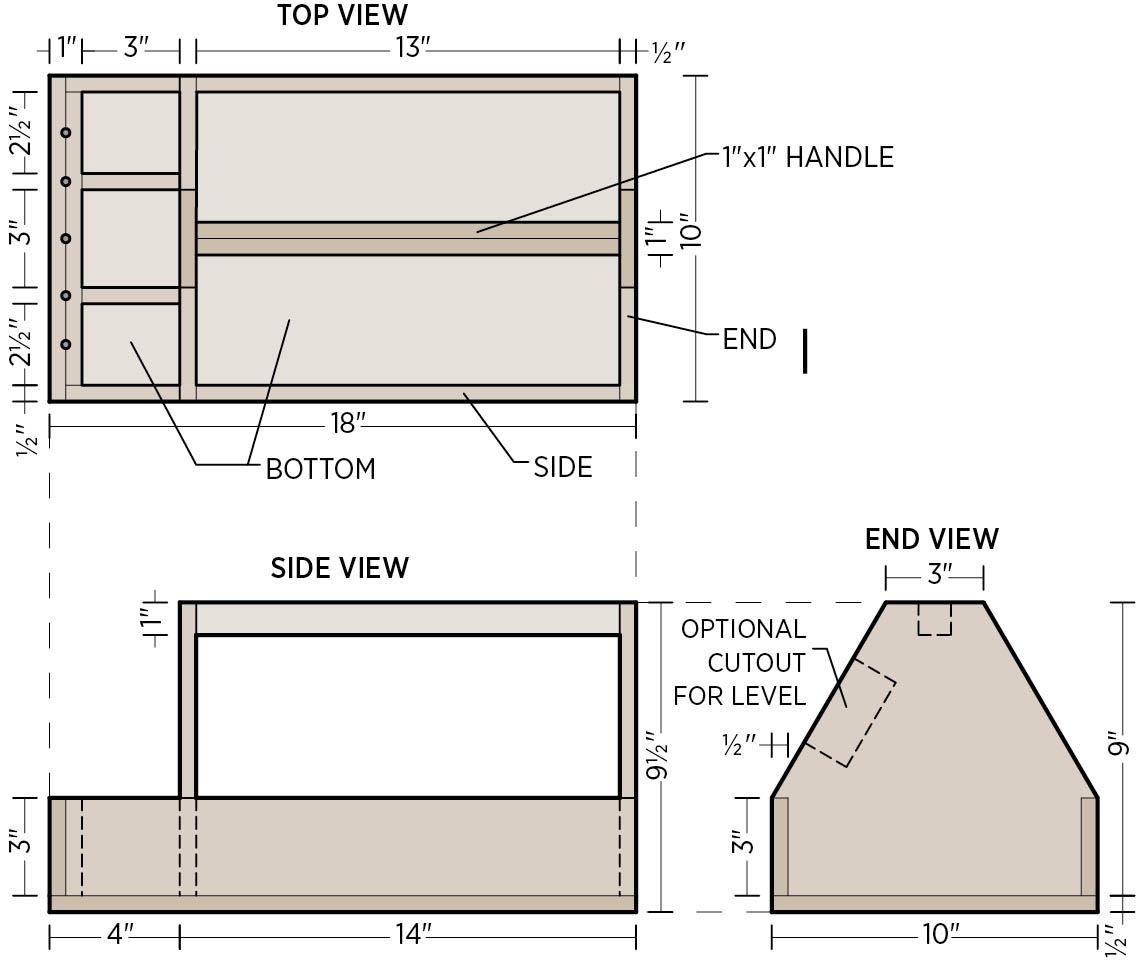
Using a circular saw and a straightedge guide for clean, straight cuts, cut the following pieces:
- 2 sides at 3" × 171⁄2" each
- 1 bottom at 10" × 18"
- 1 inner short end at 3" × 9"
- 1 outer short end at 3" × 10"
- 2 dividers at 3" × 3" each
You’ll also need to cut the two tall ends. Lay out the shape of one piece on your stock, following the large toolbox plans. Use a framing square to make the perpendicular lines and as a straightedge. The 1⁄2" × 3" side cutouts are to accept the ends of the side pieces. If desired, mark a rectangular cutout for storing a level across the two tall ends, as shown in the end-view drawing; base the dimensions on your own level.
Cut out the overall shape of the tall end piece with a circular saw, then make the side cutouts with a jigsaw, circular saw, or handsaw. If you want a cutout for a level, make it with a jigsaw. Sand the cut edges smooth and free of saw marks. Then use the cut piece as a template to trace the shape for the second tall end piece. Cut out and sand the second tall end piece.
- 2. Mark the divider locations.
On the outside face of one tall end piece, measure in 21⁄2" from the vertical edge of the side cutout, and mark a line perpendicular to the bottom edge of the end piece. Draw a matching line on the opposite side of the same tall end piece. Next, draw lines on the inside face of the inner short end piece, 21⁄2" from each end. All these lines represent the outside faces of the divider pieces (see the top view in the plan).
- 3. Drill pilot holes for the frame.
Dry-assemble and clamp the parts of the box frame: sides, tall ends, short ends, and dividers. Make sure that everything fits properly and the assembly sits flat. Use a combination square to check the inside corners of the frame for squareness. Make any necessary adjustments.
Drill pilot holes for the fasteners you’re using, starting with the side tall–end joints and outer short-end joints. To drill holes for the dividers, remove the outer short end piece and drill through the inner short end and into the dividers. Drill pilot holes in the opposite divider ends through the adjacent tall end piece.
- 4. Glue up the frame.
Apply glue to the edges of the cutouts in the tall end pieces, and fit and clamp the sides in place. Add fasteners to the joints.
Glue and fasten the dividers between the inner short end and tall end pieces; also glue and fasten the inner short end to the sides. Cover the inside face of the outer short end piece with glue and fasten it to the sides. Clamp the entire assembly, making sure all corners are square. Also clamp the two short end pieces together. Let the glue dry overnight.
- 5.Create the handle.
Cut two 1"-wide strips of 1⁄2" plywood to length at about 14". Glue and clamp the strips together face-to-face, with their edges and ends aligned. Let the glue dry overnight.
Measure between the inside faces of the tall ends and cut the handle to length for a snug fit in between; use a miter saw or a miter box and backsaw for a straight cut. Sand the corners and edges of the handle for a comfortable feel, as desired. You can also round over the corners with a router and 1⁄4" roundover bit, if available. Don’t sand or round over the ends of the handle.
- 6. Install the handle and bottom.
Dry-fit and clamp the handle and bottom to the frame assembly. The top edge of the handle should be flush with the top edges of the tall end pieces and centered side-to-side. The bottom should be flush with the outside of the frame on all sides. Drill pilot holes through the bottom and into the sides, tall ends, and outer short end. Also drill pilot holes through the tall end pieces and into the ends of the handle.
Disassemble the parts. Apply glue to the ends of the handle, and clamp and fasten it in place. Glue the bottom edges of the sides and all end pieces, and clamp and fasten the bottom panel in place. Let the glue dry overnight.
- 7. Sand and finish the piece.
If desired, drill a series of vertical holes into the top edges of the short end pieces (or along the joint between the two); they are handy for storing drill bits, marking tools, and so on, and they keep valuable accessories like router bits out of the common bin area, where they can easily become chipped and damaged.
Sand all surfaces of the box, working up to 150-grit or finer sandpaper. Slightly round over all edge corners to prevent splintering. If desired, apply a finish of your choice. Finishes such as penetrating oils and paste wax retain the natural look and feel of the wood and can be refreshed when they get worn.
Super Shelves
Designed by James Scheifla
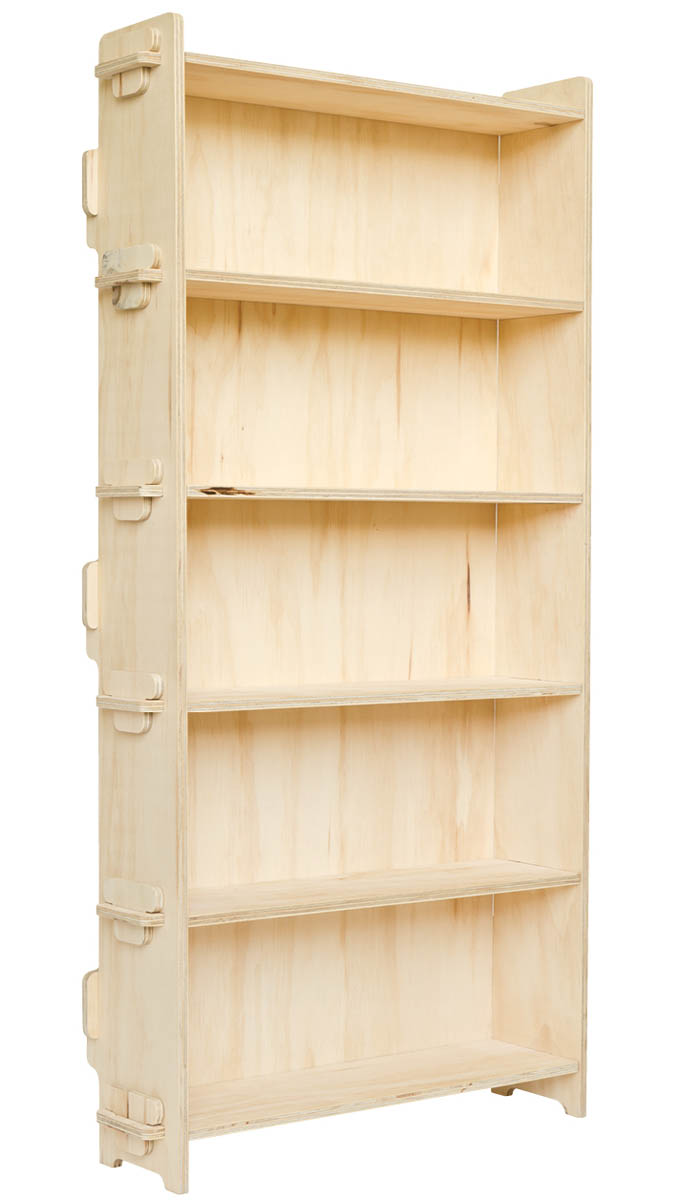
You’re probably wondering what makes the Super Shelves so super. Well, apart from their super cool look, made possible with their super unusual laminated construction, take a look at the shelf span: it’s over 6 feet. To put that into perspective, most references will tell you that plain plywood shelves should not exceed 3 feet without some kind of (often unsightly) support. How do these shelves seem to be stronger than steel? Because they are steel, at least partially. Each shelf plank is reinforced with 1" square steel tubing recessed into its bottom face. And the planks themselves are cut from 1"-thick Russian birch. That’s good, thick plywood. Super good.
MATERIALS
- One 4 × 8-foot sheet 1" Russian birch plywood
- Wood glue
- Three 72" (or longer) lengths 1" square steel tubing
- Construction adhesive
- One 30" × 74" (or larger) piece 1⁄4" plywood
- 1" wood screws
- Finish materials (see step 12)
TOOLS
- Circular saw with straightedge guide or table saw (with miter gauge)
- Sliding miter saw or radial arm saw
- Bar clamps
- Belt sander, other portable sander, or stationary sander
- Router with:
- 3⁄8" rabbeting bit (bearing-guided)
- 1⁄2" or larger straight bit (1" min. cutting depth)
- Hacksaw or reciprocating saw
- Caulking gun (for adhesive)
- C-clamps (at least 4)
- Mineral spirits
- Square
- Low-angle block plane (if available) or sanding block
- Wood chisel
- Drill with combination pilot-countersink bit
- Sandpaper (up to 220 grit)
Instructions
- 1. Cut the sidewall pieces.
Using a circular saw and straightedge guide or a table saw, cut two 103⁄4" × 48" pieces from one end of the full plywood panel, with the length of the pieces perpendicular to the face grain. Set the remainder of the sheet aside.
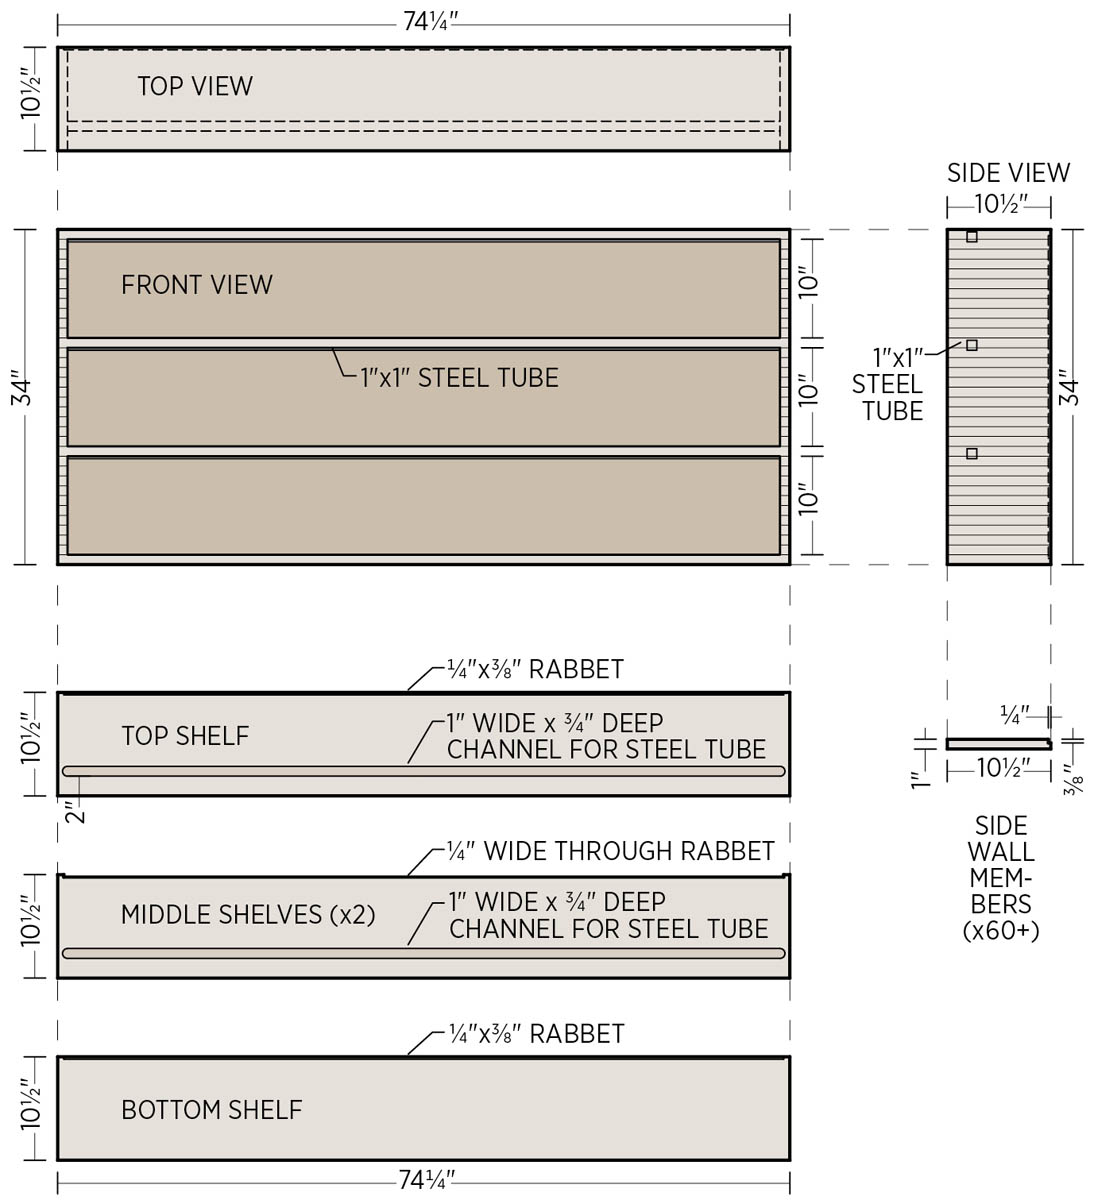
Set up a stop block on a sliding miter saw or a radial arm saw for cutting the ripped plywood pieces into 11⁄8"-wide, 103⁄4"-long pieces for the sidewalls. Make sure the block is parallel to the saw blade so the pieces are perfect rectangles. Cut at least 60 sidewall pieces from the two plywood planks (and it never hurts to cut a few extras while the jig is set up). In later steps, you’ll sand and trim these pieces to their finished size of 1" × 101⁄2"; see the plan.
- 2. Glue up the sidewalls.
Arrange the sidewall pieces into six groups of ten. Apply a liberal amount of wood glue to the face of each mating piece and clamp the entire group, being careful not to let the pieces slip out of square. The corners of the pieces should be perfectly aligned. Excess glue should drip from the joints; wipe off as much as possible with a wet rag. Keep the clamps on each group for the amount of time recommended by the manufacturer, then remove the clamps and glue up the next group. Let the assemblies dry overnight.
- 3. Sand the sidewalls.
Use a belt sander (or better yet, a large stationary sander, if available) to sand the front and back of each sidewall group so the surfaces are flat and parallel to each other and the finished piece measures 1" thick (down from the original 11⁄8"). This requires a good deal of sanding. If you don’t have a belt sander, you can use another type of portable sander, working up from 80-grit paper.
- 4. Trim the sidewall pieces.
It’s likely that the glued-up sidewalls are no longer perfectly square, which is why the pieces are cut 1⁄4" longer than the finished size. Square them up using a miter saw and a stop block or a table saw and a miter gauge. First trim off about 1⁄8" from one end of each piece. Then set up the stop block or table saw fence for a 101⁄2" cut and cut the pieces to size by trimming off the uncut ends.
- 5.Cut the shelves.
If you used a table saw for the sidewall cuts, you can leave the fence in place for the shelves. Otherwise, use a circular saw and a straightedge guide to rip the remaining plywood stock into four pieces at 101⁄2" wide. Cut the pieces to length at 741⁄4", using the miter saw. (The long waste piece left from the rip cuts–provided it has a factory edge–makes a handy straightedge for routing the shelf grooves.)
- 6. Mill rabbets for the back panel.
The sidewall pieces and the top and bottom shelves get a 3⁄8"-wide, 1⁄4"-deep rabbet to accept the 1⁄4" plywood back panel. The two middle shelves get a 1⁄4"-deep “through rabbet” (continuous notch) cut into their back edges.
Use a router and a 3⁄8" rabbeting (bearing-guided) bit to mill the sidewall pieces. Make the rabbets just a hair deeper than 1⁄4". These rabbets run along the entire length of each sidewall piece on one inside rear corner.
To rabbet the top and bottom shelves, make a mark 5⁄8" in from each end of each piece; this is where you will start/stop the rabbets. Mill the shelves as you did the sidewall pieces.
If you’re using a rabbeting bit, switch to a straight bit with at least 1" of cutting depth. Mark each end of the two middle shelves at 5⁄8", as before. Cut the notches a hair deeper than 1⁄4", as before, stopping at the marks on each end. Again, these notches run through the full thickness of the shelf material.
- 7. Mill the tubing grooves.
The top and two middle shelves each get a 3⁄4"-deep groove to accept a steel tubing stiffener. (The tubing will extend about 1⁄4" below the underside of each plank.) The bottom shelf does not require a stiffener because it rests directly on the floor. To mill each groove, set up a long straightedge to mark the groove’s front edge, 2" from the front edge of the shelf. Mark the shelf 1⁄2" in from each end; this is where you will start/stop the groove.
If you have a 1"-diameter router bit, you can mill each groove without moving the straightedge. Otherwise, cut one side of the groove, then move the setup to cut the other side, for a finished width of 1". Mill the groove with multiple passes (about 1⁄8" deep for each is recommended), stopping at the 1⁄2" marks at either end. Complete the groove in all three planks.
- 8. Cut and install the tubing.
If necessary, cut the three pieces of tubing to length at 72", using a hacksaw or reciprocating saw. Make sure the tubes will fit into the grooves of the shelves.
Working with one shelf at a time, lay the shelf bottom face up, and apply a generous bead of construction adhesive along the entire length of both sides of the groove. Set the tube into the groove so it is centered on the shelf’s length; the tube should stop about 11⁄8" from each end of the shelf.
Clamp the tube in place with four C-clamps, placing one at each end, with the two others spaced evenly in between. Carefully clean up any squeeze-out of adhesive, using mineral spirits and a rag; any adhesive residue left on the surface will likely be there permanently. Let the adhesive dry for 24 hours (or as directed by the manufacturer), then repeat the process with the remaining two planks.
- 9. Glue up the shelves and sidewalls.
This glue-up involves two stages. First you will glue two planks and two sidewalls at a time to create two rectangular assemblies. Then you glue the rectangles together with the remaining two sidewalls.
Apply glue to the top and bottom edges of two sidewall pieces, and fit them between the bottom shelf and one of the middle shelves so the ends of the shelves overhang the outside faces of the sidewalls by 1⁄16" and all pieces are flush at the front. Clamp the assembly and make sure it is square. Keep the clamps on for at least the amount of time recommended by the glue manufacturer. Repeat the process to glue up the top and remaining middle shelf with two more sidewalls.
Complete the glue-up by gluing the remaining two sidewalls between the middle shelves, making sure the entire unit is perfectly square after clamping. Let the assembly dry overnight.
Note: If desired, you can reinforce the joints with wood screws driven through the bottom and middle shelves and into the sidewalls (use countersunk pilot holes to recess the screw heads).
- 10. Clean up the shelf ends.
The best way to bring the overhanging shelf ends flush with the sidewalls is with a low-angle block plane. If you don’t have a plane, you can simply sand the shelves with coarse sandpaper and a flat sanding block (any scrap piece of wood will do).
Set the plane’s cutting height extremely low, so that it shaves only a small sliver at a time. Plane the shelf ends flush with the sidewalls, working from the front and back edges of each shelf toward its middle, to prevent tearout at either edge corner.
- 11. Cut and install the back panel.
Use a sharp chisel to square off the ends of the 1⁄4" rabbets in the top and bottom shelves and in the notches of the middle shelves (these will have been left rounded by the router bit).
Measure between the rabbets in the sidewalls and between the top and bottom shelves to find the dimensions for the back panel. Cut the back panel from 1⁄4" plywood to fit snugly within the rabbets. Set the panel in place, and confirm that the unit is square. Drill pilot holes with slight countersinks, and fasten the back panel to the shelves and sidewalls with 1" wood screws.
- 12. Finish the unit.
Finish-sand all the surfaces with 150-grit sandpaper, creating a slight roundover on any sharp or splintered edges. Work up to 220-grit or finer paper for the final preparation. Finish the piece as desired. Since you’ll want to emphasize the laminated edges of the sidewalls (and the thick plywood shelf edges), it’s best to use a semitransparent colorant (if desired) and a clear protective finish. Be sure to test any stains on some scrap wood to see how the edges absorb the finish.
Hardwareless Shelf
Designed by Norman Stuby
Of all the easy-assembly designs in this book, this shelf is one of the few knock-down pieces that uses no (you guessed it) hardware–at least not hardware in the conventional sense. Its “fasteners” are twelve interchangeable plywood tongues that fit into slotted tenons on the shelf ends, while the back and sides are held together with interlocking hooks cut into the panels. Combining the crisp lines of plywood with ancient forms of joinery, the look is both modern and medieval, resulting in an uncommonly decorative solution to storing notoriously undecorative digital media.
MATERIALS
- One 4 × 8-foot sheet 7⁄16" hardwood plywood
- 7⁄8" brads
- Finish materials (as desired)
TOOLS
- Circular saw with straightedge guide or table saw
- Drill with 7⁄16" straight bit
- Double-sided tape
- Router with 3⁄8" flush-trimming bit (with min. 1"-long cutter)
- Jigsaw
- Band saw (optional)
- Square-edged file
- Sandpaper
- Hammer
- Hot glue gun (optional)
Instructions
- 1. Create the side template.
Cut the full sheet of plywood roughly in half, using a circular saw and a straightedge guide. This is to make handling easier, since all the parts are under 4 feet long. From one half sheet, rip three pieces at 7" wide. Two of these will become the sides of the unit; the third is for the side template.
Lay out all the cuts for the template on one of the cut pieces, following the side template drawing at right. For the 1⁄2" radii on the top corners and the hooks, you can use a quarter to make the curves.
Drill a 7⁄16" hole inside the cutting lines of the four shelf slots, to accept the 3⁄8" flush-trimming router bit. To mill these slots with a router, use double-sided tape to secure four scrap pieces of MDF or other material along the marked cutting lines, as shown in the shelf-slot guides drawing below. Cut the first slot with the router and flush-trimming bit (the bit’s bearing rides along the MDF pieces). Test-fit the slot with a scrap of the plywood stock; it should be snug but not so tight as to hinder assembly. Rout the remaining shelf slots.
Set up a straightedge guide and make the straight cuts along the back edge of the template, using a circular saw or a jigsaw. Then rough-cut the profiles of the hooks and bottom “foot” cutout, using a jigsaw or a band saw. Fine-tune these curves by carefully freehanding with the router, or you can simply cut them close with a saw and then file and sand them smooth. Test-fit the inside (throat) of the hooks with scrap plywood, filing and sanding as needed for a snug fit.
Sand the template’s edges to smooth out all the curves and remove any saw marks. Confirm that the slots and hooks will accept the plywood’s thickness, as now is the time to make any adjustments.
- 2. Shape the side pieces.
Place the two side pieces face-to-face with their edges aligned, and nail them together with a couple of brads. Position the side template over the side pieces so their front edges and bottom ends are aligned, and tack the template to the sides with brads.
Drill 7⁄16" starter holes in the shelf slots for the flush-trimming bit, as before. Use a jigsaw to rough-cut the shelf slots and the profiles of the back and bottom edges, following the template. Do not cut along the rounded top end of the template at this time. Use the router and flush-trimming bit to clean up the slots and edges of the side pieces.
Separate the template from the side pieces and move it up, aligning the bottom two shelf slots on the template with the top two slots on the sides (use pieces of scrap plywood to align the slots perfectly). Nail the template to the side with brads, then repeat the process of sawing and routing to cut the top third of the side pieces. You will have a total of six shelf slots and three hooks per side piece. Now you can cut the rounded top end of the side pieces, following the template.
Remove the template, and sand the edges of the sides, as needed. Separate the side pieces.
- 3. Create the shelf template and cut the shelves.
Create the shelf template from a 6" × 6" piece of plywood stock, as shown in the shelf template drawing below. Follow the same process as before to mark, cut, and rout the template, and sand the cut edges smooth.
Using the leftover material from the side pieces, rip three pieces at 6" wide. Cut these to length at 235⁄8" so you have six pieces total; these are for the shelves. You can make your shelves shorter or longer, as desired–just make sure that all the shelves are precisely the same length. Also keep in mind that the longer they are, the less rigidity they have.
Secure the shelf template to one end of one of the shelf pieces, and shape the shelf end as before, using the jigsaw for a rough cut and the router and flush-trimming bit for cleaning up the edges. Move the template to the other end and repeat. Now you can use the cut shelf as a template to shape the remaining shelves or continue to use the original shelf template. Use a square-edged file to clean up the inside corners at the base of each shelf tongue.
- 4. Create the tongues.
Rip a 4"-wide piece from one of your 4-foot-long leftovers. Crosscut 13 pieces from the strip at 27⁄8" each. Follow the tongue template below to draw the profile of the tongue on one of the cut pieces. Cut the template with a jigsaw or band saw and smooth the edges with sandpaper. Test-fit the template on the shelves, and adjust as needed. (To make fitting easier, you can “cheat in” the side edges of the 21⁄2" section by tapering the sides slightly toward the bottom end; just check the measurement on your shelf pieces.)
Use the template to make a total of 12 tongues. For routing, secure the template to the workpieces with brads, double-sided tape, or hot glue, as desired. Again, use the square-edged file to square the inside corners so the tongues will seat nicely.
- 5. Cut and shape the back.
Assemble the shelves and sides, using the tongues to secure the shelf ends. Place the unit facedown, and make sure the assembly is square. Measure the length between the sides to find the width of the main part of the back panel. Add 2" to this dimension to find the overall width of the back.
Disassemble the shelves and sides. You will use the side pieces as templates for the edge details of the back panel: On each long edge of the back panel, make a mark 4" up from the bottom. Set a side piece upside-down on the back panel. Align the bottom of the throat of the top hook with the mark you just made, keeping the outside edges of the hooks flush with the long edge of the back (see the hook layout on the back panel template). The top of the side piece will hang over the bottom edge of the back. Nail the side down carefully, using brads, making sure the hooks stay flush with the back’s edge.
Rough-cut the side’s profile into the back with a jigsaw, then use the router to clean up the profiles, as you did with the other parts. Do not cut across the top edge of the back panel (around the feet of the side piece); you will trim the back panel to length later. Repeat the process to shape the other side edge of the back panel.
- 6. Complete the final fitting.
Assemble the shelves and sides, as before, then test-fit the back panel. Getting a good fit here requires squaring the inside corners of all the hook throats, using the square-edged file. Use a piece of scrap plywood to check the fit as you work. The scrap should slip in easily; if it’s tight, remove material from the outer wall of the hook throat rather than the edge of the side or back panel.
When all 12 hooks fit properly, replace the back on the assembly. When fully seated, the top and bottom edges of the back should be parallel to (but not flush with) the shelves. The bottom is the easiest to check–the back should overhang the bottom shelf by about 1⁄8". Wiggle the unit from side to side while applying downward pressure to the back until you’re sure it’s fully seated. Mark the back panel along the top face of the top shelf and the bottom face of the bottom shelf. Remove the back, and trim the ends of the back panel along your marked lines.
- 7. Finish the piece.
Disassemble the entire unit, finish-sand all parts as needed, and apply the finish of your choice. To prevent fitting problems, a relatively thin but durable finish material is recommended, such as a penetrating-type oil finish, wax, or wipe-on polyurethane.
Tips for a Growing Collection
If your DVD collection grows off the shelves, you can expand your shelf unit by making new, taller sides and a few new shelves and tongues, using the original templates. Expand the back with a filler piece rather than a whole new panel, and hide the seam behind a shelf edge. To store items taller than the shelves can accommodate, simply take the unit apart and remove a shelf or two.
Gather
Designed by Ryan Mahan
Gather is a functional piece of art in the form of a mailbox. It’s also an exceptional example of plywood construction: its body is made with lamination–face-gluing multiple pieces together to create a form that’s primarily edge grain–while its door is a broad, flat panel that displays the natural beauty of face grain, creating the perfect contrast with the distinctive lines of the lamination. The manageable size and nice woodworking details, such as simple mortises and closure magnets hidden within the wood, make Gather a great project for practicing template routing and lamination techniques.
MATERIALS
- One 2 × 4-foot piece 3⁄16" hardboard
- One 4 × 4-foot sheet 3⁄4" hardwood plywood
- One 84" length (or longer) 3⁄8" hardwood dowel
- Two 3⁄8"-thick, 1⁄2"-wide, 3⁄4"-tall neodymium bar magnets
- One 2" length 1⁄4" × 1" solid pine board
- One 5" length 1⁄4" × 3" solid maple board
- 10-24 brass or stainless steel knife-thread insert
- General-purpose two-part epoxy
- 10-24 1⁄2" stainless steel pan-head bolt
- Wood glue
- Two 3⁄8" stainless steel or brass washers
- Two 9⁄16"-wide, 3"-long, heavy-duty double keyhole hangers with screws
- Clear hardwood floor filler (optional)
- Finish materials (see step 12)
TOOLS
- Jigsaw
- Band saw (optional)
- Drill with:
- 1⁄8" straight bit
- 3⁄8" straight bit
- Sandpaper
- Hammer
- Clamps
- Double-sided tape (optional)
- Router with:
- Flush-trimming bit
- 3⁄8" straight bit
- 1⁄2" roundover bit
- Straightedge
- Circular saw or table saw (optional)
- Doweling jig (optional)
- Wood chisel
- Coping saw (optional)
- Glue brush (optional)
- Three bar clamps (36" min.)
Instructions
- 1. Create the body template.
The main body of this project consists of two end caps, a door stop, and 19 identical body pieces. All the parts are assembled with glue and two dowels running through each body piece and the door stop and into the inside faces of the end caps. You will use a hardboard template to drill dowel holes and cut the profiles of the body pieces.
Draw the shape of the body on hardboard stock, following the cutting diagram. Also mark the centers for the two dowel holes. Cut out the profile with a jigsaw or a band saw, then drill the dowel holes with a drill and 3⁄8" bit.
Sand the edges of the template so they are smooth and free of saw marks. It is critical that the template have the proper shape and clean edges, as it will determine the quality of every plywood body piece.
- 2. Cut the body pieces.
Clamp the template over the plywood stock. Carefully drill a 3⁄8" hole through the stock, using the predrilled holes in the template as guides. Cut two lengths of dowel at 3⁄4". Insert each dowel piece into one of the dowel holes, securing the template to the stock. Tap the dowels with a hammer so they’re flush with the hardboard surface.
Use a jigsaw to rough-cut around the template profile, staying about 1⁄8" from the edges. Keeping the template in place, secure the pieces to your work surface with clamps or double-sided tape. Use a router and flush-trimming bit to clean up the edges of the plywood workpiece, creating an exact copy of the template. Remove the dowels and template, then repeat the same process to cut the 18 remaining body pieces.
- 3.Cut the door stop.
In its outside dimensions and shape, the door stop is identical to the body pieces, so you can use the body template to drill the dowel holes and create most of the door stop’s profile. With the template in place on the workpiece, draw the unique interior profile of the door stop, as shown in the cutting diagram. Cut and rout all the edges common to the template, then remove the template and cut the remainder of the profile with the jigsaw.
- 4. Cut the end caps.
The right and left end caps are virtually identical in shape to the body pieces, but they have no cutout for the cavity; see the cutting diagram. Using the body-piece template as before, drill the two dowel holes into one of the end cap workpieces, making them only 3⁄8" deep (be especially careful to drill no deeper than 3⁄8" with the top hole on the right end cap, lest the hole become exposed by the flag mortise; see step 8). With the template in place on the workpiece, use a straightedge to draw the line that marks the front of the end cap. Rough-cut the workpieces with a jigsaw, then rout the matching edges with the template in place. Remove the template and complete the front edge of the end cap with a jigsaw. Repeat the process with the other end cap.
- 5. Cut the door panel.
Detailed dimensions for the door are given in the cutting diagram. However, because plywood can vary slightly in thickness, it’s a good idea to preassemble the body–including all body pieces, door stop, and end caps–and clamp the parts together. Then measure the width of the door opening to find the precise width for your door panel. The door should be about 1⁄8" narrower than the opening, to allow for 1⁄16" of clearance on each side.
Lay out the door profile on the plywood stock, and make the cuts with a jigsaw (you might prefer to use a circular saw and straightedge guide or a table saw for the straight cuts).
Round over the inside and outside edges along the bottom of the door, using a router and 1⁄2" roundover bit. Do not rout too deeply on the first cut; the bearing needs a flat surface to ride along for the second cut.
Note: The project shown was constructed with furniture-grade maple plywood for its door panel.
- 6. Drill the door-hinge holes.
The door hinges on 3⁄4" lengths of dowel glued into the door’s edges and captured by the end caps. With the body still clamped together, test-fit the door in the opening and make any necessary adjustments for a proper fit. Hold the door in the closed position, and make matching marks on the door face (near each side edge) and the corresponding end cap; these should be about 7⁄16" up from the bottom edge of the door.
Using a doweling jig (or just measure and mark very carefully), drill a 1⁄2"-deep dowel hole into the door’s side edges, using a 3⁄8" bit; these should be centered on the reference marks and on the thickness of the door’s edges. Drill corresponding holes halfway into the end caps.
- 7. Create the door-magnet cavities.
The door and door stop each get a 3⁄8"-thick, 1⁄2"-wide, 3⁄4"-tall bar magnet. The magnets are embedded in the plywood and are invisible in the finished piece. On the door stop, the magnet is covered by the right end cap. On the door, the magnet is covered by a plug cut from a piece of solid pine and glued into place.
Mark the magnet cavity on the right face of the door stop so it is 1⁄4" from the lower front edge of the piece; see the exploded-view drawing. The cavity is 3⁄4" tall, 3⁄8" wide, and 1⁄2" deep. Remove most of the waste in the cavity with a drill and 3⁄8" bit (you can also use a plunge router and 3⁄8" straight bit to cut the cavity). Clean up the sides of the cavity with a sharp chisel. Test-fit the magnet and make any necessary adjustments.
Mark the door cavity on the door’s right edge so it will be aligned with the door-stop cavity and centered on the edge of the door. Drill and chisel the cavity as before, using a doweling jig if available. Make this cavity about 5⁄8" deep to provide space for the pine plug. Cut a piece of 1⁄4"-thick pine to fit snugly into the cavity. Set a magnet into the cavity, then glue the pine plug into the hole, about 1⁄8" deep, and let the glue dry. Sand the plug flush to the plywood edge.
You will install the door-stop magnet during the final assembly.
- 8. Create the flag mortise and flag.
The flag fits into a 1⁄4"-deep mortise milled into the outside face of the right end cap. Draw the outline of the mortise on the end cap, as shown in the cutting diagram. Cut the mortise with the router and a straight bit. Freehanding with the router works fine. It’s best to remove most of the waste with two passes, staying a little inside the marked line. Then make a single, full-depth pass, cutting to the line.
Cut the flag from 1⁄4"-thick maple (or other) stock, following the cutting diagram. A coping saw or band saw works well for this cut (or you can use a jigsaw). Sand the edges smooth and test-fit the flag in its mortise.
Mark a mounting hole on the flag, as indicated on the template. Drill the hole through the flag with a 1⁄8" bit. Position the flag into its mortise, and use the mounting hole to mark the location for a threaded insert in the end cap. Drill a 3⁄8" hole at 1⁄2" deep for the insert. Glue the insert into the hole with epoxy. Once the epoxy sets, mount the flag with a 1⁄2" bolt, and check the flag motion–it should be able to stand completely upright; if it doesn’t, sand the flag as needed for a proper fit.
- 9. Glue up the main body.
Cut two lengths of dowel at 3⁄4" each for the door hinges, and set them aside. Cut the remaining dowel piece in half. Slide all the body pieces and the door stop onto the two dowels, leaving plenty of space in between for applying glue. Position the door stop about an inch from the dowel ends. Have your clamps and all other supplies ready for the glue-up, because you have to work quickly. You might want to use a glue brush for easy glue application.
Apply glue to the outside face of the first body piece, and press it against the door stop. Glue the inside face of the first body piece, then slide the next body piece down against the first. Repeat this process to glue all the body pieces, then clamp the entire assembly with bar clamps. Quickly clean up as much glue squeeze-out as possible, using damp paper towels. You can leave the dowels long for now. Let the glue dry overnight.
Trim the dowel ends so they extend 5⁄16" beyond the outer left body piece and the door stop. Sand the interior of the body so it is smooth and flat.
- 10. Add the door and end caps.
Glue the remaining bar magnet into the door-stop cavity with epoxy and let it set. Glue the 3⁄4" hinge dowels into the door, using wood glue, so they extend 3⁄8" beyond the door’s edges. Let the glue set.
Test-fit the door by placing a thin washer on each hinge dowel and then fitting the end caps over the hinge dowels and the dowel stubs on the body. Check the door operation, making sure the side clearances are adequate, the gaps (reveals) along the door’s edges are even, and the magnets hold the door securely closed. You may have to sand or file the washers so they aren’t visible in the final assembly.
When all looks good, apply glue to the outer left body piece and door stop, and complete the assembly. Clamp the end caps in place, applying pressure on the body, not the door. Check the door operation, and loosen or tighten the clamp pressure accordingly. Wipe off excess glue with a damp paper towel. Let the glue dry overnight.
- 11. Mortise for the keyhole hangers.
Mark the locations for two keyhole hangers on the back of the unit, near the upper ends of the body. Space the hangers evenly, making sure they are the same distance from the top of the body. Trace around the outer edge of the hangers to mark the mortises.
Mill the mortises with the router and a straight bit to a depth equal to the hangers’ thickness. Drill shallow pilot holes for the hanger screws.
- 12. Finish the piece.
Finish-sand the entire project, including the flag. If the exposed plywood edges have any voids, you can fill them with clear hardwood-floor filler, as directed by the manufacturer, and sand the filler flush. Stain or paint the flag, then finish the body, door, and flag with a clear protective finish. In the project shown, the flag was colored with bright-red stain, and everything was finished with spar varnish.
Install the keyhole hangers with short screws. Attach the flag with the bolt. Hang the finished piece under a roof eave or other location where it will stay dry.
Mudroom Organizer
Designed by Sascha Ayad
Imagine, if you will, the unutterable bliss of having every little shoe, every backpack, every hat and glove, and every ball not strewn about the floor or piled in a corner, but neatly displayed in an attractive, wonderfully rational storage unit designed by a cabinetmaker and fellow parent (he feels your pain). This state of serenity can be yours with two simple steps: 1) build this project, and 2) nag your kids approximately 1,200 times to use the darned thing. This organizer measures just 3’ × 4’ × 1’ feet and contains 20 cubbies ranging in size from about 7" to over 11" square. If you need a different configuration or overall size to fit your space or storage items, you can easily modify the given plan and stick with same basic construction. Serenity now!
MATERIALS
- One 4 × 8-foot sheet 3⁄4" plywood
- One 4 × 4-foot sheet 1⁄2" plywood
- Scrap materials for dowel jig (see steps 1 and 5)
- Wood glue
- 11⁄2"-long, 3⁄8"-diam. wood dowel pins
- 15⁄8" #8 coarse-thread drywall screws
- 6d (2") finish nails (for optional base)
- Wood veneer edge tape (optional)
- Finish materials (see step 9)
TOOLS
- Drill with:
- 3⁄8" straight bit
- #8 combination pilot-countersink bit
- Circular saw with straightedge guide
- Table saw (if available)
- Framing square
- Bit stop (or masking tape)
- Clamps
- Hammer and nail set (for finish nails in optional base)
- Utility knife (if using veneer edge tape)
- Clothes iron (if using veneer edge tape)
- Sandpaper (up to 220 grit)
CUTTING LIST
Instructions
- 1. Build the dowel jig.
All the parts of the organizer (except the back) are joined with glued dowel pins (precut dowels). A homemade dowel jig will help ensure that the dowel holes line up between mating parts. You use the same jig for all the parts. To account for the 1⁄4" set-back between the vertical dividers and the horizontal shelves, you will simply add a 1⁄4"-thick spacer to the jig before drilling the holes in the vertical pieces.
Create a jig with two pieces of scrap plywood, as shown in the illustration of the jig for face dowel holes, joining the jig base to the ledger with screws to form a right angle. Draw a centerline perpendicular to the ledger, then mark the centerline at 2" and 8" from the inner edge of the ledger. Drill a 3⁄8"-diameter hole at each mark; these are the guide holes for drilling the dowel holes in step 4.
- 2. Cut the parts.
Cut the vertical dividers, shelves, sides, bottom, and top from 3⁄4" plywood, as listed at right. Arrange the parts so that the length of the pieces parallels the grain of the plywood’s face veneers. Cut the back panel from 1⁄2" plywood. (See Cutting List).
Cut all the parts with a circular saw and a straightedge guide to ensure clean, straight cuts. If available, a table saw is preferable for ripping the 3⁄4" plywood pieces.
- 3.Mark reference lines for dowel holes.
The divider and shelf locations are shown on the plan drawing. On the bottom face of the lowest shelf (not the bottom piece), make a mark 11 7⁄16" from each end of the shelf. Use a framing square to draw a line at each mark perpendicular to the front edge of the shelf. Next, draw a line at the precise center of the shelf’s length, again perpendicular to the front edge. Transfer these line locations to the top face of the bottom piece.
On the top face of the lowest shelf, mark lines at 9⁄16" from each shelf end, then mark two more lines at 9 7⁄16" from the first marks. Transfer these lines to both faces of the next shelf up and to the bottom face of the top shelf.
On the top face of the top shelf, mark lines at 71⁄2" from each end, then three more lines at 77⁄8" in between. Transfer these lines to the bottom face of the top piece.
Finally, mark lines on the inside face of one of the side panels (perpendicular to the front edge). The first line is 3⁄8" from the bottom. From that line, make a line at 12", then make three more lines spaced at 73⁄4". The topmost line should be 3⁄8" from the top of the side piece. Transfer these lines to the other side piece.
- 4. Drill the face dowel holes.
Position the dowel jig at the front edge of one of the workpieces and align the jig’s centerline with each marked line on the workpiece face; see the drawing of the jig for face dowel holes. Clamp or securely hold the jig in place, and drill a 3⁄8"-diameter hole straight down through each guide hole in the jig, going halfway (3⁄8") into the workpiece. Mark the drill bit with tape or a bit stop at the proper depth, to prevent drilling all the way through the material. In this way, drill the two holes at each line on the faces of the top, bottom, shelves, and sides.
- 5.Drill the edge dowel holes.
Now you will use the dowel jig to drill holes on the edges at the ends of the dividers, top piece, and bottom piece (the holes will be parallel to the front and back edges of the pieces). But first you have to modify the jig so that the holes will be 13⁄4" and 73⁄4" from the front edge of each piece (instead of 2 and 8") and centered on the 3⁄4"-thick edge of the material.
Modify the jig by gluing a 1⁄4"-thick strip of wood to the inside face of the ledger, so it is centered on the jig’s centerline. Then screw a second ledger cut from a straight piece of scrap to the underside of the jig base so it is perpendicular to the front ledger and its inside face is 3⁄8" away from the centers of the holes; see the drawing of the jig for edge dowel holes.
Set the tape or stop on the 3⁄8" drill bit for a depth that’s 1⁄4" shorter than the length of your dowel pins (or 11⁄4" for 11⁄2"-long pins). Drill the dowel holes on both ends of the dividers and top and bottom pieces, making sure to register the ledger of the jig against the front edge of each piece.
- 6. Dry-assemble the organizer.
Glue dowel pins into both holes in all of the top and bottom edges of the dividers, and let the glue dry.
Dry-fit the organizer to make sure everything fits before the final glue-up. Start at the bottom and work up, fitting together all the shelves and dividers, then adding the top piece and finally the sides. Remember that the dividers will sit 1⁄4" back from the front edges of the shelves, top, and bottom. Make sure the assembly is square, and fit the back panel into the recess created by the sides, top, and bottom. Make any necessary adjustments.
- 7. Complete the final assembly.
With clamps at the ready, begin the final glue-up, again working from bottom to top, then adding the sides. Apply glue not only to the dowels but also to the edges of the mating pieces. To save on clamps, you can add screws to any joints where the screw heads won’t be visible, such as under the bottom piece, under the lowest shelf, and (if the organizer will abut a wall when installed) on either side. Drive the screws through pilot holes to prevent splitting an edge. Clamp the assembly securely, making sure it is square, and let the glue dry overnight.
Install the back by drilling countersunk pilot holes and screwing through the back and into the rear edges of the dividers, shelves, and bottom piece.
- 8. Add a base (optional).
A base adds a finished look and makes it easier to level the unit on an out-of-level floor. To create a base, rip 3"-wide strips of 3⁄4" plywood. From these strips, cut the front and back of the base to length at 44", and cut the sides at 71⁄2". (If you prefer to miter the base’s corners rather than butt them, miter the ends of the strips at 45 degrees, and cut the sides to length at 9".)
Glue and finish-nail the base frame together so the front and back cover the ends of the sides. Glue the base to the bottom face of the bottom piece so the front and sides of the base are 2" from the front and sides of the unit.
- 9. Finish the unit.
If desired, cover the front edges of the pieces with veneer edge tape, following the manufacturer’s directions (use self-adhesive, iron-on tape for easy application). Otherwise, sand the bare plywood edges smooth with sandpaper, rounding over the corners slightly to prevent splintering. Finish-sand the entire piece, working up to 220-grit or finer sandpaper.
Finish the piece with three coats of wipe-on polyurethane or other desired finish. Because the unit is assembled, wipe-on poly and other rag-applied finishes are easier to work with than brushed-on materials.
Sliding Mirror Shelves
Designed by Shawn Calvin
This clever storage system is bound to prompt the old question, “How come no one’s ever thought of that before?” The simple box shelves are perfect for holding everyday bedroom items, like jewelry and perfume bottles, and the mirror performs more than its standard function – it also glides from side to side to conceal stored items while maintaining easy access to the entire shelf. The piece shown here was made largely with salvaged materials, including the mirror frame, which used to house a picture (another good idea suggested by the designer).
MATERIALS
- One 2 × 3-foot piece 3⁄4" plywood
- Staples (for staple gun)
- Four recessed mounting brackets with screws
- Mirror (cut to fit frame) or picture insert
- Picture frame
- Flat clips or metal strips and screws (for securing mirror)
- One set sliding closet hardware
- Heavy-duty hollow-wall anchors (as needed)
TOOLS
- Circular saw with straightedge guide
- Square
- Staple gun
- Wood chisel
- Drill with standard bit set
- Hacksaw
- Level
Instructions
- 1.Cut the box parts.
Following the plan drawings below, cut the eight box parts to size with a circular saw and straightedge guide. These include:
- 4 side pieces at 51⁄2" × 12"
- 1 top and 1 bottom for the long box at 51⁄2" × 30"
- 1 top and 1 bottom for the short box at 51⁄2" × 12"
- 2. Assemble the boxes.
Assemble each box by placing the top and bottom pieces over the ends of the side pieces, with their edges flush at the front. Use a small square (such as a Speed Square or combination square) to make sure the box parts are square, then fasten them together by stapling through the top and bottom pieces and into the sides’ edges with a staple gun.
Note: If you don’t have a staple gun or prefer a less-visible fastener, you can assemble the boxes with wood glue and 6d (2") finish nails.
- 3. Install the mounting brackets.
Cut mortises to recess the mounting brackets into the back edges of the box sides, using a sharp wood chisel. Also drill holes, as needed, to provide clearance for the wall-mounting screw heads (step 6). The brackets should be flush with the box edges. Install the brackets with the provided screws.
- 4. Assemble the mirror.
Have the mirror cut to size at the hardware store or home center, so it fits snugly inside the picture frame. Set the mirror in the frame and secure it at the back with flat clips or metal straps. Alternatively, you can fill the frame with artwork, a photograph, or other decorative materials, as desired.
- 5. Add the closet hardware.
Cut the sliding closet track to fit snugly inside the top of the long box, using a hacksaw. Position the track against the box top so it is flush with the front of the box, and install the track with the provided screws.
Fasten the sliding closet brackets to the backside of the mirror frame, in the desired location.
- 6. Install the shelves.
Position each box on the wall, and use a level to make sure each one is level across the top and level with the other box. Mark along the box top and sides with light pencil marks.
Drive mounting screws into the wall following your reference marks. Drive the screws into wall studs whenever possible; otherwise, use heavy-duty hollow-wall anchors to secure the screws (don’t use the cheap plastic friction-type sleeves). Hang the boxes on the screws.
Hang the mirror by fitting the sliding brackets into the closet track.
Cantilevered Shelves
Designed by Larry Finn
These elegant shelves were designed to accompany the Peninsula Workstation, and they feature some of the same clever construction details – namely, the triple-layer built-up edge. With the shelves, however, the layered construction is not only decorative, it also creates a cavity for concealing the mounting hardware, the secret bit of engineering behind all cantilever shelves. The design technique can be used for shelves of any length and up to about 9" deep.
MATERIALS
- One 4 × 4-foot sheet 3⁄4" hardwood plywood
- One 64" (or longer) length 1⁄2" × 1⁄2" galvanized metal angle (with holes)
- 3⁄4" coarse-thread wood screws with washers (for mounting angle to shelf)
- Wood glue
- Heavy-duty hollow-wall anchors (as needed)
- 2" coarse-thread wood screws with washers (for mounting angle to wall)
- Four (or more) 11⁄2" finish nails or brads
- Finish materials (see step 5)
- Caulk (optional)
Note: The materials listed here will yield two matching shelves.
TOOLS
- Compass
- Circular saw with straightedge guide
- Jigsaw
- Sandpaper (up to 220 grit) and sanding block
- Hacksaw or reciprocating saw
- Drill with pilot bits
- Clamps
- 4-foot level
- Stud finder (wall scanner)
- Hammer and nail set (if using finish nails)
- Brad nailer (if using brads)
- Masking tape
Instructions
- 1.Cut the plywood pieces.
Each shelf is made up of a full-size top and bottom panel and a 2"-wide buildup strip running along the front and exposed side edge of the shelf. All parts should be cut from the same sheet of 3⁄4" plywood. The shelves shown here measure 341⁄4" long and 9" deep. Your shelves can be any length; just make sure that long shelves won’t end up overloaded with stuff, especially books. These shelves are pretty sturdy, but excessive weight will likely crush the drywall, causing the shelves to tip downward.
Lay out the cuts for the top and bottom panels for each shelf on 3⁄4" plywood stock. Use a compass to draw the 31⁄2" radius at the outside corners, as shown in the top-view drawing. Cut the pieces with a circular saw and a straightedge guide, cutting the outside corners square. Lay out and cut the 2"-wide buildup strip for each shelf, forming an L that matches the outside dimensions of the tops and bottoms.
Stack the three pieces for each shelf with their edges flush, and clamp them to a work surface so the corner to be rounded is fully accessible. Cut the radius with a jigsaw and a very-fine-tooth wood blade (to minimize splintering), cutting through all three pieces at once. Sand the rounded edges with coarse sandpaper and a sanding block, as needed, to smooth the curve and remove any rough or flat spots.
- 2. Prepare the angle.
Cut two pieces of 1⁄2" × 1⁄2" metal angle at 32" each (or 21⁄4" less than the shelf length), using a hacksaw or reciprocating saw. Position a piece of angle near the rear edge of the bottom face of each top panel, with one end of the angle just inside the square end of the top. Carefully adjust the angle so its back flange is 1⁄16" in from the rear edge of the top, as shown in the cutaway side-view drawing, and clamp the angle in place. Drill pilot holes, and fasten the angle to the shelf with 3⁄4" wood screws and washers. The 1⁄16" inset will help hold the shelf tightly to the back wall.
- 3. Add the buildup strips.
For each shelf, apply wood glue to both faces of the buildup strip. Position the strip on the bottom face of the top panel. Clamp the pieces, making sure all exposed edges are flush and there are no visible gaps between the layers. Let the glue dry overnight.
- 4. Hang the top panels.
Determine the hanging height of each shelf. Using a 4-foot level, draw a level line on the back wall (where the shelf will mount) to represent the shelf’s top surface. Locate the wall studs within the shelf area along the back wall, using a stud finder (wall scanner) or your preferred manual technique. Ideally, you’ll be able to anchor into the corner stud (where the back wall meets the adjacent side wall) and the nearest two studs from the corner, along the back wall. If you can’t find three studs, you’ll have to install one or more heavy-duty hollow-wall anchors (such as toggle bolts) to anchor the angle.
Set each shelf top into position against the wall, with its top face on the level line, and screw through the angle and into each stud with a 2" wood screw and washer. The 1⁄16" offset will cause the shelf to tip downward slightly; this will be corrected in the next step.
Note: Instead of installing the top panel (with strip) now, you can attach the bottom panel to the top panel (using finish nails, as described in step 5), sand and finish the completed shelf, and then remove the bottom to install the shelf.
- 5. Complete the shelves.
With clamps at the ready, position each bottom panel in place against the buildup strip, push up slightly until the shelf is level and the bottom panel is flush with the edges of the strip, then clamp the pieces tightly together. Drill pilot holes for four or more 11⁄2" finish nails (or use a brad nailer) and fasten the bottom panel to the strip. This will hold the entire shelf tightly against the wall. Remove the clamps.
Finish-sand the exposed surfaces of the shelves, working up to 220-grit or finer sandpaper. Tape off the walls around the shelves, and apply the finish of your choice. Finishing the bottom panel requires working upside down, so it’s a good idea to use a wipe-on finish rather than a brush-on formulation. Furniture oils (Danish, tung, linseed, et cetera) and paste wax are good options if the shelves don’t need to be moisture-resistant. If they do, wipe-on polyurethane is a good choice. Let the finish cure fully before using the shelf.
If desired, caulk the joints where the shelves meet the walls, using a fine bead of caulk that matches the wall color.
Built-In Hutch
Designed by Anton Willis & Kate Lydon of Civil Twilight
This may just be the easiest and most elegant built-in storage solution ever devised. The designers are two architects who love their historic residence and its quaint appointments, such as the cabinets for pies and irons. But the fact is, they just don’t bake pies. Nor could they make the most of a nicely sized but empty alcove in their entryway. So they installed four simple bracket-hung shelves, two of which support sliding acrylic doors to create a “floating” cabinet. Shoes go below the cabinet, mail and keys go on top, and anything else can be stashed inside. The frosted acrylic lightens the piece and, in the words of the designers, “makes objects inside look more abstract than messy.” Simple design magic.
MATERIALS
- 3⁄4" Finnish birch or other hardwood plywood (quantity as needed)
- Wood glue
- Finish materials (see step 4)
- 1⁄4" aluminum sliding door track
- Four 3⁄4" metal L brackets with screw holes (per shelf)
- Hollow-wall anchors (as needed)
- 11⁄2" or 2" coarse-thread drywall screws or wood screws
- 1⁄2" wood screws
- 1⁄4"-thick frosted acrylic panels
TOOLS
- Circular saw with straightedge guide or table saw
- Clamps
- Sandpaper (up to 220 grit)
- Hacksaw
- Drill with:
- Pilot bits
- 11⁄2" hole saw (see step 7)
- Level
- Cutting tools for acrylic panel (optional; see step 7)
Instructions
- 1. Plan your built-in.
The project shown here consists of two 8"-deep shelves for books and display items and two deeper shelves that form the top and bottom of the cabinet. The alcove is 20" deep, and the cabinet shelves are 18" deep, so they look nicely tucked in. The cabinet hangs 12" above the floor; its top is at a comfortable height of 36". The shallower shelves are spaced at 10" intervals above the cabinet, as shown in the plan drawings.
All the construction details, including the size and number of shelves and the configuration of the pieces, can be modified to suit your space, design preferences, and storage needs. Once you’ve determined the size and layout of all the elements, draw level lines on both side walls of the alcove to mark the shelf locations. These will help you take accurate measurements and install the shelves.
As for additional decorating ideas, the designers offer a few suggestions: Add more shelves, or build multiple cabinets. Paint the back of the alcove or line it with wallpaper. Use painted hardboard or pegboard, instead of acrylic, for the doors. And if you want to get fancy, mount stick-on, battery-operated lights under the shelves as mini-spotlights for special displays.
- 2. Cut the shelves.
Measure the width and depth of the alcove at each shelf location. When checking for width, take a few measurements for each shelf – at the front, middle, and back of the shelf location; this will account for any variation in the wall planes (a common reality in older homes). If the measurements vary significantly, you’ll have to size the shelf to the smallest dimension or cut one or both ends at an angle to follow the wall(s). Also keep in mind that one or both walls might be out of whack.
To find the cutting width for the shelves, subtract 1⁄4" from the alcove dimensions. Cut the shelves to size from 3⁄4" plywood, using a circular saw with a straightedge guide or a table saw. Also cut two 1⁄2" strips of plywood and trim them to length to match the width of the cabinet shelves; these will be used to build up the edges of the cabinet shelves and to hide the door tracks.
- 3. Attach the cabinet strips.
Apply wood glue to one 1⁄2" face of one of the 1⁄2" × 3⁄4" strips, and clamp it to the bottom face of the top cabinet shelf so the front edges of both pieces are perfectly flush. The layered edge of the plywood strip should face forward, just as it does on the shelf edge. Let the glue set, as directed by the manufacturer, before removing the clamps. Repeat the same process to glue the other strip to the top face of the bottom cabinet shelf.
- 4. Finish the shelves.
Finish-sand all four shelves, working up to 220-grit or finer sandpaper. Finish all surfaces of each shelf as desired. The shelves in the hutch shown here were given two coats of Danish furniture oil.
- 5. Install the door tracks.
Cut two pieces of aluminum door track to match the width of the cabinet shelves, using a hacksaw. Position the top track (which should be deeper than the bottom track) against the top cabinet shelf so it’s flush against the plywood strip. Drill pilot holes, and fasten the track with the provided screws. Be careful not to drill or screw through the top face of the shelf. Repeat the process to install the bottom track on the bottom cabinet shelf.
- 6.Install the shelves.
Each shelf is supported by four small metal angle brackets. Be sure to use brackets that have a hole in each of their two flanges, for driving screws. It’s best to drive the screws into wall studs, whenever possible. Therefore, check for wall studs at each shelf location, using a stud finder (wall scanner) or the old-fashioned method of tapping with a hammer and probing with a finish nail. The brackets should go near the back corners of the shelves and about 1" back from each front corner. Make sure the two front brackets for the top cabinet shelf will be clear of the door track.
There should be studs in the rear corners of any alcove or closet. If you can’t find studs elsewhere, you’ll have to use hollow-wall anchors, such as toggle bolts. Don’t use cheap plastic cone anchors, which have very little holding strength.
Mark the bracket locations, following your reference lines from step 1. Drill pilot holes, as needed, and install the brackets with 11⁄2" or 2" coarse-thread drywall or wood screws. Place each upper (shallow) shelf in position on its brackets, drill a small pilot hole for each bracket, and fasten the brackets to the shelf with 1⁄2" wood screws.
Set the cabinet shelves on their brackets. Use a level to make sure the front edges of the shelves are perfectly aligned – the level should read plumb when set against both front edges of the shelves. Secure the shelves with 1⁄2" screws.
- 7. Add the doors.
You can cut the acrylic (a.k.a. Plexiglas) doors to size yourself or have them cut by a plastics retailer (online or at a store), usually for a small fee. If you’re having them professionally cut, also have the finger-pull holes drilled, as both operations come with the risk of damage when you do them yourself.
The width of each door should be 1" more than half of the alcove width. For example, if the alcove is 30" wide, each door should be 16" wide. The door height should be 1⁄2" less than the interior face-to-face distance between the cabinet top and bottom; be sure to confirm this dimension with your own door tracks.
You can cut the acrylic sheet with a jigsaw, circular saw, band saw, or (preferably) a table saw. For a circular saw or table saw, use a blade with a carbide-tipped, triple-chip tooth design. For a jigsaw, use a new blade with 10 teeth per inch. Lay the acrylic sheet on a sacrificial piece of Styrofoam insulation board, to provide support (there’s no need for the board with a table saw), and cut through the sheet and board at the same time.
Create the 11⁄2" finger holes (see the plan) using a sharp, coarse-tooth 11⁄2" hole saw. As with sawing, use a Styrofoam board to support the acrylic, and be careful not to apply too much pressure and risk cracking the plastic. Drill halfway through the plastic from one face, then flip the sheet over and complete the hole from the other face. To prevent the acrylic from melting, lubricate and cool the cutting area as you work with water and a small amount of colorless liquid soap (such as Ivory).
Remove the protective plastic layer from each door face. Install the doors by slipping their top edges all the way into the top door track, then dropping the bottom edges down into the bottom track.
Plywood as . . . A showcase of inspired pieces and
the stories behind them. . . inherent potential
Flip Chair
by Igor Zemskov
The Flip chair was designed as a lounge chair formed from a 4 × 8-foot sheet of bendable plywood. The entire piece is first bent into its unique U shape. After bending the plywood, I cut out the center of the U-shaped form to create the seat. My inspiration came mainly from IKEA and the idea of trying to ship the least amount of air. By being cut down the center, the chair’s parts can be stacked for shipping.
The biggest challenge was trying to achieve the sharp curves with the material without splitting the plywood. The process I used to bend the wood was vacuum forming. I built a buck (out of MDF board) with the negative of the shape I wanted. By adding one layer of 1⁄4" bendable plywood at a time into the vacuum bag and using watered-down wood glue, I was able to avoid any cracking in the plywood.
Using a jigsaw to cut out the seat while keeping the walls straight was a great struggle, but sanding helped afterward. After the seat is flipped around, the chair is assembled into an invigorating yet relaxing lounge chair.
To attach the sides together I used lap joints on the feet, and after routing two grooves on each side, I fit the seat between the two sides. The finish on the Flip chair is a Honduran mahogany veneer, with handmade foam cushions for extra padding.
