Chapter 6
Art & Deco
Decorative things for walls and other areas. Tip: If it doesn’t look like plywood, it didn’t turn out right.
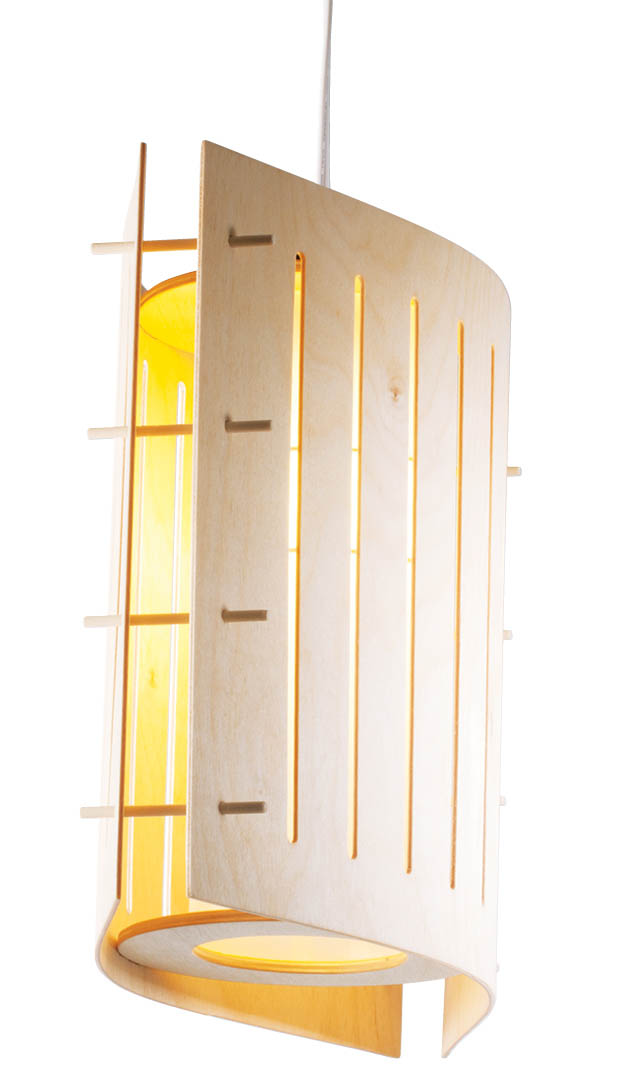
Light Within
Designed by Philip Schmidt
Oddly enough, this is the only plywood light fixture in the book, even though the malleability and light weight of very thin plywood make it a pretty darned good material for fixturey things. And since the book has virtually everything else for the house, including a play slide, doghouses, and a boomerang, surely it needs at least one light fixture. This one is surprisingly easy to build and involves no wiring. It also uses no glue or fasteners. And every part besides the electrical stuff comes from a tree. Why does all this matter? It doesn’t, really. But it might make for good conversation if anyone asks.
MATERIALS
- One 17" × 241⁄4" (or larger) piece 1⁄8" Baltic birch or other hardwood plywood
- Materials for router jig (see step 2)
- One 6" × 121⁄4" (or larger) piece 1⁄4" Baltic birch or other hardwood plywood
- One 30" length 3⁄16"-diam. birch dowel
- Finish materials (optional)
- One 12" × 13" sheet vellum paper (or two 12" × 12" sheets)
- Hanging light fixture socket (with cord, in-line switch, and metal cage)
- Scotch tape or clear glue
TOOLS
- Circular saw with straightedge guide or table saw
- Router with 1⁄4" straight or spiral bit
- Clamps
- Drill with:
- 3⁄16" straight bit
- 3⁄8" straight bit
- Compass
- Jigsaw with ultra fine-tooth wood blade
- Sandpaper (80 to 220 grit)
- Straightedge
- Utility knife
- Wood chisel
Instructions
- 1. Cut the side pieces.
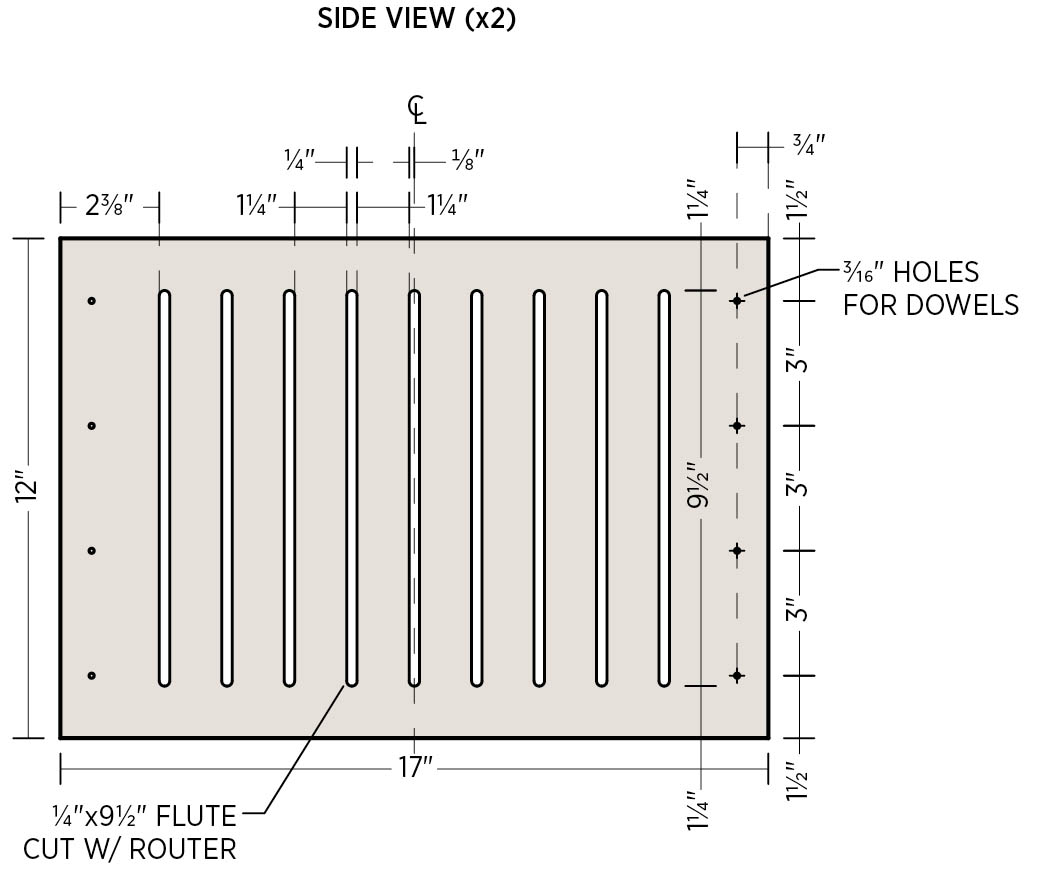
Lay out the two side pieces at 12" × 17" on the 1⁄8" plywood stock, with the grain of the face veneers parallel to the 12" dimension. This is necessary because thin plywood is more flexible across (perpendicular to) the grain of its face veneers. Cut the pieces to size with a circular saw and a straightedge guide or a table saw.
- 2. Mill the side flutes.
The nine flutes (or grooves) in the side pieces are cut with a router and 1⁄4" straight or spiral bit. For accuracy and efficiency, it’s best to build a simple jig to guide the router for each cut.
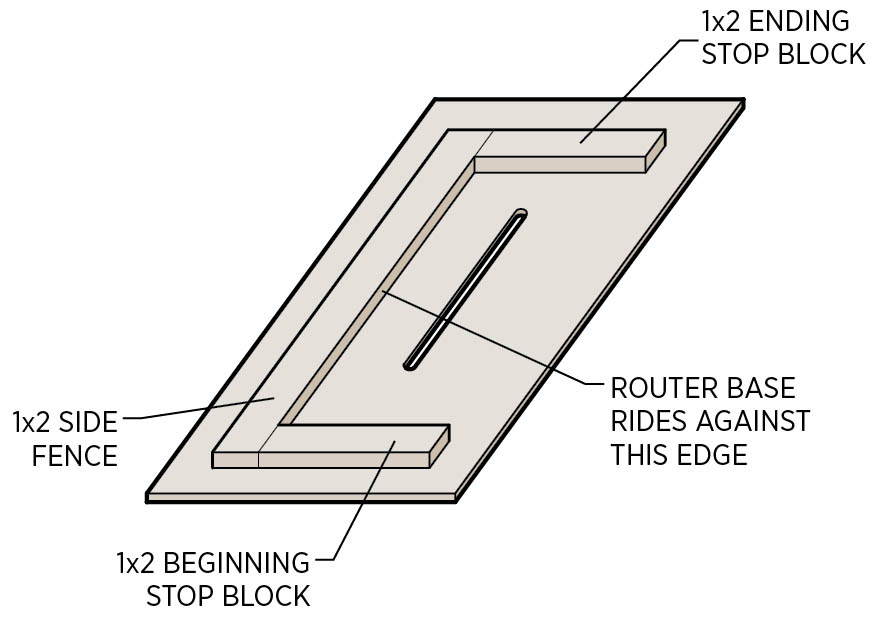
Create the jig with an 8" × 20" piece of hardboard or thin plywood and three lengths of 1 × 2 or other straight scrap lumber. Glue and/or screw a long piece of 1 × 2 parallel to the long edges of the hardboard base, to serve as a side fence; see the fluting jig drawing below. Secure a short 1 × 2 near one end of the base, perpendicular to the long piece; this is the beginning stop block.
Measure the offset between the edge of the router’s base and the outside edge of the bit’s cutter; multiply this dimension by 2, then add 91⁄2. This sum equals the distance (in inches) between the beginning and ending stop blocks. Install the ending stop block perpendicular to the side fence.
Test the jig on a sacrificial surface, cutting through the jig base with the 1⁄4" bit, and keeping the router base tight against the side fence throughout the cut. The resulting slot in the base should be 1⁄4" wide and 91⁄2" long.
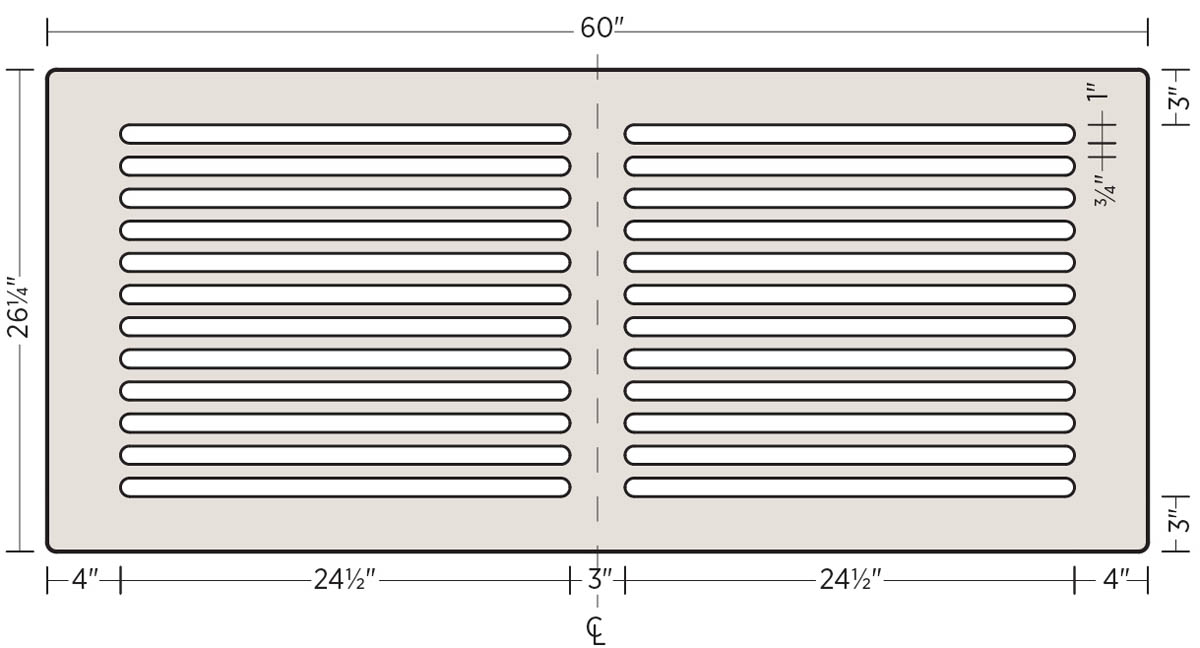
Mark the flute layout on one of the side pieces, as shown in the side view of the plan above. The flutes are laid out over the center of the side and are spaced 11⁄4" apart. Mark all edges of each flute to prevent confusion during the routing.
Clamp the two sides together on top of a sacrificial surface, with the sides’ edges perfectly aligned. Clamp the jig at the first flute location, aligning the slot in the jig with the flute markings. Rout the flute through both pieces in one or more passes. Repeat the process to cut the remaining eight flutes.
- 3. Drill the dowel holes.
The side pieces get four dowel holes near each side edge. Mark the dowel hole locations on the face of one side piece, following the side view drawing above. Align the two sides and clamp them to the sacrificial surface, as before. Drill the holes through both pieces, using a 3⁄16" bit.
- 4. Cut the rings.
The top and bottom rings are cut from 1⁄4" plywood, using a jigsaw. If your router base is small enough, you can use the router and a trammel (see here) to cut the outer diameters of the rings, if desired.
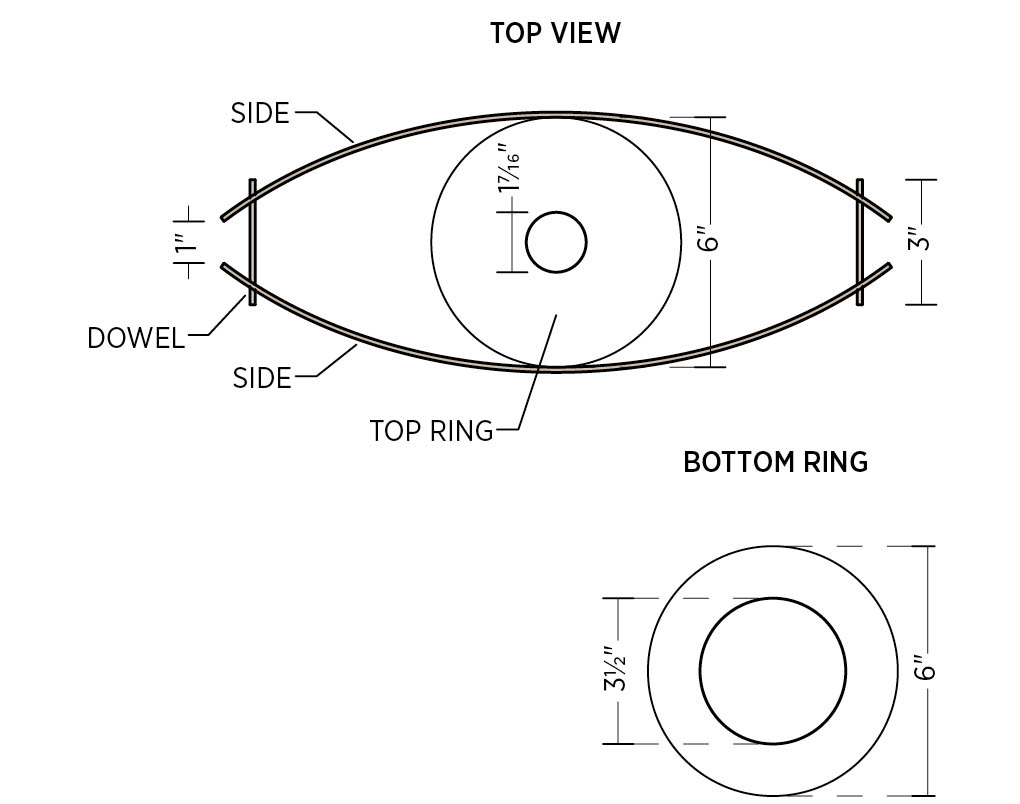
Mark two 6"-diameter circles on the 1⁄4" plywood stock, using a compass. Pivoting from the centerpoint in each circle, mark a 31⁄2"-diameter circle on the bottom ring and a 17⁄16"-diameter circle on the top ring. The latter is a cutout for the body of the light socket, so confirm this dimension with your own lighting parts.
Drill a 3⁄8" starter hole inside the inner circle of each ring. Insert the jigsaw blade into each hole and cut out the inner circle. Then cut out the outer circles.
Note: Be sure to use a very fine, or “clean,” jigsaw blade to minimize splintering. A narrow blade with 20 tpi (teeth per inch) works well, or you might prefer to use a “scroll” blade.
- 5. Prepare the dowels.
Cut eight lengths of dowel at 3" each, using the jigsaw. Sand the ends of the dowels slightly for a finished look and to facilitate insertion into the holes in the side pieces.
- 6. Notch the sides.
Shallow notches in each side piece aid in assembly and help hold the top and bottom rings securely in place. You’ll cut the notches with a utility knife and a sharp wood chisel.
On the inside face of each side piece, measure and mark a 1"-long, 1⁄4"-tall notch centered along the width of the side piece and 1⁄2" away from the bottom edge. Mark a similar notch along the top edge. Using a straightedge, score along the perimeter of each notch with a utility knife, cutting no more than 1⁄16" into the wood. Complete the notches by carefully removing the material between the scored lines with a chisel. Test-fit the rings in the notches and make any necessary adjustments for a good fit.
- 7. Sand and finish the wood parts.
Sand the cut edges of the sides and rings, using coarse sandpaper to shape or smooth any rough spots. Finish-sand all surfaces and edges of the pieces, working up to 220-grit or finer paper, so everything has a finished look and is smooth to the touch.
At this stage, you have the option of adding a wood finish. However, a protective finish most likely isn’t necessary unless you want to protect the wood from fingerprints. The fixture as shown was given two light coats of “natural” Danish oil.
- 8. Create the shade.
The shade is simply a piece of white (or clear) vellum wrapped around the cage of the light socket assembly. The shade eliminates glare from the naked bulb and creates a column of soft light within the fixture’s interior. It’s also the reason for the cage – keeping the paper vellum from touching the heated light bulb.
The cage for a standard-size socket is likely to be about 4" in diameter. Wrapping around that diameter takes a little more than 121⁄2", plus a bit of overlap for the seam. If you can find a vellum sheet at least 11" × 13", use it. Otherwise, you’ll have to graft a strip onto a smaller sheet.
Measure between the inner edges of the notches on each side piece, and trim the vellum sheet to this dimension (it should be close to 101⁄2"). Wrap the vellum around the cage and secure the seam with clear tape or glue, forming a cylinder that fits snugly over the cage.
Assemble the socket, fitting the top ring onto the socket body, followed by the cage, and securing both with the provided screw rings. Install a new light bulb in the socket. Slip the shade over the cage so it touches the top ring, and set the assembly aside.
Important note: Use only a CFL (compact fluorescent lamp) or LED bulb in this fixture. Do not use incandescent, halogen, or other types of bulbs that get very hot, creating a dangerous fire hazard. As with any light fixture containing paper, do not leave the light on while unattended for long periods.
- 9. Assemble the fixture.
Place the sides together with their inside (notched) faces against each other. Insert the dowels through the eight holes so they extend beyond both sides about the same distance. Carefully separate the two sides to create an even 1"-wide gap, as shown in top view in the plan. Adjust the dowels as you work so they project equally beyond both side pieces.
Now it’s time to flex your fixture: Spread the sides apart at the bottom and fit the bottom ring into place inside its notches. Measure to make sure the ring is centered from side to side. Then spread the sides at the top and fit the socket (with shade and top ring) into place. Adjust the top ring as needed so the shade is plumb and centered over the bottom ring. The shade should just touch the bottom ring all the way around. Make any final adjustments so all looks good, then hang the fixture from the cord as desired.
Note: If you ever need to replace the light bulb, spread the fixture’s sides apart slightly at the bottom, remove the bottom ring, reach into the shade to unscrew and replace the bulb, then fit the bottom ring back into place.
Resin Art Panels
Designed by Andrew Williams
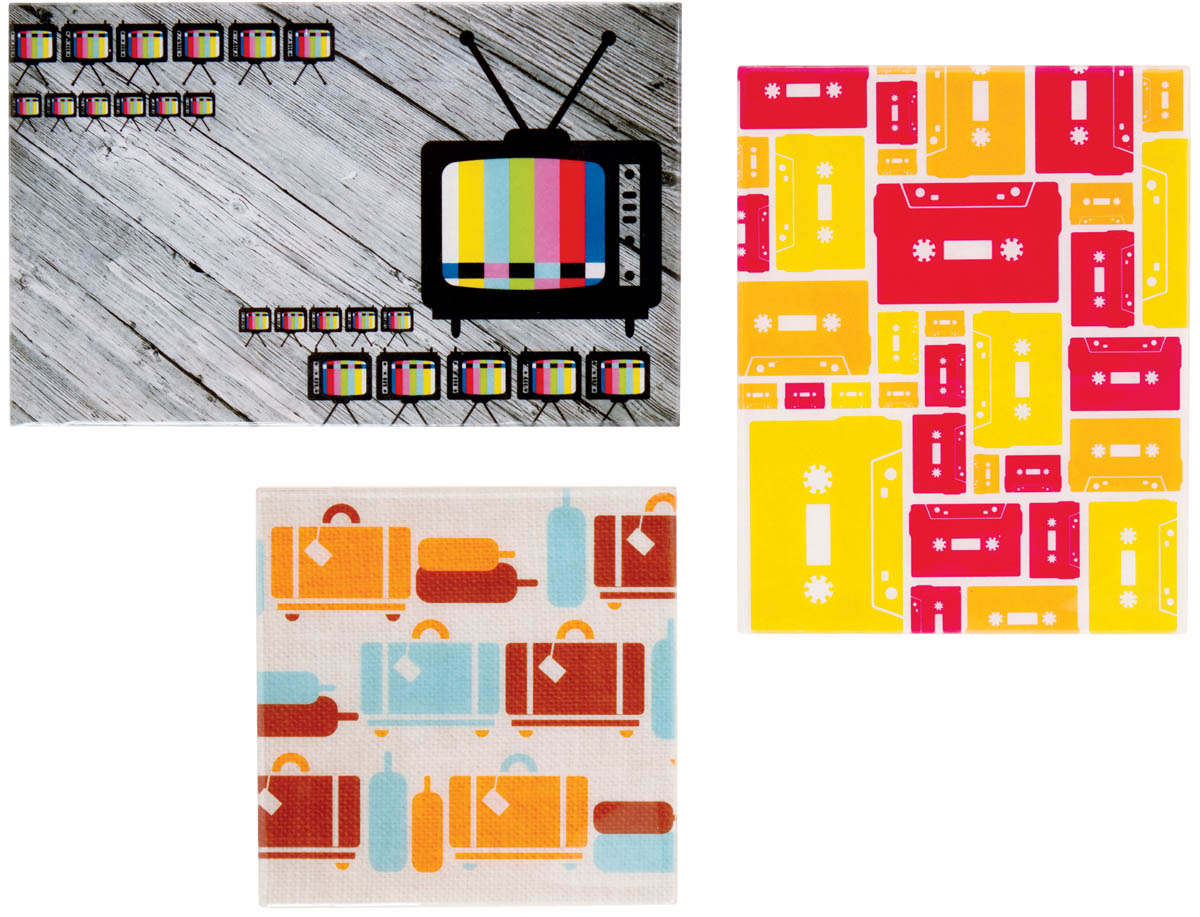
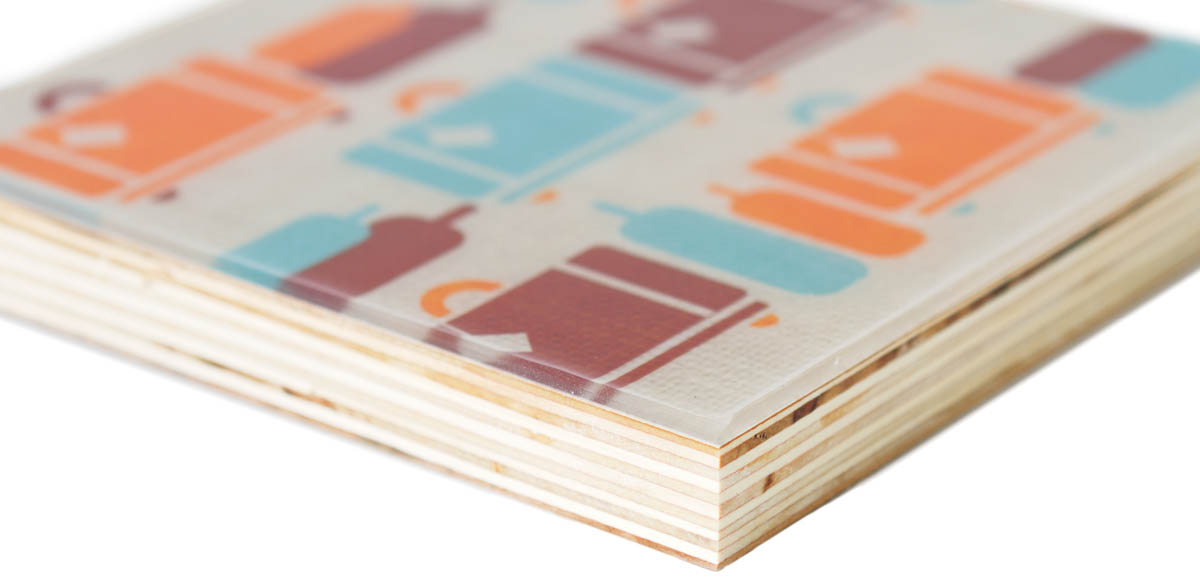
No matter how much you’ve paid for an artwork or print, the cost of custom framing is exorbitant. And cheap frames in stock sizes are both limiting and, frankly, a little boring. These clever art panels solve both problems. Originally created as a gift, the panels received so many compliments that the designer just kept on making them. They can be custom-sized to fit any artwork or space, so they’re ideal for both one-offs or elaborate salon-style arrangements. The crisp plywood edges provide a subtle decorative touch and just the right thickness for a satisfying visual depth.
MATERIALS
- Artwork or print
- 3⁄4" plywood (AC or better grade; quantity as needed)
- Contact cement or other adhesive suitable for use with artwork
- Two-part resin/bar-top finish
- Mineral oil (with rag for applying it)
- Picture-mounting brackets
- 1⁄4" self-adhesive rubber or felt bumpers or protective pads
TOOLS
- Table saw or circular saw with straightedge guide
- Fine sandpaper
- Tack cloth
- X-Acto knife
- 1"-wide masking tape
- Safety goggles and rubber gloves
- Plastic stir stick
- Disposable mixing cups
- 3" rubber or plastic spreader or mud knife
- Razor (optional)
Note: This mounting technique works for many kinds of materials, from images cut from art books to photographs and original works. What’s important is having the right material: Printed paper works best. Fabric tends to absorb a lot of resin. If you want to mount a fabric piece or collage of fabrics, you might scan it and print out a color replica on paper. You can choose any size of artwork, but keep in mind that large panels can create an undesirable glare in some settings.
Instructions
- 1. Cut the plywood panel.
Measure the artwork, then lay out and cut the plywood panel so it’s at least 1⁄4" smaller than the artwork in both height and width. Use a table saw or circular saw with a straightedge guide for clean, straight cuts. Remember that these edges are aesthetically critical, so make sure they are square and free of burn marks.
- 2. Glue down the artwork.
Sand the face and edges of the panel as needed, then wipe them with a tack cloth to remove all dust. These surfaces must be smooth, clean, and dust-free. Apply adhesive to the panel face and/or the back of the artwork, as directed by the manufacturer. Glue down the artwork, face up, so all its edges overhang the panel by at least 1⁄8".
Note: Contact cement works well as an adhesive for paper and some other materials. If contact cement isn’t right for your artwork material, choose an adhesive that bonds well to both your material and the wood; otherwise, the piece can delaminate.
- 3. Trim the artwork.
Lay the panel facedown on a cutting mat. Carefully trim the edges of the artwork flush with the plywood, using an X-Acto knife with a new blade.
- 4. Mask the edges.
Apply masking tape to all four edges of the panel, so that the top edges of the tape rise at least 1⁄4" above the panel face, creating a reservoir for the resin. Use your fingers or fingernails to burnish the tape and create a tight seal along the panel edges; any gaps here will allow the resin to leak out.
- 5. Pour the resin.
Mix the resin as directed by the manufacturer (see Working with Two-Part Resin, below). Wear safety goggles and gloves, and work in a well-ventilated area. The amount of resin you need depends on the size of your panel; mix enough to cover the panel face with a 1⁄16"-thick layer. Carefully pour a small puddle of resin on the panel face and spread it around with a spreader. Add a little bit of resin at a time, as needed, and spread until you’ve achieved the desired thickness. Resin is self-leveling, so once the surface is coated it’s time to leave it alone. If necessary, you can add a second coat after the first one cures. Place the panel on a level surface in a dust-free area, such as a cabinet, and let it cure overnight.
Note: The project shown used Parks’ Super Glaze Pour-On Finish and Preservative, a high-gloss epoxy resin.
- 6. Remove the tape and sand the edges.
Peel the tape from the edges of the panel. If any resin seeped under the tape, scrape it off with your fingernails or a razor, and sand the plywood edge smooth. Sometimes the resin pools against the tape, leaving a raised edge that can be sharp. Knock this down with sandpaper, rounding over the edge slightly.
- 7. Finish the plywood edges.
Seal the edges of the plywood with mineral oil (or other desired finish) applied with a rag. This helps preserve the wood and creates a finished look.
- 8. Mount the panel.
You can use any standard picture-mounting bracket – the little metal strip with teeth works well and is easy to install. Be sure to install the bracket parallel to the top of the panel. Apply felt or rubber bumper disks to the bottom two corners of the panel’s back to ensure that the panel rests level against the wall.
Shop Tip
Working with Two-Part Resin
When working with two-part resin, the most important thing is mixing part A (resin) and part B (activator) in equal amounts. Disposable measuring cups are great for maintaining proper proportions.
When pouring the resin, the main challenge is getting an even coat all the way to the edges. Use a rubber or plastic spreader or mud knife to push the resin in all directions. With an overhead light trained on the panel, move your head from side to side to note the glare along the surface. A dull spot indicates that you need more resin in that area.
Whitewashed Ply Paneling
Designed by Camden Whitehead
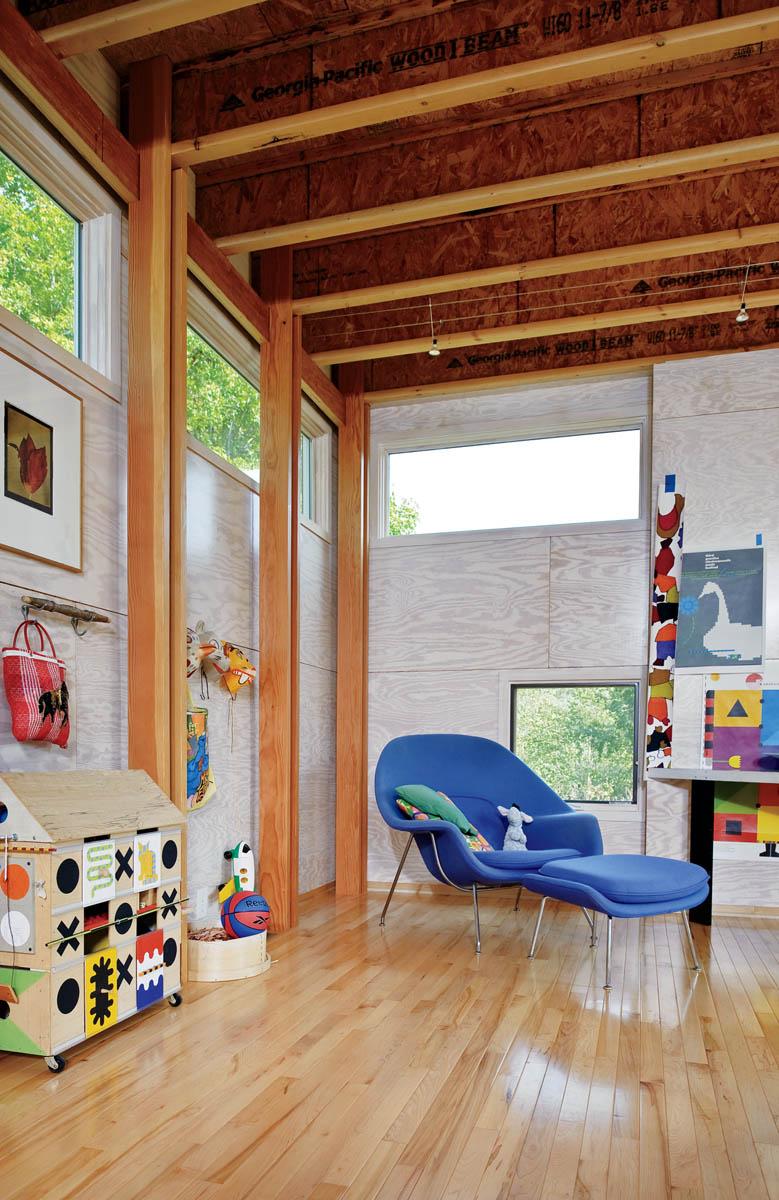
If you’re into building materials, you undoubtedly love to discover common products used in uncommon applications. You also know that sometimes this works and sometimes it doesn’t. Well, here’s an idea for the top of the “works” category. It’s 1⁄2" AC-grade pine plywood, whitewashed and urethaned, and installed with a fine reveal between panels and along the trim and ceiling finish (battens or butt joints just wouldn’t do). The treatment works so well that the designer used it as the only wall finish in one of his custom home projects. That’s right – no drywall, no plaster; just plywood. (You can see the house on Camden Whitehead’s website; see Contributor Bios.)
MATERIALS
- 4 × 8-foot sheets AC-grade 1⁄2" plywood (quantity as needed)
- Flat white exterior latex paint (or other color, as desired)
- Water-based polyurethane in satin finish
- 6d (2") or 8d (21⁄2") finish nails or pneumatic brads (see step 4)
- White glue
TOOLS
- Orbital or random orbital sander with 120- and 220-grit sandpaper
- Medium-nap paint roller
- Router with 1⁄2" rabbeting bit (bearing-guided)
- Chalk line
- 1⁄8"-thick scrap material (for spacers)
- Hammer and nail set or brad nailer
- Circular saw with straightedge guide or table saw
Note: The layout and installation of this paneling over an entire wall is straightforward and well within the skill set of a finish carpenter or even an experienced DIYer. If you’re not used to working with paneling and trim elements, you might want to contract with a skilled helper for the installation, while you can easily take care of the more time-consuming steps of prefinishing the panels.
Instructions
- 1. Prefinish the panels.
It’s best to prefinish the plywood panels before installing them. This results in a much cleaner installation with crisper joints and less damage to adjacent finishes. The basic finish for the paneling is a whitewash of diluted latex paint topped with two coats of polyurethane. You can buy whitewash as a premixed product, but it’s preferable to mix your own, so you can vary the opacity to your liking by adjusting the paint-to-water ratio. A good mix to start with is three parts water to two parts paint.
To finish the panels, sand the good (“A”) face of the plywood with 120-grit sandpaper, using an orbital or random orbital sander (if available). Mix the paint with clean water to the desired consistency, and apply it to each panel face with a medium-nap paint roller. Apply the whitewash generously, taking care to coat the surface as evenly as possible. Let the wash dry completely.
Next, apply a generous coat of water-based polyurethane to the whitewashed surfaces, again using a roller. Let the poly dry completely, then sand the surface with 220-grit sandpaper. Apply a second coat of poly, and let it dry overnight (at least).
- 2. Plan the installation.
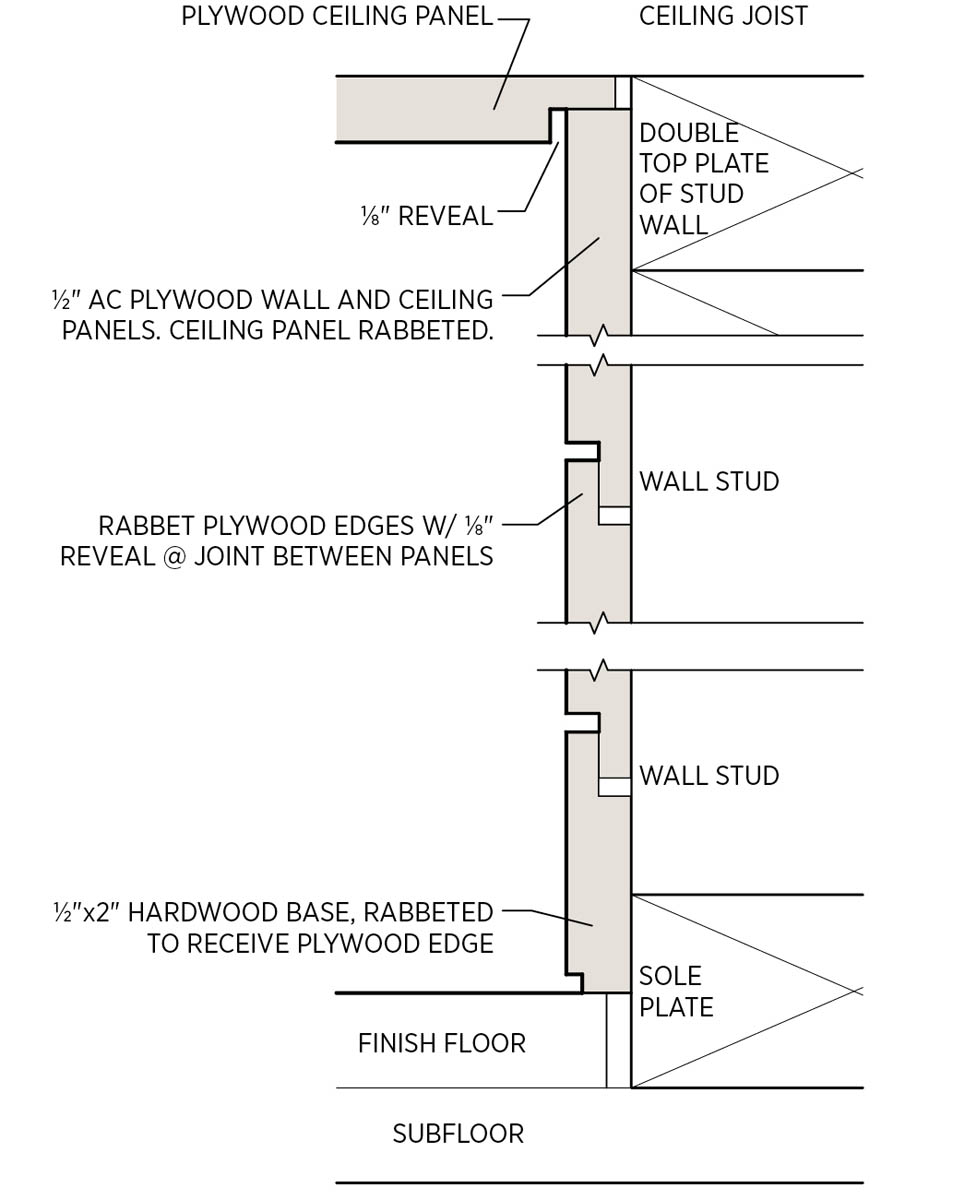
As shown here, the plywood panels are joined with overlapping 1⁄2"-wide, 1⁄4"-deep rabbets cut into the edges where panels meet one another and where they meet the baseboard trim; see the paneling detail drawing. The baseboard shown in the detail drawing is custom-milled hardwood stock; this is just one way to finish the bottom edges of the paneling. The drawing also shows an option for continuing the paneling treatment over the ceiling.
At this stage, you need to plan the panel installation to determine which panel edges to rabbet. To facilitate installation, it’s recommended that you rabbet one long and one short edge on the front side of each panel, then rabbet the remaining two edges on the back side.
If you’re using a baseboard like the one shown in the drawing, plan to install the baseboard first, then work up the wall to the ceiling. The panels can simply be butted together at wall corners (without rabbets). If you’re paneling the ceiling and the wall(s), plan to cover the ceiling first.
Note: Before applying plywood paneling directly over wall or ceiling framing, check with the local building department regarding fire ratings. Building codes may require drywall behind any wood paneling, or they may specify that the plywood must be treated for fire resistance.
- 3. Mill the rabbets.
Cut the rabbets into the panel edges according to your layout, using a router and a 1⁄2" bearing-guided rabbeting bit. The depth of the rabbets must be precisely half the thickness of the plywood for the panels to install flush with one another. If desired, you can cut the rabbets during the installation to minimize planning errors.
- 4. Install the panels.
You should have at least one, but preferably two, helpers for this step. Snap or draw reference lines on the wall to represent the top edges of the bottom course of panels. Install baseboard or other base trim, as applicable. Set the first panel in place, following the reference line. If you’re using baseboard like that shown below, set the 1⁄8" reveal between the panel and trim with 1⁄8"-thick spacers of scrap hardboard or other flat material.
Tack the panel in place with a few 6d finish nails (use 8d nails if you’re going over drywall) or pneumatic brads, driving all nails into the wall framing. The reveal will let you cheat the panels a little to follow your layout, as needed.
Set the next panel and tack it in place, maintaining a 1⁄8" reveal between the two panels. Repeat the process to complete the first course. Trim panels to size as needed, using a circular saw and straightedge guide or a table saw. Confirm that everything fits well in the first course, then go back and nail the panels fully. Set the nails slightly below the surface, using a nail set for hand-nailing or by adjusting the nailer pressure to countersink the brads.
Follow the same procedure to install the remaining courses of panels, using the spacers to set the reveals at all edges of the panels (except at inside wall corners, where the panels should be butted). If you’re paneling up to an existing ceiling finish, you can leave a reveal at the top (with no rabbet on the top edges of the wall panels) or add another trim element.
Mix fine sawdust with white glue and a little pigment so the mixture (when dry) matches the coloring of the panels. Use the mixture to fill the nail holes. Touch up any scratches or other damage to the panels with paint and/or polyurethane, as needed.
Book of Plies
Designed by Carl Harris
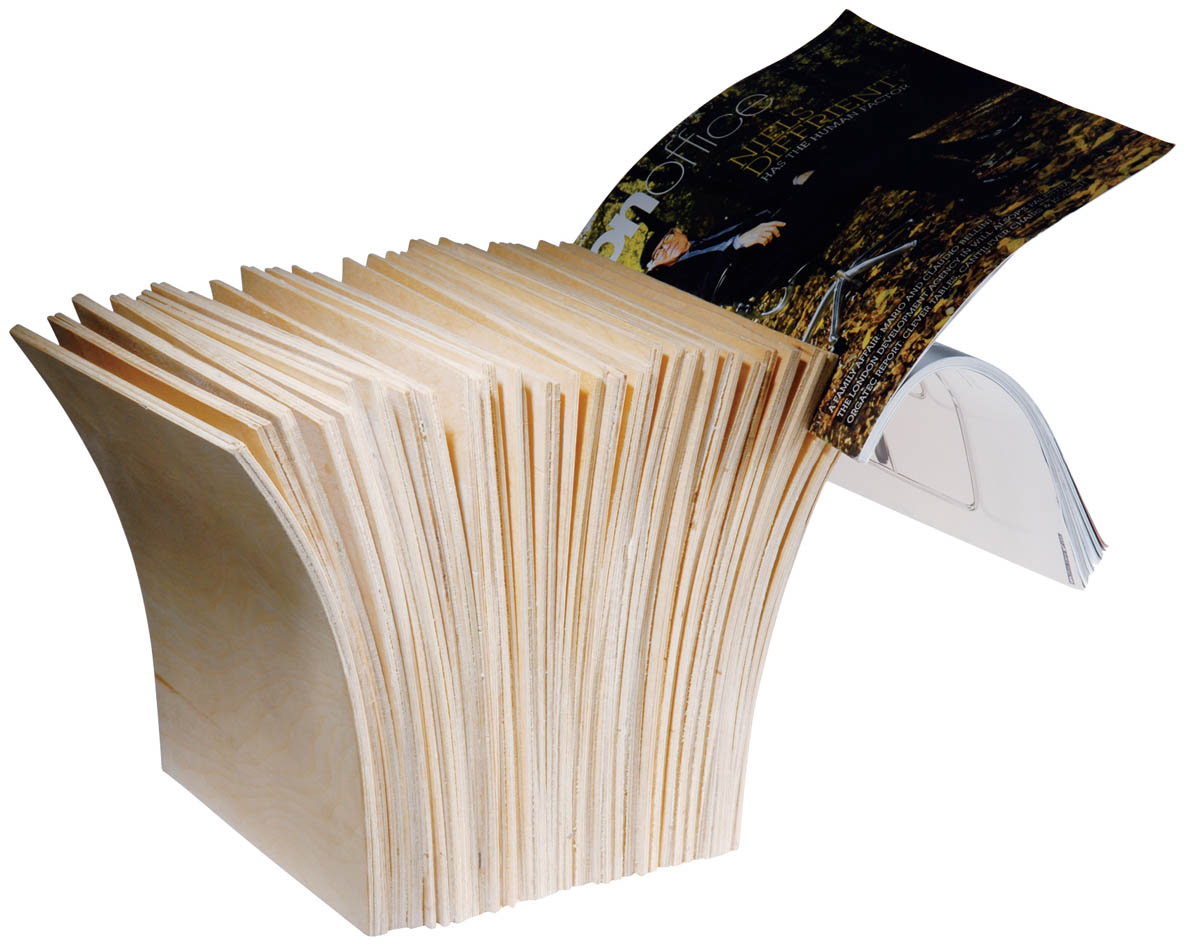
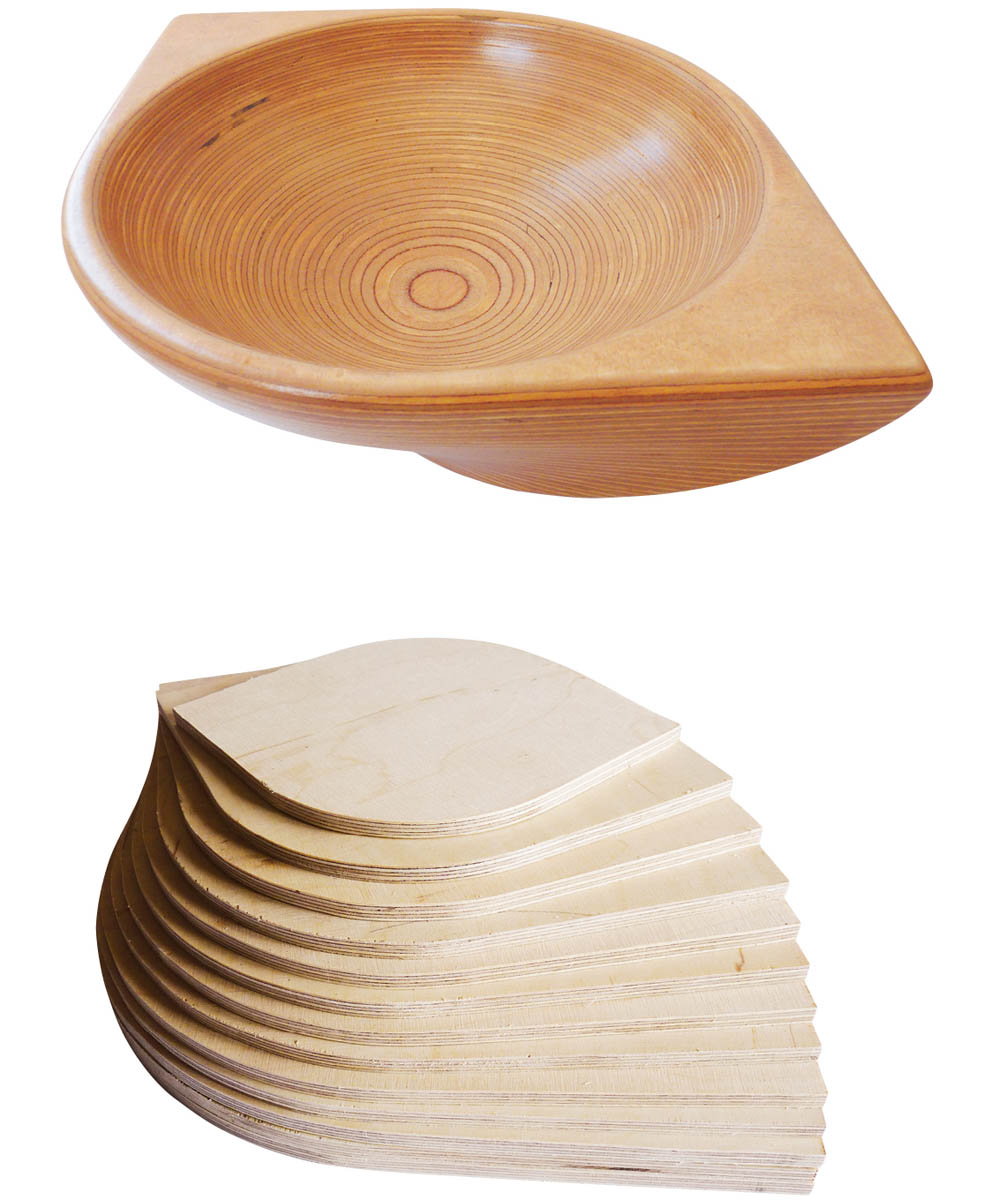
In the words of the designer, the goal for this design was “to get back to basics and to understand the qualities of a material and its constraints. As a designer, it is imperative to understand how a material works from the inner threads to overall aesthetics. I chose plywood because it’s a versatile and flexible material that can be simply manipulated using low-tech or high-tech processes.” Clearly, he also set out to have some fun, and the resulting piece offers both function and folly – the Book of Plies makes a great accent piece but can also be put to work as a magazine holder, a side table, or a stool.
MATERIALS
- 3 mm (3⁄16") beech plywood (quantity as needed)
- Scrap 2x lumber
- Wood glue
- Finish materials (as desired)
TOOLS
- Circular saw with straightedge guide or table saw
- Sandpaper (220 to 600 grit)
- Bucket or plastic tub (large enough to submerge one or more cut plywood pieces)
- Speed Square (rafter square)
- Clamps
- Band saw or crosscut handsaw
Note: This project offers numerous opportunities for customization. You can change the size and number of cut plywood sheets (“leaves”). You can make the curves of the individual leaves as subtle or pronounced as you like. And you can arrange the leaves in different ways, keeping them perfectly lined up or slightly tilting some or all of the leaves out to the side in random or ordered patterns. (In step 6, you will cut the glued ends of the leaf assembly to create a flat surface for the base, so any corners and edges sticking out will be trimmed flush with the others.)
Indeed, customization is an important part of this design, so plan to experiment a little, with both the curves and the leaf arrangement. The basic construction process is given here; it’s up to you to add creativity and a personal touch.
Instructions
- 1. Cut the plywood leaves.
Cut the plywood stock into as many leaves as you desire, using whatever dimensions you desire. In the project shown, the leaves measure 1111⁄16" × 15 5⁄8". The grain of the plywood’s face veneers should parallel the long dimension of the leaves. Cut the leaves with a circular saw and straightedge guide or a table saw to ensure straight, clean cuts.
- 2. Sand and soak the leaves.
Sand each leaf with 220-grit to 600-grit sandpaper to achieve the desired smoothness. Fully submerge one or more of the leaves in hot water for 1 hour, or until the plywood is flexible enough to bend without cracking.
- 3. Cut the wedges.
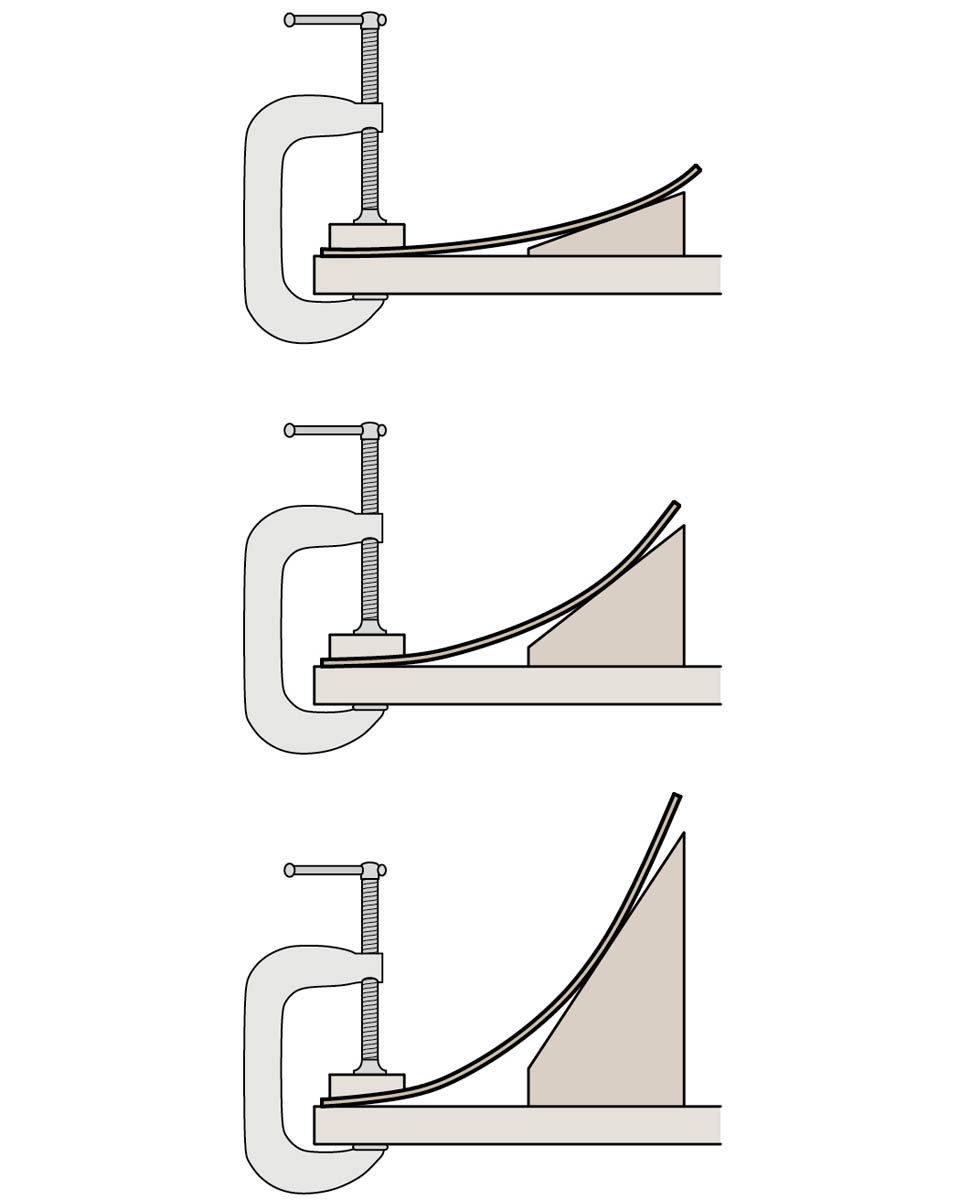
While the leaves soak, you can cut 2x lumber (use scrap material, if available) into wedges for shaping the leaves (see the drawing showing the shaping process). Begin with the wedge for the steepest degree of angle desired. Use a Speed Square (rafter square) to mark the angled line across the face of the lumber, noting the degree of angle for reference. Cut along the angled line with a circular saw. Create two wedges with this angle.
- 4. Form the leaves.
Each leaf must be clamped and dried for 3 hours, so it takes a while to form all of them. If you have enough clamps and wedges, you can shape more than one leaf at a time.
Remove a leaf from the water and immediately clamp one of the shorter ends to a work table, with a wood block on top of the leaf to prevent the shoe of the clamp from marring the plywood. Slide the angled wedges underneath the opposite end of the leaf, pushing them in as needed to achieve the desired amount of curve. You may have to add clamps and blocks behind the wedges to keep them in place. Let the leaf dry undisturbed for 3 hours, then unclamp and remove the leaf, setting it aside for now.
Repeat the process with the remaining leaves, one at a time, reducing the angle of the wedges as you go. You can reuse the same wedges by shaving them down to a less-acute angle. Decreasing the wedge angle incrementally results in an open-book effect, as shown in the project here.
Keep in mind that the sheets will bend back slightly toward a flatter shape as they dry completely. Also, if you want a symmetrical piece, you can shape two leaves at each level of arch. As you work, lay out the bent leaves in order, moving from the most curved at the outside to the least curved in the center.
Note: If you try for too much curve, you might find some cracking on the veneer; this may be hidden in the finished product.
- 5. Glue the leaves.
After all the sheets are shaped and completely dry, glue each piece to its neighbors, using wood glue applied along the same edge where the clamp went. Glue as many sheets as you can (or want to) within the working time of the glue, then clamp the pieces together, again using wood blocks to prevent marks.
Start the glue-up with the straighter leaves in the center, working out to the sides with increasingly curved leaves. Let each phase of the glue-up dry for 24 hours, then remove the clamps.
- 6. Cut the straight edge.
Mark a straight line at the same height across all four edges, near the glued end of the assembly. The best tool for making this cut is a band saw, which can accommodate the entire piece and allow for a single cut. Lay the assembly on one of its flat sides. If the leaves tilt out to the side at all, place some blocking under the flattest portion of the assembly, so that the end to be trimmed is perpendicular to the saw blade. Push the assembly slowly through the saw to make a straight cut.
If you don’t have access to a band saw, you can make the straight-edge cut with a good crosscut handsaw. Clamp a straight stick of 1x lumber (preferably hardwood) along the cutting lines on both sides of the assembly; this will help keep the saw straight as you make the cut and will minimize tearout.
- 7. Finish the piece.
Sand the straight-cut bottom of the assembly so it is flat and smooth. Also sand the outer leaves and all edges as needed until you are happy with the finish. Apply oil or a clear varnish (such as wipe-on polyurethane) to all exposed surfaces to protect the plywood.
Shop Tip
Bending Thin Plywood
Thin beech plywood is available in thicknesses such as 1.5 mm (1⁄16"), 3 mm (1⁄8"), and 5 mm (3⁄16") and in constructions with three, five, and seven plies. In general, the thicker the material, the harder it is to bend. To create more pronounced bends to your leaves, you can glue together two 1.5 mm sheets, forming the curve at the same time. Better-quality plywood has even thickness among the layers. One thing to avoid, for example, is a 5 mm sheet with one thick layer in the middle and two thin layers on the outside; the layers should all be roughly equal in thickness.
Candleholders
DDesigned by Philipp Herbert
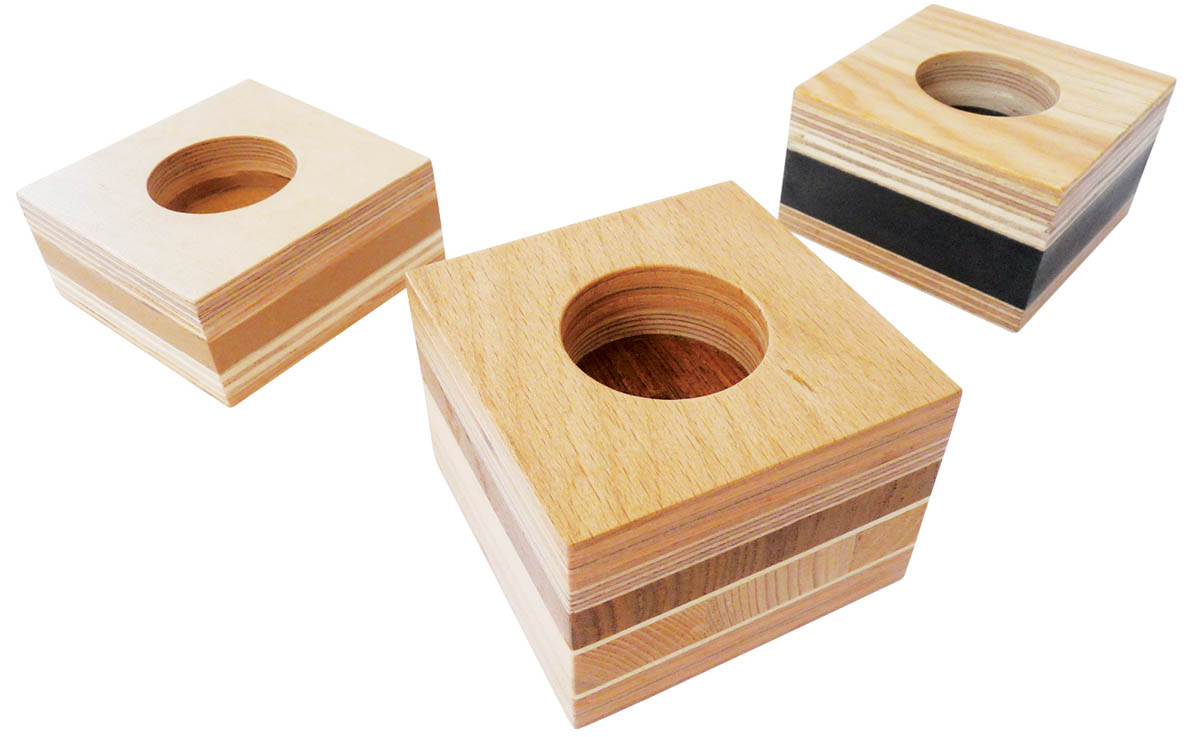
Like most people who craft with wood, the designer of this piece regularly accumulates a surplus of scrap material that’s too small to build with and too big to throw away. (If you’re a wood person, you know how ridiculously small that can be.) This simple candleholder is just one of his clever solutions for using up the smaller leftovers. Whether you create one or many holders, the process is simple and satisfying, and the result is a decorative display of wood’s beauty in its many forms, from stratified plywood edges to solid hardwood to edge-glued panels . . . whatever you can find in your pile.
MATERIALS
- Wood pieces in the desired size (see step 1)
- Wood glue
- Finish materials (see step 6)
TOOLS
- Miter saw or other saw
- Clamps
- Sandpaper (from 60 to 400 grit) and sanding block
- Bench vise (if available)
- Square
- Drill or drill press with 40 mm Forstner bit (must be slightly larger than candle diameter)
- Paintbrush
Instructions
- 1. Plan the design.
Determine the best size for your candleholders, considering the size of your scrap, the diameter of the candles you will use, and the desired size of the finished piece. The holders shown here are about 3" × 3" and hold 11⁄2" candles. For an appealing look, each holder should include at least two (three or more is better) different types and/or colors of material, and it’s best to combine plywood pieces with solid material.
- 2. Cut the materials.
The best way to cut numerous small squares of stock is with a miter saw set up with a stop block. Otherwise, you can use any saw you’re comfortable with and mark the stock with cutting lines in the conventional manner. Carefully cut the first piece to size so all four edges are straight and square, then use the cut piece as a template for marking the remaining pieces. Stack up the pieces for each holder as you work to make sure you have enough pieces for the desired height.
- 3. Glue up the layers.
To prepare for the glue-up, stack the layers of each holder in the desired arrangement, considering grain, coloring, and other features for the best appearance. For example, it usually looks best to orient the grain of similar woods in the same direction. Also think about the hole depth for the candle and in which layer the hole’s bottom will be.
Apply a layer of glue to one face of the mating layers, and fit the pieces together so all outside edges are flush. You should get a small amount of glue squeeze-out at the edges. Depending on how many layers you have, you can glue up all of them for each holder or split them up into two assemblies, and glue the assemblies together in a second round. Clamp all glued layers, wipe off any squeeze-out, and let the glue dry. If you don’t have enough clamps to go around, you can substitute with any heavy, flat weight.
- 4. Sand the holders.
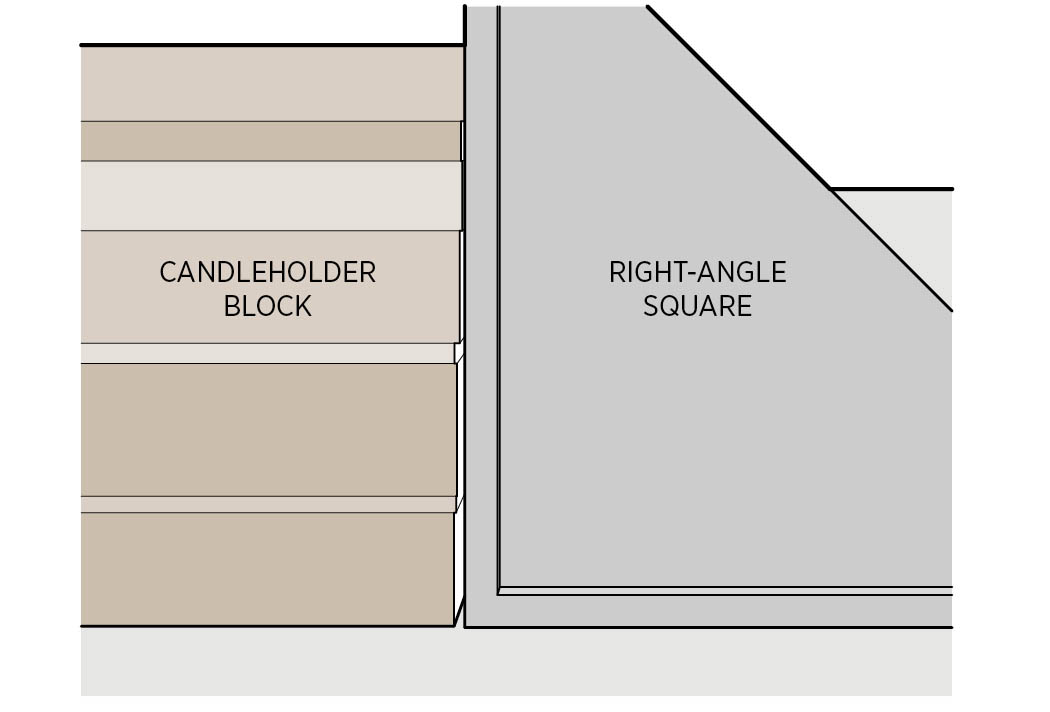
Using a sanding block (any piece of scrap wood will do) and coarse sandpaper, sand the sides of each holder until all the layers are flush. (It helps to secure the holder in a bench vise, if you have one. Just be sure to protect the sides of the piece with scrap.) Sand diagonally across the side of the holder (this makes it easier to get the surface flat). As you sand, check periodically with a square to make sure the sides are flat and square. Mark any high spots with a pencil for further sanding.
Once the sides are flat and square, move to medium-grit sandpaper and sand some more. This pass should remove the scratches from the coarse paper. After that, move up the grit scale to the finer papers (at least 220 grit), so that the surfaces are smooth to the touch.
- 5. Drill the candle hole.
Mark the center of the topmost layer by drawing perpendicular lines from corner to corner across the holder’s top face (diagonals always cross in the center of a square).
Set up the Forstner bit in a drill press (preferable) or a portable drill, and secure the holder to the drill table or a bench. Bore the candle hole to the desired depth at the center mark. The depth should be at least 1⁄4" to prevent the candle from falling out easily.
If you’re using a portable drill, keep the drill plumb throughout the operation, and use a homemade jig to keep the bit from wandering as you start the hole (see A Forstner Drilling Jig).
Smooth the edge of the hole with fine sandpaper.
- 6. Finish the holder.
Apply a clear protective finish, such as polyurethane or lacquer, using a paint brush. Let the first coat dry, then sand the surfaces lightly with 400-grit sandpaper, and apply another coat (unless directed otherwise). A clear finish does a nice job of bringing out the different colors of the wood layers.
Desk Coverlet
Designed by Jorie Ruud
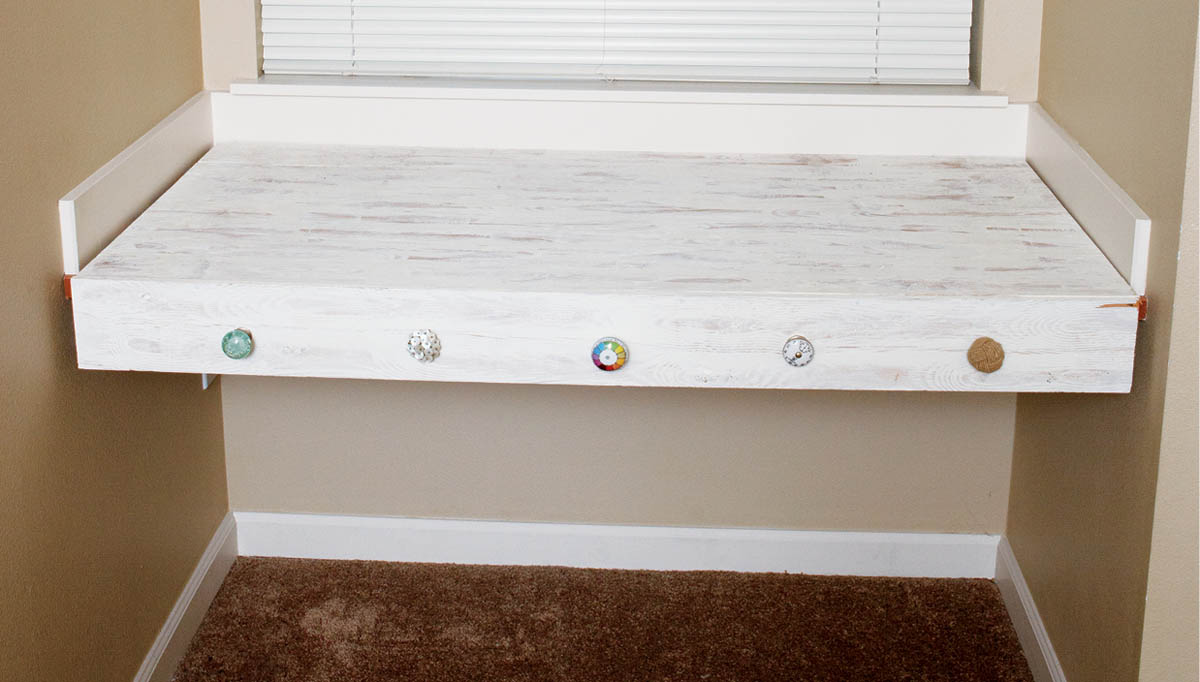
When this designer moved into her first apartment, she loved the built-in desk by the window, but (being an incurable aesthete, no doubt) she couldn’t live with the old laminate desktop. So she devised this clever plywood cover that completely hides the old top and, because it’s removable, won’t jeopardize her damage deposit. The basic design can easily be adapted to cover all sorts of surfaces, from built-in shelves and countertops to freestanding desks and tables. Adding decorative embellishments is also up to you. Here, the whole coverlet receives a whitewashed, wood-grain finish created with a graining tool and ordinary interior paint, and the front apron is bejeweled with a random collection of drawer knobs.
MATERIALS
- 1⁄2" or 3⁄4" plywood (enough to cover desk, plus front apron; see step 1)
- Wood glue
- 6d (2") finish nails
- Finish materials (see step 3)
- Decorative drawer knobs (quantity as desired)
- Foam shelf liner (if needed; see step 4)
TOOLS
- Circular saw with straightedge guide
- Bar clamps (if available)
- Drill with:
- 1⁄16" straight bit
- Bit sized for knob mounting bolts
- Hammer
- Nail set (if available)
- Sandpaper (see step 3)
- Wide paintbrush
- Wood-graining rocker tool (optional)
Instructions
- 1. Cut the plywood top and apron.
The top panel is simply cut to fit the surface or space you’re covering, so start by taking careful measurements of the area. Measure in several places to account for variances created by out-of-square corners and adjoining walls or other surfaces.
One decision you have to make is whether to cover the apron with the top or vice versa. In the project as shown, the apron fits over the front edge of the top panel, creating an uninterrupted front face. To do this, plan to cut the top flush with the front edge of the existing surface. To have the top panel cover the top edge of the apron, measure to the edge of the surface, then add the thickness of your plywood stock.
The apron can be any height you desire; just be sure to add or subtract the plywood’s thickness depending on the arrangement of the two pieces.
Cut the top and apron with a circular saw and straightedge guide to ensure clean, straight cuts. Whenever possible, use the panel’s factory edges for the front edge of the top (or whichever is the most important exposed edge) and the top edge of the apron.
- 2. Assemble the coverlet.
Position the top and apron together according to your plan. Make sure the outside surfaces of both pieces are perfectly flush. If you have a couple of bar clamps, clamp the pieces together; otherwise, have a helper hold them in place. Drill 1⁄16" pilot holes about 4" apart, drilling through the apron or top (whichever is the overlapping piece) and into the edge of the mating piece.
Apply glue to the mating surfaces, and fasten the pieces together with 6d finish nails driven into the pilot holes. If desired, you can drive the nail heads slightly below the surface with a small nail set; otherwise, set them flush with the hammer. Let the glue dry overnight.
- 3. Finish the coverlet.
Finish-sand the top surfaces of the entire cover with 150-grit sandpaper (for a painted surface) or 220-grit paper (for a clear finish). Carefully sand the joint between the apron and top so the two are perfectly flush.
Apply the finish of your choice. To create the wood-grain effect shown here, apply a thick coat of white interior paint in an eggshell finish over the exposed surfaces, using a wide paintbrush. The thicker the coating, the better – but you don’t want so much that the paint puddles.
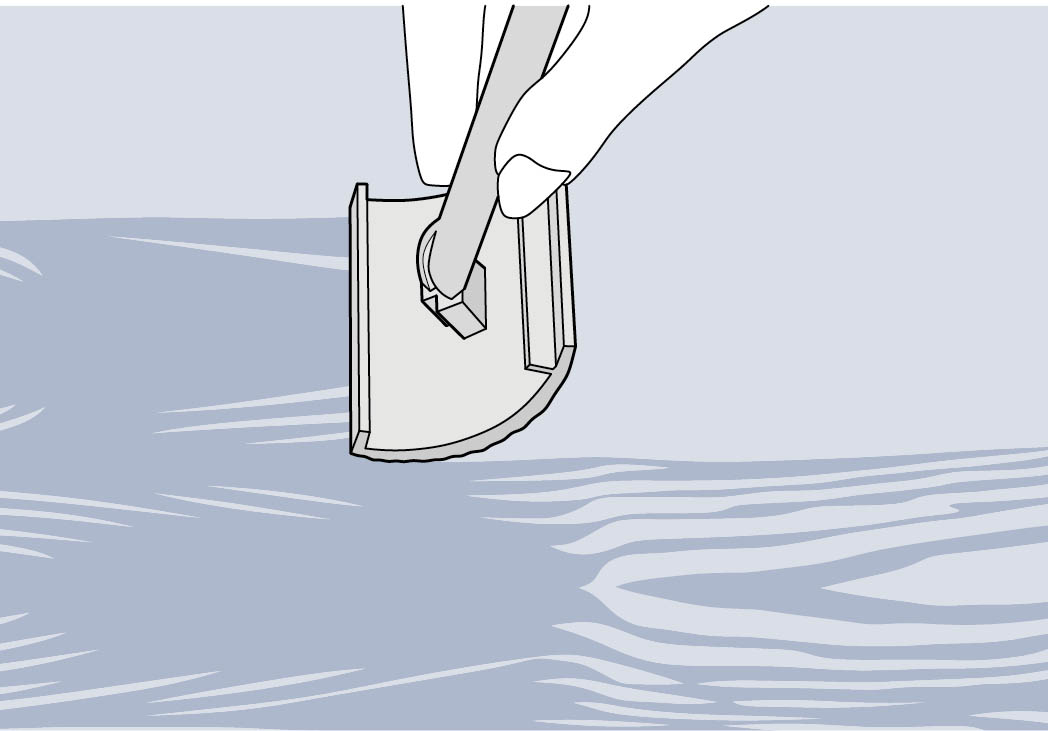
While the paint is wet, drag and roll a wood-graining rocker tool through the paint, working in about 3" (or the width of your tool) sections at a time; see the drawing above (and there are loads of videos online demonstrating how to use this tool). The goal is a realistic-looking grain. If the look is too uniform, “grain” a few random areas at the end to add realism. Let the paint dry completely.
- 4. Add the knobs.
Mark the locations for the decorative knobs (or other features), positioning them as desired. Drill holes through the front of the apron for each mounting bolt. Install the knobs with the bolts inserted through the back of the apron.
Install the cover by simply setting it in place. If sliding or slight rocking (due to warpage of the plywood or the old top) is a concern, you can lay a sheet of grippy foam shelf liner under the coverlet to cushion and grip the plywood top.
Note: Most drawer knobs have bolts sized for 3⁄4" material. If you use 1⁄2" plywood, you may need to find shorter bolts – just be sure to bring the knobs with you to the hardware store, because the bolt threads have to match the knobs precisely. Also, you might want to drill a slight counterbore for the bolts so the heads will be flush with the apron surface.
Kidnetic
Designed by Christie Murata, adapted by Kathy and Philip Schmidt
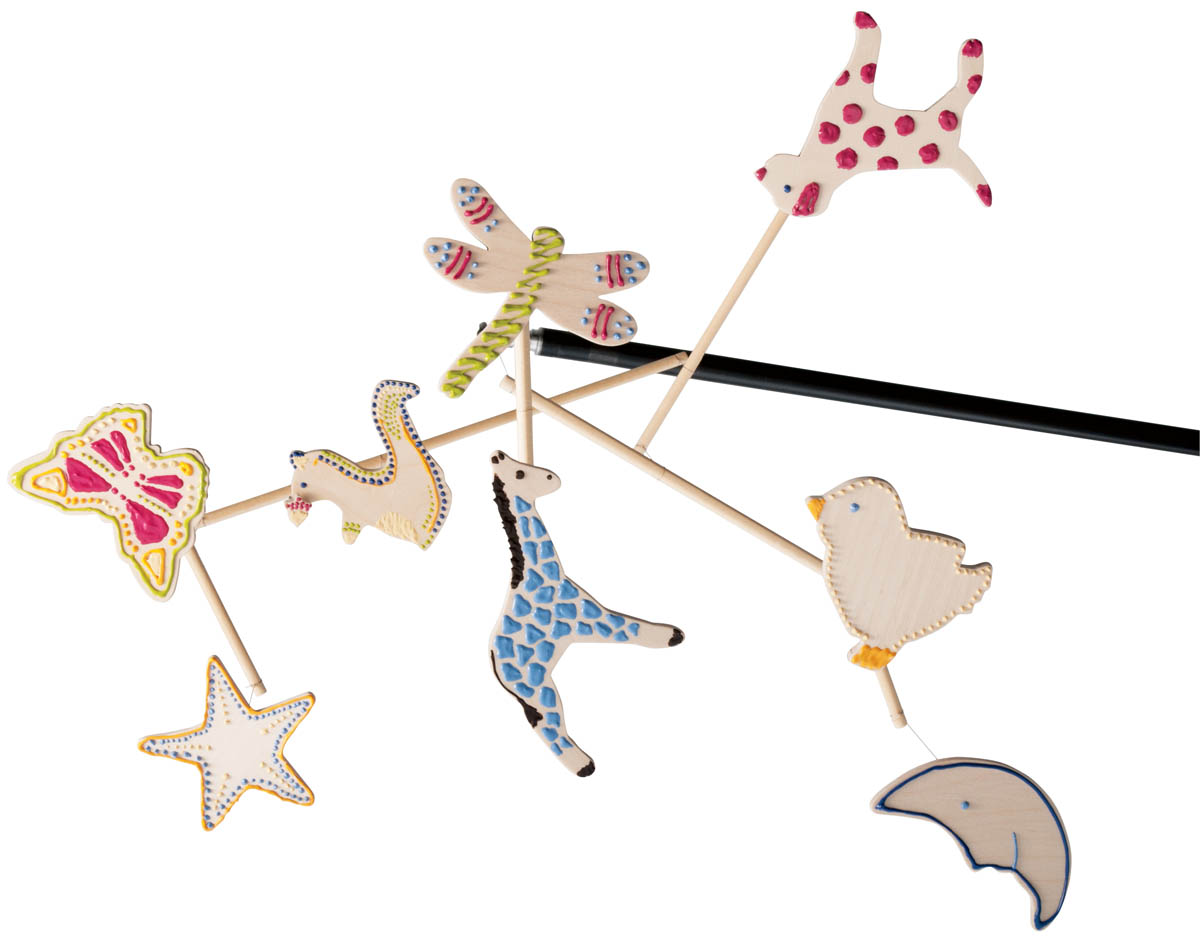
Delighted, fixated, entranced, giddy, zoned out, amused, bewitched . . . any of these enviable states of mind fairly describes a baby caught in the spell of a mobile. And the best kind of mobile is moved by the silent forces of air and gravity (not a wind-up model that spins in one direction while playing off-key snippets of Mozart). The traditional mobile shown here is a simple adaptation of one of the designer’s more elaborate originals, pieces that require considerable skill with a scroll saw, not to mention an artist’s attention to detail. This version lets you use cookie cutters to draw the mobile figures and a jigsaw to cut them out. But don’t worry – a quick Internet search yields thousands of different cookie cutters for sale, so your own mobile will be anything but, you know, cookie-cutter.
MATERIALS
- Seven (or more) cookie cutters
- 1⁄4" Baltic birch plywood (quantity as needed; see note below)
- Finish nail or brad
- Foam core or scrap wood
- Craft paint
- One 40" length 1⁄4"-diam. birch dowel
- Seven (or more) 1⁄2" screw eyes
- Superglue or white glue (optional)
- Strong, lightweight string
- Fishing swivel
- One small metal washer or ring
TOOLS
- Mechanical pencil
- Jigsaw with ultra-fine-tooth wood blade
- Drill with 1⁄16" straight bit
- Sandpaper (100 to 220 grit) with sanding block
- Paintbrushes
- Pliers
- Scissors
Note: Thin birch and Baltic birch plywood are commonly available in small pieces at craft stores (in sizes such as 12" × 24") and woodworking retailers (24" × 30" is common). For this project, the material should be relatively flat and have at least one good face (without patches).
As mentioned, cookie cutters are available in a vast range of shapes and sizes. Since they’re made for fragile cookies, the shapes and contours tend be simple enough; just keep in mind when choosing cutters, that you will be cutting the shapes out of thin plywood. You can find cool and unusual cookie cutters at specialty kitchen stores or from online retailers. Choose at least seven different characters; you can follow a specific theme or just pick a random collection.
Instructions
- 1. Cut out the shapes.
Place each cookie cutter on 1⁄4" plywood stock. Holding it down firmly, trace around the outside of the cutter with a mechanical pencil (which has a very fine point).
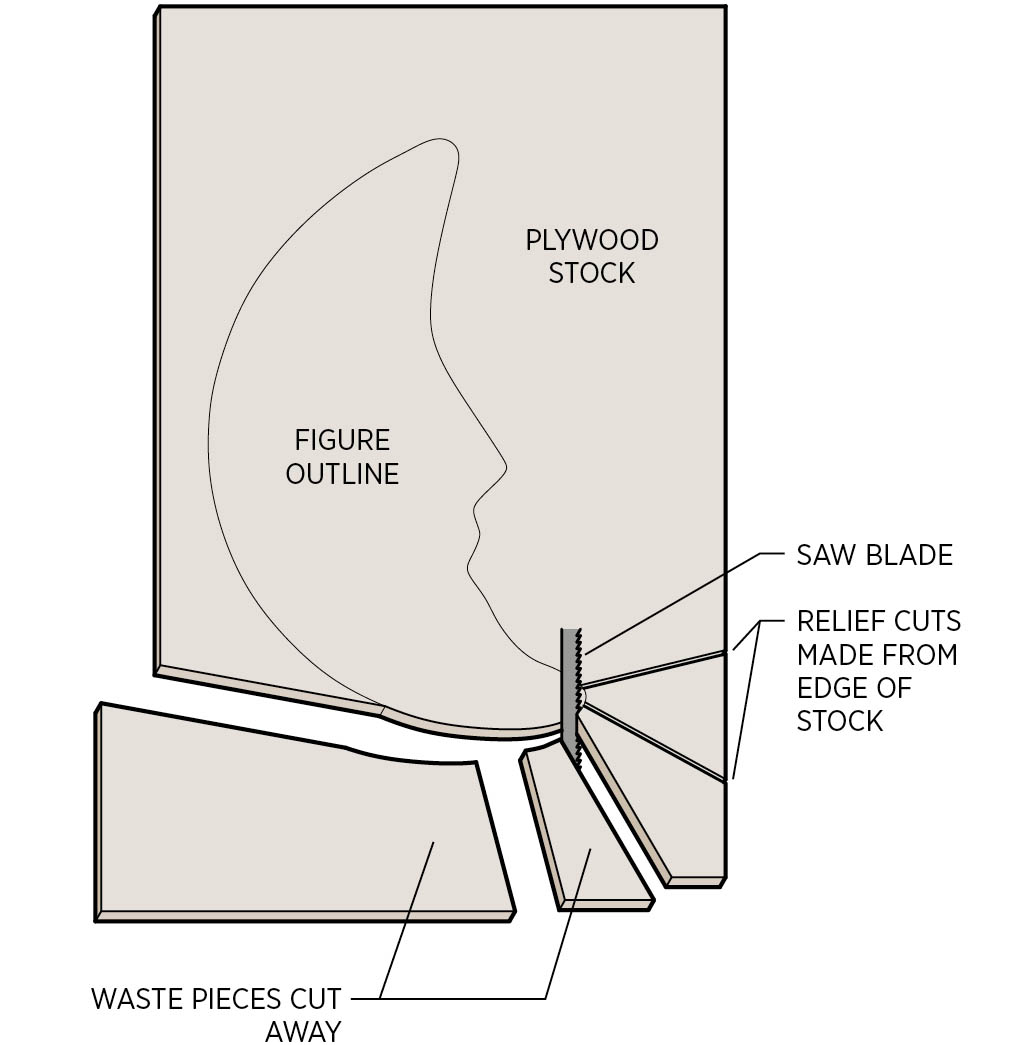
Cut out the figure with a jigsaw and a very fine, or “clean,” blade. A narrow blade with 20 tpi (teeth per inch) works well with minimal splintering. A “scroll” blade is another option. The finer the blade, the more maneuverable it will be. To cut tight curves and tricky details, make relief cuts as needed. A relief cut is roughly perpendicular to the cutting line, and it allows the waste to fall away, freeing up the blade to approach the cut at a more direct angle; see the drawing of relief cuts at right.
As you cut, try to keep the figure attached to the stock for as long as possible; once you cut it free, a small piece can be difficult to secure by hand and is likely to bring your fingers close to the saw blade. For this same reason, it’s best to trace and cut the pieces one at a time. If you try to save material by fitting them closely together (as you might when cutting rolled-out cookie dough), you’ll end up having to cut each piece free from the stock prematurely.
- 2. Find the balance point.
To ensure that the figures will hang level (facedown), you have to install the screw eyes as close as possible to each figure’s center – not the center of its area, but the center of its weight. A simple balancing jig will help you find the weight center and mark it for locating the screw eye. Make the jig by pushing a small finish nail or brad up through a piece of foam core or scrap wood so the nail stands plumb with its point up.
To find the weight centers, place each figure with its back side on the nail point, and move the figure around until it balances itself (or nearly so). Then press the figure onto the nail to mark the back side with a small hole.
Drill a shallow (about 1⁄8") pilot hole at the mark, using a 1⁄16" bit, being very careful not to drill through to the front face of the figure. Repeat the process with the remaining figures.
- 3. Sand and paint the figures.
Sand the edges and faces of each figure. Use coarse sandpaper to shape edges, keeping the strokes parallel to the edge to prevent splintering. A flat sanding block helps shape straight edges and gradual convex curves. For detail sanding, wrap the sandpaper around a bit of dowel or a pencil, using it like a file. Use fine paper to smooth the edges and face veneers.
Decorate the figures with paint. The blonde plywood provides a nice background for painted details. The figures shown here were painted with acrylic craft paint in squeezable bottles with decorator tips. Let the paint dry completely.
- 4.Cut the dowels.
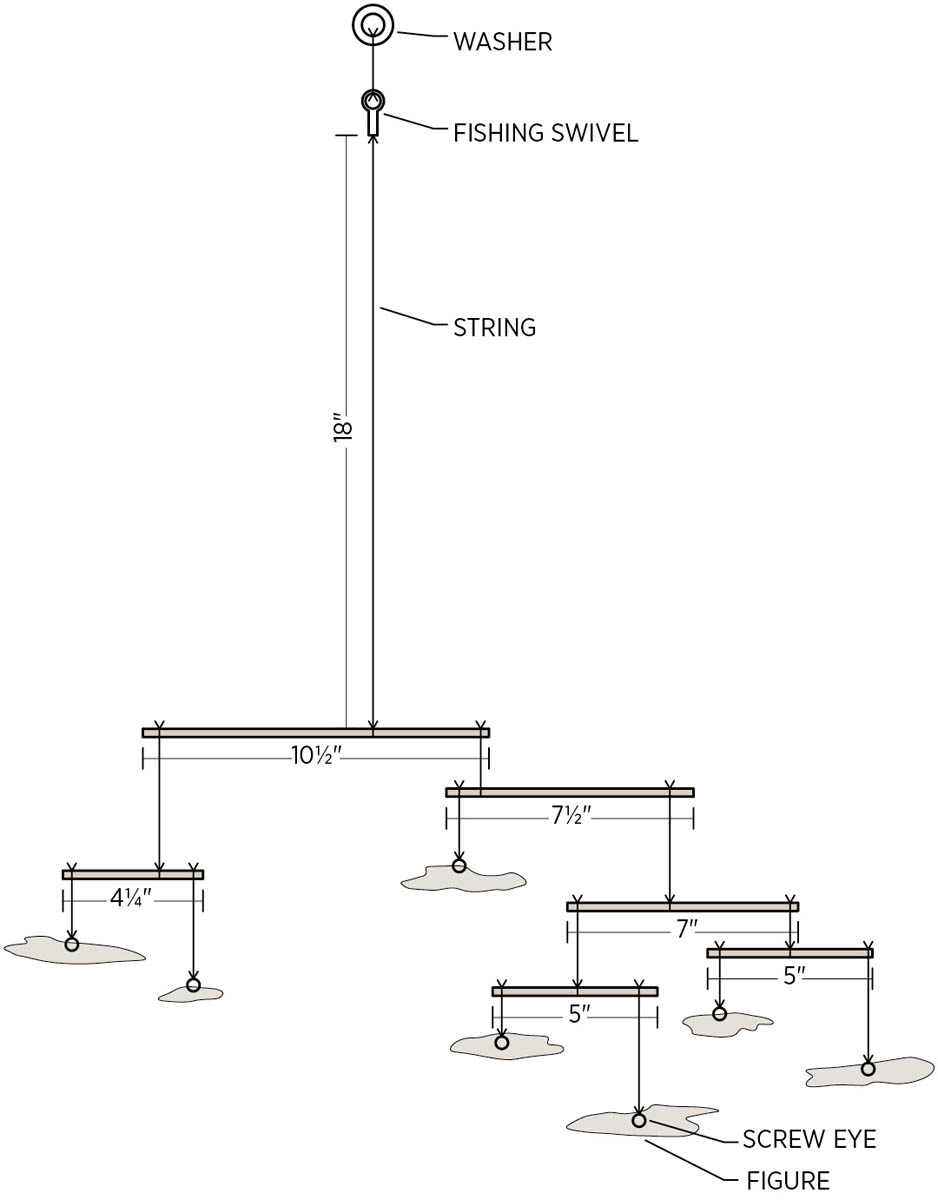
Using the jigsaw, cut six pieces of 1⁄4" dowel as follows (or as desired):
- 1 at 101⁄2"
- 1 at 71⁄2"
- 1 at 7"
- 2 at 5"
- 1 at 41⁄4"
These pieces are the balancing rods that will suspend the mobile figures. If you have more than seven figures, cut as many additional rods as you need. You can also change the length and configuration of the rods; anything will work, as long as the pieces are balanced and can move freely.
- 5. Assemble the mobile.
Assembling a mobile is a study in trial and error. Since every piece is counterbalanced by another, each tiny adjustment changes their weight relationship. The two factors that affect the balance are the relative weights of the pieces and the positions of the strings on the rods. The lengths of the strings have little effect on the balance.
First install the screw eyes. Using pliers for a good grip, carefully drive the threaded end of a screw eye into the pilot hole in the back of each figure, going in only about 1⁄8". Push in as you turn to engage the threads and prevent stripping the hole. If this does happen, just install the eye with a little glue and let it dry undisturbed.
Because each mobile is unique, there are no standard dimensions or layout guidelines for assembly. As an example, the mobile shown here is detailed in the mobile assembly drawing.
Start the assembly by cutting a length of string about 3 feet long and tying a fishing swivel to one end; this allows the mobile to spin without twisting the string. Tie a small washer or other type of ring to the free end of the swivel; this is for hanging the mobile.
Lay out the dowels and figures in the desired configuration, then start tying them off one by one. You can work from the top down or from the bottom up, whichever you prefer. First tie off the figures near the end of their supporting rods; most of the figures will be in pairs on a short rod. Then find the approximate balancing point of each rod with figure pairs, and loosely tie a string at this point. Again, you can adjust the length of any string throughout the assembly. To hang a single figure from a rod, counterbalance it with another rod.
As you work, move the strings sideways on the rods as needed to achieve balance. When all is properly balanced and all of the elements can rotate freely without touching one another, tie off the strings with strong knots, and trim the excess. If the string is slippery and doesn’t grip the dowels well, affix it with a small drop of superglue or white glue.
Light Headboard
Designed by Katherine Belsey
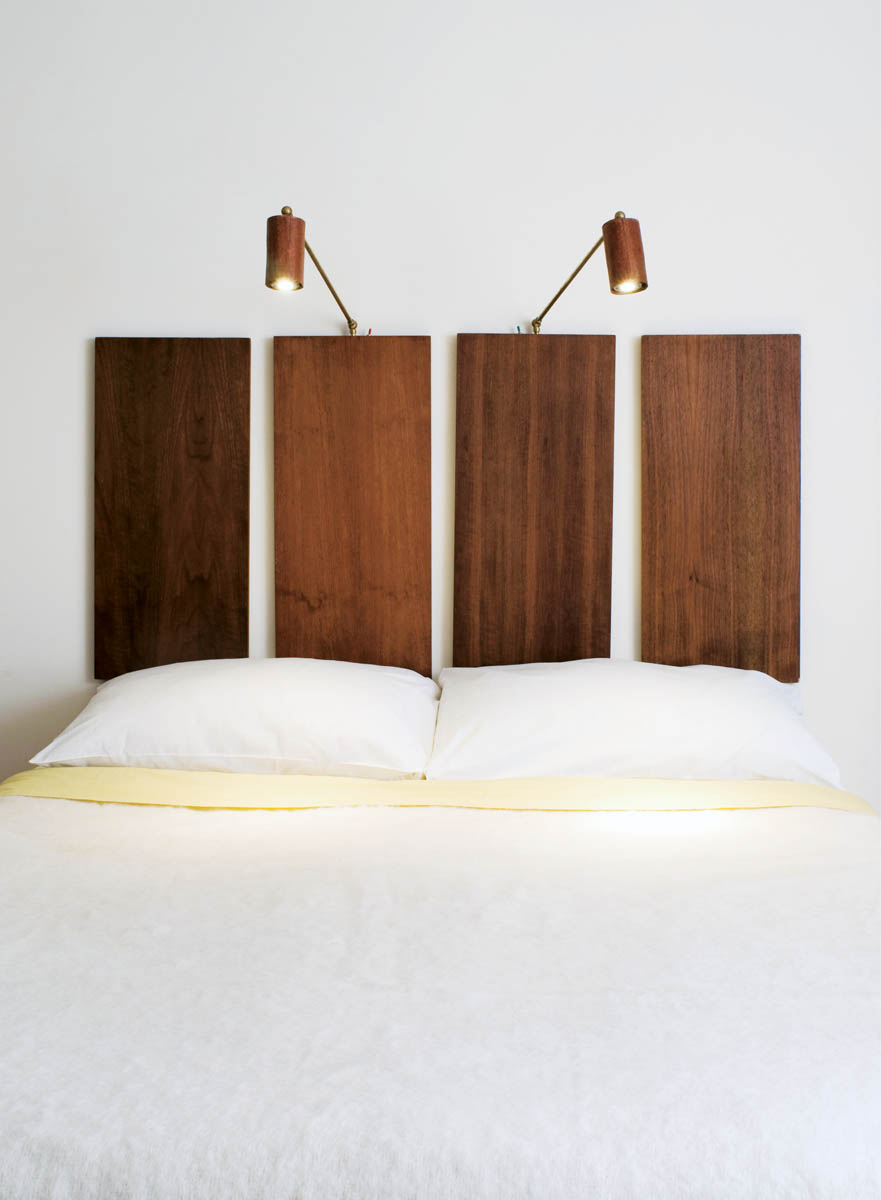
This custom headboard for nighttime readers is named for its two best features: the built-in lighting, of course, and the light visual quality of the evenly spaced planks; these are hung on the wall and appear to float above the bed, offering a creative alternative to the traditional monolithic headboard. The simplicity of the design also makes it highly customizable. You can use almost any plywood or other sheet good for the planks, and the light fixtures can be assembled with lamp parts in any style, finish, or configuration you like. In fact, the composition shown here was made with mahogany plywood shelf boards and lighting parts salvaged from an old ceiling fan.
MATERIALS
For a queen-size headboard:
- One 3 × 4-foot piece 3⁄4" plywood or other sheet good (grain of face veneers should parallel 4-foot dimension)
- Wood veneer edge tape (optional)
- Finish materials (as desired)
- Four 10" or 12" two-part aluminum cleat hangers with 3⁄4" screws
- 2" wood screws
- Hollow-wall anchors (as needed)
- Eight rubber bumpers (self-adhesive; sized to match depth of cleat)
For each light fixture:
- One metal cylinder light shade or tin can (see step 7)
- 2"-wide tape roll or larger sheet of pressure-sensitive (peel-and-stick) wood veneer
- Finish materials (as needed)
- 1⁄8 IP threaded hollow all-thread lamp tubing (length as needed; see step 8)
- General-purpose two-part epoxy
- Two lamp swivels
- Lamp cord
- One 18" length 3⁄8"-diam. lamp pipe with threaded ends
- One 3" length 3⁄8"-diam. lamp pipe with threaded ends
- One Edison-base socket with 1⁄8" rear IPS
- One in-line cord switch
TOOLS
- Circular saw with straightedge guide or table saw
- Clothes iron (if using veneer edge tape)
- Utility knife, razor blade, or veneer trimmer
- Sandpaper
- Square
- Straightedge
- Drill with:
- 3⁄8" straight bit
- 7⁄16" straight bit
- Pilot bits
- 4-foot level
- Hacksaw
Note: Because the light shades are small and are close to your head and combustibles like bedding, don’t use standard incandescent bulbs for the light fixtures. Instead, choose LED or CFL (compact fluorescent) bulbs, which will stay relatively cool when running. LED bulbs are ideal because they can provide better directional light and run cooler than CFLs, but they are more expensive. A bulb with light output equivalent to a 40-watt incandescent is sufficient for most reading lights.
Instructions
- 1. Cut the planks.
Cut four planks to size at 12" wide × 27" long, with the length running parallel to the grain of the face veneer of the material.
To keep the pieces as equal as possible when cutting from a 4-foot-wide sheet, mark the first cut line at 12" from a long factory edge, and make the cut down the center of the line. Mark the next cut line at 12" and cut down the center, and so on. This should give you four equal pieces that are slightly under 12" wide. Use a circular saw and straightedge guide or a table saw to ensure clean, straight cuts.
- 2. Apply edge tape (optional).
If you prefer that the headboard planks look like solid wood, you can cover the edges with iron-on edge tape in a matching wood species. Apply the tape as directed by the manufacturer. For most types, you simply hold the tape against the panel’s edge, making sure it is perfectly aligned along the entire length of the panel and it overhangs both faces of the panel slightly. Then press a hot clothes iron to the exposed side of the tape to activate the adhesive, bonding the tape to the wood. When the tape has cooled, trim off the excess with a sharp utility knife, a razor blade, or a veneer trimmer. Sand the edges of the tape carefully with fine sandpaper to soften the edge slightly and feather it into the panel.
- 3. Mark the cleat locations.
Draw a horizontal line about 3" down from the top edge of one plank, on its back side. Use a square registered against the side edge to make sure the line is precisely perpendicular to the side edges of the plank.
Arrange all the planks side by side so their side edges are touching and their top ends are flush. Transfer the horizontal line from the marked plank to the other planks, using a straightedge and a square. This helps ensure that all the plank-side cleats will be hung at the same height, so the planks will hang at the same elevation (provided you hang the wall-side cleats all at the same height).
- 4. Prepare the plank(s) for a light.
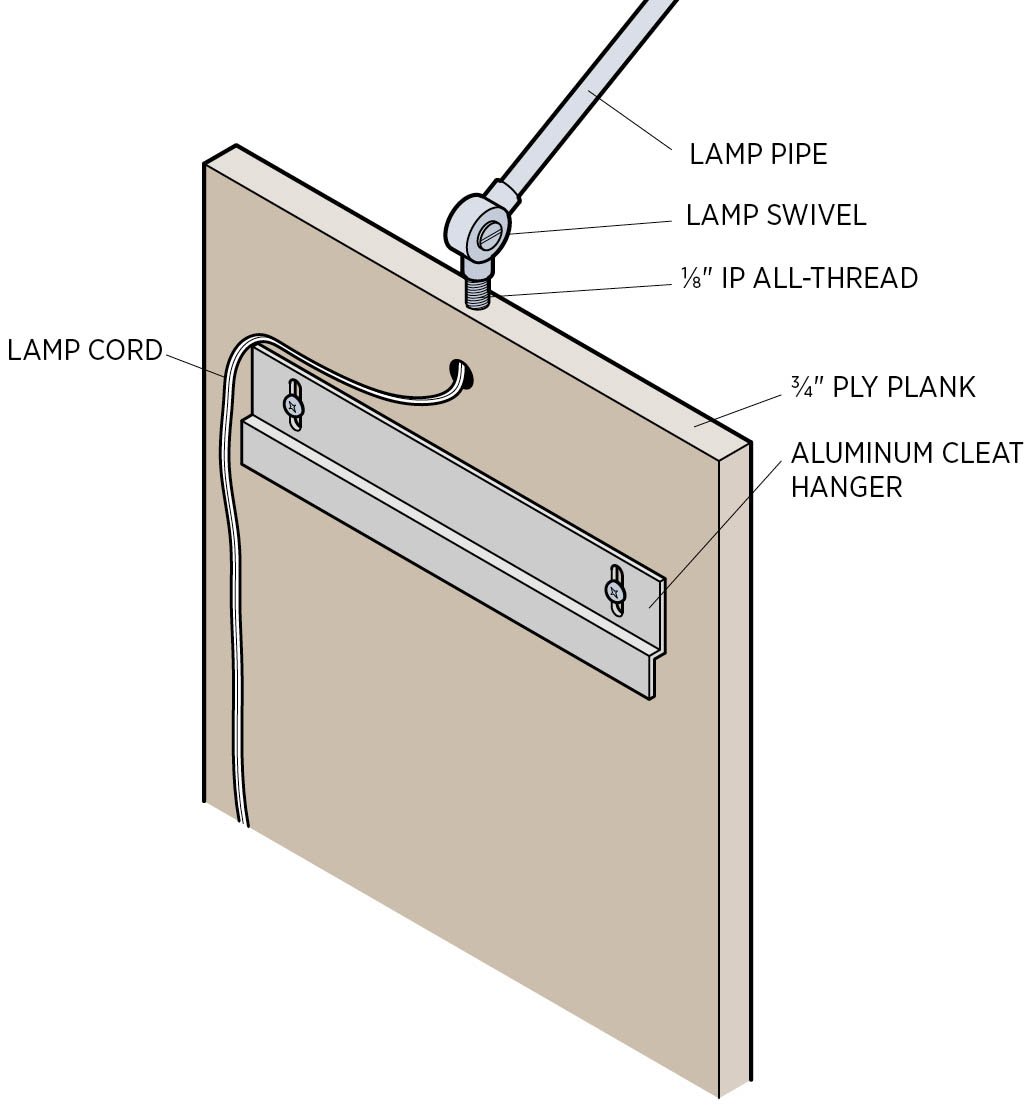
On each plank on which you intend to install a light, mark the centerpoint on the top edge. Drill a 2"-deep hole at the centerpoint using a 3⁄8" bit, being careful to drill straight in so the hole will be perfectly plumb when the plank is installed. This hole will receive a piece of all-thread lamp tubing for mounting the lower lamp swivel, as shown in the rear view illustration.
Drill a second hole through the back face of the plank, intersecting the first hole at its bottom end. For this hole, start drilling straight down, then angle the bit toward the top of the plank to create a hole that slopes down and back from the top edge of the plank. Be careful not to drill through to the plank’s front face. This tunneling hole is for threading the lamp cord through the plank.
Test-fit the all-thread tubing by threading one end partially into the top hole. It should thread in snugly. Remove the tubing.
- 5.Finish the planks.
Finish-sand the planks and apply the finish of your choice. Because a headboard essentially is furniture, you want a durable, washable finish, like polyurethane or a highly buffed furniture wax. Don’t finish inside the holes for the lamp parts.
- 6. Install the cleats.
Each cleat has two parts: the panel-mounted side, whose slot faces down, and the wall-mounted side, whose slot faces up. Mount the panel-side cleats to the back faces of the planks, centered from side to side, using 3⁄4" screws driven through pilot holes. Make sure the top edges of the cleats are on the reference lines you made in step 3.
Fit one set of the cleat halves together and measure from the bottom edge of the wall-side half to the bottom edge of the plank. Add 6" (or as desired) to this dimension. Using this dimension, measure up from the top of the bed mattress and mark a level line across the wall at the desired plank elevation.
Use a 4-foot level to extend the level line on the wall to the other cleat locations. As shown here, the planks are spaced about 11⁄2" apart, but you can choose any spacing you like. Install the wall-side cleat halves on their lines using 2" wood screws. Screw into wall studs whenever possible, or use heavy-duty hollow-wall anchors (don’t use those cheap, plastic plug anchors).
- 7. Cover the light shades.
The best light shades to use are 1950s-style cylinders that you can often find at thrift stores and the like, or you can look for them at local retailers. Barring that, you can use a tin can with the lid removed. At the closed end, drill a 7⁄16" hole through the center of the end; this will accept the lamp pipe or nipple.
Wrap the outside of each light shade with self-adhesive wood veneer in a species that matches or complements the plank material. Cut the veneer a little large so you can trim the edges after applying it to the shades; trim with a sharp utility knife or razor blade. Finish the veneer to match the planks.
- 8. Complete the lights.
Not all lamp parts are alike, so you’ll have to follow the manufacturer’s directions for assembling and wiring the lights. But here is the basic process:
Cut a piece of all-thread lamp tubing about 13⁄4" long, using the hacksaw; cut from a factory end so you have clean threads for the top end. Apply epoxy to the tubing and thread it into the hole in the top edge of the prepared plank, leaving the top end extending about 3⁄8" above the plank. You can use pliers to help thread the piece, but protect the threads with a scrap of leather or thick rubber. Let the epoxy dry.
Screw the lower swivel onto the exposed tubing end. Feed the cord through the back of each plank and up through the tubing and swivel. Insert the long lamp pipe, followed by the upper swivel and the short lamp pipe, threading the cord through each piece as you go. Wire the cord to the socket, then assemble the socket and shade and mount the socket to the short pipe, using retaining nuts and/or nipples, as appropriate.
- 9. Mount the plank.
Install a rubber bumper on the bottom corner of each plank, on the back side. These keep the planks plumb when installed. Hang the planks on the wall-side cleats and adjust their side-to-side positions for even spacing.
Run the light cord down behind its plank so it is out of view. Find a convenient location for the light switch, and install the switch onto the cord as directed by the manufacturer.
Shop Tip
Lamp Fittings
Lamp parts of all descriptions are sold at hardware stores, home centers, lighting stores, and online retailers. The various fittings, pipes, cords, and other elements are conveniently standardized, so it’s easy to mix and match pieces to get just what you want. To find parts for your headboard project, your best bet is to visit a well-stocked hardware store and start fitting pieces together. The bulb socket is the most critical element, so choose that first, then build the hardware set around it. If you can’t find the finish or exact size you want at local stores, check online, making sure that any threaded ends and other fittings are the right size for the other parts.
Groovy Headboard
Designed by Kathy and Philip Schmidt
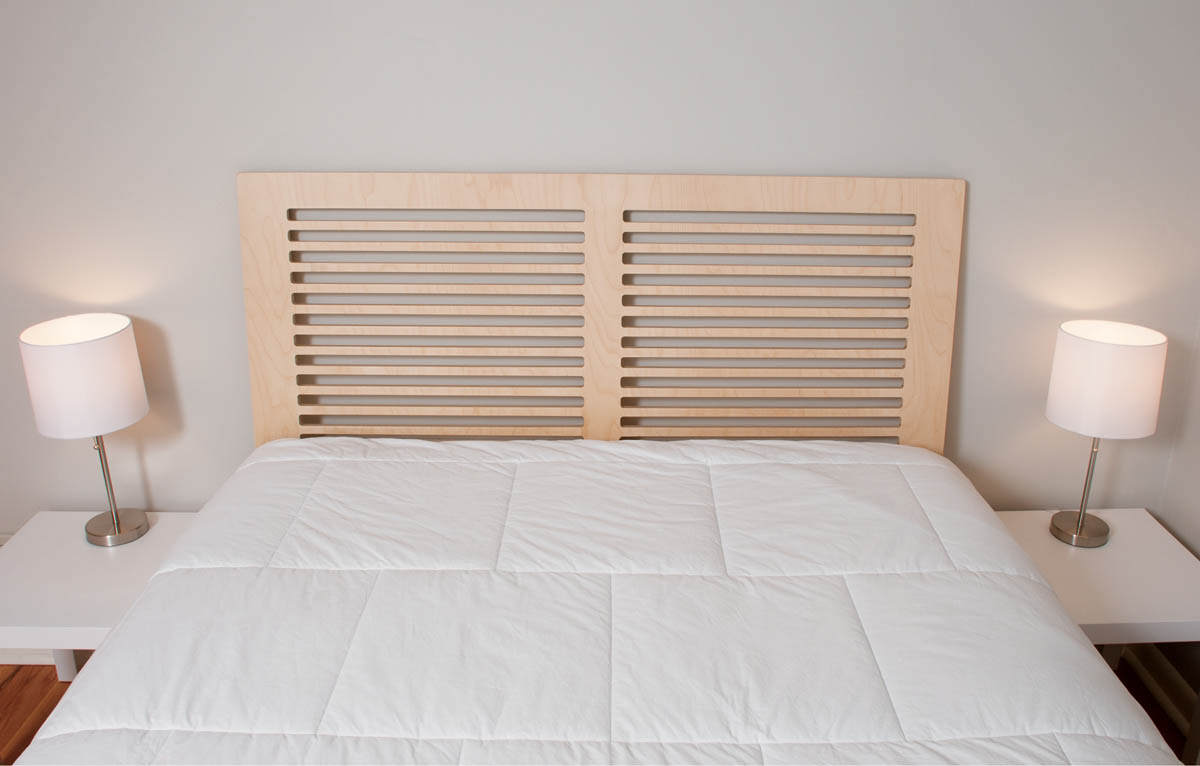
. . . as in lots of grooves, see? It was the express intention of the designers of this piece not to have a monolithic hulk of a headboard, so they decorated it with negative space. The grooves also highlight the edge strata of the plywood, adding depth and interest that change with your viewing angle. And if you really want to get groovy, you can install some hidden lighting in the back (letting the glow play through the slats or throwing bars of light onto the ceiling). At 60" wide, a sheet of Baltic birch is perfect for a queen-size bed; larger beds might call for a standard 4 × 8-foot panel running lengthwise. In any case, this is a job for good material with thin, even plies (and minimal voids, of course).
MATERIALS
- One 5 × 5-foot sheet 3⁄4" Baltic birch plywood (261⁄4" × 60" min.)
- Scrap materials for routing jig (see step 4)
- Finish materials (as desired)
- One 8-foot length 2 × 4 lumber
- Coarse-thread drywall screws or wood screws (length as needed)
- Wood glue
- 6d (2") finish nails
- Wood putty or white glue
TOOLS
- Circular saw with straightedge guide
- Table saw (optional)
- Jigsaw
- Router with 1⁄2" straight bit
- Wood file or sanding block
- Sandpaper (up to 220 grit)
- Level
- Drill with:
- Pilot bits
- Counterbore bits
- Nail set
Instructions
- 1. Cut the panel to size.
As shown here, the headboard measures 60" wide and 261⁄4" tall. If you’re using a 5 × 5-foot panel with its edges in good shape, you need to make only one cut to size the piece. Make the cut with a circular saw and a straightedge guide (or a table saw) for a clean, straight edge.
For a bed size other than a queen, cut the panel to the desired dimensions. You can also make your headboard as tall as you like. And keep in mind that the groove sizing and layout are almost infinitely customizable.
- 2. Mark the grooves.
Lay out the grooves on the back face of the headboard panel, following the cutting diagram. The headboard shown here has 1"-wide grooves spaced 3⁄4" apart. Again, you can adjust the dimensions or layout as desired. To prevent mistakes and to make sure the design is right for you, it’s a good idea to draw the entire groove pattern on the panel, then fill in each of the grooves with scribbled pencil lines. With repeating linear patterns like this, it’s easy to lose your bearings when making cuts. Taking the time to mark everything carefully can save you from a disastrous miscut.
- 3.Rough-cut the grooves.
Precutting the grooves with a circular saw and jigsaw will save considerable wear on your router bit (and your patience). Working from the back face of the panel, cut the long edges of the grooves with a circular saw, staying about 1⁄8" inside the cutting lines. Stop each cut about 1" or so from the end of the marked groove.
With both long edges cut on all of the grooves, finish the rough cutouts with a jigsaw. Keep in mind that the router, when making the final cuts, will round over the corners of the grooves with a 1⁄4" radius (if you’re using a 1⁄2" bit). Therefore, keep the saw cuts about 1⁄2" from the groove ends; the router will clean up the rest.
Note: Cutting the grooves with a circular saw requires plunge cuts – lowering the spinning blade into the work by pivoting on the front edge of the saw’s foot. If you’re not familiar or comfortable with this operation, you can drill a 3⁄8" starter hole inside each marked groove and insert the jigsaw blade into the hole to initiate the cut. With this method, you will rough-cut the groove entirely with the jigsaw.
When using either saw, be very careful to prevent tearout (splintering) on the faces of the panel, especially the front face. Use sharp blades, and take your time. Even the router can cause splintering if it’s not sharp.
- 4. Build the router jig.
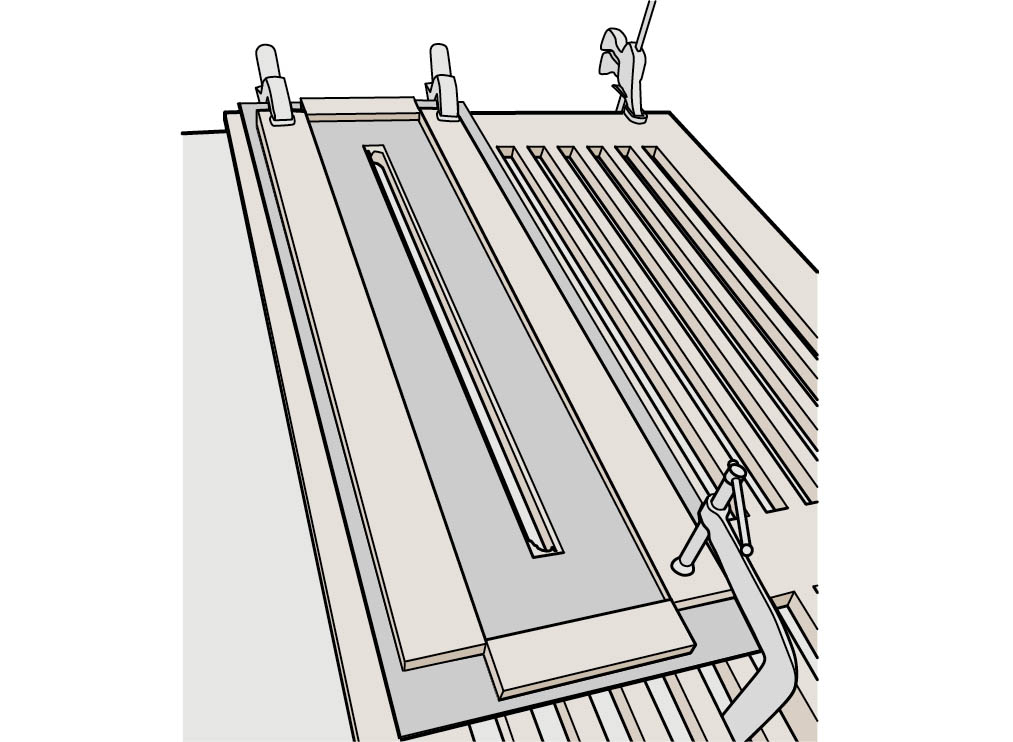
A simple shop-made jig makes the routing process easy and relatively foolproof; see the illustration of the router jig setup. You can cut the jig base from any flat sheet material, preferably something thin, like hardboard or thin MDF, and use straight scraps of plywood, solid stock, or old trim for the guide (fence) pieces.
The jig base is a rectangle that’s about 32" long and at least 10" wide. Mark a straight reference line across the base, 3" from (and parallel to) one long edge. Cut two fence pieces to length at about 30". Glue or fasten one of the fence pieces to the base, aligned with the outside of your reference line.
Set up a router with a 1⁄2" straight bit. Using the router to guide the spacing, secure the other long fence piece to the jig base so the two fences are perfectly parallel and the router, when floating between them, will cut a 1"-wide groove. Cut two short fence pieces to fit between the long fences. Secure these to the base to serve as end stops for the router so the groove will be 241⁄2" long.
Clamp the jig over a sacrificial surface, then carefully cut through the base with the router and 1⁄2" bit, with the fences guiding the router. The finished cutout will match the final grooves cut into the headboard.
- 5. Rout the grooves.
Prop the headboard panel back side up on scrap material (or you can use a sacrificial backerboard if it will help prevent tearout), and clamp the jig to the board so its cutout edges are aligned with one of the groove’s cutting lines. Clean up the groove’s edges with the router and 1⁄2" bit, making several passes and increasing the bit depth about 1⁄8" with each pass. Repeat to rout the remaining grooves. Again, watch carefully for tearout as you work.
Note: Once you’ve cut the first few grooves, you’ll need a relatively narrow C-clamp to secure the inside end of the jig, as shown in illustration of the router jig setup. The clamp fits through the adjacent groove to secure the jig.
- 6. Finish the headboard.
Mark the 1⁄4" roundovers on the corners of the headboard, as shown in the cutting diagram; tracing around a 9 mm or 1 1⁄32" socket makes this easy. Shape the corners by sanding them with a file and/or coarse sandpaper and a sanding block.
Finish-sand the entire headboard, working up to 220-grit or finer sandpaper. Carefully sand the outside edges of the panel and all the grooves’ edges to smooth the sharp corners and prevent any splintering, while maintaining crisp edges with minimal rounding. Finish the headboard as desired. The piece as shown was finished with paste wax. Another good finish option is a penetrating oil, such as Danish oil, that doesn’t require sanding between coats. This is not a fun project to sand.
- 7. Prepare the mounting cleats.
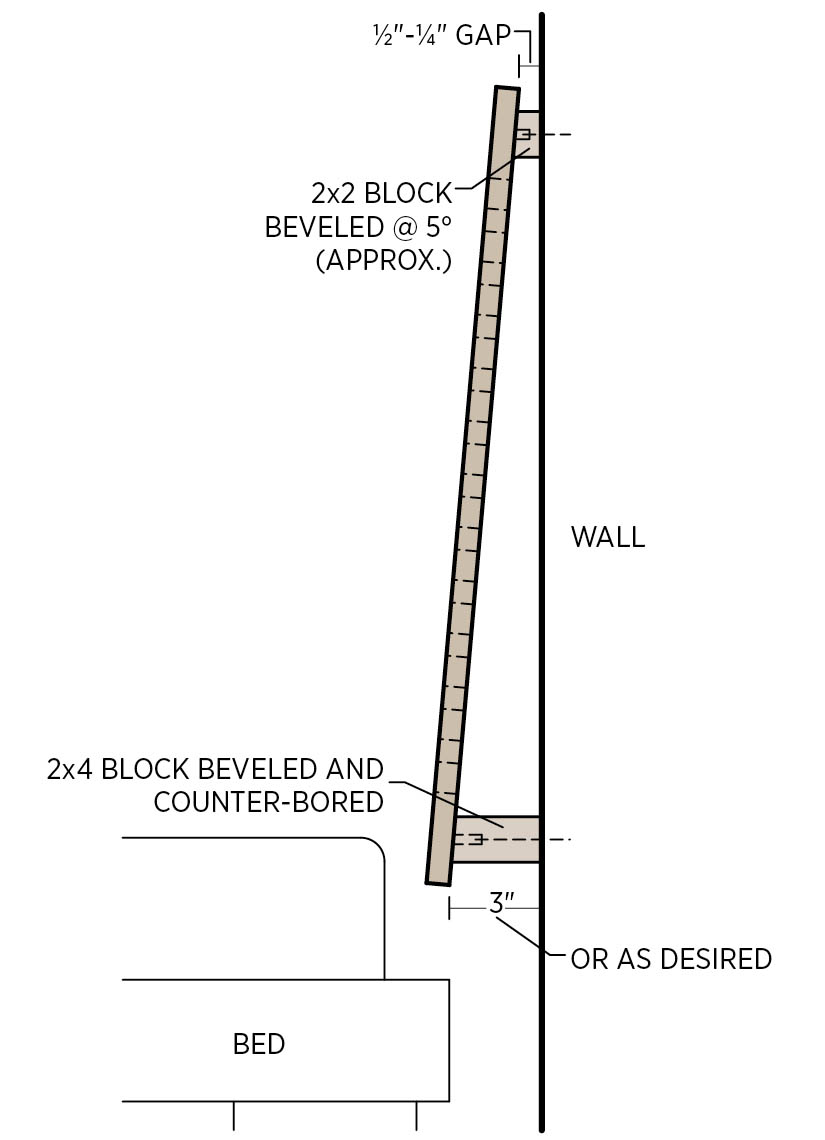
The headboard shown here was mounted to a wall so that it reclines at a 5-degree angle; see the side-view illustration. This slight slope softens the look just a bit, and it makes the headboard more comfortable as a backrest for sitting up in bed. You can slope your headboard as much or as little as you like, or you can position it vertically.
To create mounting cleats for the sloped installation, cut two lengths of 2 × 4 at about 46". Bevel one short edge of one of the pieces at 5 degrees so the longer side is about 3" wide, using a circular saw with the blade (foot) tilted at 5 degrees.
Bevel the other piece of 2 × 4 at 5 degrees so its narrow side is about 1⁄2" wide. This is the upper mounting cleat.
- 8. Install the headboard.
Determine the desired location of the headboard. Mark a level line on the wall to represent the top edge of the upper mounting cleat; the cleat should be roughly centered on the 3" solid space at the top of the headboard. Drill pilot holes, and mount the upper cleat to the wall with drywall or wood screws, driving the screws into wall studs. Alternatively, if you’d like the headboard to be movable (see note at right), glue the cleat to the backside of the headboard instead of fastening it to the wall.
Measure down from the upper cleat location and make reference marks for the lower wall cleat, roughly centering it on the bottom solid portion, as before. Drill pilot holes through the cleat at the wall stud locations, then drill a deep counterbore into each hole so the screws will reach at least 11⁄2" into the wall studs. Fasten the lower cleat to the wall with screws.
With a helper or two, position the headboard over the cleats, making sure it is centered behind the bed and level across the top. Drill pilot holes, and fasten the headboard to the cleats with one 6d finish nail near each corner of the headboard. Set the nails slightly below the surface with a nail set, then fill the holes with color-matched wood putty or a homemade blend of white glue and sawdust. Touch up the putty with finish, if desired.
Note: To make the headboard movable, you can hang its bottom edge from the lower cleat using two homemade metal clips. Cut two strips of any stiff scrap metal (3⁄4" wide, or so) about 3" long. Use pliers to make two bends in one end of each strip to form a square-cornered “J” that hooks onto the headboard’s bottom edge. Drill a hole through the upper portion of the strip for a mounting screw. Fasten the clips near the ends of the lower mounting cleat, using 11⁄4" wood screws or drywall screws. Set the headboard into the clips, resting the upper cleat against the wall. The 5-degree angle keeps the headboard in place.
File Cabinet Cap
Designed by Dan Biller
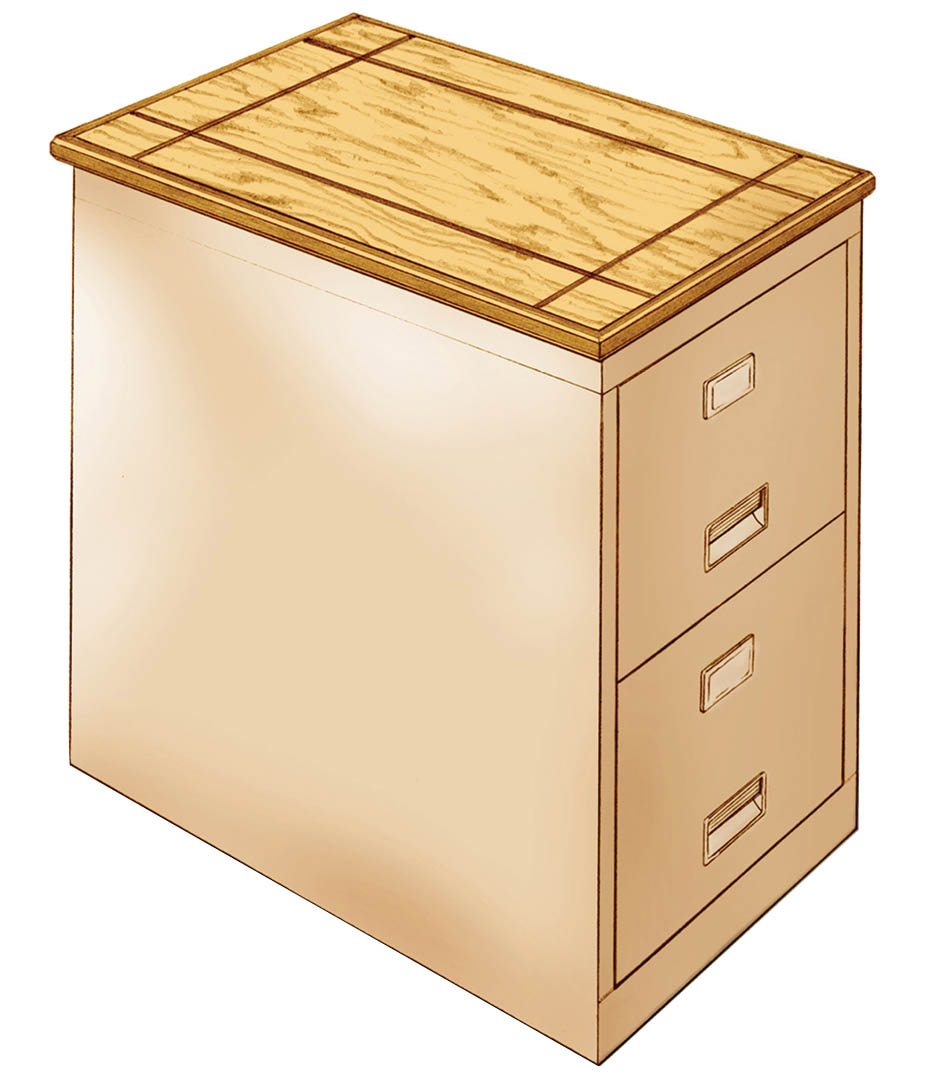
Few fixtures in the modern home are as necessary and as unattractive as the basic file cabinet. As popular as the two-drawer model is for the home office, you’d think manufacturers would have come up with something to make them more livable. But no. Well, here’s a custom treatment that works perfectly on a standard low boy cabinet and can be adapted to fit almost anything else that could use a new top. It’s a great weekend project for any hobby woodworker who’s comfortable with a table saw (or a router table). Hardwood trim keeps the top in place, and a simple inlay gives the plywood slab some furniture-grade detailing.
MATERIALS
- One 17" × 29" (or larger) piece 3⁄4" oak or other hardwood plywood
- One 36" length 1 × 4 solid walnut or other hardwood
- Wood glue
- Finish materials (see step 7)
TOOLS
- Table saw with standard and 1⁄4" dado blades
- Flush-trimming saw
- Sandpaper (up to 220 grit)
- Miter saw
- Bar clamps
- Router with chamfer bit
Instructions
- 1. Cut the plywood top.
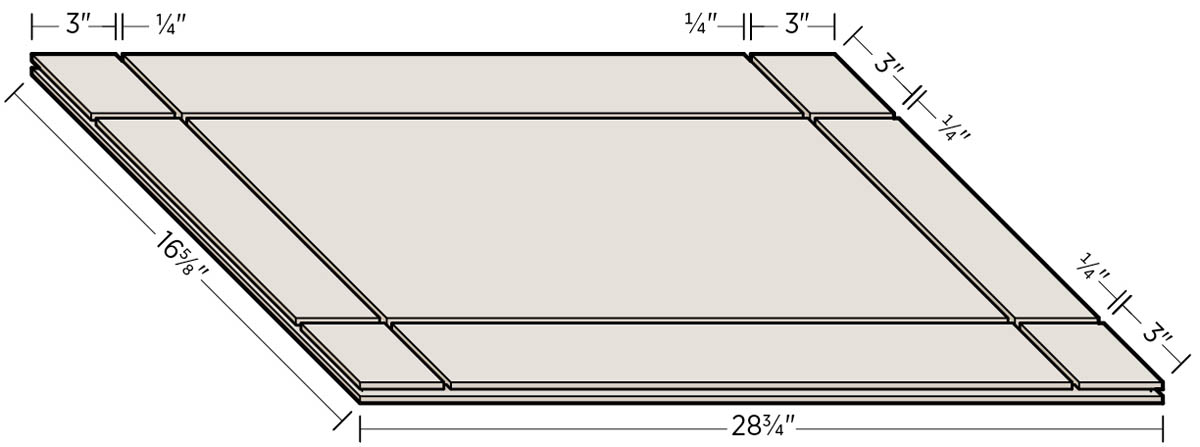
Mark the layout for the panel on 3⁄4" plywood, sizing the piece to match the cabinet dimensions plus 1⁄8" in both directions. The panel in the cap shown here is 165⁄8" × 283⁄4". Cut the panel to size on a table saw.
- 2. Cut the inlay strips.
The inlay strips can be cut from solid stock in any suitable hardwood (walnut is used here). They measure 1⁄4" wide and 3⁄16" thick. You need two strips slightly longer than the length of the panel and two slightly more than its width. Cut the strips on the table saw.
- 3. Mill the edge dadoes.
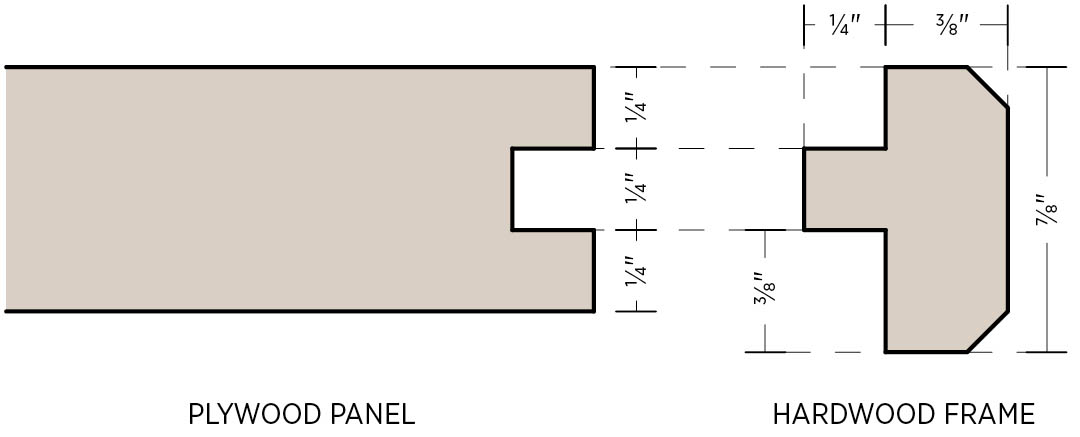
The 1⁄4" × 1⁄4" dadoes centered in the plywood panel’s edges will receive the tongue of the hardwood edge trim; see the panel detail drawing. To mill the dadoes, set up the table saw with a 1⁄4" dado blade. Position the fence 1⁄4" from the blade, and set the blade height at 1⁄4" above the table. Run the panel on its edges, with one face against the fence, to create the dadoes around the perimeter of the panel.
- 4. Install the inlays.
To cut the dadoes into the panel face for the inlay strips, set the fence on the table saw 3" from the dado blade, and set the blade height at 3⁄16". With the plywood panel facedown, run the panel across the saw lengthwise. Turn the panel around, again facedown, and mill a groove on the opposite side of the panel so the two grooves are parallel.
Apply a small bead of glue in the grooves, and lay in the two longer walnut strips so they overhang the panel edges at both ends. Clean any glue residue from the panel face, and let the glue set. Trim the ends of the strips flush to the panel edges, using a flush-trimming saw (or as desired). Sand the inlays flush with the panel face, using 220-grit sandpaper, being careful to not oversand into the plywood’s thin face veneer.
Turn the panel widthwise and cut two more dadoes in the face for the crossing inlay strips, creating a grid pattern. Glue the remaining strips into the grooves, then trim and sand them flush, as before.
- 5. Cut and install the trim.
Using the table saw and standard blade, cut the remaining walnut stock into four strips at 5⁄8" × 7⁄8". Set up the saw with the dado blade, and cut 1⁄4" of depth from the top and bottom edges of the strips, creating the 1⁄4" × 1⁄4" tongue, as shown in the frame detail drawing. The tongues should match the edge dadoes in the plywood panel. Note that the bottom shoulder below the tongue is 3⁄8" wide; this will create a 1⁄8" lip around the bottom face of the panel to keep the cap from shifting on the cabinet.
Cut the trim to fit around the panel, mitering the corners with a miter saw. When all four pieces are precisely fitted, glue the trim to the panel edges, clamp the assembly, and let the glue set.
- 6. Chamfer the trim.
The outside corners of the trim get a slight chamfer, about 1⁄8" or as desired, as shown in the frame detail drawing. Mill the chamfer with router and chamfer bit.
- 7. Finish the cap.
Finish-sand all surfaces of the cap, working up to 220-grit or finer sandpaper. Apply the finish of your choice. The project shown here was given a medium oak stain, followed by three topcoats of clear polyurethane for a durable, washable surface.
Repair-a-Chair
Designed by Philip Schmidt
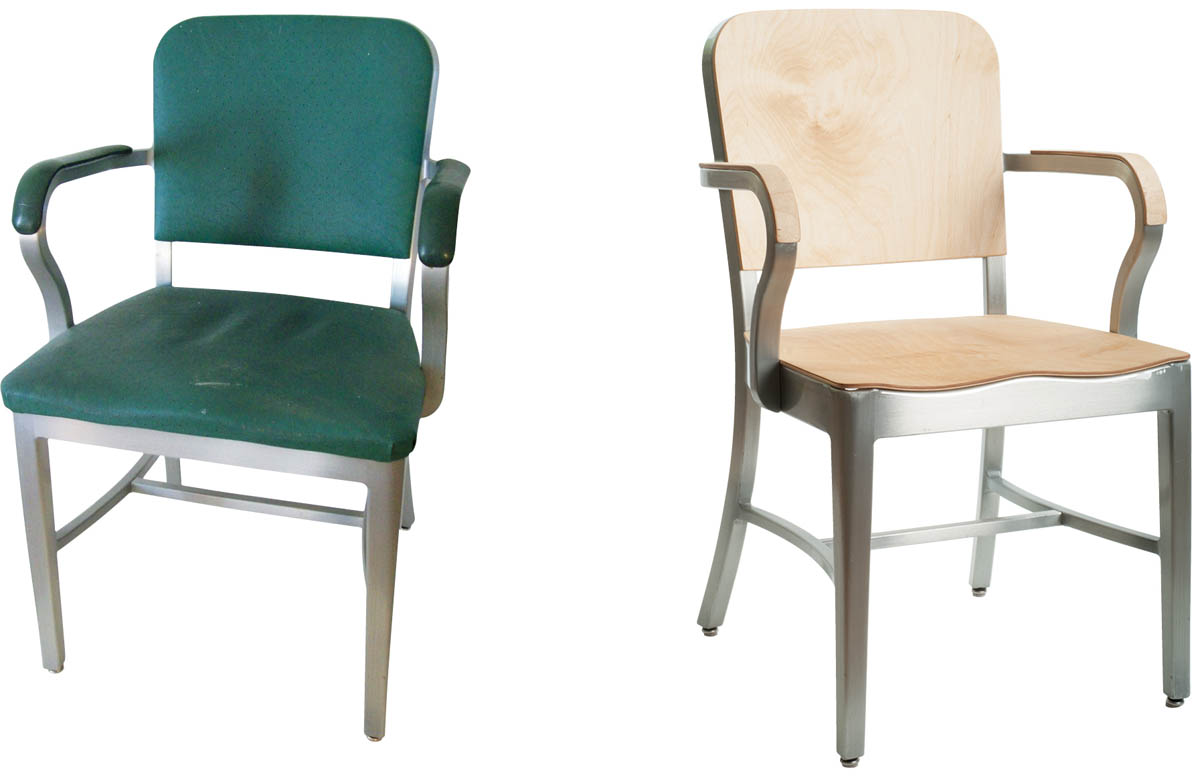
Whether you’re a garage-sale junkie, a hopeless sentimental, or just plain cheap, there’s a good chance you’re holding on to a tired old chair that could use a little love. Why not treat it to a complete plywood makeover? It has to be a good candidate, of course – plywood’s not exactly cozy, so easy chairs and anything that needs a lot of give are out. But for many straight-back chairs and even stools and ottomans, a new outfit of sheet material can be the perfect upgrade. This old aluminum-frame workhorse is a case in point. Built by GoodForm for the General Fireproofing Company of Youngstown, Ohio, it has dutifully served insurance offices for decades, and now it’s time to retire in style. Since every chair is more or less unique, the following is an overview of some basic techniques you can use to spruce up your seat.
MATERIALS (AS NEEDED)
- Hardwood plywood
- Heavy paper or poster board (for making a template)
- Adhesives (wood glue, epoxy, or polyurethane glue, as applicable)
- Fasteners (screws, nails, brackets, or dowel pins, as applicable)
- Finish materials (as desired)
TOOLS (AS NEEDED)
- Pencil (carpenter’s or standard)
- Scissors (if making a paper pattern)
- Tape, double-sided tape, or hot glue gun
- Foam brushes or paintbrushes
- Clamps
- Bucket or plastic tub (for soaking plywood prior to shaping)
- Jigsaw, band saw, or scroll saw
- Router with flush-trimming bit
- Sandpaper (60 to 220 grit)
Instructions
- 1. Plan the makeover.
Spend some time deciding what type and thickness of plywood to use for the various replacement parts. You can use rigid material, such as 3⁄8" or thicker plywood, for parts that are flat. If a piece needs to bend a little to conform to the chair’s frame, you’ll need something thinner. Standard 1⁄4" plywood will bend some but not much. For more curve, you can laminate layers of 1⁄8" or thinner material. “Bendy” plywood is another option. It’s a flexible plywood made with all of its plies’ grain running parallel (instead of cross-grained). For cosmetic touches in hard-to-reach areas, you can use self-adhesive veneer tape or sheets in a wood species that matches the plywood.
If you’ve been paying attention, you may have read that bent lamination is too complicated for this book. Well, we lied, but only just a little. The project shown here uses a simple process of laminating two layers of 1⁄8" plywood into curves, using the chair itself as the form.
- 2. Remove the bad parts.
Carefully disassemble the chair as needed to remove the seat, backrest, or any other parts you plan to replace. If any pieces can be used as a pattern for marking the plywood substitutes, be careful to keep them completely intact.
Clean up the chair and make any necessary repairs to prepare for the makeover.
Note: For loose joints on old wood chairs, clean up the mating pieces as well as possible, then apply some Gorilla Glue (standard formula) as directed and clamp the parts while the glue cures. Gorilla Glue is a polyurethane adhesive that expands as it dries. It does a nice job of filling gaps in old, worn wood joints.
- 3. Lay out the parts.
Laying out and cutting the new parts to fit the chair might prove a little tricky and painstaking, but the process usually involves more trial and error than skill. A couple of classic finish carpentry techniques can help.
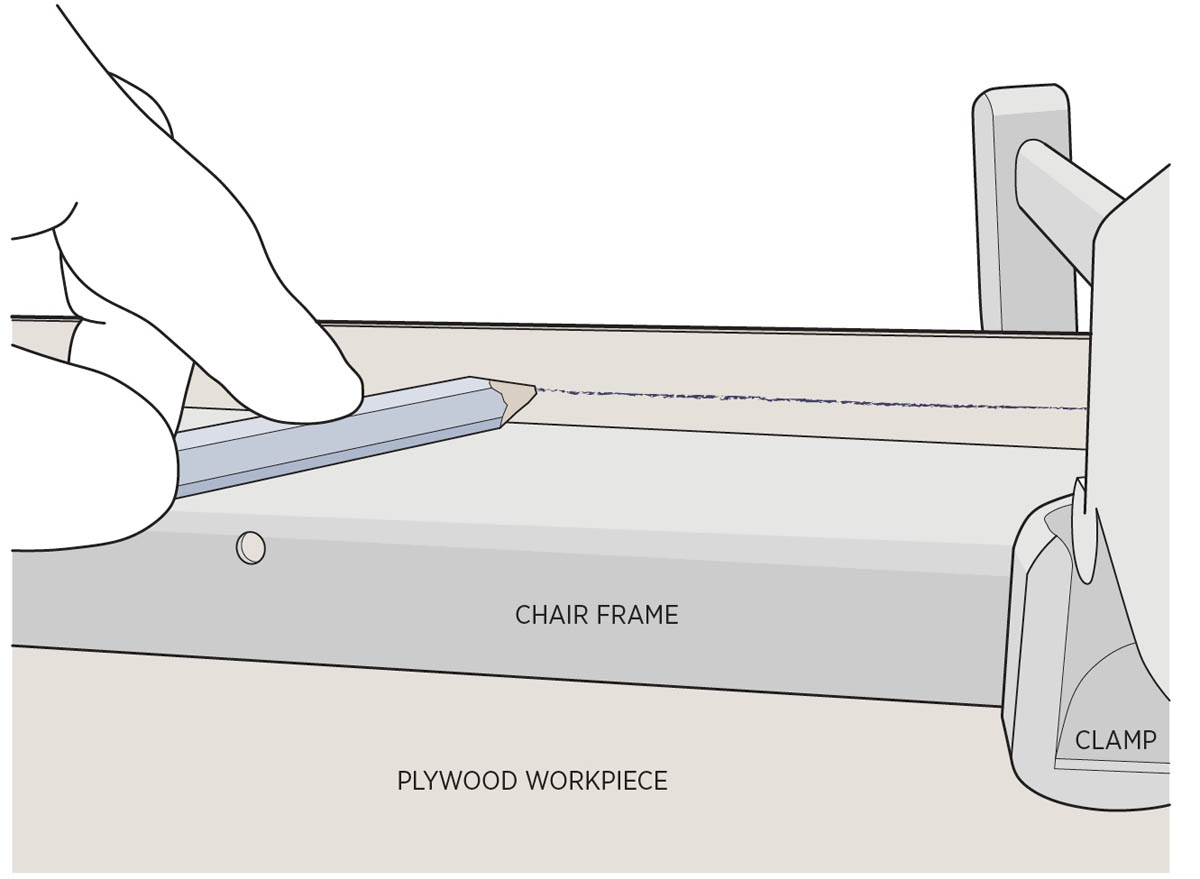
The first technique is scribing. If, for example, your seat or backrest is accessible enough that you can place a rough-cut workpiece directly on the chair’s structural framework, you can simply trace around the frame to lay out the piece, as shown in the illustration above. To create a decorative overhang, use a carpenter’s pencil set flat against the frame; the thickness of the pencil will make the traced outline a little bigger than the frame’s edges. Otherwise, trace along the frame so the pencil line is flush with the frame.
The other layout technique is to make a pattern, using heavy paper or poster board. This is necessary when you can’t fit a workpiece into position (because arms or other chair parts are in the way) for accurate scribing. First cut the paper roughly to fit the space. Set it on the chair frame, and scribe to the frame as best you can. Recut the paper, and repeat, as needed. (If it’s difficult to scribe and cut the pattern as one piece, use two pieces that overlap roughly in the middle of the area you’re fitting to. Once both pieces are scribed and fitted to their respective sides, tape them together to form a single pattern.)
When the paper pattern is complete, lay it over your work-piece (taping it down, if desired) and trace around the edges to mark the piece for cutting.
Note: If you will laminate any parts, oversize the pieces somewhat, then scribe and cut them to fit after the lamination.
- 4. Laminate the curved parts.
For a simple two-layer lamination, rough-cut the two plywood layers, oversizing them as much as possible so you can scribe and trim the edges after the glue-up. Apply a thin, even layer of wood glue to one face of one piece, spreading it out with a finger or foam brush. Lay the other piece on top and set the assembly into place on the chair.
Starting at the center (or apex) of the curve, clamp the layers tightly to the chair frame. Add clamps every few inches, maintaining even spacing and working out from the center to the side edges. Clamp along the edges carefully to close the seam between the two layers. Let the glue dry overnight.
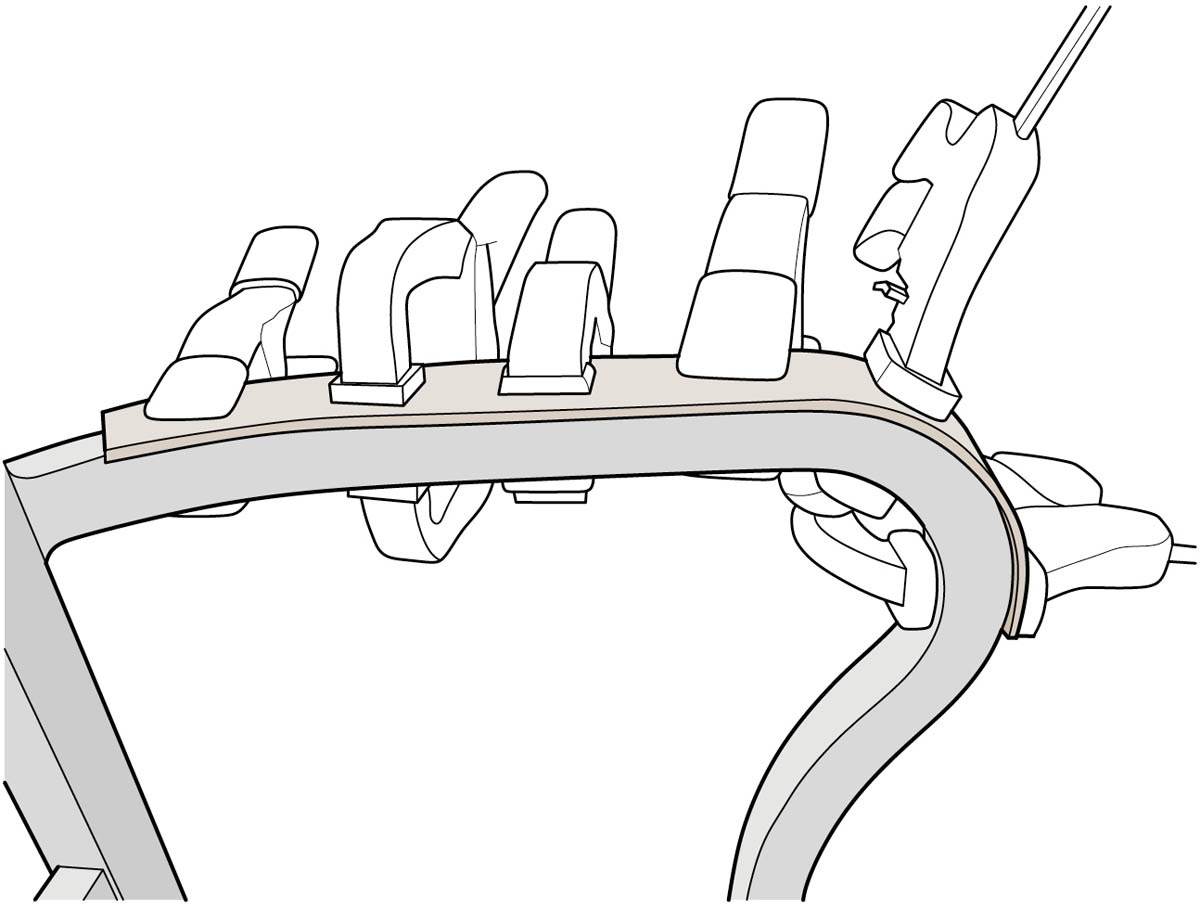
To form tight curves with relatively small pieces, such as over an armrest, preshape the pieces before laminating them with glue. First soak the pieces in hot water for at least 1 hour (if they’re small enough, set them in a baking pan, cover with boiling water, and place the pan in the oven at 200 degrees to keep the water hot). Remove the pieces, quickly pat them dry, then clamp them together onto the chair frame, as shown in the drawing at left. Let the pieces dry overnight, or longer, as needed; if they’re not dry, they won’t hold their shape. Unclamp and separate the pieces for several more hours of drying. Finally, glue the preshaped pieces together and clamp them to the chair, as described above, to complete the lamination.
- 5. Cut the parts.
The standard tool for cutting to a scribed line is a jigsaw (or a band saw or scroll saw). Be sure to use a very-fine-tooth blade (such as 20 teeth per inch) to minimize splintering. If desired, you can play it safe by cutting a little outside the marked lines, then sanding down to the line. Another option is to clamp the piece in place on the chair and use a router and flush-trimming bit to mill the edges flush to the chair frame; however, try this only if the router base will remain flat and fully supported, and if the frame can easily be repaired if it gets buzzed by the bit’s cutter.
Cut and/or sand the pieces as desired. Test-fit the pieces on the chair, and sand any edges as needed for final shaping and to smooth saw marks and rough spots. Finish-sand the completed parts, working up to 220-grit or finer sandpaper. Slightly round over any exposed or visible edges for comfort and a finished look, and to prevent splinters.
- 6. Install and finish the parts.
You might have to think like a furniture maker for the parts installation, which may require some creative solutions. Often the main goal is to conceal all fasteners from view, so screws are appropriate if they won’t be seen. Metal brackets facilitate fastening in hard-to-reach places. Alternatively, the hardware can become an aesthetic feature. For example, you could use oval-head screws with finish washers driven through the exposed surfaces of the plywood.
As an alternative to fasteners, epoxy and other adhesives are an easy option for joining wood to metal and plastic (or to wood), but keep in mind that the installation is permanent. In the project shown here, all the parts were installed with general-purpose two-part epoxy. At 1⁄4" thick, the plywood was too thin to screw into from behind, and exposed hardware was not desired. In addition to invisibility, adhesives are good for holding bent pieces tightly to the frame with a continuous bond.
Install and finish the wood parts as desired. The plywood parts in the chair shown here were finished with natural Danish oil.
Note: The fastening method will determine whether to finish the parts before installing them or afterward. If you’re using adhesive and would like to prefinish, make sure the finish won’t prevent a good bond with the wood.
Twinkle Board
Designed by Maya Lee
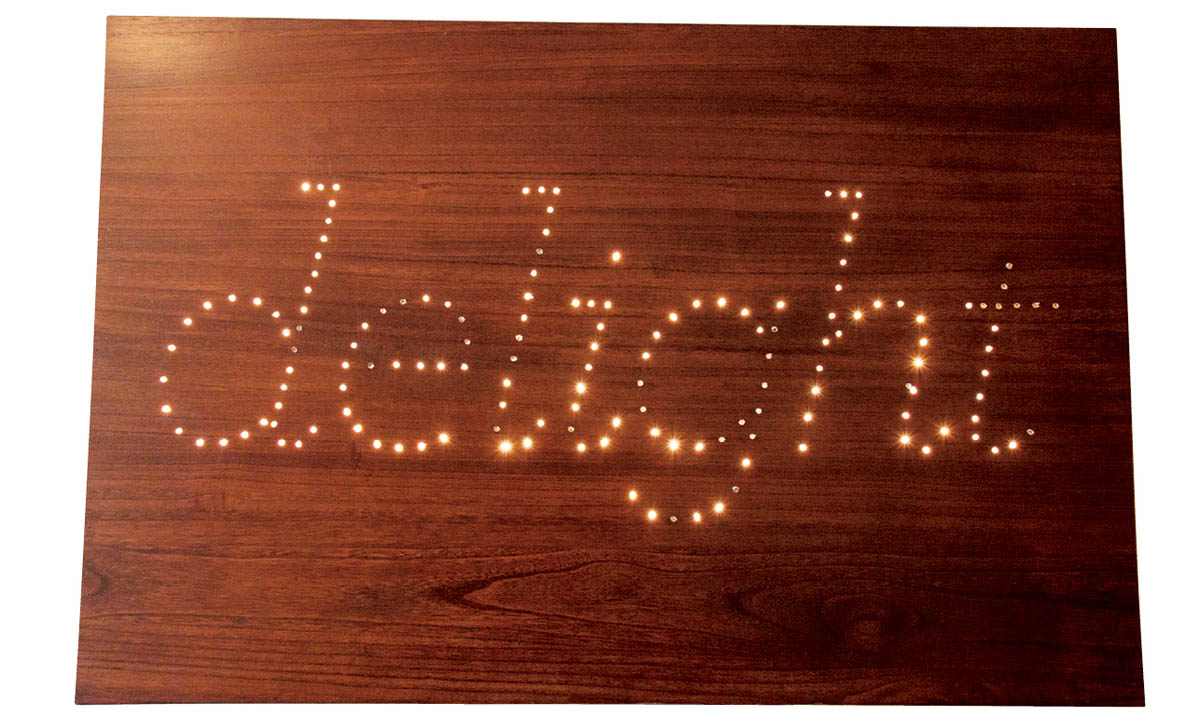
At the time of this book’s writing, this designer’s website bore the slogan “Martha and MacGyver’s love child,” which applies equally well to this clever decoration. The original was made with a found plank of wood, a string of twinkle lights bought on sale, and a borrowed drill. And the whole idea is about getting creative with whatever you have – a scrap of plywood, an old shelf, a salvaged desktop . . . You can choose your own word and typeface (Archer was the designer’s choice) and even do something funky with the lights (LEDs, color, pulsing . . . ). In case you’re wondering, delight was inspired by Horace: “The role of art is to inform and delight.”
MATERIALS
- 3⁄4"-thick plywood or other sheet material (size as desired)
- Finish materials (as desired)
- Paper and tape (for paper template; see step 2)
- Twinkle lights (plug-in string; quantity as needed)
TOOLS
- Circular saw with straightedge guide and/or jigsaw
- Sandpaper (up to 220 grit) and sanding block
- Computer and printer
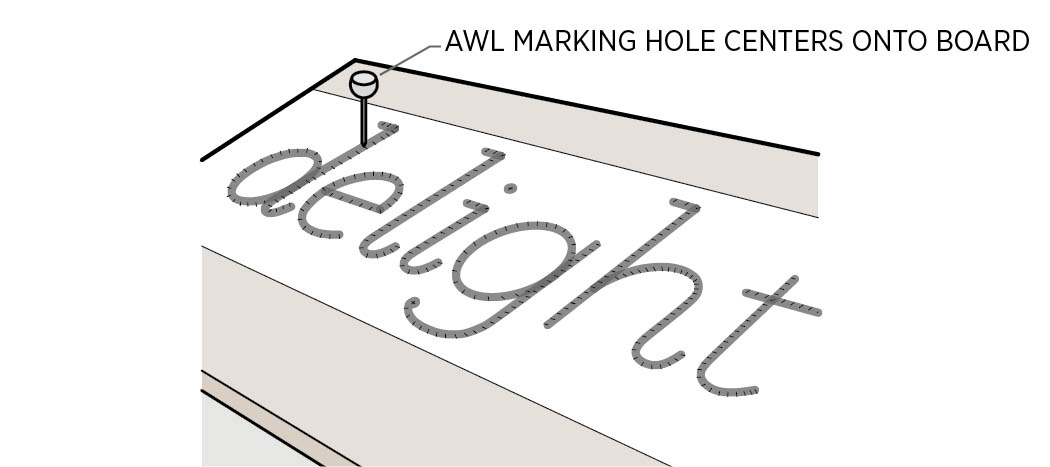
- Awl or hammer and small finish nail
- Drill with straight bit sized for light bulbs
Instructions
- 1. Cut and finish the board.
Cut the plywood or other material to the desired size, using a circular saw with a straightedge guide to ensure clean, straight cuts. Alternatively, you can shape the board with curves or rounded corners, making the cuts with a jigsaw.
Sand the cut edges smooth and flat, using coarse sandpaper and a sanding block (any flat piece of scrap wood will do). Finish-sand the front face and edges of the board, working up to 220-grit or finer sandpaper. Finish the board as desired.
- 2. Create the paper template.
Your twinkle message can be anything you like – a word or short phrase, a custom design, or representative shapes or figures, anything you can print out on a computer, copy, or draw by hand.
To create one or more words, choose a typeface (font), preferably one with clean lines and an unfussy look overall. Print out the message at full size, using a word processing (or other) application on your computer. For large letters, print out one letter at a time or even partial letters, if necessary. If you can, print in a light color or gray tone, which makes it easy to mark inside the lines for the light locations (see step 3).
Tape the printed sheets together to form the complete message, making sure the letters are aligned properly and evenly spaced.
- 3. Mark the light holes.
Position the paper template on the board so the message is centered from top to bottom and side to side. Secure the template in place with tape. Mark the light locations, using the desired spacing (3⁄4" between lights is a good place to start), making little tick marks on the paper and following the contours of the letters.
Mark the hole locations on the board by poking the point of an awl through the template to make a small dent in the wood surface, as shown in the illustration at right. If you don’t have an awl, you can use a small finish nail, tapping it lightly with a hammer to make the marks. Follow the tick marks (or eyeball the spacing) carefully to maintain even spacing as you work. Mark the entire message, then remove the template from the board.
- 4. Drill the holes.
Place the board faceup on top of a piece of sacrificial plywood or other flat material as backerboard, and clamp them both down to your work surface. The sacrificial backerboard helps prevent splintering (tearout) on the back face of the board when the drill bit comes through. Tearout won’t affect the finished product, but it’s best to keep the holes clean.
Find a drill bit that creates a snug fit for the bulbs of your twinkle lights (13⁄64" works well for standard-size lights), using scrap plywood to test the size. If you’re using thick board material (11⁄2" or so), you might want to insert the plastic casing of each light into the hole, instead of just the glass bulb, to bring the light closer to the front surface. Be sure to use a sharp bit, to minimize splintering on the front face of the board.
Wrap some masking tape around the bit, 1" from the point (assuming the project board is 3⁄4" thick); this is a depth guide to prevent you from drilling through the backerboard. Drill the holes through the front face of the board, using the awl marks to center the bit.
- 5. Install the lights.
Plug in the light string(s) to make sure all the lights are working, then unplug. Starting at the end of the string (opposite the plug), insert the light bulbs into the holes, working from one end of the message to the other; see rear-view illustration. If you need more than one string, simply plug a second string into the end of the first and continue filling the holes.
After all the lights are installed, you can tidy up the loose wiring in the back with dabs of hot glue or duct tape. Be sure to leave some slack at the plug end of the string for plugging in the lights.
Due to the tangle of wiring in the back, the light board works best when placed on a table or other surface with its back against the wall or, preferably, a wall corner. If you’d like to mount the board to the wall, position it so that the wiring will be hidden from view.
Note: Twinkle lights are low-wattage, and typically the bulbs do not get very hot. However, because the bulbs are in direct contact with wood (a combustible material), never leave your board plugged in overnight or when you’re not at home.
Plywood as . . . A showcase of inspired pieces and
the stories behind them. . . sculpture
Propeller Bowl
by Philipp Herbert
This project started with a picture of a vintage wooden airplane propeller made of many layers of wood, which gave it strength and prevented deformation.
So I started thinking about how I could make an object with a similar construction that also reinterprets the typical rotation of a propeller in its form and shape.
After some sketching and a little calculating, I bought the plywood and cut out the 13 layers (like overlapping rings) that make the rough shape of the bowl. After gluing them together, I came to the hardest part: shaping the inner surface. I started with the roughest sandpaper I could buy and attached it to a rounded sanding block. It took me about eight hours to make that inner surface smooth. The outer surface was done in about two hours.
Actually, I consider this bowl more as a prototype, since the layers of the wood are very thin–so thin, in fact, that they almost form a pattern on the surface and aren’t really recognizable as layers of wood orthogonal to each other anymore. So maybe one day I will make another one with the perfect number of layers to reach the perfect design.
