It is time now to implement the
ActivateSheet
utility in our SRXUtils application. This will
demonstrate the use of UserForms.
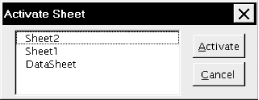
In particular, when the user selects
ActivateSheet, we would like to present her with
a custom dialog that lists all of the sheets in the active workbook,
as shown in Figure 14-5. The user can select one of
these sheets, which will then be activated.
To implement this utility, we need to do the following:
Change the
ActivateSheetprocedure inbasMainto open the Activate Sheet dialog (instead of displaying the current message).Design the Activate Sheet dialog itself.
Write the code behind the Activate Sheet dialog.
So crank up the
SRXUtils.xls
worksheet and replace the
ActivateSheet procedure in
basMain:
Public Sub ActivateSheet()
  MsgBox "This is the ActivateSheet utility"
End Sub
with the procedure:
Public Sub ActivateSheet()
  dlgActivateSheet.Show
End Sub
which simply displays the Activate Sheet dialog (which we will call
dlgActivateSheet).
After you insert a
UserForm into your
project, you should use the Properties window to change its Name
property to dlgActivateSheet and its
Caption property to "Activate
Sheet." Then you can add the controls to the form.
The UserForm in Figure 14-5 has two command buttons
and one list box.
Place a List box on the form as in Figure 14-5. Using the Properties window, set the properties shown in Table 14-1. Note that the TabIndex property determines not only the order that the controls are visited as the user hits the Tab key, but also determines which control has the initial focus. Since we want the initial focus to be on the list box, we set its tab index to 0.
We should also note that, in general, there are two places in which a control property can be set: in the Properties window at design time or using code during run time. Some properties should be (or must be) set at design time, whereas others can only be set at run time. However, most properties can be set at either time.
As a simple example, a control's Visible or Enabled
property is often set during run time, in response to actions by the
user. For instance, we may want to disable a command button labeled
Print until the user has selected an object to print from a list of
objects. Setting the Enabled property of a command button whose name
is PrintButton is easily done:
PrintButton.Enabled = False
In general, the choice of where to set a given property of a control is partly a matter of taste. I favor setting properties in code because it tends to make the code more complete and thus more readable. It can also make changing properties simpler. However, some fundamental properties, such as Name and Caption, are best set at design time.
Place a command button on the form, as in Figure 14-5. Using the Properties window, set the properties shown in Table 14-2.
Place another command button on the form, as in Figure 14-5. Using the Properties window, set the properties shown in Table 14-3.
Now it is time to create the code behind these controls.
Double click on the Cancel button to display the Click event code shell. Adding the line:
Unload Me
will fill out the code shell as follows and cause the form to be
unloaded when the user hits the Cancel button:
Private Sub cmdCancel_Click()
    Unload Me
End SubNext, we create a procedure that will activate the selected sheet. We want this procedure to be called in three situations; namely, when the user:
Selects a sheet name from the list box and clicks the Activate button (or uses the Alt-A hot key)
Double-clicks on a sheet name in the list box
Selects a sheet name from the list box and hits the Enter key
Since this code will be used in three different situations, we can avoid repeating the code by placing it in its own procedure in the General section of a UserForm, as shown in Example 14-1.
Example 14-1. The ActivateSelectedSheet Procedure
Sub ActivateSelectedSheet()
If lstSheets.ListIndex > -1 Then
  Sheets(lstSheets.List(lstSheets.ListIndex)).Activate
End If
Unload Me
End Sub
This code demonstrates some list box properties. First, the ListIndex
property returns the index number (starting at 0) of the currently
selected item in the list box. Thus, the following code checks to see
if an item is selected (otherwise ListIndex
=
-1):
If lstSheets.ListIndex > -1 Then
The code:
lstSheets.List(i)
returns the ith item in the list box (as a
string). Thus:
lstSheets.List(lstSheets.ListIndex))
is the currently selected item—that is, the currently selected sheet name. Finally, the code:
Sheets(lstSheets.List(lstSheets.ListIndex)).Activate
activates that worksheet by invoking its Activate method. We will discuss the Activate method in Chapter 18. For now, we simply note that if a worksheet has the name MySheet, then the code:
Sheets("MySheet").Activateactivates that sheet.
Finally, the last thing done in the cmdActivate_Click event is to unload the form, since it is no longer needed.
To set the code behind the Activate button, select cmdActivate in the
Objects drop-down box (above the upper-left corner of the code
window) and select Click in the Procedures drop-down box (above the
upper-right corner of the code window). You can now fill in the code
for the Click event of the cmdActivate button:
Private Sub cmdActivate_Click()
    ActivateSelectedSheet
End SubWe also want ActivateSelectedSheet to be called
when the user double-clicks on a sheet name. The DblClick event for
the list box fires when the user double-clicks on an item in the list
box. Select lstSheets in the Objects drop-down and DblClk in the
Procedures drop-down. Then fill in the DblClk event code shell:
Private Sub lstSheets_DblClick(ByVal Cancel As _
   MSForms.ReturnBoolean)
     ActivateSelectedSheet
End SubWe also want to invoke ActivateSelectedSheet
when the user selects a sheet name and hits the
Enter key.
When the list box has the focus, any keystroke fires the KeyDown
event. Choose this event in the Procedures drop-down and add the code
shown in Example 14-2 to the event shell.
Example 14-2. The lstSheets_KeyDown Event Procedure
Private Sub lstSheets_KeyDown(ByVal KeyCode As _
   MSForms.ReturnInteger, ByVal Shift As Integer)
If KeyCode = vbKeyReturn Then ActivateSelectedSheet
End Sub
In this case, we must add code to determine whether the Enter key was
struck. Fortunately, Excel will fill in the
KeyCode parameter of the KeyDown event
with the key code for the key that caused the event to be fired. (For
a list of key codes, check
"KeyCode" in the Excel VBA help
file.)
Next, we need to fill the
lstSheets
list box with a list of all of the
sheets in the current workbook. We want this to be done
automatically, so we will place the required code in the Initialize
event of the UserForm. This event is fired by Excel when the form is
loaded, but before it becomes visible. As the name implies, it is
designed to initialize various properties of the form and its
controls.
Select UserForm in the Object drop-down and Initialize in the Procedures drop-down. You should get the UserForm_Initialize event code shell. Fill it with the code shown in Example 14-3.
Example 14-3. The UserForm_Initialize Event Procedure
Private Sub UserForm_Initialize()
' Fill lstSheets with the list of sheets
Dim cSheets As Integer
Dim i As Integer
cSheets = Sheets.Count
lstSheets.Clear
For i = 1 To cSheets
  lstSheets.AddItem Sheets(i).Name
Next
End Sub
This code first gets the total number of sheets (worksheets and
charts) in the current workbook. (We will discuss this in detail in
later chapters, so don't worry about it now.) The
list box is then cleared of any previous content. Then we have a
For loop that adds the sheet names to the list
box. This is done using the ListBox control's
AddItem method. The name of a sheet is given by its Name property.