A Worksheet object represents an Excel worksheet. Figure 18-1 shows that portion of the Excel object model that relates directly to worksheets.
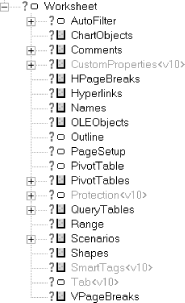
Table 18-1 shows the members of the Worksheet object.
Table 18-1. Members of the Worksheet Object
|
_CheckSpelling<v9> |
DropDowns |
Previous |
|
_CodeName |
EnableAutoFilter |
PrintOut |
|
_DisplayRightToLeft<v9> |
EnableCalculation |
PrintPreview |
|
_Evaluate |
EnableOutlining |
Protect |
|
_PasteSpecial<v10> |
EnablePivotTable |
ProtectContents |
|
_PrintOut<v9> |
EnableSelection |
ProtectDrawingObjects |
|
_Protect<v10> |
Evaluate |
Protection<v10> |
|
_SaveAs<v10> |
FilterMode |
ProtectionMode |
|
Activate |
GroupBoxes |
ProtectScenarios |
|
Application |
GroupObjects |
QueryTables |
|
Arcs |
HPageBreaks |
Range |
|
AutoFilter |
Hyperlinks |
Rectangles |
|
AutoFilterMode |
Index |
ResetAllPageBreaks |
|
Buttons |
Labels |
Rows |
|
Calculate |
Lines |
SaveAs |
|
Cells |
ListBoxes |
Scenarios |
|
ChartObjects |
MailEnvelope<v10> |
Scripts<v9> |
|
CheckBoxes |
Move |
ScrollArea |
|
CheckSpelling |
Name |
ScrollBars |
|
CircleInvalid |
Names |
Select |
|
CircularReference |
Next |
SetBackgroundPicture |
|
ClearArrows |
OLEObjects |
Shapes |
|
ClearCircles |
OnCalculate |
ShowAllData |
|
CodeName |
OnData |
ShowDataForm |
|
Columns |
OnDoubleClick |
SmartTags<v10> |
|
Comments |
OnEntry |
Spinners |
|
ConsolidationFunction |
OnSheetActivate |
StandardHeight |
|
ConsolidationOptions |
OnSheetDeactivate |
StandardWidth |
|
ConsolidationSources |
OptionButtons |
Tab<v10> |
|
Copy |
Outline |
TextBoxes |
|
Creator |
Ovals |
TransitionExpEval |
|
CustomProperties<v10> |
PageSetup |
TransitionFormEntry |
|
Delete |
Parent |
Type |
|
DisplayAutomaticPageBreaks |
Paste |
Unprotect |
|
DisplayPageBreaks |
PasteSpecial |
UsedRange |
|
DisplayRightToLeft |
Pictures |
Visible |
|
DrawingObjects |
PivotTables |
VPageBreaks |
|
Drawings |
PivotTableWizard |
Many of the members in Table 18-1 exist solely to return the children of the Worksheet object. These members and their return types are shown in Table 18-2.
Table 18-2. Members That Return Objects
|
Name |
ReturnType |
|---|---|
|
Application |
Application |
|
AutoFilter |
AutoFilter |
|
Cells |
Range |
|
CircularReference |
Range |
|
Columns |
Range |
|
Comments |
Comments |
|
CustomProperties |
CustomProperties |
|
HPageBreaks |
HPageBreaks |
|
Hyperlinks |
Hyperlinks |
|
Names |
Names |
|
Outline |
Outline |
|
PageSetup |
PageSetup |
|
PivotTableWizard |
PivotTable |
|
Protection |
Protection |
|
QueryTables |
QueryTables |
|
Range |
Range |
|
Rows |
Range |
|
Shapes |
Shapes |
|
SmartTags |
SmartTags |
|
Tab |
Tab |
|
UsedRange |
Range |
|
VPageBreaks |
VPageBreaks |
Let us discuss some of the members in Table 18-1.
- Activate method
This method activates the worksheet, as in:
ThisWorkbook.Worksheets("Sheet1").Activate- AutoFilterMode property
This property is
Trueif the AutoFilter drop-down arrows are currently displayed on the worksheet. (Also see the FilterMode property, discussed later in this section). Note that we can set this property toFalseto remove the arrows, but we cannot set it toTrue. To display the AutoFilter arrows, we use the AutoFilter method, which is discussed in Chapter 19.- Calculate method
This method calculates all cells in the worksheet. (Note that the method applies to workbooks and specific ranges as well.) The syntax is simply:
WorksheetObject.Calculate- CodeName property
This property returns the code name for the worksheet (it also applies to workbook and chart objects). The code name can be used in place of any expression that returns the worksheet. The code name can also be set in the Properties window. It is referred to as (name) to distinguish it from the Name property.
To illustrate, suppose that we have a worksheet whose code name is SheetCodeName and whose name is SheetName. Then the following are equivalent:
Worksheets("SheetName").Activate
SheetCodeName.Activate
Note that when we first create a worksheet, the name and code name are the same. The two names can then be changed independently. However, the code name can be changed only at design time; it cannot be changed with code at run time.
- Copy method
The Copy method has multiple syntaxes. To copy a worksheet, we use the syntax:
WorksheetObject.Copy(Before,After)where the optional
Beforeparameter is the sheet before which the copied sheet will be placed and theAfterparameter is the sheet after which the copied sheet will be placed. (Only one ofBeforeorAfteris allowed at one time.)Note that if neither
BeforenorAfteris specified, Excel will copy the worksheet to a new workbook.To illustrate, the following code copies the active worksheet and places the copy at the end of the list of current worksheets:
ActiveSheet.Copy After:=Worksheets(Worksheets.Count)
- Delete method
This method simply deletes the worksheet. The syntax is:
WorksheetObject.Delete- EnableCalculation property (R/W Boolean)
When this property is
True, Excel automatically recalculates the worksheet when necessary. Otherwise, the user must request a recalculation. Note that when this property is first set toTrue, Excel will do a recalculation.- Evaluate method
The Evaluate method converts an Excel name to an object or a value. We discussed the details of this method in Chapter 16.
- FilterMode property (Read-Only Boolean)
This property is
Trueif the worksheet is in filter mode. Thus, for instance, if the AutoFilter arrows are displayed but no filtering has taken place, then AutoFilterMode isTruewhereas FilterMode isFalse. Once filtering is actually performed, then FilterMode isTrue. Put another way, the FilterMode property indicates whether there are hidden rows due to filtering.- Move method
The Move method moves the worksheet to another location in the workbook. The syntax is:
WorksheetObject.Move(Before,After)where the parameters have the same meaning as in the Copy method, discussed earlier in this section.
- Name property (R/W String)
This property returns or sets the name of the worksheet, as a string.
- Names property
This property returns the Names collection representing all the worksheet-specific names. For more on Name objects, see Chapter 16.
- PasteSpecial method
This method pastes the contents of the Clipboard onto the worksheet, using a specified format. The most commonly used syntax is simply:
WorksheetObject.PasteSpecial(Format)where
Formatspecifies the format of the data to paste, as a string. For instance, the following code pastes data in Word document format (assuming that it exists on the Clipboard):ActiveSheet.PasteSpecial "Microsoft Word Document"
To learn the syntax of other
Formatstrings, you can copy the desired object and then check Excel's Paste Special dialog box.Note that we must select the destination range before using the PasteSpecial method.
- PrintOut method
The PrintOut method prints a worksheet. (The method also applies to Workbook and Range objects.) The syntax is:
WorksheetObject.PrintOut(From,To,Copies, _Preview,ActivePrinter,PrintToFile,Collate)Note that all of the parameters to this method are optional.
The
Fromparameter specifies the page number of the first page to print, and the To parameter specifies the last page to print. If omitted, the entire object (range, worksheet, etc.) is printed.The
Copiesparameter specifies the number of copies to print. The default is1.Set
PreviewtoTrueto invoke print preview rather than printing immediately. The default isFalse.ActivePrintersets the name of the active printer.Setting
PrintToFiletoTruecauses Excel to print to a file. Excel will prompt the user for the name of the output file. (Unfortunately, there is no way to specify the name of the output file in code.)The
Collateparameter should be set toTrueto collate multiple multipage copies.- PrintPreview method
This method invokes Excel's print preview feature for the worksheet. Its syntax is:
WorksheetObject.PrintPreview- Protect method
This method protects a worksheet from modification. Its syntax is:
WorksheetObject.Protect(Password,DrawingObjects, _Contents,Scenarios,UserInterfaceOnly)(Note that the syntax varies from the same method of the Workbook object.)
The optional
Passwordparameter is a string that specifies a case-sensitive password for the worksheet.The optional
DrawingObjectsparameter should be set toTrueto protect shapes. The default value isFalse.The optional
Contentsparameter should be set toTrue, the default, to protect the cells in the worksheet.The optional
Scenariosparameter should be set toTrue, the default, to protect scenarios.The Protect method allows independent protection of cells from changes by the user and by code. In particular, if
UserInterfaceOnlyis set toTrue, then the user cannot make changes to the worksheet, but changes can be made through code. On the other hand, ifUserInterfaceOnlyisFalse(the default), then neither the user nor the programmer can alter the worksheet. Note that it is not the macros themselves that are protected, as the help documentation seems to indicate. Rather, the worksheet is protected from the effect of the macros.Note also that if the
UserInterfaceOnlyargument is set toTruewhen protecting a worksheet and then the workbook is saved, the entire worksheet (not just the interface) will be protected when the workbook is reopened. To unprotect the worksheet but reenable user interface protection, we must reapply the Protect method withUserInterfaceOnlyset toTrue.- ProtectionMode property (Read-Only)
This property is
Trueif user-interface-only protection is turned on (via the Protect method). Its default value isFalse.- SaveAs method
This method saves changes to the worksheet in a different file. Its syntax is:
WorksheetObject.SaveAs(Filename,FileFormat,Password, _WriteResPassword,ReadOnlyRecommended,CreateBackup, _AddToMru,TextCodePage,TextVisualLayout)The
Filenameparameter specifies the filename to use for the newly saved disk file. If a path is not included, Excel will use the current folder.The
FileFormatparameter specifies the file format to use when saving the file. Its value is one of theXlFileFormatconstants described in our discussion of the FileFormat property in Chapter 17.The
Passwordparameter specifies the password to use when saving the file and can be set to any case-sensitive string of up to 15 characters.The
WriteResPasswordparameter is a string that specifies the write-reservation password for this file. If a file is saved with a write-reservation password and this password is not supplied when the file is next opened, the file will be opened as read-only.We can set the
ReadOnlyRecommendedparameter toTrueto display a message when the file is opened, recommending that the file be opened as read-only.Set the
CreateBackupparameter toTrueto create a backup file.Set the
AddToMruparameter toTrueto add the workbook to the list of recently used files. The default value isFalse.The remaining parameters are not used in the U.S. English version of Excel.
- ScrollArea property
This property returns or sets the range where scrolling and cell selection is allowed. The value should be an A1-style range reference. For instance, the code:
ActiveSheet.ScrollArea = "A1:B200"
allows cell selection and scrolling only within the range A1:B200. To remove any restrictions on cell selection and scrolling, set this property to an empty string, as in:
ActiveSheet.ScrollArea = ""
Note that setting the scroll area has nothing to do with freezing panes.
- Select method
This method selects the worksheet. This is not the same as making it active through the Activate method. In fact, several sheets can be selected at one time (to delete them, for instance). The syntax is:
WorksheetObject.Select(Replace)where
Replaceis set toTrueto replace the current selection with the specified worksheet, rather than including the worksheet in the current selection.- SetBackgroundPicture method
This method sets the background graphic for a worksheet (or chart). The syntax is:
WorksheetObject.SetBackgroundPicture(FileName)where
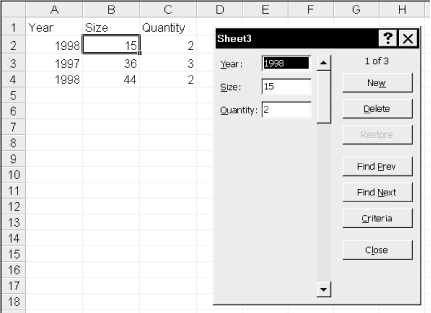
FileNameis the name of the graphic file to use for the background.- ShowDataForm method
This method displays the data form associated with the worksheet. Note that for the ShowDataForm method to work without generating an error, Excel must be able to determine that the current selection is part of a list. For information on the use of data forms, see the Excel 8 help topic "Guidelines for creating a list on a worksheet" or the Excel 9 help topic "About data forms."
The syntax of this method is simply:
WorksheetObject.ShowDataFormNote that the procedure in which the ShowDataForm method is called will pause while the data form is displayed. When the data form is closed, the procedure will resume at the line following the call to ShowDataForm. (In other words, the data form is modal.)
Figure 18-2 illustrates the data form for a worksheet.
- Unprotect method
This method removes protection from a worksheet. It has no effect if the worksheet is not protected. The syntax is:
WorksheetObject.Unprotect(Password)where
Passwordis the password used to protect the worksheet (if any). If we omit this argument for a sheet that is password-protected, Excel will prompt the user for the password.- UsedRange property
This ostensibly very useful property returns a Range object that represents the smallest rectangular region that encompasses any currently used cells.
Unfortunately, the UsedRange property has had a rather rocky history in past versions of Excel, and my experience is that the problems have not been completely resolved in Excel 97. (Unfortunately, I know of no single test to check the reliability of this property, and I have not yet used Excel 9 long enough to make a definitive statement about this version.) Thus, I strongly suggest that you use this method with caution, for it sometimes seems to include cells that once had contents but have since been completely cleared.
At the end of Chapter 19, we will give an example function that can be used to compute the correct used range.
- Visible property
This property returns
Trueif the worksheet is visible andFalseotherwise. However, in addition to setting this property toTrueorFalse, we can also set this property toxlVeryHidden, in which case the only way to make the worksheet visible is by setting this property toTruein code. Hence, the user cannot make the worksheet visible.