As we discussed in Chapter 15, the majority of the action in the Excel object model rests in the six objects: Application, Chart, PivotTable, Range, Workbook, and Worksheet. In this book, we will concentrate on the following objects, along with some of their children:
| Application |
| Chart |
| CommandBars |
| Dialogs |
| Global |
| Names |
| Range |
| Sheets |
| Window/Windows |
| Workbook/Workbooks |
| Worksheet |
| WorkSheetFunctions |
This constitutes the vast majority of the Excel object model. With this knowledge, you should be able to program most Excel tasks and be in a position to easily pick up any additional information from the Excel help files that you might need for less common programming tasks.
As you might imagine, several of these objects are complicated enough to deserve a complete chapter, so we will devote this chapter to discussing some of the properties and methods of the Application object itself, along with some of its simpler children.
Figure 16-1 shows the Application object, which sits atop the Excel object model and represents Excel itself, and its children. Each object is preceded by an icon that indicates whether it is a collection object (the little basket) or a noncollection object (the little oval).[1]
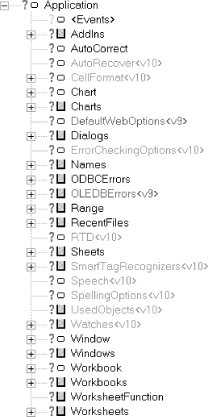
Figure 16-1. The Excel Application object and its children (the tag <vX> means that the object is new in version X of Excel)
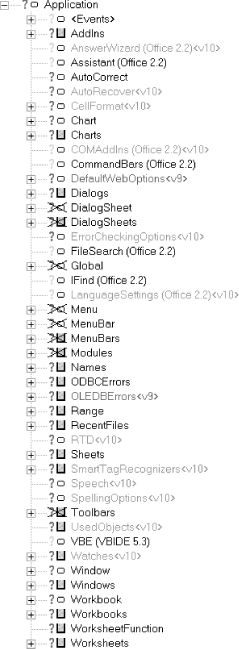
Figure 16-2 shows all children of the Application object, including those that are marked as hidden in the Excel object model. These latter objects are marked with an X through the icon. The objects in Figure 16-2 that are marked (Office 2.2) actually belong to the Microsoft Office object model, but are included here because they are accessible from the Excel object model and are sometimes used when programming the Excel model. There is also one object that belongs to the Visual Basic Extensibility model. It is marked as (VBIDE 5.3).
The Application object has a whopping 268 properties and methods, shown in Table 16-1.
Table 16-1. Application object members[2]
|
_Default |
DisplayRecentFiles |
OnDoubleClick |
|
_Evaluate |
DisplayScrollBars |
OnEntry |
|
_FindFile<v9> |
DisplayStatusBar |
OnKey |
|
_Run2 |
DoubleClick |
OnRepeat |
|
_Wait<v9> |
Dummy1 |
OnSheetActivate |
|
_WSFunction |
Dummy10 |
OnSheetDeactivate |
|
ActivateMicrosoftApp |
Dummy101<v9> |
OnTime |
|
ActiveCell |
Dummy11 |
OnUndo |
|
ActiveChart |
Dummy12<v9> |
OnWindow |
|
ActiveDialog |
Dummy13<v10> |
OperatingSystem |
|
ActiveMenuBar |
Dummy14<v10> |
OrganizationName |
|
ActivePrinter |
Dummy2 |
Parent |
|
ActiveSheet |
Dummy3 |
Path |
|
ActiveWindow |
Dummy4 |
PathSeparator |
|
ActiveWorkbook |
Dummy5 |
PivotTableSelection |
|
AddChartAutoFormat |
Dummy6 |
PreviousSelections |
|
AddCustomList |
Dummy7 |
ProductCode<v9> |
|
AddIns |
Dummy8 |
PromptForSummaryInfo |
|
AlertBeforeOverwriting |
Dummy9 |
Quit |
|
AltStartupPath |
EditDirectlyInCell |
Range |
|
AnswerWizard<v9> |
EnableAnimations |
Ready<v10> |
|
Application |
EnableAutoComplete |
RecentFiles |
|
AskToUpdateLinks |
EnableCancelKey |
RecordMacro |
|
Assistant |
EnableEvents |
RecordRelative |
|
AutoCorrect |
EnableSound |
ReferenceStyle |
|
AutoFormatAsYouTypeReplaceHyperlinks<v10> |
EnableTipWizard |
RegisteredFunctions |
|
AutomationSecurity<v10> |
ErrorCheckingOptions<v10> |
RegisterXLL |
|
AutoPercentEntry<v9> |
Evaluate |
Repeat |
|
AutoRecover<v10> |
Excel4IntlMacroSheets |
ReplaceFormat<v10> |
|
Build |
Excel4MacroSheets |
ResetTipWizard |
|
Calculate |
ExecuteExcel4Macro |
RollZoom |
|
CalculateBeforeSave |
ExtendList<v9> |
Rows |
|
CalculateFull<v9> |
FeatureInstall<v9> |
RTD<v10> |
|
CalculateFullRebuild<v10> |
FileConverters |
Run |
|
Calculation |
FileDialog<v10> |
Save |
|
CalculationInterruptKey<v10> |
FileFind |
SaveWorkspace |
|
CalculationState<v10> |
FileSearch |
ScreenUpdating |
|
CalculationVersion<v9> |
FindFile |
Selection |
|
Caller |
FindFormat<v10> |
SendKeys |
|
CanPlaySounds |
FixedDecimal |
SetDefaultChart |
|
CanRecordSounds |
FixedDecimalPlaces |
Sheets |
|
Caption |
GenerateGetPivotData<v10> |
SheetsInNewWorkbook |
|
CellDragAndDrop |
GetCustomListContents |
ShortcutMenus |
|
Cells |
GetCustomListNum |
ShowChartTipNames |
|
CentimetersToPoints |
GetOpenFilename |
ShowChartTipValues |
|
Charts |
GetPhonetic<v9> |
ShowStartupDialog<v10> |
|
CheckAbort<v10> |
GetSaveAsFilename |
ShowToolTips |
|
CheckSpelling |
Goto |
ShowWindowsInTaskbar<v9> |
|
ClipboardFormats |
Height |
SmartTagRecognizers<v10> |
|
ColorButtons |
Help |
Speech<v10> |
|
Columns |
Hinstance<v10> |
SpellingOptions<v10> |
|
COMAddIns<v9> |
Hwnd<v10> |
StandardFont |
|
CommandBars |
IgnoreRemoteRequests |
StandardFontSize |
|
CommandUnderlines |
InchesToPoints |
StartupPath |
|
ConstrainNumeric |
InputBox |
StatusBar |
|
ControlCharacters |
Interactive |
TemplatesPath |
|
ConvertFormula |
International |
ThisCell<v10> |
|
CopyObjectsWithCells |
Intersect |
ThisWorkbook |
|
Creator |
Iteration |
ThousandsSeparator<v10> |
|
Cursor |
LanguageSettings<v9> |
Toolbars |
|
CursorMovement |
LargeButtons |
Top |
|
CustomListCount |
Left |
TransitionMenuKey |
|
CutCopyMode |
LibraryPath |
TransitionMenuKeyAction |
|
DataEntryMode |
MacroOptions |
TransitionNavigKeys |
|
DDEAppReturnCode |
MailLogoff |
UILanguage |
|
DDEExecute |
MailLogon |
Undo |
|
DDEInitiate |
MailSession |
Union |
|
DDEPoke |
MailSystem |
UsableHeight |
|
DDERequest |
MapPaperSize<v10> |
UsableWidth |
|
DDETerminate |
MathCoprocessorAvailable |
UsedObjects<v10> |
|
DecimalSeparator<v10> |
MaxChange |
UserControl |
|
DefaultFilePath |
MaxIterations |
UserLibraryPath<v9> |
|
DefaultSaveFormat |
MemoryFree |
UserName |
|
DefaultSheetDirection |
MemoryTotal |
UseSystemSeparators<v10> |
|
DefaultWebOptions<v9> |
MemoryUsed |
Value |
|
DeleteChartAutoFormat |
MenuBars |
VBE |
|
DeleteCustomList |
Modules |
Version |
|
Dialogs |
MouseAvailable |
Visible |
|
DialogSheets |
MoveAfterReturn |
Volatile |
|
DisplayAlerts |
MoveAfterReturnDirection |
Wait |
|
DisplayClipboardWindow |
Name |
Watches<v10> |
|
DisplayCommentIndicator |
Names |
Width |
|
DisplayExcel4Menus |
NetworkTemplatesPath |
Windows |
|
DisplayFormulaBar |
NewWorkbook<v10> |
WindowsForPens |
|
DisplayFullScreen |
NextLetter |
WindowState |
|
DisplayFunctionToolTips<v10> |
ODBCErrors |
Workbooks |
|
DisplayInfoWindow |
ODBCTimeout |
WorksheetFunction |
|
DisplayInsertOptions<v10> |
OLEDBErrors<v9> |
Worksheets |
|
DisplayNoteIndicator |
OnCalculate | |
|
DisplayPasteOptions<v10> |
OnData | |
[2] (g) indicates a global member. | ||
Of course, there are far too many members to discuss even the majority in a nonreference book, so we will pick out a few of the more interesting and useful members. The important point is that you can use Table 16-1 to find a member that suits a particular purpose and then check the Excel help files for more information if it is not covered in this book.
We will also discuss additional properties and methods of the Application object throughout the remainder of the book, hopefully at times when the discussion will be more relevant.
In the hope of making our discussion a bit more structured, we will try to break the members in Table 16-1 into separate groups. Note, however, that this is in many cases a bit arbitrary.
Many of the members of the Application object are designed simply to gain access to a child object of the Application object. For instance, the Workbooks property simply returns the Workbooks collection object, which represents all of the currently open Workbook objects (i.e., workbooks). We will discuss many of these objects at the proper time, but it is worth taking a look at the members that return these objects now.
Table 16-2 shows the 48 members of the Application object that return child objects.
Table 16-2. Members that return child objects
|
Name |
ReturnType |
|---|---|
|
ActiveCell |
Range |
|
ActiveChart |
Chart |
|
ActiveDialog |
DialogSheet |
|
ActiveMenuBar |
MenuBar |
|
ActiveWindow |
Window |
|
ActiveWorkbook |
Workbook |
|
AddIns |
AddIns |
|
Application |
Application |
|
AutoCorrect |
AutoCorrect |
|
AutoRecover |
AutoRecover |
|
Cells |
Range |
|
Charts |
Sheets |
|
Columns |
Range |
|
DefaultWebOptions |
DefaultWebOptions |
|
Dialogs |
Dialogs |
|
DialogSheets |
Sheets |
|
ErrorCheckingOptions |
ErrorCheckingOptions |
|
Excel4IntlMacroSheets |
Sheets |
|
Excel4MacroSheets |
Sheets |
|
FindFormat |
CellFormat |
|
Intersect |
Range |
|
MenuBars |
MenuBars |
|
Modules |
Modules |
|
Names |
Names |
|
NextLetter |
Workbook |
|
ODBCErrors |
ODBCErrors |
|
OLEDBErrors |
OLEDBErrors |
|
Parent |
Application |
|
Range |
Range |
|
RecentFiles |
RecentFiles |
|
ReplaceFormat |
CellFormat |
|
Rows |
Range |
|
RTD |
RTD |
|
Sheets |
Sheets |
|
ShortcutMenus |
Menu |
|
SmartTagRecognizers |
SmartTagRecognizers |
|
Speech |
Speech |
|
SpellingOptions |
SpellingOptions |
|
ThisCell |
Range |
|
ThisWorkbook |
Workbook |
|
Toolbars |
Toolbars |
|
Union |
Range |
|
UsedObjects |
UsedObjects |
|
Watches |
Watches |
|
Windows |
Windows |
|
Workbooks |
Workbooks |
|
WorksheetFunction |
WorksheetFunction |
|
Worksheets |
Sheets |
There are some points worth noting in Table 16-2. First, there are several members that begin with the word "Active." It should come as no surprise that these members return the corresponding currently active object. For instance, the ActiveSheet member returns the currently active worksheet or chart, depending upon which is active at the time. (Note that there is no Sheet object. Sheets are either worksheets or stand-alone charts. We will discuss this issue in detail in Chapter 18.)
Observe also that often the name of a member is the same as the name of the object that the member returns. For instance, the AddIns property returns the AddIns collection, the Application property returns the Application object, and the Windows property returns the Windows collection.
The notable exceptions to this rule are:
The ThisWorkBook property returns the Workbook object containing the currently running code. One use of this property is in determining the location (complete path and filename) of the workbook on the user's computer, which is done by writing:
ThisWorkbook.FullName
Several object properties, such as Cells, Columns, and Rows, return a Range object. This is because there are no Cell, Column, or Row objects in the Excel object model. Instead, each of these "objects" is actually a Range object. (Incidentally, a similar thing happens in the Word object model. In particular, there are no Character, Word, or Sentence objects. Rather, these are Range objects in the Word object model as well.)
There are several members that affect the display of certain items:
- DisplayAlerts property (R/W Boolean)
When
True, Excel displays various warning messages (such as a confirmation message that precedes the deletion of a worksheet) while a macro is running. If you do not want a macro to be disturbed, then set this toFalse:Application.DisplayAlerts = False
The default value of this property is
True.- DisplayCommentIndicator property (R/W Long)
This property affects the way that Excel indicates the presence of a comment in an unselected cell. It can be any one of the constants in the following enum:
Enum XlCommentDisplayMode
     xlCommentIndicatorOnly = -1          ' Display indicator only
     xlNoIndicator = 0                    ' Display
     xlCommentAndIndicator = 1            ' Display indicator and comment
                                          '  itself
End Enum
Setting DisplayCommentIndicator to either
xlCommentIndicatorOnlyorxlCommentAndIndicatorsets the value of the DisplayNoteIndicator property (described later in this section) toTrue, while setting DisplayCommentIndicator toxlNoIndicatorchanges DisplayNoteIndicator toFalse.- DisplayFormulaBar property (R/W Boolean)
This property determines whether the formula bar is displayed. Its default value is
True.- DisplayFullScreen property (R/W Boolean)
This property determines whether Excel is in full-screen mode. (Note that displaying Excel in full-screen mode is not the same as maximizing Excel's application window.)
- DisplayNoteIndicator property (R/W Boolean)
If this property is
True(its default value) then cells containing notes display cell tips and contain note indicators (which are small dots in the upper-right corner of a cell). Setting DisplayNoteIndicator toFalsealso sets DisplayCommentIndicator toxlNoIndicator, while setting DisplayNoteIndicator toTruesets DisplayCommentIndicator toxlCommentIndicatorOnly.
Several Application members enable or disable certain Excel features:
- AutoFormatAsYouTypeReplaceHyperlinks property (R/W Boolean)
Set to
Trueto have Excel automatically format hyperlink text as a hyperlink. Set toFalseto turn off this often-annoying feature of Excel.- EnableAnimations property (R/W Boolean)
This property determines whether animated insertion and deletion is enabled. When animation is enabled, inserted worksheet rows and columns appear slowly and deleted worksheet rows and columns disappear slowly. The default value is
False.- EnableAutoComplete property (R/W Boolean)
This property determines whether Excel's AutoComplete feature is enabled; its default value is
True.- EnableCancelKey property (R/W Long)
This property controls how Excel handles the Ctrl -Break or Esc key combinations during a running procedure. It can be one of the following
XlEnableCancelKeyconstants:Enum XlEnableCancelKey xlDisabled = 0 xlInterrupt = 1 xlErrorHandler = 2 End EnumThe meanings of these constants follow:
-
xlDisabled Trapping is disabled (the keystrokes are ignored).
-
xlInterrupt The running procedure is interrupted by the display of a dialog box that enables the user to either debug or end the procedure. This is the default value.
-
xlErrorHandler The keystroke interrupt is sent to the running procedure as an error that is trappable by an error handler using the
On Error
GoTo
statement. The error code is 18.
Note that this property can be dangerous and should be used with great circumspection. In particular, if you set the property to
xlDisabled, then there is no way to interrupt an infinite loop. Similarly, if you set the property toxlErrorHandlerbut your error handler returns using theResumestatement, there is no way to stop nonself-terminating code.For these reasons, Excel always resets the EnableCancelKey property to
xlInterruptwhenever Excel returns to the idle state and there is no code running.-
- EnableEvents property (R/W Boolean)
This property is
True(its default value) if events are enabled for the Application object. (For more on this, see Chapter 11.)- EnableSound property (R/W Boolean)
This property enables and (mercifully) disables sounds for Microsoft Office. The default value is
False.
It is possible to assign macros to certain events. (These are special events—not the events that we discussed in Chapter 11.) For instance, we can assign a macro to play whenever a particular key is pressed. This is done by invoking the OnKey method for the Application object. Let us describe two of the more useful events that can be assigned a macro.
The syntax for the OnKey method is:
Application.OnKey(Key,Procedure)
where Key is the key or key combination
(written as a string) that will execute the macro and
Procedure is the name of that macro.
Note that we can alter the normal behavior of Excel by assigning a
key combination to the Key parameter that
has a normal Excel response (such as Ctrl-S for save). If we assign
an empty string to the Procedure
parameter, then Excel will omit its normal response (so nothing will
happen). If we omit the Procedure
parameter, then Excel will return the key combination to its normal
function.
To illustrate, the following code will disable the Ctrl-o key combination, which normally displays the Open dialog box:
Application.OnKey "^o",""
The following code returns the Ctrl-o key combination to its normal Excel function:
Application.OnKey "^o"
The Key argument can specify a single key
or any key combined with one or more of Alt, Ctrl, or Shift. Normal
alphanumeric keys are denoted by themselves, as in
"a,"
"A,"
"1." Table 16-3
shows how to enter special keys. For instance, the F2 key is denoted
by "{F2}", and the Enter key is
denoted either by "{ENTER}" or
"~".
Table 16-3. Special Keys for the Key Parameter
|
Key |
Code |
|---|---|
|
Backspace |
{BACKSPACE} or {BS} |
|
Break |
{BREAK} |
|
Caps Lock |
{CAPSLOCK} |
|
Clear |
{CLEAR} |
|
Delete or Del |
{DELETE} or {DEL} |
|
Down Arrow |
{DOWN} |
|
End |
{END} |
|
Enter (numeric keypad) |
{ENTER} |
|
Enter |
~ (tilde) |
|
Esc |
{ESCAPE} or {ESC} |
|
Help |
{HELP} |
|
Home |
{HOME} |
|
Ins |
{INSERT} |
|
Left Arrow |
{LEFT} |
|
Num Lock |
{NUMLOCK} |
|
Page Down |
{PGDN} |
|
Page Up |
{PGUP} |
|
Return |
{RETURN} |
|
Right Arrow |
{RIGHT} |
|
Scroll Lock |
{SCROLLLOCK} |
|
Tab |
{TAB} |
|
Up Arrow |
{UP} |
|
F1 through F15 |
{F1} through {F15} |
To combine keys with Shift, Ctrl, or Alt, use the following prefixes:
For instance, to denote the Alt-F2 key combination, write "%{F2}". To denote Ctrl-Shift-Enter, write "^+{ENTER}".
In order to use one of the characters +, ^, %, {, }, or ~ without having it interpreted as a special key, simply enclose the character in braces. For instance, to reassign the { key, we would assign the Key parameter to "{{}".
This method is used to run a procedure at a specific time or after a specific amount of time has passed. The syntax is:
Application.OnTime(EarliestTime,Procedure,LatestTime,Schedule)
Of course, the Procedure parameter is the
name of the macro to run. The EarliestTime
parameter is the time you want the macro to be run. To specify a
time, we use the TimeValue function. For
instance, the following code executes the macro
test in the ThisWorkbook code
module of the book1 workbook at 3:58 P.M.:
Application.OnTime TimeValue("3:58 PM"), _
   "d:\excel\book1.xls!ThisWorkbook.test"
LatestTime is an optional parameter that
specifies the latest time at which the procedure can
begin running. We can use the
TimeValue function to specify a time for this
parameter, or we can set LatestTime to
EarliestTime plus some additional time.
For instance, the following code requires that Excel run the macro no
later than 30 seconds following 3:58 P.M.:
Application.OnTime TimeValue("3:58 PM"), _
   "d:\excel\book1.xls!ThisWorkbook.test", _
   TimeValue("3:58 PM") + 30
The LatestTime parameter may be useful,
since if Excel is busy (running another procedure, for instance),
then execution of the macro denoted by
Procedure will be delayed. If you do not
want the macro to be run after a certain time, then set the
LatestTime parameter.
If you want to clear a previously set OnTime macro, you can call the
procedure with the Schedule parameter set
to False. Otherwise, the parameter can be omitted,
since its default value is True.
Note that the Now function returns the current
time. Thus, to schedule a macro for a certain amount of time from the
present, we can set EarliestTime to:
Now + TimeValue(time)The Application object has several members related to calculation.
This method calculates all open workbooks, a specific worksheet in a workbook, or a specified range of cells on a worksheet, depending upon how it is applied.
When applied to the Application object, as in:
Application.Calculate
Excel will calculate all open workbooks. When applied to a specific worksheet, as in:
Worksheets(1).Calculate
Excel will calculate that worksheet. When applied to a specific range, as in:
Worksheets(1).Rows(2).Calculate
Excel will calculate the cells in that range. Note that since Calculate is a global method, we can simply write:
Calculate
in place of:
Application.Calculate
This method calculates all data and rebuilds all dependencies (formulas that refer to other cells) in all open workbooks. This method applies only to the Application object.
This property sets Excel's calculation mode and can be set to any of the following constants:
Enum XlCalculation
     xlCalculationManual = -4135
     xlCalculationAutomatic = -4105
     xlCalculationSemiautomatic = 2
End Enum
The default value is xlCalculationAutomatic. As is
typical, the documentation does not explain the term semiautomatic
(at least I could not find an explanation). However, there is an
option in Excel's Calculation tab under the Options
dialog that allows us to specify automatic calculation except for
data tables; this is what is meant by semiautomatic.
This property is True if workbooks are calculated
before they are saved to disk. This is relevant only when the
Calculation property is set to xlManual.
Let us take a brief look at the members that are related to file operations.
This property returns or sets the default path that Microsoft Excel uses when it opens or saves files. This setting can also be changed by the user in the General tab of the Options dialog.
This property returns or sets the default format for saving files.
The default for this property is xlWorkbookNormal,
indicating the normal workbook format for the current version of
Excel. The possible values for this property are the
XLFileFormat constants shown in Table 16-4.
Table 16-4. XLFileFormat constants
|
xlAddIn (18) |
xlExcel5 (39) |
xlWJ3 (40) |
|
xlCSV (6) |
xlExcel7 (39) |
xlWJ3FJ3 (41) |
|
xlCSVMac (22) |
xlExcel9795 (43) |
xlWK1 (5) |
|
xlCSVMSDOS (24) |
xlHtml (44)<v9> |
xlWK1ALL (31) |
|
xlCSVWindows (23) |
xlIntlAddIn (26) |
xlWK1FMT (30) |
|
xlCurrentPlatformText (-4158) |
xlIntlMacro (25) |
xlWK3 (15) |
|
xlDBF2 (7) |
xlSYLK (2) |
xlWK3FM3 (32) |
|
xlDBF3 (8) |
xlTemplate (17) |
xlWK4 (38) |
|
xlDBF4 (11) |
xlTextMac (19) |
xlWKS (4) |
|
xlDIF (9) |
xlTextMSDOS (21) |
xlWorkbookNormal (-4143) |
|
xlExcel2 (16) |
xlTextPrinter (36) |
xlWorks2FarEast (28) |
|
xlExcel2FarEast (27) |
xlTextWindows (20) |
xlWQ1 (34) |
|
xlExcel3 (29) |
xlUnicodeText (42)<v9> |
xlXMLSpreadsheet (46)<v10> |
|
xlExcel4 (33) |
xlWebArchive (45)<v10> | |
|
xlExcel4Workbook (35) |
xlWJ2WD1 (14) |
This property programmatically opens a file-related dialog box and returns a FileDialog object. It takes as parameter one of the following constants to indicate the type of dialog:
msoFileDialogFilePicker
msoFileDialogFolderPicker
msoFileDialogOpen
msoFileDialogSaveAs
To illustrate, the following code:
' Open dialog
With Application.FileDialog(msoFileDialogFolderPicker)
    .Show
    ' Display path
    MsgBox .SelectedItems(1)
End With
allows the user to select a folder and then displays the folder's complete path.
This method, whose syntax is:
Application.FindFile
displays the Open dialog box. If a file is opened successfully by the
user, the method returns True. If the user cancels
the dialog box, the method returns False.
This method displays the Open dialog box and gets a filename or filenames from the user but does not open the files. Its syntax is:
Application.GetOpenFilename(FileFilter, _FilterIndex,Title,ButtonText,MultiSelect)
The optional FileFilter parameter is a
string that specifies what to put in the "Files of
type" drop-down list box in the Open dialog. In
other words, it specifies file filtering criteria. This string is in
two parts, of the form:
description, filefilter
The first part is the description of the file type, and the second part is the MS-DOS wildcard file-filter specification. The two parts are separated by a comma. Note that the first part is the string that appears in the "Files of type" drop-down box in the Open dialog box. Thus, the first part also includes the wildcard file-filter specification. Perhaps a few examples will help clarify:
It is also possible to use multiple wildcard file filters, as in:
Backup Files (*.xlk; *.bak), *.xlk; *.bak
(Note the semicolons.) If the FileFilter
argument is omitted, the default is:
All Files (*.*),*.*
Note that FileFilter can consist of more
than one filter specification, separated by commas, as in:
Debug.Print Application.GetOpenFilename( _
   "Text Files (*.txt),*.txt, _
   Backup Files (*.xlk; *.bak), *.xlk; *.bak")
In this case, the optional FilterIndex
parameter specifies which of the filters appears in the
"Files of type" drop-down list box.
For instance, the following will cause the second filter (backup
files) to appear in the "Files of
type" drop-down list box:
Debug.Print Application.GetOpenFilename( _
   "Text Files (*.txt),*.txt, _
   Backup Files (*.xlk; *.bak), *.xlk; *.bak", 2)
The optional Title parameter specifies the
title of the dialog box. If this argument is omitted, the title is
Open. The ButtonText parameter is ignored
by Windows, but used on the Macintosh.
The optional MultiSelect property is set
to True to allow multiple filenames to be selected
and False to allow only one filename to be
selected. The default value is False. To select
multiple files from the Open dialog, the user must hold down the Ctrl
or Shift key.
The method returns the selected filename or the name entered by the
user. The returned name may also include a path specification. If the
MultiSelect parameter is
True, the return value is an array of the selected
filenames (even if only one filename is selected). The method returns
False if the user cancels the dialog box.
When Multiselect is
True, we can determine the number of files
selected by the user by using the UBound
function to get the upper bound for the returned array, as in:
NumFiles = UBound(Application.GetOpenFilename(MultiSelect:=True))
Note finally that this method may change the current drive or folder.
This method is similar to the GetOpenFilename method, but instead displays the Save As dialog box and gets a filename from the user without saving any files. The syntax is:
Application.GetSaveAsFilename(InitialFilename, _FileFilter,FilterIndex,Title,ButtonText)
The optional InitialFilename parameter
specifies the filename that is placed in the "File
name" text box on the Save As dialog. If this
argument is omitted, Excel uses the name of the active workbook. The
other parameters (and return values) are the same as for the
GetOpenFilename method. As with GetOpenFilename, this method may
change the current drive or folder.
This property returns a RecentFiles collection that represents the list of recently used files. There are two interesting aspects to the RecentFiles collection. First, it has a Maximum property that returns or can be set to the maximum number of files allowed in the recently used files list that appears on Excel's File menu. This number must be an integer between 0 and 9, inclusive. Thus, the code:
MsgBox Application.RecentFiles.Maximum
displays the current value.
Second, we can print a list of the filenames of the most recently used files as follows (of course, you may want to do more than print this list):
Dim rf As RecentFile
For Each rf In Application.RecentFiles
   Debug.Print rf.Name
Next
Note that the RecentFiles collection contains RecentFile objects, and not simply the names of the recently used files, as one might expect.
The following members have an effect on the current settings of Excel:
- CopyObjectsWithCells property (R/W Boolean)
When this property is
True, objects (such as embedded controls or shapes) are cut, copied, extracted, and sorted along with cells.- Cursor property (R/W Long)
This property returns or sets the appearance of the mouse pointer. It can be one of the following
XlMousePointerconstants:Enum XlMousePointer xlDefault = -4143 xlNorthwestArrow = 1 xlWait = 2 xlIBeam = 3 End EnumIt is considered good programming practice to set the mouse pointer to
xlWaitif your code will take more than a second or so to complete. Of course, you will need to return the mouse pointer to its previous state when the procedure terminates. The proper way to do this is to save the original Cursor property value before changing it, so it can be reset to its original value.- CutCopyMode property (R/W Long)
This property returns or sets the status of Cut or Copy mode.
The CutCopyMode property can be set to either
TrueorFalse. On the PC, these have the same effect (but differ on the Macintosh); namely, to cancel Cut or Copy mode and remove the moving border that surrounds the region to be cut or copied.The CutCopyMode property can return
False, indicating that Excel is in neither Cut nor Copy mode, or else one of the two values from the following enum:Enum XlCutCopyMode xlCopy = 1 ' Copy mode xlCut = 2 ' Cut mode End Enum- DataEntryMode property (R/W Long)
This property returns or sets Data Entry mode. When in Data Entry mode, data can be entered only in the cells in the currently selected range.
The property can assume any of the following constant values:
-
xlOn Data Entry mode is on.
-
xlOff Data Entry mode is off.
-
xlStrict Data Entry mode is on, and pressing Esc will not turn it off.
-
- EditDirectlyInCell property (R/W Boolean)
When this property is
True(which is its default value), Excel allows editing in cells. Otherwise, it does not allow editing in the cells (but you can still edit in the formula bar).- FixedDecimal property (R/W Boolean)
When this property is
True, all numeric data entered will be formatted with the number of fixed decimal places set by the FixedDecimalPlaces property. The default value of this property isFalse; the value of the FixedDecimalPlaces property is ignored.- FixedDecimalPlaces property (R/W Long)
This property returns or sets the number of fixed decimal places used when the FixedDecimal property is set to
True. For example, if the FixedDecimalProperty isTrueand FixedDecimalPlaces is set to 3, an entry of 100 in a cell will be displayed as 0.1.- Interactive property (R/W Boolean)
When this property is set to
False, Excel will block all input from the keyboard and mouse except for input to dialog boxes that are displayed by code. This will prevent the user from interfering with the currently running macro. The default value of the Interactive property isTrue.Of course, considerable care must be taken with this property. For instance, if you forget to reset the property to
True, or if your code terminates unexpectedly, the user may need to restart Excel. Note that the Alt-F4 key combination will work to shut down Excel, but the user will not be able to save any work. Be careful with this one!- MoveAfterReturn property (R/W Boolean)
When this property is
True, its default value, the active cell will be moved as soon as the Enter key is pressed. The MoveAfterReturnDirection property is used to specify the direction in which the active cell will be moved. If set toFalse, the active cell remains unchanged after the Enter key is pressed.- MoveAfterReturnDirection property (R/W Long)
This property returns or sets the direction in which the active cell is moved when the user presses Enter if the MoveAfterReturn property is set to
True. It can assume any one of the following values:Enum XlDirection xlUp = -4162 xlToRight = -4161 xlToLeft = -4159 xlDown = -4121 End Enum- ReferenceStyle property (R/W Long)
This property returns or sets the style (A1 style or R1C1 style) in which Excel displays cell references and row and column headings. It can be one of the following
XlReferenceStyleconstants:Enum XlReferenceStyle xlR1C1 = -4150 xlA1 = 1 End Enum- ScreenUpdating property (R/W Boolean)
When this property is
True, its default value, screen updating is turned on. Since this may slow down some display-intensive procedures considerably, you may want to temporarily turn off screen updating.- SheetsInNewWorkbook property (R/W Long)
This property returns or sets the number of sheets that Excel automatically inserts into new workbooks.
- ShowChartTipNames property (R/W Boolean)
When this property is
True, its default value, Excel charts show chart tip names.- ShowChartTipValues property (R/W Boolean)
When this property is
True, its default value, Excel charts show chart tip values.- ShowToolTips property (R/W Boolean)
When this property is
True, its default value, ToolTips are turned on.- StandardFont property (R/W String)
This property returns or sets the name of the standard font. Note that the change does not take effect until Excel is restarted.
- StandardFontSize property (R/W Long)
This property returns or sets the standard font size, in points. The change does not take effect until Excel is restarted.
- StartupPath property (Read-Only String)
This property returns the complete path of the startup folder, excluding the final separator.
- TemplatesPath property (Read-Only String)
Several members of the Application object perform some sort of action.
This method converts cell references in a formula between the A1 and R1C1 reference styles. It can also convert between relative and absolute references. Its syntax is:
Application.ConvertFormula(Formula,FromReferenceStyle,ToReferenceStyle, _ToAbsolute,RelativeTo)
The Formula parameter is a string
containing the formula to convert. It must be a valid formula,
beginning with an equal sign.
The FromReferenceStyle parameter must be
one of the following constants:
Enum XlReferenceStyle
     xlR1C1 = -4150
     xlA1 = 1
End EnumThe optional ToReferenceStyle parameter is
the reference style into which to convert the formula. It is also one
of the XlReferenceStyle constants. If we omit this
argument, the reference style is not changed.
The optional ToAbsolute parameter
specifies the converted reference type and can be one of the
following XlReferenceType constants:
Enum XlReferenceType
     xlAbsolute = 1
     xlAbsRowRelColumn = 2
     xlRelRowAbsColumn = 3
     xlRelative = 4
End Enum
If this argument is omitted, the reference type is not changed.
Finally, the optional RelativeTo parameter
is a Range object containing a single cell. This cell is used to
determine relative references.; that is, we can think of the formula
as being placed in this cell and so all relative references are with
respect to this cell.
To illustrate, consider the following code:
sFormula = "=D2"
Debug.Print Application.ConvertFormula(sFormula, _
    xlA1, xlR1C1, xlRelative, Range("C3"))
Debug.Print Application.ConvertFormula(sFormula, _
    xlA1, xlR1C1, xlRelRowAbsColumn, Range("C3"))
The second line converts from A1 notation to R1C1 notation, assuming that the formula is in cell C3. Hence, the output is:
= R[-1]C[1]
since D2 is one column to the right and one row up from cell C3. The third line of code converts A1 notation to R1C1 notation, but uses an absolute column reference and so produces:
= R[-1]C4
since column 4 is one column to the right of column 3.
This method converts an Excel name to an object or a value. Its syntax is:
Application.Evaluate(Name)
(This method also applies to Chart, DialogSheet, and Worksheet objects.)
The Name parameter is the name of the
object. It can be any of the following types of name:
- An A1-style reference
Namecan be any A1-style reference to a single cell. The reference is considered to be absolute. To illustrate, consider the following code, each line of which purports to place the word Mary in cell A1:Range("A1").Value = "Mary" A1.Value = "Mary" Evaluate("A1").Value = "Mary" [A1].Value = "Mary"The first line uses the Range method. The second line will produce an error because Excel considers A1 a variable rather than a cell reference. The third line uses the Evaluate method to convert the name of a cell to a Range object. The fourth line is shorthand for the third line.
- A range
Namecan be any range formed by using the range operator (colon), intersect operator (space), and union operator (comma) with references. The Evaluate method will return the corresponding Range object. To illustrate, consider the following code:Evaluate("B2:C4").Select Evaluate("B2:C4, D5:F6").Select Evaluate("B2:C4 B1:F2").Select [B2:C4 B1:F2].SelectThe first line selects the range B2:C4. The second line selects the union of the two rectangular ranges B2:C4 and D5:F6. The third line selects the intersection of the two rectangular ranges B2:C4 B1:F2. The fourth line is shorthand for the third line.
- A Defined Name
Namecan be any defined name. For instance, if we name a rangetest, then the following code selects that range:Evaluate("test").Select(Incidentally, I have had some inconsistent results using the syntax
[test].Select. It seems to work some but not all of the time.) We can also use formula names. For instance, the following code displays the sum of the values in cells B2 through B5:MsgBox Evaluate("SUM(B2:B5)")Note that external references (references to other workbooks) can be used as well, as in:
Workbooks("BOOK2.XLS").Sheets("MySheet").Evaluate("A1").Select
As we have seen, using square brackets is equivalent to calling the Evaluate method with a string argument. Square brackets have the advantage of producing more concise code, but they cannot be used with string variables. For instance, we can write:
Dim sFormula As String
sFormula = "SUM(B2:B5)"
MsgBox Evaluate(sFormula)
But the code:
MsgBox [sFormula]
will simply display the string SUM(B2:B5), as it would without the square brackets.
This method selects a given range in any workbook. (It can also select a Visual Basic procedure.) The syntax is:
Application.Goto(Reference,Scroll)
The optional Reference parameter specifies
the destination. It can be a Range object, a string that contains a
cell reference in R1C1-style notation, or a string that contains a
Visual Basic procedure name. If the argument is omitted, the
destination is the destination used in the previous call to GoTo.
The optional Scroll parameter should be
set to True to scroll through the window so that
the upper-left corner of the destination appears in the upper-left
corner of the window. The default is False, which
means the destination will not move if it was visible within the
window, or else it will appear at the bottom of the window if it was
not visible.
For example, to select the range B5:C6 in the active worksheet, we can write:
Application.Goto Reference:=Range("B5:C6")or:
Application.Goto Reference:="R5C2:R6C3"
The GoTo method also works in conjunction with the PreviousSelections array. In particular, the Application object has a PreviousSelections property that returns an array of Range objects referencing the previous four ranges selected. The syntax is:
Application.PreviousSelections(Index)
where Index is a number between 1 and 4.
Each time the user selects a range or cell either by using the Name box or the Go To command (on the Edit menu), or the Goto method is called in code, the current range (before the action takes place) is added to the top (index 1) of the PreviousSelections array and the other items in the array are moved down one index value. (The item in position 4, of course, drops out of the array.)
As a simple illustration, consider the code:
Application.Goto Sheet1.Range("A1")
ActiveCell.Value = 1
Application.Goto Sheet2.Range("A1")
ActiveCell.Value = 2
which fills the first cell on each of two sheets, using the GoTo method to add the cell ranges to the PreviousSelections array.
Now the following line will alternate between the two cells when executed repeatedly:
Application.Goto Application.PreviousSelections(1)
Note that the GoTo method differs from the Select method in several ways:
Both methods select the given range, but the Select method does not activate the sheet upon which the new selection is made (if it is not already active).
The Select method does not have a
Scrollargument.The Select method does not add the current selection to the PreviousSelections array.
The Select method has a
Replaceargument.
This method closes Excel. Note that the BeforeClose event will fire
when the Quit method is executed. (This event
has a Cancel parameter that can be set to
cancel the quit operation.) We discussed workbook events (including
BeforeClose) in Chapter 11.
Note that if there are any unsaved open workbooks when the Quit
method is invoked, Excel will display the usual dialog box asking the
user whether he or she wants to save the changes. We can prevent this
either by explicitly saving all workbooks (using the Save method)
before invoking the Quit method or by setting the DisplayAlerts
property to False. However, in the latter case,
any unsaved data will be lost without warning!
It is also important to note that Excel checks the Saved property of
a workbook in order to determine whether to prompt for saving. Thus,
if we set the Saved property to True but do not
save the workbook, Excel will quit without prompting to save the
workbook (and without saving the workbook).
Here are some additional members of the Application object.
The CellFormat object works in conjunction with the FindFormat and ReplaceFormat properties of the Application object to programmatically find and replace cell formatting.
Specifically, the new FindFormat and ReplaceFormat properties of the Application object each return a unique CellFormat object. We can set the formatting properties of either of these CellFormat objects and then use the Replace method of the Range object to replace the formatting in the CellFormat object returned by the FindFormat property, with the formatting in the CellFormat object returned by the ReplaceFormat property.
For example, the following code replaces cells that have been formatted as bold with bold italic formatting. Note that nowhere in the code is a CellFormat object explicitly declared.
Sub Example_CellFormat()

' Replace Bold with Bold Italic

With Application.FindFormat
   .Clear
   .Font.Bold = True
End With
With Application.ReplaceFormat
   .Clear
   .Font.Bold = True
   .Font.Italic = True
End With
Cells.Replace SearchFormat:=True, ReplaceFormat:=True

End Sub
The CellFormat object has a number of format-related properties. These are listed here. (The CellFormat object has a single method named Clear, which clears all formatting.) These are used just as we used the Font property in the previous code.
AddIndent
Borders
Font
FormulaHidden
HorizontalAlignment
IndentLevel
Interior
Locked
MergeCells
NumberFormat
NumberFormatLocal
Orientation
ShrinkToFit
VerticalAlignment
WrapText
We have already discussed the VBA InputBox
function, which is used to return input from the user. The InputBox
method of the Application object also returns user information, but
has the advantage of being able to validate the return type and to
return Excel formulas, objects, and error values.
The syntax for the InputBox method is:
Application.InputBox(Prompt,Title,Default, _Left,Top,HelpFile,HelpContextId,Type)
The parameters are as follows (note that all of the parameters are
optional except the Prompt parameter):
-
Prompt The message to be displayed in the dialog box; it can be a string, number, date, or Boolean value.
-
Title The caption for the dialog box. The default caption is Input.
-
Default The value that will appear in the text box when the dialog box is displayed. If this argument is omitted, the text box will be empty.
-
LeftandTop The upper-left corner of the dialog box in points, measured from the upper-left corner of the screen.
-
HelpFileandHelpContextID The name of the Help file and the context ID for a help topic to invoke when the user hits the Help button on the input box. If these arguments are omitted, then no Help button is included on the input box dialog.
-
Type The data type that can be entered into the text box by the user (and thus the return type of the method). It can be one or a sum of the values in Table 16-5. When the value is a sum of several numbers, then any of the corresponding data types is acceptable. It follows that formulas are always acceptable. The default value is 2 for Text.
Table 16-5. Values for the InputBox Method's Type Parameter
|
Value |
Meaning |
|---|---|
|
0 |
A formula |
|
1 |
A number |
|
2 |
Text (a string) |
|
4 |
A logical value (True or False) |
|
8 |
A reference to a single cell |
|
16 |
An error value, such as #N/A |
|
64 |
An array of values |
Unfortunately, the type checking done by the InputBox method does not seem to be very accurate. To illustrate, the InputBox statement:
Range("A1").Value = Application.InputBox( _
   Prompt:="Enter data", Type:=0)
should accept only formulas and not text. However, entering the text
"test" simply puts this text in
cell A1. (The help documentation does say that when
Type is 0, InputBox returns the formula as
text and any references in the formula are returned as A1-style
references.)
Note that when Type is equal to 8, the
InputBox method returns a Range object that refers to the cell in the
reference. Therefore, we must use the Set
statement to assign this object to a variable of type Range, as in:
Dim rng as Variant
Set rng = Application.InputBox( _
   Prompt:="Enter Cell Reference", Type:=8)
If we omit the Set statement, the variable is set
to the value in the range, rather than the Range object itself. (If
we had declared the rng variable to be of
type Range, then the preceding code, without the
Set statement, would result in the error message,
"Object variable or With block variable not
set.")
When Type is equal to 64, the user is
expected to enter a rectangular cell range that will be treated as a
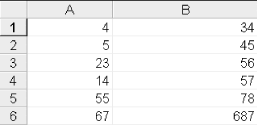
two-dimensional array. For instance, consider a worksheet as shown in
Figure 16-3.
The code:
Dim a As Variant
a = Application.InputBox( _
   Prompt:="Enter Array", Type:=64)
Debug.Print a(3,2)
will accept the input:
A1:B6
after which a(3,2) will equal 56.
As a final example, if we respond to the code:
Dim a As Variant
a = Application.InputBox( Prompt:="Enter Formula", Type:=1)
Range("D1").Formula = a
with a formula, Excel does not put the formula in the cell D1 (it puts only the number), even though 1 is a sum of 1 and 0. In other words, we shouldn't take the sum statement too literally.
This property simply returns the currently selected object in the
active window. For instance, if a cell is selected, the property
returns a Range object denoting this cell. The Selection property
returns Nothing if nothing is selected. Note that
the property also applies to a Window object and returns the current
selection in that window.
This useful property returns or sets the text in
Excel's status bar. To return control of the status
bar to Excel, simply set this property to False.
(Similarly, this property will return False if
Excel currently has control over the status bar.)
This method returns a Range object that represents the rectangular intersection of two or more ranges. The syntax is:
Application.Intersect(Arg1,Arg2, ...)
where Arg1,
Arg2, . . . are the Range objects whose
ranges we wish to intersect. At least two Range
objects must be specified. For instance, the following line selects
the intersection, which is the range B2:D5:
Application.Intersect(Range("A1:D5"), Range("B2:F9")).SelectThis method is the analog of the Intersect method, but returns the union of two or more ranges. The syntax is:
Application.Union(Arg1,Arg2, ...)
where Arg1,
Arg2, . . . are the Range objects whose
ranges we wish to join together. At least two Range objects must be
specified. For instance, the following code selects both rectangular
regions A1:D5 and B2:F9:
Application.Union(Range("A1:D5"), Range("B2:F9")).Select[1] This figure and others like it was taken from a program called Object Model Browser. For more on this, please check out my web site at http://www.romanpress.com.