Looking at some useful methods of the Stage
and Scene
classes
Alternating scenes within a single stage
Displaying alert boxes
Discovering the proper way to exit a JavaFX program
O for a Muse of fire, that would ascend The brightest heaven of Invention,
A kingdom for a stage, princes to act, And monarchs to behold the swelling scene!
So begins William Shakespeare’s play Henry V,
and so also begins this chapter, in which I explore the various ways to manipulate the appearance of a JavaFX application by manipulating its stage and its swelling scenes.
Specifically, this chapter introduces you to important details about the Stage
class and the Scene
class so that you can control such things as whether the window is resizable and if so, whether it has a maximum or a minimum size. You also learn how to coerce your programs into displaying additional stages beyond the primary stage, such as an alert or confirmation dialog box. And finally, you learn the proper way to end a JavaFX program by handling the events generated when the user closes the stage.
Examining the Stage Class
A stage, which is represented by the Stage
class, is the topmost container in which a JavaFX user interface appears. In Windows, on a Mac, or in Linux, a stage is usually a window. On other types of devices, such as a smartphone or tablet, the stage may be the full screen or a tiled region of the screen.
When a JavaFX application is launched, a stage known as the primary stage
is automatically created. A reference to this stage is passed to the application’s start
method via the primaryStage
parameter:
@Override public void start(Stage primaryStage) { // primaryStage refers to the // application's primary stage. }
You can then use the primary stage to create the application’s user interface by adding a scene, which contains one or more controls or other user-interface nodes.
In many cases, you will need to access the primary stage outside of the scope of the start
method. You can easily make this possible by defining a class field and using it to reference the primary stage. You see an example of how to do that later in this chapter, in the section “Switching Scenes
.”
The primary stage initially takes on the default characteristics of a normal windowed application, which depends on the operating system within which the program will run. You can, if you choose, change these defaults to suit the needs of your application. At the minimum, you should always set the window title. You may also want to change such details as whether the stage is resizable and various aspects of the stage’s appearance.
The Stage
class comes equipped with many methods that let you manipulate the appearance and behavior of a stage. Table 3-1
lists the ones you’re most likely to use.
TABLE 3-1
Commonly Used Methods of the Stage Class
Method
Description
void close()
Closes the stage.
void initModality(Modality modality)
Sets the modality of the stage. This method must be called before the show
method is called. The modality can be one of the following:
Modality.NONE
Modality.APPLICATION_MODAL
Modality.WINDOW_MODAL
void initStyle(StageStyle style)
Sets the style for the stage. This method must be called before the show
method is called. The style can be one of the following:
StageStyle.DECORATED
StageStyle.UNDECORATED
StageStyle.TRANSPARENT
StageStyle.UNIFIED
StageStyle.UTILITY
void getMaxHeight(double maxheight)
Gets the maximum height for the stage.
void getMaxWidth(double maxwidth)
Gets the maximum width for the stage.
void getMinHeight(double maxheight)
Gets the minimum height for the stage.
void getMinWidth(double maxwidth)
Gets the minimum width for the stage.
void setFullScreen(boolean fullscreen)
Sets the fullscreen status of the stage.
void setIconified(boolean iconified)
Sets the iconified status of the stage.
void setMaximized(boolean maximized)
Sets the maximized status of the stage.
void setMaxHeight(double maxheight)
Sets the maximum height for the stage.
void setMaxWidth(double maxwidth)
Sets the maximum width for the stage.
void setMinHeight(double maxheight)
Sets the minimum height for the stage.
void setMinWidth(double maxwidth)
Sets the minimum width for the stage.
void setResizable(boolean resizable)
Sets the fullscreen status of the stage.
void setScene(Scene scene)
Sets the scene to be displayed on the stage.
void setTitle(String title)
Sets the title to be displayed in the stage’s title bar, if a title bar is visible.
void show()
Makes the stage visible.
void showAndWait()
Makes the stage visible and then waits until the stage is closed before continuing.
void toFront()
Forces the stage to the foreground.
void toBack()
Forces the stage to the background.
The following paragraphs point out some of the ins and outs of using the Stage
class methods listed in Table 3-1
:
For many (if not most) applications, the only three methods fromTable3-1you need to use are setScene
, setTitle
, and show
.
Every stage must
have a scene.
Every stage should
have a title.
There’s not much point in creating a stage if you don’t intend on showing it to the user.
The other methods in the table let you change the appearance or behavior of the stage, but the defaults are acceptable in most cases.
If you want to prevent the user from resizing the stage, use the setResizable
method like this:
primaryStage.setResizable(false);
Then, the user can’t change the size of the window. (By default, the stage is resizable. Thus, you don’t need to call the setResizable
method unless you want to make the stage non-resizable.)
If the stage is resizable, you can set the minimum and maximum size for the window.
For example:
In this example, the user can resize the window, but the smallest allowable size is 200-x-200 pixels and the largest allowable size is 600-x-600 pixels.
If you want to display the stage in a maximized window, call setMaximized
:
primaryStage.setMaximized(true);
A maximized window still has the usual decorations (a title bar, window borders, and Minimize, Restore, and Close buttons). If you want the stage to completely take over the screen with no such decorations, use the setFullScreen
method instead:
primaryStage.setFullScreen(true);
When your stage enters fullscreen mode, JavaFX displays a message advising the user on how to exit fullscreen mode.
If, for some reason, you want to start your program minimized to an icon, use the setIconified
method:
primaryStage.setIconified(true);
For more information about the close
method,
see the section “Exit, Stage Right
” later in this chapter.
The initModality
and initStyle
methods are interesting because they can be called only before
you call the show
method.
The initModality
method allows you to create a modal dialog box — that is, a window that must be closed before the user can continue using other functions within the program. And the initStyle
method lets you create windows that do not have the usual decorations such as a title bar or Minimize, Restore, and Close buttons. You typically use these methods when you need to create additional stages for your application beyond the primary stage. You can read more about how that works later in this chapter, in the section “Creating a Dialog Box.”
Examining the Scene Class
Like the Stage
class, the Scene
class is fundamental to JavaFX programs. In every JavaFX program, you use at least one instance of the Scene
class to hold the user-interface controls that your users will interact with as they use your program.
Table 3-2
lists the more commonly used constructors and methods of the Scene
class.
TABLE 3-2
Commonly Used Constructors and Methods of the Scene class
Constructor
Description
Scene(Parent root)
Creates a new scene with the specified root node
Scene(Parent root, double width, double height)
Creates a new scene with the specified root node, width, and height
Method
Description
double getHeight()
Gets the height of the scene
double getWidth()
Gets the width of the scene
double getX()
Gets the horizontal position of the scene
double getY()
Gets the vertical position of the screen
void setRoot(Parent root)
Sets the root node
TABLE 3-3
Commonly Used Constructors and Methods of the Alert class
Constructor
Description
Alert(Alert.AlertType)
Creates a new alert of the specified type
Alert(Alert.AlertType, String text)
Creates a new alert of the specified type and sets the message text
Creates a new alert and sets the buttons to be displayed
Method
Description
void setTitle(String text)
Sets the title
Optional<ButtonType> showAndWait()
Shows the alert and waits for the user’s response, which is returned as a ButtonType
object
The following paragraphs explain some of the more interesting details of the constructors and methods of the Scene
class:
All the Scene
class constructors require that you specify the root node.
You can change the root node later by calling the setRoot
method, but it’s not possible to create a scene without a root node.
You might be wondering why the root node is an instance of the Parent
class rather than an instance of the Node
class.
The Parent
class is actually a subclass of the Node
class, which represents a node that can have child nodes. There are several other subclasses of Node
, which represent nodes that can’t have children; those nodes can’t be used as the root node for a scene.
You can set the scene’s initial size when you create it by specifying the Width
and Height
parameters.
If you don’t set the size, the scene will determine its own size based on its content.
You can retrieve the size of the scene via the getHeight
and getWidth
methods.
There are no corresponding set
methods that let you set the height or width.
In general, the size of the scene determines the size of the stage,
provided that that scene is not smaller than the minimum size specified for the stage or larger than the maximum size.
If the user resizes the stage, the size of the scene is resized accordingly.
Switching Scenes
The primary stage of a JavaFX program (or any other stage, for that matter) can have only one scene displayed within it at any given time. However, that doesn’t mean that your program can’t create several scenes and then swap them as needed. For example, suppose you’re developing a word-processing program and you want to let the user switch between an editing view and a page preview view. You could do that by creating two distinct scenes, one for each view. Then, to switch the user between views, you simply call the stage’s setScene
method to switch the scene.
In Chapter 1
of this minibook, you read about a ClickCounter program whose scene displays a label and a button and then updates the label to indicate how many times the user has clicked the button. Then, in Chapter 2
of this minibook, you saw several variations of an AddSubtract program whose scene displayed a label and two buttons: One button added one to a counter when clicked, the other subtracted one from the counter.
Listing 3-1
shows a program named SceneSwitcher that combines the scenes from the ClickCounter and AddSubtract programs into a single program. Figure 3-1
shows this program in action:
When the SceneSwitcher program is first run,
it displays the ClickCounter scene as shown on the left side of the figure.
When the user clicks the Switch Scene button,
the scene switches to the AddSubtract scene, as shown in the right side of the figure.
import javafx.application.*; import javafx.stage.*; import javafx.scene.*; import javafx.scene.layout.*;
import javafx.scene.control.*; import javafx.event.*; public class SceneSwitcher extends Application { public static void main(String[] args) { launch(args); } // class fields for Click-Counter scene →15 int iClickCount = 0; Label lblClicks; Button btnClickMe; Button btnSwitchToScene2; Scene scene1; // class fields for Add-Subtract scene →22 int iCounter = 0; Label lblCounter; Button btnAdd; Button btnSubtract; Button btnSwitchToScene1; Scene scene2; // class field for stage Stage stage; →31 @Override public void start(Stage primaryStage) { stage = primaryStage; →35 // Build the Click-Counter scene →37 lblClicks = new Label(); lblClicks.setText("You have not clicked the button."); btnClickMe = new Button(); btnClickMe.setText("Click me please!"); btnClickMe.setOnAction( e -> btnClickMe_Click() ); btnSwitchToScene2 = new Button(); btnSwitchToScene2.setText("Switch!"); btnSwitchToScene2.setOnAction( e -> btnSwitchToScene2_Click() ); VBox pane1 = new VBox(10); pane1.getChildren().addAll(lblClicks, btnClickMe, btnSwitchToScene2); scene1 = new Scene(pane1, 250, 150); // Build the Add-Subtract scene →59 lblCounter = new Label(); lblCounter.setText(Integer.toString(iCounter)); btnAdd = new Button(); btnAdd.setText("Add"); btnAdd.setOnAction( e -> btnAdd_Click() ); btnSubtract = new Button(); btnSubtract.setText("Subtract"); btnSubtract.setOnAction( e -> btnSubtract_Click() ); btnSwitchToScene2 = new Button(); btnSwitchToScene2.setText("Switch!"); btnSwitchToScene2.setOnAction( e -> btnSwitchToScene1_Click() ); HBox pane2 = new HBox(10); pane2.getChildren().addAll(lblCounter, btnAdd, btnSubtract, btnSwitchToScene2); scene2 = new Scene(pane2, 300, 75); // Set the stage with scene 1 and show the stage →84 primaryStage.setScene(scene1); primaryStage.setTitle("Scene Switcher"); primaryStage.show(); } // Event handlers for scene 1 →91 public void btnClickMe_Click() { iClickCount++; if (iClickCount == 1)
{ lblClicks.setText("You have clicked once."); } else { lblClicks.setText("You have clicked " + iClickCount + " times." ); } } private void btnSwitchToScene2_Click() { stage.setScene(scene2); } // Event handlers for scene 2 →112 private void btnAdd_Click() { iCounter++; lblCounter.setText(Integer.toString(iCounter)); } private void btnSubtract_Click() { iCounter--; lblCounter.setText(Integer.toString(iCounter)); } private void btnSwitchToScene1_Click() { stage.setScene(scene1); } }
The following paragraphs point out some key sections of the program:
→15:
The section of the programs defines class fields that will be used by the scene for the Click-Counter portion of the program. These fields include iClickCount
, used to count the number of times the user has clicked the Click Me! Button; the label used to display the count of how many times the Click Me! button has been clicked; the Click Me! button itself; and the button used to switch to the Add-Subtract scene. Also included is a Scene
field named scene1
that will be used to reference the Click Counter scene.
→22:
These lines define class variables used by the Add-Subtract portion of the program, including the counter (iCounter
), the label used to display the counter, the two buttons used to increment and decrement the counter, the button used to switch back to the Click-Counter scene, and a Scene
field named scene2
that will be used to reference the Add-Subtract scene.
→31:
A class field named stage
is used to hold a reference to the primary stage so that it can be accessed throughout the program.
→35:
This line sets stage
class field to reference the primary stage.
→37:
This section of the program builds the Click-Counter scene. First, it creates the label and buttons displayed by the scene. Then it creates a VBox
layout pane (which lays out its controls in a vertical stack) and adds the label and buttons to the pane. Finally, it creates the scene using the VBox
pane as its root.
→59:
This section of the program builds the Add-Subtract scene by creating the label and the buttons displayed by the scene, arranging them in an HBox
layout pane, and creating the scene using the HBox
pane as its root.
→84:
These lines set the Click-Counter scene as the root scene for the primary stage, sets the stage title, and then shows the stage.
→91:
This section of the program provides the event handlers for the buttons in the Click-Counter scene. The event handler for the Click Me! button increments the click counter, then sets the label to display an appropriate message. The handler for btnSwitchToScene2
simply switches the scene of the primary stage to scene2
, which instantly switches the display to the Add-Subtract
scene as shown in the right side of Figure 3-1
.
→112:
This section of the program provides the event handlers for the buttons in the Add-Subtract scene. The event handler for the Add and Subtract buttons increment or decrement the counter and update the text displayed by the label. The handler for btnSwitchToScene1
switches the scene back to scene1
, which switches the display back to the Click-Counter scene shown in the left right side of Figure 3-1
.
Creating an Alert Box
JavaFX provides a simple means of displaying a basic message box by using the Alert
class, which is similar to the JOptionPane
class you learned back
in Chapter 2
of Book 2. Table 3-3
shows the commonly used constructors and methods for this class.
The Alert
class was introduced with Java version 1.8.0_40, so you must be using a version of Java more recent than that to use this feature. If you get compiler errors when you try to use the Alert class, upgrade to the most current version of Java.
The AlertType
parameter lets you specify one of several types of Alert dialogs:
AlertType.CONFIRMATION
, which prompts the user to confirm an action.
AlertType.ERROR
, which display an error message.
AlertType.INFORMATION
, which displays an information dialog box.
AlertType.WARNING
, which displays a warning message.
AlertType.NONE
, which display a generic alert dialog.
Here’s a snippet of code that displays a simple informational message using the Alert
class:
Alert a = new Alert(Alert.AlertType.INFORMATION, "You have clicked once."); a.showAndWait();
You can control what buttons appear on the Alert box by using the optional ButtonType
parameter. You can choose from among the following types of buttons:
ButtonType.APPLY
ButtonType.CANCEL
ButtonType.CLOSE
ButtonType.FINISH
ButtonType.NEXT
ButtonType.NO
ButtonType.OK
ButtonType.PREVIOUS
ButtonType.YES
You can include more than one button on an Alert box by simply specifying more than one ButtonType parameters in the constructor. For example:
Alert a = new Alert(Alert.AlertType.INFORMATION, "Are you certain?", ButtonType.YES, ButtonType.NO);
In this example, the Alert box will include both a YES and a NO button.
To determine which button the user clicked, you must test the value returned by the showAndWait
method. This value is an object of type Optional
, since the user can close the dialog box without clicking any of the displayed buttons. You should first test whether the user clicked a button by calling the isPresent
method. Then, you can call the get
method to retrieve the actual result.
Here’s an example that determines whether the user clicked the YES button:
Alert a = new Alert(Alert.AlertType.INFORMATION, "Are you certain?", ButtonType.YES, ButtonType.NO); Optional<ButtonType> r = a.showAndWait(); if (r.isPresent() && r.get() == ButtonType.YES) { // The user clicked OK! }
To demonstrate how you might use the ALERT
class, the program shown in Listing 3-2
is a variation of the ClickCounter program that was originally discussed in Chapter 2
. The original version of this program displayed a label and a button, using the label to display a count of how many times the user has clicked the button. This version of the program dispenses with the label and instead uses the Alert
class to display a message indicating how many times the user has clicked the button.
import javafx.application.*; import javafx.stage.*; import javafx.scene.*; import javafx.scene.layout.*; import javafx.scene.control.*; public class ClickCounterAlert extends Application { public static void main(String[] args) { launch(args); } Button btn; Label lbl; int iClickCount = 0; @Override public void start(Stage primaryStage) { // Create the button btn = new Button(); btn.setText("Click me please!"); btn.setOnAction(e -> buttonClick()); // Add the button to a layout pane BorderPane pane = new BorderPane(); pane.setCenter(btn); // Add the layout pane to a scene Scene scene = new Scene(pane, 250, 150); // Add the scene to the stage, set the title // and show the stage primaryStage.setScene(scene); primaryStage.setTitle("Click Counter"); primaryStage.show(); } public void buttonClick() { iClickCount++; if (iClickCount == 1) { Alert a = new Alert(Alert.AlertType.INFORMATION, "You have clicked once." ); a.showAndWait(); } else { Alert a = new Alert(Alert.AlertType.INFORMATION, "You have clicked " + iClickCount + " times."); a.showAndWait(); } } }
This program is nearly identical to the version that was presented in Chapter 2
(in Listing 2-2
). In fact, here are the only two differences:
No label is defined in this program because a message box, not a label, is used to display the number of times the button has been clicked.
In the buttonClick
method of the Chapter 2
version, the label’s setText
method was called to display the number of times the button has been clicked. In this version, an Alert box is used instead.
Figure 3-2
shows the new version of the ClickCounter program in action. Here, you can see the alert box displayed when the user clicks the button the first time. (In this example, I moved the message box to the side a little so that you can see the primary stage beneath it. When you actually run the program, the message box is centered over the primary stage.)
Exit, Stage Right
Because I started this chapter by quoting Shakespeare, I thought it’d be nice to end it by quoting Snagglepuss, the famous pink mountain lion from the old Hanna-Barbera cartoons. He’d often leave the scene by saying, “Exit, stage left” or “Exit, stage right.”
Heavens to Mergatroyd!
There’s a right way and a wrong way to exit the stage, even. And so far, none of the programs presented in this book have done it the right way. The only mechanism the programs you’ve seen so far have provided to quit the program is for the user to click the standard window close button, typically represented by an X in the upper-right corner of the window’s title bar. That is almost always the wrong way to exit a program.
In most cases, the correct way to exit a program involves the following details:
Adding a button, menu command, or other way for the user to signal that she wishes to close the program.
Many programs include a button labeled Exit or Close, and programs that use a menu usually have an Exit command.
Optionally displaying a confirmation box that verifies whether the user really wants to close the program.
You can do that by using the ConfirmationBox
class shown in the preceding section or by using a similar class.
Depending on the program, you might want to display this dialog box only if the user has made changes to a document, database, or other file that have not yet been saved.
If the user really does want to close the program, the program should perform any necessary clean-up work,
such as
Saving changes to documents, databases, or other files.
Properly closing databases and other resources.
After you’ve done any necessary clean-up work, you can close the application by calling the primary stage’s close
method.
The verification and clean-up steps should be taken whether the user attempts to close the program
by using a button or menu command you’ve provided in your user interface or by clicking the built-in window close button.
In the following sections, you read about how to add a Close button to your application, how to prevent the window close button from unceremoniously terminating your application, and how to put these two elements together in a complete program.
Creating a Close button
To add a button or other user-interface element that allows the user to close the button, all you have to do is provide an action event handler that calls the stage’s close
method.
For example, suppose you create a Close button using the following code:
Button btnClose = new Button(); btnClose.setText("Close"); btnClose.setOnAction( e -> primaryStage.close() );
In this case, the action event handler simply calls primaryStage.close()
to close the application.
If you want to do more than simply call the close
method in the action event handler, you may want to isolate the event handler in a separate method, as in this example:
btnClose.setOnAction( e -> btnClose_Clicked());
Because the btnClose_Clicked
method will need to access the primary stage to close it, you need to define a class field of type Stage
and use it to reference the
primary stage. Then, your btnClose_Clicked
method can easily perform additional tasks. For example:
private void btnClose_Click() { boolean reallyQuit = false; reallyQuit = ConfirmationBox.show( "Are you sure you want to quit?", "Confirmation", "Yes", "No"); if (reallyQuit) { // Perform cleanup tasks here // such as saving files or freeing resources stage.close(); } }
In this example, a confirmation box is displayed to make sure the user really wants to exit the program.
Handling the CloseRequest event
Providing a Close button is an excellent way to allow your users to cleanly exit from your program. However, the user can bypass your exit processing by simply closing the window — that is, by clicking the window close button, usually represented as an X in the upper-right corner of the window border. Unless you provide otherwise, clicking this button unceremoniously terminates the application, bypassing all your nice code that confirms whether the user wants to save his work, closes any open resources, and otherwise provides for a graceful exit.
Fortunately, you can easily avoid such ungraceful exits. Whenever the user attempts to close the window within which a JavaFX stage is displayed, JavaFX generates a CloseRequest
event, which is sent to the stage. You can provide an event handler for this event by calling the setOnCloseRequest
method of the Stage
class. Then, the event handler is called whenever the user tries to close the window.
You might be tempted to create a single method that can serve as the event handler for both the Action
event of your Close button and the CloseRequest
event, like this:
btnClose.setText("Close"); btnClose.setOnAction( e -> btnClose_Click () ); primaryStage.setOnCloseRequest( e -> btnClose_Click () );
Here, the intent is to handle the CloseRequest
event exactly as if the user had clicked the btnClose
button.
That’s a good idea, but it doesn’t work if the btnClose_Click
event displays a confirmation box and closes the stage only if the user confirms that she really wants to quit the program. That’s because when the event handler for the CloseRequest
event ends, JavaFX automatically closes the stage if the event handler doesn’t explicitly close the stage.
To prevent that from happening, you call the consume
method of the CloseRequest
event object. Consuming the event causes it to be stopped in its tracks within the event handler, thus preventing JavaFX from automatically closing the stage when the event handler ends.
In the Lambda expression passed to the setOnCloseRequest
method, the CloseRequest
event object is represented by the argument e
. Thus, you can consume the CloseRequest
event by calling e.consume()
.
An easy way to provide a method that handles both the Action
event for a Close button and the CloseRequest
event for a stage is to craft the Lambda expression for the setOnCloseRequest
method so that it consumes the event before calling the method that will handle the event:
btnClose.setText("Close"); btnClose.setOnAction( e -> btnClose_Click () ); primaryStage.setOnCloseRequest( e -> { e.consume(); btnClose_Click (); } );
Here, the event handler for the CloseRequest
event first consumes the event and then calls btnClose_Click
. The btnClose_Click
method, in turn, displays a confirmation box and closes the stage if the user confirms that this is indeed what he wishes to do.
Putting it all together
Now that you know how to add a Close button to a scene and how to handle the CloseRequest
event, I look at a program that puts together these two elements to demonstrate the correct way to exit a JavaFX program.
This section presents a variation of the ClickCounter program that includes a Close button in addition to the Click Me! button. When the user clicks the Click Me! button, a message box displays to indicate how many times the button has been clicked. But when the user attempts to exit the program, whether by clicking the Close button or by simply closing the window, the ConfirmationBox
class that was shown in Listing 3-3
is used to ask the user whether she really wants to exit the program. Then, the stage is closed only if the user clicks the Yes button in the confirmation box.
The source code for this program is shown in Listing 3-3
.
import javafx.application.*; import javafx.stage.*; import javafx.scene.*; import javafx.scene.layout.*; import javafx.scene.control.*; import javafx.geometry.*; import java.util.*; public class ClickCounterExit extends Application { public static void main(String[] args) { launch(args); } Stage stage; int iClickCount = 0; @Override public void start(Stage primaryStage) { stage = primaryStage; // Create the Click Me button Button btnClickMe = new Button(); btnClickMe.setText("Click me please!"); btnClickMe.setOnAction(e -> btnClickMe_Click()); // Create the Close button Button btnClose = new Button(); btnClose.setText("Close"); btnClose.setOnAction(e -> btnClose_Click()); // Add the buttons to a layout pane VBox pane = new VBox(10); pane.getChildren().addAll(btnClickMe, btnClose); pane.setAlignment(Pos.CENTER); // Add the layout pane to a scene Scene scene = new Scene(pane, 250, 150); // Finish and show the stage primaryStage.setScene(scene); primaryStage.setTitle("Click Counter"); primaryStage.setOnCloseRequest( e -> { e.consume(); btnClose_Click(); } ); primaryStage.show(); }
public void btnClickMe_Click() { iClickCount++; if (iClickCount == 1) { Alert a = new Alert(Alert.AlertType.INFORMATION, "You have clicked once." ); a.showAndWait(); } else { Alert a = new Alert(Alert.AlertType.INFORMATION, "You have clicked " + iClickCount + " times."); a.showAndWait(); } } public void btnClose_Click() { Alert a = new Alert(Alert.AlertType.CONFIRMATION, "Are you sure you want to quit?", ButtonType.YES, ButtonType.NO); Optional<ButtonType> confirm = a.showAndWait(); if (confirm.isPresent() && confirm.get() == ButtonType.YES) { stage.close(); } } }
 Looking at some useful methods of the Stage
and Scene
classes
Looking at some useful methods of the Stage
and Scene
classes
 In many cases, you will need to access the primary stage outside of the scope of the
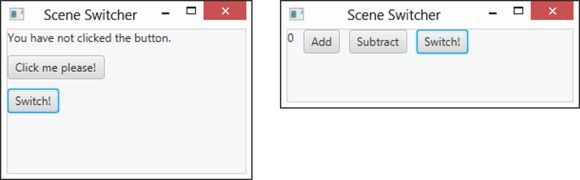
 The
The 