In designing OS X, one of Apple’s key goals was to address the window-proliferation problem. As you create more files, stash them in more folders, and launch more programs, it’s easy to wind up paralyzed before a screen awash with overlapping rectangles.
That’s the problem admirably addressed by Mission Control, described in detail on Mission Control: Death to Window Clutter. Some handy clutter and navigation controls are built into the windows themselves, too. For example:
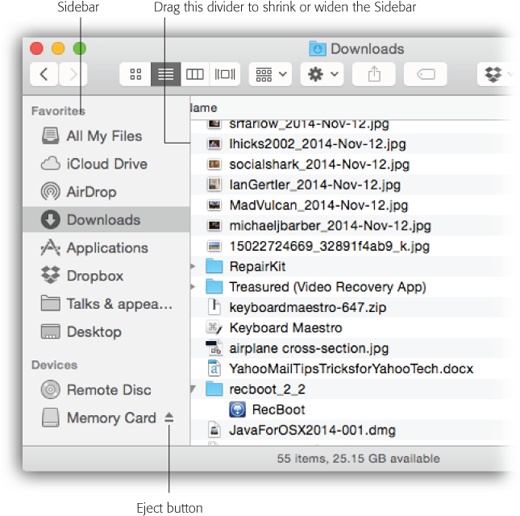
The Sidebar (Figure 1-3) is the pane at the left side of every Finder window, unless you’ve hidden it. (It’s also at the left side of every Open dialog box and every full-sized Save dialog box.) In Yosemite, it’s slightly translucent—your desktop picture shines through it just a little bit.
The Sidebar has as many as four sections, each preceded by a collapsible heading.
Note
The little flippy triangles that could collapse (hide) each Sidebar heading are gone. Instead, if you point to a heading without clicking, a tiny Hide or Show button appears. Click it to collapse or expand that heading’s contents.
Here are the headings you’ll soon know and love. (You can drag these headings up and down in the Sidebar to rearrange them.)
Favorites. This primary section of the Sidebar is the place to stash things for easy access. You can stock this list with the icons of disks, files, programs, folders, and the virtual, self-updating folders called saved searches.
Each icon is a shortcut. For example, click the Applications icon to view the contents of your Applications folder in the main part of the window. And if you click the icon of a file or a program, it opens.
Figure 1-3. Good things to put in the Sidebar: favorite programs, disks on a network you often connect to, a document you’re working on every day, and so on. You can drag a document onto a folder icon to file it there, drag a document onto a program’s icon to open it with the “wrong” program, and so on.
Here, too, you’ll find the icons for important Mac features like All My Files (see the box on All My Files); AirDrop, the instant file-sharing feature described on AirDrop; and the fantastic iCloud Drive (Revert).
Shared. Here’s a complete list of the other computers on your network whose owners have turned on File Sharing, ready for access (see Chapter 14 for details). Back to My Mac (Variations on Screen Sharing) is also listed here.
Devices. This section lists every storage device connected to, or installed inside, your Mac: hard drives, iPhones, iPads, iPods, CDs, DVDs, memory cards, USB flash drives, and so on. (Your main hard drive doesn’t usually appear here, but you can drag it here.) The removable ones (like CDs, DVDs, i-gadgets) bear a little gray
 logo, which you can click to eject that disk.
Tags. This section lists all your Finder tags (color-coded keywords). See Finder Tags for more on tags.
Note
If you remove everything listed under one of these headings, the heading itself disappears to save space. The heading reappears the next time you put something in its category back into the Sidebar.
The beauty of this parking lot for containers is that it’s so easy to set up with your favorite places. For example:
Remove an icon by dragging it out of the Sidebar entirely. It vanishes with a puff of smoke (and even a little whoof sound effect). You haven’t actually removed anything from your Mac; you’ve just unhitched its alias from the Sidebar.
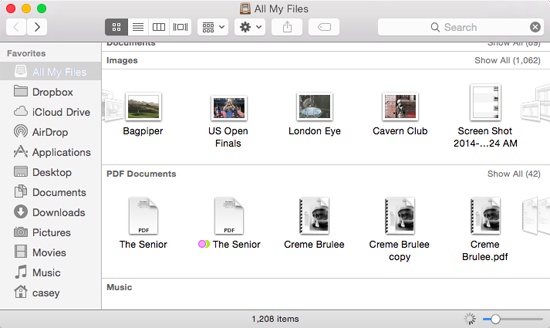
UP TO SPEED: All My Files
There it is, staring you in the face at the top of the Sidebar in every window: an icon called All My Files. What is this, some kind of geeked-out soap opera?
Nope. It’s a massive, searchable, sortable list, all in a single window, of every human-useful file on the computer. That is, pictures, movies, music, documents—no system files, preference files, or other detritus. No matter what folders they’re actually in, they appear here in a single window. You can summon it whenever you want, just by clicking the All My Files icon in the Sidebar.
When you first open All My Files, it has your files grouped by type: Contacts, Events & To Dos, Images, PDF Documents, Music, Movies, Presentations, Spreadsheets, Developer (which lists HTML Web site files and Xcode programming files), and Documents (meaning “everything else”). In icon view—the factory setting—each class of icons appears in a single scrolling row. Use a two-finger scroll (trackpad) or one-finger slide (Magic Mouse) to move through the horizontal list. (If you’d rather not have to scroll, click the tiny Show All button that appears at the right end of each row. Now you’re seeing all the icons of this type; click Show Less to return to the single-row effect.)
You can see how this sorting method—which is the Arrange By command at work (Arrange By and Sort By)—might be useful. Suppose you’re looking for a certain PowerPoint or Keynote presentation, but you can’t remember what you called it or where you filed it. Open All My Files, make sure it’s arranged by Kind, and presto: You’re looking at a list of every presentation file on your Mac. Using Quick Look (Quick Look), you can breeze through them, inspecting them one at a time, until you find the one you want.
Apple thinks you’ll like All My Files as a starting point for standard file-fussing operations so much that All My Files is the window that appears automatically when you choose File→New Finder Window (or press ⌘-N). (Of course, you can change that in Finder→Preferences.)
Rearrange the icons by dragging them up or down in the list. For example, in Yosemite, hard drives don’t appear at the top of the Sidebar anymore, but you’re free to drag them back into those coveted spots. (You’re not allowed to rearrange the computers listed in the Shared section, though.)
Rearrange the sections by dragging them up or down. For example, you can drag Favorites to the bottom but promote the Shared category.
Install a new icon by dragging it off your desktop (or out of a window) into any spot in the Favorites list of the Sidebar. Press the ⌘ key after beginning the drag. You can’t drag icons into any section of the Sidebar—just Favorites.
Adjust the width of the Sidebar by dragging its right edge—either the skinny divider line or the extreme right edge of the vertical scroll bar, if there is one. You “feel” a snap at the point when the line covers up about half of each icon’s name. Any covered-up names sprout ellipses (…) to let you know there’s more (as in “Secret Salaries Spreadsh…”).
Hide the Sidebar by pressing ⌘-Option-S, which is the shortcut for the View→Hide Sidebar command. Bring the Sidebar back into view by pressing the same key combination (or by using the Show Sidebar command).
Tip
You can hide and show the Sidebar manually, too: To hide it, drag its right edge all the way to the left edge of the window. Unhide it by dragging the left edge of the window to the right again.
Then again, why would you ever want to hide the Sidebar? It’s one of the handiest navigation aids since the invention of the steering wheel. For example:
It takes a lot of pressure off the Dock. Instead of filling up your Dock with folder icons (all of which are frustratingly alike and unlabeled anyway), use the Sidebar to store them. You leave the Dock that much more room for programs and documents.
It’s better than the Dock. In some ways, the Sidebar is a lot like the Dock, in that you can stash favorite icons of any sort there. But the Sidebar reveals the names of these icons, and the Dock doesn’t until you use the mouse to point there.
It makes ejecting easy. Just click the
button next to any removable disk to make it pop out. (Other ways to eject disks are described in Chapter 12.)It makes burning easy. When you’ve inserted a blank CD or DVD and loaded it up with stuff you want to copy, click the
 button next to its name to begin burning that disc. (Details on burning discs are in Chapter 12.)
You can drag onto its folders and disks. That is, you can drag icons onto Sidebar icons, exactly as though they were the real disks, folders, and programs they represent.
It simplifies connecting to networked disks. Park your other computers’ shared folder and disk icons here, as described in Chapter 14, to shave several steps off the usual connecting-via-network ritual.
The title bar (Figure 1-4) has several functions. First, when several windows are open, the darkened title bar, window name, mini-icon, and colored left-corner buttons tell you which window is active (in front); in background windows, these elements appear dimmed and colorless. Second, the title bar acts as a handle that lets you move the window around on the screen.
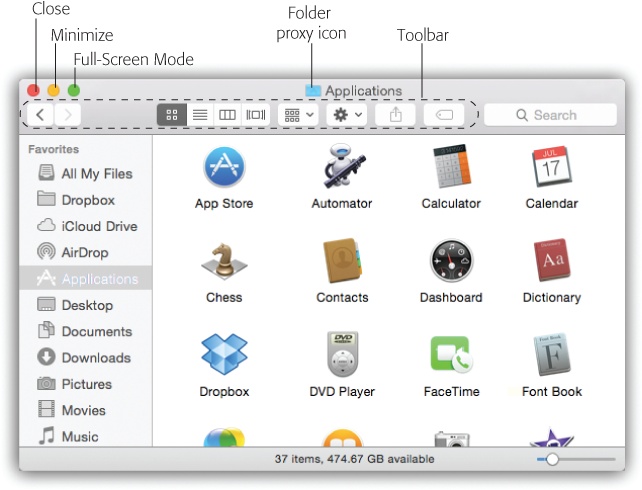
Figure 1-4. When Steve Jobs unveiled Mac OS X at Macworld Expo in 2000, he said his goal was to oversee the creation of an interface so attractive “you just want to lick it.” Desktop windows, with their juicy, fruit-flavored controls, are a good starting point.
You can also move a window by dragging the solid gray strip on the bottom, assuming you’ve made it appear (choose View→Status Bar or View→Show Path Bar).
Tip
Here’s a nifty keyboard shortcut: You can cycle through the different open windows in one program without using the mouse. Just press ⌘-~ (that is, the tilde key, to the left of the number 1 key on U.S. keyboards). With each press, you bring a different window forward within the current program. It works both in the Finder and in your everyday programs, and it beats the pants off using the mouse to choose a name from the Window menu. (Note the difference from ⌘-Tab, which cycles through different open programs.)
After you’ve opened one folder that’s inside another, the title bar’s secret folder hierarchy menu is an efficient way to backtrack—to return to the enclosing window. Get in the habit of right-clicking (or two-finger clicking, or Control-clicking, or ⌘-clicking) the name of the window to access the menu shown in Figure 1-5. (You can release the Control or ⌘ key immediately after clicking.)
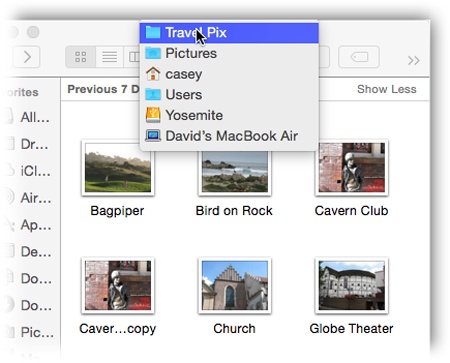
Figure 1-5. Right-click or two-finger click a Finder window’s title bar to summon the hidden folder hierarchy menu. This trick also works in most other OS X programs. For example, you can right-click a document window’s title to find out where the document is actually saved on your hard drive.
By choosing the name of a folder from this menu, you open the corresponding window. When browsing the contents of the Users folder, for example, you can return to the main hard drive window by right-clicking or two-finger clicking the folder name “Users” and then choosing Macintosh HD from the menu.
UP TO SPEED: Fixing the Sidebar
Anything you drag out of the Sidebar can be dragged back in again, including the big-ticket items like Applications and Pictures. That’s good to know if you drag something important out of the Sidebar and then change your mind.
Even so, there’s a quicker way to restore the Sidebar to its factory settings.
If you choose Finder→Preferences and then click the Sidebar button, you discover the checkboxes shown here. They let you put back the Apple-installed icons that you may have removed in haste. Just turn on a checkbox to restore its icon to your Sidebar. So if something you expect to see in your Sidebar isn’t there, check back here.
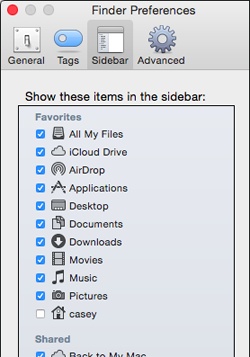
On the other hand, you may as well streamline your computing life by turning off the checkboxes of icons you never want to see filling your Sidebar.
Tip
Keyboard lovers, take note. Instead of using the title bar menu, you can also jump to the enclosing window by pressing ⌘- (up arrow), which is the shortcut for the Go→Enclosing Folder command.
Pressing ⌘- . (down arrow) takes you back into the folder you started in, assuming that it’s still highlighted. (This makes more sense when you try it than when you read it.)
Once you’ve mastered dragging, you’re ready for these title bar tips:
Pressing the ⌘key lets you drag the title bar of an inactive window—one that’s partly covered by a window in front—without bringing it to the front. (Drag any empty part of the title bar—not the title itself.)
By the way, you can close, minimize, or full-screenize a background window without the help of the ⌘ key. Just click one of those three corresponding title-bar buttons normally, even if the window you’re working on is in front.
Double-clicking the title bar is a special technique. Right out of the box, it does something in Yosemite that it never did before: It zooms the window, enlarging it enough to reveal all the icons inside it (or, in programs, large enough to reveal all the text, graphics, or music). If your monitor isn’t big enough to show all the icons in a window, then the window grows to show as many as possible.
With a quick visit to System Preferences→Dock, though, you can change things up. You can turn on “Double-click a window’s title bar to minimize.” Now double-clicking the title bar makes the window collapse into the Dock, exactly as though you had clicked the Minimize button.
As the tip of your cursor crosses the three buttons at the upper-left corner of a window, tiny symbols appear inside them:  ,
,  , and
, and  . Ignore the gossip that these symbols were added to help color-blind people who can’t distinguish the colors red, yellow, and green. Color-blind people are perfectly capable of distinguishing the buttons by their positions, just as they do with traffic lights.
But for people who aren’t paying attention to button position, these cues distinguish the buttons when all three are identical shades of gray, as they are when you use Graphite mode (Graphic Designers’ Corner: The Gray Look). They also signal when it’s time to click. For example, as described in the previous section, you can use these three buttons even when the window is not at the front. You know the buttons are ripe for the clicking when you see the little symbols appear under your cursor.
The most important window gadget is the Close button, the red, droplet-like button in the upper-left corner (Figure 1-4). Clicking it closes the window, which collapses back into the icon from which it came.
Tip
If, while working on a document, you see a tiny dot in the center of the Close button, OS X is trying to tell you that you haven’t yet saved your work. (It doesn’t appear in Autosave programs like TextEdit.) The dot goes away when you save the document.
POWER USERS’ CLINIC: The Go to Folder Command
Sometimes a Unix tentacle pokes through the friendly OS X interface and you find a place where you can use Unix shortcuts instead of the mouse.
One classic example is the Go→Go to Folder command (Shift-⌘-G). It brings up a box like the one shown here.
The purpose of this box is to let you jump directly to a certain folder on your Mac by typing its Unix folder path. Depending on your point of view, this special box is either a shortcut or a detour.
For example, if you want to see what’s in the Documents folder of your Home folder, you could choose Go→Go to Folder and type this:
/Users/chris/Documents
Then click Go or press Return. (In this example, of course, chris is your short account name.)
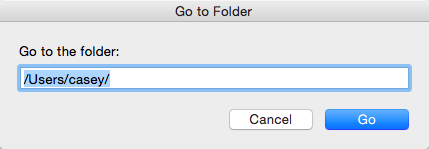
In other words, you’re telling the Mac to open the Users folder in your main hard drive window, then your Home folder inside that, and then the Documents folder inside that. Each slash means “and then open.” (You can leave off the name of your hard drive; that’s implied by the opening slash.) When you press Return, the folder you specified pops open immediately.
Of course, if you really wanted to jump to your Documents folder, you’d be wasting your time by typing all that. Unix (and therefore OS X) offers a handy shortcut that means “home folder.” It’s the tilde character (~) at the upper-left corner of the U.S. keyboard.
To see what’s in your Home folder, then, you could type just that ~ symbol into the Go to Folder box and then press Return. Or you could add some slashes to it to specify a folder inside your Home folder, like this:
~/Documents
You can even jump to someone else’s Home folder by typing a name after the symbol, like this:
~chris
If you get into this sort of thing, here’s another shortcut worth noting: If you type nothing but a slash (/) and then press Return, you jump immediately to the main hard drive window.
Note, too, that you don’t have to type out the full path—only the part that drills down from the window you’re in. If your Home folder window is already open, for example, then you can open the Pictures folder just by typing Pictures.
But the Go to Folder trick really turns into a high-octane timesaver if you use autocompletion. Here’s how it works: After each slash, you can type only enough letters of a folder’s name to give OS X the idea—de instead of desktop, for example—and then wait a fraction of a second (or, if you’re late for a plane, press the Tab key). OS X instantly and automatically fills in the rest of the folder’s name. It even auto-capitalizes the folder names for you. (In Unix, capitalization matters.)
For example, instead of typing /Applications/Microsoft Office/clipart/standard, you could type nothing more than /ap/mi/cl/st, remembering to press Tab after each pair of letters. Now that’s a way to feel like a Unix programmer.
The universal keyboard equivalent of the Close button is ⌘-W (for window)—a keystroke well worth memorizing. If you get into the habit of dismissing windows with that deft flick of your left hand, you’ll find it far easier to close several windows in a row, because you won’t have to aim for successive Close buttons.
In many programs, something special happens if you’re pressing the Option key when using the Close button or its ⌘-W equivalent: You close all open windows. This trick is especially useful in the Finder, where a quest for a particular document may have left your screen plastered with open windows for which you have no further use. Option-clicking the Close button of any one window (or pressing Option-⌘-W) closes all of them.
The Option-key trick doesn’t close all windows in every program—only those in the current program. Option-closing a Microsoft Word document closes all Word windows, but your Finder windows remain open.
Moreover, Option-closing doesn’t work in all programs.
Click this yellow dot to minimize any Mac window, sending it shrinking, with a genie-like animated effect, into the right end of the Dock, where it then appears as an icon. The window isn’t gone. It’s just out of your way for the moment, as though you’ve set it on a shelf. To bring it back, click the newly created Dock icon; see Figure 1-6. Chapter 4 has more on the Dock.
Minimizing is a great window-management tool. In the Finder, minimizing a window lets you see whatever icons were hiding behind it. In a Web browser, minimizing lets you hide a window that has to remain open (because you’re waiting for some task to finish) so you can read something else in the meantime.
And now, some Minimize button micro-goodies:
If you enjoy the ability to roll up your windows in this way, remember that you actually have a bigger target than the tiny Minimize button. You can make the entire title bar a giant Minimize button, as described on Close Button.)
Better yet, you can also minimize the frontmost window of almost any program (including the Finder) from the keyboard by pressing ⌘-M. That’s a keystroke worth memorizing on Day One.
Option-clicking one minimized window on the Dock un-minimizes all a program’s windows—at least for Cocoa programs (Cocoa and Carbon). But if it’s a Carbon program, like old versions of Word, then you have to click the windows one at a time on the Dock to bring them back.
Tip
OS X can change menu commands as you press modifier keys. For example, open a couple of Finder windows and then click the Window menu. Focus on the Minimize Window command. Now press Option and watch both the wording and the listed keyboard equivalent change instantly to Minimize All (Option-⌘-M).
In the bad old days (up to late 2009), minimizing a bunch of documents could get really messy. Each one flew onto the Dock, putting a new icon there, creating a tighter and tighter squeeze, shrinking the Dock’s icons until they were the size of Tic Tacs.
Figure 1-6. Clicking the Minimize button sends a window scurrying down to the Dock, collapsing in on itself as though being forced through a tiny, invisible funnel. A little icon appears on the lower-right corner of its minimized image to identify the program it’s running in.
Nowadays, your document windows can minimize themselves into their program’s Dock icon, rather than creating new Dock icons for themselves. That way, your Dock doesn’t get any more crowded, and the icons on it don’t keep shrinking away to atoms.
To turn on this feature, choose
 →System Preferences→Dock. Turn on “Minimize windows into application icon.”
So how do you get those windows back out of the Dock icon? You use Dock Exposé, which is described on One-App Exposé.
In Yosemite, Apple changed the purpose of this third dot, the green one, on every window’s title bar (in most programs, anyway). A click here throws the window into Full Screen mode, in which the menu bars and window edges disappear, in the name of making your window fill your screen edge to edge. See Full Screen Mode for details.
As your cursor approaches this green dot, a little indicator appears inside it: . That’s the hint that you’re about to enter Full Screen mode.
And once you are in Full Screen mode, that shape changes to this:  . That’s right: It’s the universal symbol for “Click me to leave Full Screen mode.”
In OS X versions before Yosemite, this button was called the Zoom button. It made a desktop window just large enough to reveal all the icons inside it (or, in programs, large enough to reveal all the text, graphics, or music). (The Window→Zoom command does the same thing, and so does double-clicking the title bar of a Finder window.)
And if you miss those hazy, happy days, just press the Option key as you click. The button sprouts a  button, just as it did in the olden days. Now you’ll get a zoomed window instead of a full-screen one. (A second Option-click restores the window to its previous size.)
In the Finder, there’s a tiny icon next to the window’s name (Figure 1-7). It’s a stand-in—a proxy—for that window’s folder itself.
By dragging this tiny icon, you can move or copy the folder into a different folder or disk, into the Sidebar, into the Trash, or into the Dock without having to first close the window.
POWER USERS’ CLINIC: Adjusting the Genie Speed
Apple has a name for the animation you see when you minimize, open, or close a window: the genie effect, because it so closely resembles the way Barbara Eden, Robin Williams, and other TV and movie genies entered and exited their magic lamps and bottles.
But you don’t have to watch the “genie” animation in precisely the same way, day in and day out. You can slow it down or speed it up, like this:
Slow it down. When Steve Jobs first demonstrated Mac OS X, one of his favorite bits was slowing down the animation so we could see it in graceful slow motion. How did he do that?
If you Shift-click a window’s Minimize button, it collapses into the Dock at about one-tenth its usual speed—an effect sure to produce gasps from onlookers. The Shift key also slows the un-minimizing animation, the one you see when you click a window icon in the Dock to restore it to full size. (Shift-clicking a button to slow down its animation is a running theme in OS X. You’ll find it mentioned in several spots in this book.)
Speed it up. There’s no keystroke for making the animation go faster. You can, however, substitute a faster style of minimizing animation.
To do so, choose →Dock→Dock Preferences. From the “Minimize windows using” pop-up menu, choose Scale Effect, and then close the window. Now, instead of collapsing through an invisible funnel, minimized windows simply shrink as they fly down to the Dock, remaining rectangular. The time you save isn’t exactly going to get you home an hour earlier each day, but at least you have the illusion of greater speed.
(Actually, there’s a third animation style, too, but there’s a trick to unleashing it: You need the free utility called Tinker-Tool. It’s available from this book’s “Missing CD” page at www.missingmanuals.com.)
Tip
You have to hold down the mouse button on the folder proxy icon until the icon darkens before dragging. (It darkens in a fraction of a second.)
Figure 1-7. When you find yourself in a Finder window that contains useful stuff, consider dragging its proxy icon to the Dock. That will install its folder or disk icon there for future use. It’s not the same as minimizing the window, which puts the window icon into the Dock only temporarily. (Note: Most document windows also offer a proxy-icon feature, but it usually produces only an alias when you drag the proxy to a different folder or disk.)
When you drag this proxy icon to a different place on the same disk, the usual folder-dragging rules apply: Hold down the Option key if you want to copy the original disk or folder; ignore the Option key to move the original folder. (You’ll find details on moving and copying icons in the next chapter.)
Many programs, including Microsoft Word, Preview, TextEdit, and others, offer the same mini-icon in open document windows. Once again, you can use it as a handle to drag a document into a new folder or onto a new disk. Sometimes, doing that really does move the document—but more often, you just get an alias of it in the new location.
Chapter 4 describes this fascinating desktop-window element in great detail.
Double-clicking a folder in a window doesn’t leave you with two open windows. Instead, double-clicking a folder makes the contents of the original window disappear (Figure 1-8).
Tip
If you Option-double-click a folder, you don’t simply replace the contents of a fixed window that remains onscreen; you actually switch windows, as evidenced by their changing sizes and shapes.
So what if you’ve now opened inner folder B, and you want to backtrack to outer folder A? In that case, just click the tiny  button—the Back button—in the upper-left corner of the window, or use one of these alternatives:
None of that helps you, however, if you want to move a file from one folder into the other, or to compare the contents of two windows. In that case, you probably want to see both windows open at the same time.
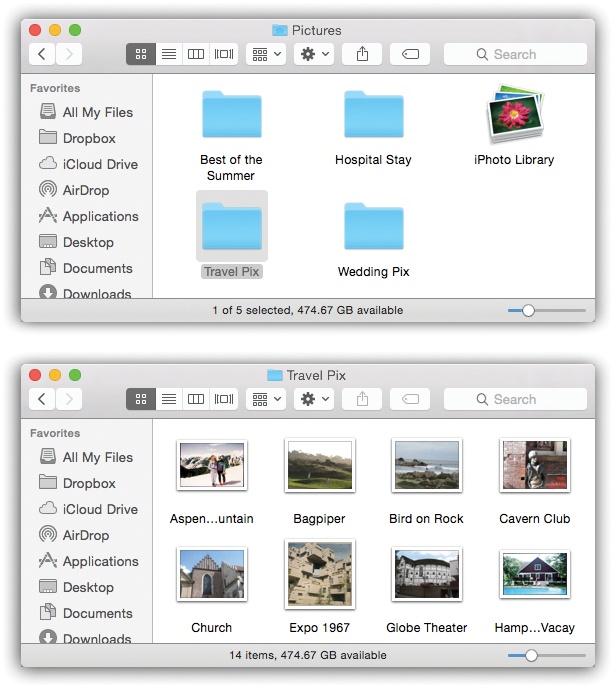
Figure 1-8. To help you avoid window clutter, Apple has designed OS X windows so that double-clicking a folder in a window (top) doesn’t actually open another window (bottom). Every time you double-click a folder in an open window (except in column view), its contents replace whatever was previously in the window. If you double-click three folders in succession, you still wind up with just one open window.
You can open a second window using any of these techniques:
Choose File→New Finder Window (⌘-N).
Tip
What folder contents fill the “new” window that appears when you use this command? Usually, it’s the All My Files folder, showing your entire universe of files.
But you can choose any window you want. To make the change, choose Finder→Preferences. Click the General icon. Change the “New Finder windows show” pop-up menu to whatever folder you’d like to use as the starting point for your computing life. All My Files is a good choice; so is your Home folder. But you’re also free to choose your Documents folder, your iDisk, or any folder at all. Now every new Finder window shows you that specified folder, which is a much more useful arrangement.
Double-click a disk or folder icon.
Double-click a folder or disk icon on your desktop.
The upper-right corner of every Finder window used to contain a little button that looked like a half-inch squirt of toothpaste. Clicking it entered Old Finder Mode.
Old Finder Mode (not the technical Apple term) was designed for people who come to OS X from an earlier version, like Mac OS 9, and lose half their hair when they discover how different things are in OS X.
In this mode, two of the biggest behavioral differences between OS X and its predecessors disappear:
The Sidebar and the toolbar blink out of sight.
Double-clicking a folder now works like it did back in 2000. Every time you double-click a folder, you open a new window for it.
The Old Finder Mode button no longer appears, but the mode itself is still available. Press Option-⌘-T, the equivalent for the View→Hide Toolbar command. (Repeat that keystroke or command to turn Old Finder Mode off again.)
Here’s one of the biggest changes from the OS X of old: Scroll bars don’t appear nearly as often as they used to (see Figure 1-9).
A scroll bar, of course, is the traditional window-edge slider that lets you move through a document that’s too big for the window. Without scroll bars, for example, you’d never be able to write a letter that’s taller than your screen.
On the very first Macs, scroll bars were a necessary evil; those computers were too slow and underpowered to manage visibly moving the contents of the window. That’s why scroll bars were invented in the first place: to give you some feedback about how far you were moving into a document, because the window itself went pure white when you dragged the handle.
Today, though, you can manipulate the contents of a window and see where you are at all times. Nobody questions the absence of scroll bars on an iPad, right? Because you just push the contents of a window around with your fingers to scroll.
In OS X, you scroll by pushing two fingers up the trackpad (or one finger up the Magic Mouse) or by turning your mouse’s scroll wheel. You almost never use the antiquated method of dragging the scroll bar’s handle manually, with the mouse.
Tip
More reasons nobody uses the mouse on the scroll bar: You can scroll using the keyboard. Your Page Up and Page Down keys let you scroll up and down, one screen at a time, without having to take your hands off the keyboard. The Home and End keys are generally useful for jumping directly to the top or bottom of your document (or Finder window). And if you’ve bought a mouse that has a scroll wheel on the top, you can use it to scroll windows without pressing any keys at all.
That’s a long-winded way of explaining why, in most programs, the scroll bars are hidden. See Figure 1-9 for details.
Note
If the missing scroll bars leave you jittery and disoriented, you can bring them back. Open System Preferences→General and then turn on “Show scroll bars: Always.”
Figure 1-9. Scroll bars don’t appear at all while you’re working (bottom); you have more screen area dedicated to your work. If you begin to scroll by sliding your fingers across the trackpad or Magic Mouse, the scroll-bar handle appears, so you know where you are (middle). But if you point to the scroll bar, it fattens up so you can grab it (top).
For the first 28 years of its existence, the Mac offered only one way to make a window bigger or smaller: Drag the ribbed-looking lower-right corner.
These days, you can drag any edge of a window to change its shape. Just move the pointer carefully to the exact top, bottom, left, or right edge; once its shape changes to a double-headed arrow, you can drag to move that window’s edge in or out.
Tip
There are a few cool, totally undocumented variations on the window-edge-dragging business. First, if you press the Option key while dragging, you resize the opposite edge simultaneously. For example, if you Option-drag the bottom edge upward, the top edge simultaneously collapses downward.
If you press Shift as you drag, you resize the entire window, retaining its proportions.
And if you Shift-Option drag, you resize the window around its center, rather than from its edges.
Choose View→Show Path Bar to see a tiny map at the bottom of the window, showing where you are in the folder hierarchy. If it says Casey→Pictures→Picnic, well, then, by golly, you’re looking at the contents of the Picnic folder, which is inside Pictures, which is inside your Home folder (assuming your name is Casey).
Out of the box, OS X hides yet another information strip at the bottom of a window: the status bar, which tells you how many icons are in the window (“14 items,” for example) and the amount of free space remaining on the disk. To make it appear, choose View→Show Status Bar.
Tip
The status bar shows you disk-space information for the entire disk, but not how much disk space this particular window’s contents occupy.
To find out that piece of information, make sure no icon in the window is highlighted. Then choose File→Get Info (or press ⌘-I). The resulting Info window, which is described at the end of the next chapter, shows the size of the folder or disk whose window you’re browsing, along with other useful statistics.
NOSTALGIA CORNER: How the Scroll Bar Used to Work
If you are that rare, special individual who still operates the scroll bar by clicking it with the mouse, the old-style controls are still around.
For example: Ordinarily, when you click in the scroll bar track above or below the dark-gray handle bar, the window scrolls by one screenful. But another option awaits when you choose →System Preferences→General and turn on “Jump to the spot that’s clicked.” Now when you click the scroll-bar track, the Mac considers the entire scroll bar a proportional map of the document and jumps precisely to the spot you clicked. That is, if you click the very bottom of the scroll-bar track, you see the very last page.
No matter which scrolling option you choose in the Appearance panel, you can always override your decision on a case-by-case basis by Option-clicking the scroll-bar track. In other words, if you’ve selected the “Jump to the spot that’s clicked” option, you can produce a “Jump to the next page” scroll by Option-clicking in the scroll-bar track.