It’s part of the Mac’s user-friendly heritage: You can do practically everything using only the mouse. Everything is out front, unhidden, and clickable, whether it’s an icon, a button, or a menu.
But as in rival operating systems, you can shave seconds and steps off your workload if you master shortcut menus: short menus that sprout out of things you click, offering commands that the software thinks you might want to invoke at the moment, as shown in Figure 2-13.
To summon one, just right-click or two-finger click something—an icon, the desktop, a window, a link in Safari, text in a word processor, whatever. You can also trigger these shortcut menus with special clicks on your trackpad or Magic Mouse; see The Complicated Story of the Function Keys for additional options.
In any case, a menu drops down listing relevant commands: Get Info, Move to Trash, Copy, and so on. You can click the command you want, or type the first couple of letters of it and then tap the space bar.
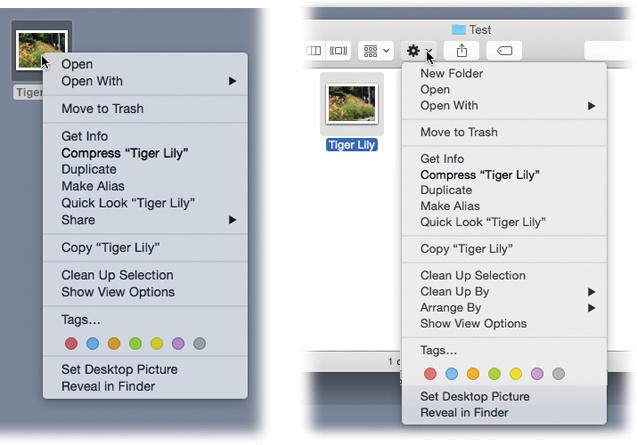
Figure 2-13. These pop-up entities used to be called contextual menus, but Apple started calling them “shortcut menus” a few years ago, perhaps because that’s what they’re called in Windows and Unix.
These menus become more useful the more you get to know them. The trouble is, millions of Mac fans never even knew they existed. That’s why there’s a second way to access them. At the top of every Finder window, you’ll find a  pop-up menu, technically called the Action menu (Figure 2-13, right).
It lists the same sorts of commands you’d find in the shortcut menus, but it’s visible, so novices stand a better chance of stumbling onto it.
The Finder shortcut menus offer some of the most useful Mac features ever. Don’t miss these two in particular:
Imagine this: You’ve got a bunch of icons scattered on your desktop, or a mass of related files in a window. You can now highlight all of them; right-click any one of them; and from the shortcut menu, choose “New Folder with Selection (12 items)” (or whatever the number of icons is).
With a cool animation, the Finder visibly throws the selected icons into a brand-new folder. It’s initially named New Folder With Items (duh), but the hard part is over. All you have to do is rename it—and be grateful that you were spared the 736 steps it would have taken you to do the same job manually.

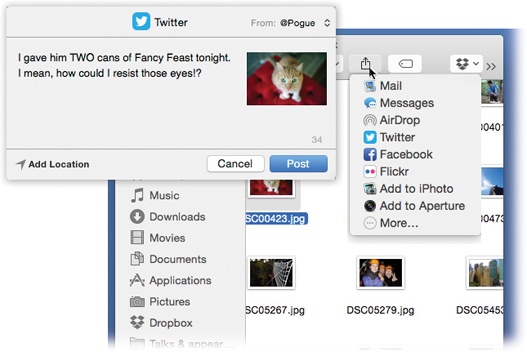
Here’s a handy menu of ways to send whatever’s highlighted to somebody else. In the case of selected Finder icons, you can use these three methods (see Figure 2-14):
Mail whips open Mail and creates a new, outgoing message with the selected file(s) already attached. Address and send, and make a sacrifice to the right-clicky gods.
Messages sends the file to somebody’s iPhone. Type a little message and then click Send. Off it goes, just as though you’d sent it from the Messages app (Chapter 20).
AirDrop. AirDrop is a slick, simple way to shoot a file from one Mac to another—or even to or from an iPhone or iPad—without involving any setup, network settings, or user accounts; see AirDrop.
But now, you don’t have to budge from your current window. Click the file(s) you want to send, click Share→AirDrop, click the name of the nearby destination Mac, iPhone, or iPad, and click Send. Off it goes!
Twitter, Facebook, Flickr, Vimeo. If you have accounts with these Web sites, these options appear, too, making it easy to post your file to those services. For details on these and other Share-menu options, see The Share Button ().
Add to iPhoto, Add to Aperture. If you’ve selected a photo (or several), these commands send your photographic masterpieces directly into your favorite photo-organizing program.
More. This command opens up a dialog box where you can rearrange the commands in your Share menu, turn off the ones you don’t use, and so on; see The Share Button ().