Apple starts the Dock off with a few icons it doesn’t want you to miss: Finder, Launchpad, Mission Control, App Store, Mail, the Safari Web browser, and so on. But using your Mac without putting your own favorite icons in the Dock is like buying an expensive suit and turning down the free alteration service. At the first opportunity, you should make the Dock your own.
The concept of the Dock is simple: Any icon you drag onto it (Figure 4-1) is installed there as a button. You can even drag an open window onto the Dock—a Microsoft Word document you’re editing, say—using its proxy icon (The Folder Proxy Icon) as a handle.
Tip
If you right-click a folder, or any other icon, in the Sidebar (The Sidebar), you get an Add to Dock command for that icon. Bet you can’t guess what it does.
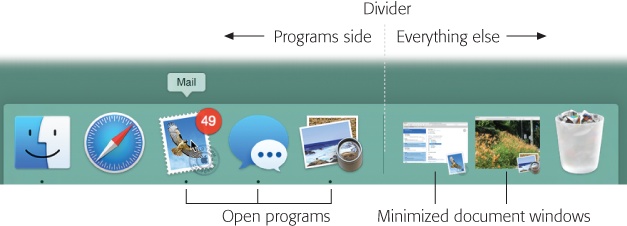
Figure 4-1. To add an icon to the Dock, simply drag it there. You haven’t moved the original file; when you release the mouse, it remains where it was. You’ve just installed a pointer—like a Macintosh alias or a Windows shortcut.
A single click, not a double-click, opens the corresponding icon. In other words, the Dock is an ideal parking lot for the icons of disks, folders, documents, programs, and Internet bookmarks that you access frequently.
You can even install batches of icons onto the Dock all at once—just drag them as a group. That’s something you can’t do with the other parking places for favorite icons, like the Sidebar and the Finder toolbar.
Here are a few aspects of the Dock that may throw you at first:
It has two sides. See the divider line (Figure 4-1)? Everything on the left side is an application—a program. Everything else goes on the right side: files, documents, folders, disks, and minimized windows.
Remember this division. If you try to drag an application to the right of the line, for example, the Mac teasingly refuses to accept it. (Even aliases observe that distinction. Aliases of applications can go only on the left side, and vice versa.)
Its icon names are hidden. To see the name of a Dock icon, point to it without clicking. You’ll see the name appear above the icon.
Folders and disks sprout stacks. If you click a folder or a disk icon on the right side of the Dock, a list of its contents sprouts from the icon. It’s like X-ray vision without the awkward moral consequences. Turn to Pop-Up Dock Folders (“Stacks”) for details on stacks.
Programs appear there unsolicited. Nobody but you (and Apple) can put icons on the right side of the Dock. But program icons appear on the left side of the Dock automatically whenever you open one, even one that’s not listed in the Dock. Its icon remains there for as long as it’s running.
You can move the tiles of the Dock around by dragging them horizontally. As you drag, the other icons scoot aside to make room. When you’re satisfied with its new position, drop the icon you’ve just dragged.
To remove a Dock icon, just drag it away. (You can’t remove the icons of the Finder, the Trash, or any minimized document window.) Once your cursor has cleared the Dock, release the mouse button. The icon disappears in a charming little puff of animated smoke. The other Dock icons slide together to close the gap.
GEM IN THE ROUGH: Living Icons
OS X brings to life a terrific idea, a new concept in mainstream operating systems: icons that tell you something. If the Dock is big enough, you can often tell documents apart just by looking at their icons.
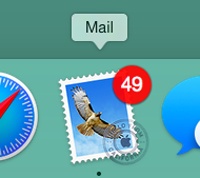
Some program icons even change over time. The Mail icon, for example (Chapter 18) bears a live counter that indicates how many new email messages are waiting for you. (After all, why should you switch into the Mail program if you’ll only be disappointed?) The Messages icon lets you know how many chat responses are waiting. You can make your Activity Monitor graph show up right on its icon. Toast illustrates the progress of a disc you’re burning.
Think of the possibilities. One day the Safari icon could change to let you know when interesting new Web pages have appeared, the Quicken icon could display your current bank balance, and the Microsoft Word icon could change every time Microsoft posts a bug fix.
Something weird happens if you drag away a Dock program’s icon while that program is running. You don’t see any change immediately, because the program is still open. But when you quit the program, its previously installed icon disappears from the Dock.
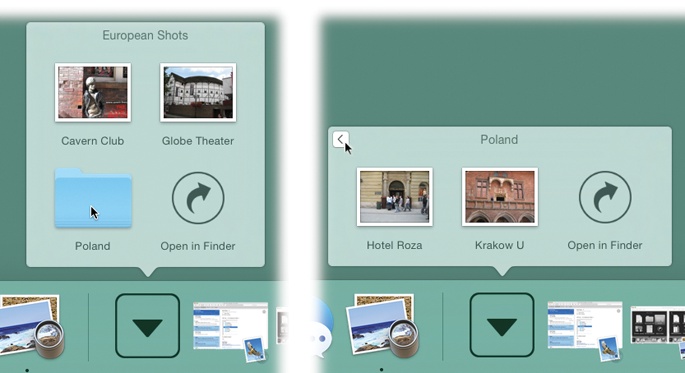
When you click a disk or folder icon on the Dock, you witness the effect shown in Figure 4-2. In essence, OS X is fanning out the folder’s contents so you can see all of them. If it could talk, it would be saying, “Pick a card, any card.”

Figure 4-2. What happens when you click a folder in the Dock? You see its contents in one of three views. Here’s how you choose the file you’re looking for in each: Top left: In List view, the folder contents appear as a menu; you can “drill down” into subfolders, and you open something by choosing its name. Top right: In Fan view, click an icon to open it. Bottom: In Grid view, many more icons appear than can fit in Fan view. In any of the views, you can get a quick look at a document’s contents by using Quick Look. That is, highlight the icon (point without clicking, or use the keyboard to select), and then press the space bar. A window sprouts, showing the actual document contents.
Tip
You can change how the icons in a particular stack are sorted: alphabetically, chronologically, or whatever. Use the “Sort by” section of the shortcut menu.
In principle, of course, pop-up folders are a great idea, because they save you time and clicking. Click a folder to see what’s in it; click the icon you want inside; and you’re off and running, without having had to open, manage, and close a window.
Anyway, here’s how to operate pop-up Dock folders.
When you click a disk or folder icon on the Dock, what happens? You see its contents, arrayed in your choice of three displays:
Fan. The fan is a single, gently curved column of icons that pops out of the disk or folder icon. It’s ideal for folders that contain very few icons, because there’s room for only a handful of items in a fan (the exact number depends on your screen size). After the first few, you see only a “31 more in Finder” button, which you can click to see everything in that folder—but now you’ve wasted time, not saved it.
Grid. If you’ve set a folder to open as a grid, you get to see many more icons in a big rectangular window. File names often get abbreviated because there’s not enough horizontal room, but you get to see many more icons this way. Actually, thanks to the scroll bar, you get to see all the icons this way. (You can also type the beginning of an icon’s name to select it.)
Tip
A cool white-ghostly-highlighting effect is available, which makes it easier to see which icon you’re pointing to as you move your mouse around in a grid or a fan. To make it appear, click-and-hold a folder on the Dock—and then, without releasing the mouse, slide onto the grid or fan. The highlighting follows your cursor.
Alternatively, as soon as the grid or fan appears, press the arrow keys on your keyboard to move from icon to icon—complete with ghostly selection square.
List. You can also opt for a simple list of the folder’s contents, like a pop-up menu; in Yosemite, you actually see little, tiny icons for the files and folders within. The list appears much faster than a fan or a grid does.
There’s no scroll bar, but you can scroll the list nonetheless just by pointing to the top or bottom of it with your mouse. And, of course, you can type-select.
Tip
The List view also displays a little
 to the right of each folder within the Dock folder. That is, it’s a hierarchical list, meaning that you can burrow into folders within folders, all from the original Dock icon, and all without opening a single new window. You can stick your entire Home folder, or even your whole hard drive icon, onto the Dock; now you have complete menu access to everything inside, right from the Dock.
Automatic. There’s a fourth option in the shortcut menu for a Dock folder, too: Automatic. If you turn this on, then OS X chooses either Fan or Grid view, depending on how many icons are in the folder.
So how do you choose which display you want? Right-click (or two-finger click) the Dock folder’s icon, and make a selection from the shortcut menu. Each disk or folder icon remembers its own fan/grid/list setting.
Those were the basics of pop-up Dock folders. Here’s the advanced course:
Ever-Changing Folder-Icon Syndrome (ECFIS). When you add a folder or disk icon to the Dock, you might notice something wildly disorienting: Its icon keeps changing to resemble whatever you most recently put into it. Your Downloads folder might look like an Excel spreadsheet icon today, a PDF icon tonight, and a photo tomorrow—but never a folder. The annoying part is that you can’t get to know a folder by its icon.
Fortunately, this problem is easy to fix. Right-click (or two-finger click) the Dock folder. From the shortcut menu, in the “Display as” section, choose either Folder (which looks like a folder forever) or Stack (which changes to reflect its contents.)
Ready-made pop-up folders. When you install OS X, you get a couple of starter Dock folders, just to get you psyched. One is Downloads; the other is Documents. (Both of these folders are physically inside your Home folder. But you may well do most of your interacting with them on the Dock.)
The Downloads folder collects all kinds of online arrivals: files you download from the Web using Safari, files you receive in a Messages file-transfer session, file attachments you get via Mail, files sent to you using AirDrop (Chapter 14), and so on. Unless you intervene, they’re sorted by the date you downloaded them.
It’s handy to know where to find your downloads, and nice not to have them all cluttering your desktop.
Tip
Once you’ve opened a stack’s fan or grid, you can drag any of the icons right out of the fan or grid. Just drag your chosen icon onto the desktop or into any visible disk or folder. In other words, what lands in the Downloads folder doesn’t have to stay there. (You can’t drag out of a list, however.)
Hierarchical folders. The fans and grids are hierarchical—that is, you can drill down from their folders into their folders. Figure 4-3 makes this concept clearer.
Tip
Figure 4-3 shows you how to open a folder in a grid or a list using the mouse—but you can do it all from the keyboard, too. Once a folder is selected, press Return, ⌘-O, or ⌘-
 to see what’s inside it; press ⌘-
 to backtrack to the original display. When a folder is highlighted, you can press ⌘-Return to open it in a Finder window; add the Option key to open that Finder window without closing the grid or fan.
Type selecting. Once a list, fan, or grid is on the screen, you can highlight any icon in it by typing the first few letters of its name. For example, once you’ve popped open your Applications folder, you can highlight Safari by typing sa. (Press Return to open the highlighted icon.)
Two ways to bypass the pop-up. If you just want to see what’s in a folder, without all the graphic overkill of the fan or the grid, then right-click (or two-finger click) the Dock folder’s icon and choose the first command—Open “Applications” (or whatever the folder’s name is—from the shortcut menu. You go straight to the corresponding window.
Actually, if you really value your time, you’ll learn the shortcut: Option-⌘-click the Dock folder’s icon. That accomplishes the same thing.
The bottom of the screen isn’t necessarily the ideal location for the Dock. All Mac screens are wider than they are tall, so the Dock eats into your limited vertical screen space. You have three ways out: Hide the Dock, shrink it, or rotate it 90 degrees.
Handily enough, the Dock has a hiding feature. To see the on/off switch, open System Preferences→Dock, and turn on “Automatically hide and show the Dock.” (Chapter 9 contains much more about the System Preferences program.)
When the Dock is hidden, it doesn’t slide into view until you move the cursor to the Dock’s edge of the screen. When you move the cursor back to the middle of the screen, the Dock slithers out of view once again. (Individual Dock icons may occasionally shoot upward into desktop territory when a program needs your attention—cute, very cute—but otherwise, the Dock lies low until you call for it.)
On paper, an auto-hiding Dock is ideal; it’s there only when you summon it. In practice, however, you may find that the extra half-second the Dock takes to appear and disappear makes this feature slightly less appealing.
Many Mac fans prefer to hide and show the Dock at will by pressing the hide/show keystroke, Option-⌘-D. This method makes the Dock pop on and off the screen without requiring you to move the cursor.
Depending on your screen’s size, you may prefer smaller or larger Dock buttons. The official way to resize them is shown in Figure 4-4.
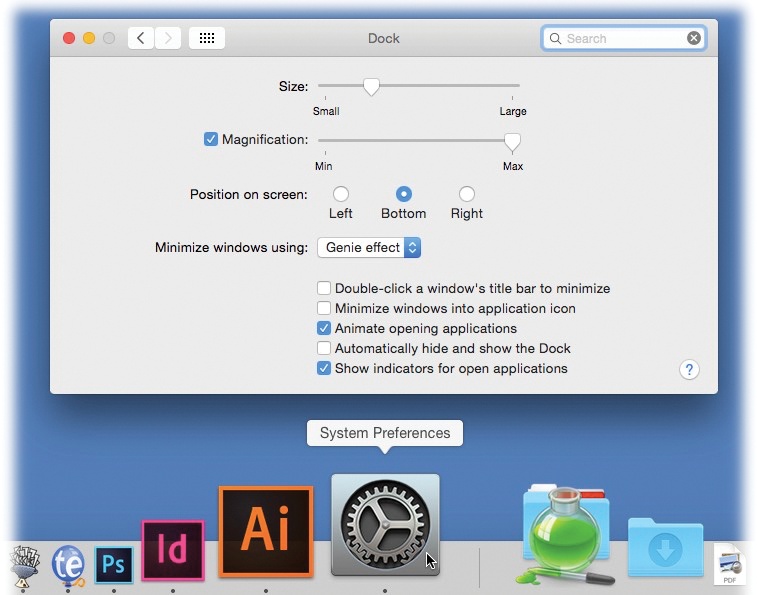
Figure 4-4. To make your Dock icons bigger or smaller, choose  →Dock→Dock Preferences. Leave the Dock Preferences window open on the screen, as shown here. After each adjustment of the Dock size slider, try out the Dock (which still works when the Dock Preferences window is open) to test your new settings.
There’s a much faster way to resize the Dock, though: Just position your cursor carefully on the Dock’s divider line so that it turns into a double-headed arrow (shown in Figure 4-5). Now drag up or down to shrink or enlarge the Dock.
Tip
If you press Option as you drag, the Dock snaps to certain canned icon sizes—those that the programmer actually drew. (You won’t see the in-between sizes that OS X generally calculates on the fly.)

Figure 4-5. Look closely—you can see the secret cursor that resizes the Dock. If you don’t see any change in the Dock size as you drag upward, then you’ve reached the size limit. The Dock’s edges are already approaching your screen’s edges.
As noted in Figure 4-5, you may not be able to enlarge the Dock, especially if it contains a lot of icons. But you can make it almost infinitely smaller. This may make you wonder: How can you distinguish among icons if they’re the size of molecules?
The answer lies in the System Preferences→Dock→Magnification checkbox. What you’ve just done is trigger the swelling effect shown in Figure 4-4. Now your Dock icons balloon to a much larger size as your cursor passes over them. It’s a weird, magnetic, rippling, animated effect that takes some getting used to. But it can actually come in handy when you find your icons shrinking away to nothing.
Tip
You can get Dock magnification à la carte, too. If you press Shift-Control as your cursor approaches the Dock, the icons swell into magnification mode even if magnification is turned off in System Preferences. (The icons swell to whatever maximum size you specified in System Preferences (Figure 4-4).
Yet another approach to getting the Dock out of your way is to rotate it, so that it sits vertically against a side of your screen. You can rotate it in either of two ways:
You’ll probably find that the right side of your screen works better than the left. Most OS X programs put their document windows against the left edge of the screen, where the Dock and its labels might get in the way.
Note
When you position your Dock vertically, the “right” side of the Dock becomes the bottom of the vertical Dock. In other words, the Trash now appears at the bottom of the vertical Dock. So as you read references to the Dock in this book, mentally substitute the phrase “bottom part of the Dock” when you read references to the “right side of the Dock.”